
CVS is a system used by multiple developers to share a centralized source code repository from which they can all check out files, make changes to those files, and then check the modified files back in. Other developers may also concurrently work on the same files, with merges of overlapping changes being handled by CVS at check-in time.
Perhaps you have already used revision control. This is the software development process of checking code incrementally into some sort of automated repository. Doing this allows programmers to retrieve not only the latest revision but also previous revisions when they want to revert, that is, drop back to a previous revision, perhaps to recover some lost code. Also, automated revisioning systems allow development projects to branch code so that a current or past release can be maintained and have bugs fixed while the main line of the code continues to progress toward the next release. This avoids having the less-tested technology under development in the main line (or in another branch) injected into the stable release.
Tip
The terms “version control” and “versioning” are used interchangeably with the term “revision control.”
Conceptually (and often in implementation) CVS is a shell around and extension of the Revision Control System (RCS). RCS deals with storing revisions of single files under the effective control of a single developer. Whereas RCS deals with files, CVS deals with source modules (not to be confused with NetBeans modules, discussed elsewhere in this book). Source modules are collections of files. In CVS, a module consists of all the source files in a given directory and its subdirectories. Modules can also be aliases for a number of directory hierarchies to be checked out at one time.
Under CVS, source modules consisting of any depth of directories and files can be checked out by any number of developers concurrently. Whenever the modules are checked back in, CVS helps the developers, usually by managing automatically the merge of variants caused by concurrent revision and less frequently by pointing out differences that cannot be reconciled automatically. These differences must be reconciled manually by the developer who checks in the latest revision that caused the conflicts.
The relationship between RCS and CVS is summarized in Table 7-1.
Table 7-1. Summary of how CVS extends RCS
|
Concept |
RCS |
CVS |
|---|---|---|
|
Concurrent developers |
Single |
Multiple |
|
Scope of management |
Individual files resident in a single directory |
Contents of a CVS root directory and its entire subdirectory hierarchy |
|
Repository location |
Local subdirectory named RCS |
Centralized shared repository with TCP/IP server support |
If you want to study CVS itself, which is a good idea if you have read this far without ever having used it, you may read http://www.cvshome.org/docs/manual/, The CVS Info Manual.
NetBeans supports CVS in two ways:
Executing an external CVS application against an existing archive via host operating system commands
Performing CVS operations on an existing archive via NetBeans’ own Java-coded module for CVS support
The name CVS is applied to more than one implementation of the CVS idea, notably the classic CVS (http://www.cvshome.org/) associated with the Free Software Foundation GNU Project (http://www.gnu.org). There are also other version control applications in the world of software development. In addition to supporting CVS, NetBeans allows you to use pretty much any other versioning system in place of either command-line or built-in CVS.
Tip
NetBeans allows you to use “real CVS” (either NetBeans’ own built-in implementation or a command line version of CVS), or any generic version control system (VCS). You configure the two types of systems separately. But once configured, versioning operations except mounting a filesystem fall usually under the menu selection CVS and do not distinguish between CVS/VCS. In other words, in the context of everyday operations on a mounted versioned filesystem, it’s all just called CVS. However, some VCS profiles, for instance, the ClearCase template, create a menu selection that identifies the specific VCS system.
NetBeans allows you to use any reasonable generic version control system, with specific support for the most popular systems, as we will see below. But because
CVS specifically is so well supported in NetBeans, and
If you are in a position to use a different versioning system, you probably know a good deal about such matters already,
our exposition here of versioning under NetBeans will mostly be expressed in terms of CVS, while still informing you of that which is necessary for successful use of any generic version control system.
If you’re a lone developer, you might wonder why and when you would want to use CVS. Isn’t it just one more bureaucratic obstruction to your work flow?
You use CVS always. Always! It isa important for you as a developer to make sure you keep all your projects and even your little test programs in a source repository. The trouble it takes you to set up CVS (usually about 5 minutes) is more than amply repaid the first time you need to retrieve important code from an archived revision. CVS also allows you to collate the entire body of your work in what is effectively a neatly indexed source code database.
CVS is available in both source code and binary form for any platform on which NetBeans will run. Offerings range from full CVS including the server to client-only implementations of varying degrees of completeness and GUI support. See Appendix C for links to sites offering CVS downloads.
Tip
For use with NetBeans, you generally don’t need a CVS client. NetBeans’ CVS support module implements a CVS client in Java and is usually sufficient for your needs. However, if you plan on dealing with a shared source repository against which other members of your team are executing command-line CVS operations, you probably will also want to have at your disposal a CVS client for use from the command line.
Depending on how you set up your project,C NetBeans performs CVS operations in any of three ways:
Command-line CVS formulates CVS-specific command lines and passes these command lines to the operating system shell.
Built-in CVS uses a NetBeans module consisting of Java classes that mimic classic CVS operations.
Generic VCS formulates command lines based upon a user-supplied template and passes these command lines to the operating system shell.
In cases where command templates are used, the templates are
parameterized; that is, the NetBeans logic concerned with CVS
operations performs substitutions on special variables. This is so
that the template does not need to contain, for instance, the name of
every file the user might want to check in. When an operation is
requested as a result of the user interacting with the Explorer,
NetBeans substitutes the values of variables such as
${ROOTDIR} based on the current project.
Using a generic VCS as an alternative to using CVS means that you can use pretty much any versioning system you please. Essentially, all that is required is that the versioning system provide a method of command-line invocation. NetBeans generic VCS support allows you to create a template of command-line strings subject to variable substitution that NetBeans can then invoke with appropriate instantiations of the variables to execute the high-level operations that you have requested via the NetBeans Explorer menu options for version control.
Don’t worry too much about writing a template for your favorite versioning system. First of all, it’s easy, and more importantly, most popular version control systems have already been tried with NetBeans and templates already exist for dealing with them. Many of these templates are shipped with NetBeans. Still others, which you may download and install into NetBeans generic VCS support, may be found at http://vcsgeneric.netbeans.org/profiles/index.html.
As mentioned above, NetBeans possesses two means of accessing CVS repositories:
An installable module that implements most of a CVS client in Java
A facility for issuing CVS commands via the operating system shell to an external CVS client implementation
Generally, CVS operations in NetBeans default to mounting via built-in CVS. This is as it should be, because the built-in CVS client is quite reliable and there’s no reason that chasing down problems in versioning operations under NetBeans should be muddied by having to audit the behavior of your external CVS client. There are, however, a couple of reasons you might end up using command-line support via an external client for your CVS operations:
You want to customize your CVS operations to a greater degree than practical via the built-in CVS client.
Some feature in your external command-line CVS client isn’t implemented in built-in CVS.
In any event, the NetBeans development team seems to be deprecating specific command-line support for CVS as opposed to treating command-line CVS as just one more instance of the support for generic VCS. We’ll be showing you how to use the specific command-line support for CVS in NetBeans, but probably generic VCS and a CVS template is the future of command-line CVS in NetBeans.
NetBeans Explorer presents a view of a project and its components. This view contains both more information than is available in a directory listing (such as methods and fields of classes) and less information (the Explorer doesn’t show the form files NetBeans uses to describe visual components). CVS itself deals with files and directories, and understands none of the abstractions employed by the NetBeans Explorer to present its object-centric view of the project to the user.
When you use the NetBeans Explorer to create a new Java package, a directory is created in the filesystem. When you likewise create a new class, a .java file is added and later a .class file results from compiling the .java file. When you create a class from a Swing-based template, a .form file is created, which is an XML file describing the composition of the visual component that the user is creating. NetBeans Explorer displays the composition of the class in great detail but doesn’t specifically reveal that there are often three files behind the Explorer’s rendition—the .java, .class, and the .form files.
So when NetBeans prepares a CVS operation in the Explorer, NetBeans makes its own assumptions about what is to be saved. Adding a Java package to CVS means, to NetBeans, adding the directory and its .java and .form files. Additionally, if there are any files of a type that NetBeans either recognizes as significant, such as .xml and .html files, these files are added, along with any files of types NetBeans doesn’t recognize, such as .foo, .xyz, or .chocolate_malted_milk. NetBeans CVS support does not check in .class files. You don’t want these in your repository; you compile them while you are working on checked out source. Nor does NetBeans CVS support check in .nbattrs files. They’re simply not terribly important and are regenerated when missing, if and when they are needed.
NetBeans does not automatically add new files and packages you create to the repository at the time you create them. Read on in this chapter to see how you add new files and packages to the repository.
If you try to perform CVS operations on a source tree that is mounted in NetBeans, either at the command line or via some GUI tool other than NetBeans, it is best to close NetBeans while you are doing so.
To operate on your project outside of NetBeans CVS support:
Make sure that the CVSROOT environment variable is set to point to the repository where your project is kept and, optionally, that the type of repository and server name (in the case of external or password servers) is provided in the CVSROOT environment variable.
In the case of an external or password server, make sure you are logged in or otherwise prepared for authentication.
Alternatively, you can pass these options with the -d switch to CVS.
Change directory to the appropriate directory, usually the top level of your project.
Perform your CVS operations.
If you choose to perform CVS operations outside NetBeans on a file tree used by NetBeans, be sure that you take into account that which we mentioned earlier about the actions NetBeans CVS support performs on your behalf behind the facade of the NetBeans Explorer object representation of your project. For instance, don’t forget to check in .form files and do forget to check in .nbattrs files.
A source hierarchy that is backed by a CVS or other versioning system repository is mounted in a fashion similar to mounting any source hierarchy in the NetBeans Explorer. In the Filesystem view of your project, right-click on the Filesystems icon and choose either Mount → Version Control → CVS or Mount → Version Control → Generic VCS. We’ll discuss the details of the dialogs that are then presented a little later in this chapter.
After your hierarchy has been mounted, it appears like any other mounted source hierarchy. However, the icon at the top of the mounted versioned hiearchy is different to indicate that this is a tree under version control. Thereafter, you can not only perform all the normal operations pertaining to your development work flow on any tree, but you can also now right-click on a node of the tree and perform versioning operations such as checkin, checkout, update, and refresh on all or any part of the tree.
NetBeans Explorer offers a special mode for examing versioned sources. Right-click anywhere in the Explorer Filesystems view and select CVS Versioning Explorer and the Version Explorer will pop up in a new window (see Figure 7-1).

Versioning Explorer, unlike the regular NetBeans Explorer, represents everything as an object in the mounted hierarchy being explored. .form files are shown right along side .java files. If the file the object represents is not under version control, Versioning Explorer will indicate so.
If you click the little switch icon to the left of an object, the object will expand to show all its versions with the revision comment you entered at the time you committed the change. Right-clicking in the Versioning Explorer brings up various other menus, allowing you to do diffs, merges, and other normal CVS operations. Oddly enough, the little switch also appears to the left of objects not under version control, but once you click it and Versioning Explorer verifies that the object is not versioned, the switch will disappear.
Versioning Explorer is a good window to visit for sanity checks on the state of versioning in your project.
NetBeans CVS operations can be performed on individual nodes or on several nodes at once. Either select a single entity in the NetBeans Explorer, or using Shift-Left Click to select a range of files or Control-Left Click to select multiple individual nodes.
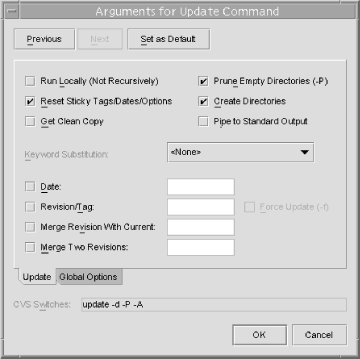
The default mode of CVS operations in NetBeans is to use a default set of options issued behind the scenes to the CVS commands backing NetBeans CVS support. We recommend changing your CVS settings in NetBeans (which are kept on a project-by-project basis) to use the GUI Style operations, which present a dialog each time you perform a CVS operation. Choose Tools → Options → Source Creation and Management → Version Control Settings → CVS Settings and set User Interface Mode property to GUI Style. Thereafter, you’ll get a dialog for most CVS operations that allows you to add options by checking boxes. Also, the dialog will show you what your checked options translate to in terms of switches to the operating systems shell cvs command. Figure 7-2 shows some useful options checked [prune empty directories, create new directories, reset all sticky (version number) flags] that are not default settings for the Update operation in NetBeans CVS support.
Once you have your source tree mounted, it’s easy to check out or get any level of it. Right-click on the node that you want to check out and choose CVS → Checkout.
At least as far as real CVS is concerned, a
Checkout/Get performed on a tree
that’s already been checked out is the equivalent of
a cvs update -D (update adding any new
subdirectories that have appeared in the interim). Furthermore, any
modified files will not be overwritten, and the
CVS log will show that there were modified files. This implies that
if there were concurrent changes entered in the repository, your
local file was either:
Not updated, or
Was transformed by the update into a merge of the repository version and your local version, and that merged version has not been committed back to the repository.
In the latter case you will also see messages in the CVS log about a merge. If you need to review the messages issued by CVS, remember the NetBeans Explorer Runtime view, VCS Operations node.
Checking in your source is the process of entering your changed files into the central source repository. To check in all sources in a package, select the package in the NetBeans Explorer by single-clicking the mouse on its icon (not its name). This can start as high up in your source hierarchy as you like; you can start from your top-level package and commit all changed sources in that package and below it. Right-click on the package now and select CVS → Commit.
You will be offered a dialog that contains some options and a text entry box in which to enter your commit comment for the revision log of the file(s) being committed. The options offered by this dialog will vary depending on how you have set your NetBeans CVS options.
After you create a new folder, Java class , Ant build file, or other program object visible in the NetBeans Explorer, you can add it into your source repository so that upon checkout it appears in the same relative place in your source tree that it occupied at the time it was added. To add source or a folder or Java package, right-click on the object in the NetBeans Explorer and choose CVS → Add. The added entity will thereafter be annotated in the NetBeans Explorer as “Locally Added” until you commit it.
Remember two things about an add operation in CVS:
addis a marking of the entity for a later commit. Thus, you still must perform acommitto complete the entry of the new entity into the source repository. The status window that pops up during anaddhas a button on it that you can click to complete the commit. Alternatively, you can right-click on the added entity at some later time and choose CVS → Commit.adddoes not add the contents of a folder/project or any subfolder/project. It only adds the specific item you selected.
Apropos the second point, there is a similar but different CVS
operation called import. A CVS
import operation immediately adds a file, folder,
or Java package to the repository, along with all its contents and
subfolders/packages. It’s like an item-by-item add
with a subsequent commit. Right-click on the file or folder/package
and choose CVS
→
Import to import many items at once.
You can browse a log of the version control activity relative to one or many objects. Right-click on the object and choose CVS → Log to see a GUI-formatted CVS log of your file. Clicking on an individual revision will expand the comments pertaining to that revision, as shown in Figure 7-3.

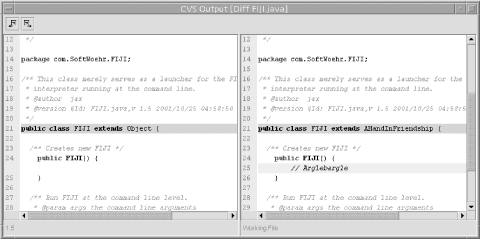
You can invoke a textual or visual representation of all the differences between the version of a file that you are currently working on and the latest version in the repository (or between the current file and any version in the repository). Right-click on the object and choose CVS → Diff → Textual or CVS → Diff → Graphical to see either a textual or graphical difference report of the file or files selected. Figure 7-4 shows this in action.
For projects on which several developers are working, the source can change without you touching it. You can always update your tree safely to the latest version of a file or project without losing changes you yourself made. Right-click on the topmost node of your mount that you wish to update, and choose CVS → Update.
At times, you may find that the CVS support in NetBeans does something different from what you expected. Often, this is not a result of you making a mistake, but of a quirk associated with NetBeans or its built-in CVS client. To avoid getting tripped up by these quirks, several common ones are listed here for reference.
Sometimes NetBeans seems to think a folder or other object that is indeed under version control is a locally added folder that has recently been added to the filesystem. In such cases the [Local] designation appears to the right of the folder in the NetBeans Explorer.
Usually this is just a case of the multithreaded nature of NetBeans where the thread that refreshes the Explorer view is a little behind. Sometimes it is caused by operations performed on the file hierarchy outside NetBeans (e.g., at the command line) not being “noticed” by NetBeans. In any case, by right-clicking on a parent folder and choosing CVS → Refresh Recursively you can cause NetBeans Explorer to recalculate its view of things.
Remember our discussion above about Add versus Import? It is very easy to add a directory and forget to individually add the files within that directory. In this case, fewer files have been added than you might think. This results in an erroneous assumption that all your files have been added to the CVS repository. In a similar manner, it is common to import a directory mistakenly, instead of adding it. This can result in more files being added than intended. Use caution when dealing with entire directories, and choose whether to add or import carefully.
NetBeans is pretty smart about distinguishing between binary files, which must be added with the -kb option to prevent their content from being damaged by carriage return and line feed processing and keyword expansion. However, mistakes can occur when using only the default switches for NetBeans CVS support. Using these defaults, CVS does what you would usually want; however, in fringe cases, it doesn’t ask you if you want something different.
One way to avoid this sort of problem is to change your CVS settings in NetBeans to use the GUI Style form of CVS commands as mentioned above.
If a file is somehow added mistakenly to a CVS repository without the
binary options, it is best to fix matters before you check the binary
object out and in again. It’s easy to modify the
relevant CVS options at the command line. Move to the directory in
which the file is located. Let’s say the file is
myfile.bin and is in the current directory.
Enter the command cvs admin -kb myfile.bin, and
the repository will be modified to indicate that on this file no
end-of-line processing and no CVS keyword expansion should take
place.
Usually, NetBeans recognizes it is adding files of a binary type and formulates the correct switches. If you have any trouble with this automated support you can always choose Versioning → Run CVS Command from the main window and formulate all the switches manually.
Tip
We’ve been bitten by the “CVS
destroyed my binary object!” bug enough times that
we wish to emphasize again the critical point of handling binary
objects in CVS. (Again, by “binary
objects” we mean files ending in extensions like
.jar, .zip,
.exe, .jpg, files that are
not readable text.) The critical point to remember is that
they must be checked in from the start as binary
(i.e., using the -kb switch as applied to the
add or import commands). Once
you check them in the wrong way, they may be damaged. (The actual
results of an error in this regard vary somewhat from CVS
implementation to CVS implementation.)
Although we’ve covered the basics of CVS already, you may find that you need to perform some of the more advanced operations upon a CVS repository from within NetBeans. This section details these less-used, yet powerful, commands.
Branching and Merging of source paths are fully supported via your typical GUI dialogs under NetBeans. You can right-click on an object and choose CVS → Branching and Tagging for a submenu full of these options, each of which leads to dialogs. If you understand CVS branching, merging, and tagging, you will understand these dialogs without difficulty. If you do not understand CVS branching, merging, and tagging, we are not in a position to instruct you on this most complex aspect of CVS in the course of this volume.
Some remote CVS repositories only
allow the user
to log in via the SSH. This form of communication and authentication
typically uses the :ext: style of CVS server
(one with an external authentication mechanism). SourceForge is a
good example of this type of CVS repository. Typically you will have
to use ssh-agent, a part of the SSH suite, to
handle the key exchange. However, once you have this running
correctly on your operating system, and once your public key has been
stored on the remote server in a fashion the administrator of the
remote system will specify for you, NetBeans will correctly manage
such a CVS mount. If you have trouble
connecting, we find empirically that, despite the CVS
mount in NetBeans having all the information about the repository,
sometimes it helps to have launched NetBeans from a shell in which
the CVSROOT variable is already set to the
repository accessed via SSH. In other words, in Unix, a command like
CVSROOT=:ext:[email protected]:/usr/local/mydir; export CVSROOT; run-ide.sh is a good way to start NetBeans
if you are planning on accessing a remote server over SSH. (For links
on obtaining more information about SSH and how it negotiates keys
for login and encrypts your entire session,
please see the
Secure Shell resources section in the appendixes.)
Mounting a source tree backed by a generic version control system other than CVS is similar to mounting a CVS source tree. If the non-CVS versioning system is one of those supported by a NetBeans-supplied template, it is quite simple. If there is not a template provided for your particular versioning system, there are a few extra steps; specifically, you must provide the command lines that NetBeans will execute on your behalf to manipulate your source repository.
The first step in mounting a source tree backed by some generic versioning system is to pull down Versioning → Mount Generic Version Control System from the NetBeans main window (as shown in Figure 7-5).

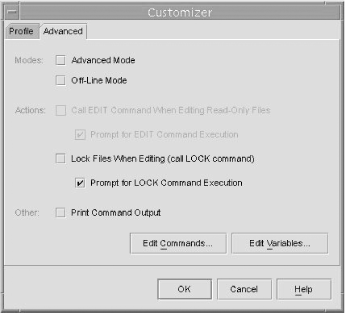
This brings up the generic versioning system Customizer dialog box, shown in Figure 7-6. You can now choose from a supported template. More templates may be available at http://vcsgeneric.netbeans.org/profiles/index.html.

If you are able to use a template, you need only fill in Working Directory and Relative Mount Point fields in the customizer dialog. However, if no template suffices, you will have to proceed to the Advanced tab (see Figure 7-7).
Click on the Edit Commands button to bring up the generic versioning Command Editor (shown in Figure 7-8). The Command Editor will allow you to fill in the appropriate commands that NetBeans generic version control support will issue on your behalf when you afterward choose versioning actions in the Explorer. You can see that its layout is styled to reflect the menu presented in the Explorer for generic versioning.

When working on a large versioned tree, here’s a good practice we’ve used for years with great success. Once every few days:
Exit from NetBeans
Rename the local directory you have been using to hold the checked-out sources
Recreate your working directory with its original name
Manually do a fresh checkout in this working directory
Then reload NetBeans and continue your development. This is a sort of sanity check. It does two things:
It makes sure you start your tree clean once in a while, which is one sure way of proving that you have remembered to add to version control all the new files you have added.
It gives you a local and recent backup of your working directory complete with revision control information (e.g., the ./CVS subdirectories in each directory in the case of real CVS) ready to swap back into place if there’s a problem in the new directory.
Admittedly, it’s a belt-plus-suspenders approach, but it works because:
When you get confused about the state of your sources, you verify against the repository.
When you get confused about both the state of your sources and the state of the repository, you have the saved older working directory to swap in and compare to the repository via commands like diff.
You may scoff, yet there will almost certainly come a time when you are absolutely sure you performed every operation correctly, yet some recent work will seem to have vanished. This is known scientifically as the principle of Stuff Happens and is generally ascribed to neutrino beams emanating from Mars. It happens to every programmer at least once. Be prepared.