
As stated in the title of this recipe, we will start with a Web Project.
This Web Project will be the basis for later recipes.
It is required to have NetBeans with Java EE support installed to continue with this and the following recipes.
If this version is not available on your machine, please visit:
http://netbeans.org/downloads/index.html
There are two application servers in this installation package and either Apache Tomcat or GlassFish can be chosen, but at least one is necessary.
An application server is a software framework layer that enables developers to access components by calling APIs defined by the platform in which the Application Server runs. They also provide security, state maintenance, data access, and persistence.
This recipe is demonstrated with Apache Tomcat.
Right-click on the projects window, and select New Project:
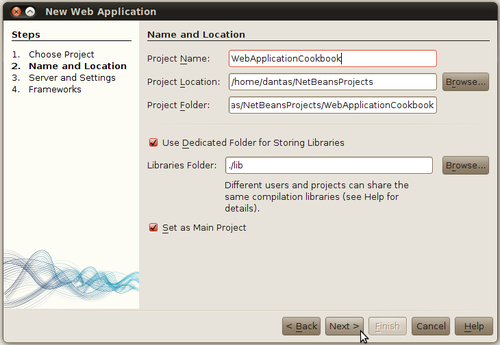
- A New Projects dialog is shown. Under Categories, select Java Web and under Projects, select Web Application, and then click Next >.
- In Name and Location:
- Type
WebApplicationCookbookunder Project Name. - Leave Project Location with the default value.
- Leave Project Folder with the default value.
- Select Use Dedicated Folder for Storing Libraries if not marked.
- Select Set as Main Project.
- Type
- Click Next >.
- In Server and Settings, leave all the default values checked:
- Server : Apache Tomcat
- Java EE version : Java EE 6 Web
- Context Path: /WebApplicationCookbook
And click on Enable Context and Dependency Injection.
- Click Next >.
- In Frameworks, click Finish.
To run the project, right-click on WebApplicationCookbook, and select Run.
The application is compiled, Apache Tomcat is started, and the default system browser opens the index.jsp file.
In NetBeans, the HTTP Server Monitor is run alongside the Application.
NetBeans creates a complete file structure for our project.
It automatically creates special directories for testing and source classes, writes down configuration files and copies the necessary libraries.
Let's go through what each file and folder means:
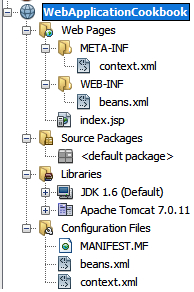
There are two folders under Web Pages.
The root folder contains index.jsp, the file which is accessed first by our users. The first page that the users will access can be changed in web.xml.
- META-INF: This contains context.xml, which configures the path in which we will access our application: /WebApplicationCookbook. If defaults were used when setting up Apache Tomcat, then the address used in the browser to access the application will be http://localhost:8080/WebApplicationCookbook.
- WEB-INF: This contains web.xml, which configures the way the application behaves and how it should be linked to the application server.
Source Packages and Test Packages are empty since we have not created any files yet. The package names give a good idea what they are supposed to hold. Source files hold normal java classes, servlets, POJOs; Test Packages hold files related to JUnit testing classes. The Libraries node contains the JDK 6 required libraries and the Apache Tomcat 7.0.11 libraries (or the version which was shipped by default with NetBeans).
The Test Libraries Package contains the JUnit libraries.
The Configuration package contains the following three files:
- MANIFEST.MF: Created and maintained by NetBeans; this file has information about the files packaged inside the WAR.
- context.xml: This is the application server configuration file.
- beans.xml: It is the bean descriptor for the project. This is used by CDI to let Apache Tomcat know that our project contains CDI beans.
Peeking at the HTTP Requests.
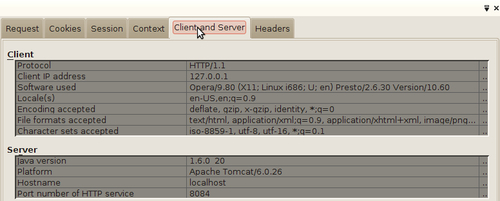
While running the application, NetBeans fires up the HTTP Server Monitor. This is used to analyze the information that is exchanged between the browser and the Application Server in real-time.

On the left-hand side of the previous screenshot, under Current Records, the requests made from the client to the browser are listed. By clicking on each one of those requests shows information related to that particular request is then presented. There are a number of tabs that can be used to monitor different sorts of information:
- Request : Displays the request information.
- Cookies : Displays cookies related to this user.
- Session : Shows the current session information.
- Context : Has information about the servlet context.
- Client and Server: Displays the client data, such as the IP address and the software used to access the application. Same goes for the Server part, which displays information relevant to access configuration, ports, hostname, and so on, of the server.
- Headers : Displays the HTTP headers contained in the request.
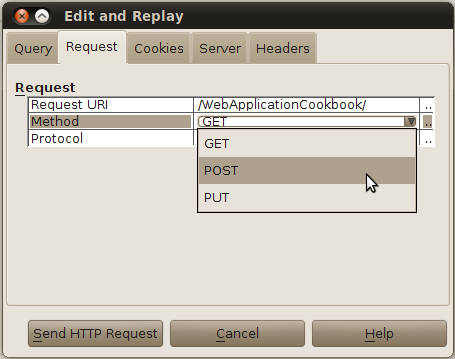
It is also possible to right-click on each individual request and choose Save, Replay, Edit and Replay..., and Delete. Selecting Edit and Replay will let the user edit the request, change the parameters, request methods, request URL, and so on.
This is a very handy tool when testing and deploying web applications. There are many other, more powerful tools that do the same thing, but they do not offer the simplicity in configuration, and mainly are not free and not that tightly integrated with NetBeans.