Chapter 5. Getting Online
Now that you have your netbook customized to your liking, it’s time to use it as it was meant to be used—on the Internet. The Internet is the home of the Cloud where you’ll find online applications like Google Docs and Yahoo Mail, 30 Rock episodes from Hulu.com, and vast datastreams from around the globe. You can have all this on your netbook as soon as you take care of a few details…like getting an Internet connection.
Getting online is a lot easier than it was just a few years ago, when stodgy dial-up modems were still in vogue and information waltzed along the wires at a leisurely 50 kilobits per second. These days, network service is streamlined. High-speed fiber-optic connections (like Verizon’s FiOS service) can download data at a blazing 50 megabits per second. (Since the old 56 kilobits-per-second dial-up modems of the 1990s can only move at a mere fraction of that speed, you can see why YouTube never really caught on until high-speed Internet became commonplace.)
Whether you use a wired or wireless network in your home, office, or on your travels, this chapter shows you how to get your netbook living up to its potential.
Ways to Connect to the Internet
Getting online means connecting your netbook to a local computer network, which in turn connects you to the giant network of networks known collectively as the Internet. Your netbook has at least two built-in ways to connect to a network—and there are a few others. Here are some of the possibilities:
A wired Ethernet network connection. Still popular in offices and places where network security is an issue, an Ethernet network connection gives you a high-speed path to the Internet over a plastic-covered cable. Just about every netbook has an Ethernet jack, so all you need is the cable (Setting Up a Wired Network).
A wireless network connection. The most popular way to get online these days, a wireless connection lets you get to the Internet over radio waves. Married to broadband Internet connections, wireless networks have flourished in homes where no one wants to see yards of unsightly cables slithering around the house. Wireless networks are also ideal for those who like to travel and travel light, and all netbooks have a wireless chip inside. (See Wireless Network Security.)
A mobile broadband card or USB dongle. Not the cheapest way online, but one of the most versatile. Getting a mobile broadband card and service plan from a wireless phone carrier lets you get online pretty much anywhere you can get a cellphone signal. Some newer netbooks from wireless carriers include the card and service. You can even combine mobile broadband card with WiFi— Verizon’s tiny MiFi router (www.VzW.com/mobilehotspot) pulls down a mobile broadband signal and shares it with up to five computers over its own WiFi connection, making it practically a pocket network. (See Getting Online with a Wireless Broadband Card.)
A cellphone connection. Not every cellphone can pull double-duty as a data modem for linking your netbook to the Internet, but some can—even over a Bluetooth connection. (See Using Your Mobile Phone as a Modem.)
An external dial-up modem. Often derided by those in urban areas with faster network access, dial-up modems still have a place in the world—especially in rural areas where the phone line is the only pipeline to the Internet. (See Using a Dial-Up Connection with Your Netbook.)
You’re not stuck with any one method, either. Sure, you may be floating along the wireless airwaves most of the time in the local café, but if you find yourself in a wired-only office or far away from a broadband connection of any kind, falling back to an Ethernet cable or pocket phone modem can still keep you connected with the rest of the world.
What You Need to Connect
Now that you’ve got the netbook in hand and know how you want to get online, you need to make sure you have a few other things:
An Internet service provider. Most people already have one of these powering home or office Internet access. If you’ve never had Internet service at home, you’ll need to sign up for a provider (Setting Up a Wired Network). If you’re traveling, those hotel and airport WiFi networks take care of the ISP factor.
Passwords. If you plan to tap into a secured wireless network—that is, one that requires a password to join—you must get the network’s name and password from the network’s administrator (the office computer guy, your 13-year-old daughter, or whoever is in charge of the network). If you’re logging into a paid wireless hotspot at the airport or bookstore, your credit card number gets you on the network (ka-ching!).
Cables. If you’re connecting to a wired Ethernet network, you need an Ethernet cable if one is not provided at the desk you’re using.
Cellphone kits/Modems. If you plan to use your cellphone as a de facto data modem, you might need a data plan from your wireless carrier, along with a cable, unless your phone and netbook both do Bluetooth. If you’re using a dial-up connection, you need an external phone modem to attach to the netbook’s USB port, as most netbooks don’t include a modem jack.
Once you have the necessary gear in hand, it’s time to get it all together and get netbooking.
Getting an Internet Service Provider
To get Internet service on the netbook, you need an Internet service provider. (Makes sense, huh?) According to some surveys, an estimated 74 percent of adults are already online and using the Internet, so chances are you’re among them. If not, or if you’re considering a change of service or provider, here are a few things to keep in mind:
How much is it? No, really, how much is it? Junk mail is full of colorful postcards from your local cable or phone company offering to give you TV, Internet, and telephone service for one low, low price. Be sure to read the fine print. How long does that rate stay in place? Do you have to sign a contract? Do you have to pay extra for equipment and installation? Do you want your home phone connected to the home network (which means no fun for anyone during an electrical blackout that lasts more than a few hours)?
What do other people think of it? After you’ve read the company’s information carefully to see what it says, see what its customers are saying. If you can go online—perhaps at a library if you don’t have an ISP yet—read reviews of the service on sites like www.theispguide.com and www.broadbandreports.com.
How’s the technical support? Do you get 24/7 for those times of crisis, or does the Help Desk go off the hook at 5:00?
Can I use my service on the road? If you’re going for mobile broadband service, check the coverage map and make sure you can get online wherever you need to. People in the dial-up modem world should check to see if the ISP offers phone numbers around the country.
Even if you already have an ISP, you may be thinking of making a home network out of your Internet connection, especially if you already have a desktop computer in place and need to get the netbook online as well. The next few pages tackle that little project.
Setting Up a Wired Network
Setting up a wired home network typically consists of two separate phases:
Installing a broadband connection, which brings fast Internet service to at least one computer in the house.
Sharing that connection with the rest of the house by using a box called a router to allow multiple computers to tap into the fast Internet service.
Once you get the router, there are a couple different ways to get the Internet connection to the other computers. These ways include Ethernet cables—plastic-covered cords that leash each computer to the router—or powerline networking, which uses the home electrical system to carry data to the computers, which are plugged into special adapters.
Setting Up a Broadband Connection
Most home users go for high-speed Internet access from their residential cable or phone company. If you order from the cable people—places like Time Warner, Cox, or Comcast—you get your fast broadband Internet access by sharing the same wires that are bringing ESPN and Comedy Central to your TV. If you order from the phone company, say, Verizon, you usually get DSL (short for digital subscriber line) or the newer, faster, more expensive fiber optic service (FiOS) that’s slowing rolling out around the country.
Once you order the service from your provider, there are two installation options:
A technician from the company comes to your house and takes care of everything.
You do it yourself (possibly with help from a friend or family member).
The latter option is becoming more common: Once you order the service, you get a connection kit with a modem, some Ethernet cables, a software CD, and a colorful step-by-step poster or setup guide. Follow your ISP’s specific instructions for setup, but in general, it goes something like this:
Install any supplied software on the computer.
If you’re using a netbook with no disc drive, try copying the CD files to a USB drive on another computer and then installing them on the netbook from the USB drive.
Unpack the modem, cables, and other gear.
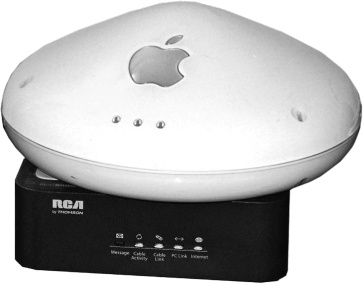
If you ordered service from the cable company, you need to unscrew the thick coaxial cable from the back of the TV or cable box and attach a little device called a splitter (shown on the next page), which lets you plug two coaxial cables into the one coming out of the wall. With the splitter connected to the wall cable, use the extra supplied bit of coaxial cable to reconnect the TV or cable box and use the other to connect the splitter to the modem. You’ve just split one cable connection into two: one for the TV, one for the computer.
Tip
If your TV picture quality suffers as a result, swapping out the cable company’s cheap splitter for a powered splitter—also called a broadband drop amplifier—to boost the signal might help improve things. You can find powered splitters at Amazon, Radio Shack, and electronics shops.
If you ordered DSL service, you need to attach the supplied plastic filters to the other phone jacks in the house except for the one the modem will use. These filters screen out the screech of data traffic coming over the phone lines and make it possible to still use the phone while also using the computer. Plug the DSL modem into the wall with the supplied phone cable.
Connect the modem to the computer.
Use the supplied Ethernet cable to link the network port on the computer to the network port on the modem. At this point, you may need to type in user names and passwords from the ISP to finish the setup and get online at last, so have all your paperwork from the company handy.
Once you have the main Internet connection up and running, it’s time to share it by making a home network.
Setting Up a Home Wired Network
Creating a home network lets you share your zippy Internet connection, but it has other perks, too. For instance, you can share printers and network drives, and even give online access to gadgets like your TiVo or game console. There are two main ways to make a wired network—Ethernet and powerline—and both of them require a router. A router is a box that takes one Internet connection and spreads it around to all the computers on the network. Routers sell for less than $40 and can be found at computer stores or sites like Amazon.com.
Ethernet
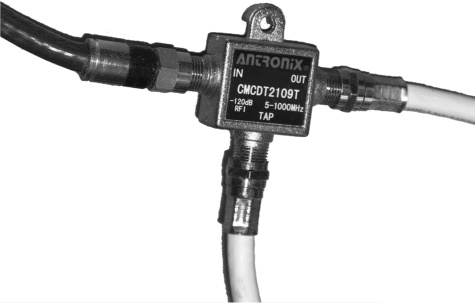
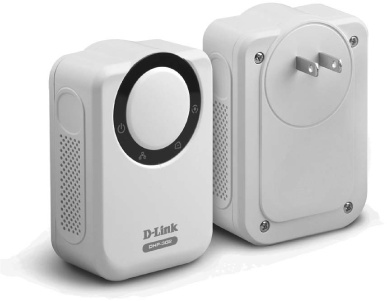
To make an Ethernet network, all you need are Ethernet cables and a router (like the D-Link model shown here and available at www.dlink.com). Ethernet cable prices vary based on length, but you can usually get a 25-foot cable for less than $10 if you shop around.
Unless you have a brand-new house prewired with Ethernet jacks in every room, you need an Ethernet cable that can stretch from the router to each computer on the network. That’s usually not a problem if all the computers live in a home office, but if you want to connect computers all over the house, you’ll need a lot of Ethernet cables.
Once you set up the router according to the manufacturer’s instructions, use an Ethernet cable to plug the broadband modem into the router. Then plug all the computers into the router’s jacks (it should have four to eight of them) with Ethernet cable. If you don’t want Ethernet cable snaking all over the house, consider setting up a wireless network (Wireless Network Security) or using powerline networking.
Powerline networking
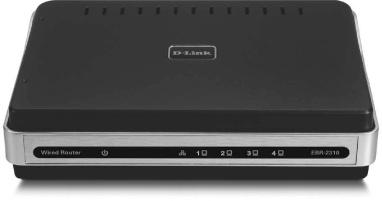
With powerline networking, you don’t need Ethernet cords all over the place, because you use the electrical wires inside your walls as your network cables. To set up this type of network, you need to get a Powerline kit, which costs around $140. Most major network-equipment providers like Linksys, Netgear, and D-Link (shown here) sell them. The kits include wall adapters that plug into the electrical outlets near the computers you want to connect. You still need a network router connected to your broadband modem, though.
Setting up a Powerline is pretty easy: Plug the Powerline adapter into the wall and then connect the router to it with an Ethernet cable. The adapter sends the router’s Internet signal out through the electrical wires in the wall. Next, plug additional Powerline adapters into wall sockets near each computer in the house. Connect the computers to the Powerline adapters with a short length of Ethernet cable, and you’re set.
Powerline networking isn’t without its problems. It can be slow compared to a wired Ethernet connection and electrical fluctuations—like when someone fires up the hair dryer—can disrupt the network. And the house’s wiring itself can affect a powerline network, particularly when there are circuits that are electrically isolated from each other.
Connecting to the Network
Once you’ve installed the hardware and plugged an Ethernet cable into each computer’s network jack, your computers—including your netbook—should be networked. Both Windows XP and Ubuntu Linux should automatically sense the network connection and be ready to go. If you want to test this theory, start up your web browser program (Using a Web Browser), and see if you can get to your favorite web page.
If you don’t have an Internet connection, make sure both ends of the Ethernet cable are firmly plugged in and then check the computer’s network settings.
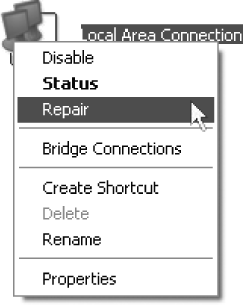
In Windows XP, choose Start→All Programs→Connect To→Show All Connections. Check to make sure the Local Area Connection is enabled. If not, try the Repair Connection option from the task pane.
In Ubuntu Linux, right-click the Network Manager icon in the top panel (usually between the user name and battery indicator). On the menu, make sure Enable Networking is selected; if it’s not, turn it on. Even if it is on, try deselecting Enable Networking from the menu, waiting a few seconds, and then turning it back on.
For either system, restarting the computer with the Ethernet cable plugged in may help the netbook realize that it’s now connected to the home network.
Setting Up a Wireless Network
The steps for putting up a wireless network are almost the same as the steps needed for setting up a wired network. You need to have the broadband connection (Setting Up a Broadband Connection) already in place, but instead of a router and cables, you need a wireless router. Instead of sending the information along cables, a wireless router broadcasts the Internet signal over the airwaves, where computers equipped with wireless cards (your netbook included) can receive the signal.

And wireless routers aren’t the ugly boxes they used to be—Cisco’s line of home-networking gear (a sample is shown here) looks positively sleek.
To set up the wireless router, just follow the instructions that came with it. In many cases, configuring the wireless router means plugging it directly into the computer with an Ethernet cable, opening the web browser, and typing in the router’s IP address along with a user name and password. These vary by manufacturer, but on Cisco-Linksys equipment, for example, you type http://192.168.1.1 in the browser window to get to the router’s configuration page, and then type admin for the user name and admin again for the password.
These settings are generic for every Cisco-Linksys router, and anybody can find them with a quick Google search, so change the router’s user name and password while you’re setting up the name of your new network and its password.
The network’s name is also known as the SSID (service set identifier). If you live in a densely populated urban area, it’s good idea to give it some sort of unique name like PuppyNet or BaseStar to make it stand out from all the LinkSys and NETGEAR networks that lazier people have set up in their own homes.
Wireless Network Security
Also turn on your router’s wireless encryption feature. This step protects the data flying around the airwaves by scrambling it. It also forces people to type a password the first time they use your network. Depending on the brand of router you buy, you will probably have a choice of two different encryption systems: WiFi Protected Access (WPA) or the older, weaker Wired Equivalent Privacy (WEP).
Pick an encryption method and add a password for the network. Most computers can handle WPA (or the newer WPAZ) these days, but make note of the network’s name, password, and type of encryption used. You then give this information with people you want to share your network with.
Some people may balk at setting a password for the network, because it can make it more difficult for friends and family to log in. But they really only have to use it the first time they connect, and can save the information in their own network settings so that future connections will seem practically automatic.
Connecting to a Wireless Network
Okay, you know the network is out there. It’s time to jump online and have some fun. If it’s a secure network, you need to know its name and the password to join it.
Windows XP
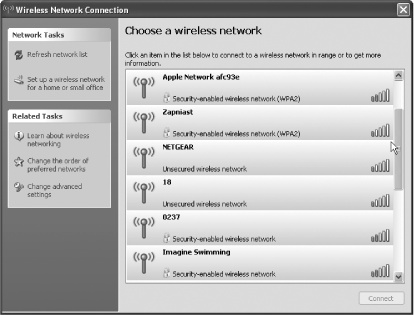
Windows XP may sense there is a wireless network within its range and alert you with one of those yellow balloons down in the taskbar’s notification area. If it doesn’t, right-click the wireless network icon (it looks like a PC beaming out radio waves) and choose View Available Wireless Networks. A box pops up showing you the networks within range.
Each network is also shown with its signal strength—weaker signals make for slower, less stable connections. The network’s security status is also displayed: Unsecured means no password is needed; security-enabled means you need a password. Find your network in the list, click it, and then click Connect.
In the next box, type the network’s password and then click Connect. After a second or two, your computer joins the network, and you can surf to your heart’s content, free of wires.
Ubuntu Linux
Choose System→Administration→Network Settings. Click the Unlock button and type your computer’s password. Click Wireless Connection and then click the Properties button. Make sure the checkbox next to “Enable automatic mode” is turned on—unless you only want to connect to your home network. In that case, type the network’s name, type of security encryption, and password. Under Connection Settings, choose “Automatic configuration (DHCP).” Click OK.
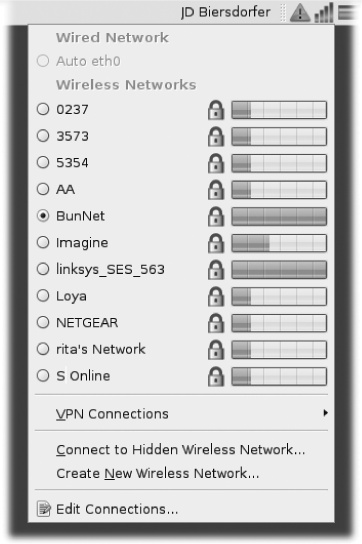
In the top panel of the Ubuntu desktop, right-click the Network Manager icon (to the left of the Battery icon) and make sure both Enable Networking and Enable Wireless are turned on. Now, click the Network Manager icon again to see a list of available networks.
A lock icon next to the network’s name means the network requires a password to join. The horizontal bar next to the lock shows the strength of the network signal. Click the button next to the name of the network you want to join and close the Network Manager menu. When presented with a password box, type the network’s password. The netbook takes a couple of seconds to send the information to the router, and then you’re online.
If you’re having trouble connecting to the network, the next section offers some suggestions.
Common Wireless Network Problems
If your netbook doesn’t magically connect to the wireless network, you can try a few basic things to troubleshoot the situation. Here are the most common things that can go wrong, and what to do about them, in order of difficulty:
You typed the wrong network password. Even though you did it once, do it again just to make sure you entered it correctly. Remember, network passwords are case-sensitive. Also, it’s a common security practice to mix letters and numbers together to make the password harder to crack, with numbers even substituting for letters. So make sure you’re not typing cooperstown500 when the password is really c00perstown500.
The wireless radio is turned off. Netbooks have that handy button or key combination to turn off the wireless card in a hurry, so make sure you didn’t accidentally hit the button yourself and turn off your wireless network card.
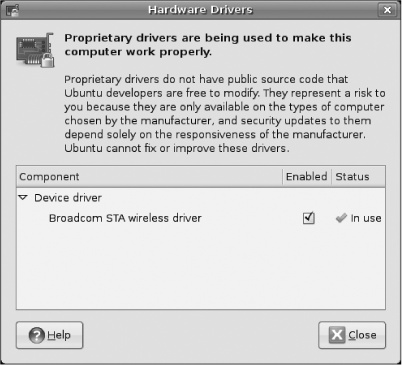
The Ubuntu wireless radio driver is turned off. Sometimes installing software or fiddling with your Ubuntu system can have unintended consequences. If you can see wireless networks but can’t connect to any,choose System→Admi-nistration→Hardware Drivers and make sure the one for your wireless card is not turned off.
The network is configured differently. Most networks use DHCP (dynamic host configuration protocol) to dole out IP addresses (Adding a shared printer) to computers wanting to join. But some networks use static IP addresses that you have to type into the network settings box. This setup makes the network more secure, but harder to join.
If that’s the case, ask your network administrator for the static IP address, plus the subnet mask and gateway numbers.
In Windows XP, choose Start→Control Panel→Network [and Internet] Connections. Right-click the wireless connection icon and choose Properties from the shortcut menu. In the Properties box, in the middle section of the General tab, under “This connection uses the following items,” select Internet Protocol (TCP/IP) and click the Properties button. Click the button next to “Use the following IP address” and type the numbers you got from your network administrator or ISP.
In Ubuntu Linux, choose System→Administration→Network Settings. Click the Unlock button and type your computer’s password. Click Wireless Connection and then click Properties. Under Connection Settings, choose “Static IP address” and type the numbers you got from your ISP or network administrator. Click OK when finished.
The network is down. Can anybody else get on the network? Check the router. Sometimes rebooting it—unplugging the broadband modem and router for a few seconds before plugging them back in again—can get that wireless network back up where it belongs.
The network signal is weak. Most WiFi networks have a range of at least 120 feet indoors, but obstructions like brick walls, windows, and metal file cabinets can sap signal strength. Try either moving the router or yourself to see if the connection improves.
Using Public Wireless Networks
Now that your netbook is all revved up for wireless action, you can use it on other networks besides your own. These include the free public networks at libraries, parks, jury-duty rooms, and other places where someone has thoughtfully connected a wireless router to a broadband Internet connection.
Commercial WiFi hotspots, or paid public networks, often found in airports and large chain bookstores are also an option—as long as you have a credit card or an account and password with the hotspot provider. T-Mobile (http://hotspot.t-mobile.com), for example, operates a lot of hotspots and has service plans that start at $20 a month.
To find a network on your Windows XP netbook, right-click the Wireless Network icon in the notification area and choose “View Available Wireless Networks” from the shortcut menu. On Ubuntu Linux, click the Network Manager icon on the right half of the top panel to see a list of nearby networks. Public wireless networks are generally unsecured, so you don’t need a password to join them.
Public wireless networks are great for casual web surfing, but remember, they’re public. You don’t know who else is on the network. So take some safety precautions to keep your netbook’s data safe from potential intruders. Ten Online Safety Tips for Netbooks has a list of tips for public network safety.
Getting Online with a Wireless Broadband Card
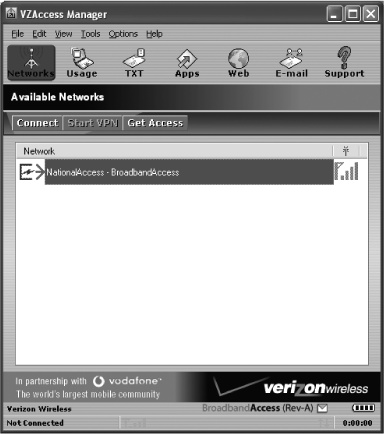
If a broadband network at home or work isn’t enough Internet access for you, another option is a wireless mobile broadband card. These cards, available from wireless phone carriers like Sprint and Verizon, are tiny modems that let your netbook jump on to the same high-speed data networks used by smartphones to get to the Internet. Some netbooks even include the mobile card built right in.
In theory, anywhere you can get a cellphone signal, you can get online. Sounds great, doesn’t it? You don’t have to search out a WiFi network or hunt around for an Ethernet cable because you’ve got the Internet right there.
Of course, all these freedom does have a price, namely up to $350 for the mobile broadband card and then $40 to $60 per month for the service plan. Still, if you’re on the go all the time—or better yet, have a job that will pay for the card—this option can be very liberating, even if the network speeds aren’t quite as fast as WiFi or Ethernet.
If you have a cellphone, check and see if your carrier offers mobile broadband cards for laptops. You might get a deal if you already have an account with the company for your phone. If not, most wireless cellphone carriers offer some sort of air card or broadband card. And if you sign a contract, say for two years of monthly service, the company might even give you the card itself (or perhaps an entire netbook) for free—or nearly free. (These are cellphone carriers; they’re used to doing this sort of thing.)
Before you seal the deal on your card, make sure you can get hardware that works with your netbook’s operating system; Linux may be trickier than Windows. Most places offer a USB stick option that has the broadband modem built right in. AT&T, Verizon, and other wireless companies now sell netbooks with the mobile broadband chip right inside—and monthly service plans to go with them.
Some netbooks like the Lenovo S10 also have an ExpressCard slot, which is a smaller, flatter version of the old PCMCIA Type II card slots found on most full-sized laptops (but not so much on their smaller netbook cousins). If the card’s driver software and connection program aren’t available for download, you may also need to beg or borrow an external CD drive if you don’t have one for your netbook.
Using Your Mobile Phone as a Modem
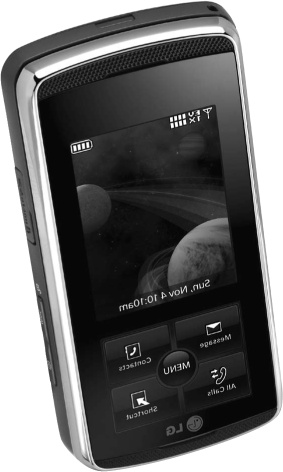
Over the past few years, cellular phone networks have been enhanced and upgraded to handle lots of data along with voice signals. These are sometimes referred to as 3G networks, in reference to the current third generation of mobile communications standards. The next, even faster type of network is called 4G, but those new networks aren’t expected until at least 2012. If you have a smartphone that sends email and surfs the Web in a flash, like an iPhone, Blackberry, or Windows Mobile model, you’re probably using a 3G network.
And with this smartphone, you might be able to get your netbook online, too. You do this by tethering (connecting) your phone to your netbook and using the phone as an external data modem for the computer.
The exact tethering procedure depends on your phone, your netbook, and your wireless carrier. A quick search for tethering at www.smartdevicecentral.com brings up instructions for all the common wireless carriers.
As far as linking the phone to the netbook, your options include:
USB cable. Many phones come with a USB cable for connecting it to a computer to transfer files. If your phone didn’t come with a cable, you can find one online by searching for "USB phone data cable”; prices range between $20 to $60.
Bluetooth. If you have Bluetooth chips in both the netbook and the phone, you can pair them (Bluetooth in Windows XP) to make a wireless connection between the two. Make sure the computer and phone both have their Bluetooth radios turned on so they can discover each other. Bluetooth in Windows XP has sample instructions for pairing Bluetooth devices, but refer to your phone’s manual for specific steps.
WiFi. If your phone has built-in WiFi, you might even be able to turn it into a pocket wireless hotspot. To do so, you need a program on your phone like WMWiFiRouter ($30 at www.wmwifirouter.com) or WalkingHotSpot ($25 a year; www.walkinghotspot.com).
The first step is connecting the phone to the netbook. Next, you have to get the phone onto the data network so it can share the goods with the netbook. If you plan to send email and other data over the connection, you need to get a data plan from your wireless carrier. This plan is separate from the one for the phone itself, and it’s specifically designed to let you tether the phone to the laptop. Prices range from $40 to $60 a month. This may sound pricey, but it can get your netbook on the Internet if you don’t have any other options.
Using a Dial-Up Connection with Your Netbook
Ah, the noble telephone dial-up modem connection. The slow, simple lifeline that got millions of people on the Web in the mid-1990s has been largely tossed aside for better, stronger, faster broadband connections—except for folks who can’t afford it or can’t get high-speed Internet access where they live.
Dial-up is still around, costing as little as $5 to $10 a month, depending on the provider. National dial-up providers include NetZero (www.netzero.net), PeoplePC (www.peoplepc.com), and Earthlink (www.earthlink.net). You can sign up for an account on an office or friend’s computer and order a CD of the software you need to connect to the ISP (if you have a disc drive) or possibly download the software from the site and install it from a USB drive.
Finding a dial-up ISP is the easy part. Because netbook hardware is so streamlined and designed for wireless Internet access, most models don’t even include an internal phone modem. In this case, you can get a USB-based 56K modem for about $50 from a company like US Robotics (www.usr.com) or Zoom (www.zoom.com); both offer Windows and Linux-compatible modems.
Even if you don’t have special connection software from the ISP, you can manually configure your netbook to get online. You need your ISP account information: your user name, password, and at least one access number for the modem to dial.
Windows XP
If you’re using Windows XP, you can summon the New Connection Wizard to walk you through punching in the ISP’s phone number. The wizard will even find you a dial-up provider if you don’t know whereto look.
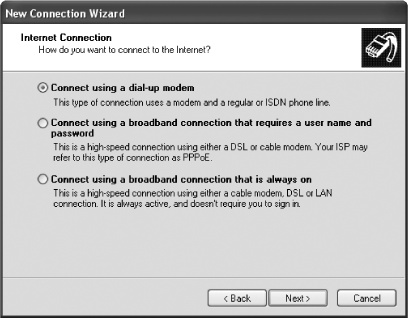
Just plug the phone cord into the netbook’s modem and then choose Start→All Programs→Accessories→Communications→New Connection Wizard. Select the Connect to the Internet option. On the next screen, you can tell Windows XP to let you choose an ISP from a list or guide you through setting up your connection using the username, password, and phone numbers you already have from your service provider. When you finish the wizard, you can get online in the future by choosing Start→Connect To→[ISP].
Ubuntu Linux
The most important step in getting Linux dial-up to work is to make sure the modem you get is actually Linux-compatible. Most aren’t, so shop wisely and follow the installation instructions.
Although you can configure a modem connection (called a point-to-point connection) in Ubuntu’s Network Settings box, there’s an alternate method, which you may find easier. Choose Applications→Add/Remove, search for gnome-ppp and install the software.
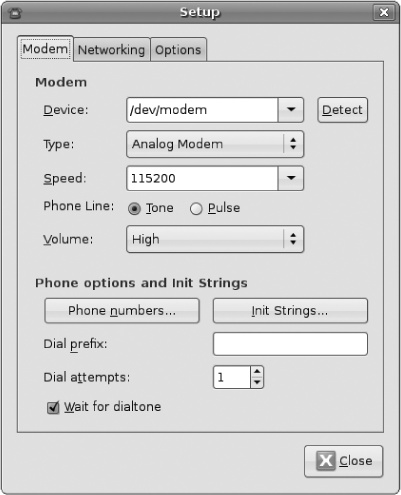
Choose Applications→Inter-net→GNOME PPP. Click the Setup button. When the Setup screen appears, click the Detect button. Once the software has configured itself to use your modem, turn off “Wait for dialtone” checkbox and then click the Options tab. Turn on the “Dock in notification area” checkbox and then click Close. Back on the main screen, type your user name, password, and ISP access number. Click the Connect button to dial your way online.
Tip
Getting Linux and certain modems to play nice can take some fiddling and venturing deeper into Linux. If you’re having trouble, check out the Ubuntu community support page on the topic at https://help.ubuntu.com/community/DialupModemHowto.