Chapter 12. Troubleshooting Your Netbook
No matter how you use it—traveling Facebook updater, portable typewriter, video game console, or all of the above—a netbook is still a computer. And computers have problems now and then.
Figuring out what’s wrong with a sick netbook is pretty much like figuring out why a regular laptop or desktop machine is acting up. Is it hardware? Is it software? Could it have something to do with the cappuccino that you just spilled all over the keyboard? (Thanks to the prevalence of wireless Internet access in coffee shops, that last issue is more common than it used to be.)
This chapter takes a look at some tools and principles you can use to figure out what ails your netbook so you can fix it. You’ll also learn basic maintenance methods that can keep it running more smoothly and possibly prevent trouble. If worse comes to worst, you’ll see what to do if your netbook really needs a major operation—like a full system reinstall.
Whenever this chapter doesn’t have all the answers, it tells you where to look for them. This information can make the difference between a happy, functioning netbook—and a flat, three-pound paperweight.
Troubleshooting Common Problems
Netbooks, like their larger laptop cousins, are meant to be portable. Netbooks go places. But the more you move the netbook around, quaff chai tea lattes over it, or plop it into the plastic tub for an airport x-ray inspection, the more you increase the odds of something going awry. Here are some quick tips for some of the more common netbook ailments.
Power issues. If the netbook won’t turn on, make sure the battery is locked into place and not loose, or that the power cord is firmly plugged into both the wall outlet and the netbook’s AC port. If the AC port on the netbook seems loose, there could be problems with the power getting to the netbook; if so, consult a computer repair service. If you’ve been using the netbook on the road a lot, make sure the battery is charged.
Liquid spills. If you dump coffee, tea, or another beverage all over your netbook, you need to act quickly. Flip it over and remove the battery from the machine to cut the power (if you’re running on electrical power, or unplug it and then pop the battery). Keep the netbook upside down to drain the liquid out of the keys. Mop out as much liquid as you can. Let the netbook dry for at least 24 hours, keeping it propped open and upside down. Liquids that contain protein or sugar (milk, soda, orange juice, coffee with milk and sugar) are the most likely to gunk up the keys. Black coffee, tea, and water do less damage. When the netbook has dried, use cotton swabs lightly moistened with distilled water or isopropyl alcohol to clean the keyboard area. When finished, snap the battery back in and see if the netbook works. If not, get thee to a repair shop for a professional evaluation.
Wireless connection issues. If the netbook is on but can’t see any wireless networks, check to make sure the WiFi radio is on (Ports of Call: Your Netbook’s Jacks). On Linux, also check to make sure you didn’t accidentally turn off your wireless card’s driver (Common Wireless Network Problems). Check your wireless settings on your Windows (Connecting to a Wireless Network) or Linux (Common Wireless Network Problems) system. If you can see networks but can’t connect to one, make sure the network you want to use is either an open network (no password required) or that you have the right password.
Unexpected shutdowns and crashes. If the netbook runs fine for awhile but gets hot and shuts down unexpectedly, it may be overheating due to inadequate airflow around it. Make sure nothing is blocking its back and side vents. Consider a laptop cooling pad or lap desk to provide increased airflow.
If you’ve added extra memory to it recently, check to make sure the chip is firmly pushed into the slot inside the netbook’s RAM compartment. Malicious software can also cause bizarre behavior, so if you don’t have security software on your netbook, try installing antivirus and antispyware programs and running them; Chapter 11 tells you where to get various free protection programs.
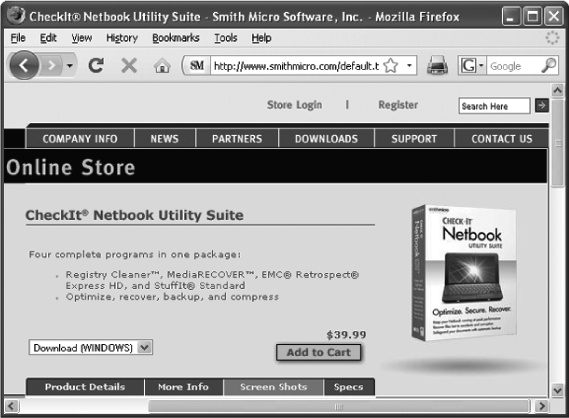
If you’ve used Windows, you may have run repair programs to solve registry problems or other common ailments. You can find similar fix-it programs designed just for netbooks. SmithMicro’s CheckIt Netbook Utility Suite ($40 at www.smithmicro.com or at www.amazon.com) is one such collection. It even comes on a USB drive so you can easily install and run it on the netbook.
Tip
You can often find utility programs grouped together in freeware collections designed to fit on a USB drive. They often include programs that can rescue corrupted files, thoroughly erase files, and scan hard drives. You can usually find a few hits by doing a web search for USB PC repair kit. For Ubuntu utilities, check out http://ubuntu-rescue-remix.org.
Built-In Windows Help Files
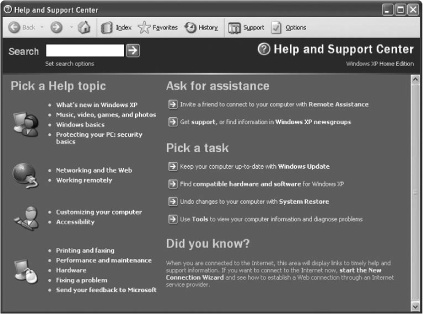
Having trouble getting Bluetooth devices to find each other? Email not downloading? Netbook freezing when you try to shut it down? Your netbook itself may hold the answers (or at least suggestions as to why things aren’t working properly). Just choose Start?→Help and Support.
When you do, the Help and Support Center appears onscreen, offering links, tips, and troubleshooting guides for a variety of common system snafus. The left side of the window is filled with help links for things like printing, networking, and more. Click the "Fixing a Problem” link at the bottom to visit a page of step-by-step troubleshooting guides for software problems, multimedia issues, email woes, networking hang-ups, printing headaches, and so on.
To get started, click the general category for the problem you’re having—“Printing problems,” for example. The right side of the window switches to a menu of different dilemmas for printing-related tasks. Click the one that’s closest to your situation. If you’re trying to solve the mystery of why nothing comes out of the printer, choose the “Fixing a printing problem” link. The next screen takes you to the “Use the Printing Troubleshooter” link. Once you click that, Windows asks you a series of questions designed to help you narrow down the situation and figure out what’s wrong.
The Help and Support Center has other useful areas, including a Search box you can use to look up articles by keyword, like wireless. If you’re new to Windows, you can get a quick tutorial with the Windows Basics section. If the Troubleshooter screens didn’t solve your problem, Help and Support’s main window has links to online newsgroup discussions where you might be able to get the answer from another Windows jockey. You also get shortcuts to the built-in Windows tools, some of which are described in this chapter, like System Restore (Using Windows System Restore) and Remote Assistance(Using Remote Assistance).
So while it may not have the solution to every problem, the Help and Support Center offers plenty of useful information, and it may just point you in the right direction for the answers you need.
Tuning Up with Windows System Tools
As mentioned back on Games, the All Programs menu features a collection of System Tools designed to help you use your netbook and keep it running in tip-top shape. Three programs in particular can help.
Disk Cleanup
Disk Cleanup
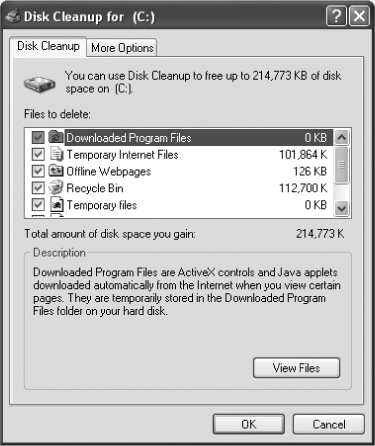
Created to safely sweep out all the digital clutter you don’t need anymore, Disk Cleanup can help you reclaim big chunks of your netbook’s drive. The program removes temporary Internet files, old program installers, and other outdated Windows debris. It can also compress old files to make them take up less room, or toss out old Windows components and programs you never use. Disk Cleanup even takes out the trash and empties the Recycle Bin for you.
To use it, choose Start→All Programs→Accessories→System Tools→Disk Cleanup. The program takes a few minutes to analyze the contents of the drive and then presents a list of old files it can safely delete—along with an estimate of how much space you’ll save. If you want to see the specific files Disk Cleanup has found in each category, click the category and then click View Files. Once you’ve decided what you want to delete, click OK to have Disk Cleanup get to work.
To dump more baggage, click the More Options tab in the Disk Cleanup box. In addition to Windows components and unused programs, you can also trim down the number of System Restore points (mini-backups of your system’s settings, as Using Windows System Restore explains) that Windows XP is saving.
Disk Defragmenter
The more you use a computer, the more fragmented its files become. Although the word sounds ominous, fragmentation is perfectly normal. It’s when the computer stores little pieces of a file around the hard drive wherever it has room for them. You see a complete file when you open it, but the computer is working madly behind the scenes to gather up all the parts. Over time, all this gathering can drag things down and make the netbook seem sluggish.
Time to defragment the drive with Disk Defragmenter. This program carefully analyzes the netbook’s drive to find all those scattered file pieces. Then it rearranges them back into contiguous pieces, making it easier and faster for the computer to find them.
To get started, choose Start→All Programs→Accessories→System Tools→Disk Defragmenter. Click Analyze to get a picture of how fragmented your drive is. In the horizontal bar in the top half of the window, the program paints a picture of the drive’s state with colored bars, each representing a type of data. If the graphic shows thin scattered colored stripes that resemble a swatch of clown pants instead of bigger, more solid blocks of color, your drive is really fragmented.
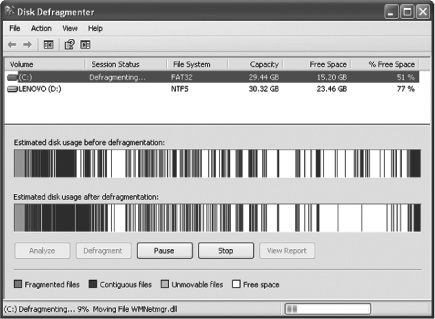
After analysis, Windows announces whether the drive needs to be defragmented. If it does, click the Defragment button and go do something else while Disk Defragmenter gets to work. It may take a while, but when the Defragmenter is done, those colored bars in the bottom bar should look a lot more solid and the netbook should run faster.
Check Disk, the tool formerly known as Scandisk
A formatted hard drive is divided up into tracks, sectors, and clusters, which the operating system uses to keep tabs on where all the stuff is stored on the computer. Over time and with use, though, sectors can go bad, clusters become lost, and the disk may begin to behave slowly or erratically. These problems happen due to system crashes, power glitches, and other file-corrupting incidents.
Windows XP comes with a program that checks for disk errors and tries to repair them. Older versions of Windows called this program Scandisk, but Windows XP calls it Check Disk or the Error-Checking tool. No matter what it’s called, running it regularly can help maintain your system.
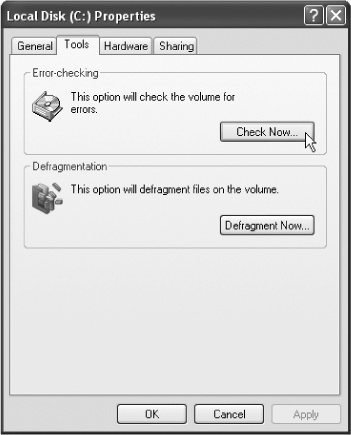
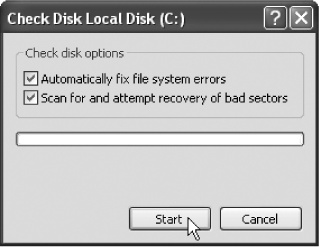
To check your netbook’s disk, choose Start→My Computer. In the list of drives, right-click the one you want to scan (usually the C: drive) and choose Properties from the pop-up menu. Click the Tools tab, and then click the Check Now button. The Check Disk Options box pops up. Turn on the checkboxes for both “Automatically fix file system errors” and “Scan for and attempt recovery of bad sectors” before you click Start.
The Check Disk tool wants to have the computer all to itself to work, so it pops up another box giving you the option to run it the next time Windows starts up. Click Yes and then restart the netbook to kick off the scan.
When you restart the netbook, the Check Disk tool takes over with its white text on a two-toned blue background screen. Depending on the size of your drive, Check Disk can take several minutes to an hour to do its thing. (You can skip the scan by tapping any key within a few seconds.)
When it finishes the job, Check Disk reports on whether it found any disk errors, found and fixed any errors, or couldn’t fix the errors it found. If Check Disk starts to find more and more bad sectors during its inspections, your hard drive may be on a downward slope. And it should also serve as a reminder to regularly back up your netbook (Built-in backup).
Using Windows System Restore
A better name for System Restore might be Bacon Saver. System Restore simply takes a series of snapshots or restore points of important system files and stores them on your hard drive in case of emergency. These snapshots come in handy later in case you fiddle around with system settings and make Windows crash.
With System Restore, you can take Windows back in time to before the bad thing happened—but not lose any files, email, or other data created or modified since then.
Windows creates its own scheduled restore points, but you can also make your own. A good time to do so is right before you spend an afternoon installing software or tweaking Windows system settings, for example.
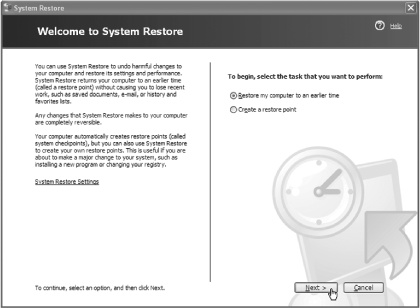
In any case, choose Start→All Programs→Accessories→System Tools? System Restore. When the System Restore window comes up, you have two choices:
Restore the computer to an earlier time.
Create a new restore point right this very instant.
If you click the button for the first option, the next screen shows you a little calendar with certain dates in bold, meaning there’s a restore point on that day. So if your computer started acting up on Sunday after you stayed up late Saturday night messing around with settings, see if you have a restore point from before Saturday.
After you’ve selected the point in time you want to return to, click Next and let System Restore do its thing. Windows restarts itself afterwards, and when it comes back up, your system should be behaving just like it was before the unfortunate incident.
To create a restore point, click the button next to “Create a restore point” on the main System Restore screen and then click Next. You’re asked to type in a name for this point (“Before the shareware games installation,” for example), and Windows takes it from there. Later, if you find that Windows is peeved at whatever you did to it after you made the restore point, you can use System Restore to go back in time.
Using Remote Assistance
Like most people, you may need a little help in life sometimes, especially when a computer is part of your life. Windows comes with a feature that lets people help one another—over the Internet. It’s called Remote Assistance, and it lets two people share the same computer screen, with an “expert” controlling the computer of a “novice” to adjust settings and fix problems.
Be careful who you invite to help you with your problems, though, as giving over control of your computer can be dangerous. Still, if you have a computer whiz in the family or a close buddy who knows about this stuff, you can use Remote Assistance to get computer help right in the comfort of your own home.
To get to the Remote Assistance screen, choose Start→Help and Support. Under the “Ask for Assistance” area at right, click “Invite a friend to connect to your computer with Remote Assistance.” Windows walks you through the steps from there.
You have three ways of getting your plea for help to your pal. You can ask by instant message if you both use Microsoft’s Messenger program (Setting Up Instant Message Software), or you can send an email request. If your email program is messed up and you don’t use Windows Live Messenger, you can save the request as a “RAInvitation” file you can copy onto a working computer and mail as an attachment. Unless you directly ask by IM, you need to supply a password that allows your expert to take over the computer.
Once the Expert user accepts the invitation and supplies the password, the Remote Assistance window appears. The Expert clicks the Take Control button onscreen. The Novice (you) gets a dialog box announcing that the Expert would like to take control of the machine. Click Yes if you want the Expert to do the driving. (Hit the Escape key on the keyboard if you want to grab back control of the netbook.)
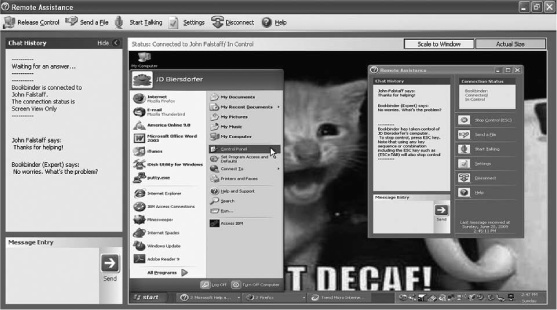
The Remote Assistance window has a panel of buttons and a chat function that lets you communicate with the other person by voice or instant message. Once the expert assumes control, she can see and move around your computer, fixing problems and so on. When the expert is finished, she clicks the Release Control button to return the reins to you. Click the Disconnect button to end the computer therapy session.
Microsoft has a document on using Remote Assistance at http://support.microsoft.com/kb/300546.
Tip
If you have another computer that’s running Windows XP Professional—say your home-office machine down in the basement—you can connect to it over the Internet from your netbook with a Windows feature called Remote Desktop. The Remote Desktop feature isn’t included with the Windows XP Home system installed on most netbooks, so you can’t control the netbook from the other PC, but it can be handy to use if you want to get a little work done and need files from your other computer. If this describes your situation, visit snipurl.com/kzzu7 for instructions on how to set up both the Windows XP Pro computer and the Windows XP netbook.
Reinstalling Windows
If your netbook won’t start up properly, or Windows has become hopelessly riddled with viruses, or you just want to wipe the netbook’s drive, a fresh installation of Windows can fix it all. How you reinstall Windows depends on your netbook, its maker, and the discs (if any) that came with it. Some netbooks keep an image of the Windows system files on a separate hard-drive partition, while some give you a Windows system or recovery disc.
So, because there are so many factors in play and they depend on the hardware you have, the first step is to check the manual or manufacturer’s website for instructions on how to reinstall Windows on your netbook’s make and model. Microsoft also has its own general step-by-step guide for reinstalling Windows at http://support.microsoft.com/kb/315341.
Note
Before you do any sort of repair or recovery procedure, though, back up all your important documents and files (Built-in backup), so they don’t get accidentally erased during any emergency procedures.
Having an external disc drive and a copy of a Windows XP installation disc is probably the quickest and most direct way to reinstall the system. Connect the drive to the netbook, pop in the Windows disc and follow the onscreen instructions. You may also be able to use the Repair function on the Windows installation disc to fix damaged system components that are tripping up the netbook.
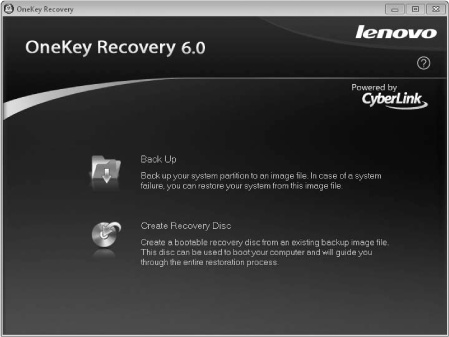
Many of Lenovo’s laptops, including its IdeaPad netbooks, include the OneKey Recovery system. By pushing the OneKey button on the keyboard, the computer calls up the onboard rescue software. If need be, you can wipe the netbook’s drive and reinstall the factory version of Windows that came with it.
One thing you’ll need for pretty much any Windows system reinstallation: your Windows product key. If there wasn’t a sticker with a huge string of 25 numbers and letters affixed to your Windows disc, look on the netbook’s underside. Lenovo, for example, slaps it on the bottom.
Tip
If you don’t have an external disc drive, but have a Windows installation CD and access to another computer with a disc drive, you can also make a bootable USB flash drive, and then install the Windows files onto it and use it to reinstall Windows on the netbook. It’s not exactly a simple process, but it can work. Check out www.missingmanuals.com/cds for links to demonstration videos and guides from netbook users around the world. You can also use this method to install different versions of Windows (like Windows 7) or even Linux (Installing Ubuntu by USB Drive).
Built-in Linux Help Files
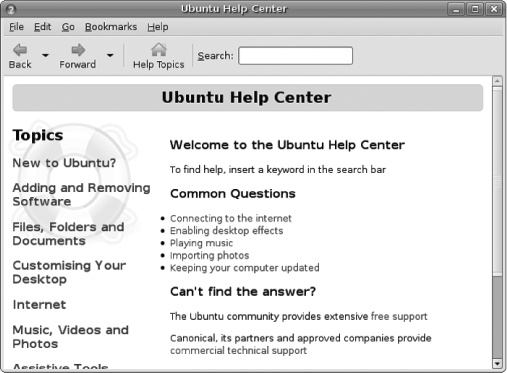
If you’re a Linux netbooker, you’re part of a growing movement. You may have been attracted by the idea of open-source software, wanted a cheaper machine, or just plain didn’t want to deal with Windows. But even without Microsoft’s huge corporate Service and Support team to fall back on, help’s not hard to find. In fact, it’s literally right in front of you—in the top-panel menu bar. Click the blue question mark icon to open up Ubuntu’s built-in Help system.
Along the left side of the Ubuntu Help Center window, you see a list of popular topics. “New to Ubuntu?” tops the list, followed by a series of links that take you to pages for adding and removing software, working with files and folders, using the Internet, and so on.
If you have basic questions or just want a simple tutorial for, say, adding codec files so you can listen to music in some of the lesser-known digital audio formats, the Help Center is worth trawling for answers. And if you don’t see the topic you’re specifically interested in, type it in the Search box at the top of the window.
The Ubuntu Help Center’s main page also has a link to the massive web-based help pages written by volunteers for the Ubuntu community. The Community pages cover a huge range of topics, and some volunteers have even created How-To videos and screencasts. You can find it all at https://help.ubuntu.com/community.
Maintaining a Linux Netbook
Compared to Windows, Linux is a fairly self-maintaining operating system. For example, defragmenting your disk (Disk Defragmenter) isn’t on your monthly to-do List, since Linux uses a different file system (called ext3) that doesn’t require the regular defragmentation like Windows’ file system.
As for remembering to run a disk-scanning program like Check Disk (Check Disk, the tool formerly known as Scandisk) to examine your hard drive for errors, you, O Linux devotee, have it easier as well. Ubuntu automatically does an error-checking scan on its drive after every 30 startups. So if you’re coming from a Windows system in your earlier life, that’s another thing you cross off your schedule.
Keeping Ubuntu Tidy
Keeping your hard drive from overflowing can be a challenge on any operating system. Be sure to empty your system’s Trash regularly: Right-click the orange recycle bin icon in the lower-right corner and choose Empty Trash from the pop-up menu.
Uninstalling programs you don’t use frees up disk space as well. You can remove these squatters by choosing Applications→Add/Remove, selecting “Installed applications only” in the Show menu, and then turning off the checkbox next to the programs you wish to remove. Click Apply Changes, and type your system password when requested. Ubuntu then removes the deselected programs.
Note
If you have the Add/Remove Applications window already open and try to open the Synaptic Package Manager, Ubuntu explains that there’s already a package manager open and won’t open Synaptic until you close the Add/Remove Applications window.
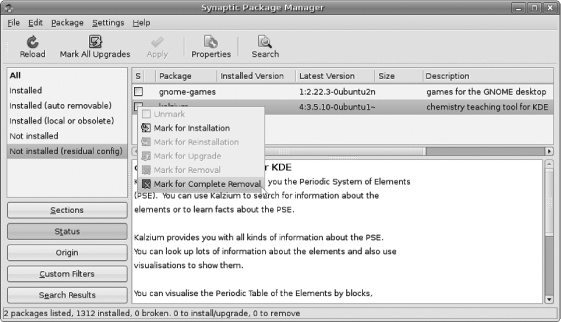
You can also remove programs by choosing System→Administration? Synaptic Package Manager. Going this route actually gives you more options for removing programs, because you can get rid of residual configuration packages. (The files Linux programs need come in packages; hence the need for a package manager program to get everything installed and uninstalled correctly.)
But sometimes, bits of package residue are left behind after you uninstall a program. That’s where the Synaptic Package Manager can help. Open it, and in the left column, click “Not installed (residual config).” If you don’t see anything listed, you don’t have any residual config bits on your system. If you do see a list of programs in the center of the window, click the ones you want to ditch and choose “Mark for Complete Removal” from the pop-up menu. At the top of the window, click Apply, type your password if asked, and let the Synaptic Package Manager take back a little space on your netbook.
Tip
Uninstalling old programs makes room for new ones, so now if you remember seeing something interesting in your netbook’s software repositories, you can add it. The Community help file at https://help.ubuntu.com/community/Repositories/Ubuntu has the illustrated details.
Ubuntu Remote Desktop
Thanks to Ubuntu’s Remote Desktop feature, you can get help over the network or Internet from your friendly Ubuntu guru. Like the Windows Remote Assistance feature (Using Remote Assistance), Ubuntu’s Remote Desktop function lets someone take over your screen to adjust settings or fix problems. But it’s a two way street: You can also use Remote Desktop to tap into another Ubuntu computer from your netbook—or even a Windows machine. This setup can be handy if you have files you need to reference back on your home or work computer.
Here’s how to set it up:
On the machine you want to remotely control, choose System→Preferences→Remote Desktop.
In the General tab, go to the Sharing area and turn on the “Allow other users to view your desktop” checkbox. In the Security section, turn on the checkbox requiring the controlling party to ask you for confirmation and the checkbox requiring a password to control your computer. Type the password you want to use (which you’ll share with your trusted friend). On the Advanced tab, turn on the “Only allow local connections” checkbox if wish to share access only on your local network. Click Close when finished.
On the computer that’s going to be doing the controlling, choose Applications→Internet→Remote Desktop Viewer.
If you’re on a local network, you may see the computer that’s hosting remote connections listed on the left. If so, select it and then click the Connect button at the top of the window. If you’re connecting over the Internet, click the Connect button and type the IP address of the computer you want to control. (If your friend is trying to help you and needs your IP address, you can get it quickly on the Web at www.whatismyip.com.) Type the password from the previous step, and you should see the other computer’s desktop in your window. Click the Close button when you’re ready to end the session.

Connecting to Windows machines
Connecting to Windows machines
You can also connect to Windows Vista and Windows XP Professional machines, but you first have to set them up to accept remote control. On Vista, click the Start button, right-click Computer, and choose Properties from the pop-up menu. In the left side of the box, click the Remote Settings link. In the box, choose “Allow Connections From Computers Running Any Version of Remote Desktop (Less Secure)” and click Apply. You also need to make sure your Vista account has a password, which you can do by choosing Start→Control Panel→User Accounts and Family Safety→User Accounts, and selecting “Create a password for your account.”
On Windows XP Professional, click the Start button, right-click My Computer, and choose Properties from the pop-up menu. In the System Properties box, click the Remote tab and in the Remote Desktop area, turn on the checkbox next to “Allow users to remotely connect to this computer.” You also need to make sure your XP machine has a user account password; choose Start→Control Panel→User Accounts to set one up if you don’t have one.
You also need to make sure the person’s user account on the Windows machine is in the Administrator group or that the user account is on the list of preapproved Remote Users. Click the Select Remote Users button in the System Properties box to add a person to the list.

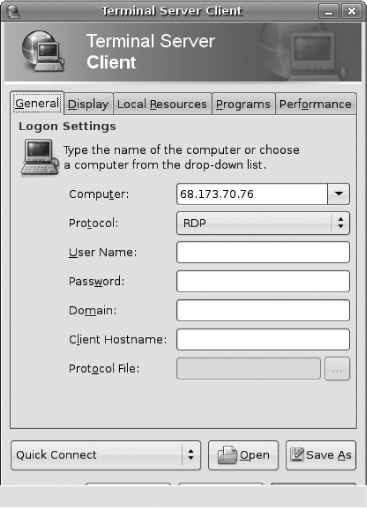
To connect to the Windows machine from your Ubuntu netbook, choose Applications→Internet→Terminal Server Client. In the box next to Computer, type the IP address of the Windows machine, and click the Connect button. (If you can’t see the Connect button very well because it’s too dark for your netbook screen, hit the Enter key on the keyboard instead.) If all goes according to plan, you next get a box demanding the name and password for the Windows machine. Type these to proceed into your Windows PC to get whatever you need.
Note
Network security may stymie your remote desktop attempts and you may have to do things like adjust firewalls and security software to allow remote connections. For example, you may need to make a firewall rule that allows traffic on port 3389 or 5900 to get your connections to work. If you’re having no luck, check with your network administrator (especially if you are trying to get into an office PC). You can also find tutorials on other remote methods online, like the one at www.linuxplanet.com/linuxplanet/tutorials/6641/1.
Installing (or Reinstalling) Ubuntu
There may come a time when you want to (or have to) reinstall Ubuntu Linux on your netbook. Or maybe your netbook came with a different distribution of Linux and you want to switch to Ubuntu, or maybe Windows has finally driven you over the edge with its viruses and spyware. Whatever the case, you have several options for putting Ubuntu on your netbook—including installing the system from a USB drive.
The best part is, you don’t have to buy the software. It’s free. You can download it at www.ubuntu.com/getubuntu. Actually, you download the 700-megabyte installer file, which you then can burn to a CD and use as an installation disc. Since your netbook probably doesn’t have a CD burner, it’s best to do this downloading and disc-making on a more fully equipped computer.
Tip
Canonical, the company behind Ubuntu, even has a lean, mean version of the system designed with netbooks in mind. It’s called the Ubuntu Netbook Remix, and you can find more information on it at http://www.canonical.com/projects/ubuntu/unr.
Installing Ubuntu by CD
Now, if you have an external CD drive for your netbook, you can use it to install Ubuntu from the disc you just burned, or from the disc that may have come with your netbook. (The manufacturer may have included a disc of hardware-specific driver software as well, which you’ll also need if you’re reinstalling Ubuntu.) Make sure you have all the documents, pictures, and other files you want to save backed up on a USB stick or other drive.

Once you put the Ubuntu CD in the disc drive and restart the netbook, you should see the Ubuntu LiveCD screen, which includes an Install icon to start walking you through the installation. You work your way through a number of screens, picking a system language, location, keyboard layout, and a username and password. Once you’ve made your selections, the installer goes about putting Ubuntu on the computer.
Note
If the netbook does not start from the CD, you have to adjust the settings in its BIOS (basic input-output system) to allow booting the computer from the CD drive (or even a USB drive, explained below). Getting to the BIOS varies by computer, but usually it’s something like pressing the F2 key, F8 key, or Delete.
If you don’t see a key listed onscreen for Setup when the computer starts up, check your manual. Once you get into the BIOS settings, select the Boot area by navigating with the arrow keys and select the CD drive as the first device to boot from. Again, BIOS settings vary, so dig out that manual or look it up on the manufacturer’s website.
Installing Ubuntu by USB Drive
Another possibility for installing Ubuntu is putting the contents of the Ubuntu installation disc on a USB drive, booting up from it, and then installing the system on your netbook that way. You can do so in multiple ways, depending on whether you’re creating the bootable USB stick on a Windows or Ubuntu machine and which program you want to use to create the USB installer. The Ubuntu community has a page on the various options at https://help.ubuntu.com/community/Installation/FromUSBStick.
Note
Not all USB drives work as installation drives for Ubuntu. Kingston DataTravelers, SanDisk Cruzers, Sony Microvaults, and Verbatim Store ‘n’ Go drives are among those known to work.
One program that works with both Windows and Linux is UNetbootin (http://unetbootin.sourceforge.net). To make a bootable USB drive with the Linux installation files, you need a USB drive (one gigabyte or bigger), a copy of the free UNetbootin software, and a fast Internet connection for downloading the Linux installation files.
Making a bootable USB drive with UNetbootin goes something like this:
Once you download the UNetbootin program from the website, plug in your USB drive and start it up.
If you’re using the Linux version, you may have to right-click the UNetbootin program icon and choose Properties→Permissions so you can turn on the checkbox next to Execute for “Allow executing file as program.”
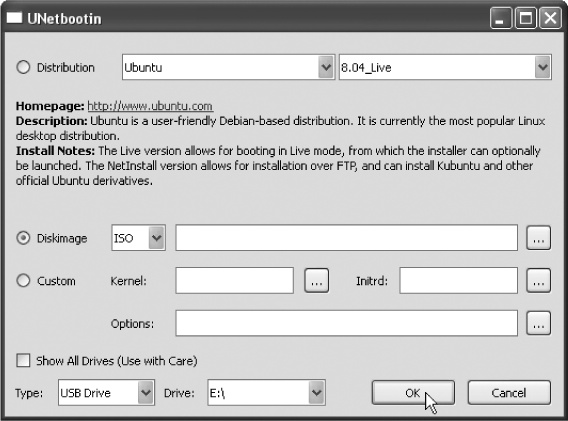
Once the program opens, select the Linux distribution you want from the Distribution pop-up menu.
Choose Ubuntu from the list. Version 8.0.4 is the current one with long-term support and is often offered on netbooks.
Select Disk Image and choose ISO. Then, in the Type pop-up menu (bottom), choose to put all this on the USB drive.
Click OK. UNetbootin gets busy downloading the Ubuntu installation files and turning your USB drive into a bootable installation stick you can use to install Ubuntu on a netbook without a CD drive.
To install Ubuntu from the USB stick, plug it into the netbook and then restart. The netbook should boot from the USB drive and start walking you through the installation process. If it doesn’t start from the USB stick, check your BIOS settings (see the Note on Installing Ubuntu by CD).
Not only can you install Ubuntu from a USB drive, you can even run Ubuntu from a USB drive. This trick can come in handy if the family netbook runs Windows but you really want to play around with Ubuntu (or you’re an Ubuntu loyalist who has to use a Windows machine every once in a while). In fact, there’s a whole website full of tutorials devoted to running Linux from USB flash drives at www.pendrivelinux.com. Because if that Windows netbook is acting up and you really need to get something done, it never hurts to have a little penguin in your pocket.
Tip
If you generally like your Linux netbook but find there are a few Windows programs that you really miss or need to use, don’t whine—try Wine. Wine (a recursive acronym for Wine Is Not an Emulator) is an open-source application for Linux that basically tricks Windows programs into thinking they’re running on Windows. If this sort of thing piques your interest, you can read about Wine at www.winehq.org. You can install Wine by choosing Applications→Add/Remove and searching for Wine. Salut!
Finding Help and Information Online
If you’re having a specific problem with your netbook that you still need a solution for, the Web is your friend. Although you may have free technical support by telephone for the first month or two after you buy your netbook, you can see answers in other places when the free phone helpline time runs out.
The Support area of your netbook maker’s website is the first stop to make in your search for answers. Customizing and Buying Your Netbook has a list of most major netbook manufacturer’s and their web addresses.
For Windows questions, there’s http://support.microsoft.com.
Ubuntu’s searchable help pages are at https://help.ubuntu.com/community.
Want to learn more about Linux command lines? You can find free tutorials to please your inner geek at www.tuxfiles.org/linuxhelp/cli.html.
Tip
For real-time help with questions, Ubuntu has a number of Internet Relay Chat channels that let you talk to other Ubuntu fans and experts about your system. The Pidgin program (The Buddy List/Contacts List) even works for IRC conversations as well as regular instant messaging. You can find more information on using the Ubuntu IRC channels, along with a lengthy list of discussion topics, at https://help.ubuntu.com/community/InternetRelayChat.
Several sites dedicate themselves to all things netbook, and some include how-to videos and user forums:
Liliputing. If it’s small and it’s a computer, Liliputing has probably written it up. The site has reviews, forums, and plenty of netbook news. (www.liliputing.com)
Netbook Choice. A news-heavy site rounding up netbook headlines from all over. (www.netbookchoice.com)
NetBookMag. A blogazine featuring videos, product announcements, and news on many kinds of netbooks. (http://netbookmag.com)
Linux Netbook. A site dedicated to tiny laptops running Linux. (www.linux-netbook.com)
Netbook Reviews. Helpful if you’re still in the shopping-research stage—or ready to upgrade already. (www.netbookreviews.com)
Some netbooks have even inspired their own fan sites, where owners of a particular brand trade tips and tricks. For example:
HP Mini Guide. Reviews, guides, and gossip on HP’s netbook line can be found here. (www.hp2133guide.com)
UbuntuMini. A site for Dell Mini 9 owners running Ubuntu Linux, complete with videos and installation guides. (www.ubuntumini.com)
By the time you read this book, even more netbook sites and resources will have sprouted up, so don’t forget to search the Web. Netbooks may not be for everyone, and they may never become your everyday computer. But the combination of price, portability, and steadily improving hardware and software means netbooks are here to stay. Less is more.