
Chapter 6: Working with Light
The word photography is derived from two Greek words: photos (light) and graphos (writing or painting). Without a doubt light is the most essential ingredient that goes into making a photograph. Light is also the most variable part of the photographic equation. Light can change instantaneously, whether it is by the hand of the photographer or by the force of nature. Ultimately, the way the light interacts with the subject is the defining factor on the tone and mood of the image.
Working with light, as well as learning to control and manipulate it, is one of the fundamental keys to becoming a successful photographer. If you allow the lighting situation to control your photography you will forever be at the mercy of the light and will never truly grasp the art of photography.

Finding the right light or controlling the light to make it right is the key to setting the tone of your image.
Lighting Essentials
The way light interacts with a subject has an enormous impact on the way the camera records the subject. The angle and direction from which the light is coming, as well as the color of the light source and the quality of the light, all play a part in the way the image appears. All of these things combined affect the mood, tone, and feeling of an image, so it’s pretty important to grasp the basic tenets behind using light for photography.
This section covers the two main types of lighting that are used by photographers and filmmakers today: soft and hard light.
The quality of light
Photographers and filmmakers alike use the term quality of light to describe the way that light interacts with the scene. In the phrase, the term quality doesn’t necessarily describe whether the light is good or bad, but simply describes how it looks as it applies to the scene at hand.
The first thing a photographer should consider when planning the concept for an image or when assessing an existing light scene is the quality of light. For example, if you’re planning to shoot a portrait, you need to decide how you want to portray the person. If you’re shooting a landscape, think about what time of day the lighting is best for that particular terrain.
Soft lighting
Soft light is distributed evenly across the scene and also appears to wrap around the subject. It comes from a large light source, and the shadows fade gradually from dark to light, which results in a subtle shadow edge transfer. This is a very desirable type of light to use in most types of photography, especially in portraiture. You can also create soft light by placing a light source close to the subject or by diffusing the light source, thereby mimicking a larger light source.
The term shadow edge transfer is used to describe how abruptly the shadows in images go from light to dark. This is the determining factor in whether light is soft or hard. Soft light has a smooth transition, and hard light has a well-defined shadow edge transfer.
Soft light is very flattering to most subjects. It is used to soften hard edges and smooth out the features of a subject. Soft lighting can be advantageous for almost any type of photography, although in some instances it can lack the depth that you get from using a more direct light source.
To achieve soft lighting naturally, you can place the subject in an area that isn’t receiving direct sunlight, such as under a porch, overhang, or tree. Cloudy, especially partly cloudy, days are also ideal for soft, diffused lighting.
When artificial light is the source of your subject’s illumination, you usually need to modify the light in some way to make it soft. Redirecting or bouncing the light off a wall or some other reflective material softens the light; aiming the light source through diffusion material is also a good way to soften the light.

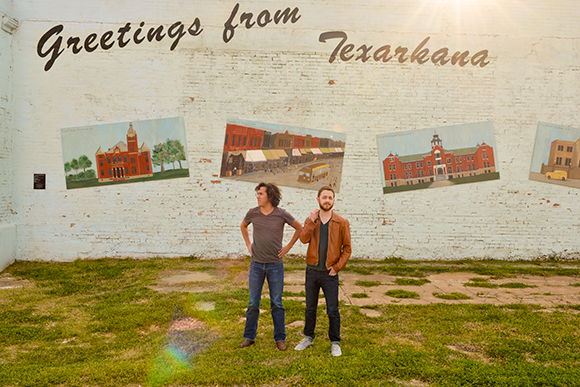
6.1 This photo was taken on a cloudy day, giving the scene a shadowless, soft light appearance. Exposure: ISO 100, f/2.8, 1/800 second with a NIKKOR 17-55mm f/2.8G at 55mm.
Hard lighting
The opposite of soft light is hard light. With hard light, the shadow edge transfer is more defined. It is very directional, and you can pinpoint where the light source is located very easily. Moving the light source farther from the subject results in harder light because the light source becomes smaller relative to the subject.
Hard light isn’t used as extensively as soft light, but it is very effective in highlighting details and textures in almost any subject. Hard light is often used in landscape shots to bring attention to details in natural formations. Hard light is also effective for creating gritty or realistic portraits.
Artificial hard light is easily achieved with a bare light source. You can also use accessories, such as grids or snoots, to make the light more directional. The bright midday sun is an excellent example of a natural, hard light source.
Lighting direction
The direction from which light strikes your subject has a major impact on how your images appear. When using an artificial light source, you can easily control the direction of the lighting by moving the light source relative to the subject. When using natural lighting, moving the subject relative to the light source is the key to controlling the lighting direction.
I cover the three major types of lighting direction in the following sections.
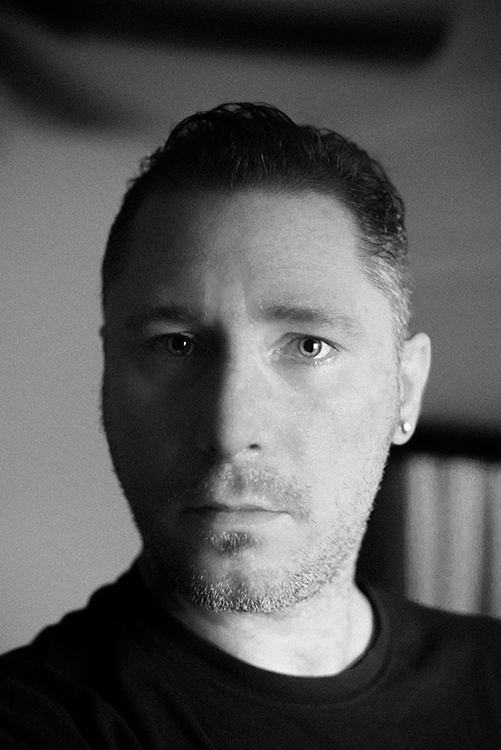
6.2 This hard-light portrait was taken using bounce flash. Exposure: ISO 100, f/2.8, 1/60 second with a 28mm f/1.8G.
Frontlighting
Frontlighting comes from directly in front of the subject, following the old photographer’s adage: keep the sun at your back. This is a good general rule; however, sometimes frontlighting can produce flat results lacking in depth and dimension. In Figures 6.3 and 6.4, you can see the difference that changing the direction of the light can make in a subject. When the light is aimed straight ahead, more of it reflects from the background, which brightens the background significantly.
Frontlighting works pretty well for portraits, and a lot of fashion photographers swear by it, especially for highlighting hair and makeup. Frontlighting flattens out the facial features and also hides blemishes and wrinkles very well. Be aware that using frontlighting with a continuous light source such as the sun can cause your subject to squint.
Sidelighting
Although sidelighting comes in from the side, it doesn’t necessarily have to come in from a 90-degree angle. It usually comes in from a shallower angle, such as 45 to 60 degrees.
Lighting the subject from the side increases the shadow contrast and causes the details to become more pronounced. This is what gives your two-dimensional photograph a three-dimensional feel. If you take a look at Figure 6.3 you can see that the textures look flat and nonexistent. In Figure 6.4, the sidelight causes the textures to appear more pronounced. Sidelight is equally effective when using either hard or soft light, and it works for just about any subject.
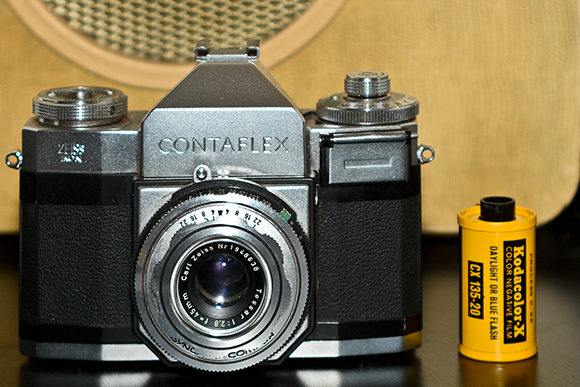
6.3 This vintage camera was lit from the front using an on-camera SB-900 Speedlight. Notice the nice, flat, even lighting. Exposure: ISO 400, f/5.6, 1/60 second with a Sigma 28-70mm f/2.8-4 DG at 70mm.

6.4 The light was moved to the side for this shot. Notice that the subject has more texture, depth, and form, giving it more dimensionality and lending the image a somewhat moodier quality. Exposure: ISO 400, f/5.6, 1/60 second with a Sigma 28-70mm f/2.8-4 DG at 70mm.
Backlighting
Backlighting involves placing the light source behind the subject. Although it’s not as common as front- and sidelighting, it does have its uses. Backlighting is often used in conjunction with other types of lighting to add highlights to the subject.
Backlighting has often received a bad rap in photography, but more photographers are now using it to add artistic flair to their images. Backlight introduces effects that were once perceived as undesirable in classical photography, such as lens flare and decreased contrast. Photographers today are discovering that, when used correctly, backlighting can create interesting images.
The key to making backlighting work is to use the Spot metering mode ( ![]() ). When shooting portraits, meter on the subject; for silhouettes, meter on the brightest area in the scene.
). When shooting portraits, meter on the subject; for silhouettes, meter on the brightest area in the scene.
Backlighting can make portraits more dynamic, incorporate silhouettes into landscape photos, or make translucent subjects like flowers seem to glow.
Using backlighting and lens flare creates a classic cinematic effect. You can also do the same with the video feature on the D7100.
6.5 Backlighting can add lens flare to your image, giving it a cinematic effect. Exposure: ISO 100, f/8.0, 1/100 second using a Nikon 17-55mm f/2.8g at 22mm.
Natural Light
Natural light is probably the easiest light source to find simply because it’s all around you, as the sun is the source of all natural light. Some people confuse available light with natural light. To make it clear, all natural light is available light, but not all available light is natural light. Available light is light that exists in a scene and that isn’t augmented by the photographer. For example, when you walk into a room that is solely lit with an overhead lamp, the overhead lamp provides the available light, but it is not natural light.
That being said, natural light can be the most difficult light to work with. It can be too harsh on a bright sunny day, it can be too unpredictable on a partly cloudy day, and although an overcast day can provide beautiful soft lighting, it can sometimes lack definition, which leads to flat images.
Natural light often benefits from some sort of modification to make it softer and a little less directional. Here are a few examples of natural lighting techniques:
• Use fill flash. As contrary as it sounds, using flash to augment natural light can really help. You can use the flash as a secondary light source (not as your main light) to fill in the shadows and reduce contrast.

6.6 Window lighting was all that was necessary for this food shot I took for a local restaurant’s menu. Exposure: ISO 440, f/1.6, 1/160 second, using a Sigma 35mm f/1.4 DG HSM.
• Try to use window lighting. Like fill flash, this technique is one of the best ways to use natural light, even though it seems contrary. Go indoors and place your model next to a window. This provides a beautiful soft light that is very flattering. A lot of professional portrait and food photographers use window light. It can be used to light almost any subject softly and evenly, yet it still provides directionality. This is definitely the quickest, and often, the nicest light source you can find.
Early in the morning and late in the evening when the sun is rising or setting are the best times to take photographs. These times are known as the Golden Hour.
• Find some shade. The shade of a tree or the overhang of an awning or porch can block the bright sunlight while still providing plenty of diffuse light with which to light your subject.
• Take advantage of clouds. A cloudy day softens the light, allowing you to take portraits outside without worrying about harsh shadows and too much contrast. If it’s only partly cloudy, you can wait for a cloud to pass over the sun before taking your shot.
• Use a modifier. Use a reflector to reduce the shadows, or a diffusion panel to filter the direct sunlight from your subject making it softer.
Continuous Light
Continuous lighting is a constant light source that gives you a what you see is what you get effect; therefore, it’s the easiest type of light to use. You can set up the lights and see what effect they have on your subject before you even pick up your D7100. Continuous lights are an affordable option for photographic lighting, and the learning curve isn’t steep.
As with other lighting systems, you have many continuous lighting options; here are a few of the most common:
• Incandescent. Incandescent, or tungsten, lights are the most common type of lights (a standard light bulb is a tungsten lamp). With tungsten lamps, an electrical current runs through a tungsten filament, heating it and causing it to emit light. This type of continuous lighting is the source of the name hot lights.
• Halogen. Halogen lights, which are much brighter than typical tungsten lights, are another type of hot light. Considered a type of incandescent light, halogen lights employ a tungsten filament, but they also include halogen vapor in the gas inside the lamp. The color temperature of halogen lamps is higher than the color temperature of standard tungsten lamps. Halogen lights are also more expensive and the lamps burn much hotter than standard light bulbs.
• Fluorescent. Fluorescent lighting is used in most office buildings and retail stores. In a fluorescent lamp, electrical energy changes a small amount of mercury into a gas. The electrons collide with the mercury gas atoms, causing them to release photons, which in turn cause the phosphor coating inside the lamp to glow. Because this reaction doesn’t create much heat, fluorescent lamps are much cooler and more energy efficient than tungsten and halogen lamps. In the past, fluorescent lighting wasn’t commonly used because of the ghastly green cast the lamps caused. These days, with color-balanced fluorescent lamps and the ability to adjust white balance, fluorescent light kits for photography and especially video are becoming more common and are very affordable.
Here are some disadvantages of using incandescent lights:
• Color temperature inconsistency. The color temperature of the lamps changes as your household current varies and as the lamps get more and more use. The color temperature may be inconsistent from manufacturer to manufacturer and may even vary within the same types of bulbs.
• Light modifiers are more expensive. Because most continuous lights are hot, modifiers such as softboxes need to be made to withstand the heat; this makes them more expensive than the standard equipment intended to be used for strobes.
• Short lamp life. Incandescent lights tend to have a shorter life than flash tubes, so you must replace them more often.
If you’re really serious about lighting with continuous lights, you may want to invest in a photographic light kit. These kits are widely available from any photography or video store. They usually come with lights, light stands, and sometimes, light modifiers (such as umbrellas or softboxes) to diffuse the light and create a softer look. The kits can be relatively inexpensive, with two lights, two stands, and two umbrellas costing around $100. You can buy much more elaborate setups ranging in price up to $2,000.
The D7100 Built-in Flash
The Nikon D7100 has a built-in flash that pops up for quick use in low-light situations. Although this little flash is fine for snapshots, it’s not always the best option for portraying your subject in a flattering light.
Even when you use the pop-up flash for snapshots, I recommend using a pop-up flash diffuser. There are a number of different brands and types, but I use a LumiQuest Soft Screen. It folds up flat to fit in your pocket and costs a little over $10.
The greatest feature of the built-in flash is that it allows you to control off-camera Speedlights wirelessly. This is something that even Nikon’s flagship camera, the D4, can’t do because of its lack of a built-in flash. Nikon Speedlights are dedicated flash units, meaning that they are built specifically for use with the Nikon camera system and offer much more functionality than a nondedicated flash. A nondedicated flash is a flash made by a third-party manufacturer; the flashes usually don’t offer fully automated flash features. There are, however, some non-Nikon flashes that use Nikon’s i-TTL (intelligent Through-the-Lens) flash metering system.
Built-in flash exposure modes
The built-in flash of the D7100 has a few different exposure modes that control the way the flash calculates exposure, flash output, and brightness, and a couple of modes for using some advanced flash techniques.
i-TTL and i-TTL BL
The D7100 determines the proper flash exposure automatically by using Nikon’s proprietary i-TTL system. The camera gets most of the metering information from monitor preflashes emitted from the built-in flash. These preflashes are emitted almost simultaneously with the main flash so it almost looks as if the flash has fired only once. The camera also uses data from the lens, such as distance information and f-stop values, to help determine the proper flash exposure.
Additionally, two types of i-TTL flash metering are available for the D7100: Standard i-TTL flash and i-TTL Balanced Fill-Flash (BL). With Standard i-TTL flash mode, the camera determines the exposure for the subject only and doesn’t take the background lighting into account. With i-TTL BL mode, the camera attempts to balance the light from the flash with the ambient light to produce a more natural-looking image.
When you use the built-in flash on the D7100, the default mode is i-TTL BL when using Matrix metering ( ![]() ) or Center-weighted metering (
) or Center-weighted metering ( ![]() ). To use the flash in Standard i-TTL, you must switch the camera to Spot metering (
). To use the flash in Standard i-TTL, you must switch the camera to Spot metering ( ![]() ).
).
Manual
The built-in flash power is set by fractions in Manual mode. The D7100 is the first Nikon camera to use 1/3-step settings for the built-in flash. The settings are Full (1/1), 1/1.3, 1/1.7, 1/2, 1/2.5, 1/3.2, 1/4, 1/5, 1/6.4, 1/8, 1/10, 1/13, 1/16, 1/20, 1/25, 1/32, 1/40, 1/50, 1/64, 1/80, 1/100, and 1/128.
The Guide Number (GN) for the built-in flash is 39 when measuring distance in feet, or 12 when using meters at full power (1/1) set to ISO 100. To determine the GN at higher ISO settings, multiply the GN by 1.4 for each stop that the ISO increases. For example, doubling the ISO setting to 200 increases the GN by a factor of 1.4, so GN 39 × 1.4 = GN 54.6.
Similarly, when reducing the flash power by 1 stop, you divide the GN by a factor of 1.4, so at 1/2 power the GN is about 28 (GN 39 ÷ 1.4 = GN 27.8).
Repeating Flash
This option allows you to set the flash to fire a specified number of times while the shutter is open, producing an effect similar to that of a strobe light. This gives you an image similar to a multiple exposure. This option is useful only in low-light situations because it requires a longer shutter speed to record the flash sequence.
When you use an SB-400 Speedlight with the D7100, Custom Setting ( ![]() ) e3 defaults to Optional Flash, and the Repeating Flash and Commander mode are not available.
) e3 defaults to Optional Flash, and the Repeating Flash and Commander mode are not available.
You must set three options when using Repeating Flash:
• Output. This is the strength of the flash. The same settings are used in Manual flash mode ( ![]() ).
).
• Times. This is where you specify how many times you want the flash to go off. Note that if you don’t select a long enough shutter speed, you do not get the specified number of flashes.
• Frequency. This is expressed in hertz (Hz) and sets the number of times per second that you want the flash to fire. The frequency and the shutter speed should be matched to get the proper effect.
Commander
One of the best features of the D7100 is that the built-in flash can control off-camera Speedlights. To use this feature, you need at least one compatible Speedlight to be used off-camera. Compatible Speedlights with off-camera ability are the SB-600, SB-700, SB-800, SB-900, SB-910, and SBR-200 flashes from the ring light kits. To set up the Commander mode, follow these steps:
1 Press the Menu button ( ![]() ) and use the multi-selector to navigate to the Custom Settings menu (
) and use the multi-selector to navigate to the Custom Settings menu ( ![]() ).
).
2 Use the multi-selector to highlight Custom Setting ( ![]() ) e Bracketing/flash, and then press multi-selector right (
) e Bracketing/flash, and then press multi-selector right ( ![]() ) to enter the Custom Setting (
) to enter the Custom Setting ( ![]() ) e menu.
) e menu.
3 Use the multi-selector to highlight Custom Setting ( ![]() ) e3 Flash cntrl for built-in flash, and then press multi-selector right (
) e3 Flash cntrl for built-in flash, and then press multi-selector right ( ![]() ) to view flash control options.
) to view flash control options.
4 Press multi-selector down ( ![]() ) to choose Commander mode, and then press multi-selector right (
) to choose Commander mode, and then press multi-selector right ( ![]() ) to view settings.
) to view settings.
5 Press multi-selector up ( ![]() ) or down (
) or down ( ![]() ) to choose a flash mode for the built-in flash. You can choose M, TTL, or --. The last option (--) allows the flash to control the remotes without adding additional exposure.
) to choose a flash mode for the built-in flash. You can choose M, TTL, or --. The last option (--) allows the flash to control the remotes without adding additional exposure.
6 Press multi-selector right ( ![]() ) to highlight the exposure compensation setting. Use multi-selector up (
) to highlight the exposure compensation setting. Use multi-selector up ( ![]() ) or down (
) or down ( ![]() ) to apply exposure compensation if desired. If the built-in flash is set to --, this option is not available.
) to apply exposure compensation if desired. If the built-in flash is set to --, this option is not available.
7 Use the multi-selector to set the mode for Group A. You can choose TTL, AA, M, or --. Press multi-selector right ( ![]() ) to highlight exposure compensation. Press multi-selector up (
) to highlight exposure compensation. Press multi-selector up ( ![]() ) or down (
) or down ( ![]() ) to apply exposure compensation if desired. Repeat this process for Group B (if using more than one flash and the second flash needs to be set at a different output level).
) to apply exposure compensation if desired. Repeat this process for Group B (if using more than one flash and the second flash needs to be set at a different output level).
8 Use the multi-selector to highlight the Channel setting. You can choose from channels 1 to 4. You can change these channels if you are shooting in the same area as another photographer using the Nikon Creative Lighting System (CLS). If you are both on the same channel, you will trigger each other’s Speedlights.
9 Press the OK button (![]() ). If you do not press this button, no changes are applied.
). If you do not press this button, no changes are applied.
Make sure you set all your Speedlights to the same channel or they will not fire.
Flash Sync Modes
Flash sync modes control how the flash operates in conjunction with your D7100. These modes work with both the built-in Speedlight and accessory Speedlights, such as the SB-910, SB-700, SB-600, and so on. These modes allow you to choose when the flash fires, either at the beginning of the exposure or at the end, and they also allow you to keep the shutter open for longer periods, enabling you to capture more ambient light in low-light situations.
Before covering the sync modes, however, I need to explain sync speeds.
Sync speed
The sync speed is the fastest shutter speed that you can use while achieving a full flash exposure. This means that if you set your shutter speed faster than the rated sync speed of the camera, you don’t get a full exposure and end up with a partially exposed image (the image will appear with a black bar at the bottom. With the D7100, you can’t actually set the shutter speed above the rated sync speed of 1/250 second when using the built-in flash, or a dedicated Speedlight, such as an SB-400 or SB-700, because the camera won’t let you. This means you don’t need to worry about having partially black images when using a Speedlight, but it may be something to consider if you use studio-type flash units at any time in the future.
Limited sync speeds exist because of the way shutters work in modern cameras. All dSLR cameras have a focal plane shutter. This shutter is located directly in front of the focal plane, which is the surface of the sensor. The focal plane shutter has two shutter curtains that travel vertically in front of the sensor to control the time the light can enter through the lens. At slower shutter speeds, the front curtain covering the sensor moves away, exposing the sensor to light for a set amount of time. When you have made the exposure, the second curtain moves in to block the light, thus ending the exposure.
To achieve shutter speeds faster than 1/250 second, the second curtain of the shutter starts closing before the first curtain has exposed the sensor completely. This means the sensor is actually exposed by a slit that travels along the height of the sensor. This allows your camera to have extremely fast shutter speeds, but it limits the flash sync speed because the entire sensor must be exposed to the flash at once to achieve a full exposure.
Front-curtain sync
Front-curtain sync ( ![]() ) is the default for your camera when you use the built-in flash or one of Nikon’s dedicated Speedlights. With Front-curtain sync, the flash fires as soon as the shutter’s front curtain fully opens. This mode works well with most general flash applications.
) is the default for your camera when you use the built-in flash or one of Nikon’s dedicated Speedlights. With Front-curtain sync, the flash fires as soon as the shutter’s front curtain fully opens. This mode works well with most general flash applications.
When you set the Shooting mode to Programmed auto ( ![]() ) or Aperture-priority auto (
) or Aperture-priority auto ( ![]() ), the shutter speed is automatically set at 1/60 second.
), the shutter speed is automatically set at 1/60 second.
Front-curtain sync works well when you use relatively fast shutter speeds. However, if you use Shutter-priority auto ( ![]() ) and the shutter speed is slowed down to 1/30 or slower (also known as dragging the shutter in flash photography) — especially when photographing moving subjects — Front-curtain sync causes your images to have an unnatural-looking blur in front of them. Ambient light reflecting off of the moving subject creates this effect.
) and the shutter speed is slowed down to 1/30 or slower (also known as dragging the shutter in flash photography) — especially when photographing moving subjects — Front-curtain sync causes your images to have an unnatural-looking blur in front of them. Ambient light reflecting off of the moving subject creates this effect.
When doing flash photography, your camera actually records two exposures concurrently: the flash exposure and the ambient light. When you use a faster shutter speed in lower light, the ambient light usually isn’t bright enough to have an effect on the image. When you slow down the shutter speed substantially, it allows the ambient light to be recorded to the sensor, causing ghosting. Ghosting is a partial exposure that usually appears transparent on the image.
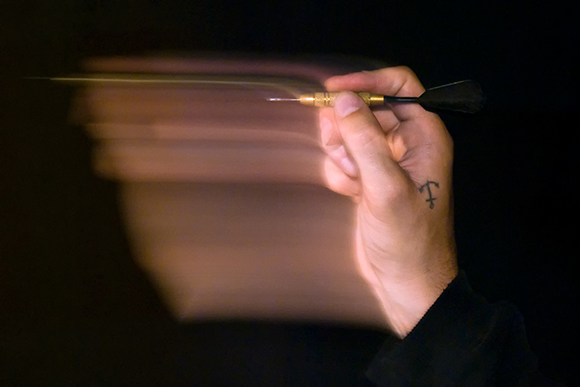
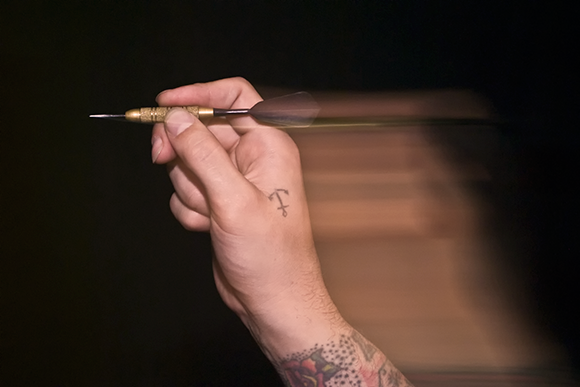
6.7 Front-curtain sync causes the image to have an unnatural looking blur in the front of the moving subject when dragging the shutter during flash exposures. Exposure: ISO 800, f/5, 1 second with 50mm f/1.8G.
Ghosting causes a trail to appear in front of the subject because the flash freezes the initial movement of the subject. Because the subject is still moving, the ambient light records it as a blur that appears in front of the subject, creating the illusion that it’s moving backward. To counteract this problem, you can use Rear-curtain sync ( ![]() ), which I explain later.
), which I explain later.
Slow sync
When doing flash photography at night, your subject is often lit well, but the background appears completely dark. Slow sync ( ![]() ) helps take care of this problem. In Slow sync (
) helps take care of this problem. In Slow sync ( ![]() ), the camera allows you to set a longer shutter speed (up to 30 seconds) to capture some of the ambient light of the background. This allows the subject and the background to be more evenly lit, and you can achieve a more natural-looking photograph.
), the camera allows you to set a longer shutter speed (up to 30 seconds) to capture some of the ambient light of the background. This allows the subject and the background to be more evenly lit, and you can achieve a more natural-looking photograph.
To avoid ghosting with Slow sync ( ![]() ), be sure that the subject remains still for the whole exposure. With longer exposures, you can use ghosting creatively.
), be sure that the subject remains still for the whole exposure. With longer exposures, you can use ghosting creatively.
Red-Eye Reduction
When using on-camera flash, such as the built-in flash, you often get the red-eye effect. This occurs because the pupils are wide open in the dark, and the light from the flash is reflected off the retina and back to the camera lens. Fortunately, the D7100 offers a Red-Eye Reduction mode ( ![]() ). When you activate this mode, the camera either turns on the AF-assist illuminator (when using the built-in flash) or fires some preflashes (when using an accessory Speedlight), which causes the pupils of the subject’s eyes to contract. This reduces the amount of light from the flash that reflects off the retina, thus reducing or eliminating the red-eye effect.
). When you activate this mode, the camera either turns on the AF-assist illuminator (when using the built-in flash) or fires some preflashes (when using an accessory Speedlight), which causes the pupils of the subject’s eyes to contract. This reduces the amount of light from the flash that reflects off the retina, thus reducing or eliminating the red-eye effect.
Rear-curtain sync
When using Rear-curtain sync ( ![]() ), the camera fires the flash at the end of the exposure just before the rear curtain of the shutter starts moving. This is useful when you take flash photographs of moving subjects. Rear-curtain sync (
), the camera fires the flash at the end of the exposure just before the rear curtain of the shutter starts moving. This is useful when you take flash photographs of moving subjects. Rear-curtain sync ( ![]() ) allows you to more accurately portray the motion of the subject by causing a motion blur trail behind the subject rather than in front of it, as is the case with Front-curtain sync mode (
) allows you to more accurately portray the motion of the subject by causing a motion blur trail behind the subject rather than in front of it, as is the case with Front-curtain sync mode ( ![]() ). You can also use Rear-curtain sync (
). You can also use Rear-curtain sync ( ![]() ) in conjunction with Slow sync (
) in conjunction with Slow sync ( ![]() ) to achieve Rear-curtain slow sync flash (
) to achieve Rear-curtain slow sync flash ( ![]() ).
).
6.8 Rear-curtain sync gives the image a more natural sense of movement with the blur following behind the subject. Exposure: ISO 800, f/5, 1 second with a 50mm f/1.8G.
Rear-curtain sync ( ![]() ) is available in all of the exposure modes: Programmed auto (
) is available in all of the exposure modes: Programmed auto ( ![]() ), Shutter-priority auto (
), Shutter-priority auto ( ![]() ), Aperture-priority auto (
), Aperture-priority auto ( ![]() ), and Manual (
), and Manual ( ![]() ); Slow rear-curtain sync mode (
); Slow rear-curtain sync mode ( ![]() ) is available only in Aperture Priority auto (
) is available only in Aperture Priority auto ( ![]() ), Programmed auto (
), Programmed auto ( ![]() ) or the Auto (
) or the Auto ( ![]() ) mode.
) mode.
Flash compensation
When you photograph subjects using flash, whether you’re using the built-in flash on your D7100 or an external Speedlight, there may be times when the flash causes your principal subject to appear too light or too dark. This usually occurs in difficult lighting situations, especially when you use i-TTL metering. Your camera’s meter can be fooled into thinking the subject needs more or less light than it actually does. This can happen when the background is very bright or very dark, or when the subject is off in the distance or very small in the frame.
Flash compensation allows you to manually adjust the flash output, while retaining the i-TTL readings so your flash exposure is at least in the ballpark. With the D7100, you can vary the output of your built-in flash’s TTL setting (or your own manual setting) from -3 Exposure Value (EV) to +1 EV. This means that if your flash exposure is too bright, you can adjust it down 3 full stops under the base setting. Or if the image seems underexposed or too dark, you can adjust it to be brighter by 1 full stop.
Press the Flash compensation button ( ![]() ) and rotate the sub-Command dial to apply flash compensation.
) and rotate the sub-Command dial to apply flash compensation.
Creative Lighting System Basics
The Creative Lighting System (CLS) is what Nikon calls its proprietary system of Speedlights and the technology that goes into them. The best part of CLS is the ability to control Speedlights wirelessly, which Nikon refers to as Advanced Wireless Lighting (AWL).
AWL allows you to get your Speedlights off-camera so that you can control light placement like a professional photographer would do with studio-type strobes.
To take advantage of AWL, all you need is your D7100, a Speedlight that can be used as a Commander (such as the current SB-910, SB-700, or SU-800, or the discontinued SB-800 or SB-900), and at least one remote Speedlight (such as the current SB-910, SB-700, or SBR-200, or the discontinued SB-600, SB-800, or SB-900).
For more information on using off-camera flash, see Chapter 9.
Communications between the commander flash and the remote units are accomplished by using pulse modulation. Pulse modulation means that the commanding Speedlight fires rapid bursts of light in a specific order. The pulses of light are used to convey information to the remote group, which interprets the bursts of light as coded information. The commander tells the other Speedlights in the system when and at what power to fire. You can also use an SB-700, SB-800, SB-900, or SB-910 Speedlight or an SU-800 Commander as a master. This allows you to control two separate groups of remote flashes and gives you an extended range.
In a nutshell, this is how the CLS works:
1 The commander unit sends instructions to the remote groups to fire a series of monitor preflashes to determine the exposure level. The camera’s i-TTL metering sensor reads the preflashes from all the remote groups and takes a reading of the ambient light.
2 The camera tells the commander unit the proper exposure readings for each group of remote Speedlights. When the shutter is released, the commander, via pulse modulation, relays the information to each group of remote Speedlights.
3 The remote units fire at the output specified by the camera’s i-TTL meter, and the shutter closes.
All of these calculations happen in a fraction of a second as soon as you press the shutter-release button. It almost appears to the naked eye as if the flash just fires once. There is little lag time waiting for the camera and the Speedlights to do the calculations.
The Nikon SB-400 cannot be used as a remote unit.
Light Modifiers
When you set up a photographic shot, you are building a scene using light. For some images, you may want a hard light that is very directional; for others, a soft, diffused light works better. Light modifiers allow you to control the light so you can direct it where you need it, give it the quality the image calls for, and even add color or texture to the image. There are many kinds of diffusers, but the following are the most common:
• Umbrella. The photographic umbrella is used to soften the light. You can either aim the light source through the umbrella or bounce the light from the inside of the umbrella, depending on the type of umbrella you have. Umbrellas are very portable and make a great addition to any Speedlight setup.
• Softbox. These also soften the light and come in a variety of sizes, from huge 8-foot softboxes to small 6-inch versions that fit right over your Speedlight mounted on the camera.
• Reflector. These are probably the handiest modifiers you can have. You can use them to reflect natural light onto your subject or to bounce light from your Speedlight onto the subject, making it softer. Some can act as diffusion material to soften direct sunlight. They come in a variety of sizes from 2 to 6 feet and fold up into a small, portable size. I recommend that every photographer have a small reflector in his or her camera bag.
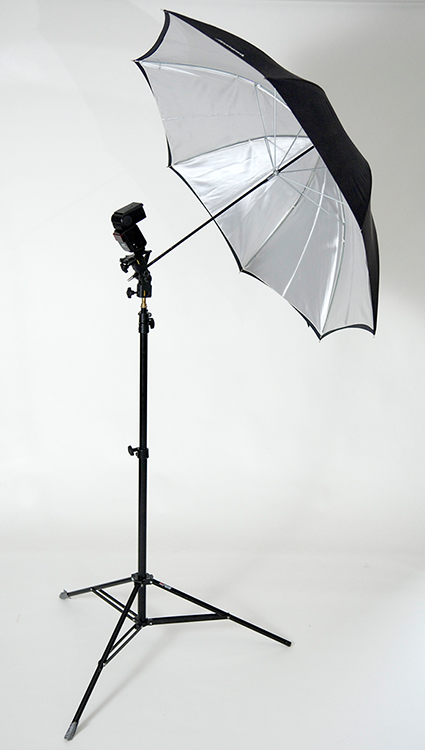
6.9 A Nikon Speedlight with an umbrella.
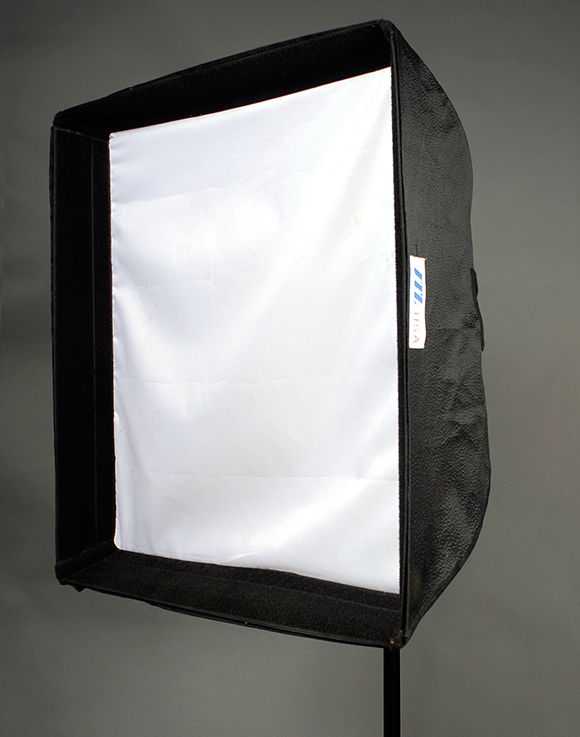
6.10 A medium-sized softbox.