
Chapter 7: Working with the Live View and Video Modes
Live View and HD video are standard on all of Nikon’s current dSLRs. Live View is a great feature that allows you to use the LCD monitor when shooting on a tripod or in the studio where the optical viewfinder may be a hindrance and when critical focus is a must.
The D7000 was Nikon’s first dSLR to offer manual exposure controls for video and true 1080p 24fps HD video. With the D7100, Nikon has upped the specifications even more almost matching the high-end D800 in performance. The D7100 not only allows you to record 1080p HD video, but allows more options for frame rates at full resolution, and it allows recording uncompressed HD video via the HDMI port as well as many other features not found on the D7000. The D7100 is a very capable HD video camera with a plethora of professional features.
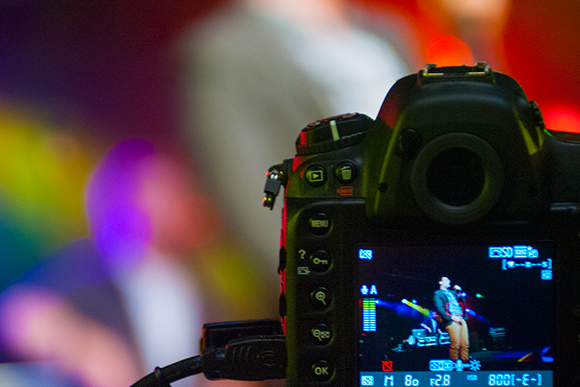
Many videographers are using dSLR cameras to record their projects.
Live View Mode
Live View mode ( ![]() ) is simply a live feed of what is being projected through the lens and onto the sensor. This live feed can also be used to produce a video. First things first: Decide whether you want to shoot still photos or record a video, then flip the Live View switch to the appropriate option; still photos (
) is simply a live feed of what is being projected through the lens and onto the sensor. This live feed can also be used to produce a video. First things first: Decide whether you want to shoot still photos or record a video, then flip the Live View switch to the appropriate option; still photos (![]() ) or video (
) or video ( ![]() ). Then activate Live View by pressing the Live View button (
). Then activate Live View by pressing the Live View button ( ![]() ). The Live View (
). The Live View ( ![]() ) button is located on the rear of the camera below the multi-selector. To shoot still photos simply half-press the shutter-release button as you normally would to focus when using the optical viewfinder and fully press the button to take the picture. To record video, press the movie-record button, which is located just behind and to the left of the shutter-release button.
) button is located on the rear of the camera below the multi-selector. To shoot still photos simply half-press the shutter-release button as you normally would to focus when using the optical viewfinder and fully press the button to take the picture. To record video, press the movie-record button, which is located just behind and to the left of the shutter-release button.
When the camera is set to ![]() you can press the shutter-release button to capture a still image in the 16:9 ratio at 1280 × 1080. Be aware that if you do this while the video is recording you will end the video recording.
you can press the shutter-release button to capture a still image in the 16:9 ratio at 1280 × 1080. Be aware that if you do this while the video is recording you will end the video recording.
When you use Live View mode ( ![]() ), shooting stills and videos are very similar. Although each feature has some options that the other doesn’t, I’m first going to cover the options they have in common.
), shooting stills and videos are very similar. Although each feature has some options that the other doesn’t, I’m first going to cover the options they have in common.
Focus modes
The D7100 offers three focus modes when using Live View mode ( ![]() ). These modes are similar in some ways to those you find when using the traditional through-the-viewfinder shooting method, are a bit different. When in Live View mode (
). These modes are similar in some ways to those you find when using the traditional through-the-viewfinder shooting method, are a bit different. When in Live View mode ( ![]() ), you change the focus mode by pressing the focus mode button while rotating the Main command dial.
), you change the focus mode by pressing the focus mode button while rotating the Main command dial.
There are two autofocus modes to choose from: Single-servo AF ( ![]() ) and Full-time Servo AF (
) and Full-time Servo AF ( ![]() ). You can also flip the focus mode switch to Manual focus (
). You can also flip the focus mode switch to Manual focus ( ![]() ) or slide the focus mode switch on the lens to Manual (if the lens features one). When the focus mode button is pressed the focus mode indicator is highlighted yellow in the monitor. When the monitor display is set to hide indicators the indicator will appear when the focus mode button is pressed (see Figure 7.1).
) or slide the focus mode switch on the lens to Manual (if the lens features one). When the focus mode button is pressed the focus mode indicator is highlighted yellow in the monitor. When the monitor display is set to hide indicators the indicator will appear when the focus mode button is pressed (see Figure 7.1).
7.1 The Focus mode and AF-area indicators are highlighted in yellow when the focus mode button is pressed.
Single-servo AF
This mode is the same as using Single-servo AF ( ![]() ) when shooting stills traditionally with the viewfinder method. Press the multi-selector up (
) when shooting stills traditionally with the viewfinder method. Press the multi-selector up ( ![]() ), down (
), down ( ![]() ), right (
), right ( ![]() ), or left (
), or left ( ![]() ) to move the focus point to your subject, and then press the shutter-release button halfway to focus. Fully press the shutter-release button when the scene is in focus and ready to shoot. Note that the D7100 takes a still photo in Single-servo AF mode (
) to move the focus point to your subject, and then press the shutter-release button halfway to focus. Fully press the shutter-release button when the scene is in focus and ready to shoot. Note that the D7100 takes a still photo in Single-servo AF mode ( ![]() ) even if the scene is out of focus when the shutter-release button is fully pressed. You follow the same procedure if you’ve selected
) even if the scene is out of focus when the shutter-release button is fully pressed. You follow the same procedure if you’ve selected ![]() , except that you press the movie-record button located just behind and to the left of the shutter-release button to start recording. You can focus first and then start recording, or you can start recording out of focus and then half-press the shutter-release button to focus in for a cinematic pull focus effect (this technique works a lot better when you manually focus however). Once the camera locks focus, it stays focused at that distance unless you press the shutter-release button again.
, except that you press the movie-record button located just behind and to the left of the shutter-release button to start recording. You can focus first and then start recording, or you can start recording out of focus and then half-press the shutter-release button to focus in for a cinematic pull focus effect (this technique works a lot better when you manually focus however). Once the camera locks focus, it stays focused at that distance unless you press the shutter-release button again.
For still photography, I recommend using Single-servo AF ( ![]() ) for stationary subjects like portraits, still life, products, and landscapes. For video, you need to be sure that your subject isn’t moving backward or forward by a large margin, especially if you’re using a wide aperture for shallow depth of field. Even the slightest change in distance can cause the subject to go out of focus. This setting is good for doing interviews or shooting scenes where there is not much subject movement.
) for stationary subjects like portraits, still life, products, and landscapes. For video, you need to be sure that your subject isn’t moving backward or forward by a large margin, especially if you’re using a wide aperture for shallow depth of field. Even the slightest change in distance can cause the subject to go out of focus. This setting is good for doing interviews or shooting scenes where there is not much subject movement.
Full-time Servo AF
Full-time Servo AF mode ( ![]() ) allows the camera to focus continuously (similar to when the shutter-release button is pressed halfway when using Continuous-servo AF mode (
) allows the camera to focus continuously (similar to when the shutter-release button is pressed halfway when using Continuous-servo AF mode ( ![]() )).
)).
When using Full-time Servo AF mode ( ![]() ) while recording video, you should be aware that the camera often hunts for focus, especially if you move or pan the camera. This can cause the video to go in and out of focus during your filming, which can cause your videos to look unprofessional (although some mockumentary videos use this for effect).
) while recording video, you should be aware that the camera often hunts for focus, especially if you move or pan the camera. This can cause the video to go in and out of focus during your filming, which can cause your videos to look unprofessional (although some mockumentary videos use this for effect).
The Autofocus modes, and the Single-servo AF ( ![]() ) and Full-time-servo AF (
) and Full-time-servo AF ( ![]() ) modes, operate in conjunction with the AF-area modes, which are covered in the next section.
) modes, operate in conjunction with the AF-area modes, which are covered in the next section.
AF-area modes
To make the Live View mode ( ![]() ) focusing quicker and easier, Nikon gives you different options for AF-area modes. The AF-area modes are different from the traditional through-the-viewfinder shooting AF-area modes. When in Live View mode (
) focusing quicker and easier, Nikon gives you different options for AF-area modes. The AF-area modes are different from the traditional through-the-viewfinder shooting AF-area modes. When in Live View mode ( ![]() ), you change the focus modes by pressing the focus mode button and rotating the sub-command dial. When the focus mode button is pressed the AF-area mode indicator is highlighted yellow in the monitor. When the monitor display is set to hide indicators the indicator appears when the focus mode button is pressed (see figure 7.1).
), you change the focus modes by pressing the focus mode button and rotating the sub-command dial. When the focus mode button is pressed the AF-area mode indicator is highlighted yellow in the monitor. When the monitor display is set to hide indicators the indicator appears when the focus mode button is pressed (see figure 7.1).
The following four options are found here:
All AF-area modes are disabled when you set the camera or lens to Manual focus ( ![]() ) or when you attach a manual-focus lens to the D7100.
) or when you attach a manual-focus lens to the D7100.
• Face-priority AF mode ( ![]() ). Use this mode for shooting portraits or snapshots of the family. You can choose the focus point, but the camera uses face recognition to focus on the face rather than something in the foreground or background. This can really be an asset when shooting in a busy environment, such as when a lot of distracting elements are in the background. When the camera detects a face in the frame, a double yellow border is displayed around the autofocus area. If the D7100 detects more than one face (the camera can read up to 35 faces), then it chooses the closest face as the focus point. You can use the multi-selector to choose a different face if you desire. When you use Face-priority AF mode (
). Use this mode for shooting portraits or snapshots of the family. You can choose the focus point, but the camera uses face recognition to focus on the face rather than something in the foreground or background. This can really be an asset when shooting in a busy environment, such as when a lot of distracting elements are in the background. When the camera detects a face in the frame, a double yellow border is displayed around the autofocus area. If the D7100 detects more than one face (the camera can read up to 35 faces), then it chooses the closest face as the focus point. You can use the multi-selector to choose a different face if you desire. When you use Face-priority AF mode ( ![]() ) to shoot group shots, I suggest using an aperture of f/5.6 or smaller to ensure greater depth of field to get all the faces in focus.
) to shoot group shots, I suggest using an aperture of f/5.6 or smaller to ensure greater depth of field to get all the faces in focus.
• Wide-area AF mode ( ![]() ). This mode makes the area from where the camera determines focus about four times the size of the Normal-area AF mode (
). This mode makes the area from where the camera determines focus about four times the size of the Normal-area AF mode ( ![]() ). This is good when you don’t need to be very critical about the point of focus in your image. For example, when shooting a far-off landscape, you really only need to focus on the horizon line. This is a good general mode for everyday use. You can move the autofocus area anywhere within the image frame.
). This is good when you don’t need to be very critical about the point of focus in your image. For example, when shooting a far-off landscape, you really only need to focus on the horizon line. This is a good general mode for everyday use. You can move the autofocus area anywhere within the image frame.
When using the Face-priority AF ( ![]() ), Normal-area AF (
), Normal-area AF ( ![]() ), or Wide-area AF (
), or Wide-area AF ( ![]() ) modes in Live View mode (
) modes in Live View mode (![]() ), press the OK button (
), press the OK button ( ![]() ) to quickly return the autofocus area to the center of the frame.
) to quickly return the autofocus area to the center of the frame.
• Normal-area AF mode ( ![]() ). This mode has a smaller autofocus point than Wide-area AF (
). This mode has a smaller autofocus point than Wide-area AF ( ![]() ), and you use it when you need to achieve focus on a very specific or precise area within the frame. This is the preferred mode when shooting with a tripod, or when shooting macros, still life, or portraits that require a more precise focus than Face-priority AF mode (
), and you use it when you need to achieve focus on a very specific or precise area within the frame. This is the preferred mode when shooting with a tripod, or when shooting macros, still life, or portraits that require a more precise focus than Face-priority AF mode ( ![]() ) provides (generally, portraits are focused on the eye closest to the camera).
) provides (generally, portraits are focused on the eye closest to the camera).
• Subject-tracking AF ( ![]() ). This is an interesting feature, especially when used in conjunction with video. Use the multi-selector to position the autofocus area over the top of the main subject in the image. Focus on the subject, and then press the OK button (
). This is an interesting feature, especially when used in conjunction with video. Use the multi-selector to position the autofocus area over the top of the main subject in the image. Focus on the subject, and then press the OK button ( ![]() ) to start tracking the subject. The autofocus area follows the subject as it moves around within the frame. Be aware, however, that this feature works best with slow to moderately paced subjects that stand out from the background. When using Subject-tracking AF mode (
) to start tracking the subject. The autofocus area follows the subject as it moves around within the frame. Be aware, however, that this feature works best with slow to moderately paced subjects that stand out from the background. When using Subject-tracking AF mode ( ![]() ) with very fast-moving subjects, the camera tends to lose the subject and lock onto something of a similar color and brightness within the frame. This mode also becomes less effective as the amount of light decreases. To disable subject tracking, simply press the OK button (
) with very fast-moving subjects, the camera tends to lose the subject and lock onto something of a similar color and brightness within the frame. This mode also becomes less effective as the amount of light decreases. To disable subject tracking, simply press the OK button ( ![]() ). This also resets the autofocus area to the center. To reactivate Subject-tracking AF mode (
). This also resets the autofocus area to the center. To reactivate Subject-tracking AF mode ( ![]() ), press the OK button (
), press the OK button ( ![]() ) again.
) again.
Using Live View mode
As you may already know, the image from the lens is projected to the viewfinder via a mirror that is in front of the sensor. There’s a semitransparent area in the mirror that acts as a beam splitter, which the camera uses for its normal phase-detection autofocus. For Live View mode ( ![]() ) to work, the mirror must be flipped up, which makes phase-detection autofocus unusable, so the camera uses contrast detection directly from the sensor to determine focus. This makes focusing in Live View mode (
) to work, the mirror must be flipped up, which makes phase-detection autofocus unusable, so the camera uses contrast detection directly from the sensor to determine focus. This makes focusing in Live View mode ( ![]() ) a bit slower than focusing normally. This makes Live View mode (
) a bit slower than focusing normally. This makes Live View mode ( ![]() ) a more challenging option to use when shooting moving subjects or events such as sports, where timing is the key element in capturing an image successfully.
) a more challenging option to use when shooting moving subjects or events such as sports, where timing is the key element in capturing an image successfully.
That being said, Live View mode ( ![]() ) is ideal when shooting in a controlled environment or studio setting, especially when using a tripod. You can move the focus area anywhere within the frame; you’re not limited to the 51-point autofocus array. Using Live View mode (
) is ideal when shooting in a controlled environment or studio setting, especially when using a tripod. You can move the focus area anywhere within the frame; you’re not limited to the 51-point autofocus array. Using Live View mode ( ![]() ) also allows you to achieve sharper images when doing long exposures because the mirror is already raised, eliminating any chance of mirror slap, which can sometimes cause images to blur slightly.
) also allows you to achieve sharper images when doing long exposures because the mirror is already raised, eliminating any chance of mirror slap, which can sometimes cause images to blur slightly.
Keep in mind that holding the camera at arm’s length when it’s in Live View mode ( ![]() ) increases the risk of blurry images due to added camera shake. Keep your elbows close to your sides for added stability.
) increases the risk of blurry images due to added camera shake. Keep your elbows close to your sides for added stability.
Shooting still photographs in Live View mode ( ![]() ) is very simple. Simply flip the switch to
) is very simple. Simply flip the switch to ![]() and press
and press ![]() to activate Live View mode (
to activate Live View mode ( ![]() ) and you’re ready to shoot. Use the multi-selector up (
) and you’re ready to shoot. Use the multi-selector up ( ![]() ), down (
), down ( ![]() ), right (
), right ( ![]() ), or left (
), or left ( ![]() ) to position the focus point. When in Single-servo AF mode (
) to position the focus point. When in Single-servo AF mode ( ![]() ), press the shutter-release button halfway to focus; in Full-time Servo AF mode (
), press the shutter-release button halfway to focus; in Full-time Servo AF mode ( ![]() ), wait until the camera achieves focus, and then fully press the shutter-release button to take the picture. To shoot video, make sure the switch is set to
), wait until the camera achieves focus, and then fully press the shutter-release button to take the picture. To shoot video, make sure the switch is set to ![]() and follow the same procedure, except when you want to start filming, press the Movie Record button.
and follow the same procedure, except when you want to start filming, press the Movie Record button.
When using Full-time Servo AF mode ( ![]() ), pressing the shutter-release button causes the camera to refocus before actually taking the photo.
), pressing the shutter-release button causes the camera to refocus before actually taking the photo.
When filming video, fully depressing the shutter-release button ends video recording and causes the D7100 to shoot a still frame.
When using Live View, the Info button ( ![]() ) performs some different functions than when it’s in standard shooting mode. Pressing this button cycles through a number of options for viewing the information laid over the Live View feed on the LCD monitor.
) performs some different functions than when it’s in standard shooting mode. Pressing this button cycles through a number of options for viewing the information laid over the Live View feed on the LCD monitor.
The options are:
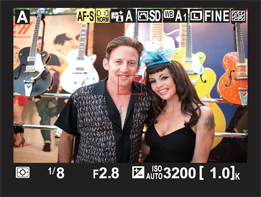
• Information on. This option displays the shooting options across the top of the frame. The settings that are shown include exposure modes, focus mode, focus area, Active D-Lighting, Picture Control, white balance, image size and quality, and image area. The bottom of the frame shows your standard shooting settings; metering mode, shutter and aperture settings, ISO sensitivity, and remaining exposures (see Figure 7.2).
7.2 The Show photo indicators option.
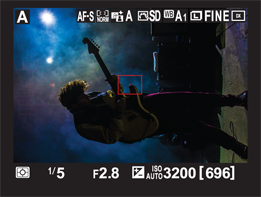
• Information off. This option hides all of the extraneous settings indicators in the frame and gives you a clear view so you can frame your shot without distractions. The shooting info is still displayed on the bottom.
• Virtual horizon. This displays the virtual horizon option, which allows you to level your camera using the sensor inside the camera and this visual aid. This is a great option to use when photographing landscapes to keep your horizons level.
• Framing grid. This is similar to the Information off option with the addition of a grid, which is helpful for keeping lines or horizons straight in your compositions or helping to compose with the Rule of Thirds.
The buttons on the back of the camera also have some features when using Live View mode ( ![]() ). Here are the options:
). Here are the options:
• Playback button ( ![]() ). Press this button to review your images or videos. Press it again to return to Live View mode (
). Press this button to review your images or videos. Press it again to return to Live View mode ( ![]() ).
).
• Menu button ( ![]() ). Press this button to access the menu system. Not all options are available. Press the Menu button (
). Press this button to access the menu system. Not all options are available. Press the Menu button ( ![]() ) again to return to Live View mode (
) again to return to Live View mode ( ![]() ).
).
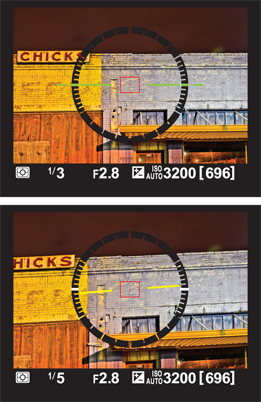
7.3 The virtual horizon. The top shows the camera when it’s level; the bottom shows the camera tilted at an angle.
• White balance button ( ![]() ). Press this button and rotate the Main-command dial to change the white balance settings and the sub command dial to fine-tune the white balance (right to add blue, left to add amber).
). Press this button and rotate the Main-command dial to change the white balance settings and the sub command dial to fine-tune the white balance (right to add blue, left to add amber).
• Zoom in button ( ![]() ). Press this button to zoom in on your focus point to check focus.
). Press this button to zoom in on your focus point to check focus.
• Thumbnail/Zoom out button ( ![]() ). Press this button to zoom out when you’re back to the standard framing; the shooting info bar reappears at the bottom of the screen. When the display is zoomed out all the way, pressing this button and rotating the Main command dial allows you to adjust the ISO sensitivity settings.
). Press this button to zoom out when you’re back to the standard framing; the shooting info bar reappears at the bottom of the screen. When the display is zoomed out all the way, pressing this button and rotating the Main command dial allows you to adjust the ISO sensitivity settings.
• i button ( ![]() ). A single press of this button brings up the Info edit menu. Press the i button (
). A single press of this button brings up the Info edit menu. Press the i button ( ![]() ) again to return to Live View mode (
) again to return to Live View mode ( ![]() ).
).
• AE-L/AF-L button ( ![]() ). This button functions as assigned in the Custom Setting menu (
). This button functions as assigned in the Custom Setting menu ( ![]() ) 4 when you press it.
) 4 when you press it.
When shooting in Live View ( ![]() ) you can quickly adjust some of the more important shooting options by pressing the i button (
) you can quickly adjust some of the more important shooting options by pressing the i button ( ![]() ). The following options can be set:
). The following options can be set:
• Image area. Choose between DX ( ![]() ) or 1.3X DX crop (
) or 1.3X DX crop ( ![]() ).
).
• Image quality. Here you can set how the images are recorded. You can choose RAW or JPEG and you can also choose how the JPEGs are compressed (Fine, Normal, or Basic). You can also set the camera to record RAW+JPEG with any of the JPEG compressions.
• Image size. You can set the JPEG file size here. The choices are small, medium, and large. When the Image quality is set to RAW, this option isn’t available.
• Picture Control. Set your Picture Controls here. You can also adjust the selected Picture Control by pressing multi-selector right ( ![]() ).
).
• Active D-Lighting. Change your Active D-Lighting options here. There are six options: Auto, Extra high, High, Normal, Low, and Off.
• Remote control mode (ML-L3). You can quickly change the options for using the optional ML-L3 wireless remote here.
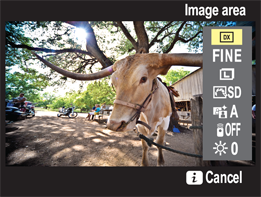
7.4 Options available when you press the i button in Live View still mode.
• Monitor brightness. Use this option to adjust how bright the monitor is. In dark locations you can set the brightness lower, or in bright situations, such as outside on a sunny day, you may need to brighten the monitor in order to see it more clearly. The monitor can be set to ±5.
Shooting and Editing Video
Using the video feature on the D7100 is quite simple: flip the Live View selector to movie mode ( ![]() ), activate Live View by pressing the Live View button (
), activate Live View by pressing the Live View button ( ![]() ), focus, and then press the Movie Record button. Now wait a second there, Tarantino. Before you press that Record button to make your Reservoir Dogs, you need to set up the camera.
), focus, and then press the Movie Record button. Now wait a second there, Tarantino. Before you press that Record button to make your Reservoir Dogs, you need to set up the camera.
The first thing you need to do is decide what exposure mode you want to use. This is a very important setting. The exposure mode you select determines whether you or the camera will choose the settings. Select one of the following options:
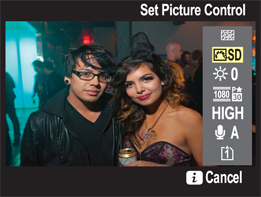
7.5 Options available when you press the i button in Live View video mode.
• Programmed auto ( ![]() ) or Shutter-priority auto (
) or Shutter-priority auto ( ![]() ) modes. These modes let the camera make all the exposure choices for you. When you press the Live View button (
) modes. These modes let the camera make all the exposure choices for you. When you press the Live View button (![]() ), the camera sets the shutter speed, aperture, and ISO sensitivity. While you’re filming, if the lighting changes, the camera adjusts the exposure by adjusting the ISO sensitivity; if the scene becomes too bright and the ISO can’t be lowered any further, the shutter speed is raised to keep a good exposure unless you lock the exposure by pressing the AE-L/AF-L button (
), the camera sets the shutter speed, aperture, and ISO sensitivity. While you’re filming, if the lighting changes, the camera adjusts the exposure by adjusting the ISO sensitivity; if the scene becomes too bright and the ISO can’t be lowered any further, the shutter speed is raised to keep a good exposure unless you lock the exposure by pressing the AE-L/AF-L button ( ![]() ). The only control you have over the exposure is the ability to adjust Exposure Compensation (
). The only control you have over the exposure is the ability to adjust Exposure Compensation ( ![]() ).
).
• Aperture-priority auto ( ![]() ). This mode allows you a little more control. You can set the aperture to control the depth of field, but the camera automatically controls the shutter speed and the ISO sensitivity. You can also use Exposure Compensation (
). This mode allows you a little more control. You can set the aperture to control the depth of field, but the camera automatically controls the shutter speed and the ISO sensitivity. You can also use Exposure Compensation ( ![]() ) to brighten or darken the image.
) to brighten or darken the image.
• Manual mode ( ![]() ). If you’re serious about video, this is the exposure mode you should be using. This mode lets you control the exposure by adjusting the aperture, shutter speed, and ISO setting yourself. It takes a little more time to set up, but this allows you to control not only the depth of field but also the amount of noise and the shutter speed effect if you want.
). If you’re serious about video, this is the exposure mode you should be using. This mode lets you control the exposure by adjusting the aperture, shutter speed, and ISO setting yourself. It takes a little more time to set up, but this allows you to control not only the depth of field but also the amount of noise and the shutter speed effect if you want.
When shooting using Manual exposure ( ![]() ) the aperture must be set before Live View (
) the aperture must be set before Live View ( ![]() ) is activated.
) is activated.
I suggest setting the ![]() button to AE-Lock (Hold) in
button to AE-Lock (Hold) in ![]() f4.
f4.
After you figure out and set the exposure mode there are a number of other settings that need to be adjusted. Luckily, Nikon makes this easy with the D7100; in previous cameras, you had to go through a number of menus to get everything set up. With the D7100, all you really need to do is press the i button ( ![]() ) and all of the necessary options are displayed. The options are:
) and all of the necessary options are displayed. The options are:
• Image area. Choose between DX ( ![]() ) or 1.3X DX crop (
) or 1.3X DX crop ( ![]() ). Generally it’s best to stick to the native size DX (
). Generally it’s best to stick to the native size DX ( ![]() ) unless you need to shoot in 1080i at 60fps (
) unless you need to shoot in 1080i at 60fps (![]() ), in which case you will have to set the camera to 1.3X crop (
), in which case you will have to set the camera to 1.3X crop ( ![]() ).
).
• Picture Control. As it does with your still images, the D7100 applies Picture Control settings to your movie. You can also create and use Custom Picture Controls that fit your specific application. One of my favorites is a Custom Picture Control that I created called Raging Bull; it uses the Monochrome Picture Control ( ![]() ) with added contrast and the yellow filter option. This gives me a black-and-white scene that’s reminiscent of the Martin Scorsese film of the same name. Before you start recording your video decide which Picture Control you want to use for your movie.
) with added contrast and the yellow filter option. This gives me a black-and-white scene that’s reminiscent of the Martin Scorsese film of the same name. Before you start recording your video decide which Picture Control you want to use for your movie.
• Monitor brightness. Use this option to adjust how bright the monitor is. In dark settings you can set the brightness lower or in bright situations such as outside on a sunny day you may need to brighten the monitor in order to see it more clearly. The monitor can be set to ±5.
• Frame size/frame rate. Choose the image size based on your intended output and preferred frame rate (see the section on frame rate and size later in this chapter). You have the following choices:
• 1920 × 1080; 60i ( ![]() )
)
• 1920 × 1080; 50i ( ![]() )
)
• 1920 × 1080; 30p ( ![]() )
)
• 1920 × 1080; 25p ( ![]() )
)
• 1920 × 1080; 24p ( ![]() )
)
• 1280 × 720; 60p ( ![]() )
)
• 1280 × 720; 50p (![]() )
)
The ( ![]() ) and (
) and ( ![]() ) options are only available when the Image area mode is set to 1.3X crop mode (
) options are only available when the Image area mode is set to 1.3X crop mode ( ![]() ).
).
• Movie quality. You have two choices: High and Normal. The difference comes down to bit rate. At higher bit rates, more information is being recorded, resulting in better color rendition and dynamic range; of course, higher bit rates also mean more data and larger file sizes. Keep in mind that High quality movie clips are limited to 20 minutes and Normal quality clips can be up to 29 minutes and 59 seconds. Again, your choice comes down to your intended output. For the web, Normal quality is fine; for viewing on HDTVs, stick with High quality. Notice that when the quality is set to High a small star appears in the Frame size/frame rate icon.
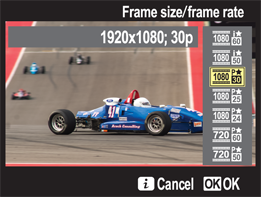
7.6 The Frame size/frame rate screen.
• Microphone. Auto works for most general filming, but for a more consistent sound in a controlled environment, you can set the microphone sensitivity manually. You can monitor the levels when filming. When recording sound to an external source you may want to turn the microphone off. Most professional filmmakers prefer to record the audio to a separate file using a dedicated sound recording system for higher audio quality. The video and sound files are later synced in postproduction editing.
Although sound may be recorded to an external source some software requires the original source audio to sync the video and audio sources. Check your editing software to determine whether you need to keep the microphone on.
• Destination. Use this option to determine to which slot the video files are recorded. If there’s only one card in the camera the movie automatically saves files to it regardless of which slot is selected.
When two cards are inserted into the camera, you can select one of them to be dedicated to video in the Movie Settings→Destination option in the Shooting Menu.
Shutter Speed
In filmmaking, there’s a concept called the 180-degree shutter rule. Without getting into why it has this name, the 180-degree shutter rule states that your shutter speed should be about twice your frame rate for natural-looking images. So, for 1080p at 24 fps ( ![]() ), you should use a shutter speed of 1/50 second; for 1080p at 30 fps (
), you should use a shutter speed of 1/50 second; for 1080p at 30 fps ( ![]() ), use a speed of 1/60 second; and at 1080i at 60 fps (
), use a speed of 1/60 second; and at 1080i at 60 fps ( ![]() ) and 720p at 60 fps (
) and 720p at 60 fps ( ![]() ), shoot at 1/125 second. This gives the video just enough blur to make it look natural to human eyes. Slower shutter speeds give the video a smeared appearance, although the D7100 avoids this by not allowing you to set the shutter speed slower than the frame rate.
), shoot at 1/125 second. This gives the video just enough blur to make it look natural to human eyes. Slower shutter speeds give the video a smeared appearance, although the D7100 avoids this by not allowing you to set the shutter speed slower than the frame rate.
On the opposite end of the spectrum, faster shutter speeds can cause the video to appear slightly jerky. This is because just as when shooting a still image the action is frozen (remember, videos are just stills played in succession), and as the subject moves through the frame, there is no motion blur to make it look more natural to the eyes. Of course, you can use the jerky, fast shutter speed as an effect as well. Movies such as Saving Private Ryan, 300, and Gladiator used this effect in the action scenes.
Frame size and frame rate
The D7100 offers a few different options for recording video. There are two size settings for HD video with six frame rate options. The HD video sizes are 1920 × 1080 and 1280 × 720. When people are discussing video frame size they usually refer to it by the height number (1080 or 720) because of the way the image is progressively recorded (from top to bottom), but more on that later.
The 1080 video size has more resolution and therefore holds more detail and has less noise in low light. Most professionals prefer to shoot in 1080 and downsize later if necessary. There are, however, some reasons for shooting in 720. For example, the file sizes are smaller and, if you’re only shooting videos to post to YouTube or Vimeo or some other online source, you don’t really need the higher resolution. If you plan to make DVDs to show on an HDTV, then the extra resolution of 1080p is going to make quite a difference in quality. So, it boils down to your intended output.
An important part of video capture is frame rate. This is the rate at which the still images are recorded, and it is expressed in terms of frames per second (fps). At the end of the resolution number (1080 or 720), there is another number in subscript (24, 25, 30, 50, or 60). This subscript number is the frame rate. Video capture involves recording still images, linking them together, and then playing them back one after another in sequence. This allows the still images to appear as if they’re moving. Most video cameras capture video at 30 or 60 fps. A rate of 30 fps is generally considered the best for smooth-looking video. Shooting at 24 fps is the minimum rate required to fool the human eye into seeing seamless motion. This is the frame rate that film-based motion pictures use, so 24 fps gives HD video a cinema-like quality.
The 25p and 50p frame rates are made for use in the European market, which uses PAL for video as opposed to NTSC for the Americas.
The frame rate you select is dependent on a few different factors. Most seasoned videographers prefer 30 fps for the smooth video look and the way that it portrays motion more naturally. Some videographers like to use 60 fps as well. This frame rate is generally used when shooting fast action or doing a lot of quick pans as the faster minimum shutter speed allows the camera to eliminate artifacts such as skew than can occur when doing a fast pan, skew causes the horizontal elements in a video to appear as if they are leaning. When a camera is panned back and forth quickly skew can make the video look wobbly, which some videographers refer to as the “jello” effect. When shooting fast action such as sports most videographers will recommend 60 fps. Shooting at 60 fps is also a way in which videographers can create smooth slow motion by slowing the 60 fps footage down to 30 fps and using it with the regular footage that was shot at 30 fps.
Some filmmakers who started out using film and have recently transitioned to HDSLR video prefer the 24 fps film look. This is also the preferred frame rate if the footage is going to be intercut with footage that was digitized from actual film stock.
You may have also noticed a little subscript p or i near the icon. If you’re familiar with HD, you’ve probably heard the terms progressive and interlaced. Your D7100 has an HDMI (High-Definition Multimedia Interface) output setting, which you can find in the Setup menu ( ![]() ). Here, you can choose between progressive and interlaced resolutions. Interlaced video scans every other line that makes up the picture, although the picture appears as if it is being displayed all at once. Progressive scanning displays single lines of the image from top to bottom. As with interlaced technology, all of this happens too fast for the human eye to detect the separate changes, and so everything appears to happen all at once.
). Here, you can choose between progressive and interlaced resolutions. Interlaced video scans every other line that makes up the picture, although the picture appears as if it is being displayed all at once. Progressive scanning displays single lines of the image from top to bottom. As with interlaced technology, all of this happens too fast for the human eye to detect the separate changes, and so everything appears to happen all at once.
You may be wondering why all of the options are 1080p, 720p, or 424p except for one — the1080i at 60 fps. This option creates manageable file sizes that are roughly the same as 1080p. Because the camera records every other line, it only records a real 30 fps.
In-camera video editing
You can make simple edits to your videos in-camera; for more serious edits, you need to think about using third-party software, such as iMovie for Mac or Adobe Premiere Elements for Mac or PC. These are affordable, entry-level editing programs, but as you progress, you may need to step up to more powerful programs such as Final Cut Pro from Apple or Adobe Premiere Pro. In-camera, you have three options: choose the start point, choose the end point, and grabbing a still image from the video. To edit a video, follow these steps:
1 Press the Menu ( ![]() ) button and use the multi-selector to select the Retouch menu (
) button and use the multi-selector to select the Retouch menu ( ![]() ). You can also press the Playback button (
). You can also press the Playback button ( ![]() ), select the video, and then press the i button (
), select the video, and then press the i button ( ![]() ).
).
2 Select Edit Movie, and then press the OK button ( ![]() ) or the multi-selector right (
) or the multi-selector right ( ![]() ) to view the menu options.
) to view the menu options.
3 Choose the type of edit that you want to make, and then press the OK button ( ![]() ) or the multi-selector right (
) or the multi-selector right ( ![]() ). The options are Choose start/end point, or Save selected frame. A menu appears with all videos that are saved to the current memory card. (When the movie is selected directly from the Playback screen, this option doesn’t appear.)
). The options are Choose start/end point, or Save selected frame. A menu appears with all videos that are saved to the current memory card. (When the movie is selected directly from the Playback screen, this option doesn’t appear.)
4 Use the multi-selector to scroll through the available videos until the one you want is highlighted in yellow, and then press the OK button ( ![]() ).
).
5 Press the OK button ( ![]() ) to begin playback, and then press the multi-selector up (
) to begin playback, and then press the multi-selector up ( ![]() ) at the point in the video where you want to make the edit. You can press the multi-selector down (
) at the point in the video where you want to make the edit. You can press the multi-selector down ( ![]() ) to stop playback, and multi-selector left (
) to stop playback, and multi-selector left ( ![]() ) or right (
) or right ( ![]() ) to go back or forward in the video clip. If you are using the Choose start/end point option press
) to go back or forward in the video clip. If you are using the Choose start/end point option press ![]() /protect to switch between the starting and ending points.
/protect to switch between the starting and ending points.
6 Press the multi-selector up ( ![]() ) to make the edit. I prefer to have the movie paused when making the edit so I can be absolutely sure it is where I want the edit to be. A dialog box appears with saving options.
) to make the edit. I prefer to have the movie paused when making the edit so I can be absolutely sure it is where I want the edit to be. A dialog box appears with saving options.
7 Select the desired option from the dialog box. You have four options.
• Save as new file. This option saves the edited movie as a new file and retains the original full length clip. This is my recommended option.
• Overwrite existing file. This replaces the original version with the edited video. There is no way to recover the original footage.
• Cancel. This cancels the edit saving no changes.
• Preview. This allows you to view the edited clip before saving.
8 Use the multi-selector to highlight the preferred option and press ![]() .
.
When playing back movie files, you can use the Command dial to jump ahead in 10-second increments. If the clip is less than 10 seconds long, it jumps to the end of the clip. Use the sub-command dial to jump to the end.