
Chapter 3. Writing a chat application
This chapter covers
- Asking the user for input
- Creating a command-line interface
- Parsing and generating JSON
- Transferring data over the network
- Using and creating modules
In the previous chapter, you learned the basics of the Nim programming language, including the syntax, some of the built-in types, how to define variables and procedures, how to use control-flow statements, and much more.
In this chapter, you’ll build on and solidify that knowledge by developing a fully functional chat application. You’ll also learn many new concepts that are essential to the development of certain applications. In particular, you’ll do the following:
- Build a command-line interface, which can be used to ask the user for input.
- Learn how to use sockets to transfer data over networks, such as the internet.
- Use a JSON parser to build a simple chat protocol. The application will use this protocol to exchange messages in a standard and consistent manner.
- Learn how to use modules to separate your code into standalone units, which will make your code more reusable.
With the popularity of the internet, computer networks have become increasingly important. The most basic feature of the internet is the transfer of data, but implementing this feature isn’t always easy at the programming language level. In creating this chapter’s chat application, you’ll learn the basics of transferring data between multiple computers.
By the end of this chapter, you’ll have successfully written an application consisting of two different components: a server and a client. You’ll be able to send the client to your friends and use it to chat with each other in real time over the internet.
The source code for all the examples in this book is available on GitHub at https://github.com/dom96/nim-in-action-code.
Let’s begin by exploring how the application will work and what it will look like.
3.1. The architecture of a chat application
The main purpose of a chat application is to allow multiple people to communicate using their personal computers. One way to accomplish this is by using a network that these computers are connected to, like the internet, and sending data over it.
Unlike applications such as Facebook Messenger or WhatsApp, which are primarily used for one-to-one communication, the chat application developed in this chapter will primarily support group communication (many-to-many) similar to Internet Relay Chat (IRC) or Slack. This means that a single message will be sent to multiple users.
3.1.1. What will the finished application look like?
Let’s say I just watched the latest Game of Thrones episode and am now excited to talk with my friends about it. I’ll call them John and Grace, in case they don’t appreciate me using their real names in this book. The conversation might go something like this (no Game of Thrones spoilers, I promise).
Listing 3.1. Conversation between me, John, and Grace about Game of Thrones
Dominik said: What did you guys think about the latest Game of Thrones
episode?
Grace said: I thought Tyrion was really great in it!
John said: I agree with Grace. Tyrion deserves an Emmy for his performance.
At the end of this chapter, you’ll have built an application that will allow this discussion to take place. Let’s see what the finished application will look like in the context of the preceding conversation.
I first asked John and Grace what they thought of the latest Game of Thrones episode. I did this by entering my message into the chat application and pressing the Enter key to send it (figure 3.1).
Figure 3.1. My screen after I send the message

Both John and Grace will receive this message on their computers, and the client application will show it to both of them in the same way (figure 3.2). Note how my message is prefixed by “Dominik said,” letting John and Grace know who sent the message.
Figure 3.2. John’s and Grace’s screens

Grace can now answer my question by typing in her response and pressing Enter; John and I will receive her reply. This way, we can have a discussion over the internet relatively easily.
This should give you an idea of what you’re aiming to achieve by the end of this chapter. Sure, it might not be as impressive as a full-blown application with a graphical user interface, but it’s a start.
Now let’s move on to discussing some of the basic aspects of this application, in particular, its network architecture.
Network architectures and models
There are two primary network architectures that can be used for this application: peer-to-peer networking and the client-server model. With peer-to-peer networking, there’s no server; instead, each client is connected to multiple other clients that then exchange information between each other. With the client-server model, there’s a single server to which all the clients connect. The messages are all sent to the server, and the server redistributes them to the correct clients. Figure 3.3 shows how these models compare.
Figure 3.3. Client-server vs. peer-to-peer

The client-server model is the simpler of the two, and because it works well for the kind of application that you’ll be writing, we’ll use it.
Another thing to consider is the transport protocol, which you’ll use to transfer messages in your application. The two major protocols in use today are TCP and UDP. They’re used widely for many different types of applications, but they differ in two important ways.
The most important feature of TCP is that it ensures that messages are delivered to their destination. Extra information is sent along with the messages to verify that they have been delivered correctly, but this comes at the cost of some performance.
UDP doesn’t do this. With UDP, data is sent rapidly, and the protocol doesn’t check whether the data arrives at its destination. This makes UDP perform better than TCP, but data transmission is less reliable.
Chat applications should be efficient, but reliable delivery of messages is more important. Based on this aspect alone, TCP wins.
Networking
There’s a vast amount of information about networking that’s outside the scope of this book. I encourage you to research this topic further if it’s of interest to you.
The client and server components
Now that you know a bit about the networking side of things, let’s look at how the software will actually work. The plan is to create two separate applications, or components: a server component and a client component.
When the server first starts, it will begin listening for connections from a client on a specific port. The port will be hardcoded into the server and chosen ahead of time so it won’t conflict with any other application. I wouldn’t want it to prevent you from enjoying a good game of Counter-Strike, would I? Once a connection on that port is detected, the server will accept it and wait for messages from it. A newly received message will be sent to any other client whose connection was previously accepted by the server.
When the client first starts, it will connect to the server address that the user specified on the command line. Once it successfully connects, the user of the client will be able to send messages to the server by inputting them through the command line. The client will also actively listen for messages from the server, and once a message is received, it will be displayed to the user.
Figure 3.4 shows how the chat application operates in a simple use case involving three clients. Dom, John, and Grace are all running clients connected to the server. In the figure, Dom sends a “Hello” message using their client. The server will accept this message and pass it on to other clients currently connected to it.
Figure 3.4. The operation of the chat application

You should now have a good idea of how the chat application will work. The next section will show you how to implement it.
3.2. Starting the project
The previous section outlined how the chat application will work. This section describes the first steps needed to begin the project. This chapter is an exercise, and I encourage you to follow along, developing the application as you read it.
You might find this surprising, but starting a project in Nim is very quick and easy. You can simply open your favorite text editor, create a new file, and start coding.
But before you do that, you should decide on a directory layout for your project. This is entirely optional—the compiler won’t mind if you save all your code in C:code, but doing so is bad practice. You should ideally create a new directory just for this project, such as C:codeChatApp (or ~/code/ChatApp). Inside the project directory, create a src directory to store all your source code. In the future you can, when necessary, create other directories such as tests, images, docs, and more. Most Nim projects are laid out this way, as illustrated in the following listing. This project is small, so it will only use the src directory for now.
Listing 3.2. Typical directory layout for a Nim project

- 1 The root directory of the MyAwesomeApp project
- 2 Holds all the executables for this project
- 3 Holds all the images for this project
- 4 Holds all the Nim source code files related to this project
- 5 Holds all the Nim source code files that contain tests for the files in src
Project directory layout
A good project directory layout is very beneficial, especially for large applications. It’s better to set it up sooner rather than later. Separating your application source code from your tests means that you can easily write test code that doesn’t conflict or otherwise affect your application. In general, this separation also makes code navigation easier.
Now create a client.nim file in the src directory. This file will compile into a client executable and act as the client component of the chat application. You’re now ready to start writing code.
As a small test, begin by writing the following into your new client.nim file, and then save it:
echo("Chat application started")
To compile your new client.nim file, follow these steps.
- Open a new terminal window.
- cd into your project directory by executing cd ~/code/ChatApp, replacing ~/code/ChatApp with the path to your project directory.
- Compile the client.nim file by executing nim c src/client.nim.
Aporia
If you’re using Aporia, you can just press F4 or select Tools > Compile Current File in the menu bar to compile the currently selected tab. You can also press F5 to compile and run.
If you’ve done everything correctly, you should see the results shown in figure 3.5 in your terminal window.
Figure 3.5. Successful compilation of client.nim

Output directory
By default, the Nim compiler will produce the executable beside the Nim source code file that was compiled. You can use the -o flag to change this. For example, nim c -o:chat src/client.nim will place a chat executable in the current directory.
Assuming that the compilation was successful, the executable that was created by the compiler can now be started. To execute it, use the ./src/client command, or .srcclient.exe if you’re on Windows. This should display “Chat application started” on the screen and then exit.
You now have a good starting point for further development. We started out slowly, and so far your application isn’t doing much. But it gives you an idea of how application development in Nim should be initiated, and it ensures that the Nim compiler works correctly on your computer.
Now that you’ve made a start on this project, let’s move on to the first task: the command-line interface.
3.3. Retrieving input in the client component
Applications typically expect to receive some sort of guidance from the user, such as the URL of a website to navigate to or the filename of a video to play. Applications need this guidance because, sadly, they can’t (yet) read our intentions directly from our brains. They need explicit instructions in the form of commands or mouse clicks. The simplest way to guide a piece of software is to give it an explicit command.
The client component of the chat application will need the following input: the address of the server to send messages to and one or more messages to send to the server. These are the minimum inputs the user will need to provide to the chat application. You need both a way to ask the user for specific input and a way to then get the data that the user enters using their keyboard.
Let’s focus on the minimum data that we need from the user. The address of the server to connect to is somewhat critical, because it’s needed before the client can do anything. We should ask the user for it as soon as the client starts. Until the client connects to the server, the user won’t be able to send any messages, so asking the user for a message will come after.
3.3.1. Retrieving command-line parameters supplied by the user
On the command line, there are two ways you can get data from the user:
- Through command-line parameters, which are passed to your application when it’s started
- Through the standard input stream, which can be read from at any time
Typically, a piece of information such as the server address would be passed to an application through command-line parameters, because the server address needs to be known when the application starts.
In Nim, command-line parameters can be accessed via the paramStr procedure defined in the os module. But before this procedure can be used, it must be imported. Let’s extend client.nim so that it reads the first command-line parameter. Code additions are shown in bold.
Listing 3.3. Reading command-line parameters
import os                                                              1
echo("Chat application started")
if paramCount() == 0:                                                  2
  quit("Please specify the server address, e.g. ./client localhost")   3

let serverAddr = paramStr(1)                                           4
echo("Connecting to ", serverAddr)                                     5
- 1 This is required in order to use the paramCount and paramStr procedures defined in the os module.
- 2 Ensures that the user has specified a parameter on the command line
- 3 Stops the application prematurely because it can’t continue without that parameter
- 4 Retrieves the first parameter that the user specified and assigns it to the new serverAddr variable
- 5 Displays the message “Connecting to <serverAddr>” to the user, where <serverAddr> is the address the user specified
It’s always important to check the number of parameters supplied to your executable. The paramCount procedure returns the number of parameters as an integer. The preceding example checks whether the number of parameters is 0, and if so, it calls the quit procedure with a detailed message of why the application is exiting. If supplied with a message, quit first displays that message and then quits with an exit code that tells the OS that the application failed.
When the user does supply the command-line parameter, the paramStr procedure is used to retrieve the first parameter supplied. An index of 1 is used because the executable name is stored at an index of 0. The first command-line parameter is then bound to the serverAddr variable.
Warning: Executable name
Don’t retrieve the executable name via paramStr(0), as it may give you OS-specific data that’s not portable. The get-AppFilename procedure defined in the os module should be used instead.
Warning: Always use paramCount
When accessing a parameter with paramStr that doesn’t exist (for example, paramStr(56) when paramCount() == 1), an IndexError exception is raised. You should always use paramCount ahead of time to check the number of parameters that have been supplied.
The last line in listing 3.3 uses the echo procedure to display the string "Connecting to " appended to the contents of the serverAddr variable on the screen. The echo procedure accepts a variable number of arguments and displays each of them on the same line.
Parsing command-line parameters
Applications typically implement a special syntax for command-line arguments. This syntax includes flags such as --help. The parseopt module included in Nim’s standard library allows these parameters to be parsed. There are also other, more intuitive packages created by the Nim community for retrieving and parsing command-line parameters.
Recompile your new client.nim module as you did in the previous section, and execute it as you did previously. As you can see in figure 3.6, the application will exit immediately with the message “Please specify the server address, e.g. ./client localhost.”
Figure 3.6. Starting the client without any parameters

Now, execute it with a single parameter, as shown in the message: src/client localhost. Figure 3.7 shows that the application now displays the message “Connecting to localhost.”
Figure 3.7. Starting the client with one parameter

Now, try specifying different parameters and see what results you get. No matter how many parameters you type, as long as there’s at least one, the message will always consist of "Connecting to " followed by the first parameter that you specified.
Figure 3.8 shows how the command-line parameters map to different paramStr indexes.
Figure 3.8. The supplied command-line parameters and how to access them

Now that the client successfully captures the server address, it knows which server to connect to. You now need to think about asking the user for the messagethat they want to send.
3.3.2. Reading data from the standard input stream
Unlike the command-line parameters, which are passed to the application before it starts, messages are provided by the user in real time, in response to messages they receive from other users. This means that the application should ideally always be ready to read data from the user.
When an application is running inside of a terminal or command line, characters can be typed in the terminal window. These characters can be retrieved by the application through the standard input stream. Just like in Python, the standard input stream can be accessed via the stdin variable. In Nim, this variable is defined in the implicitly imported system module, and it’s of type File, so the standard input stream can be read from just like any other File object. Many procedures are defined for reading data from a File object. Typically, the most useful is readLine, which reads a single line of data from the specified File.
Add the following code to the bottom of client.nim, and then recompile and run it (you can do so quickly with the following command: nim c -r src/client.nim localhost).
Listing 3.4. Reading from the standard input stream
let message = stdin.readLine()                1
echo("Sending "", message, """)             2
- 1 Reads a single line of text from the standard input stream and assigns it to the message variable.
- 2 Displays the message “Sending “<message>”,” where <message> is the content of the message variable, which contains the line of texst the user typed into their terminal window
Character escape sequences
The last line in listing 3.4 uses a character-escape sequence to show the double quote (") character. This needs to be escaped because the compiler would otherwise think that the string literal has ended.
You’ll see that your application no longer exits immediately. Instead, it waits for you to type something into the terminal window and press Enter. Once you do so, a message is displayed with the text that you typed into the terminal window.
Reading from the standard input stream will cause your application to stop executing—your application transitions into a blocked state. The execution will resume once the requested data is fully read. In the case of stdin.readLine, the application remains blocked until the user inputs some characters into the terminal and presses Enter. When the user performs those actions, they’re essentially storing a line of text into the stdin buffer.
Blocking is an unfortunate side effect of most input/output (I/O) calls. It means that, sadly, your application won’t be able to do any useful work while it’s waiting for the user’s input. This is a problem, because this application will need to actively stay connected to the chat server, something it won’t be able to do if it’s waiting for the user to type text into the terminal window. Figure 3.9 shows the problem that this causes.
Figure 3.9. Problem caused by the client being blocked indefinitely

Before we move on to solving that problem, there’s something missing from listing 3.4. The code only reads the message once, but the aim is to allow the user to send multiple messages. Fixing this is relatively simple. You just need to introduce an infinite loop using the while statement. Simply wrap the code in listing 3.4 in a while statement as follows:
while true:                                      1
  let message = stdin.readLine()                 2
  echo("Sending "", message, """)              2
- 1 The while statement will repeat the statements in its body as long as its condition is true. In this case, it will repeat the following two statements until the application is closed manually by the user.
- 2 These two lines will be repeated an infinite number of times because they’re indented under the while statement.
Now compile and run your code again to see for yourself what the result is. You should be able to input as many lines of text as you wish into the terminal window, until you terminate your application by pressing Ctrl-C.
When you terminate your application, you should see a traceback similar to the following:
Traceback (most recent call last)
client.nim(9)            client
sysio.nim(115)           readLine
sysio.nim(72)            raiseEIO
system.nim(2531)         sysFatal
SIGINT: Interrupted by Ctrl-C.
Terminating your application is a very good way to determine which line of code is currently being executed. In the traceback, you can see that when the application was terminated, line 9 in client.nim was being executed. This corresponds to let message = stdin.readLine(), which is the blocking readLine call that waits for input from the user.
Figure 3.10 shows the current flow of execution in client.nim. The main thread is blocked as it waits for input from the user. As a result, the application will sit idle until the user wakes it up by typing some text into the terminal window and pressing Enter.
Figure 3.10. Blocking execution of client.nim

This is an inherent issue with blocking I/O operations. You wouldn’t need to worry about it if the client only needed to react to the user’s input, but, unfortunately, the client must keep a persistent connection to the server in order to receive messages from other clients-.
3.3.3. Using spawn to avoid blocking input/output
There are a number of ways to ensure that your application doesn’t block when it reads data from the standard input stream.
One is to use asynchronous input/output, which allows the application to continue execution even if the result isn’t immediately available. Unfortunately, the standard input stream can’t be read asynchronously in Nim, so asynchronous I/O can’t be used here. It will be used later, when it’s time to transfer data over a network.
The other solution is to create another thread that will read the standard input stream, keeping the main thread unblocked and free to perform other tasks. Every process consists of at least one thread known as the main thread—all of the code in client .nim is currently executed in this main thread. The main thread becomes blocked when the call to readLine is made, and it becomes unblocked when the user inputs a single line into the terminal. But a separate thread can be created to make the call to readLine, in order to leave the main thread active. The newly created thread is the one that becomes blocked. This approach of using two threads is called parallelism. We won’t look at the full details of parallelism and how it works in Nim in this chapter, but we’ll discuss it in chapter 6.
A procedure can be executed in a new thread using the spawn procedure. Replace the while statement that you created previously with the following one, but don’t compile the code just yet:
while true:
  let message = spawn stdin.readLine()         1
  echo("Sending "", ^message, """)           2
- 1 The spawn keyword is used to call the readLine procedure. This will spawn a new thread and execute readLine there.
- 2 The value returned from the thread isn’t immediately available, so you must read it explicitly with the ^ operator.
The readLine procedure returns a string value, but when this procedure is executed in another thread, its return value isn’t immediately available. To deal with this, spawn returns a special type called FlowVar[T], which holds the value that the procedure you spawned returns.
The ^ operator can be used to retrieve the value from a FlowVar[T] object, but there’s no value until the spawned procedure returns one. When the FlowVar[T] object is empty, the ^ operator will block the current thread until a value has been stored. If it’s not empty in the first place, the ^ operator will return immediately with the value. That’s why the preceding code will behave much like the code in listing 3.4.
You can also check whether a FlowVar[T] type contains a value by using the isReady procedure. You can use that procedure to avoid blocking behavior.
See figure 3.11 to see how the two different threads interact with each other. Compare it to figure 3.10 to see how the execution of the client changed after the introduction of spawn.
Figure 3.11. Blocking execution of client.nim with spawn

There’s now a secondary readLine thread, but the result is the same. Both the main thread and the readLine thread become blocked, creating the same results.
Listing 3.5 shows how you can modify client.nim to use spawn, with the changed lines in bold. One key point to note is that the spawn procedure is defined in the threadpool module, so you must remember to import it via import threadpool.
Generics are a feature of Nim that you’ll be introduced to in full detail in chapter 9. For now, all you need to know is that FlowVar[T] is a generic type that can store values of any type. The type of the value that’s stored is specified in the square brackets.
For example, the spawn stdin.readLine() expression returns a FlowVar[string] type because the return type of readLine is a string, and FlowVar wraps the return value of the spawned procedure.
Applying the spawn call to any procedure that returns a string will return a Flow-Var[string] value:
import threadpool
proc foo: string = "Dog"
var x: FlowVar[string] = spawn foo()
assert(^x == "Dog")
To successfully compile the preceding example, make sure you use the --threads :on flag.
Listing 3.5. Spawning readLine in a new thread
import os, threadpool

echo("Chat application started")
if paramCount() == 0:
  quit("Please specify the server address, e.g. ./client localhost")
let serverAddr = paramStr(1)
echo("Connecting to ", serverAddr)
while true:
  let message = spawn stdin.readLine()
  echo("Sending "", ^message, """)
Compilation now requires the --threads:on flag to enable Nim’s threading support. Without it, spawn can’t function. To compile and run the client.nim file, you should now be executing nim c -r --threads:on src/client.nim localhost.
Nim config files
Flags such as --threads:on can accumulate quickly, but the Nim compiler supports config files, which save you from having to retype all these flags on the command line. Simply create a client.nims file (beside the client.nim file) and add --threads:on there. Each flag needs to be on its own line, so you can add extra flags by separating them with newlines. To learn more about this configuration system, see the NimScript page: https://nim-lang.org/docs/nims.html.
The client application still functions the same way as before, but the changes to the code that reads the standard input stream will be useful later on in this chapter.
In the next section, I’ll show you how to add asynchronous networking code, allowing the client application to connect to the server. The server itself will use the same asynchronous I/O approach to communicate with more than one client at a time.
You’ve now seen how to read input from the user in two different ways: from command-line parameters and from the standard input stream while your application is running. You also learned about the problem of blocking I/O, and I showed you one way to solve it. Now let’s move on to writing the protocol for your chat application.
3.4. Implementing the protocol
Every application that communicates over a network with another application needs to define a protocol for that communication to ensure that the two applications can understand each other. A protocol is similar to a language—it’s a standard that’s mostly consistent and that can be understood by both of the communicating parties. Imagine trying to communicate in English with somebody who can speak only Chinese. As in figure 3.12, you won’t understand them, and they won’t understand you. Similarly, the different components in your application must use the same language to understand each other.
Figure 3.12. Good and bad protocols

It’s important to remember that even if protocols are well defined, there’s still plenty of room for error, such as if the message isn’t transmitted correctly. This is why it’s vital that the code that parses messages can handle incorrectly formatted messages, or messages that don’t contain the necessary data. The code that I’ll show you in this section won’t go to great lengths to verify the validity of the messages it receives. But I will encourage you later on to add exception-handling code to verify the validity of messages and to provide the users of your code with better exception messages.
Code that parses and generates a message is easy to test, so in this section, I’ll also show you some basic ways to test your code.
The chat application’s protocol will be a simple one. The information that it will transfer between clients consists of two parts: the message that the user wants to send to the other clients, and the user’s name. There are many ways that this information could be encoded, but one of the simplest is to encode it as a JSON object. That’s what I’ll show you how to do.
3.4.1. Modules
You’ve already seen many examples of modules, but I haven’t yet explained precisely what a module is. Your client.nim file is itself a module, and you’ve also imported modules from Nim’s standard library into your code using the import keyword. The upcoming message parser should ideally be written in a separate module, so it’s a good practical example to use as I teach you about modules.
Many programming languages today utilize a module system. Nim’s module system is rather simple: every file ending with a .nim extension is a module. As long as the compiler can find the file, then it can be successfully imported.
A module system allows you to separate the functionality of your application into independent modules. One advantage of this is that modules are interchangeable. As long as the interface of the module remains the same, the underlying implementation can be changed. Later on, you can easily use something other than JSON to encode the messages.
By default, everything you define in a module is private, which means that it can only be accessed inside that module. Private definitions ensure that the implementation details of modules are hidden, whereas public definitions are exposed to other modules. In some languages, the public and private keywords are used to specify the visibility of a definition.[1]
In particular, C++ and Java use the public and private keywords to denote the visibility of identifiers.
In Nim, each definition is private by default. You can make a definition public by using the * operator. The * can be placed at the end of procedure names, variable names, method names, and field names.
The basics of the module system should be easy to grasp. There are some extra things to be aware of, but this should be enough to get you started writing simple modules. Chapter 4 looks at modules in more depth.
To create a module for your new message parser, simply create a new file named protocol.nim in the src directory beside the client.nim file.
Listing 3.6 shows the definition of the Message type, which will store the two pieces of information that a message from the server contains: the username of the client and the actual message. Both of these definitions are exported using the * marker.
At the end, the parseMessage procedure is defined. It takes in a data parameter that contains the raw string received from a server. The parseMessage procedure then returns a new Message object containing the parsed data. This procedure is also exported, and together with the Message type it forms the public interface of the protocol module.
Listing 3.6. Message type definition and proc stub
type
  Message* = object                                1
    username*: string                              2
    message*: string

proc parseMessage*(data: string): Message =        3
  discard                                          4
- 1 Defines a new Message type. The * export marker is placed after the name of the type.
- 2 Field definitions follow the type definition and are exported in a similar way.
- 3 Defines a new parseMessage procedure. The export marker is also used to export it.
- 4 The discard is necessary because the body of a procedure can’t be empty.
Add the code in listing 3.6 to the protocol module you created, and make sure it compiles with nim c src/protocol.
Now, let’s move on to implementing the parseMessage procedure.
3.4.2. Parsing JSON
JSON is a very simple data format. It’s widely used, and Nim’s standard library has support for both parsing and generating it. This makes JSON a good candidate for storing the two message fields.
A typical JSON object contains multiple fields. The field names are simple quoted strings, and the values can be integers, floats, strings, arrays, or other objects.
Let’s look back to the conversation about Game of Thrones in listing 3.1. One of the first messages that I sent was, “What did you guys think about the latest Game of Thrones episode?” This can be represented using JSON like so.
Listing 3.7. A representation of a message in JSON
{                                                                         1
  "username": "Dominik",                                                  2
  "message": "What did you guys think about the latest Game of Thrones
     episode?"                                                            3
}
- 1 The curly brackets define an object.
- 2 The username field with the corresponding value
- 3 The message field with the corresponding value
Parsing JSON is very easy in Nim. First, import the json module by adding import json to the top of your file. Then, replace the discard statement in the parseMessage proc with let dataJson = parseJson(data). The next listing shows the protocol module with the additions in bold.
Listing 3.8. Parsing JSON in protocol.nim
import json
type
  Message* = object
    username*: string
    message*: string

proc parseMessage*(data: string): Message =
  let dataJson = parseJson(data)
The parseJson procedure defined in the json module accepts a string and returns a value of the JsonNode type.
JsonNode is a variant type. This means that which fields in the object can be accessed is determined by the value of one or more other fields that are always defined in that type. In the case of JsonNode, the kind field determines the kind of JSON node that was parsed.
A variant type is an object type whose fields change depending on the value of one or more fields. An example will make this clearer:
type
  Box = object                                    1
    case empty: bool                              2
    of false:                                     3
      contents: string                            4
    else:
      discard                                     5

var obj = Box(empty: false, contents: "Hello")    6
assert obj.contents == "Hello"                    8

var obj2 = Box(empty: true)
echo(obj2.contents)                               9
- 1 A variant type is defined much like other object types.
- 2 The difference is the case statement under the definition of the object. This defines an empty field in this type.
- 3 If the empty field is false, the fields defined under this branch will be accessible.
- 4 The contents field will be accessible if empty == false.
- 5 No additional fields are defined if empty == true.
- 6 When the empty field is set to false in the constructor, the contents field can also be specified.
- 7 Because obj.empty is false, the contents field can be accessed.
- 8 This will result in an error because the contents field can’t be accessed, because empty is true.
The preceding code shows how an ordinary box that may be empty can be modeled. The end of the listing shows an erroneous case where the contents of an empty box are accessed. It should be no surprise that compiling and running that code will result in an error:
Traceback (most recent call last)
variant.nim(13)          variant
system.nim(2533)         sysFatal
Error: unhandled exception: contents is not accessible [FieldError]
This is a very simple variant type with only two states. You can also use enum types in the case statement of a variant type. This is common and is used in the Json-Node type.
There are seven different kinds of JSON values. The JsonNodeKind type is an enum with a value for each kind of JSON value. The following listing shows a list of various JSON values together with the JsonNodeKind types that they map to.
Listing 3.9. The mapping between JSON values and the JsonNodeKind type
import json
assert parseJson("null").kind == JNull
assert parseJson("true").kind == JBool
assert parseJson("42").kind == JInt
assert parseJson("3.14").kind == JFloat
assert parseJson(""Hi"").kind == JString
assert parseJson("""{ "key": "value" }""").kind == JObject
assert parseJson("[1, 2, 3, 4]").kind == JArray
When you’re parsing arbitrary JSON data, a variant type is required because the compiler has no way of knowing at compile time what the resulting JSON type should be. The type is only known at runtime. This is why the parseJson procedure returns a JsonNode type whose contents differ depending on the kind of JSON value that was passed into it.
The last two JSON values shown in listing 3.9 are collections. The JObject kind represents a mapping between a string and a JsonNode. The JArray kind stores a list of JsonNodes.
You can access the fields of a JObject by using the [] operator. It’s similar to the array and sequence [] operator but takes a string as its argument. The string determines the field whose value you want to retrieve from the JObject. The [] operator returns a JsonNode value.
import json
let data = """
  {"username": "Dominik"}
"""

let obj = parseJson(data)                          1
assert obj.kind == JObject                         2
assert obj["username"].kind == JString             3
assert obj["username"].str == "Dominik"            4
- 1 Parses the data string and returns a JsonNode type, which is then assigned to the obj variable
- 2 The returned JsonNode has a JObject kind because that’s the kind of the JSON contained in the data string.
- 3 Fields are accessed using the [] operator. It returns another JsonNode, and in this case its kind is a JString.
- 4 Because the [] operator returns a JsonNode, the value that it contains must be accessed explicitly via the field that contains it. In JString’s case, this is str. Generally you’re better off using the getStr proc.
Warning: The kind matters
Calling the [] operator with a string on a JsonNode whose kind field isn’t JObject will result in an exception being raised.
So, how can you retrieve the username field from the parsed JsonNode? Simply using dataJson["username"] will return another JsonNode, unless the username field doesn’t exist in the parsed JObject, in which case a KeyError exception will be raised. In the preceding code, the JsonNode kind that dataJson["username"] returns is JString because that field holds a string value, so you can retrieve the string value using the getStr procedure. There’s a get procedure for each of the JsonNode kinds, and each get procedure will return a default value if the type of the value it’s meant to be returning doesn’t match the JsonNode kind.
The default value for get procedures
The default value returned by the get procedures can be overridden. To override, pass the value you want to be returned by default as the second argument to the procedure; for example, node.getStr("Bad kind").
Once you have the username, you can assign it to a new instance of the Message type. The next listing shows the full protocol module with the newly added assignments in bold.
Listing 3.10. Assigning parsed data to the result variable
import json
type
  Message* = object
    username*: string
    message*: string

proc parseMessage*(data: string): Message =
  let dataJson = parseJson(data)
  result.username = dataJson["username"].getStr()          1
  result.message = dataJson["message"].getStr()            2
- 1 Gets the value under the “username” key and assigns its string value to the username field of the resulting Message
- 2 Does the same here, but instead gets the value under the “message” key
Just add two lines of code, and you’re done.
You may be wondering where the result variable comes from in listing 3.10. The answer is that Nim implicitly defines it for you. This result variable is defined in all procedures that are defined with a return type:
proc count10(): int =
  for i in 0 .. <10:         1
    result.inc
assert count10() == 10
- 1 The < operator subtracts 1 from its input, so it returns 9 here.
This means that you don’t need to repeatedly define a result variable, nor do you need to return it. The result variable is automatically returned for you. Take a look back at section 2.2.3 for more info.
You should test your code as quickly and as often as you can. You could do so now by starting to integrate your new module with the client module, but it’s much better to test code as separate units. The protocol module is a good unit of code to test in isolation.
When testing a module, it’s always good to test each of the exported procedures to ensure that they work as expected. The protocol module currently exports only one procedure—the parseMessage procedure—so you only need to write tests for it.
There are multiple ways to test code in Nim, but the simplest is to use the doAssert procedure, which is defined in the system module. It’s similar to the assert procedure: it takes one argument of type boolean and raises an AssertionFailed exception if the value of that boolean is false. It differs from assert in one simple way: assert statements are optimized out when you compile your application in release mode (via the -d:release flag), whereas doAssert statements are not.
Release mode
By default, the Nim compiler compiles your application in debug mode. In this mode, your application runs a bit slower but performs checks that give you more information about bugs that you may have accidentally introduced into your program. When deploying your application, you should compile it with the -d:release flag, which puts it in release mode and provides optimal performance.
Let’s define an input and then use doAssert to test parseMessage’s output.
Listing 3.11. Testing your new functionality
when isMainModule:                                              1
  block:                                                        2
    let data = """{"username": "John", "message": "Hi!"}"""     3
    let parsed = parseMessage(data)                             4
    doAssert parsed.username == "John"                          5
    doAssert parsed.message == "Hi!"                            6
- 1 The when statement is a compile-time if statement that only includes the code under it if its condition is true. The isMainModule constant is true when the current module hasn’t been imported. The result is that the test code is hidden if this module is imported.
- 2 Begins a new scope (useful for isolating your tests)
- 3 Uses the triple-quoted string literal syntax to define the data to be parsed. The triple-quoted string literal means that the single quote in the JSON doesn’t need to be escaped.
- 4 Calls the parseMessage procedure on the data defined previously
- 5 Checks that the username that parseMessage parsed is correct
- 6 Checks that the message that parseMessage parsed is correct
Add the code in listing 3.11 to the bottom of your file, and then compile and run your code. Your program should execute successfully with no output.
This is all well and good, but it would be nice to get some sort of message letting you know that the tests succeeded, so you can just add echo("All tests passed!") to the bottom of the when isMainModule block. Your program should now output that message as long as all the tests pass.
Try changing one of the asserts to check for a different output, and observe what happens. For example, removing the exclamation mark from the doAssert parsed.message == "Hi!" statement will result in the following error:
Traceback (most recent call last)
protocol.nim(17) protocol
system.nim(3335) raiseAssert
system.nim(2531) sysFatal
Error: unhandled exception: parsed.message == "Hi"  [AssertionError]
If you modify the protocol module and break your test, you may find that suddenly you’ll get such an error.
You now have a test for the correct input, but what about incorrect input? Create another test to see what happens when the input is incorrect:
block:
  let data = """foobar"""
  let parsed = parseMessage(data)
Compile and run protocol.nim, and you should get the following output:
Traceback (most recent call last)
protocol.nim(21) protocol_progress
protocol.nim(8)  parseMessage
json.nim(1086)   parseJson
json.nim(1082)   parseJson
json.nim(1072)   parseJson
json.nim(561)    raiseParseErr
Error: unhandled exception: input(1, 5) Error: { expected [JsonParsingError]
An exception is raised by parseJson because the specified data isn’t valid JSON. But this is what should happen, so define that in the test by catching the exception and making sure that an exception has been raised.
block:
  let data = """foobar"""
  try:
    let parsed = parseMessage(data)
    doAssert false                      1
  except JsonParsingError:              2
    doAssert true
  except:
    doAssert false
- 1 This line should never be executed because parseMessage will raise an exception.
- 2 Make sure that the exception that’s thrown is the expected one.
An ideal way for the parseMessage proc to report errors would be by raising a custom exception. But this is beyond the scope of this chapter. I encourage you to come back and implement it once you’ve learned how to do so. For now, let’s move on to generating JSON.
3.4.3. Generating JSON
You successfully parsed the JSON, so let’s move on to generating JSON. The protocol module needs to be capable of both parsing and generating messages. Generating JSON is even simpler than parsing it.
In Nim, JSON can be generated in multiple ways. One way is to simply create a string containing the correct JSON concatenated with values, as you did in your first test. This works, but it’s error prone because it’s easy to miss certain syntactical elements of JSON.
Another way is to construct a new JsonNode and convert it to a string using the $ operator. Let’s do that now. Start by defining a new createMessage procedure, and then use the % operator to create a new JsonNode object. The following listing shows how the createMessage procedure can be defined.
Listing 3.12. Creating a new message
proc createMessage*(username, message: string): string =
  result = $(%{                                               1
    "username": %username,                                    2
    "message": %message
  }) & "cl"                                                 3
- 1 The $ converts the JsonNode returned by the % operator into a string.
- 2 The % converts strings, integers, floats, and more into the appropriate JsonNodes.
- 3 A carriage return and the line feed characters are added to the end of the message. They act as separators for the messages.
Table constructor syntax
The {:} syntax used in listing 3.12 is called a table constructor. It’s simply syntactic sugar for an array constructor. For example, {"key1": "value1", "key2": "value2"} is the same as [("key1", "value1"), ("key2, "value2")].
The % operator is very powerful because it can convert a variety of different value types into appropriate JsonNode types. This allows you to create JSON using a very intuitive syntax.
The $ operator is, by convention, the operator used to convert any type to a string value. In the case of a JsonNode, the $ operator defined for it will produce a valid JSON string literal representation of the JsonNode object that was built.
The addition of the carriage return and line feed, which some OSs use to signify newlines, will be useful later on when the client and server components need to receive messages. They’ll need a way to determine when a new message stops and another begins. In essence, these characters will be the message separators. In practice, any separator could be used, but the cl sequence is used in many other protocols already and it’s supported by Nim’s networking modules.
Just like with the parseMessage procedure, you should add tests for the createMessage procedure. Simply use doAssert again to ensure that the output is as expected. Remember to include cl in your expected output. The following code shows one test that could be performed—add it to the bottom of protocol.nim:
block:
  let expected = """{"username":"dom","message":"hello"}""" & "cl"      1
  doAssert createMessage("dom", "hello") == expected
- 1 Note that triple-quoted string literals don’t support any character-escape sequences at all. As a workaround, I simply concatenate them.
Recompile your module and run it to ensure that the tests pass. You can also extend the tests further by checking different inputs, such as ones containing characters that have a special meaning in JSON (for example, the " character).
If all the tests pass, you’ve successfully completed the protocol module. You’re now ready to move on to the final stage of developing this application!
3.5. Transferring data using sockets
You’re now well on your way to completing this chat application. The protocol module is complete and the client module has mostly been completed. Before you finish the client module, let’s look at the so-far-completely neglected server.
The server module is one of the most important modules. It will be compiled separately to produce a server binary. The server will act as a central hub to which all the clients connect.
The server will need to perform two primary tasks:
- Listen for new connections from potential clients
- Listen for new messages from clients that have already connected to the server
Any messages that the server receives will need to be sent to every other client that is currently connected to it.
Figure 3.4, from earlier in the chapter, showed the basic operation of the server and the clients. It was a simplified diagram, without any protocol details. Now that you’re familiar with the protocol the chat application will be using, I can show you the exact messages that will be sent in figure 3.4.
First, assume that the server has successfully accepted connections from Dom, John, and Grace. The following events occur:
- Dom sends a message to the server.
{"username": "Dom", "message": "Hello"}cl - The server passes this message on to the other clients: John and Grace.
{"username": "Dom", "message": "Hello"}cl
The server simply passes any messages that it receives to the other clients. For simplicity, the identity of the clients is not verified, so it’s possible for them to impersonate other users. At the end of this chapter, we’ll consider ways to improve this application, and security will be one aspect that you’ll be encouraged to reinforce.
For now, though, let’s create the server module. You can begin by defining the types that will be used by it. First, create a new server.nim file in the src directory. Then, create the types shown in the following listing.
Listing 3.13. Standard library imports and type definitions
import asyncdispatch, asyncnet             1

type                                       2
  Client = ref object                      3
    socket: AsyncSocket                    4
    netAddr: string                        5
    id: int                                6
    connected: bool                        7

  Server = ref object                      8
    socket: AsyncSocket                    9
    clients: seq[Client]                   10
- 1 Imports the asyncdispatch and asyncnet modules, which contain the procedures and types needed to use asynchronous sockets
- 2 Starts a new type section
- 3 Defines the Client type as a reference type
- 4 Specifies the socket belonging to the client; the AsyncSocket type is an asynchronous socket
- 5 The field that stores the address from which this client has connected
- 6 The identification number of this client
- 7 A flag that determines whether this client is still connected
- 8 Defines the Server type as a reference type
- 9 The server socket for accepting new client connectionsA list of Client objects that have connected
- 10 A list of Client objects that have connected
The Server and Client types are both defined as reference types, which you might recall from chapter 2. Being defined this way allows procedures that take these types as arguments to modify them. This will be essential, because new elements will need to be added to the clients field when new clients connect.
The Server type holds information that’s directly related to the server, such as the server socket and the clients that have connected to it. Similarly, the Client type represents a single client that connected to the server, and it includes fields that provide useful information about each client. For example, the netAddr field will contain the IP address of the client, and the id field will hold a generated identity for each client, allowing you to distinguish between them. The connected flag is important because it tracks whether the client is still connected. The server needs to know this, because it shouldn’t attempt to send messages to a disconnected client.
All that’s left now is to create a constructor for the newly defined Server type.
Constructors in Nim are simply procedures with a specific naming convention. Nim doesn’t include any special syntax for defining constructors, but it does include some simple syntax for constructing your custom types, which you may recall from chapter 2.
Tuples can be constructed by placing values in parentheses: type
type
  Point = tuple[x, y: int]

var point = (5, 10)
var point2 = (x: 5, y: 10)
Objects, including ref objects, can be constructed by calling the type—as if it were a procedure—and then specifying each field name and value separated by a colon:
type
  Human = object
    name: string
    age: int

var jeff = Human(name: "Jeff", age: 23)
var alex = Human(name: "Alex", age: 20)
There’s no way to override these, so if you need more-complex constructors, you’ll need to define a procedure. There’s a convention in Nim for naming these constructor procedures; this table shows these conventions and how they apply to different type definitions.
Constructor naming conventions
|
Type definition |
Name |
|---|---|
| MyType = object | initMyType |
| MyTypeRef = ref object | newMyTypeRef |
| MyTuple = tuple[x, y: int] | initMyTuple |
For a ref type, such as the Server type, the procedure should be named newServer:
proc newServer(): Server = Server(socket: newAsyncSocket(), clients: @[])
This will create a new instance of the Server type and initialize its socket and clients sequence. You can now call this procedure and assign it to a new server variable.
var server = newServer()
Add the newServer procedure and server variable definitions below the types created in listing 3.13. The resulting code gives you a good base to begin adding the networking code to.
But before we get into that, let’s look at how networking, particularly asynchronous networking, works in Nim. We’ll begin by looking at the basic tool used to transfer data over a network: a socket.
3.5.1. What is a socket?
In almost every programming language, transferring data over a network is done using network sockets. In Nim, a network socket is represented using the Socket type. This type is defined in the net module, and a new instance of it can be created using the newSocket procedure.
Sockets share some similarities with file descriptors in that they support operations such as write, read, open, and close. But in practice, sockets differ enough to expose a different interface. Table 3.1 shows some of the common socket procedures and their file descriptor equivalents.
Table 3.1. Common socket procedures
|
Procedure |
File equivalent |
Description |
|---|---|---|
| recv | read | Allows incoming data to be read from the remote side. For TCP sockets, recv is used, and for UDP sockets, recvFrom is used. |
| send | write | Sends data to a socket, allowing data to be sent to the remote side. For TCP sockets, send is used, and for UDP sockets, sendTo is used. |
| connect | open | Connects a socket to a remote server. This is typically only used for TCP sockets. |
| bindAddr | None | Binds a socket to the specified address and port. When called, the socket becomes a server socket, and other sockets can connect to it. This is typically only used for TCP sockets. |
Sockets can be customized a great deal by specifying different options in the newSocket constructor. By default, the newSocket constructor will create a TCP socket, which is handy because TCP is the protocol that the chat application will use.
TCP is a connection-oriented transport protocol that allows the socket to be used as a server or as a client. A newly created TCP socket is neither until the bindAddr or connect procedure is called. The former transforms it into a server socket, and the latter a client socket. We’ll create a server socket first, as that’s what is needed for the server component of this application.
A server socket’s main purpose is to listen for new connections and accept them with as little delay as possible. But before this can be done, the socket must first be bound to an address and port. Figure 3.13 shows the procedures that need to be called to successfully create and bind a server socket.
Figure 3.13. The steps needed to start accepting new connections on a server socket

First, every server socket needs to be explicitly bound to a specific port and address. This can be done using the bindAddr procedure, which takes a port as the first argument and an address as the second. By default, the address is simply localhost, but the port must always be specified. You can specify whatever port you wish, but there are some ports that are often used by other applications, such as port 80, which is used by HTTP servers. Also, binding to a port less than or equal to 1024 requires administrator privileges.
Second, before the socket can start accepting connections, you must call the listen procedure on it. The listen procedure tells the socket to start listening for incoming connections.
New connections can then be accepted by using the accept procedure. This procedure returns a new client socket, which corresponds to the socket that just connected to the address and port specified in the call to bindAddr.
Details about sockets
Don’t worry about remembering all the details in this section. Use it as a reference together with the next sections, which will show you how to put this knowledge into practice.
Much like reading data from the standard input, the accept procedure blocks your application until a new connection is made. This is a problem, but one that’s easy to solve thanks to Nim’s support for asynchronous sockets. Asynchronous sockets don’t block and can be used instead of synchronous sockets without much trouble. They’re defined in the asyncnet module, and I’ll explain how they work in the next section.
3.5.2. Asynchronous input/output
Nim supports many abstractions that make working with asynchronous I/O simple. This is achieved in part by making asynchronous I/O very similar to synchronous I/O, so your I/O code doesn’t need to be particularly complex.
Let’s first look at the accept procedure in more detail. This procedure takes one parameter, a server socket, which is used to retrieve new clients that have connected to the specified server socket.
The fundamental difference between the synchronous and asynchronous versions of the accept procedure is that the synchronous accept procedure blocks the thread it’s called in until a new socket has connected to the server socket, whereas the asynchronous accept procedure returns immediately after it’s called.
But what does the asynchronous version return? It certainly can’t return the accepted socket immediately, because a new client may not have connected yet. Instead, it returns a Future[AsyncSocket] object. To understand asynchronous I/O, you’ll need to understand what a future is, so let’s look at it in more detail.
The Future type
A Future is a special type that goes by many names in other languages, including promise, delay, and deferred. This type acts as a proxy for a result that’s initially unknown, usually because the computation of its value is not yet complete.
You can think of a future as a container; initially it’s empty, and while it remains empty you can’t retrieve its value. At some unknown point in time, something is placed in the container and it’s no longer empty. That’s where the name future comes from.
Every asynchronous operation in Nim returns a Future[T] object, where the T corresponds to the type of value that the Future promises to store in the future.
The Future[T] type is defined in the asyncdispatch module, and you can easily experiment with it without involving any asynchronous I/O operations. The next listing shows the behavior of a simple Future[int] object.
Listing 3.14. Simple Future[int] example
import asyncdispatch                                       1

var future = newFuture[int]()                              2
doAssert(not future.finished)                              3

future.callback =                                          5
  proc (future: Future[int]) =                             5
    echo("Future is no longer empty, ", future.read)       6

future.complete(42)                                        7
- 1 The asyncdispatch module needs to be imported because it defines the Future[T] type.
- 2 A new future can be initialized with the newFuture constructor.
- 3 A future starts out empty; when a future isn’t empty, the finished procedure will return true.
- 4 A callback can be set, and it will be called when the future’s value is set.
- 5 The callback is given the future whose value was set as a parameter.
- 6 The read procedure is used to retrieve the value of the future.
- 7 A future’s value can be set by calling the complete procedure.
Futures can also store an exception in case the computation of the value fails. Calling read on a Future that contains an exception will result in an error.
To demonstrate the effects of this, modify the last line of listing 3.14 to future.fail(newException(ValueError, "The future failed")). Then compile and run it.
The application should crash with the following output:
Traceback (most recent call last)
system.nim(2510)         ch3_futures
asyncdispatch.nim(242)   fail
asyncdispatch.nim(267)   :anonymous
ch3_futures.nim(8)       :anonymous
asyncdispatch.nim(289)   read
Error: unhandled exception: The future failed
  unspecified's lead up to read of failed Future:           1
    Traceback (most recent call last)
    system.nim(2510)         ch3_futures
    asyncdispatch.nim(240)   fail [Exception]
- 1 unspecified is the name of the Future. It’s called unspecified because the future is created with no name. You can name futures for better debugging by specifying a string in the newFuture constructor.
As you can see, the error message attempts to include as much information as possible. But the way it’s presented isn’t ideal. The error messages produced by futures are still being worked on and should improve with time. It’s a good idea to get to know what they look like currently, as you’ll undoubtedly see them when writing asynchronous applications in Nim.
The preceding exception is caused by calling read on a future that had an exception stored inside it. To prevent that from occurring, you can use the failed procedure, which returns a Boolean that indicates whether the future completed with an exception.
One important thing to keep in mind when working with futures is that unless they’re explicitly read, any exceptions that they store may silently disappear when the future is deallocated. As such, it’s important not to discard futures but to instead use the asyncCheck procedure to ensure that any exceptions are reraised in your program.
The difference between synchronous and asynchronous execution
Hopefully, by now you understand how futures work. Let’s go back to learning a little bit more about asynchronous execution in the context of the accept procedure. Figure 3.14 shows the difference between calling the synchronous version of accept and the asynchronous version.
Figure 3.14. The difference between synchronous and asynchronous accept

As mentioned earlier, the asynchronous accept returns a Future object immediately, whereas the synchronous accept blocks the current thread. While the thread is blocked in the synchronous version, it’s idle and performs no useful computational work. The asynchronous version, on the other hand, can perform computational work as long as this work doesn’t require the client socket. It may involve client sockets that have connected previously, or it may involve calculating the 1025th decimal digit of π. In figure 3.14, this work is masked beneath a doWork procedure, which could be doing any of the tasks mentioned.
The asynchronous version performs many more calls to doWork() than the synchronous version. It also retains the call to doWork(socket), leading to the same code logic but very different performance characteristics.
It’s important to note that the asynchronous execution described in figure 3.14 has a problem. It demonstrates what’s known as busy waiting, which is repeatedly checking whether the Future is empty or not. This technique is very inefficient because CPU time is wasted on a useless activity.
To solve this, each Future stores a callback that can be overridden with a custom procedure. Whenever a Future is completed with a value or an exception, its callback is called. Using a callback in this case would prevent the busy waiting.
Example of asynchronous I/O using callbacks
The term callback provokes a feeling of horror in some people. But not to worry. You won’t be forced to use callbacks in Nim. Although the most basic notification mechanism Futures expose is a callback, Nim provides what’s known as async await, which hides these callbacks from you. You’ll learn more about async await later.
But although you’re not forced to use callbacks in Nim, I’ll first explain asynchronous I/O by showing you how it works with callbacks. That’s because you’re likely more familiar with callbacks than with async await. Let’s start with a comparison between Node and Nim, and not a comparison involving sockets but something much simpler: the reading of a file asynchronously.
Listing 3.15. Reading files asynchronously in Node
var fs = require('fs');
fs.readFile('/etc/passwd', function (err, data) {
  if (err) throw err;
  console.log(data);
});
The code in the preceding listing is taken straight from Node’s documentation.[2] It simply reads the contents of the /etc/passwd file asynchronously. When this script is executed, the readFile function tells the Node runtime to read the file specified by the path in the first argument, and once it’s finished doing so, to call the function specified in the second argument. The readFile function itself returns immediately, and control is given back implicitly to the Node runtime.
See the Node.js fs.readFile documentation: https://nodejs.org/api/fs.html#fs_fs_readfile_file_options_callback.
Now compare it to the Nim version.
Listing 3.16. Reading files asynchronously in Nim
import asyncdispatch, asyncfile

var file = openAsync("/etc/passwd")             1
let dataFut = file.readAll()                    2
dataFut.callback =                              3
  proc (future: Future[string]) =
    echo(future.read())                         4

asyncdispatch.runForever()                      5
- 1 Opens the “/etc/passwd” file asynchronously and binds it to the file variable
- 2 Asks for all of the contents of the file to be read, and assigns the resulting Future[string] type to the dataFut variable
- 3 Assigns a new callback to be called when the future completes
- 4 Inside the callback, reads the contents of the future that should now be present
- 5 Explicitly runs the event loop that’s defined in the asyncdispatch module
The Nim version may seem more complex at first, but that’s because Nim’s standard library doesn’t define a single readFile procedure, whereas Node’s standard library does. Instead, you must first open the file using the openAsync procedure to get an AsyncFile object, and then you can read data from that object.[3]
Creating a single readFile procedure would be a fairly trivial undertaking. I leave the challenge of creating such a procedure to you.
Other than that difference in standard library APIs, the Nim version also differs in one more important way: the readAll procedure doesn’t accept a callback. Instead, it returns a new instance of the Future type. The callback is then stored in the Future and is called once the future completes.
The event loop
In a Node application, the runtime is a form of event loop—it uses native operating system APIs to check for various events. One of these might be a file being successfully read or a socket receiving data from the server that it’s connected to. The runtime dispatches these events to the appropriate callbacks.
Nim’s event loop is defined in the asyncdispatch module. It’s similar to Node’s runtime in many ways, except that it needs to be explicitly executed. One way to do this is to call the runForever procedure. Figure 3.15 shows the behavior of the runForever procedure.
Figure 3.15. Nim’s asyncdispatch event loop
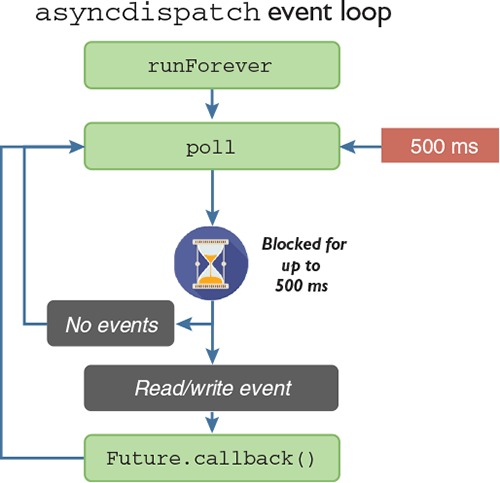
The Nim event loop puts you in control. The runForever procedure is simply a wrapper around the poll procedure, which the runForever procedure calls in an infinite loop. You can call the poll procedure yourself, which will give you greater control over the event loop. The poll procedure waits for events for a specified number of milliseconds (500 ms by default), but it doesn’t always take 500 ms to finish because events can occur much earlier than that. Once an event is created, the poll procedure processes it and checks each of the currently pending Future objects to see if the Future is waiting on that event. If it is, the Future’s callback is called, and any appropriate values that are stored inside the future are populated.
In contrast to synchronous I/O, which can block for an unlimited amount of time, the poll procedure also blocks, but only for a finite amount of time, which can be freely specified. This allows you to commit a certain amount of time to I/O processing and the rest to other tasks, such as drawing a GUI or performing a CPU-intensive calculation. I’ll show you how to utilize this procedure later in the client module, so that async sockets can be mixed with the readLine procedure that reads the standard input stream in another thread.
Async await
There’s a big problem with using callbacks for asynchronous I/O: for complex application logic, they’re not flexible, leading to what’s aptly named callback hell. For example, suppose you want to read another file after a first one has been read. To do so, you’re forced to nest callbacks, and you end up with code that becomes ugly and unmaintainable.
Nim has a solution to this problem: the await keyword. It eliminates callback hell completely and makes asynchronous code almost identical to synchronous code.
The await keyword can only be used inside procedures marked with the {.async.} pragma. The next listing shows how to read and write files using an async procedure.
Listing 3.17. Reading files and writing to them in sequence using await
import asyncdispatch, asyncfile
proc readFiles() {.async.} =                                       1
  var file = openAsync("/home/profile/test.txt", fmReadWrite)      2
  let data = await file.readAll()                                  3
  echo(data)                                                       4
  await file.write("Hello!
")                                     5
  file.close()

waitFor readFiles()                                                6
- 1 The {.async.} pragma is used to specify that the readFiles procedure is asynchronous.
- 2 Opens the ~/test.txt file asynchronously in fmReadWrite mode so that the file can be read and written to
- 3 The await keyword signifies that readFiles should be paused until the file is fully read.
- 4 Displays the contents of the file
- 5 Writes some data to the file. The procedure is paused until the data is successfully written to the file.
- 6 Runs the event loop until readFiles finishes
Listing 3.17 performs the same actions and more than the code in listing 3.16. Every time the await keyword is used, the execution of the readFiles procedure is paused until the Future that’s awaited is completed. Then the procedure resumes its execution, and the value of the Future is read automatically. While the procedure is paused, the application continues running, so the thread is never blocked. This is all done in a single thread. Multiple async procedures can be paused at any point, waiting for an event to resume them, and callbacks are used in the background to resume these procedures.
Every procedure marked with the {.async.} pragma must return a Future[T] object. In listing 3.17, the procedure might seem like it returns nothing, but it returns a Future[void]; this is done implicitly to avoid the pain of writing Future[void] all the time. Any procedure that returns a Future[T] can be awaited. Figure 3.16 shows what the execution of listing 3.17 looks like.
Figure 3.16. The execution of listing 3.17

The waitFor procedure that’s used instead of runForever runs the event loop until the readFiles procedure finishes its execution. Table 3.2 compares all the different async keywords you’ve seen so far.
Table 3.2. Comparison of common async keywords
|
Controls event loop directly |
Use case |
Description |
|
|---|---|---|---|
| runForever | Yes | Usually used for server applications that need to stay alive indefinitely. | Runs the event loop forever. |
| waitFor | Yes | Usually used for applications that need to quit after a specific asynchronous procedure finishes its execution. | Runs the event loop until the specified future completes. |
| poll | Yes | For applications that need precise control of the event loop. The runForever and waitFor procedures call this. | Listens for events for the specified amount of time. |
| asyncCheck | No | Used for discarding futures safely, typically to execute an async proc without worrying about its result. | Sets the specified future’s callback property to a procedure that will handle exceptions appropriately. |
| await | No | Used to execute another async proc whose result is needed in the line of code after the await. | Pauses the execution of an async proc until the specified future completes. |
Warning: Procedures that control the event loop
Typically, runForever, waitFor, and poll shouldn’t be used within async procedures, because they control the event loop directly.
Now, I’ll show you how to use await and asynchronous sockets to finish the implementation of the server.
3.5.3. Transferring data asynchronously
You’ve already initialized an asynchronous socket and stored it in the server variable. The next steps are as follows:
- Bind the socket to a port such as 7687.[4]Most of the easy-to-remember ports are used by other applications: https://en.wikipedia.org/wiki/List_of_TCP_and_UDP_port_numbers.
- Call listen on the socket to begin listening for new connections.
- Start accepting connections via the accept procedure.
You’ll need to use await, so you’ll need to introduce a new async procedure. The following code shows a loop procedure that performs these steps.
Listing 3.18. Creating a server socket and accepting connections from clients
proc loop(server: Server, port = 7687) {.async.} =
  server.socket.bindAddr(port.Port)                      1
  server.socket.listen()
  while true:
    let clientSocket = await server.socket.accept()      2
    echo("Accepted connection!")

waitFor loop(server)                                     3
- 1 Sets up the server socket by binding it to a port and calling listen. The integer port param needs to be cast to a Port type that the bindAddr procedure expects.
- 2 Calls accept on the server socket to accept a new client. The await keyword ensures that the procedure is paused until a new client has connected.
- 3 Executes the loop procedure and then runs the event loop until the loop procedure returns.
The loop procedure will continuously wait for new client connections to be made. Currently, nothing is done with those connections, but you can still test that this works. Add the preceding code to the end of server.nim. Then, compile and run the server by running nim c -r src/server.
Testing a server without a client
Your client hasn’t yet been completed, so you can’t use it to test the server. But it’s fairly easy to use a command-line application called telnet to connect to your new server.
On Windows, you may need to enable Telnet in the Windows Features menu—you can find more information at this link: http://mng.bz/eSor. After enabling the telnet feature, you should be able to open a new command window, type telnet at the prompt, and then connect to your server by executing the open localhost 7687 command. The server should then output “Accepted connection!”
On UNIX-like operating systems such as Linux and Mac OS, the telnet application should be available by default. You can simply open a new terminal window and execute telnet localhost 7687. The server should then output “Accepted connection!”
Creating a new Client instance to hold data about the client
Now, let’s extend the loop procedure to create a new Client instance and add it to the clients field. Replace the while loop with the following.
Listing 3.19. Creating a new Client instance for each connection
while true:
  let (netAddr, clientSocket) = await server.socket.acceptAddr()   12
  echo("Accepted connection from ", netAddr)
  let client = Client(                                             3
    socket: clientSocket,
    netAddr: netAddr,
    id: server.clients.len,
    connected: true
  )
  server.clients.add(client)                                       4
- 1 acceptAddr returns a tuple[string, AsyncSocket] type. The tuple is unpacked into two variables.
- 2 A message is displayed, indicating that a client has connected and providing its network address.
- 3 Initializes a new instance of the Client object and sets its fields
- 4 Adds the new instance of the client to the clients sequence
The acceptAddr variant of the accept procedure has been changed to return the IP address of the client that has connected. It returns a tuple, the first value of which is the IP address of the client, and the second being the client socket. The preceding code uses tuple unpacking, which allows for these two values to be assigned immediately to two different variables.
When a client successfully connects, the next line writes a message to the terminal that includes the IP address of the client that just connected. After this, a new instance of the Client object is created, with each field assigned a new value using a constructor. Finally, the new instance is added to the server’s clients sequence.
Recompiling this code and repeating the testing steps described in the section titled “Testing a server without a client” should display “Accepted connection from 127.0.0.1.” But sending messages won’t yet work.
Processing the client’s messages
Messages typed into the prompt won’t be received by the server yet, even after connecting with Telnet, because the messages still aren’t being read from the connected clients. Let’s implement the server code to do that now.
Listing 3.20. Receiving messages from a client
proc processMessages(server: Server, client: Client) {.async.} =
  while true:
    let line = await client.socket.recvLine()                      1
    if line.len == 0:                                              2
      echo(client, " disconnected!")
      client.connected = false
      client.socket.close()                                        3
      return                                                       4

    echo(client, " sent: ", line)
- 1 Waits for a single line to be read from the client
- 2 Most procedures that read data from a socket may return an empty string, which signifies that the socket has disconnected from the server.
- 3 Closes the client’s socket because it has disconnected
- 4 Stops any further processing of messages
Make sure you place this processMessages procedure above the loop procedure. Later, you’ll need to call this procedure from the loop procedure, and this procedure must be above the call site in order for that to work.
You may find it strange to see another infinite loop, denoted by the while true statement, at the top of the procedure body. Surely once this procedure is called, its execution will never stop. There is truth to that, but note this is an async procedure, so it can be paused. This procedure will never stop executing, but it will pause its execution when await client.socket.recvLine() is called. Other pieces of code will be executing while this procedure waits for the result of client.socket.recvLine().
The result will contain a single message sent by the client. A single message is guaranteed because the message protocol created in the previous section uses newline characters as delimiters.
There’s one case that will prevent a full message from being received: the client disconnecting from the server. In that case, recvLine returns an empty string, which is why the next line checks the length of the resulting string. If the string is empty, a message is displayed on the terminal stating that the client disconnected. The client’s connected flag is set to false, and the close procedure is called on the socket to free its resources.
Finally, assuming that the client hasn’t disconnected, the message that the client sent is displayed in the terminal.
If you try to recompile the code now, you’ll find that it doesn’t compile. The error will be similar to the following:
server.nim(16, 54) template/generic instantiation from here
server.nim(20, 12) Error: type mismatch: got (Client)
but expected one of:
system.$(x: int)
system.$(x: seq[T])
system.$(x: cstring)
system.$(x: bool)
...
This is because of the echo(client, " disconnected!") line, which attempts to display the Client type in the terminal. The problem is that the echo procedure attempts to use the $ operator to display all of the procedure’s arguments. If a $ operator isn’t defined for the type that you pass to echo, you’ll get an error message of this sort. The fix is to define it.
The full code listing for server.nim should now look something like this.
Listing 3.21. The full server implementation so far
import asyncdispatch, asyncnet

type
  Client = ref object
    socket: AsyncSocket
    netAddr: string
    id: int
    connected: bool

  Server = ref object
    socket: AsyncSocket
    clients: seq[Client]

proc newServer(): Server = Server(socket: newAsyncSocket(), clients: @[])
proc `$`(client: Client): string =
  $client.id & "(" & client.netAddr & ")"
proc processMessages(server: Server, client: Client) {.async.} =
  while true:
    let line = await client.socket.recvLine()
    if line.len == 0:
      echo(client, " disconnected!")
      client.connected = false
      client.socket.close()
      return

    echo(client, " sent: ", line)

proc loop(server: Server, port = 7687) {.async.} =
  server.socket.bindAddr(port.Port)
  server.socket.listen()

  while true:
    let (netAddr, clientSocket) = await server.socket.acceptAddr()
    echo("Accepted connection from ", netAddr)
    let client = Client(
      socket: clientSocket,
      netAddr: netAddr,
      id: server.clients.len,
      connected: true
    )
    server.clients.add(client)
    asyncCheck processMessages(server, client)

var server = newServer()
waitFor loop(server)
The code now includes the definition of $ for the Client type, as well as an asyncCheck command that runs the processMessages procedure in the background. These are both shown in bold. The asyncCheck command can be used to run asynchronous procedures without waiting on their result.
This code will call the processMessages procedure for each client that connects to the server, which is precisely what needs to be done. Each client needs to be continuously read from to ensure that any messages it sends are processed. Because of the nature of async procedures, all of this will be done in the background, with the execution of loop continuing and thus being ready to accept more connections.
Recompile the server module again, and then run it and connect to it using telnet. Type some text into the Telnet window and press Enter; you should see your server output messages showing the text you entered.
Sending the messages to other clients
Lastly, you need to send the messages received from a client to all other clients that are currently connected to the server. Add the following code to the bottom of the processMessages procedure, making sure you indent this code so it’s within the while loop.
Listing 3.22. Sending messages on to other clients
for c in server.clients:                        1
  if c.id != client.id and c.connected:         2
    await c.socket.send(line & "cl")          3
- 1 Loops through each of the clients in the clients sequence
- 2 Checks that the client isn’t the client that sent this message and that the client is still connected
- 3 Sends the message to the client, followed by the message separator: cl
For completeness, the following listing shows what your processMessages procedure should now look like. The addition is shown in bold.
Listing 3.23. The processMessages procedure after listing 3.22 is inserted
proc processMessages(server: Server, client: Client) {.async.} =
  while true:
    let line = await client.socket.recvLine()
    if line.len == 0:
      echo(client, " disconnected!")
      client.connected = false
      client.socket.close()
      return

    echo(client, " sent: ", line)
    for c in server.clients:
      if c.id != client.id and c.connected:
        await c.socket.send(line & "cl")
That’s all there is to the server! It can now receive messages and send them on to other clients. The problem now is that the client still has no code to connect to the server or to send messages to it. Let’s fix that.
Adding network functionality to the client
The first network functionality that should be implemented in the client is the ability for it to connect to the server. Before implementing a procedure to do that, though, you must import the asyncdispatch and asyncnet modules. You’ll need to also import the protocol module you created earlier. You can then create a new async procedure called connect, as shown here.
Listing 3.24. The client’s connect procedure
proc connect(socket: AsyncSocket, serverAddr: string) {.async.} =
  echo("Connecting to ", serverAddr)
  await socket.connect(serverAddr, 7687.Port)                            1
  echo("Connected!")

  while true:
    let line = await socket.recvLine()                                   2
    let parsed = parseMessage(line)                                      3
    echo(parsed.username, " said ", parsed.message)                      4
- 1 Connects to the server address supplied, on the default 7687 port.
- 2 Continuously attempts to read a message from the server.
- 3 Uses the parseMessage procedure defined in the protocol module to parse the received message.
- 4 Displays the message together with the username of the message sender.
You should place this procedure just below the import statement at the top of the file. It’s fairly simple: it connects to the server and starts waiting for messages from it. The recvLine procedure is used to read a single line at a time. This line is then passed to the parseMessage procedure, which parses it and returns an object that allows for specific parts of the message to be accessed. The message is then displayed, together with the username of the messenger.
Before the connect procedure can be called, you must first define a new socket variable. This variable should be initialized using the newAsyncSocket procedure. Define it after the serverAddr command-line argument is read, so, after the let serverAddr = paramStr(1) line. The following code should do the trick: var socket = newAsyncSocket().
You can then replace echo("Connecting to ", serverAddr) with a call to connect, using the asyncCheck procedure to discard the future safely: asyncCheck connect(socket, serverAddr). This code will run in the background because neither await nor waitFor is used.
It’s now time to make the reading of standard input in client.nim nonblocking. Currently, the while loop that reads the standard input blocks, but for the connect async procedure to work, the async event loop needs to be executed. This won’t happen if the thread is blocked, so the while loop needs to be modified to integrate the standard input reading with the event loop. The following code shows how this can be done—replace the while loop in client.nim with it.
Listing 3.25. Reading from standard input asynchronously
var messageFlowVar = spawn stdin.readLine()                           1
while true:
  if messageFlowVar.isReady():                                        2

    let message = createMessage("Anonymous", ^messageFlowVar)         3
    asyncCheck socket.send(message)                                   4
    messageFlowVar = spawn stdin.readLine()                           5

  asyncdispatch.poll()                                                6
- 1 The initial readLine call has been moved out of the while loop.
- 2 The isReady procedure determines whether reading the value from messageFlowVar will block.
- 3 Uses the createMessage procedure defined in the protocol module to create a new message. Getting the user’s name is left as an exercise for you.
- 4 Sends the message to the server. In this case, createMessage adds the separator for you.
- 5 Spawns readLine in another thread, as the last one has returned with data
- 6 Calls the event loop manually using the poll procedure
The readLine spawn call has been modified to prevent the readLine procedure from being executed multiple times in hundreds of threads. This would happen if the spawn call was placed inside the while statement because the messageFlowVar would no longer be read synchronously. Now, there is only ever one readLine running in a separate thread at one time.
The while loop uses the isReady procedure to check whether the readLine procedure returned a newly read value from the standard input stream. If so, the message is sent to the server, and the readLine procedure is spawned again. See figure 3.17, which shows the execution of both the main thread and the readLine thread. Compare it to figure 3.10, which you saw earlier.
Figure 3.17. The nonblocking parallel execution of client.nim)

Waiting on the standard input no longer blocks the main thread, allowing the event loop the time to check for events by calling the poll procedure.
For completeness, here’s the full code listing for client.nim. The changes made in this section are shown in bold.
Listing 3.26. The final client implementation
import os, threadpool, asyncdispatch, asyncnet
import protocol

proc connect(socket: AsyncSocket, serverAddr: string) {.async.} =
  echo("Connecting to ", serverAddr)
  await socket.connect(serverAddr, 7687.Port)
  echo("Connected!")
  while true:
    let line = await socket.recvLine()
    let parsed = parseMessage(line)
    echo(parsed.username, " said ", parsed.message)

echo("Chat application started")
if paramCount() == 0:
  quit("Please specify the server address, e.g. ./client localhost")
let serverAddr = paramStr(1)
var socket = newAsyncSocket()
asyncCheck connect(socket, serverAddr)
var messageFlowVar = spawn stdin.readLine()
while true:
  if messageFlowVar.isReady():
    let message = createMessage("Anonymous", ^messageFlowVar)
    asyncCheck socket.send(message)
    messageFlowVar = spawn stdin.readLine()

  asyncdispatch.poll()
The final results
That’s all there is to it! You can now compile both the server and the client, and then run the server and multiple clients. If you send a message from one client, it should display in the server window but also in the other clients that are connected to the server.
There’s one small feature missing, and that’s the user names. Currently, the user name for each client is hardcoded as "Anonymous". Changing this shouldn’t take too much work, so I’ll leave it as an optional challenge for you.
Let’s look back at the original use case: asking John and Grace about Game of Thrones. The discussion looks like this.
Listing 3.27. Conversation between John, Grace, and me about Game of Thrones
Dominik said:  What did you guys think about the latest Game of Thrones
episode?
Grace said: I thought Tyrion was really great in it!
John said:  I agree with Grace. Tyrion deserves an Emmy for his performance.
After this discussion takes place, each person’s screen should show the same output, except that each person’s own messages won’t be prefixed by <name> said where <name> is their name.
To see it in action, try this scenario out for yourself. Set up three clients and send the messages. The server should display the information in figure 3.18 after this exchange.
Figure 3.18. The server’s output

Each client should show a screen similar to the one in figure 3.19.
Figure 3.19. The client’s output

If you got lost somewhere along the way, or if you just couldn’t get the code to compile for some reason, take a look at the book’s code examples on GitHub: https://github.com/dom96/nim-in-action-code.
You can now even send the client binary to one of your friends and have them chat with you. You may need to do it over your LAN or forward ports on your router for it to work, though.
There’s a lot of room for improvement, such as making sure that the clients are still connected by sending special “ping” messages, or adding the ability to kick users off the server. I’m sure you’ll come up with other ideas, too.
3.6. Summary
- The recommended Nim project directory consists of the src, bin, and tests directories, storing the source code, the executables, and the tests, respectively.
- Command-line arguments can be retrieved using the paramStr procedure and counted using the paramCount procedure.
- Standard input, accessed via the stdin global variable, can be read using the readLine procedure.
- Reading from the standard input stream is a blocking operation, which means the application can’t do any work while it waits for the data to be read.
- A new thread can be used to perform work while another thread is blocked.
- New threads can be created by using spawn.
- JSON can be generated and parsed using the json module.
- The doAssert procedure is a simple and easy way to create tests.
- A socket allows data to be transferred over the internet, with asynchronous sockets ensuring that the application doesn’t become blocked.
- Asynchronous procedures can be created using an async pragma.
- A future is an object that holds a value that will be available at some point in the future.
- The await keyword can be used to wait for the completion of a future without blocking.