
Chapter 9. Metaprogramming
This chapter covers
- Understanding metaprogramming and its uses
- Using generics to remove code duplication
- Constructing a Nim abstract syntax tree
- Executing code at compile time
- Using templates and macros
This chapter describes one of the most advanced and most powerful features in the Nim programming language: metaprogramming, composed of a number of components including generics, templates, and macros.
Metaprogramming is a feature of Nim that gives you the ability to treat your application’s source code as data. This means you can write code that reads, generates, analyses, and modifies other code. Being able to perform such activities brings many advantages, including allowing you to minimize the number of lines of code needed to express a solution. In turn, this means that metaprogramming reduces development time.
Generating code is usually easy enough in most languages, but reading, analyzing, and modifying it isn’t. Consider the following simple type definition:
type
  Person = object
    name: string
    age: int
Analyzing this code to retrieve information about the Person type isn’t easy in a language without metaprogramming. For instance, in Java, you could do it via reflection at runtime. In other languages, you could attempt to treat the type definition as a string and parse it, but doing so would be very error prone. In Nim, there are facilities that allow you to analyze type definitions at compile time.
You may, for example, wish to iterate over each of the fields in a specified type:
import macros

type
  Person = object
    name: string
    age: int

static:
  for sym in getType(Person)[2]:
    echo(sym.symbol)
Compiling the preceding code will display the strings name and age among the compiler’s output.
That’s just one example of what metaprogramming allows you to accomplish. You might use this to serialize any data type, without having to write code specific to each data type, whether defined by you or someone else. You’ll find that through this and many other features, metaprogramming opens up a vast number of possibilities.
Here are some other use cases for metaprogramming:
- Advanced control flow mechanisms, such as async procedures
- Lazy evaluation, used in the logging module to ensure that parameters are only evaluated if logging is enabled
- Lexer and parser generation
Metaprogramming adds a lot of flexibility to Nim, and because it’s executed at compile time, it does so without causing any decrease in your program’s execution time.
In this chapter, you’ll learn about the three metaprogramming constructs, starting with generics, moving on to templates, and finishing up with macros. At the end of the chapter, you’ll see how you can write a simple DSL for configuration files. DSLs are languages that are specialized to a particular application domain; they’ll be discussed in more detail in section 9.4.
9.1. Generics
As you already know, Nim is a statically typed programming language. This means that each piece of data in Nim has a type associated with it. In some cases, these types are distinct but very similar. For example, the int and float types both represent numbers, but the former can’t represent a fraction, whereas the latter can.
Generics are a feature that allows you to write your applications in a style called generic programming, in which you write algorithms in terms of types that aren’t known until the algorithms are invoked. Generic programming is useful because it offers a reduction in code duplication.
Generics are related to the two other metaprogramming components in Nim—templates and macros—because they offer a way to generate repetitive code. This section covers generics in procedures and types, showing how to best utilize them in those contexts. It also briefly shows how generics can be constrained to make the definitions of algorithms more accurate.
Some languages refer to generics as parametric polymorphism or as templates. Many prominent statically typed programming languages include support for generics, including Java, C#, C++, Objective C, and Swift. There are also a few that consciously omit the feature; the Go programming language is infamous for doing so.
9.1.1. Generic procedures
To give you a better idea of how generics in Nim work, take a look at the following implementation of a generic myMax procedure:
proc myMax[T](a, b: T): T =
  if a < b:
    return b
  else:
    return a

doAssert myMax(5, 10) == 10
doAssert myMax(31.3, 1.23124) == 31.3
The key part of this example is the first line. There, a generic type, T, is defined in square brackets after the procedure name, and it’s then used as the type for the parameters a and b as well as the procedure’s return type.
Occasionally, the compiler may not be able to infer generic types. In those cases, you can specify them explicitly using square brackets, as shown in the following code:
doAssert myMax[float](5, 10.5) == 10.5
This code tells the compiler explicitly that the generic type T should be instantiated to float for this myMax procedure call.
You can define as many generic types in a procedure definition as you want. Currently, the myMax procedure only accepts two arguments of the same type. This means that the following procedure call will fail with a type mismatch error:
doAssert myMax(5'i32, 10.5) == 10.5
The preceding code fails to compile because the type of argument a is int32, whereas the type of b is float. The myMax procedure defined previously can only be called with arguments of the same type.
9.1.2. Generics in type definitions
When writing Nim code, you may run into cases where you’d like to specify the types of one or more fields in an object during initialization. That way, you can have a single generic type definition, and you can specialize it by specifying a particular type on a case-by-case basis.
This is useful for container types, such as lists and hash maps. A simple single-item generic container can be defined as follows:
type
  Container[T] = object
    empty: bool
    value: T
This code defines a Container type that accepts a generic type T. The type of the value that the Container type stores is then determined by the generic type T specified when a Container variable is defined.
A constructor for the Container type can be defined like this:
proc initContainer[T](): Container[T] =
  result.empty = true
You can then call this constructor as follows:
var myBox = initContainer[string]()
Specifying the generic type in between the square brackets is currently mandatory. This means that the following code will not work:
var myBox = initContainer()
Compiling this code will result in an “Error: cannot instantiate: ‘T’” message. As mentioned previously, the compiler can’t always infer the generic type, and this is one case where it can’t.
9.1.3. Constraining generics
Occasionally, you may wish to limit the types accepted by a generic procedure or type definition. This is useful for making the definition stronger and therefore more clear to yourself and other users of your code. Consider the myMax procedure defined previously and what happens when it’s called with two strings:[1]
There’s a reason why I named this procedure myMax and not max. I wanted to avoid a conflict with the max procedure defined in the system module.
proc myMax[T](a, b: T): T =
  if a < b:
    return b
  else:
    return a

echo myMax("Hello", "World")
If you save this code, compile, and run it, you’ll see the string World displayed.
Let’s assume that you don’t want your algorithm to be used with a pair of strings, but only with integers and floats. You can constrain the myMax procedure’s generic type like so:
proc myMax[T: int | float](a, b: T): T =
  if a < b:
    return b
  else:
    return a

echo myMax("Hello", "World")
Compiling this code will fail with the following error:
/tmp/file.nim(7, 11) Error: type mismatch: got (string, string)
but expected one of:
proc myMax[T: int | float](a, b: T): T
To make the constraint process more flexible, Nim offers a small number of type classes. A type class is a special pseudo-type that can be used to match against multiple types in a constraint context. You can define custom type classes like so:
type
  Number = int | float | uint

proc isPositive(x: Number): bool =
  return x > 0
Many are already defined for you in the system module. There are also a number of built-in type classes that match whole groups of types. You can find a list of them in the Nim Manual: http://nim-lang.org/docs/manual.html#generics-type-classes.
9.1.4. Concepts
Concepts, sometimes known as user-defined type classes in other programming languages, are a construct that can be used to specify arbitrary requirements that a matched type must satisfy. They’re useful for defining a kind of interface for procedures, but they’re still an experimental Nim feature. This section will give you a quick overview of concepts without going into too much detail, because their semantics may still change.
The myMax procedure defined earlier includes a constraint that limits it to accepting only int and float types as parameters. For the purposes of the myMax procedure, though, it makes more sense to accept any type that has the < operator defined for it. A concept can be used to specify this requirement in the form of code:
type
  Comparable = concept a                      1
    (a < a) is bool                           2

proc myMax(a, b: Comparable): Comparable =
  if a < b:
    return b
  else:
    return a
- 1 A concept definition is introduced with the concept keyword. What follows are the type identifiers.
- 2 For this concept to match the type, a < procedure that returns a bool value must be defined for the type.
A concept is composed of one or more expressions. These expressions usually utilize the instances that are defined after the concept keyword. When a type is checked against a concept, the type is said to implement the concept as long as both of these are true:
- All the expressions in the concept body compile
- All the expressions that evaluate to a Boolean value are true
The is operator determines whether the specified expression returns a value of type bool by returning true if it does and false if it doesn’t.
You can check whether the Comparable concept works as expected by writing some quick tests. The following is from a previous example:
doAssert myMax(5, 10) == 10
doAssert myMax(31.3, 1.23124) == 31.3
You’d expect both lines to work, and they do. The first line specifies two int arguments; a proc `<`(a, b: int): bool exists, so int satisfies the Comparable concept. The second line specifies two float arguments, and a similar proc `<`(a, b: float): bool also exists.
But attempting to pass two arrays into the myMax procedure by writing echo myMax([5, 3], [1, 6]) fails as follows:
/tmp/file.nim(11, 9) Error: type mismatch: got (Array constructor[0..1, int],Array constructor[0..1, int]) but expected one of: proc myMax[Comparable](a, b: Comparable): Comparable ...
Concepts are powerful, but they’re also a very new Nim feature, and as such are considered experimental. As a result, this chapter doesn’t go into detail about them, but you’re more than welcome to read about them in the Nim manual: http://nim-lang.org/docs/manual.html#generics-concepts.
Now let’s move on to templates.
9.2. Templates
A template in Nim is a procedure that generates code. Templates offer one of the easiest ways to generate code directly, the other being macros, which you’ll learn about in the next section. Unlike generics, templates offer a substitution mechanism that allows you to substitute arguments passed to them in the body of the template. Just like with all metaprogramming features, their code-generation ability helps you deal with boilerplate code.
In general, templates offer a simple way to reduce code duplication. Some features, like their ability to inject variables into the calling scope, are easiest to achieve in Nim by defining a template.
Templates are invoked in the same way as procedures. When the Nim compiler compiles your source code, any template invocations are substituted with the contents of the template. As an example, take a look at the following template from the standard library:
template `!=` (a, b: untyped) =          1
  not (a == b)
- 1 Don’t worry about the “untyped” type right now. It will be explained later.
It would be possible to define the != operator as a procedure, but that would require a separate implementation for each type. You could use generics to get around this, but doing so would result in a lot more call overhead.
This template definition of != means that this line
doAssert(5 != 4)
gets rewritten as follows:
doAssert(not (5 == 4))
This is done during compilation, as shown in figure 9.1.
Figure 9.1. Templates are expanded during the compilation of Nim source code

The primary purpose of templates is to offer a simple substitution mechanism that reduces the need for code duplication. In addition, templates offer one feature that procedures don’t: a template can accept blocks of code.
9.2.1. Passing a code block to a template
Code blocks are composed of one or more statements, and in an ordinary procedure call, passing multiple statements into the procedure can only be done using an anonymous procedure. With templates, you can pass a code block much more directly. Nim supports a special syntax for templates that allows one or more code statements to be passed to them.
The following code shows a template definition that accepts a code block as one of its parameters:
import os                                  1
template repeat(statements: untyped) =     2
  while true:
    statements                             3

repeat:                                    4
  echo("Hello Templates!")
  sleep(1000)
- 1 Needed for the sleep procedure.
- 2 The template accepts a statements parameter that corresponds to the code block.
- 3 The code block is substituted into here.
- 4 Templates that accept code blocks are used like this.
Code blocks in macros
Macros, which you’ll learn about in the next section, also support code blocks as parameters.
The statements identifier in the body of the template is replaced with whatever code block is passed into the template. After the compiler expands the template, the remaining code looks like this:
import os

while true:
  echo("Hello Templates!")
  sleep(1000)
Figure 9.2 shows the code that’s generated by the repeat template, which accepts a code block as an argument. This shows some of the amazing substitution capabilities of templates.
Figure 9.2. A code block passed into the repeat template is substituted into its body

Of course, template parameters don’t always have to accept a code block. The next section describes how template parameters are substituted into the body of a template and how the parameter’s type affects this.
Multiple code blocks
There are also ways to pass multiple code blocks to a template or macro via do notation, but this is beyond the scope of this chapter. See the Nim manual’s discussion of do notation for more information: http://nim-lang.org/docs/manual.html#procedures-do-notation.
It’s important to know how code blocks and other parameters interact. The rule is that when a code block is passed into a template, the last parameter always contains it. Here’s an example:
import os
template repeat(count: int, statements: untyped) =         1
  for i in 0 .. <count:
    statements

repeat 5:
  echo("Hello Templates!")
  sleep(1000)
- 1 The last parameter named “statements” contains the code block.
9.2.2. Parameter substitution in templates
Templates can accept multiple parameters, and these parameters are often simple identifiers, such as variable or type names. In this section, I’ll explain the different template-specific parameter types and how they modify the parameter-substitution behavior in templates.
Arguments can be passed into templates in the same manner as with procedures:
template declareVar(varName: untyped, value: typed) =        1
  var varName = value                                        2

declareVar(foo, 42)                                          3
echo(foo)
- 1 The template’s return value is void because its body is a statement that has no type.
- 2 Whatever arguments are passed into the template, they will replace varName and value in this line.
- 3 This line will be expanded to var foo = 42.
When the declareVar template is called, it expands into a simple variable declaration. The name and value of the variable is specified in the template using two arguments that differ in type, the first being untyped and the second typed. Figure 9.3 shows how the declareVar template produces code that defines a new variable.
Figure 9.3. Arguments are substituted as-is in templates. Their types determine whether an undefined identifier is accepted.

The difference between the untyped and typed argument types is simple:
- Untyped— An untyped template argument allows identifiers that haven’t been declared yet to be specified. The reason this type is named untyped is because undeclared identifiers have no type yet. The foo identifier in the preceding example isn’t declared anywhere and is thus untyped.
- Typed— A typed template argument allows an identifier that has been declared, or a value that has a type, to be specified. In the preceding example, the value 42 has the type int. The typed type allows any type to be specified, but templates also allow you to specify concrete types like int, float, and string.
To see the difference in more detail, take a look at the following declareVar calls:
var myInt = 42
declareVar(foo, myInt)                      1

declareVar(foo, myUndeclaredVar)            2
- 1 This will compile because myInt is declared above.
- 2 This won’t compile because myUndeclaredVar is not declared anywhere.
Remember that the second parameter of declareVar is typed, so undeclared variables can’t be passed to it. Only if a variable has the specified identifier defined can it be passed into declareVar.
Compiling the preceding code listing will result in an “undeclared identifier” error.
9.2.3. Template hygiene
As shown with the preceding declareVar template, templates can define variables that are accessible after the template is instantiated, but this feature may not always be desirable. There may be cases when you wish to declare a variable inside a template without exposing it to the outside scope, a practice referred to as template hygiene.
Consider the previous template example again:
template declareVar(varName: untyped, value: typed) =
  var varName = value

declareVar(foo, 42)
echo(foo)
Calling the declareVar template declares a new variable because the varName variable is injected into the calling scope. The injection occurs automatically because the name of the variable is taken from the template’s arguments.
Normally, variables aren’t injected into templates unless they’re marked explicitly with the {.inject.} pragma. The following code shows a comparison of the different cases where variables are injected and where they aren’t:
template hygiene(varName: untyped) =
  var varName = 42                                   1
  var notInjected = 128                              2
  var injected {.inject.} = notInjected + 2          3

hygiene(injectedImplicitly)

doAssert(injectedImplicitly == 42)
doAssert(injected == 130)
- 1 Injected implicitly because its name is taken from the varName parameter
- 2 Only accessible in this template
- 3 Injected because of the {.inject.} pragma. Note how the notInjected variable can still be used.
Attempting to access the notInjected variable outside the template will result in an “Error: undeclared identifier: ‘notInjected’” message. The other variables are accessible because they’re injected by the template into the calling scope.
When writing templates, make sure that you document precisely the variables that are injected by the template, and be careful that only those variables are exposed. Keep in mind that, in general, injecting variables is considered bad style. The standard library only injects variables in rare cases, such as in the mapIt procedure or the =~ operator defined in the re module.
For reference, the following definitions are all hygienic by default:
- type
- var
- let
- const
In contrast, the following definitions aren’t hygienic by default:
- proc
- iterator
- converter
- template
- macro
- method
The decision to make certain identifiers hygienic and others not was made to capture the most common use cases without annotations.
The next section explains macros, a component of Nim related to templates that’s a lot more flexible and many times more powerful than templates.
9.3. Macros
A macro in Nim is a special kind of procedure that’s executed at compile time and that returns a Nim expression or statement. Macros are the ultimate way to read, generate, analyze, and modify Nim code.
In the world of computer science, macros exist in many different forms. Templates are indeed a form of macro, albeit a very simple form that mostly consists of simple substitutions. Templates are said to be declarative, because in their body they show what the code that should be produced looks like, instead of describing the steps needed to produce that code.
A Nim macro, on the other hand, is said to be procedural because it contains steps that describe how the code should be produced. When macros are invoked, their body is executed at compile time, which means a related feature of the Nim programming language, compile-time function execution, is also relevant to the study of macros. This feature allows procedures to be executed by the compiler during compilation, and you’ll learn more about it in the next section.
Macros operate on Nim code, but not in the same way that you operate on code. You, as a programmer, are used to dealing with the textual representation of code. You write, read, and modify code as text. But macros don’t work that way. They operate on a different representation known as an abstract syntax tree (AST). The abstract syntax tree is a special tree structure that represents code; you’ll learn more about it in section 9.3.2.
Figure 9.4 shows the primary difference between templates and macros.
Figure 9.4. Templates are declarative, whereas macros are procedural.

We’ll go through each of these concepts to teach you the ins and outs of macros. At the end, you’ll also get to use your new macro skills to write a simple configuration library.
First, to understand how macros work, you’ll need to learn about the concept of compile-time function execution.
9.3.1. Compile-time function execution
Compile-time function execution (CTFE) is a feature of Nim that allows procedures to be executed at compile time. This is a powerful feature that’s relatively uncommon among programming languages.
CTFE was introduced briefly in chapter 2, where you were shown that the value of a constant in Nim must be computable at compile time.
proc fillString(): string =
  result = ""
  echo("Generating string")
  for i in 0 .. 4:
    result.add($i)

const count = fillString()
When the preceding code is compiled, the message “Generating string” will be shown among the compilation messages. This is because the fillString procedure is executed at compile time.
Compile-time execution has some limits, including the following:
- There’s no access to the foreign function interface (FFI), which means that some modules or procedures can’t be used. For example, you can’t generate random numbers at compile time unless you do so indirectly using staticExec.
- Global variables that aren’t annotated with the {.compileTime.} pragma can’t be accessed at compile time.
Despite these limitations, Nim includes workarounds to permit common operations like reading files and executing external processes at compile time. These operations can be performed using the staticRead and staticExec procedures, respectively.
Because macros are used to generate, analyze, and modify code, they must also be executed at compile time. This means that the same limits apply to them as well.
9.3.2. Abstract syntax trees
An AST is a data structure that represents source code. Many compilers use it internally after the source code is initially parsed. Some, like the Nim compiler, expose it to the user.
The AST is a tree with each node representing a single construct in the code. Let’s look at an example. Consider a simple arithmetic expression such as 5 * (5 + 10). The simplest AST for this might look something like the one shown in figure 9.5.
Figure 9.5. A simple AST for 5 * (5 + 10)
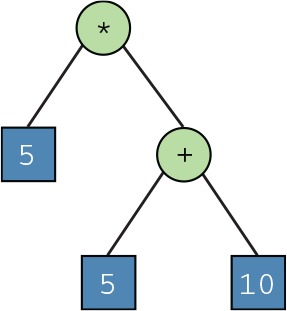
I’ll refer to this AST as the Simple AST for the rest of this chapter. Let’s look at how the Simple AST can be represented as a Nim data type. The following listing shows the definition for a Node type that’s then used to model the Simple AST shown in figure 9.5.
Listing 9.1. Modeling the Simple AST shown in figure 9.5
type
  NodeKind = enum
    Literal, Operator                             1

  Node = ref object
    case kind: NodeKind
    of Literal:
      value: int                                  2
    of Operator:
      left, right: Node                           3
      operator: char                              4

proc newLiteralNode(value: int): Node =           5
  result = Node(
    kind: Literal,
    value: value
  )
var root = Node(                                  6
  kind: Operator,
  operator: '*',
  left: newLiteralNode(5),
  right: Node(
    kind: Operator,
    operator: '+',
    left: newLiteralNode(5),
    right: newLiteralNode(10),
  )
)
- 1 In the Simple AST, there are only two node kinds: literals, which include any number, and operators, which specify the type of arithmetic operation to perform.
- 2 When the node is a literal, an int can be stored in its value field.
- 3 Each operator node may have up to two child nodes. This recursive definition allows a tree to be formed.
- 4 When the node is an operator, a char can be stored in its operator field.
- 5 A convenience proc to create a new literal node
- 6 The “root” variable holds a reference to the root node in the AST.
The root node holds the full representation of 5 * (5 + 10) in the form of an AST. Figure 9.6 shows how the Simple AST diagram maps to the Node data structure defined in listing 9.1.
Figure 9.6. An annotated version of figure 9.5 showing how it maps onto root in listing 9.1

You could write a procedure to convert any Node instance into its textual representation, or to display it as a tree using an indentation-based format as follows.
Listing 9.2. A simplified AST for 5 * (5 + 10) displayed using an indentation-based format
Operator '*'
  Literal 5
  Operator '+'
    Literal 5
    Literal 10
Nim’s AST isn’t as simple as this because it models a language that’s far more complex than simple arithmetic expressions. However, the arithmetic expression modeled by the Simple AST is valid Nim code, so we can compare Nim’s AST to it. The dumpTree macro defined in the macros module takes a block of code as input and outputs the code block’s AST in the same indentation-based format as shown in listing 9.2.
To display the AST of 5 * (5 + 10) in Nim, compile the following code:
import macros

dumpTree:
  5 * (5 + 10)
Among the messages from the compiler, you should see the following.
Listing 9.3. The Nim AST for 5 * (5 + 10) displayed using an indentation-based format
StmtList
  Infix
    Ident !"*"
    IntLit 5
    Par
      Infix
        Ident !"+"
        IntLit 5
        IntLit 10
You’ll note that the Nim AST differs from the Simple AST of the arithmetic expression in two important ways:
- It includes many more node kinds, such as StmtList, Infix, and Ident.
- The AST is no longer a binary tree: some nodes contain more than two children.
The structure is the same, but this AST contains more information about the expression. For example, it indicates that infix notation was used to invoke the * and + operators, and that a part of the expression is enclosed in parentheses.
The AST can represent any valid Nim code, so there are many node kinds. To get a feel for the different node kinds, try displaying the AST of some common constructs, such as procedures, for loops, procedure calls, variable declarations, and anything else you can think of.
The Nim AST is described in the documentation for the macros module (http://nim-lang.org/docs/macros.html). The documentation includes the definition of a NimNode type that’s very similar to the Node type defined in listing 9.1. The macros module also contains many procedures that can be used for building, modifying, and reading the AST.
Before moving on, let’s look at some of these node kinds. Table 9.1 describes each of the node kinds in the Nim AST that you’ve seen so far.
Table 9.1. Various Nim node kinds and what they mean
|
Description |
Children |
|
|---|---|---|
| StmtList | A list of statements. | Arbitrary number of other Nim nodes that represent a statement. |
| Infix | An infix expression, such as 5 * 5. | Infix operator, the infix operator’s two arguments. |
| Ident | An identifier, such as the name of a procedure or variable. The node’s ident field contains the identifier. | Cannot contain children. |
| Par | Parentheses | The code inside the parentheses. |
| IntLit | An integer literal. The node’s intVal field contains the integer value. | Cannot contain children. |
Let’s try to build the Nim AST of 5 * (5 + 10) in a way that’s similar to the definition of root in listing 9.1, using the procedures defined in the macros module. The following listing shows the code needed to create this AST.
Listing 9.4. Creating the Nim AST of 5 * (5 + 10)
import macros                      1

static:                            2
  var root = newStmtList(
    infix(
      newIntLitNode(5),
      "*",
      newPar(
        infix(
          newIntLitNode(5),
          "+",
          newIntLitNode(10)
        )
      )
    )
  )
  echo(root.repr)                  3
- 1 The macros module defines all the necessary procedures for constructing the AST.
- 2 The static keyword runs its body at compile time. It’s used because the AST procedures are only available at compile time.
- 3 The repr call converts the root node to a textual representation of the Nim code.
Compile listing 9.4, and you’ll see that the output is 5 * (5 + 10). You’ve successfully constructed your first Nim AST!
9.3.3. Macro definition
So far, you’ve learned what an AST is, including how it can be constructed and the different ways of displaying it during compilation. But you’re still missing an important piece of knowledge: how to add the Nim code that the AST represents into the final executable.
A macro is used for precisely that purpose. In the previous section, you constructed a simple arithmetic expression that produces a numeric value. Let’s write a macro that emits this expression’s AST so its result can be calculated.
Listing 9.5. A macro that emits 5 * (5 + 10)
import macros                         1

macro calculate(): int =              2
  result = newStmtList(               3
    infix(                            4
      newIntLitNode(5),               5
      "*",                            6
      newPar(                         7
        infix(                        8
          newIntLitNode(5),
          "+",                        6
          newIntLitNode(10)
        )
      )
    )
  )

echo(calculate())
- 1 Imports the macros module, which is necessary for AST creation
- 2 Defines a new macro called “calculate”
- 3 Creates a new StmtList node with children. The resulting node produces “5 * (5 + 10).”
- 4 Creates a new Infix node as a child of the StmtList node. The resulting node produces “5 * (5 + 10).”
- 5 Creates a new IntLit node as a child of the Infix node. The resulting node produces “5.”
- 6 Specifies the infix operator to call
- 7 Creates a new Par node as a child of the Infix node. The resulting node produces “(5 + 10).”
- 8 Creates a new Infix node as a child of the Par node. The resulting node produces “5 + 10.”
There are two important things to note about listing 9.5:
- Macros can be invoked in the same way as procedures and templates.
- The AST tree structure constructed in the body of the macro is very similar to the Nim AST shown in listing 9.3.
The calculate macro currently generates only a single expression, so the StmtList node can be safely removed from the calculate macro. Once you remove it, the macro will generate functionally equivalent code with no extraneous AST nodes.
That was a very simple macro, designed to show you how macros use the AST to emit Nim code. The equivalent template is much simpler and achieves the same thing:
template calculate(): int = 5 * (5 + 10)
echo(calculate())
The calculate macro produces a static AST, but the true power of macros is their ability to produce ASTs dynamically. The next section will show you how to best make use of this power.
9.3.4. Arguments in macros
As with procedures and templates, when macros are called, you may pass one or more arguments to them. Doing so allows you to alter the behavior of your macro, changing the code that it produces. You may, for example, wish to pass the name of a variable that the macro should use in the code that it generates.
You should think about arguments passed to macros a little bit differently from those passed to procedures and templates. For example, a macro parameter’s type may be int, but in the body of the macro, it’s a NimNode. The following code demonstrates this:
import macros

macro arguments(number: int, unknown: untyped): untyped =     1
  result = newStmtList()                                      2
  echo number.treeRepr()                                      3
  echo unknown.treeRepr()                                     3

arguments(71, ["12", "89"])
- 1 Every macro must have a return type.
- 2 Every macro must generate a valid AST; an empty StmtList node is created here to satisfy this rule.
- 3 The treeRepr procedure is similar to the dumpTree macro; it returns a textual representation of a NimNode.
Compiling this listing will result in the following output:
IntLit 71               1
Bracket                 2
  StrLit 12
  StrLit 89
- 1 The AST of the first argument passed to the macro: 71
- 2 The AST of the second argument passed to the macro: [“12”, “89”]
There are two things that you need to take away from this example:
- A macro must always have a return type, and it must always return a valid AST, even if that AST is essentially empty.
- All macro parameters are Nim AST nodes (with the exception of static[T] and typedesc parameters; you can find information about such special types in the Nim manual: http://nim-lang.org/docs/manual.html#special-types).
The latter point makes perfect sense because macros already manipulate the AST. Representing each macro argument as an AST node allows for constructs that ordinarily wouldn’t be possible in Nim. One example of this is the following:
arguments(71, ["12", 876, 0.5, -0.9])
This example displays the following AST for the second argument:
Bracket
  StrLit 12
  IntLit 876
  Float64Lit 0.5
  Prefix
    Ident !"-"
    Float64Lit 0.9
Arrays in Nim are homogeneous, so each value that they contain must be of the same type. Attempting to declare an array with the values "12", 876, 0.5, -0.9 wouldn’t be possible because the value’s types include string, int, and float. In this case, macros give greater flexibility, allowing the possibility to use a heterogeneous array constructor when calling macros.
That should give you a good idea of the basic macro concepts. In the next section, I’ll show you how to build a configuration DSL.
9.4. Creating a configuration DSL
Perhaps most usefully, metaprogramming allows you to create a DSL: a language that’s specialized to a particular application domain. Within the bounds of Nim’s syntax, you can define very flexible and intuitive languages that make writing software easier.
For example, you might write a DSL for defining the structure of HTML. Instead of writing a long, error-prone string literal, you could write something like the following:
html:
  head: title("My page")
  body: h1("Hello!")
That’s just one example. In this section, I’ll show you how to create a configuration DSL that will allow you to more easily define the structure of a configuration file and to read and write configuration files easily. You’ll first see how a typical DSL is represented in Nim’s AST, and then we’ll look at the AST representation of the desired generated code. Finally, we’ll look at how to build that AST based on information specified by the user when they use the DSL.
The DSL that you’ll create as part of this chapter will allow the following code to be written:
import configurator

config MyAppConfig:
  address: string
  port: int

var config = newMyAppConfig()
config.load("myapp.cfg")
echo("Configuration address: ", config.address)
echo("Configuration port: ", config.port)
This code defines a simple configuration file named MyAppConfig that stores two pieces of information: an address that’s a string, and a port that’s an integer. The definition is initialized using a constructor, and it’s then loaded from a local myapp.cfg file. The address and port are then accessible as fields and their values are displayed on the screen.
Specifying a configuration like this is useful because it streamlines the process of reading and writing configuration files. There’s only a single place where the configuration file is defined, and that file is very easy to read and understand.
This DSL will be written as a library named configurator. Let’s get started!
9.4.1. Starting the configurator project
Begin by creating a new configurator directory somewhere on your filesystem. As with any project, set up a project directory structure containing a src directory and a Nimble file. Remember that you can use the nimble init command to help with this. Finally, create a configurator.nim file inside the src directory, and open it in your favorite code editor.
Macros will be used to implement the configurator DSL, so import the macros module at the top of your newly created configurator.nim file.
When working on a DSL, it’s a good idea to start by writing down what you’d like the language to look like. Chances are that the code you have in mind may not be possible due to syntax restrictions,[2] so it’s a good idea to test your language’s syntax first. The easiest way to do so is to use the dumpTree macro defined in the macros module. For example, to test whether the configuration DSL can be used, you can compile the following:
These syntax restrictions are often a good thing because they ensure that Nim programmers can always parse Nim DSLs.
import macros

dumpTree:
  config MyAppConfig:
    address: string
    port: int
The dumpTree macro doesn’t need the code inside it to be defined; the code only needs to be syntactically valid. If the syntax is correct, you’ll see the compiler output its AST, and you can be sure that it can be used as a DSL.
After testing the validity of your DSL, you can write a macro for that DSL and display the various arguments’ ASTs, as in the following listing.
Listing 9.6. A simple config macro
import macros

macro config(typeName: untyped, fields: untyped): untyped =      1
  result = newStmtList()                                         2
  echo treeRepr(typeName)                                        3
  echo treeRepr(fields)                                          3

config MyAppConfig:
  address: string
  port: int
- 1 The config macro takes a type name and a list of fields.
- 2 Each macro must return a valid AST, so create a basic one here.
- 3 For now, display the AST of the typeName and fields arguments.
Save this code into configurator.nim and compile the file. You’ll see the following among the output:
Ident !"MyAppConfig"
StmtList
  Call
    Ident !"address"
    StmtList
      Ident !"string"
  Call
    Ident !"port"
    StmtList
      Ident !"int"
This gives you an idea of the AST structure that you’ll be working with. Next, it’s time to decide what code needs to be emitted in order to implement the desired code logic. To implement the example shown at the start of this section, the macro will need to create three separate constructs:
- A MyAppConfig object type, to store the configuration data
- A newMyAppConfig constructor procedure that initializes a new MyAppConfig type
- A load procedure that parses the specified file and then populates the specified instance of the MyAppConfig object with the information stored in the parsed file
The name of the generated type and constructor procedure depends on the name specified in the config construction. For the example in listing 9.6, the name specified in the config construction is MyAppConfig. This name will be used by the macro for the generated type and for the constructor, which derives its name from the generated type.
The fields included in the generated type will also depend on those specified in the config construction body. This includes the address string field and the port int field in listing 9.6.
The next three sections focus on implementing functionality in the macro to create the three constructs: an object type, a constructor procedure, and a load procedure.
9.4.2. Generating the object type
Before you begin to write AST-generation code in the macro, you’ll first need to figure out what AST you want to generate, which means you need to know the Nim code that you want the macro to emit.
Let’s start by writing down the type definition that should be generated by the config construct. You saw this construct earlier:
config MyAppConfig:
  address: string
  port: int
The type definition that needs to be generated from this is very simple:
type
  MyAppConfig = ref object
    address: string
    port: int
Two pieces of information specified in the config construct have been used to create this type definition: the type name MyAppConfig, and the two fields named address and port.
Like any code, this code can be represented as an AST, and you need to find out what that AST looks like in order to generate it. Let’s take a look at the information that dumpTree shows us about this type definition:
import macros

dumpTree:
  type
    MyAppConfig = ref object
      address: string
      port: int
Compiling this code should show the following AST.
Listing 9.7. The AST of the MyAppConfig type definition
StmtList
  TypeSection
    TypeDef
      Ident !"MyAppConfig"
      Empty                          1
      RefTy
        ObjectTy
          Empty                      2
          Empty                      2
          RecList
            IdentDefs
              Ident !"address"
              Ident !"string"
              Empty                  2
            IdentDefs
              Ident !"port"
              Ident !"int"
              Empty                  2
- 1 Empty nodes reserve space for extra features like generics in the AST.
- 2 Empty nodes reserve space for extra features like generics in the AST.
The AST in listing 9.7 contains a large number of Empty nodes. These exist for optional constructs like generics, in order to ensure that the index position of each node remains the same. This is important, because navigating an AST is done using the [] operator and an index, which you’ll see in action later in this chapter.
Now that you know what the AST that needs to be generated looks like, you can begin to write code to generate it. In some cases, the macros module contains procedures that make the process of generating an AST for a specific construct easier. Unfortunately, in this case you’ll need to generate the AST in listing 9.7 manually using certain primitive procedures because there currently is no type section constructor in the macros module. The following listing shows a procedure that generates a large chunk of the AST shown in listing 9.7.
Listing 9.8. Generating the AST for a type definition
proc createRefType(ident: NimIdent, identDefs: seq[NimNode]): NimNode =   1
  result = newTree(nnkTypeSection,                                        2
    newTree(nnkTypeDef,                                                   3
      newIdentNode(ident),                                                4
      newEmptyNode(),                                                     4
      newTree(nnkRefTy,
        newTree(nnkObjectTy,
          newEmptyNode(),                                                 4
          newEmptyNode(),                                                 4
          newTree(nnkRecList,
            identDefs
          )
        )
      )
    )
  )
- 1 This procedure takes two arguments: an identifier that specifies the name of the type to define and a list of identifier definitions, which includes information about the type’s fields. It returns a new NimNode.
- 2 Each node is created using the newTree procedure, which allows children to be easily added during its creation.
- 3 Each child node is given as an argument to the outer newTree call.
- 4 Certain specialized procedures make the process of creating nodes easier.
The code in listing 9.8 creates each node, one by one, manually using the newTree procedure. It takes a node kind as an argument, together with zero or more child nodes. These child nodes are added automatically to the resulting new Nim AST node returned by newTree.
Each node kind begins with the nnk prefix. For example, in the procedure’s body, the first line shows the creation of a nnkTypeSection node. This matches the output of dumpTree shown in listing 9.7, except that the output doesn’t contain the nnk prefixes.
Note the striking similarities between the dumpTree output shown in listing 9.7 and the code in listing 9.8. The way in which the nodes are nested is even the same. The differences lie in the procedure calls: most of them involve newTree, but there are also a couple of specialized procedures:
- newIdentNode—This procedure takes either a string or a NimIdent argument and creates an appropriate nnkIdent node out of it. A nnkIdent node can also be created via newTree, but doing so would be more verbose because the ident would also need to be assigned. An ident node can refer to any identifier, such as a variable or procedure name, but, as in this case, it may contain an identifier that hasn’t been defined yet.
- newEmptyNode—This procedure creates a new nnkEmpty node. It’s simply an alias for newTree(nnkEmpty).
Now let’s look at the createRefType procedure implemented in listing 9.8. It doesn’t generate the full AST shown in listing 9.7—it misses out on a key part, the identDefs. Instead, it accepts the identDefs as an argument and assumes that they were generated somewhere else. A single nnkIdentDefs node represents a field definition, including the name and type of the field. In order to generate these, let’s define a new procedure. The next listing shows the toIdentDefs procedure, which converts a list of call statements to a list of nnkIdentDefs nodes.
Listing 9.9. Converting a list of call statements to a list of nnkIdentDefs nodes
proc toIdentDefs(stmtList: NimNode): seq[NimNode] =
  expectKind(stmtList, nnkStmtList)                        1
  result = @[]                                             2

  for child in stmtList:                                   3
    expectKind(child, nnkCall)                             4
    result.add(                                            5
      newIdentDefs(                                        6
        child[0],                                          7
        child[1][0]                                        8
      )
    )
- 1 Ensures that the stmtList node is of kind nnkStmtList
- 2 Initializes the result variable with an empty sequence
- 3 Iterates over all child nodes in stmtList
- 4 Ensures that the child node is of kind nnkCall
- 5 Adds a nnkIdentDefs node to the result sequence
- 6 Creates a new nnkIdentDefs node
- 7 The field name. The child’s first child, such as Call -> Ident !“address”.
- 8 The field type. The child’s second child’s child, such as Call -> StmtList -> Ident !“string”.
The stmtList argument that will be passed to the toIdentDefs procedure is the second argument in the config macro. More to the point, as you saw previously, the AST of stmtList will look like this:
StmtList
  Call
    Ident !"address"
    StmtList
      Ident !"string"
  Call
    Ident !"port"
    StmtList
      Ident !"int"
It’s the job of the toIdentDefs procedure to take this AST and convert it to a list of nnkIdentDefs nodes that matches the ones in listing 9.7. The code is fairly short, but it could be shortened further at the cost of some error checking.
The expectKind procedure is used to ensure that the input AST doesn’t contain any unexpected node kinds. It’s a good idea to use this when writing macros because sometimes your macro may get an unusual AST. Adding such checks makes debugging easier and is akin to using the doAssert procedure.
The conversion process is fairly simple:
- The statement list node’s children are iterated over.
- Each child’s children and grandchildren are accessed using the [] operator to retrieve the two identifiers corresponding to the name and type of the fields.
- The newIdentDefs procedure is used to create a new nnkIdentDefs node.
- The new nnkIdentDefs node is added to the result sequence.
Both the conversion and the indexing depend on the structure of the AST. The structure shouldn’t change unless the user of the configurator library passes something unexpected in the config macro’s body. Later in this section, you’ll see how this code reacts to different inputs and how to make the failures more informative.
You have now defined enough to generate the correct type definition in the config macro. All you need to do is add a call to createRefType and toIdentDefs:
let identDefs = toIdentDefs(fields)
result.add createRefType(typeName.ident, identDefs)
Add these two lines after the result variable is defined in your macro. Then, at the end of the macro, add echo treeRepr(result) to display the produced AST. Compile the code, and your AST should match the one shown in listing 9.7.
Another way to confirm that the generated AST is correct is to convert it to code and display that. You can do so by writing echo repr(result) at the end of your file. After compiling, you should see the following:
type
  MyAppConfig = ref object
    address: string
    port: int
That’s the first and most lengthy part of this macro finished! The two remaining parts shouldn’t take as long.
9.4.3. Generating the constructor procedure
The config macro can now generate a single type definition, but this type definition needs a constructor to be usable. This section will show you how to create this very simple constructor.
The constructor doesn’t need to do much—it only needs to initialize the reference object. Because of this, the code that needs to be generated is simple:
proc newMyAppConfig(): MyAppConfig =
  new result                               1
- 1 The new call initializes the reference object in memory.
You could generate this code much like the type definition in the previous section, but there’s an easier way. Instead of manually creating the AST for the procedure and its body, you can use a template. The following code shows the required template. Add this template just above your config macro in the configurator.nim file:
template constructor(ident: untyped): untyped =
  proc `new ident`(): `ident` =                         1
    new result
- 1 For the procedure name, the compiler concatenates the text “new” with whatever the ident parameter holds. This is a simple way by which templates allow you to construct identifiers.
This template creates a new procedure, naming it newIdent, where Ident is the ident argument passed to the template. The ident argument is also used for the return type of the created procedure. If you were to call this template via constructor(MyApp-Config), you’d essentially define the following procedure:
proc newMyAppConfig(): MyAppConfig =
  new result
But how can this template be used in the config macro? The answer lies in the getAst procedure defined in the macros module. This procedure converts the code returned by a template or a macro into one or more AST nodes.
Thanks to getAst and the power of templates, you can add result.add getAst(constructor(typeName.ident)) right after the createRefType call. Your config macro should now look like the following code listing.
Listing 9.10. The config macro
macro config*(typeName: untyped, fields: untyped): untyped =
  result = newStmtList()

  let identDefs = toIdentDefs(fields)
  result.add createRefType(typeName.ident, identDefs)
  result.add getAst(constructor(typeName.ident))

  echo treeRepr(typeName)
  echo treeRepr(fields)

  echo treeRepr(result)
  echo repr(result)
You should be able to compile the code again and see that the constructor procedure is now generated.
9.4.4. Generating the load procedure
Last but not least is the load procedure. It will load the configuration file for you, parse it, and populate an instance of the configuration type with its contents.
For the config definition shown in the previous sections, which contains an address string field and a port integer field, the load procedure should be defined as follows:
proc load*(cfg: MyAppConfig, filename: string) =
  var obj = parseFile(filename)                       1
  cfg.address = obj["address"].getStr                 2
  cfg.port = obj["port"].getNum.int                   3
- 1 Loads the JSON file from filename and saves it into the obj variable
- 2 Gets the address field from the parsed JSON object, retrieves its string value, and assigns it to the configuration instance’s address field
- 3 Gets the port field from the parsed JSON object, retrieves its integer value, and assigns it to the configuration instance’s port field. The type conversion is needed because the getNum procedure returns a BiggestInt type.
For simplicity, the underlying configuration format used in this example is JSON. The load procedure starts by parsing the JSON file, and it then accesses the address and port fields in the parsed JSON object and assigns them to the configuration instance.
The address field is a string, so the load procedure uses getStr to get a string for that field. The port field is similarly filled, although in this case the field is an integer, so the getNum procedure is used. The type of the field will need to be determined by the macro when the procedure is generated.
In order to generate these statements, you’ll need information about the config fields, including their names and types. Thankfully, the code already deals with this information in the form of IdentDefs. You can reuse the IdentDefs that have already been created to generate the load procedure. Let’s take a look at these IdentDefs for the MyAppConfig definition again:
IdentDefs
  Ident !"address"
  Ident !"string"
  Empty
IdentDefs
  Ident !"port"
  Ident !"int"
  Empty
The structure is pretty simple. There are two nodes, and they each contain the field name and type. Let’s use these to generate the load procedure. I’ll show you how to write it in steps.
First, define a new createLoadProc procedure and add it just above the config macro in your configurator.nim file:
proc createLoadProc(typeName: NimIdent, identDefs: seq[NimNode]): NimNode =
Just like the createRefType procedure defined previously, createLoadProc takes two parameters: a type name and a list of IdentDefs nodes. This procedure will use a semiautomatic approach to generating the necessary AST.
The load procedure takes two parameters—a cfg and a filename—and you need to create an Ident node for each of them. In addition to that, you should create an Ident node for the obj variable used in the procedure:
var cfgIdent = newIdentNode("cfg")                    1
var filenameIdent = newIdentNode("filename")          2
var objIdent = newIdentNode("obj")                    3
- 1 The cfg parameter that will store an instance of the configuration object
- 2 The filename parameter that will store the filename of the configuration file
- 3 The obj variable that will store the parsed JSON object
Add this code to the body of the createLoadProc procedure.
The preceding code is pretty straightforward. It creates three different identifier nodes that store the names of the two parameters and one of the variables. Let’s use these to generate the first line in the load procedure:
var body = newStmtList()                              1
body.add quote do:                                    2
  var `objIdent` = parseFile(`filenameIdent`)         3
- 1 Defines a variable that stores the body of the load procedure
- 2 The quote procedure returns an expression’s AST. It allows for nodes to be quoted inside the expression.
- 3 The expression whose AST is generated is the first line of the load procedure, essentially: var obj = parseFile(filename)
Append this code to the end of the createLoadProc body.
This code starts off by creating a new StmtList node to hold the statements in the load procedure’s body. The first statement is then generated using the quote procedure defined in the macros module. The quote procedure returns a NimNode in a manner similar to the getAst procedure, but instead of needing to declare a separate template, it allows you to pass statements to it. Code inside the body of quote can be substituted by surrounding it with backticks.
In the preceding code, the name that the objIdent node holds is substituted into the var definition. A similar substitution happens for the filenameIdent node. This results in var obj = parseFile(filename) being generated.
The next step is to iterate through the IdentDefs and generate the correct field assignments based on them.
for identDef in identDefs:                                                 1
  let fieldNameIdent = identDef[0]                                         2
  let fieldName = $fieldNameIdent.ident                                    3
  case $identDef[1].ident                                                  4
  of "string":
    body.add quote do:
      `cfgIdent`.`fieldNameIdent` = `objIdent`[`fieldName`].getStr         5
  of "int":
    body.add quote do:
      `cfgIdent`.`fieldNameIdent` = `objIdent`[`fieldName`].getNum().int   6
  else:
    doAssert(false, "Not Implemented")
- 1 Iterates through the IdentDefs nodes
- 2 Retrieves the field name from the IdentDefs node
- 3 Converts the Ident into a string
- 4 Generates different code depending on the field’s type
- 5 For a string field, generates the getStr call
- 6 For an int field, generates the getNum call and a type conversion
Append this code to the end of the createLoadProc body.
This is a rather large chunk of code, but it generates very simple statements that depend on the fields specified in the config body. For the config definition shown in the previous sections, it will generate the following two statements:
cfg.address = obj["address"].getStr
cfg.port = obj["port"].getNum.int
With that code, the procedure body is fully generated. All that’s left is to create the AST for the procedure, and this can be done easily using the newProc procedure defined in the macros module.
return newProc(newIdentNode("load"),                           1
    [newEmptyNode(),                                           2
     newIdentDefs(cfgIdent, newIdentNode(typeName)),           3
     newIdentDefs(filenameIdent, newIdentNode("string"))],     4
    body)                                                      5
- 1 The name of the procedure
- 2 The return type of the procedure; an empty node is used to signify a void return type
- 3 The first procedure parameter, in this case cfg
- 4 The second procedure parameter, in this case filename
- 5 A StmtList node containing statements to be included in the body of the procedure
The newProc procedure generates the necessary AST nodes that model a procedure. You get to customize the procedure by specifying the name, the parameters, the return type, and the procedure body.
All that’s left to do is add a call to generate the load proc in the config macro. Just add result.add createLoadProc(typeName.ident, identDefs) below the getAst call.
That’s all there is to it! Let’s make sure that it all works now.
9.4.5. Testing the configurator
Before testing the code, you should create a JSON file that can be read. Create a new file called myappconfig.json beside your configurator.nim file,[3] and add the following code to it:
This was done for simplicity; ideally, you’d create a new tests directory and place the JSON file there.
{
  "address": "http://google.com",
  "port": 80
}
This will be read by the configurator in your test. The following listing shows how to test it.
Listing 9.11. Testing the config macro
import json

config MyAppConfig:
  address: string
  port: int

var myConf = newMyAppConfig()
myConf.load("myappconfig.json")
echo("Address: ", myConf.address)
echo("Port: ", myConf.port)
Add the code in listing 9.11 to the bottom of the configurator.nim file. Then compile and run the file. You should see the following output:
Address: http://google.com
Port: 80
Warning: Working directory
Be sure to run the program from the src directory; otherwise, your myappconfig.json file will not be found.
The DSL is finished! Based on this example, you should have a good idea of how DSLs can be written in Nim and how macros work. Feel free to play around with the resulting DSL. For an extra challenge, you might wish to add support for more field types or to export the generated types and procedures to make them usable from other modules.
9.5. Summary
- Metaprogramming consists of three separate constructs: generics, templates, and macros.
- Generic procedures reduce code duplication.
- Concepts are an experimental feature related to generics that allows you to specify requirements that a matched type must satisfy.
- You can define generic procedures to reduce code duplication.
- Templates are an advanced substitution mechanism; they’re expanded at compile time.
- Templates support hygiene, which is a way to control access to variables defined in them.
- Templates and macros are the only constructs that can take a code block as an argument.
- Macros work by reading, generating, and modifying code in the form of an abstract syntax tree.
- You can get an AST representation of any piece of Nim code.
- You can generate code by constructing an AST using macros.