
Chapter 7. Building a Twitter clone
This chapter covers
- Developing a Twitter clone in Nim
- Storing and querying for data in a SQL database
- Generating HTML and sending it to the user’s browser
- Deploying your web application
Web applications have become extremely popular in recent years because of their convenience and the widespread use of web browsers. Many people have taken advantage of this to become millionaires, developing the likes of Twitter, Facebook, and Google.
Large web applications consisting of many components are typically written in several different programming languages, chosen to match the requirements of the components. In most cases, the core infrastructure is written in a single language, with a few small specialized components being written in one or two different programming languages. YouTube, for example, uses C, C++, Java, and Python for its many different components, but the core infrastructure is written in Python.
Thanks to the great speed of development that Python provides, YouTube was able to evolve by quickly responding to changes and implementing new ideas rapidly. In specialized cases, C extensions were used to achieve greater performance.
Smaller web applications are typically written in a single programming language. The choice of language differs, but it’s typically a scripting language like Python, Ruby, or PHP. These languages are favored for their expressive and interpreted characteristics, which allow web applications to be iterated on quickly.
Unfortunately, applications written in those languages are typically slow, which has resulted in problems for some major websites. For example, Twitter, which was initially written in Ruby, has recently moved to Scala because Ruby was too slow to handle the high volume of tweets posted by users every day.
Websites can also be written in languages such as C++, Java, and C#, which are compiled. These languages produce very fast applications, but developing in them is not as fast as in Python or other scripting languages. This is likely due to the slow compile times in those languages, which means that you must spend more time waiting to test your application after you’ve made changes to it. Those languages are also not as expressive as Python or other scripting languages.
Nim is a hybrid. It’s a compiled language that takes inspiration from scripting languages. In many ways, it’s as expressive as any scripting language and as fast as any compiled language. Compilation times in Nim are also very fast, which makes Nim a good language for developing efficient web applications.
This chapter will lead you through the development of a web application. Specifically, it will show you how to develop a web app that’s very similar to Twitter. Of course, developing a full Twitter clone would take far too much time and effort. The version developed in this chapter will be significantly simplified.
You’ll need some knowledge of SQL for this chapter. Specifically, you’ll need to understand the structure and semantics of common SQL statements, including CREATE TABLE and SELECT.
7.1. Architecture of a web application
Developers make use of many different architectural patterns when designing a web application. Many web frameworks are based on the very popular model-view-controller (MVC) pattern and its variants. One example of an MVC framework is Ruby on Rails.
MVC is an architectural pattern that has been traditionally used for graphical user interfaces (GUIs) on the desktop. But this pattern also turned out to be very good for web applications that incorporate a user-facing interface. The MVC pattern is composed of three distinct components that are independent of each other: the model, which acts as a data store; the view, which presents data to the user; and the controller, which gives the user the ability to control the application. Figure 7.1 shows how the three different components communicate.
Figure 7.1. The three different components in the MVC architecture and how they interact

Consider a simple calculator application consisting of a number of buttons and a display. In this case, the model would be a simple database that stores the numbers that have been typed into the calculator, the view would be the display that shows the result of the current calculation, and the controller would detect any button presses and control the view and model accordingly. Figure 7.2 shows a simple graphical calculator with the different components labeled.
Figure 7.2. The three different MVC components as seen on a calculator’s GUI

It’s a good idea to design web applications using the MVC pattern, especially when writing very large applications. This pattern ensures that your code doesn’t mix database code, HTML generation code, and logic code together, leading to easier maintenance for large web applications. Depending on the use case, variations on this pattern can also be used, separating code more or less strictly. Stricter separation would mean separating the web application into more components than just the model, view, and controller, or separating it into further subgroups derived from the model, view, or controller.
When you design the architecture of a web application, you may already naturally separate your code into logical independent units. Doing so can achieve the same benefits as using the MVC pattern, with the additional benefit of making your codebase more specific to the problem you’re solving. It isn’t always necessary to abide by architectural patterns, and there are some web frameworks that are pattern agnostic. This type of framework is more suited for small web applications, or applications that don’t need to incorporate all the components of the MVC pattern.
Sinatra is one example of a framework that doesn’t enforce the MVC pattern. It’s written in Ruby, just like Ruby on Rails, but it has been designed to be minimalistic. In comparison to Ruby on Rails, Sinatra is much lighter because it lacks much of the functionality that’s common in full-fledged web application frameworks:
- Accounts, authentication, and authorization
- Database abstraction layers
- Input validation and sanitation
- Templating engines
This makes Sinatra very simple to work with, but it also means that Sinatra doesn’t support as many features out of the box as Ruby on Rails does. Sinatra instead encourages developers to work on additional packages that implement the missing functionality.
The term microframework is used to refer to minimalistic web application frameworks like Sinatra. Many microframeworks exist, some based on Sinatra and written in various programming languages. There’s even one written in Nim called Jester.
Jester is a microframework heavily based on Sinatra. At the time of writing, it’s one of the most popular Nim web frameworks. We’ll use Jester to develop the web application in this chapter, as it’s easy to get started with and it’s the most mature of the Nim web frameworks. Jester is hosted on GitHub: https://github.com/dom96/jester. Later on in this chapter, you’ll see how to install Jester using the Nimble package manager, but first I’ll explain how a microframework like Jester can be used to write web applications.
7.1.1. Routing in microframeworks
Full-fledged web frameworks usually require a big application structure to be created before you can begin developing the web application. Microframeworks, on the other hand, can be used immediately. All that’s needed is a simple definition of a route. The following listing shows a simple route definition in Jester.
Listing 7.1. A / route defined using Jester
routes:
  get "/":
    resp "Hello World!"
To better understand what a route is, let me first explain how your web browser retrieves web pages from web servers. Figure 7.3 shows an HTTP request to twitter.com.
Figure 7.3. An HTTP request to twitter.com

When you’re browsing the internet and you navigate to a website or web page, your web browser requests that page using a certain URL. For example, when navigating to the front page of Twitter, your web browser first connects to twitter.com and then asks the Twitter server to send it the contents of the front page. The exchange occurs using the HTTP protocol and looks something like the following.
Listing 7.2. A simple HTTP GET request
GET / HTTP/1.1                 1
Host: twitter.com              2
                               3
- 1 Specifies three pieces of information: the type of HTTP request used, the path of the page requested, and the HTTP protocol version
- 2 The HTTP request may include one or more headers. The Host header specifies the domain name that the web browser has connected to.
- 3 An empty line is sent to ask the server for a response.
Note the similarities between the information in listing 7.2 and listing 7.1. The two important pieces of information are the GET, which is a type of HTTP request, and the /, which is the path of the web page requested. The / path is a special path that refers to the front page.
In a web application, the path is used to distinguish between different routes. This allows you to respond with different content depending on the page requested. Jester receives HTTP requests similar to the one in listing 7.2, and it checks the path and executes the appropriate route. Figure 7.4 shows this operation in action.
Figure 7.4. HTTP requests and routing in Jester

An ordinary web application will define multiple routes, such as /register, /login, /search, and so on. The web application that you’ll develop will include similar routes. Some routes will perform certain actions, such as tweeting, whereas others will simply retrieve information.
7.1.2. The architecture of Tweeter
Tweeter is what we’ll call the simplified version of Twitter that you’ll develop in this chapter. Obviously, implementing all of Twitter’s features would take far too much time and effort. Instead, Tweeter will consist of the following features:
- Posting messages up to 140 characters
- Subscribing to another user’s posts, called following in Twitter and many other social media websites
- Viewing the messages posted by users you’re following
Some of Twitter’s features that won’t be implemented are
- User authentication: the user will simply type in their username and log in with no registration required
- Search, including hashtags
- Retweeting, replying to messages, or liking messages
That’s a pretty small set of features, but it should be more than enough to teach you the basics of web development in Nim. Through these features, you’ll learn several things:
- How web application projects are structured
- How to store data in a SQL database
- How to use Nim’s templating language
- How to use the Jester web framework
- How the resulting application can be deployed on a server
The architecture of Tweeter will roughly follow the MVC architectural pattern explained earlier.
The following information will need to be stored in a database:
- Posted messages, and the users who posted them
- The username of each user
- The names of the users that each user is following
When you’re developing web applications, it’s useful to abstract database operations into a separate module. In Tweeter, this module will be called database and it will define procedures for reading from and writing to a database. This maps well onto the model component in the MVC architecture.
HTML will need to be generated based on the data provided by the database module. You’ll create two separate views containing procedures to generate HTML: one for the front page and the other for the timelines of different users. For example, a renderMain procedure will generate an HTML page, and a renderUser procedure will generate a small bit of HTML representing a user.
Finally, the main source code file that includes the routes will act as the controller. It will receive HTTP requests from the web browser, and, based on those requests, it will perform the following actions:
- Retrieve the appropriate data from the database
- Build the HTML code based on that data
- Send the generated HTML code back to the requesting web browser
Figure 7.5 shows the process of developing these three components and their features.
Figure 7.5. The components of Tweeter and how they’ll be developed

7.2. Starting the project
The previous section described how web applications in general are designed and specifically how Tweeter will be designed, so you should have a reasonable idea of what you’ll be building in this chapter. This section describes the first steps in beginning the project, including the following:
- Setting up Tweeter’s directory structure
- Initializing a Nimble package
- Building a simple Hello World Jester web application
Just like in chapter 3, we’ll start by creating the directories and files necessary to hold the project. Create a new Tweeter directory in your preferred code directory, such as C:codeTweeter or ~/code/Tweeter. Then create a src directory inside that, and a Nim source code file named tweeter.nim inside the src directory. This directory structure is shown in the following listing.
Listing 7.3. Tweeter’s directory structure
Tweeter
└─ src
    └─ tweeter.nim
The web framework that this project will use is Jester. This is an external dependency that will need to be downloaded in order for Tweeter to compile. It could be downloaded manually, but that’s not necessary, because Jester is a Nimble package, which means that Nimble can download it for you.
Chapter 5 showed you how to use Nimble, and in this chapter you’ll use Nimble during development. To do so, you’ll need to first create a .nimble file. You may recall that Nimble’s init command can be used to generate one quickly.
To initialize a .nimble file in your project’s directory, follow these steps:
- Open a new terminal window.
- cd into your project directory by executing something like cd ~/code/Tweeter. Make sure you replace ~/code/Tweeter with the location of your project.
- Execute nimble init.
- Answer the prompts given by Nimble. You can use the default values for most of them by simply pressing Enter.
If you’ve done everything correctly, your terminal window should look something like figure 7.6.
Figure 7.6. Successful initialization of a Nimble package
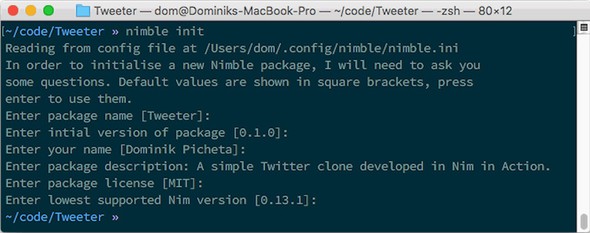
Now, open the Tweeter.nimble file that was created by Nimble. It should look similar to the following.
Listing 7.4. The Tweeter.nimble file
# Package

version       = "0.1.0"
author        = "Dominik Picheta"
description   = "A simple Twitter clone developed in Nim in Action."
license       = "MIT"

# Dependencies

requires "nim >= 0.13.1"
As you can see in the last line, in order for the Tweeter package to successfully compile, the Nim compiler’s version must be at least 0.13.1. The requires line specifies the dependency requirements of the Tweeter package. You’ll need to edit this line to introduce a requirement on the jester package. Simply edit the last line so that it reads requires "nim >= 0.13.1", "jester >= 0.0.1". Alternatively, you can add requires "jester >= 0.0.1" at the bottom of the Tweeter.nimble file.
You’ll also need to add bin = @["tweeter"] to the Tweeter.nimble file to let Nimble know which files in your package need to be compiled. You should also instruct Nimble not to install any Nim source files, by adding skipExt = @["nim"] to the file. Your Tweeter.nimble file should now contain the following lines.
Listing 7.5. The final Tweeter.nimble file
# Package

version       = "0.1.0"
author        = "Dominik Picheta"
description   = "A simple Twitter clone developed in Nim in Action."
license       = "MIT"

bin = @["tweeter"]
skipExt = @["nim"]

# Dependencies

requires "nim >= 0.13.1", "jester >= 0.0.1"
Now, open up tweeter.nim again, and write the following code in it.
Listing 7.6. A simple Jester test
import asyncdispatch                  1

import jester                         2

routes:                               36
  get "/":                            46
    resp "Hello World!"               56

runForever()                          7
- 1 This module defines the runForever procedure, which is used to run the event loop.
- 2 Imports the Jester web framework
- 3 Starts the definition of the routes
- 4 Defines a new route that will be executed when the / path is accessed using an HTTP GET request
- 5 Responds with the text “Hello World!”
- 6 These are part of the DSL defined by Jester.
- 7 Runs the asynchronous event loop forever
Go back to your terminal and execute nimble c -r src/tweeter. Your terminal should show something like what you see in figure 7.7.
Figure 7.7. The successful compilation and execution of tweeter

Compiling your project using Nimble will ensure that all dependencies of your project are satisfied. If you haven’t previously installed the Jester package, Nimble will install it for you before compiling Tweeter.
As you can see in figure 7.7, Jester lets you know in its own whimsical way about the URL that you can use to access your web application. Open a new tab in your favorite web browser and navigate to the URL indicated by Jester, typically http://localhost:5000/. At that URL, you should see the “Hello World” message shown in figure 7.8.
Figure 7.8. “Hello World!” from Jester

Your web application will continue running and responding to as many requests as you throw at it. You can terminate it by pressing Ctrl-C.
With Nimble’s help, you were able to get started with Jester relatively quickly, and you now have a good starting point for developing Tweeter. Your next task will involve working on the database module.
7.3. Storing data in a database
Tweeter will use a database module to implement the storage and querying of information related to the messages and users. This module will be designed in such a way that it can easily be extended to use a different database implementation later.
Because Nim is still relatively young, it doesn’t support as many databases as some of the more popular programming languages such as C++ or Java. It does, however, support many of the most popular ones, including Redis, which is a key-value database; MongoDB, which is a document-oriented database; MySQL, which is a relational database; and many more.
If you’re familiar with databases, you’ll know that both Redis and MongoDB are what’s known as NoSQL databases. As the name suggests, these databases don’t support SQL for making queries on the database. Instead, they implement their own language, which typically isn’t as mature or sophisticated as SQL.
It’s likely that you have more experience with relational databases than any of the many different types of NoSQL databases, so you’ll be happy to hear that Nim supports three different SQL databases out of the box. MySQL, SQLite, and PostgreSQL are all supported via the db_mysql, db_sqlite, and db_postgres modules, respectively.
Tweeter will need to store the following information in its database:
- Messages posted by users with metadata including the user that posted the message and the time it was posted
- Information about specific users, including their usernames and the names of users that they’re following
All the databases I mentioned can be used to store this information. The choice of database depends on the requirements. Throughout this chapter, I use a SQL database for development, and specifically SQLite because it’s far easier to get started with than MySQL or PostgreSQL.
MySQL and PostgreSQL support
Both MySQL and PostgreSQL are supported by Nim in the same way that SQLite is. Changing between different database backends is trivial. As far as code changes go, simply importing db_mysql or db_postgres instead of db_sqlite should be enough.
7.3.1. Setting up the types
Let’s begin by setting up the types in the database module. First, you’ll need to create a new database.nim file in Tweeter’s src directory. You can then define types in that file. These types will be used to store information about specific messages and users.
The next listing shows what those definitions look like.
Listing 7.7. The types that store a Tweeter message and user information
import times                         1
type                                 2
  User* = object                     3
    username*: string                4
    following*: seq[string]          5

  Message* = object                  6
    username*: string                7
    time*: Time                      8
    msg*: string                     9
- 1 Imports the times module, which defines the Time type needed in the definition of Message
- 2 Begins a new type definition section
- 3 Defines a new User value type
- 4 Defines a string field named username in the User type
- 5 Defines a sequence named following in the User type, which will hold a list of usernames that the user has followed
- 6 Defines a new Message value type
- 7 Defines a string field named username in the Message type. This field will specify the unique name of the user who posted the message.
- 8 Defines a floating-point time field in the Message type. This field will store the time and date when the message was posted.
- 9 Defines a string field named msg in the Message type. This field will store the message that was posted.
The User type will represent information about a single specific user, and the Message type will similarly represent information about a single specific message. To get a better idea of how messages will be represented, look at the sample Twitter message shown in figure 7.9.
Figure 7.9. A sample Twitter message

An instance of the Message type can be used to represent the data in that message, as shown in the next listing.
Listing 7.8. Representing the data in figure 7.9 using an instance of Message
var message = Message(
  username: "d0m96",
  time: parse("18:16 - 23 Feb 2016", "H:mm - d MMM yyyy").toTime,        1
  msg: "Hello to all Nim in Action readers!"
)
- 1 The parse procedure is defined in the times module. It can parse a given time in the specified format and return a TimeInfo object that holds that time.
Figure 7.9 doesn’t include information about the people I follow, but we can speculate and create an instance of the User type for it anyway.
Listing 7.9. Representing a user using an instance of User
var user = User(
  username: "d0m96",
  following: @["nim_lang", "ManningBooks"]
)
The database module needs to provide procedures that return such objects. Once those objects are returned, it’s simply a case of turning the information stored in those objects into HTML to be rendered by the web browser.
7.3.2. Setting up the database
Before the procedures for querying and storing data can be created, the database schema needs to be created and a new database initialized with it.
For the purposes of Tweeter, this is pretty simple. The User and Message types map pretty well to User and Message tables. All that you need to do is create those tables in your database.
ORM
You may be familiar with object-relational mapping libraries, which mostly automate the creation of tables based on objects. Unfortunately, Nim doesn’t yet have any mature ORM libraries that could be used. Feel free to play around with the libraries that have been released on Nimble.
I’ll use SQLite for Tweeter’s database. It’s easy to get started with, as the full database can be embedded directly in your application’s executable. Other database software needs to be set up ahead of time and configured to run as a separate server.
The creation of tables in the database is a one-off task that’s only performed when a fresh database instance needs to be created. Once the tables are created, the database can be filled with data and then queried. I’ll show you how to write a quick Nim script that will create the database and all the required tables.
Create a new file called createDatabase.nim inside Tweeter’s src directory. The next listing shows the code that you should start off with.
Listing 7.10. Connecting to a SQLite database
import db_sqlite

var db = open("tweeter.db", "", "", "")          1

db.close()
- 1 The open procedure creates a new database at the location specified. In this case, it will create a tweeter.db file in createDatabase’s working directory.
The db_sqlite module’s API has been designed so that it’s compatible with the other database modules, including db_mysql and db_postgres. This way, you can simply change the imported module to use a different database. That’s also why the open procedure in the db_sqlite module has three parameters that aren’t used.
The code in listing 7.10 doesn’t do much except initialize a new SQLite database at the specified location, or open an existing one, if it exists. The open procedure returns a DbConn object that can then be used to talk to the database.
The next step is creating the tables, and that requires some knowledge of SQL. Figure 7.10 shows what the tables will look like after they’re created.
Figure 7.10. The database tables

The following listing shows how to create the tables that store the data contained in the User and Message objects.
Listing 7.11. Creating tables in a SQLite database
import db_sqlite

var db = open("tweeter.db", "", "", "")

db.exec(sql"""                                                      1
  CREATE TABLE IF NOT EXISTS User(                                  2
    username text PRIMARY KEY                                       3
  );
""")

db.exec(sql"""                                                      1
  CREATE TABLE IF NOT EXISTS Following(                             4
    follower text,                                                  5
    followed_user text,                                             6
    PRIMARY KEY (follower, followed_user)                           7
    FOREIGN KEY (follower) REFERENCES User(username),               8
    FOREIGN KEY (followed_user) REFERENCES User(username)           8
  );
""")

db.exec(sql"""                                                      9
  CREATE TABLE IF NOT EXISTS Message(                               10
    username text,                                                  11
    time integer,
    msg text NOT NULL,                                              12
    FOREIGN KEY (username) REFERENCES User(username)                13
  );
""")

echo("Database created successfully!")

db.close()
- 1 The sql procedure converts a string literal into a SqlQuery string that can then be passed to exec.
- 2 Creates a new table, as long as the database doesn’t already contain it
- 3 Specifies that the User table should contain a username field and that it should be a primary key[1]In some cases, it may be faster to use an integer as the primary key. This isn’t done here for simplicity.
- 4 Creates a new table, as long as the database doesn’t already contain it
- 5 Contains the username of the follower
- 6 Contains the username of the user that the follower is following
- 7 Specifies that the follower and followed_user fields are, together, the primary key
- 8 Creates a foreign-key constraint, ensuring that the data added to the database is correct
- 9 The sql procedure converts a string literal into a SqlQuery string that can then be passed to exec.
- 10 Creates a new table, as long as the database doesn’t already contain it
- 11 Contains the username of the user who posted the message
- 12 Contains the actual message text; a NOT NULL key constraint is also present to ensure that it’s not null
- 13 Contains the time when the message was posted, stored as UNIX time, the number of seconds since 1970-01-01 00:00:00 UTC
Whew. That’s a lot of SQL. Let me explain it in a bit more detail.
Each exec line executes a separate piece of SQL, and an error is raised if that SQL isn’t executed successfully. Otherwise, a new SQL table is successfully created with the specified fields. After the code in listing 7.11 is finished executing, the resulting database will contain three different tables. The Following table is required because SQLite doesn’t support arrays.
The table definitions contains many table constraints, which prevent invalid data from being stored in the database. For example, the FOREIGN KEY constraints present in the Following table ensure that the followed_user and follower fields contain usernames that are already stored in the User table.
Save the code in listing 7.11 in your createDatabase.nim file, and then compile and run it by executing nimble c -r src/createDatabase. You should see a “Database created successfully!” message and a tweeter.db file in Tweeter’s directory.
Your database has been created, and you’re now ready to start defining procedures for storing and retrieving data.
7.3.3. Storing and retrieving data
The createDatabase.nim file is now finished, so you can switch back to the database.nim file. This section explains how you can begin adding data into the database and how to then get the data back out.
Let’s start with storing data in the database. These three actions in Tweeter will trigger data to be added to the database:
- Posting a new message
- Following a user
- Creating an account
The database module should define procedures for those three actions, as follows:
proc post(message: Message)
proc follow(follower: User, user: User)
proc create(user: User)
Each procedure corresponds to a single action. Figure 7.11 shows how the follow procedure will modify the database.
Figure 7.11. Storing follow data in the database

Each of those procedures simply needs to execute the appropriate SQL statements to store the desired data. And in order to do that, the procedures will need to take a DbConn object as a parameter. The DbConn object should be saved in a custom Database object so that it can be changed if required in the future. The following listing shows the definition of the Database type.
Listing 7.12. The Database type
import db_sqlite
type
  Database* = ref object
    db: DbConn

proc newDatabase*(filename = "tweeter.db"): Database =
  new result
  result.db = open(filename, "", "", "")
Add the import statement, the type definition, and the corresponding constructor to the top of your database.nim file. After you do so, you’ll be ready to implement the post, follow, and create procedures.
The following listing shows how they can be implemented.
Listing 7.13. Implementing the post, follow, and create procedures
proc post*(database: Database, message: Message) =
  if message.msg.len > 140:                                                1
    raise newException(ValueError, "Message has to be less than 140 characters.")

  database.db.exec(sql"INSERT INTO Message VALUES (?, ?, ?);",              2
    message.username, $message.time.toSeconds().int, message.msg)          3

proc follow*(database: Database, follower: User, user: User) =
  database.db.exec(sql"INSERT INTO Following VALUES (?, ?);",               2
    follower.username, user.username)

proc create*(database: Database, user: User) =
  database.db.exec(sql"INSERT INTO User VALUES (?);", user.username)        2
- 1 Verifies that the message length isn’t greater than 140 characters. If it is, raises an exception.[2]This won’t handle Unicode accurately, as len doesn’t return the number of Unicode characters in the string. You may wish to look at the unicode module to fix this.
- 2 Inserts a row into the specified table. The question marks are replaced with the values passed in after the SQL statement. The exec procedure ensures that the values are escaped to prevent SQL injections.
- 3 The time, which has type Time, is converted into the number of seconds since the UNIX epoch by calling toSeconds. The float result is then converted into an int.
The code in listing 7.13 is fairly straightforward, and the annotations explain the important parts of the code. These procedures should work perfectly well, but you should still test them. In order to do so, you’ll need a way to query for data.
This gives us a good excuse to implement the procedures needed to get information from the database. As before, let’s think about the actions that will prompt the retrieval of data from the database.
The primary way that the user will interact with Tweeter will be via its front page. Initially, the front page will ask the user for their username, and Tweeter will need to check whether that username has already been created. A procedure called findUser will be defined to check whether a username exists in the database. This procedure should return a new User object containing both the user’s username and a list of users being followed. If the username doesn’t exist, an account for it will be created, and the user will be logged in.
At that point, the user will be shown a list of messages posted by the users that they follow. A procedure called findMessages will take a list of users and return the messages that those users posted, in chronological order.
Each of the messages shown to the user will contain a link to the profile of the user who posted it. Once the user clicks that link, they’ll be shown messages posted only by that user. The findMessages procedure will be flexible enough to be reused for this purpose.
Let’s define those two procedures. The following listing shows their definitions and implementations.
Listing 7.14. Implementing the findUser and findMessages procedures
import strutils
proc findUser*(database: Database, username: string, user: var User): bool = 1
  let row = database.db.getRow(
      sql"SELECT username FROM User WHERE username = ?;", username)           2
  if row[0].len == 0: return false                                           3
  else: user.username = row[0]

  let following = database.db.getAllRows(
      sql"SELECT followed_user FROM Following WHERE follower = ?;", username) 4
  user.following = @[]
  for row in following:                                                      5
    if row[0].len != 0:
      user.following.add(row[0])

  return true

proc findMessages*(database: Database, usernames: seq[string],
    limit = 10): seq[Message] =                                              6
  result = @[]                                                               7
  if usernames.len == 0: return
  var whereClause = " WHERE "
  for i in 0 .. <usernames.len:                                              8
    whereClause.add("username = ? ")
    if i != <usernames.len:
      whereClause.add("or ")

  let messages = database.db.getAllRows(                                     9
      sql("SELECT username, time, msg FROM Message" &
          whereClause &
          "ORDER BY time DESC LIMIT " & $limit),
      usernames)
  for row in messages:                                                       10
    result.add(Message(username: row[0], time: fromSeconds(row[1].parseInt), msg: row[2]))
- 1 This procedure returns a Boolean that determines whether the user was found. The User object is saved in the user parameter.
- 2 Finds a row with the specified username in the database
- 3 False is returned when the database doesn’t contain the username specified.
- 4 Finds the usernames of people that the user with the specified username is following
- 5 Iterates through each row that specifies who the user is following, and adds each username to the list named following
- 6 This procedure takes an optional limit parameter. Its default value is 10, and it specifies the number of messages that this procedure will return.
- 7 Initializes the seq[Message] so that items can be added to it
- 8 Adds “username = ?” to the whereClause for each username specified in usernames. This ensures that the SQL query returns messages from each of the usernames specified.
- 9 Asks the database to return a list of all the messages from usernames in chronological order, limited to the value of limit
- 10 Iterates through each of the messages and adds them to the resultant sequence. The returned time integer, which is the number of seconds since the UNIX epoch, is converted into a Time object by the fromSeconds procedure.
Add these procedures to your database.nim file. Make sure you also import the strutils module, which defines parseInt.
These procedures are significantly more complicated than those implemented in listing 7.13. The findUser procedure makes a query to find the specified user, but it then also makes another query to find who the user is following. The findMessages procedure requires some string manipulation to build part of the SQL query because the number of usernames passed into this procedure can vary. Once the WHERE clause of the SQL query is built, the rest is fairly simple. The SQL query also contains two keywords: the ORDER BY keyword instructs SQLite to sort the resulting messages based on the time they were posted, and the LIMIT keyword ensures that only a certain number of messages are returned.
7.3.4. Testing the database
The database module is now ready to be tested. Let’s write some simple unit tests to ensure that all the procedures in it are working correctly.
You can start by creating a new directory called tests in Tweeter’s root directory. Then, create a new file called database_test.nim in the tests directory. Type import database into database_test.nim, and then try to compile it by executing nimble c tests/database_test.nim.
The compilation will fail with “Error: cannot open ‘database’.” This is due to the unfortunate fact that neither Nim nor Nimble has any way of finding the database module. This module is hidden away in your src directory, so it can’t be found.
To get around this, you’ll need to create a new file called database_test.nim.cfg in the tests directory. Inside it, write --path:"../src". This will instruct the Nim compiler to look for modules in the src directory when compiling the database_test module. Verify that the database_test.nim file now compiles.
The test will need to create its own database instance so that it doesn’t overwrite Tweeter’s database instance. Unfortunately, the code for setting up the database is in the createDatabase module. You’re going to have to move the bulk of that code into the database module so that database_test can use it. The new createDatabase.nim file will be much smaller after you add the procedures shown in listing 7.15 to the database module. Listing 7.16 shows the new createDatabase.nim implementation.
Listing 7.15. The setup and close procedures destined for database.nim
proc close*(database: Database) =         1
 database.db.close()

proc setup*(database: Database) =         2
  database.db.exec(sql"""
    CREATE TABLE IF NOT EXISTS User(
      username text PRIMARY KEY
    );
  """)

  database.db.exec(sql"""
    CREATE TABLE IF NOT EXISTS Following(
      follower text,
      followed_user text,
      PRIMARY KEY (follower, followed_user),
      FOREIGN KEY (follower) REFERENCES User(username),
      FOREIGN KEY (followed_user) REFERENCES User(username)
    );
  """)

  database.db.exec(sql"""
    CREATE TABLE IF NOT EXISTS Message(
      username text,
      time integer,
      msg text NOT NULL,
      FOREIGN KEY (username) REFERENCES User(username)
    );
  """)
- 1 The close procedure closes the database and returns any allocated resources to the OS.
- 2 The setup procedure initializes the database with the User, Following, and Message tables.
Listing 7.16. The new implementation of createDatabase.nim
import database

var db = newDatabase()
db.setup()
echo("Database created successfully!")
db.close()
Add the code in listing 7.15 to database.nim, and replace the contents of createDatabase.nim with the code in listing 7.16.
Now that this small reorganization of code is complete, you can start writing test code in the database_test.nim file. The following listing shows a simple test of the database module.
Listing 7.17. A test of the database module
import database

import os, times
when isMainModule:
  removeFile("tweeter_test.db")                                         1
  var db = newDatabase("tweeter_test.db")                               2
  db.setup()                                                            3

  db.create(User(username: "d0m96"))                                    4
  db.create(User(username: "nim_lang"))                                 4

  db.post(Message(username: "nim_lang", time: getTime() - 4.seconds,    5
      msg: "Hello Nim in Action readers"))
  db.post(Message(username: "nim_lang", time: getTime(),                5
      msg: "99.9% off Nim in Action for everyone, for the next minute only!"))

  var dom: User
  doAssert db.findUser("d0m96", dom)                                    6
  var nim: User
  doAssert db.findUser("nim_lang", nim)                                 6
  db.follow(dom, nim)                                                   7

  doAssert db.findUser("d0m96", dom)                                    8

  let messages = db.findMessages(dom.following)                         9
  echo(messages)
  doAssert(messages[0].msg == "99.9% off Nim in Action for everyone,
    for the next minute only!")
  doAssert(messages[1].msg == "Hello Nim in Action readers")
  echo("All tests finished successfully!")
for the next minute only!")
doAssert(messages[1].msg == "Hello Nim in Action readers")
echo("All tests finished successfully!")
- 1 Removes the old test database
- 2 Creates a new tweeter_test.db database
- 3 Creates the tables in the SQLite database
- 4 Tests user creation
- 5 Posts two messages 4 seconds apart, with the first message posted in the past and the second in the present
- 6 Tests the findUser procedure. It should return true in both cases because the d0m96 and nim_lang users have been created.
- 7 Tests the follow procedure
- 8 Rereads the user information for d0m96 to ensure that the “following” information is correct
- 9 Tests the findMessages procedure
This test is very large. It tests the database module as a whole, which is necessary to test it fully. Try to compile it yourself, and you should see the two messages displayed on your screen followed by “All tests finished successfully!”
That’s it for this section. The database module is complete, and it can store information about users including who they’re following and the messages they post. The module can also read that data back. All of this is exposed in an API that abstracts the database away and defines only the procedures needed to build the Tweeter web application.
7.4. Developing the web application’s view
Now that the database module is complete, it’s time to start developing the web component of this application.
The database module provides the data needed by the application. It’s the equivalent of the model component in the MVC architectural pattern. The two components that are left are the view and the controller. The controller acts as a link joining the view and model components together, so it’s best to implement the view first.
In Tweeter’s case, the view will contain multiple modules, each defining one or more procedures that will take data as input and return HTML as output. The HTML will represent the data in a way that can be rendered by a web browser and displayed appropriately to the user.
One of the view procedures will be called renderUser. It will take a User object and generate HTML, which will be returned as a string. Figure 7.12 is a simplified illustration of how this procedure, together with the database module and the controller, will display the information about a user to the person accessing the web application.
Figure 7.12. The process of displaying information about a user in the web browser

There are many ways to implement procedures that convert information into HTML, like the renderUser procedure. One way is to use the % string formatting operator to build up a string based on the data:
import strutils
proc renderUser(user: User): string =
  return "<div><h1>$1</h1><span>Following: $2</span></div>" %
          [user.username, $user.following.len]
Unfortunately, this is very error prone, and it doesn’t ensure that special characters such as ampersands or < characters are escaped. Not escaping such characters can cause invalid HTML to be generated, which would lead to invalid data being shown to the user. More importantly, this can be a major security risk!
Nim supports two methods of generating HTML that are more intuitive. The first is defined in the htmlgen module. This module defines a DSL for generating HTML. Here’s how it can be used:
import htmlgen
proc renderUser(user: User): string =
  return `div`(                                     1
    h1(user.username),                              2
    span("Following: ", $user.following.len)        3
  )
- 1 The backticks (`) around the div are needed because “div” is a keyword.
- 2 The username passed to h1 becomes the <h1> tag’s content.
- 3 Only strings are accepted, so the length must be explicitly converted to a string using the $ operator.
This method of generating HTML is great when the generated HTML is small. But there’s another more powerful method of generating HTML called filters. The following listing shows filters in action.
Listing 7.18. Using a Nim filter to generate HTML
#? stdtmpl(subsChar = '$', metaChar = '#')                       1
#import "../database"                                            2
#                                                                3
#proc renderUser*(user: User): string =
#  result = ""                                                   4
<div id="user">                                                  5
  <h1>${user.username}</h1>
  <span>${$user.following.len}</span>
</div>
#end proc                                                        6
#
#when isMainModule:
#  echo renderUser(User(username: "d0m96", following: @[]))
#end when
- 1 This line, the filter definition, allows you to customize the behavior of the filter.
- 2 This file assumes that it’s placed in a views subdirectory. This is why the “..” is necessary to import “database”.
- 3 In filters, it’s important to ensure that all lines are prefixed with #.
- 4 In the filter, an ordinary procedure is created, and in it you need to initialize the result variable.
- 5 Each line that doesn’t begin with # is converted to result.add by the compiler.
- 6 Keywords delimit where the procedure ends because indentation doesn’t work well in templates such as these.
Filters allow you to mix Nim code together with any other code. This way, HTML can be written verbatim and Nim code can still be used. Create a new folder called views in the src directory of Tweeter, and then save the contents of listing 7.18 into views/user.nim. Then, compile the file. You should see the following output:
<div id="user">
  <h1>d0m96</h1>
  <span>0</span>
</div>
Filters are very powerful and can be customized extensively.
Warning: An important filter gotcha
When writing filters, be sure that all the empty lines are prefixed with #. If you forget to do so, you’ll get errors such as “undeclared identifier: result” in your code.
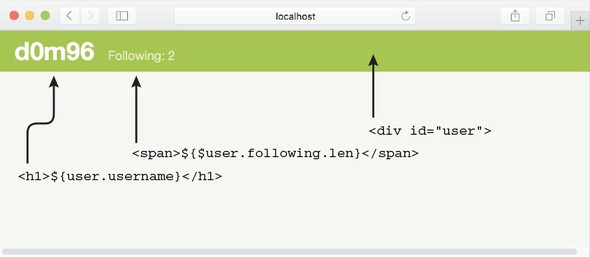
Figure 7.13 shows the view that the renderUser procedure will create.
Figure 7.13. The view created by listing 7.18
The code shown in listing 7.18 still suffers from the same problems as the first example in this section: it doesn’t escape special characters. But thanks to the filter’s flexibility, this can easily be repaired, as follows.
Listing 7.19. Escaping special characters in views/user.nim
#? stdtmpl(subsChar = '$', metaChar = '#', toString = "xmltree.escape")  1
#import "../database"
#import xmltree                                                          2
#
#proc renderUser*(user: User): string =
#  result = ""
<div id="user">
  <h1>${user.username}</h1>
  <span>Following: ${$user.following.len}</span>
</div>
#end proc
#
#when isMainModule:
#  echo renderUser(User(username: "d0m96<>", following: @[]))            3
#end when
- 1 This parameter specifies the operation applied to each expression, such as ${user.username}. Here, the toString parameter is overwritten with a new xmltree.escape string to escape the expression.
- 2 The xmltree module that defines escape needs to be imported.
- 3 The username of the user is now d0m96<> to test the escape mechanism.
Filter definitions
You can learn more about how to customize filters by taking a look at their documentation: http://nim-lang.org/docs/filters.html.
Save this file in views/user.nim and note the new output. Everything should be as before, except for the <h1> tag, which should read <h1>d0m96<></h1>. Note how the <> is escaped as <>.
7.4.1. Developing the user view
The vast majority of the user view is already implemented in the view/user.nim file. The procedures defined in this view will be used whenever a specific user’s page is accessed.
The user’s page will display some basic information about the user and all of the user’s messages. Basic information about the user is already presented in the form of HTML by the renderUser procedure.
The renderUser procedure needs to include Follow and Unfollow buttons. Instead of making the renderUser procedure more complicated, let’s overload it with a new renderUser procedure that takes an additional parameter called currentUser. The following listing shows its implementation. Add it to the view/user.nim file.
Listing 7.20. The second renderUser procedure
#proc renderUser*(user: User, currentUser: User): string =                 1
#  result = ""
<div id="user">
  <h1>${user.username}</h1>
  <span>Following: ${$user.following.len}</span>
  #if user.username notin currentUser.following:                           2
  <form action="follow" method="post">                                     3
    <input type="hidden" name="follower" value="${currentUser.username}">  4
    <input type="hidden" name="target" value="${user.username}">           4
    <input type="submit" value="Follow">
  </form>
  #end if
</div>
#
#end proc
- 1 This procedure definition is almost identical to the previous renderUser procedure. The difference is in the parameters, in this case the addition of the currentUser parameter.
- 2 Checks to see if the currently logged-in user is already following the specified user. If not, creates a Follow button.
- 3 Adds a form that contains a Follow or Unfollow button. The form is submitted to the /follow route.
- 4 Hidden fields are used to pass information to the /follow route.
Figure 7.14 shows what the follow button will look like once its rendered.
Figure 7.14. The Follow button constructed by renderUser in listing 7.20

Now, let’s implement a renderMessages procedure. The next listing shows the full implementation of the renderMessages procedure, together with the renderUser procedures implemented in the previous section.
Listing 7.21. Final views/user.nim with the new renderMessages procedure
#? stdtmpl(subsChar = '$', metaChar = '#', toString = "xmltree.escape")
#import "../database"
#import xmltree
#import times                                                                1
#
#proc renderUser*(user: User): string =
#  result = ""
<div id="user">
  <h1>${user.username}</h1>
  <span>Following: ${$user.following.len}</span>
</div>
#end proc
#
#proc renderUser*(user: User, currentUser: User): string =
#  result = ""
<div id="user">
  <h1>${user.username}</h1>
  <span>Following: ${$user.following.len}</span>
  #if user.username notin currentUser.following:
  <form action="follow" method="post">
    <input type="hidden" name="follower" value="${currentUser.username}">
    <input type="hidden" name="target" value="${user.username}">
    <input type="submit" value="Follow">
  </form>
  #end if
</div>
#
#end proc
#
#proc renderMessages*(messages: seq[Message]): string =                      2
#  result = ""                                                               3
<div id="messages">                                                          4
  #for message in messages:                                                  5
    <div>
      <a href="/${message.username}">${message.username}</a>                 6
      <span>${message.time.getGMTime().format("HH:mm MMMM d',' yyyy")}</span>8
      <h3>${message.msg}</h3>                                                8
    </div>
  #end for                                                                   9
</div>
#end proc
#
#when isMainModule:
#  echo renderUser(User(username: "d0m96<>", following: @[]))
#  echo renderMessages(@[                                                    10
#    Message(username: "d0m96", time: getTime(), msg: "Hello World!"),
#    Message(username: "d0m96", time: getTime(), msg: "Testing")
#  ])
#end when
- 1 The times module is imported so that the time can be formatted.
- 2 The new renderMessages procedure takes a list of messages and returns a single string.
- 3 As before, result is initialized so that text can be appended to it by the filter.
- 4 The procedure will first emit a new <div> tag.
- 5 Iterates through all messages. All the following HTML code will be added verbatim in each iteration.
- 6 Adds the username to the HTML first.
- 7 The time when the message was created is formatted and added to the HTML.
- 8 Message text is added last.
- 9 The for loop is explicitly finished by the “end for” keywords.
- 10 The renderMessages procedure is tested with some messages.
Replace the contents of your views/user.nim file with the contents of listing 7.21. Then compile and run it. You should see something similar to the following:
<div id="user">
<h1>d0m96<></h1>
<span>Following: 0</span>
</div>
<div id="messages">
<div>
<a href="/d0m96">d0m96</a>
<span>12:37 March 2, 2016</span>
<h3>Hello World!</h3>
</div>
<div>
<a href="/d0m96">d0m96</a>
<span>12:37 March 2, 2016</span>
<h3>Testing</h3>
</div>
</div>
Figure 7.15 shows what the rendered message will look like.
Figure 7.15. A message produced by renderMessages

And that’s it for the user view. All you need to do now is build the remaining views.
7.4.2. Developing the general view
The user view will be used for a specific user’s page. All that remains to be created is the front page. The front page will either show a login form or, if the user has logged in, it will show the messages posted by the people that the user follows.
This general view will be used as the front page of Tweeter, so for simplicity we’ll implement the procedures in a new file called general.nim. Create this file in the views directory now.
One important procedure that we haven’t implemented yet is one that will generate the main body of the HTML page. Let’s implement this now as a renderMain procedure and add it to the new general.nim file. The following listing shows the implementation of renderMain.
Listing 7.22. Implementing the renderMain procedure
#? stdtmpl(subsChar = '$', metaChar = '#')             1
#import xmltree
#
#proc `$!`(text: string): string = escape(text)        2
#end proc
#
#proc renderMain*(body: string): string =              3
#  result = ""
<!DOCTYPE html>
<html>
  <head>
    <title>Tweeter written in Nim</title>
    <link rel="stylesheet" type="text/css" href="style.css">
  </head>

  <body>
    <div id="main">
      ${body}
    </div>
  </body>

</html>
#end proc
- 1 The toString parameter is no longer set in the filter definition.
- 2 Defines a new operator that can be used to escape text easily
- 3 Defines the renderMain procedure, which simply generates a new HTML document and inserts the body of the page inside the <div> tag
The code is fairly straightforward. The renderMain procedure takes a parameter called body containing the HTML code that should be inserted into the body of the HTML page. In comparison to listing 7.21, the toString parameter is no longer used to ensure that the body isn’t escaped. Instead, a new operator called $! has been introduced. This operator is simply an alias for the escape procedure. This means that you can easily decide which of the strings you’re embedding will be escaped and which won’t be.
Now that the renderMain procedure has been implemented, it’s time to move on to implementing the remaining two procedures: renderLogin and renderTimeline. The first procedure will show a simple login form, and the second will show the user their timeline. The timeline is the messages posted by people that the user is following.
Let’s start with renderLogin. The following listing shows how it can be implemented.
Listing 7.23. The implementation of renderLogin
#proc renderLogin*(): string =
#  result = ""
<div id="login">
  <span>Login</span>
  <span class="small">Please type in your username...</span>
  <form action="login" method="post">
    <input type="text" name="username">
    <input type="submit" value="Login">
  </form>
</div>
#end proc
This procedure is very simple because it doesn’t take any arguments. It simply returns a piece of static HTML representing a login form. Figure 7.16 shows what this looks like when rendered in a web browser. Add this procedure to the bottom of the general .nim file.
Figure 7.16. The rendered login page

The renderTimeline procedure, shown next, is also fairly straightforward, even though it takes two parameters. Add this procedure to the bottom of general.nim, and make sure that you also import "../database" and user at the top of the file.
Listing 7.24. The implementation of renderTimeline
#proc renderTimeline*(username: string, messages: seq[Message]): string =
#  result = ""
<div id="user">
  <h1>${$!username}'s timeline</h1>
</div>
<div id="newMessage">
  <span>New message</span>
  <form action="createMessage" method="post">
    <input type="text" name="message">
    <input type="hidden" name="username" value="${$!username}">         1
    <input type="submit" value="Tweet">
  </form>
</div>
${renderMessages(messages)}                                             2
#end proc
- 1 The $! operator is used here to ensure that username is escaped.
- 2 The renderMessages procedure is called, and its result is inserted into the generated HTML.
The preceding implementation is fairly simple. It first creates a <div> tag that holds the title, and then a <div> tag that allows the user to tweet a new message. Finally, the renderMessages procedure defined in the user module is called.
For completeness, here’s the full general.nim code.
Listing 7.25. The final code of general.nim
#? stdtmpl(subsChar = '$', metaChar = '#')
#import "../database"
#import user
#import xmltree
#
#proc `$!`(text: string): string = escape(text)
#end proc
#
#proc renderMain*(body: string): string =
#  result = ""
<!DOCTYPE html>
<html>
  <head>
    <title>Tweeter written in Nim</title>
    <link rel="stylesheet" type="text/css" href="style.css">
  </head>

  <body>
    ${body}
  </body>

</html>
#end proc
#
#proc renderLogin*(): string =
#  result = ""
<div id="login">
  <span>Login</span>
  <span class="small">Please type in your username...</span>
  <form action="login" method="post">
    <input type="text" name="username">
    <input type="submit" value="Login">
  </form>
</div>
#end proc
#
#proc renderTimeline*(username: string, messages: seq[Message]): string =
#  result = ""
<div id="user">
  <h1>${$!username}'s timeline</h1>
</div>
<div id="newMessage">
  <span>New message</span>
  <form action="createMessage" method="post">
    <input type="text" name="message">
    <input type="hidden" name="username" value="${$!username}">
    <input type="submit" value="Tweet">
  </form>
</div>
${renderMessages(messages)}
#end proc
With that, the view components are complete, and Tweeter is very close to being finished. All that’s left is the component that ties the database and views together.
7.5. Developing the controller
The controller will tie the database module and the two different views together. Compared to the three modules you’ve already implemented, the controller will be much smaller. The bulk of the work is now essentially behind you.
You’ve already created a file, tweeter.nim, that implements the controller. Open this file now, so that you can begin editing it.
This file currently contains one route: the / route. You’ll need to modify this route so that it responds with the HTML for the login page. To do so, start by importing the different modules that you implemented in the previous section: database, views/user, and views/general. You can use the following code to import these modules:
import database, views/user, views/general
Once you’ve done that, you can modify the / route so that it sends the login page to the user’s web browser:
get "/":
  resp renderMain(renderLogin())
Save your newly modified tweeter.nim file, and then compile and run it. Open a new web browser tab and navigate to http://localhost:5000. You should see a login form, albeit a very white one. It might look similar to figure 7.17.
Figure 7.17. The unstyled login form

Let’s add some CSS style to this page. If you’re familiar with CSS and are confident in your web design abilities, I encourage you to write some CSS yourself to create a nice design for Tweeter’s login page.
Share your CSS
If you do end up designing your own Tweeter, please share what you come up with on Twitter with the hashtag #NimInActionTweeter. I’d love to see what you come up with. If you don’t have Twitter, you can also post it on the Nim forums or the Manning forums at http://forum.nim-lang.org and https://forums.manning.com/forums/nim-in-action, respectively.
If you’re more like myself and don’t have any web design abilities whatsoever, you can use the CSS available at the following URL: https://github.com/dom96/nim-in-action-code/blob/master/Chapter7/Tweeter/public/style.css.
The CSS file should be placed in a directory named public. Create this directory now, and save your CSS file as style.css. When a page is requested, Jester will check the public directory for any files that match the page requested. If the requested page exists in the public directory, Jester will send that page to the browser.
Static file directory
The public directory is known as the static file directory. This directory is set to public by default, but it can be configured using the setStaticDir procedure or in a settings block. For more information on static file config in Jester, see the documentation on GitHub: https://github.com/dom96/jester#static-files.
Once you’ve placed the CSS file in the public directory, refresh the page. You should see that the login page is now styled. It should look something like the screen in figure 7.18 (or it may look better if you wrote your own CSS).
Figure 7.18. The login page

Type in a username, and click the Login button. You’ll see an error message reading “404 Not Found.” Take a look at your terminal and see what Jester displayed there. You should see something similar to figure 7.19.
Figure 7.19. Debug information from Jester
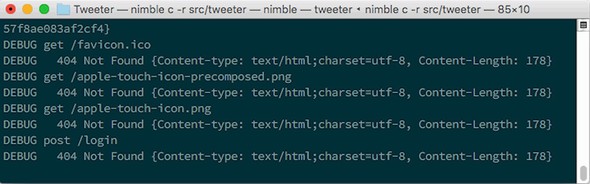
Note the last line, which reads as follows:
DEBUG post /login
DEBUG   404 Not Found {Content-type: text/html;charset=utf-8, Content-Length: 178}
This specifies that an HTTP post request was made to the /login page. A route for the /login page hasn’t yet been created, so Jester responds with a “404 Not Found” error.
7.5.1. Implementing the /login route
Let’s implement the /login route now. Its implementation is short.
Listing 7.26. The /login route
post "/login":                                                           1
  setCookie("username", @"username", getTime().getGMTime() + 2.hours)    2
  redirect("/")                                                          3
- 1 Specifies a new POST route on the path /login. Any HTTP POST requests on /login will activate this route, and the code in its body will be executed.
- 2 Sets a new cookie with a key of “username” and tells it to expire in 2 hours. The cookie’s value is set to the username that the user typed into the login box on the front page.
- 3 Asks Jester to redirect the user’s web browser to the front page
Add the code in listing 7.26 to tweeter.nim, and make sure it’s indented just like the other route. You’ll also need to import the times module. The preceding code may seem a bit magical, so let me explain it in more detail.
The code does two simple things: it sets a cookie and then redirects the user to the front page of Tweeter.
A cookie is a piece of data stored in a user’s browser. It’s composed of a key, a value, and an expiration date. The cookie created in this route stores the username that was typed in by the user just before the Login button was clicked. This username was sent together with the HTTP request when the Login button was clicked. It’s referred to by "username" because that’s the name of the <input> tag that was created in the renderLogin procedure. The value of "username" is accessed in Jester using the @ operator.
The expiration date of the cookie is calculated using a special + operator that adds a TimeInterval to a TimeInfo object. In this case, it creates a date that’s 2 hours in the future. At the end of the code, the route finishes by redirecting the user to the front page.
Recompile tweeter.nim, run it, and test it out. You should now be able to type in a new username, click Login, and see the web browser navigate to the front page automatically. Notice what’s happening in your terminal, and particularly the following line:
DEBUG post /login
DEBUG   303 See Other {Set-Cookie: username=test; Expires=Wed,
02 Mar 2016 21:57:29 UTC, Content-Length: 0, Location: /}
The last line is actually the response that Jester sent, together with the HTTP headers, which include a Set-Cookie header. Figure 7.20 shows this in action. The cookie is set, but the user is redirected back to the front page.
Figure 7.20. The current login process

7.5.2. Extending the / route
The cookie is set, but the user is still shown the front page without actually being logged in. Let’s fix that. The following listing shows a modified version of the / route that fixes this problem.
Listing 7.27. The / route
let db = newDatabase()                                                     1

routes:
  get "/":
    if request.cookies.hasKey("username"):                                 2
      var user: User
      if not db.findUser(request.cookies["username"], user):               3
        user = User(username: request.cookies["username"], following: @[]) 4
        db.create(user)                                                    4
      let messages = db.findMessages(user.following)                       5
      resp renderMain(renderTimeline(user.username, messages))             6
    else:
      resp renderMain(renderLogin())                                       7
- 1 Creates a new database instance that will open the database saved in tweeter.db. This is done inside a global variable so that every route can access it.
- 2 Checks if the cookie has been set
- 3 Checks if the username already exists in the database
- 4 If the username doesn’t exist in the database, creates it
- 5 Retrieves the messages posted by the users that the logged-in user is following
- 6 Uses the renderTimeline procedure to render the user’s timeline, and then passes the result to renderMain, which returns a fully rendered web page
- 7 If the cookie isn’t set, shows the login page
Modify tweeter.nim by replacing the / route with the code in listing 7.27. Then recompile and run Tweeter again. Navigate to http://localhost:5000, type test into the Login text box, and click Login. You should now be able to see test’s timeline, which should look similar to the screenshot in figure 7.21.
Figure 7.21. A simple timeline

Congratulations, you’ve almost created your very own Twitter clone!
7.5.3. Implementing the /createMessage route
Let’s keep going. The next step is to implement the tweeting functionality. Clicking the Tweet button will try to take you to the /createMessage route, resulting in another 404 error.
The following listing shows how the /createMessage route can be implemented.
Listing 7.28. The /createMessage route
post "/createMessage":
  let message = Message(
    username: @"username",
    time: getTime(),
    msg: @"message"
  )
  db.post(message)
  redirect("/")
This route initializes a new Message and uses the post procedure defined in the database module to save the message in the database. It then redirects the browser to the front page.
Add this code to the bottom of your routes. Then recompile, run Tweeter, and navigate to http://localhost:5000. After logging in, you should be able to start tweeting. Unfortunately, you’ll quickly notice that the tweets you create aren’t appearing. This is because your username isn’t passed to the findMessages procedure in the / route.
To fix this problem, change let messages = db.findMessages(user.following) to let messages = db.findMessages(user.following & user.username). Recompile and run Tweeter again. You should now be able to see the messages you’ve created. Figure 7.22 shows an example of what that will look like.
Figure 7.22. A timeline with messages

7.5.4. Implementing the user route
The username in the message is clickable; it takes you to the user page for that specific username. In this example, clicking the test username should take you to http://localhost:5000/test, which will result in a 404 error because a route for /test hasn’t yet been created.
This route is a bit different, because it should accept any username, not just test. Jester features patterns in route paths to support such use cases. The following listing shows how a route that shows any user’s timeline can be implemented.
Listing 7.29. The user route
get "/@name":                                                       1
  var user: User
  if not db.findUser(@"name", user):                                2
    halt "User not found"                                           3

  let messages = db.findMessages(@[user.username])
  resp renderMain(renderUser(user) & renderMessages(messages))      4
- 1 Inside the route, the @ operator is used to retrieve the value of the “name” variable in the path. The User object for that username value is then retrieved.
- 2 Anything that follows the @ character in a path is a variable. Jester will activate this route when the path is /test, or /foo, or /<insert_anything_here>.
- 3 If the user isn’t found, the route finishes early with the specified message. The halt procedure is similar to a return.
- 4 The renderUser procedure is used to render the timeline of the specified user, and the renderMessages procedure is then used to generate the HTML for the user’s messages.
Add the route in listing 7.29 into tweeter.nim, recompile, run Tweeter again, and navigate to the front page: http://localhost:5000/.
You’ll note that the page no longer has any style associated with it. What happened? Unfortunately, the route you’ve just added also matches /style.css, and because a user with that name doesn’t exist, a 404 error is returned.
This is easy to fix. Jester provides a procedure called cond that takes a Boolean parameter, and if that parameter is false, the route is skipped. Simply add cond '.' notin @"name" at the top of the route to skip the route if a period (.) is inside the value of the name variable. This will skip the route when /style.css is accessed, and it will fall back to responding with the static file.
Test this by recompiling tweeter.nim and running it again. You should see that the stylesheet has been restored when you navigate to http://localhost:5000/. Log in using the test username, and click on the username in your message again. You should see something resembling figure 7.23.
Figure 7.23. Another user’s timeline

7.5.5. Adding the Follow button
There’s one important feature missing from the user’s timeline page. That’s the Follow button, without which users can’t follow each other. Thankfully, the user view already contains support for it. The route just needs to check the cookies to see if a user is logged in.
This operation to check if a user is logged in is becoming common—the / route also performs it. It would make sense to put this code into a procedure so that it’s reusable. Let’s create this procedure now. Add the following userLogin procedure above your routes and outside the routes block, inside the tweeter.nim file.
Listing 7.30. The userLogin procedure
proc userLogin(db: Database, request: Request, user: var User): bool =
  if request.cookies.hasKey("username"):
    if not db.findUser(request.cookies["username"], user):
      user = User(username: request.cookies["username"], following: @[])
      db.create(user)
    return true
  else:
    return false
The userLogin procedure checks the cookies for a username key. If one exists, it reads the value and attempts to retrieve the user from the database. If no such user exists, the user will be created. The procedure performs the same actions as the / route.
The new implementations of the / and user routes are fairly easy. The following listing shows the new implementation of the two routes.
Listing 7.31. The new implementations of the / and user routes
get "/":
    var user: User
    if db.userLogin(request, user):
      let messages = db.findMessages(user.following & user.username)
      resp renderMain(renderTimeline(user.username, messages))
    else:
      resp renderMain(renderLogin())

  get "/@name":
    cond '.' notin @"name"
    var user: User
    if not db.findUser(@"name", user):
      halt "User not found"
    let messages = db.findMessages(@[user.username])

    var currentUser: User
    if db.userLogin(request, currentUser):
      resp renderMain(renderUser(user, currentUser) & renderMessages(messages))
    else:
      resp renderMain(renderUser(user) & renderMessages(messages))
Now the Follow button should appear when you navigate to a user’s page, but clicking it will again result in a 404 error.
7.5.6. Implementing the /follow route
Let’s fix that error by implementing the /follow route. All that this route needs to do is call the follow procedure defined in the database module. The following listing shows how the /follow route can be implemented.
Listing 7.32. The /follow route
post "/follow":
  var follower: User
  var target: User
  if not db.findUser(@"follower", follower):         1
    halt "Follower not found"                        2
  if not db.findUser(@"target", target):             1
    halt "Follow target not found"                   2
  db.follow(follower, target)                        3
  redirect(uri("/" & @"target"))                     4
- 1 Retrieves the current user and the target user to follow from the database
- 2 If either of the usernames isn’t present in the database, responds with an error
- 3 Calls the follow procedure, which will store follower information in the database
- 4 The redirect procedure is used to redirect the user’s browser back to the user page.
That’s all there is to it. You can now log in to Tweeter, create messages, follow other users using a direct link to their timeline, and see on your own timeline the messages of users that you’re following.
Testing Tweeter
Without the ability to log out, it’s a bit difficult to test Tweeter. But you can log in using two different accounts by either using a different web browser or by creating a new private browsing window.
Currently, Tweeter may not be the most user-friendly or secure application. Demonstrating and explaining the implementation of features that would improve both of those aspects would take far too many pages here. But despite the limited functionality you’ve implemented in this chapter, you should now know enough to extend Tweeter with many more features.
As such, I challenge you to consider implementing the following features:
- The ability to unfollow users
- Authentication with passwords
- Better navigation, including a button that takes the user to the front page
- The ability to log out
7.6. Deploying the web application
Now that the web application is mostly complete, you may wish to deploy it to a server.
When you compile and run a Jester web application, Jester starts up a small HTTP server that can be used to test the web application locally. This HTTP server runs on port 5000 by default, but that can be easily changed. A typical web server’s HTTP server runs on port 80, and when you navigate to a website, your web browser defaults to that port.
You could simply run your web application on port 80, but that’s not recommended because Jester’s HTTP server isn’t yet mature enough. From a security point of view, it’s also not a good idea to directly expose web applications like that.
A more secure approach is to run a reliable HTTP server such as NGINX, Apache, or lighttpd, and configure it to act as a reverse proxy.
7.6.1. Configuring Jester
The default Jester port is fine for most development work, but there will come a time when it needs to be changed. You may also wish to configure other aspects of Jester, such as the static directory.
Jester can be configured easily using a settings block. For example, to change the port to 80, simply place the following code above your routes.
Listing 7.33. Configuring Jester
settings:
  port = Port(80)
Other Jester parameters that can be customized can be found in Jester’s documentation: https://github.com/dom96/jester#readme.
7.6.2. Setting up a reverse proxy
A reverse proxy is a piece of software that retrieves resources on behalf of a client from one or more servers. In the case of Jester, a reverse proxy would accept HTTP requests from web browsers, ensure that they’re valid, and pass them on to a Jester application. The Jester application would then send a response to the reverse proxy, and the reverse proxy would pass it on to the client web browser as if it generated the response. Figure 7.24 shows a reverse proxy taking requests from a web browser and forwarding them to a Jester application.
Figure 7.24. Reverse proxy in action

When configuring such an architecture, you must first decide how you’ll get a working binary of your web application onto the server itself. Keep in mind that binaries compiled on a specific OS aren’t compatible with other OSs. For example, if you’re developing on a MacBook running Mac OS, you won’t be able to upload the binary to a server running Linux. You’ll either have to cross-compile, which requires setting up a new C compiler, or you can compile your web application on the server itself.
The latter is much simpler. You just need to install the Nim compiler on your server, upload the source code, and compile it.
Once your web application is compiled, you’ll need a way to execute it in the background while retaining its output. An application that runs in the background is referred to as a daemon. Thankfully, many Linux distributions support the management of daemons out of the box. You’ll need to find out what init system your Linux distribution comes with and how it can be used to run custom daemons.
Once your web application is up and running, all that’s left is to configure your HTTP server of choice. This should be fairly simple for most HTTP servers. The following listing shows a configuration suitable for Jester web applications that can be used for NGINX.
Listing 7.34. NGINX configuration for Jester
server {
        server_name tweeter.org;

        location / {
                proxy_pass http://localhost:5000;
                proxy_set_header Host $host;
                proxy_set_header X-Real_IP $remote_addr;
        }
}
All you need to do is save that configuration to /etc/nginx/sites-enabled/tweeter.org and reload NGINX’s configuration, and you should see Tweeter at http://tweeter.org. That’s assuming that you own tweeter.org, which you most likely don’t, so be sure to modify the domain to suit your needs.
Other web servers should support similar configurations, including Apache and lighttpd. Unfortunately, showing how to do this for each web server is beyond the scope of this book. But there are many good guides online that show how to configure these web servers to act as reverse proxies.
7.7. Summary
- Web applications are typically modeled after the model-view-controller pattern.
- A route is a block of code that’s executed whenever a certain HTTP path is requested.
- Jester is a Nim web microframework inspired by Sinatra.
- Nim’s standard library offers connectivity to the MySQL, SQLite, and Postgre-SQL databases.
- HTML can be generated in two ways: using the htmlgen module and using filters.
- Filters are expanded at compile time. They allow you to mix literal text and Nim code in the same file.
- A Jester web application should be deployed behind a reverse proxy.