Chapter 7 Diagnostic and Repair Tools
Regardless of the type of troubleshooting you need to perform, having the right tools is essential. You can’t troubleshoot effectively if you can’t see what and where the error is. This chapter introduces you to the various NDS/eDirectory server- and workstation-based diagnostic tools and utilities included with the NetWare 4, 5, and 6 operating systems, those included with eDirectory for non-NetWare platforms, and additional tools available from Novell sources.
It is important to keep in mind that NDS/eDirectory is a global, distributed name service whose database exists as a set of files stored on one or more DS servers. These servers continually exchange updates and other time-sensitive information. If a server’s local copy of the DS information is corrupted, it can prevent the rest of the servers in the same DS tree from communicating changes. Therefore, NetWare and eDirectory for non-NetWare platforms ship with a number of server-centric diagnostic and repair tools that can help you determine whether the local DS database has problems and repair those errors automatically if possible.
Oftentimes, the same tool that provides diagnostic information is also the tool to use to rectify the detected problem(s). The features of these utilities are discussed in the following sections; specific applications of the tools can be found in later chapters.
NOTE
You will find that much of the discussion about server-based tools concentrates on the nonbrowser-based products, such as DSRepair and DSTrace. There are two reasons for this: The first is that nonbrowser-based tools do not depend on a working HTTP stack, a functional Web server, or other components on the target server (as is the case of iManager). You simply run the module on the server console and they interact with the local DIB directly. Secondly, nonbrowser-based tools tend to have a less intuitive user interface, thus a little more explanation is generally required.
Over time, you will find that you rely more on server-based tools than workstation-based ones because the server utilities can provide much more information. This is due to their capability to access the DIB directly, bypassing much of the DS security. Because of that, much of the material presented in this chapter centers more on the server tools than their workstation counterparts.
NOTE
All server-based eDirectory tools (such as DSRepair and DSTrace) and related modules (such as the Directory Agent for Novell eDirectory, ds.dlm) for the Windows platform are accessed through the NDSCons utility (drive:Novell NDSNDSCons.exe). NDSCons is installed as a Control Panel applet (labeled as Novell eDirectory Services). It is recommended that you create a shortcut on the desktop to access it more easily.
The most commonly used DS diagnostic utility is probably DSRepair. It is provided with NetWare 4 and higher operating systems and is included with eDirectory for non-NetWare platforms. DSRepair allows you to check for and correct problems in the DS database on a server-centric basis.
NOTE
The DSRepair utility is frequently updated to include new functionalities and bug fixes. Generally, new versions of DSRepair are included with new versions of DS.NLM or eDirectory releases, and you should use the latest version whenever possible. Check support.novell.com/filefinder/ for information about newer releases of DSRepair.
Depending on the operating system and the version of DSRepair, the opening screen of DSRepair can look different. Figure 7.1 shows the opening screen for DSRepair NLM on a NetWare 6 server that offers seven options:
![]() Unattended Full Repair
Unattended Full Repair
![]() Time Synchronization
Time Synchronization
![]() Report Synchronization Status
Report Synchronization Status
![]() View Repair Log File
View Repair Log File
![]() Advanced Options Menu
Advanced Options Menu
![]() Exit
Exit
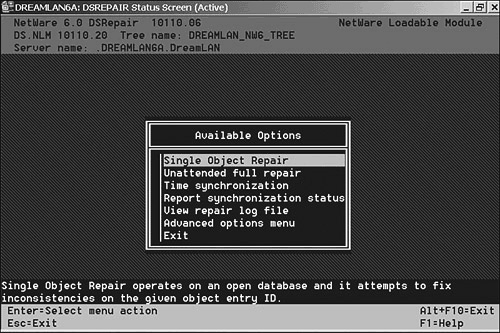
The version of DSRepair, along with the name of the current NDS tree and server name, is always shown at the top of the menu.
NOTE
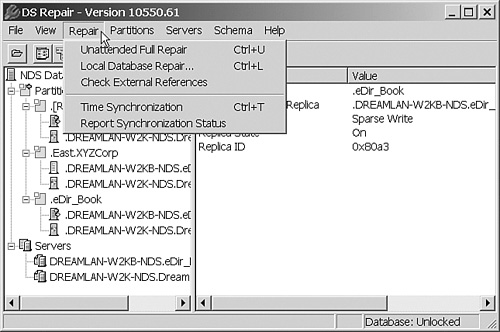
On Windows servers, DSRepair is started from NDSCons by highlighting dsrepair.dlm and clicking Start. On Linux/Unix servers, the executable for DSRepair is called ndsrepair.
Due to the GUI nature of the Windows platform, the various menu options you see in the NLM version of DSRepair are accessed via the various pull-down menus in dsrepair.dlm, as shown in Figure 7.2. Depending on whether a partition, replica, or server is selected, menu options not related to the selected object might not be active for a selection.
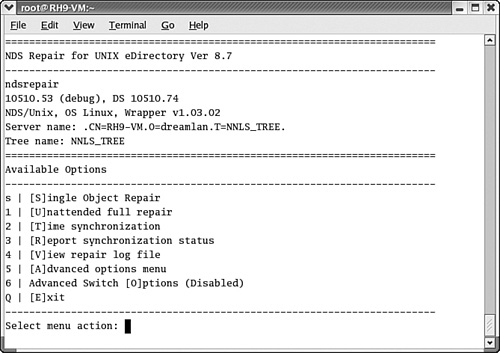
On the other hand, ndsrepair on Linux/Unix is a command-line-based application that requires you to specify options to select the various repair features. To display a list of supported options, type ndsrepair -? (or ndsrepair --help) at a terminal window. The output looks similar to the following:
The locale is en_US.UTF-8
Repair utility for Novell eDirectory 8.6 - 8.7.1 v10510.53
ndsrepair - corrects problems in the NDS database
Usage: ndsrepair { -U ¦ -E ¦ -C ¦ -P [-Ad] ¦ -S [-Ad] ¦ -N ¦![]() -T ¦ -J <entry_id> ¦ --version} [-F filename]
-T ¦ -J <entry_id> ¦ --version} [-F filename]![]() [-A <yes/no>] [-O <yes/no>]
[-A <yes/no>] [-O <yes/no>]
-U Unattended Full Repair option
-R Repair Local Database option
-E Report Synchronization Status option
-C Check External References option
-P Replica and Partition Operations option
-S Global Schema operations
-N Servers Known to this Database
-T Time Synchronization option
-J Repair Single Object
--version Print DSRepair Version Information
-A Append to the existing Log File
-O Log Output to file
-F Log Output to file 'fileName'
By default -A and -O options are set
Press ENTER to continue...
The default file name is /var/nds/ndsrepair.log
Log file size = 426 bytes.
The -R option has the following sub options:
ndsrepair -R [-l <yes/no>] [-u <yes/no>] [-m <yes/no>]![]() [-i <yes/no>] [-f <yes/no>][-d <yes/no>]
[-i <yes/no>] [-f <yes/no>][-d <yes/no>]![]() [-t <yes/no>] [-o <yes/no>][-r <yes/no>]
[-t <yes/no>] [-o <yes/no>][-r <yes/no>]![]() [-v <yes/no>] [-c <yes/no>] [-F filename]
[-v <yes/no>] [-c <yes/no>] [-F filename]![]() [-A <yes/no>] [-O <yes/no>]
[-A <yes/no>] [-O <yes/no>]
-l lock nds database during entire repair
-u use temporary nds database during repair
-m maintain original unrepaired database
-i perform database structure and Index check
-f reclaim database free space
-d rebuild entire database
-t perform Tree structure check
-o rebuild Operational schema
-r repair all local replicas
-v validate stream files
-c check local references
By default -i, -d, -t, -r, -v and -c options are set.
NOTE
Keep in mind that the command-line options for ndsrepair are case sensitive. Notice that all first-level options, such as -T for the time synchronization check, are in uppercase.
To make ndsrepair a little more user-friendly and to look more like its NetWare counterpart, Novell has developed a “menu wrapper” using a shell script. The wrapper provides a text-based menu that has the look-and-feel of DSREPAIR.NLM (see Figure 7.3). Refer to TID #2964755 for more information about the wrapper and to download it.
The Single Object Repair selection allows you to repair a specific object on an open database, based on the object ID you provide. It is a useful option if you know which particular object is inconsistent and the operation is performed quickly.
The Unattended Full Repair option automatically performs all the possible repair operations that don’t require user input. You can select the items to be checked or repaired using the Repair Local Database option in the Advanced Repair Options menu. A log file (called DSREPAIR.LOG) located in the SYS:SYSTEM directory on NetWare records all actions during the repair operation so you can later determine what was done; on Windows servers, the file is located in drive:NovellNDSDIBFiles, and on Linux/Unix servers the file is in /var/nds and is called ndsrepair.log.
NOTE
During the repair of the local database, the DS database (on the server running DSRepair only) might be locked, making it inaccessible to the client or any other use until the repair is completed. That means new users are not able to authenticate to this server while users already logged in are able to continue to access other (non-DS) resources on this server. NDS 8 and later allows you to repair a database without locking it.
The unattended full repair goes through the following four major diagnostic and repair procedures:
![]() Local DS data (database can be locked during this phase)
Local DS data (database can be locked during this phase)
![]() Validation of all network addresses (database is not locked)
Validation of all network addresses (database is not locked)
![]() Validation of remote server IDs (database is not locked)
Validation of remote server IDs (database is not locked)
![]() Consistency check of replica rings (database is not locked)
Consistency check of replica rings (database is not locked)
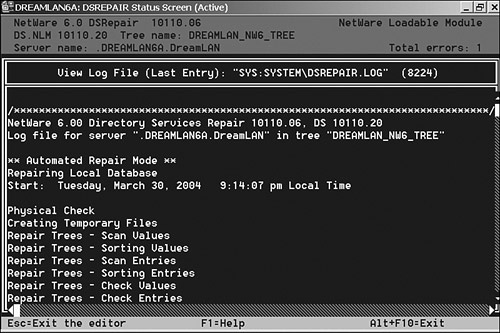
A status menu is displayed during the repair operation (see Figure 7.4). The same information shown is also recorded in the log file. When the repair operations are completed, the log file is automatically displayed for your viewing so you can determine which repairs were done and which state of the database is following the repair operation.
TIP
You can initiate an unattended repair option from the command line by loading DSRepair with the -U option switch. The NLM unloads itself when the operation is completed. The -U switch has the same effect on Windows and Linux/Unix servers.
The Time Synchronization check procedure contacts every server known to this server’s local database and looks up information about DS (such as the version of DS.NLM), time synchronization status, and server status. The retrieved data is displayed on the screen (see Figure 7.5) and recorded to the log file as a table.

TIP
When performing a time synchronization check, it should be from a server that holds a copy of [Root] because that server knows of all servers in the tree and the check contacts only servers known to the local server.
The table shows the following information:
![]() Server name—This field shows the absolute distinguished name of the server responding to the query. For NetWare 5 and higher, including non-NetWare eDirectory servers, DSRepair reports the server names with a leading period (for example,
Server name—This field shows the absolute distinguished name of the server responding to the query. For NetWare 5 and higher, including non-NetWare eDirectory servers, DSRepair reports the server names with a leading period (for example, .DREAMLAN6A.DreamLAN), whereas NetWare 4’s shows the server names without the leading period.
![]() DS.NLM version (DS Version on non-NetWare servers)—This field lists the version of DS that’s running on the reporting server. This is useful in determining, at a glance, the versions of DS you have running on your tree.
DS.NLM version (DS Version on non-NetWare servers)—This field lists the version of DS that’s running on the reporting server. This is useful in determining, at a glance, the versions of DS you have running on your tree.
![]() Replica depth—This entry shows a
Replica depth—This entry shows a -1 if the reporting server holds no replica. A 0 indicates the server contains a replica of the [Root] partition (as is the case for server DREAMLAN6A), and a positive integer indicates how many “levels” away from [Root] the first replica is on the reporting server.
NOTE
DSRepair for eDirectory 8.7.1 and 8.7.2 has a cosmetic bug in reporting the correct replica depth on all platforms. For servers holding the Master of [Root], it reports a depth of 5, whereas servers holding a Read/Write of [Root] show a replica depth of 2. This has been fixed in eDirectory 8.7.3.
![]() Time source—The name of this field is misleading. What this field shows is not the time source, but rather the time server type of the queried server (such as Single Reference, Primary, and so on). The information provided in this field can be useful in determining whether time synchronization has been configured properly. Non-NetWare servers always report a time source of Secondary.
Time source—The name of this field is misleading. What this field shows is not the time source, but rather the time server type of the queried server (such as Single Reference, Primary, and so on). The information provided in this field can be useful in determining whether time synchronization has been configured properly. Non-NetWare servers always report a time source of Secondary.
![]() Time is in sync—A
Time is in sync—A Yes here indicates the reporting server’s time is in synchronization with the network time. A No status means either the reporting server can’t communicate with the target server or that the reporting server’s time is not in agreement with the network time.
NOTE
If a server reports time not in sync for a short period of time (perhaps 24 hours), there’s nothing to worry about because the server’s internal clock generally does not drift significantly. You should, however, determine and resolve this problem at your earliest convenience. All servers in the tree must be time-synchronized because DS can’t otherwise resolve synchronization collisions properly, which can lead to DS data inconsistency.
![]() Time +/-—This field reports the time difference between the server running DSRepair and the queried server. With time sync working correctly and no network communication errors, all servers should be, by default, within 2 seconds of each other. (This threshold is determined by the NetWare
Time +/-—This field reports the time difference between the server running DSRepair and the queried server. With time sync working correctly and no network communication errors, all servers should be, by default, within 2 seconds of each other. (This threshold is determined by the NetWare SET Timesync Synchronization Radius server console command whose default value is 2000 milliseconds; this setting can be increased if you have slow WAN links, such as satellite hops.) This field reports up to 999 minutes and 59 seconds, or approximately 16.5 hours, in the form MINUTES:SECONDS. If the time difference is greater than that, the maximum value is displayed as 999:59.
TIP
If you have non-NetWare eDirectory servers in the tree, you should periodically check the operation and status of your NTP server using a utility such as ntpq (www.eecis.udel.edu/~mills/ntp/html/ntpq.html). For more information, visit www.eecis.udel.edu/~mills/ntp/html/debug.html.
The Report Synchronization Status process checks the synchronization status by examining the Sync Up to attribute of the partition root object of all partitions that have a replica stored on the local server. Each server in the replica ring is queried and any errors found are displayed (see Figure 7.6) and logged to the DSRepair log file.
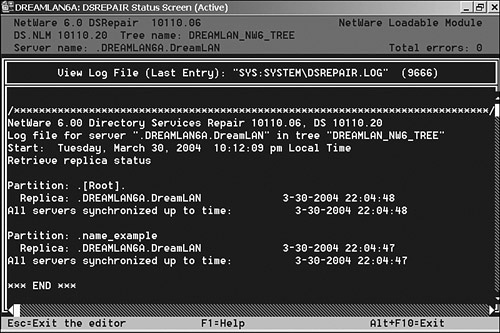
In the log file, each partition has its own section. The section starts with the name of the partition and ends with All servers synchronized up to time. This is the time stamp according to the Master replica of that partition and is not an average of all reported sync-up-to times for that replica ring. The sample in Figure 7.6 shows two partitions, [Root] and name_example. Below each partition name, each replica known to the local server is identified by a server name. The key thing to note here is that a synchronization status is available only for the servers that hold replicas according to this local database.
TIP
By comparing the status reports of all servers within the replica ring, you can easily determine the consistency of the ring. For example, each server in the replica ring should report the same number of replicas (regardless of the replica type, including SubRefs) for a particular partition.
To the right of each replica entry, one of the two following is displayed:
![]() The date and time of the last successful synchronization
The date and time of the last successful synchronization
![]() The date and time of the last successful synchronization with an error code (such as
The date and time of the last successful synchronization with an error code (such as -625) and a designation of whether the error was local or remote to the server in question
The following is an example of a replica synchronization report that contains some errors:
Partition: .O=XYZCorp.
Replica: CN=NETWARE6-D.OU=Consulting.OU=Toro...![]() 2-09-2004 22:18:46
2-09-2004 22:18:46
Replica: CN=NW65B.OU=Consulting.O=North_...![]() ******** ******** -625
******** ******** -625
Replica: CN=NETWARE51-C.OU=Toronto.O=North_...![]() 2-09-2004 22:17:41
2-09-2004 22:17:41
Server: CN=NW65B.OU=Consulting.O=North...![]() 2-09-2004 22:10:05 -621 Remote
2-09-2004 22:10:05 -621 Remote
All servers synchronized up to time: 2-09-2004![]() 22:17:41
22:17:41
In this example, three servers are in the replica ring: NW65B, NETWARE51-C, and NETWARE6-D. The first error suggests that the local server isn’t able to obtain a replica synchronization status from the NW65B server and an error (-625) is returned. Error -625 indicates some kind of communication error. The second error means that server NETWARE51-C last successfully synchronized at 22:17:41 and failed to synchronize at 22:10:05 with the replica stored on server NW65B due to error -621. Error -621 means TTS is disabled. This could be a result of the SYS volume being out of disk space or SYS volume being dismounted. Combined with the -625 error when the synchronization check is performed, chances are good that there was a problem with NW65B’s SYS volume and the server has been taken down, thus the -625 error.
Use the View Report Log File option to examine the DSRepair log file without having to first exit DSRepair. Through the Log file and login configuration option in the Advanced options menu, you can disable the logging, enable the logging, delete the log file, change the name of the log file, or change the location in which the log file is to be stored. When viewing the log file using this option, you start with the beginning of the file; when an operation—such as a time synchronization check—is completed, the most recent entry (which contains information from the operation that was just performed) of the log file is displayed instead.
NOTE
Whenever any DSRepair operation is performed, new information is appended to the log file. You should keep track of the size of this log file because it can quickly grow in size to many megabytes. The size of the file is displayed in parenthesis at the end of the log file title line.
TIP
On NetWare, you can use the -L command-line switch to specify an alternative directory path and filename for the log file (for example, -L SYS:LOGFILESDS.LOG). The specified path can be any NetWare volume or DOS drive. You can also use --RL in place of -L to cause the existing file to be overwritten instead of new data being appended.
For Linux/Unix, use the -F option to specify an alternative output filename.
For Windows, select File, Log File Options to change the name and location of the log file.
The Advanced Options menu should be selected when you need to perform specific repair or diagnostic operations. This menu option allows you to manually control a number of individual repair operations and global repair functions in the DS tree. Also available from this choice is diagnostic information about the local DS database and the overall status of your DS tree. The Advanced Options menu in NetWare 5 and above versions of DSRepair provides the following additional selections (see Figure 7.7):
![]() Log File and Login Configuration—Configure options for the DSRepair log file (such as enabling or disabling logging and setting the log file’s size limit). Also you can use this option to log in to the Directory Services tree that is required by some operations (the login is valid only for the duration when DSRepair is running; the login name and password are not stored for later use).
Log File and Login Configuration—Configure options for the DSRepair log file (such as enabling or disabling logging and setting the log file’s size limit). Also you can use this option to log in to the Directory Services tree that is required by some operations (the login is valid only for the duration when DSRepair is running; the login name and password are not stored for later use).
![]() Repair Local DS Database—Repairs the Directory Services database files stored on this server.
Repair Local DS Database—Repairs the Directory Services database files stored on this server.
![]() Servers Known to This Database—Performs verification operations on servers that are known to this database: time synchronization, network addresses, and server status check.
Servers Known to This Database—Performs verification operations on servers that are known to this database: time synchronization, network addresses, and server status check.
![]() Replica and Partition Operations—This selection provides functions to repair replicas, replica rings, and server objects. It also dynamically displays each server’s last synchronization time.
Replica and Partition Operations—This selection provides functions to repair replicas, replica rings, and server objects. It also dynamically displays each server’s last synchronization time.
![]() Check Volume Objects and Trustees—Performs checks on all mounted volumes for valid Volume objects and valid trustees on the volumes.
Check Volume Objects and Trustees—Performs checks on all mounted volumes for valid Volume objects and valid trustees on the volumes.
![]() Check External References—Checks for illegal external references or stuck obituaries.
Check External References—Checks for illegal external references or stuck obituaries.
![]() Security Equivalence Synchronization—Allows you to synchronize security equivalence attributes throughout the global tree. (This option is available only on servers running NDS v6 or NDS v7.)
Security Equivalence Synchronization—Allows you to synchronize security equivalence attributes throughout the global tree. (This option is available only on servers running NDS v6 or NDS v7.)
![]() Global Schema Operations—Provides functions to update the schema in the tree.
Global Schema Operations—Provides functions to update the schema in the tree.
![]() View Repair Log File—Views the log file that is optionally created when repair operations are performed.
View Repair Log File—Views the log file that is optionally created when repair operations are performed.
![]() NDS Archive Options—This option copies the Directory Services database files into a single file in a compressed format that is to be used for offline repairs and diagnostics by Novell Technical Support. This option is not meant to be a backup method for your DS database.
NDS Archive Options—This option copies the Directory Services database files into a single file in a compressed format that is to be used for offline repairs and diagnostics by Novell Technical Support. This option is not meant to be a backup method for your DS database.

We’ll briefly discuss each of these functions and highlight some of their more salient features. You’ll find examples of their application in later chapters.
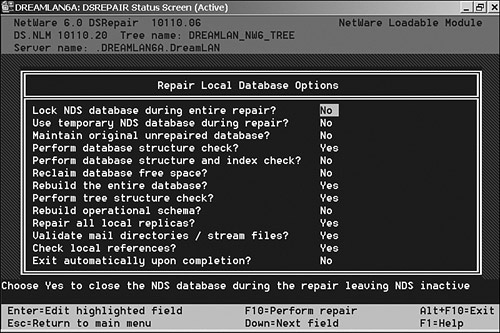
The Repair Local Database function (see Figure 7.8) works with the DS files stored on the local server and is analogous to running Bindfix in the NetWare 3 environment. You can control the following repair options:
![]() Validate Mail Directories and Stream Files—Select Yes to check the mail directories on volume
Validate Mail Directories and Stream Files—Select Yes to check the mail directories on volume SYS for users who no longer exist and deletes those directories. The option also verifies that the stream files are associated with valid DS objects and delete those that are not. (A stream file is a file containing a series of data bytes. An example of a stream file is the login script associated with a User object.) The default is Yes.
![]() Check Local References—Select Yes to check local reference properties to ensure they are valid and to check for duplicate time stamps. Using this option slows down the repair process. The default is Yes.
Check Local References—Select Yes to check local reference properties to ensure they are valid and to check for duplicate time stamps. Using this option slows down the repair process. The default is Yes.
![]() Rebuild Operational Schema—Select Yes to check the schema for valid object class and attribute definitions. DSRepair rebuilds any invalid classes or attributes found in the predefined (base) schema on this server. You generally need not enable this option unless your server’s schema is corrupted; it has no effect on extended schema definitions. The default is No.
Rebuild Operational Schema—Select Yes to check the schema for valid object class and attribute definitions. DSRepair rebuilds any invalid classes or attributes found in the predefined (base) schema on this server. You generally need not enable this option unless your server’s schema is corrupted; it has no effect on extended schema definitions. The default is No.
![]() Maintain Original Unrepaired Database—Select Yes to the backup files before the repair. These files can help recover a damaged database, but they take up disk space. The default is No.
Maintain Original Unrepaired Database—Select Yes to the backup files before the repair. These files can help recover a damaged database, but they take up disk space. The default is No.
NOTE
All repairs are performed on a temporary copy of the DS database files, which are renamed at the end when you commit to save the database on which repairs have been made. With the Maintain Original Unrepaired Database option enabled, when DSRepair saves the changed database, it renames the previous database files to a .OLD extension and the temporary files (which have a .TMP extension) are renamed to the appropriate names. See Chapter 3, “ The Directory Information Base,” for naming conventions for a given version of NDS/eDirectory. One important note is that the .OLD files are not preserved if a .OLD file set exists that is less than 72 hours old. This is to provide some reference point to go back to if you run into trouble while running multiple DSRepairs within 72 hours.
![]() Exit Automatically upon Completion—Select Yes to immediately exit DSRepair and open the local Directory Services database files after completing the repairs. The default is No.
Exit Automatically upon Completion—Select Yes to immediately exit DSRepair and open the local Directory Services database files after completing the repairs. The default is No.
If the server is running NDS 8 or eDirectory, additional options are available. Some of these extra options deal with DIB size management and database integrity checks. The one nice feature of NDS 8 and above is that you can leave the DS database open during a repair operation to avoid preventing users from authenticating to the server.
NOTE
Due to the architectural differences in the DS database between NDS 6/7 and NDS 8/eDirectory, you need to be running the correct version of DSRepair for the version of DS running on the server. Otherwise, DSRepair reports an API version mismatch error and exits.
During the repair operation, DSRepair performs an extensive analysis of the database. It checks for invalid partitions and partition roots and fixes any errors found. For each partition, it checks all objects in the partition for valid containment and consistency with the schema. All illegal attributes are removed. DSRepair changes any object that is missing a mandatory attribute (such as a User object missing the Last Name attribute) to Unknown. It checks all attribute syntaxes for consistency and also checks for invalid checksum and links in the database records.
TIP
Like running VRepair, you should continue running DSRepair until it reports no more errors. You might need to run DSRepair multiple times until you get zero errors.
NOTE
From our experience, a typical DSRepair operation for a Pentium P-4 2GHz server, with a moderately fast SCSI drive (not RAID-5) and 10,000 objects in the local replicas, takes less than 5 minutes to perform a local database repair.
The Unattended Full Repair option in the main DSRepair menu executes all the previously mentioned checks and repairs using the default parameter settings.
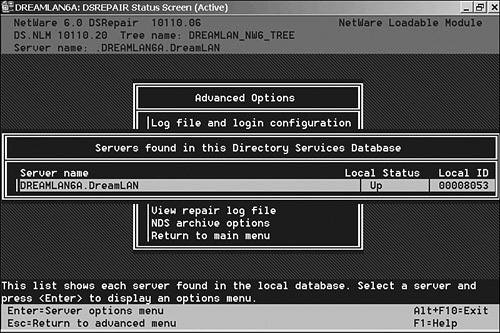
The Servers Known to This Database option lists all the servers known to the local DS database. The server names are obtained from the NCP Server objects found in the replicas stored on the server, and they are not learned through Service Advertising Protocol (SAP) or Service Locator Protocol (SLP). If this server holds a replica of [Root], this list most likely contains all the servers in the tree. If, however, the server doesn’t contain a replica of [Root], the list is a subset of the servers in the DS tree.
The Servers Known to This Database shows the Local Status and Local ID for each server in the list (see Figure 7.9). The Local Status field reports the state of the listed server as known to this server. If the state is Up, it is active; if it is Down, some sort of communication problem has recently occurred. Upon selecting a server from the list, several options become available:
![]() Time Synchronization and Server Status—This option performs the same task as the Time Synchronization option found in the main DSRepair menu.
Time Synchronization and Server Status—This option performs the same task as the Time Synchronization option found in the main DSRepair menu.
![]() Repair All Network Addresses—For each of the listed servers, DSRepair compares the server’s network address found in the SAP table with that found in the local DS database. If they are different, the entries in the DS database are updated with the value from the SAP table. If DSRepair can’t find the server in the SAP table, no repair is made.
Repair All Network Addresses—For each of the listed servers, DSRepair compares the server’s network address found in the SAP table with that found in the local DS database. If they are different, the entries in the DS database are updated with the value from the SAP table. If DSRepair can’t find the server in the SAP table, no repair is made.
![]() Repair Selected Server’s Network Address—This operation is identical to the Repair All Network Addresses function, except that only the selected server’s network address is checked and repaired.
Repair Selected Server’s Network Address—This operation is identical to the Repair All Network Addresses function, except that only the selected server’s network address is checked and repaired.
![]() View Entire Server Name—The DSRepair log file and status screen shows only the first 35 characters in a server name. Use this option to verify the entire distinguished name, which can be as long as 256 bytes.
View Entire Server Name—The DSRepair log file and status screen shows only the first 35 characters in a server name. Use this option to verify the entire distinguished name, which can be as long as 256 bytes.
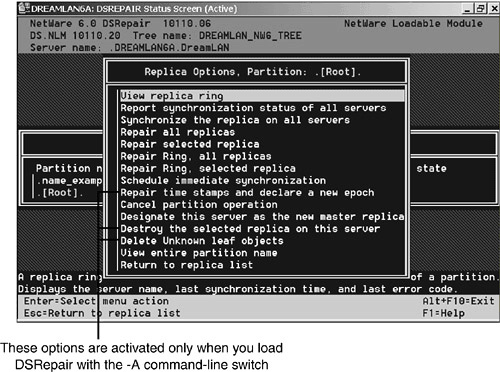
The Replica and Partition Operation function is probably the most powerful of all DSRepair options because you can “kill off” (destroy) a replica just as easily as you can repair one. The initial opening screen of this option displays a list of all replicas stored on the local server. A table shows each replica along with its replica type (Master, Read/Write, Read-Only, and so on) and replica state (On or Off) as it is stored on this server. After selecting a replica to work with, a list of replica-related functions is displayed (see Figure 7.10). Chapter 11, “Examples from the Real World,” discusses the uses of these functions.
TIP
To protect you from inadvertently exercising some of the more destructive options in DSRepair, such as editing a replica ring or repairing time stamps and declaring a new time epoch, these options are not automatically listed in the Advanced Options menu. You need to start DSRepair with the -A switch to toggle these special options on for selection. On Windows servers, put the --A option in the Startup Parameters edit box before starting dsrepair.dlm. On Linux/Unix servers, use ndsrepair -P -Ad; or if you are using the wrapper, select Option #6 on the main menu to toggle the options on or off.
The Check Volume Objects and Trustees option (not included on Windows and Linux/Unix versions) checks the association of all mounted volumes (including CD-ROM volumes and those mounted through NFS) on the current server with volume objects in the tree. If DSRepair doesn’t find a matching volume object for a given mounted volume, one is created. After the associations between the volumes and its objects are verified, file system trustee assignments for that volume are verified.
The Check External References option validates all entries found in the External Reference partition and attempts to locate a backlink for each entry. This operation also displays obituary information for all obituaries contained in the local database (if the -A startup option was used). You’ll learn in Chapter 11 how to apply this information for troubleshooting obituary problems.
The functionality of global schema operations changed somewhat between NetWare 4’s and later versions of DSRepair. In the NetWare 4 versions, this option can update the operational (base) schema on all servers within the tree or on only the root server—the root server is the server that contains the master of [Root]. You can also use this option to import schema definitions (including extensions) from a remote tree so that the schemas for both trees are identical prior to a tree merge. If the -A switch was used to start the utility, you have the additional option to update the schemas on all NetWare 4.0x servers within the current tree as well as to declare a new epoch on the schema.
Warning
Declaring a new schema epoch causes the server holding the master of [Root] to time stamp the schema and resend it to all servers in the tree. You should use extreme caution when using this option. If the schema is bad and you force it to be sent, you will corrupt the tree. This can also generate a lot of traffic on the wire. Furthermore, if the receiving server contains a schema that was not in the new epoch, objects and attributes that use the schema are changed to the Unknown object class or attribute.
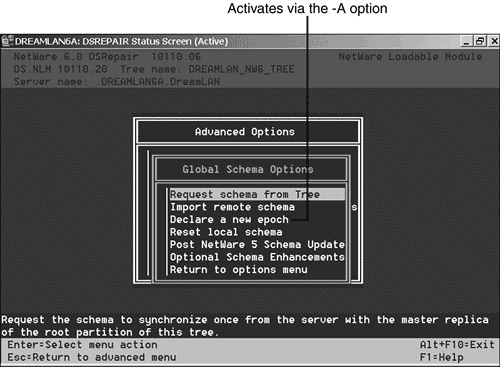
The Global Schema Operations option in post-NetWare 4’s version of DSRepair performs the following tasks (see Figure 7.11):
![]() Request Schema from Tree—Update this server’s schema by synchronizing once from the server holding the master of
Request Schema from Tree—Update this server’s schema by synchronizing once from the server holding the master of [Root].
![]() Import Remote Schema—Import schema from a remote tree. This is a helpful process when trying to merge trees.
Import Remote Schema—Import schema from a remote tree. This is a helpful process when trying to merge trees.
![]() Declare a New Epoch—This option is available only when the
Declare a New Epoch—This option is available only when the -A option is specified. See the previous warning for more information about this option.
![]() Reset Local Schema—Resets the local schema by requesting a complete copy of the schema from the server holding the master of
Reset Local Schema—Resets the local schema by requesting a complete copy of the schema from the server holding the master of [Root]. After the local server receives the schema updates, it removes any additional schema it has that did not get updated. As a result, any objects and attributes that used the old schema are changed to the Unknown object class or attribute.
![]() Post NetWare 5 Schema Update—This option extends and modifies the schema for compatibility with Post NetWare 5 DS changes. This option requires that the local server contain a replica of the
Post NetWare 5 Schema Update—This option extends and modifies the schema for compatibility with Post NetWare 5 DS changes. This option requires that the local server contain a replica of the [Root] partition and that the state of the replica be in the On state.
![]() Optional Schema Enhancements—This option extends and modifies the schema to provide the ability for domain (dc) objects to contain container objects such as Country, Locality, Organization, or Organizational Unit. This option requires that the local server contain a replica of the
Optional Schema Enhancements—This option extends and modifies the schema to provide the ability for domain (dc) objects to contain container objects such as Country, Locality, Organization, or Organizational Unit. This option requires that the local server contain a replica of the [Root] partition and that the state of the replica be in the On state.
The NDS Archive options allow you to take a snapshot copy of the server’s DIB set. The snapshot stores the data in a compressed format that can be used by Novell Technical Support for offline diagnostics and repair purposes. You should, however, not use this option as a means to back up your DS because DSRepair doesn’t have an option to restore the component files of this dump file. See Chapter 8, “eDirectory Data Recovery Tools,” for DS backup and restore options.
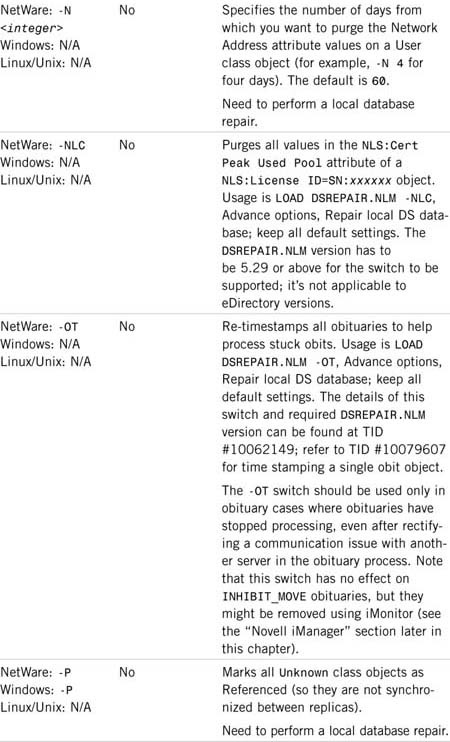
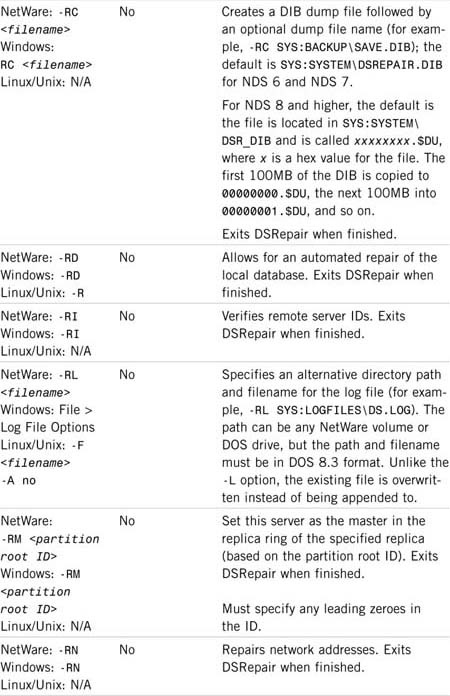
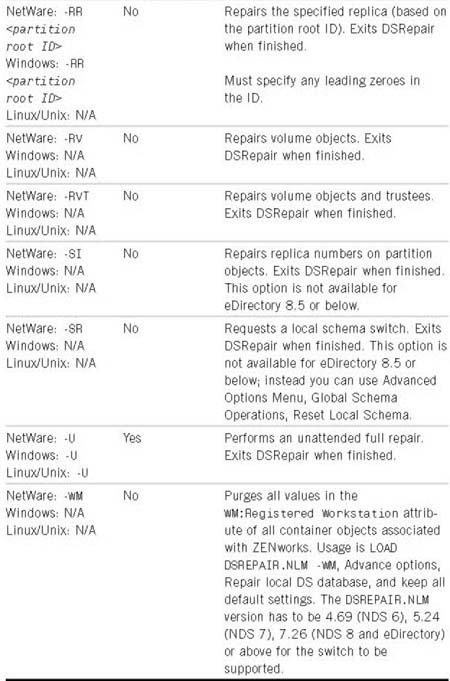
Table 7.1 is a summary of documented (meaning they are listed in DSREPAIR.NLM -?) DSRepair command-line switches and some more commonly known and used undocumented switches. Because some of these switches are undocumented, Novell might change their availability and functions without any notice. Not all switches available for DSREPAIR.NLM are supported on the Windows or Linux/Unix versions of DSRepair.

NOTE
Many of the DSRepair command-line switches (such as -RC) on Windows servers cause dsrepair.dlm not to display its dialog box after clicking Start. Instead, it just quietly performs the task and then exits.
Other switches, known affectionately as killer switches (-Kx or -XKx, such as -K2 or --XK2), can be used in DSRepair to fix stubborn DS issues. These switches are not listed in Table 7.1 because inappropriate use of these killer switches could result in serious damage to parts of or your entire DS tree. The one possible safe killer switch, if you can call it that, is -XK3. This switch is used to fix broken backlinks on external referenced objects. Some of the symptoms of this problem are
![]() Local DS on a server does not hold a real copy of an object and is getting errors trying to access said object.
Local DS on a server does not hold a real copy of an object and is getting errors trying to access said object.
![]() DSRepair reports a
DSRepair reports a -626 error when checking external referenced object IDs.
![]() After removing a replica, users cannot log in to the server.
After removing a replica, users cannot log in to the server.
![]() Error
Error -601 is reported on an object. The server reporting the error does not hold a real (master, Read/Write, and so on) replica of the object.
![]() A renamed (
A renamed (#_#) NCP Server object shows on servers that do not hold real copies of the NCP Server object.
![]() Previously deleted objects are showing up in the tree.
Previously deleted objects are showing up in the tree.
The following outlines the procedure for fixing broken backlinks using -XK3 based on your operating system:
|
NetWare |
At the server console, type SET DSTRACE=ON |
|
From NDSCons, highlight To start the backlink process, do the following: From NDSCons, highlight |
|
|
Linux/Unix |
Run |
The SET DSTRACE=*B command kicks off the backlinker process that reestablishes the backlinks and updates the time stamps on those objects that are still valid. Those that are not updated are purged the next time the Janitor and Flat Cleaner processes run.
WARNING
Unless directly instructed by Novell Technical Support, avoid using the DSRepair killer switches. Additionally, the advanced maintenance options should be enabled only for specific repair tasks. Ensure time is in sync before using any of the -A or -XKx options.
NOTE
There have been varying opinions about how often to run the repair options in DSRepair (such as Unattended full repair). From our experience, you don’t need to (and shouldn’t, as a matter of fact) exercise the repair functions in DSRepair on a daily or even weekly basis as part of your regular network maintenance.
The repair features in DSRepair are not meant to be day-to-day management tools nor are they intended for health checking. Rather, they are to be used as precise surgical scalpels to address specific problems. Running DSRepair on a quarterly basis is more than sufficient under normal circumstances, and even then, only after a large number of changes has been made to your tree.
DSTrace was originally a troubleshooting aid built in to DS.NLM by Novell’s NDS Engineering Team to help in the development and debugging processes. It has since been made known to all that such a tool is available for diagnosing DS synchronization problems, and it has been enhanced into a standard troubleshooting tool. Because of its origin as an engineering tool, DSTrace can sometimes display a lot of obscure information that is difficult to interpret.
In the NetWare 4 context, DSTrace really referred to a group of SET commands available at the server console, although DSTrace was often referred to as a utility. NetWare 5 and later, however, have two DSTrace utilities. One is the built-in version in DS.NLM; the other is a DSTRACE.NLM utility that provides expanded monitoring capabilities compared to its predecessor. After DSTrace is activated (either the built-in version or the NLM one), you can use it to monitor synchronization status and errors. DSTrace is primarily used to determine and track the health of DS as it communicates with other NetWare servers in the network.
The user interface of DSTrace varies a little depending on the operating system. Use one of the following methods to enable DSTrace:
![]() NetWare 4—At the server console, type
NetWare 4—At the server console, type SET DSTRACE=ON. This creates a new screen called Directory Services.
![]() NetWare 5 and higher—To enable the built-in version, at the server console, type
NetWare 5 and higher—To enable the built-in version, at the server console, type SET DSTRACE=ON. This creates a new screen called Directory Services. To use the expanded version, at the server console, type LOAD DSTRACE. This creates a new screen called DSTrace Console.
![]() Windows—From NDSCons, highlight dstrace.dlm and click Start.
Windows—From NDSCons, highlight dstrace.dlm and click Start.
![]() Linux/Unix—At a terminal screen, type
Linux/Unix—At a terminal screen, type ndstrace. Type exit to shut down ndstrace.
On a NetWare 5 and higher server, after DSTrace NLM is enabled, you can type HELP DSTRACE to display a list of options as shown here:
DSTRACE - Novell Directory Services Trace Event Monitor.
USAGE: DSTRACE {Options}
Options:
{taglist} List of qualified event tags.
ON Enable tracing to target device.
OFF Disable tracing to target device.
FILE Change command target to log file.
SCREEN Change command target to trace![]() screen.
screen.
INLINE Display events inline.
JOURNAL Display events on a background![]() thread.
thread.
FMAX={size} Specify maximum disk file size.
FNAME={name} Specify disk file name.
Examples:
DSTRACE INLINE
DSTRACE SCREEN ON +AL +CB -FR
DSTRACE FMAX=10240 FNAME=DBTRACE.LOG
Notes:
All event type tags and keywords (except DSTRACE) may be
shortened. To display the current configuration and a
list of event tag names, enter ’DSTRACE’ with no options.
The default tag qualifier is ’+’.
After DSTrace NLM is loaded and you have enabled its tracing (using the DSTRACE SCREEN ON command), an alternative console screen is created—called DSTrace Console—where DS event information is displayed. You can specify what type of information you would like DSTrace to display. You can select a wide variety of information to view by specifying the DSTrace command followed by a filter list. The list of possible filters and their current settings is displayed by typing DSTRACE at the console. Figure 7.12 shows a sample of that screen.
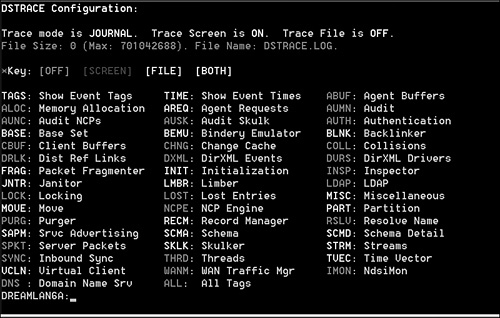
The status of each filter (enabled or disabled) is denoted by a different color:
![]() Dimmed—The filter is disabled.
Dimmed—The filter is disabled.
![]() Blue—The information associated with this filter is displayed to the console screen only.
Blue—The information associated with this filter is displayed to the console screen only.
![]() Green—The information associated with this filter is recorded to the log file only.
Green—The information associated with this filter is recorded to the log file only.
![]() Cyan—The information associated with this filter is displayed to the console screen and is also recorded in the log file.
Cyan—The information associated with this filter is displayed to the console screen and is also recorded in the log file.
To enable a filter, you simply type DSTRACE at the server console followed by the filter name or item you want to view. If you specified the filter without specifying a + (to enable) or - (to disable) in front of the filter name, a + is assumed. Therefore, DSTRACE +SYNC is the same as DSTRACE SYNC. When a filter name is specified without qualifying it with either SCREEN or FILE, the action is applied to both devices. That means DSTRACE +SYNC enables the display of inbound synchronization information on the trace screen as well the data recorded in the log file; DSTRACE FILE -SYNC turns off the recording of inbound sync data to the log file.
TIP
You can usually abbreviate the filter names to just the first two letters (sometimes three in order to keep it unique) of the name. For example, you can use either DSTRACE -SKLK or DSTRACE -SK.
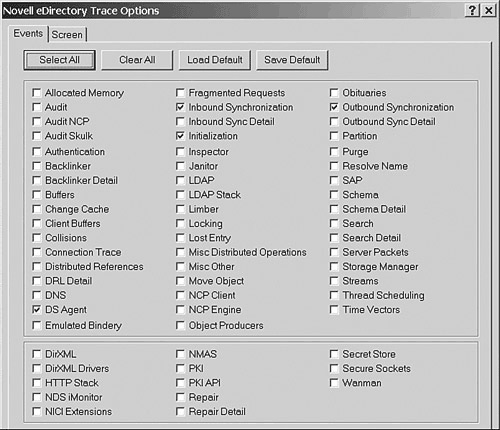
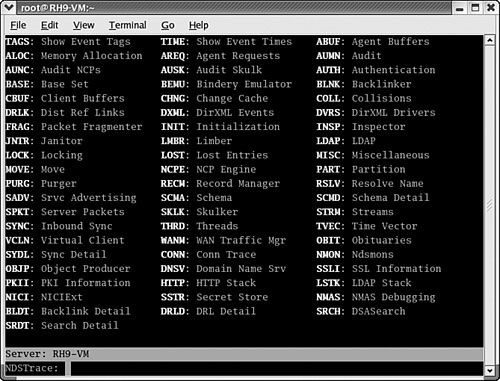
On Windows, upon dstrace.dlm startup, the trace status screen is displayed. To access the filter options (see Figure 7.13), select Edit, Options. The user interface for DSTrace on Linux/Unix looks similar to that on NetWare. Upon ndstrace startup, it automatically displays the current filter settings, as shown in Figure 7.14, in the trace status screen. Commands are entered on the last line of the screen while the rest of the screen scrolls to display new information.
If you work with NetWare 4 servers, the procedures for enabling the DSTrace screen and setting the filters are slightly different than what was described previously. In NetWare 4, you must use SET commands exclusively when working with DSTrace; there is no menu interface. The following commands start and stop DSTrace and its file logging function on a NetWare 4 server:
![]()
SET DSTRACE=ON—Activates the trace screen
![]()
SET DSTRACE=OFF—Deactivates the trace screen
![]()
SET TTF=ON—Enables the recording of DSTrace information to the log file, SYS:SYSTEMDSTRACE.DBG
![]()
SET TTF=OFF—Closes the DSTrace log file so it can be viewed
NOTE
All the SET DSTRACE and SET TTF commands also work on NetWare 5 and higher servers because they are built in to DS.NLM regardless of whether it is NDS 6, 7, 8, or eDirectory.
WARNING
You should not leave the TTF (Trace To File) function running unattended. Due to the amount of information DSTrace collects, the DSTRACE.DBG file can become very large very quickly and could fill up your SYS volume in a matter of hours or days.
In general, the DSTrace screen shows five main things about each partition that exists on the server where you run the command:
![]() The name of the partition
The name of the partition
![]() The name of the server with which the synchronization is being performed
The name of the server with which the synchronization is being performed
![]() The state and type of the partition
The state and type of the partition
![]() The DS process currently taking place
The DS process currently taking place
![]() Whether the process completed successfully
Whether the process completed successfully
The following is a sample of the DSTrace output, with these five items highlighted in bold:
[2004/02/18 22:04:01] Sync - using version 6 on server![]() <.NETWARE65-A.East.XYZCorp.EDIR873>.
<.NETWARE65-A.East.XYZCorp.EDIR873>.
[2004/02/18 22:04:01] Sending to ---->![]() .NETWARE65-A.East.XYZCorp.EDIR873
.NETWARE65-A.East.XYZCorp.EDIR873
[2004/02/18 22:04:01] Sync - sending updates to server![]() <.NETWARE65-A.East.XYZCorp.EDIR873>.
<.NETWARE65-A.East.XYZCorp.EDIR873>.
[2004/02/18 22:04:01] Start outbound sync from change cache![]() with (1) <.NETWARE65-.East.XYZCorp.EDIR873>
with (1) <.NETWARE65-.East.XYZCorp.EDIR873>![]() state:0 type:1
state:0 type:1
[2004/02/18 22:04:01] Sync - [1c0000c6]![]() <.West.XYZCorp.EDIR873.> [2003/11/29 0:22:13, 1, 1].
<.West.XYZCorp.EDIR873.> [2003/11/29 0:22:13, 1, 1].
[2004/02/18 22:04:01] 2004/02/18 22:04:01 * SchemaPurger![]() processing deleted classes.
processing deleted classes.
[2004/02/18 22:04:01] End sync out to![]() .NETWARE65-A.East.XYZCorp.EDIR873 from change cache,
.NETWARE65-A.East.XYZCorp.EDIR873 from change cache,![]() rep:1 state:0 type:1, success
rep:1 state:0 type:1, success
[2004/02/18 22:04:01] Sync - Process: Send updates to![]() <.NETWARE65-A.East.XYZCorp.EDIR873> succeeded.
<.NETWARE65-A.East.XYZCorp.EDIR873> succeeded.
[2004/02/18 22:04:01] 2004/02/18 22:04:01 * SchemaPurger![]() processing deleted attributes.
processing deleted attributes.
[2004/02/18 22:04:01] SkulkPartition for .West.XYZCorp.EDIR873.![]() succeeded.
succeeded.
[2004/02/18 22:04:01] Sync - Partition .West.XYZCorp.EDIR873.![]() All processed = YES
All processed = YES
[2004/02/18 22:04:01] All processed = YES.
[2004/02/18 22:04:14] Start updating inherited ACLs...
[2004/02/18 22:04:14] Update inherited ACLs succeeded.
The example shows that an outbound sync for partition West.XYZCorp occurred and is targeted at server NETWARE65-A.East.XYZCorp. The replica on NETWARE65-A is On (state 0) and has a Read/Write (type 1) replica of the partition in question. The sync process was successful.
To assist you in noticing error messages among the vast amount of data displayed on the DSTrace screen, key information and error codes are shown in color to help them stand out from the other information. For example, DSTRACE.NLM (and dstrace.dlm and ndstrace) displays partition and server names in blue, whereas the success and All processed=YES messages (actually just the word YES) are in green; errors are shown in red. Not all problems show up as color-coded, but in most cases the colors do help you sort through the massive amount of information.
DSTrace has a number of SET commands you can use to manipulate the display to show you more or less information about the various DS processes. There are also commands to initiate certain synchronization processes, such as limber, and for tuning certain DS parameters on the server. These DSTrace SET commands can be divided into four groups: basic functions (such as starting and stopping DSTrace), setting filters, initiating DS background processes, and tuning parameters (server-centric).
The DSTrace SET commands (SET DSTRACE=command) that control the basic functions include the following:
![]()
ON—Starts the DS trace screen with basic trace messages.
![]()
OFF—Disables the trace screen.
![]()
ALL—Starts the DS trace screen with all the trace messages.
![]()
AGENT—Starts the DS trace screen with the trace messages that are equivalent to the ON, BACKLINK, DSAGENT, JANITOR, RESNAME, and VCLIENT flags.
![]()
CHECKSUM—Enables Transport Dependent Checksumming (TDC). This is useful in IPX networks where routers fragment and rebuild data packets. This option ensures data integrity of the reassembled packets. (This option is not supported if you’re using ETHERNET_802.3 frame type.)
![]()
NOCHECKSUM—Disables TDC.
![]()
DEBUG—Turns on a predefined set of trace messages typically used for debugging. The flags set are ON, BACKLINK, ERRORS, EMU, FRAGGER, INIT, INSPECTOR, JANITOR, LIMBER, MISC, PART, RECMAN, REPAIR, SCHEMA, SKULKER, STREAMS, and VCLIENT.
![]()
NODEBUG—Leaves the trace screen enabled but turns off all debugging messages previously set. It leaves the messages set to the ON command option.
WARNING
The SET DSTRACE=ON command activates the trace screen from DS.NLM (called the Directory Services screen), and the DSTRACE SCREEN ON command activates the trace screen from DSTRACE.NLM (called the DSTrace Console screen). On a NetWare 5 and higher server, you can issue both commands and can end up with two trace screens showing the same information—or different information if the filters are set differently.
Table 7.2 provides a list of DSTrace filters. They can be used in place of the filter list available from DSTRACE.NLM, with minor exceptions. For example, no corresponding DSTrace SET commands exist for WAN Traffic Manager. These filters are turned on by using a + (for example, SET DSTRACE=+BLINK) and off by using a - (for example, SET DSTRACE=-AUTHEN).
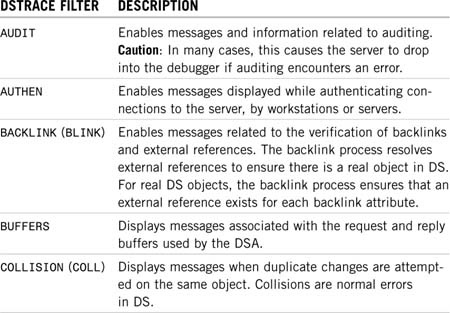
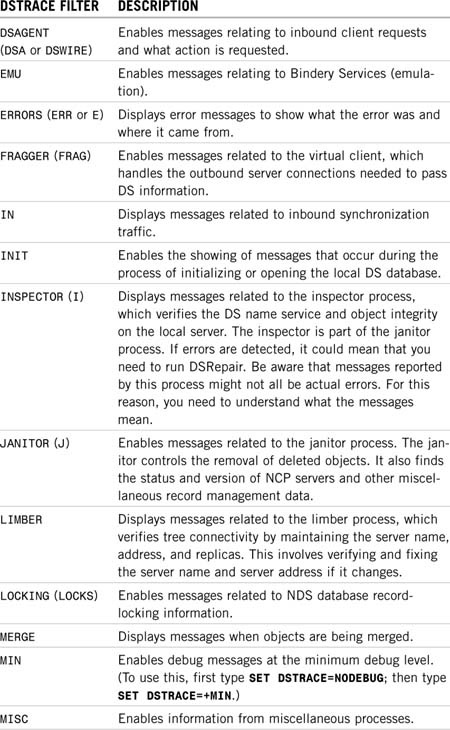
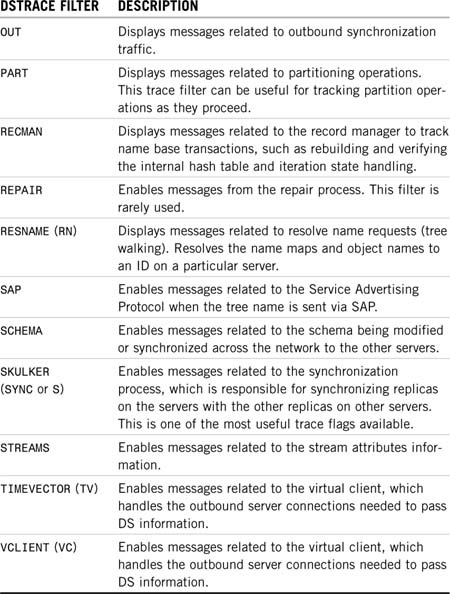
NOTE
Although many of the filter names listed in Table 7.2 are the same as those used in DSTRACE.NLM and ndstrace, some differences do exist. For example, the Backlinker filter for the SET command is BLINK, but for DSTRACE.NLM and ndstrace, the name is BLNK. Therefore, if your environment has NetWare 5 or higher and Linux/Unix servers, it is best to use DSTRACE.NLM on NetWare so you need to remember only one set of filter names.
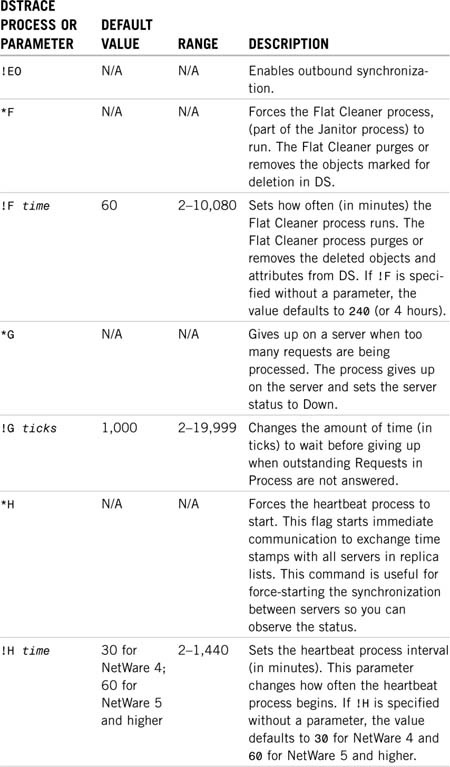
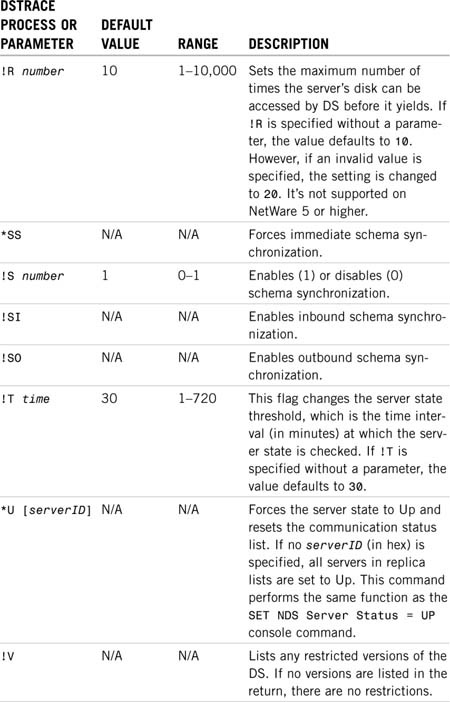
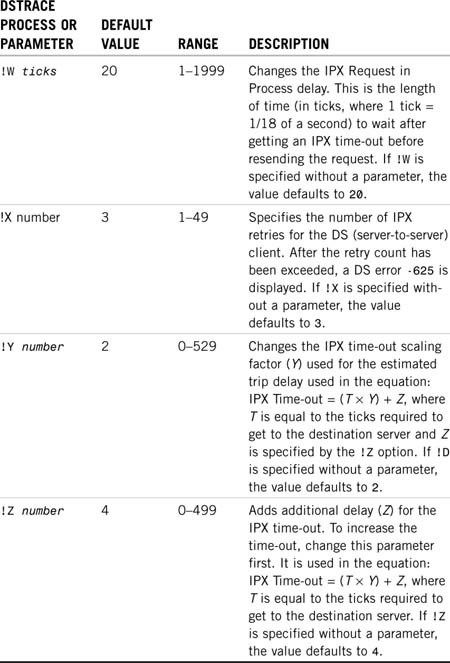
Table 7.3 lists the various DS background processes (ones that have an asterisk in their names) and DS tuning parameters (ones that have an exclamation mark in their names) that can be manipulated using DSTrace SET commands. You can force a specific DS background process to run by using one of the SET DSTRACE=*option commands. For instance, to force the Schema Synchronization process to run, use SET DSTRACE=*SS. If you have a specific reason to change the default time intervals for an DS process, you can use the SET DSTRACE=!parameter command.
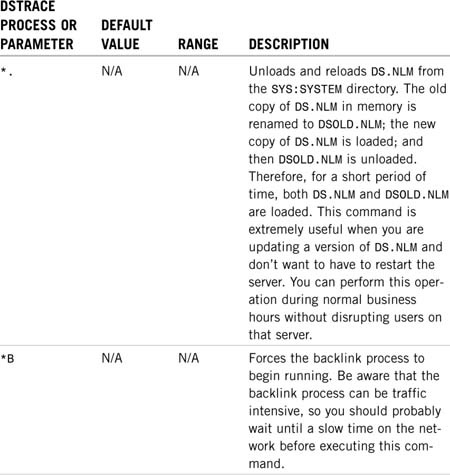

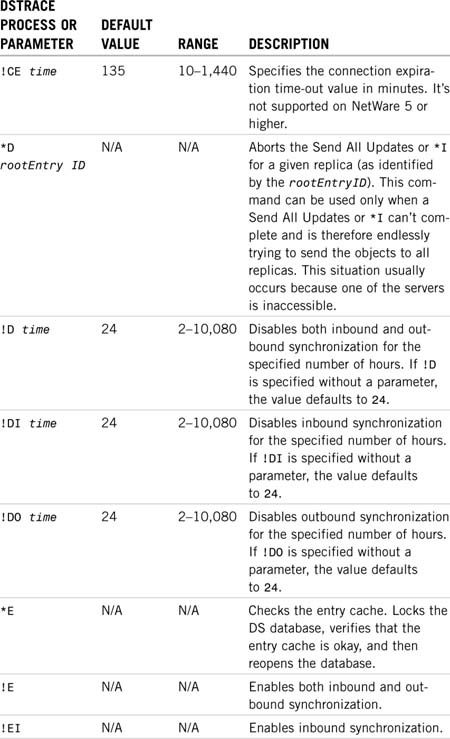

NOTE
Some of the previously listed parameter values (such as !B) can be looked up using the SET DSTRACE=*P option. For others, you need to use NDS iMonitor. They are listed under the Agent Configuration link, such as Background Process Settings and Schema Synchronization.
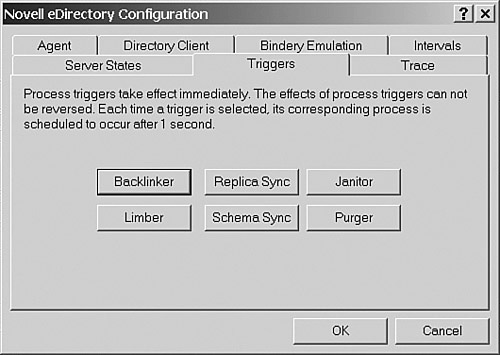
Some of the tuning parameters listed in Table 7.3 can also be changed using console SET commands, via SERVMAN.NLM (NetWare 4) or MONITOR.NLM (NetWare 5 and higher). Many of them can also be used on Linux/Unix servers using set dstrace=parameter within ndstrace—for instance, set dstrace=!b value. Similarly, most of the * commands (such as *H) also work on Linux/Unix servers; the known exception is the *. command that does not work on Linux/Unix (but does not return an error stating such). In Windows servers, however, there is no provision to enter any set commands. Instead, the commonly used triggers (such as *B) are accessed by clicking the corresponding buttons in the ds.dlm configuration dialog box (see Figure 7.15).
NOTE
A number of Novell TIDs indicate to use SET NDSTRACE on Linux/Unix platforms. You can, however, also use SET DSTRACE. This is especially useful when you work with both NetWare and Linux/Unix servers, because you only have to remember one syntax.
There is a known cosmetic bug with the SET DSTRACE=*H command on NetWare 4.11 and above (but not for ndstrace on Linux/Unix). If you enter this DSTrace command twice, back-to-back, it doesn’t take effect. For example, say you issue a SET DSTRACE=*H and follow it by another SET DSTRACE=*H in a few minutes because you didn’t catch the displayed information and want to see it again. The server displays the message DSTrace is ALREADY set to *H and does nothing. For *H to be issued twice, you must set another (different) command after the first one and then reissue the command. For example, you could issue SET DSTRACE=*H, followed by SET DSTRACE=*U, and then SET DSTRACE=*H again. This does not happen with ndstrace on Linux/Unix.
Novell has created a utility called DSBrowse that you can use to get a server-centric view of your DS data. The information you see in this utility is localized to what is in the replicas stored on the server. If the server does not hold a replica for the whole tree, you see only parts of your tree. The data shown by DSBrowse includes attribute values that standard management tools, such as ConsoleOne, can provide. DSBrowse can also show additional information, such as when an object or attribute of an object was last modified and by whom; this information is not reported by standard management utilities.
DSBrowse can display the following information categories from the main menu:
![]() Entry Information—Use this option to view the information about the entries themselves. In DSBrowse’s vocabulary, an entry can be the local object ID, a base class, creation time, an attribute, an attribute’s value, and so on.
Entry Information—Use this option to view the information about the entries themselves. In DSBrowse’s vocabulary, an entry can be the local object ID, a base class, creation time, an attribute, an attribute’s value, and so on.
![]() Partition Information—Displays information about DS-related partitions (such as the Schema partition and user-created partitions) located on the local server.
Partition Information—Displays information about DS-related partitions (such as the Schema partition and user-created partitions) located on the local server.
![]() Attribute Definitions—Displays the attributes defined by the schema.
Attribute Definitions—Displays the attributes defined by the schema.
![]() Class Definitions—Displays the classes defined by the schema.
Class Definitions—Displays the classes defined by the schema.
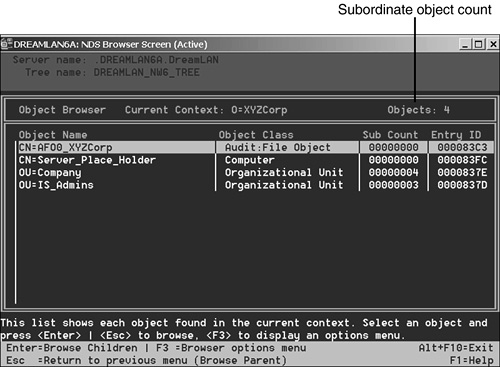
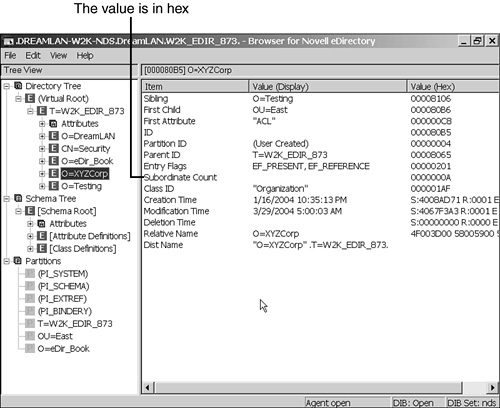
DSBrowse navigates through the entries in the DIB using the tree model: You go from parent to child. When examining an object, you can select to view its attributes and the values or details about the object itself. Depending on the implementation of DSBrowse, a varying amount of detail is provided. For instance, when examining a container, DSBROWSE.NLM shows the number of subordinate objects (see Figure 7.16), but the Windows version provides a lot more information such as the object’s parent object name, sibling object name, and so on (see Figure 7.17).
TIP
When browsing through the data, you’ll find that DSBROWSE.NLM presents the entries in alphabetical order but that the Windows version does not. In most cases, the Windows version seems to present the entries according to creation time stamp, but over time you will find that there is no specific order in which the entries are listed. This is because it actually reads from the local DS data files, and the entries are listed in the order in which the entry’s data records are found in the database.
One of the most powerful features of DSBrowse is its capability to display the attributes and attribute values of any object. One of the more useful pieces of data provided by DSBrowse is an object’s modifiersName attribute. Starting with NDS 8, DS keeps track of the object name that last modified an object. Using this attribute, you can see the information without having to enable auditing. modifiersName, however, is a single-valued attribute so it keeps track of only the last modifier’s object name.
Because DSBrowse is a server-centric tool, you can use it to compare objects in different replicas to check for any inconsistency as a result of failed synchronization or from data corruption. In addition, DSBrowse is a powerful tool to use in learning various NDS tidbits that the standard utilities don’t (and can’t) provide. As such, DSBrowse can be an indispensable tool for DS-aware application programmers who need to look up attribute syntax and attribute names. The attribute names you see in NetWare Administrator, for example, do not truly reflect the names used in the schema. Therefore, if you use the attribute name listed in NetWare Administrator in your application, your program might not find that attribute.
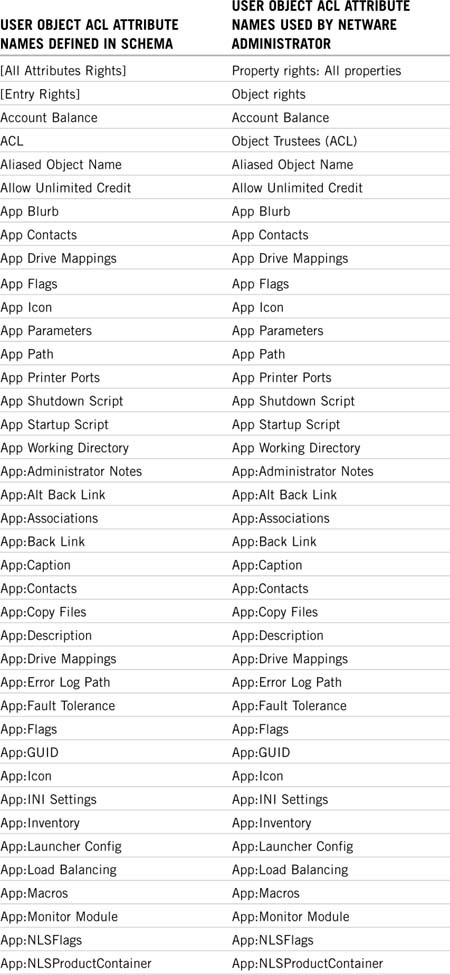
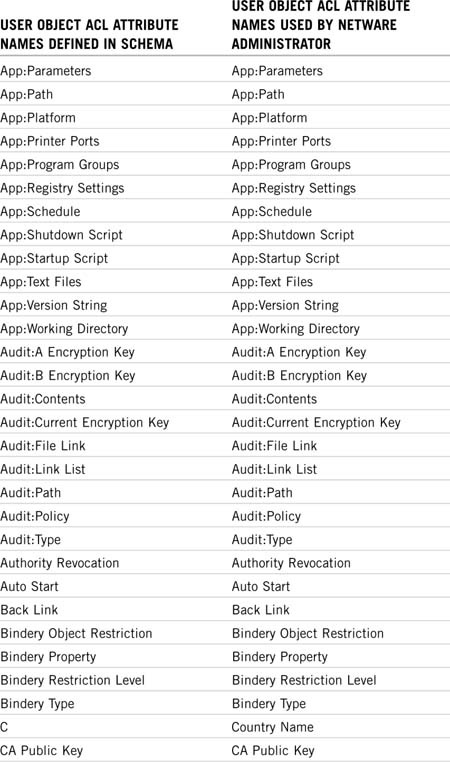
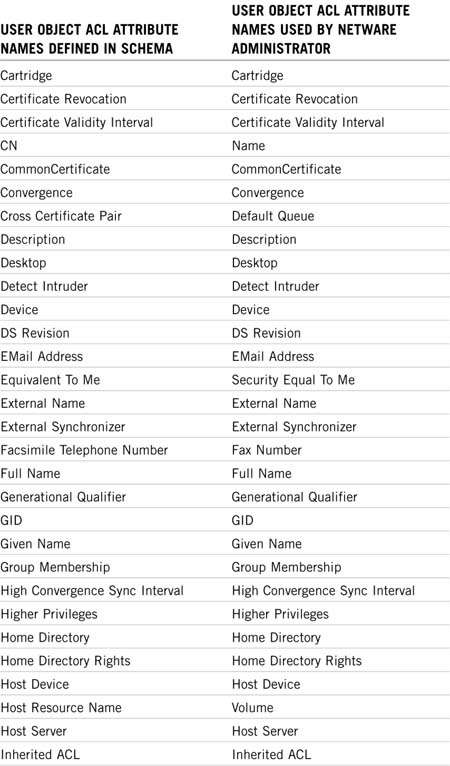
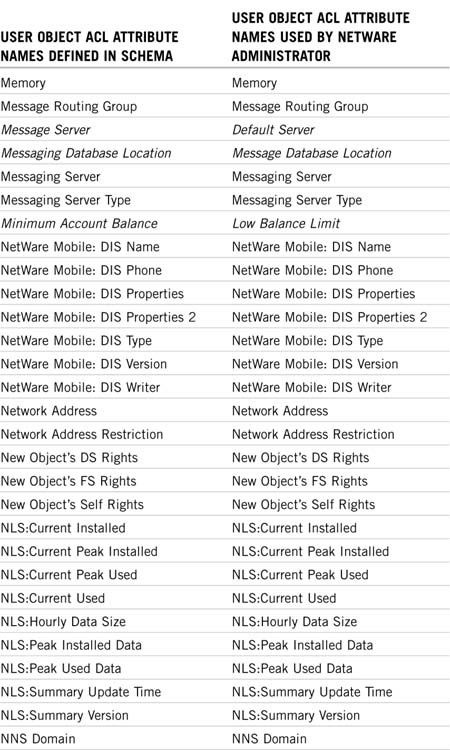
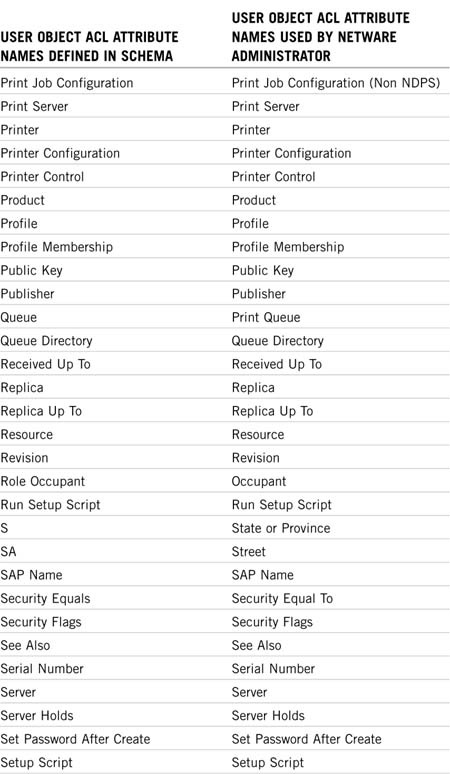
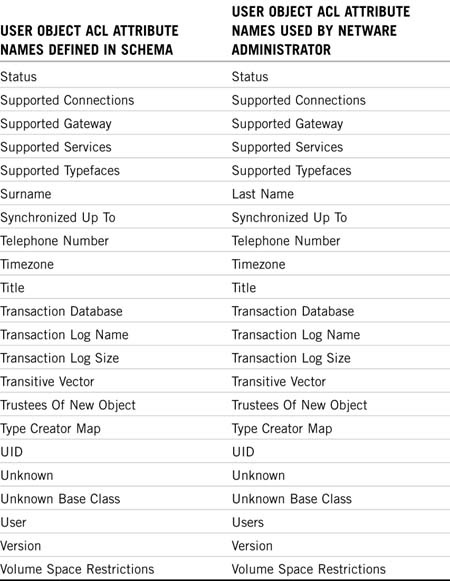
To illustrate the point, Table 7.4 offers a comparison of ACL attribute names defined for a User object in the NetWare 4.11 schema and the ACL attribute names used in NetWare Administrator. The entries that are different are shown in italic. Due to the large number of new attributes introduced in NetWare 5 and higher and depending on the additional products installed (such as ZENworks), we have chosen to use NetWare 4.11 for simplicity.
NOTE
It is interesting that NETADMIN.EXE, the DOS version of NetWare Administrator that shipped with NetWare 4, uses the same ACL attribute names as those used to define the schema.


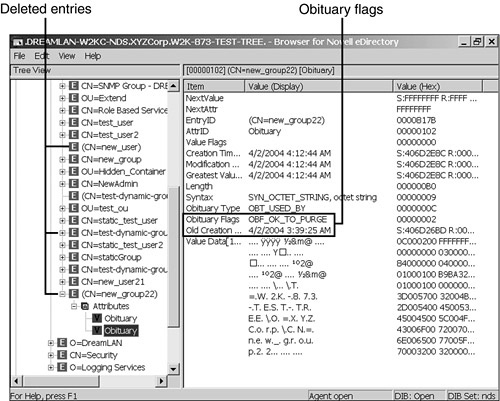
The Windows version of DSBrowse can also show you any deleted entries that haven’t yet been removed from the DIB. These entries are shown with parentheses around their names (see Figure 7.18). As previously discussed in the “Obituaries” section of Chapter 6, “Understanding Common eDirectory Processes,” when an object is deleted from the DIB, it is stripped down to its husk—an object with no attributes—and waits for the Purger process to remove it from the DIB. The (CN=new_user) and (CN=test_dynamic_group) are two such objects. The (CN=new_group22) is a deleted object, but it has not yet reached the All Purge state like the other two deleted objects; its obituary flag is OBF_OK_TO_PURGE. Next time Janitor runs, (CN=new_group22) will be turned into a husk.
As the name implies, DSBrowse is a read-only utility. You could, however, use DSBrowse to delete an object from the DIB if necessary. On NetWare, you need to load DSBROWSE.NLM with the -A switch to enable the delete object option; on Windows, this feature is enabled by default. The delete feature is designed to remove objects from your tree that NetWare Administrator or ConsoleOne do not, but it is not a way to get around security imposed by Inherited Rights Filters (IRFs) on an object.
NOTE
Once enabled, Delete selected object is accessed via the Browsers Options menu on NetWare. On Windows, it is listed under the Edit menu. You can also select the object to be deleted and then right-click for the option in the context menu.
NetWare 5 and higher store NetWare licensing information in DS. Due to security, only the user who installed the license certificate can delete it. The NetWare Administrator snap-in checks for object ownership and gives an error about insufficient rights if a user other than the installer attempts to perform the delete. If the User object that installed the license certificates is not available, you can use the advanced mode of DSBrowse to delete the certificates.
Starting with NetWare 5 Support Pack 3, an IRF is placed on every NLS:License Certificate class object (whose name is of the form NLS:License ID=SN:xxxxxx; NLS:License ID is the naming attribute for the object). DSBrowse is unable to remove these objects because of the IRF.
TIP
You can use rmLicIRF (ftp.dreamlan.com/Freeware/rmLicIRF.zip), an NLM utility, to remove the IRF placed on NLS:License Certificate objects.
NOTE
DSBROWSE -A also enables two additional features: Send Object and Receive Object. The use of these two options is discussed in the “Unknown Objects” section in Chapter 11.
Sometimes when an attribute has a high number of values (for example, more than 500 members in a Group object), it can lead to synchronization problems or problems with DS high utilization. DSBROWSE.NLM has a lesser-known option that can report on attributes that have high value counts.
DSBROWSE -CV### can be used to search for objects that have attributes with a high number of values. At the server console, type DSBROWSE --CV500 (to get a list of all the objects that have at least one attribute with more than 500 values). From the main menu, select Object Search and in the Name field enter a *; then press F10 to launch the search. This generates a list of objects matching the search criteria on the screen and creates a log file called VALCNT500.LOG in SYS:SYSTEM. The numeric value in the filename corresponds to the ### value specified in the --CV switch. The following is a sample VALCNT100.LOG file:
Objects with value count > 100:
[Pseudo Server]
value count = 641
OU=East.O=XYZCorp.T=EDIR_873_TEST_TREE
ACL value count = 1336
Inherited ACL value count = 257
WM:Registered Workstation value count = 1305
CN=NETWARE65A.O=XYZCorp.T=EDIR_873_TEST_TREE
Reference value count = 240
CN=admin.O=XYZCorp.T=EDIR_873_TEST_TREE
Reference value count = 102
CN=NETWARE65A-PS.O=XYZCorp.T=EDIR_873_TEST_TREE
ndsPredicate value count = 205
CN=WebAccess_pco.OU=WebAccess.O=XYZCorp.T=EDIR_873_TEST_TREE
Reference value count = 149
bhObjectList value count = 131
CN=Sales_Group.OU=West.O=XYZCorp.T=EDIR_873_TEST_TREE
Member value count = 1367
Equivalent To Me value count = 1367
When looking for possible causes of DS high utilization, you can safely ignore the [Pseudo Server] object and the Reference attribute from the previous listing. The [Pseudo Server] object refers to the (DS) System partition that is local to the server and is not synchronized with other servers. Similarly, the Reference attribute is flagged PER_REPLICA and also is not synchronized to other servers. Therefore, these two items would not be the cause of high DS utilization. The other attributes reported, however, are potential sources of high DS utilization. They are as follows:
![]() Sales_Group.West.XYZCorp—This Group object has 1,367 members. This is generally not a cause of high utilization, one of the reasons being that when a member of this group logs in, it uses the Group Membership attribute of its object and does not search the 1,367 values of the Member attribute of the group. If the login script uses
Sales_Group.West.XYZCorp—This Group object has 1,367 members. This is generally not a cause of high utilization, one of the reasons being that when a member of this group logs in, it uses the Group Membership attribute of its object and does not search the 1,367 values of the Member attribute of the group. If the login script uses IF MEMBER OF checking, however, the high number of members in the group could cause slow logins because the check is done using a sequential search through the Member attribute values for a match.
TIP
The login performance can be further degraded if the large groups are also global groups, meaning they contain members from different partitions and that are located on servers separated by a slow link. You can use GGroup (www.dreamlan.com/ggroup.htm) to check for possible global groups in your tree.
![]() ACL and Inherited ACL—The large number of values in the ACL and Inherited ACL attributes of
ACL and Inherited ACL—The large number of values in the ACL and Inherited ACL attributes of East.XYZCorp container is a potential cause for high utilization. The solution to this problem is explained in TID #10080332.
![]() WM:Registered Workstation—The large number of values in the WM:Registered Workstation attribute of
WM:Registered Workstation—The large number of values in the WM:Registered Workstation attribute of East.XYZCorp container is also a point of concern. This attribute is for workstation registration entries that are invalid or old. If you are using ZENworks for Desktop version 3.0 or above, this attribute is no longer used. The solution to this problem is described in TID #10022546.
NOTE
To check for attributes with high values on Windows and Linux/Unix servers, use NDS iMonitor instead (see the “Novell iManager” section later in this chapter).
Similar to DSREPAIR.NLM, DSBROWSE.NLM is DS version-specific. Therefore, you cannot use the version of DSBROWSE.NLM for NDS 7 on a server that is running eDirectory, and vice versa. For NetWare 4 servers, use DSVIEW.NLM, a character-mode utility, instead.
Similar to DSBrowse, DSView navigates through the entries using the tree model: You go from parent to child or from sibling to sibling. When viewing the entry information, DSView displays at the bottom of the screen information telling whether the current object has any siblings (other objects at the same NDS context level). For example, the following sample DSView output shows that the entry being viewed is OU=East.O=XYZCorp in the NW411_TEST_TREE tree. OU=East.O=XYZCorp is an organizational unit (as indicated by the Class Name field) that has 26 objects within that container (Subordinate Count: 26), and it has siblings—other OUs and leaf objects at the same level (O=XYZCorp):
Key<Action> 1<Parent> 2<Child> 3<Sibling> 4<Goto Another Entry>
5<Attribute list> 6<Backup To Previous Entry>
7<View Partition Entry> 8<Find Sibling>
9<Toggle Display Mode> ESC<Return to Main Menu>
********---- Entry Information ----********
Entry ID: 010000B8 "OU=East".O=XYZCorp.NW411_TEST_TREE
Partition ID: 00000004
Partition Type: User Created Name: "NW411_TEST_TREE"
Parent ID: 010000B7 "O=XYZCorp"
Class Name: "Organizational Unit"
Subordinate Count: 26
Flags: Present
Creation TimeStamp: 04/02/09 05:16:41; rep# = 0001;![]() event = 000B
event = 000B
Modification TimeStamp: 04/03/27 18:30:06; rep# = 0001;![]() event = 0014
event = 0014
Siblings: Yes
NOTE
DSView is not Year 2000 compliant in that the date field shows only the last two digits of the year. Therefore, 04/03/27 is really 2004/03/27.
Instead of a menu such as the one that appears in DSBROWSE.NLM, you navigate DSView using the number corresponding to the desired action, such as 3 for moving to the next sibling. You can use the first letter in the action, as well. So, in this example, you can either press 3 or press the letter S to move to the next sibling. If more than one command has the same first letter, such as Next Attribute and Next Value, use the first letter of the second word (A and V) instead.
For speed and simplicity, DSView is not designed with a fancy user interface, nor does it have any online help. If you spend perhaps 30 minutes working with it, though, you’ll find it easy to use and understand.
NOTE
At the time of this writing, no DSBrowse implementation is available for Linux/Unix platforms. Instead, you can use NDS iMonitor (discussed in the “NDS iMonitor” section).
With the release of eDirectory 8.5, two Web-based eDirectory management and monitoring tools—Novell iManager and NDS iMonitor—have been included with eDirectory. They were developed as part of the effort to make management tools truly platform-independent and do not require additional software to be installed on the management workstation, as is the case with ConsoleOne, which requires a compatible Java Runtime Environment (JRE) and the Novell Client software. These two applications only require you to have a Web browser installed on the workstation and IP configured (which is a rather standard configuration for today’s computers). This section looks at iManager, and the next section examines NDS iMonitor.
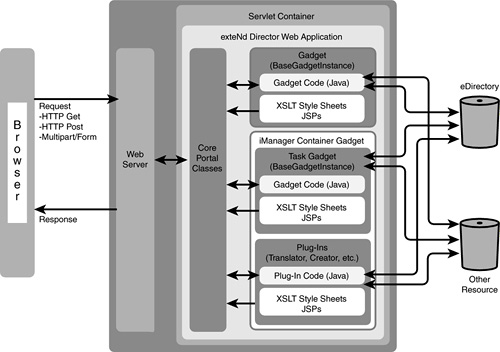
The current version of iManager 2.0.x (released with eDirectory 8.7) is a Novell exteNd Director gadget that facilitates role-based management of Novell eDirectory and other network resources using gadgets contained within the iManager gadget. iManager functionality can also be extended through other software components collectively referred to as plug-ins. Figure 7.19 illustrates the iManager architecture.
NOTE
iManager is designed to run on a single server within an organization and is used to manage other network resources in the organization.
Task gadgets consist of Java code, Extensible Stylesheet Language Transformation (XSLT) style sheets or Java Server Pages (JSPs), configuration, and resource files that are placed in the appropriate directories within the Novell exteNd Director servlet document root directory. Task gadgets also take advantage of special management features of iManager, such as role-based services.
NOTE
iManager depends heavily on many Web-based or related technologies, such as a functional Web server, a compatible JVM, and a working LDAP server. You have to ensure that all these components are working correctly to take full advantage of iManager.
iManager uses the role-based services (RBS) technology product, which provides access to network management functions based on the user’s role in an organization. RBS is a set of extensions to the eDirectory schema and defines several object classes and attributes that provide a mechanism for administrators to assign users to roles with specific tasks or responsibilities. Administrators can allow users access to only those tasks (thus, tools) that the users need to perform based on their roles.
iManager is designed to allow you to manage and maintain your eDirectory tree. The following are some of the functions provided via snap-in modules:
![]() Tree repair functions similar to those of DSRepair
Tree repair functions similar to those of DSRepair
![]() Tree merge functionality similar to those of DSMerge
Tree merge functionality similar to those of DSMerge
![]() eDirectory backup and restore
eDirectory backup and restore
![]() LDAP server configuration
LDAP server configuration
![]() eDirectory index management
eDirectory index management
![]() Import Convert Export (ICE) Wizard
Import Convert Export (ICE) Wizard
![]() DS partition management, including filtered replica support
DS partition management, including filtered replica support
![]() DS schema management
DS schema management
![]() DS object management, including dynamic groups
DS object management, including dynamic groups
At the time of this writing, iManager 2.0.x is supported on the following operating system platforms:
![]() NetWare 6 Support Pack 3 or later
NetWare 6 Support Pack 3 or later
![]() NetWare 6.5
NetWare 6.5
![]() Linux RedHat 8 or later, RedHat AS 2.1, SuSE SLES 8, and SuSE 8.2 or later
Linux RedHat 8 or later, RedHat AS 2.1, SuSE SLES 8, and SuSE 8.2 or later
![]() Windows 2000 Pro/Server/Advanced Server
Windows 2000 Pro/Server/Advanced Server
![]() Windows XP Pro SP1 and higher
Windows XP Pro SP1 and higher
![]() Solaris 8 and higher
Solaris 8 and higher
![]() HP/UX 11i and higher
HP/UX 11i and higher
NOTE
iManager 2 requires JVM 1.4.1 or later. Because only JVM 1.3.1 is supported on NetWare 5.x, iManager 2 is not supported on NetWare 5.x.
TIP
The iManager 2 installation is generally smooth. Installation on Windows servers, especially when Internet Information Server (IIS) is involved, can be problematic. At the time of this writing, iManager 2.0.x does not work with IIS6 that is shipped with Windows 2003 (but does work with Apache6). iManager installs best on Windows servers without IIS; you should let iManager install the Apache Web server instead. If you already have IIS on your Windows 2000 eDirectory server and are having trouble installing iManager, try this procedure: Uninstall eDirectory from the server, install iManager and set it to use IIS, reinstall eDirectory, and then run the exteNd Directory Configuration Wizard by accessing the URL servername_or_IP/nps/servlet/configure to configure iManager. For more information, see the “Configuring and Customizing iManager” section in the iManager documentation at www.novell.com/documentation/lg/imanager20.
For browsers, you can use Internet Explorer 6.0 SP1 or later, Netscape 7.1 or higher, or Mozilla 1.4 or higher. The following features are not available when using Netscape or Mozilla:
![]() ToolTips function for iManager buttons do not always work.
ToolTips function for iManager buttons do not always work.
![]() Multiselect function does not work.
Multiselect function does not work.
![]() Object view cannot be used.
Object view cannot be used.
![]() You might be unable to use the Tree button to log in to a different tree.
You might be unable to use the Tree button to log in to a different tree.
![]() The Repair Through iMonitor task might not work.
The Repair Through iMonitor task might not work.
![]() The Install and Upgrade Plug-in task might not work.
The Install and Upgrade Plug-in task might not work.
To access iManager, point your browser to servername_or_IP/nps/servlet/iManager.html. You will be required to authenticate to access iManager, and you’ll have access to only those features to which your roles allow you. For full access to all iManager features, you must authenticate as a user with Supervisor rights to the tree (see Figure 7.20).

WARNING
iManager authenticates users via LDAP. Therefore, you must specify the username in LDAP format using commas to separate the context and including the object type, such as cn=username,ou=ou_name,o=org.
You can access iManager in Simple mode (see Figure 7.21). This is suitable for compliance with Federal accessibility guidelines. Simple mode provides the same functionality as Regular mode, but with an interface optimized for accessibility by those with disabilities (for example, expanded menus for vision-impaired users who use a screen reader). To use Simple mode, replace iManager.html with Simple.html in the iManager URL.
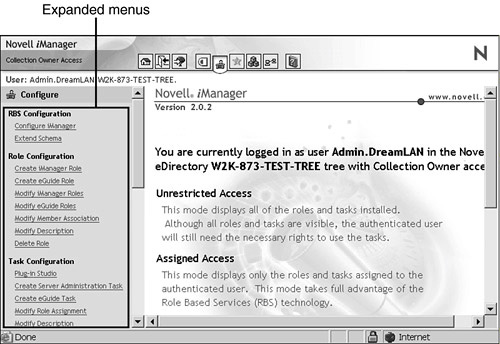
NOTE
Using either interface, you will have access to only those features associated with your assigned roles. The exception is when you log in to a different tree via iManager. In that case, the Unrestricted Access Mode, where all roles and tasks are visible, is used. You still need to have the necessary DS rights to perform a specific task, though.
NDS iMonitor is installed automatically as part of eDirectory 8.5 and higher. It is meant to be a Web-based alternative—and eventual replacement—for many of the console-based eDirectory management and troubleshooting tools, such as DSBrowse, DSTrace, and DSRepair. The following are some of the major features offered by iMonitor 2.3:
![]() General eDirectory tasks—This category of tasks includes searching for eDirectory objects, checking DirXML driver status, running preconfigured and customizable eDirectory health checks and reports, and online help with a list of eDirectory error codes and troubleshooting references.
General eDirectory tasks—This category of tasks includes searching for eDirectory objects, checking DirXML driver status, running preconfigured and customizable eDirectory health checks and reports, and online help with a list of eDirectory error codes and troubleshooting references.
![]() Monitoring health of eDirectory agent—Reports on the synchronization status, synchronization information, known eDirectory servers to the local agent, and the status of partitions and replicas stored on this server (similar to what DSRepair does).
Monitoring health of eDirectory agent—Reports on the synchronization status, synchronization information, known eDirectory servers to the local agent, and the status of partitions and replicas stored on this server (similar to what DSRepair does).
![]() Browsing eDirectory DIB—Allows you to view objects in the local DIB and their attributes (similar to what DSBrowse does). You can browse the eDirectory schema that is known to the local agent and compare schema between two servers.
Browsing eDirectory DIB—Allows you to view objects in the local DIB and their attributes (similar to what DSBrowse does). You can browse the eDirectory schema that is known to the local agent and compare schema between two servers.
![]() Configuring eDirectory agent—Allows you to set and change replication filters, background process run intervals, agent triggers, and DIB cache settings (similar to what
Configuring eDirectory agent—Allows you to set and change replication filters, background process run intervals, agent triggers, and DIB cache settings (similar to what SET DSTRACE does).
![]() Server-centric eDirectory tasks—Includes Web-based version of DSTrace, a background process scheduler, and a simplified version of DSRepair.
Server-centric eDirectory tasks—Includes Web-based version of DSTrace, a background process scheduler, and a simplified version of DSRepair.
To access NDS iMonitor, point your browser to servername_or_IP:8008. This takes you to the DHost HTTP Server URL Registration Page where you can select to access the DHost Console, DSTrace, or NDS iMonitor. After selecting a link, you might be prompted to accept a SSL certificate and then be taken to a secured page to log in to iMonitor. After authentication, you are presented with the iMonitor home page showing a summary of DSAgent information (see Figure 7.22). You can also get to the authentication screen for iMonitor directly by using servername_or_IP:8008/nds as the URL.
NOTE
Unlike iManager, to log in to NDS iMonitor, you use the standard dot notation for the username, such as .username.org_unit.org.
The ports used by iMonitor can vary depending on your operating system platform. Typically, NetWare uses ports 8008 and 8009, whereas the Windows and Linux/Unix platforms use 8008 and 8010.
Many iMonitor pages are divided into four areas or sections (see Figure 7.23):
![]() Navigator frame—Located across the top of the page, this frame shows the server name where the data is being read from; your identity; and links you can click to access other screens, including online help, login, server portal, and other iMonitor pages.
Navigator frame—Located across the top of the page, this frame shows the server name where the data is being read from; your identity; and links you can click to access other screens, including online help, login, server portal, and other iMonitor pages.
![]() Assistant frame—Located on the left side of the page, this frame contains additional navigational aids, such as links to other pages, items that help you navigate data in the Data frame, and other items to assist you with obtaining or interpreting the data on a given page.
Assistant frame—Located on the left side of the page, this frame contains additional navigational aids, such as links to other pages, items that help you navigate data in the Data frame, and other items to assist you with obtaining or interpreting the data on a given page.
![]() Data frame—Shows the detailed information about your servers that you request by clicking one of the previously listed links. This is the only page you see if your Web browser does not support frames.
Data frame—Shows the detailed information about your servers that you request by clicking one of the previously listed links. This is the only page you see if your Web browser does not support frames.
![]() Replica frame—Allows you to determine which replica you are currently viewing and provides links to view the same information from another replica or from another server’s point of view. This frame appears only when you view pages where another replica of the requested data exists or where another replica might have a different view of the information being presented in the Data frame.
Replica frame—Allows you to determine which replica you are currently viewing and provides links to view the same information from another replica or from another server’s point of view. This frame appears only when you view pages where another replica of the requested data exists or where another replica might have a different view of the information being presented in the Data frame.
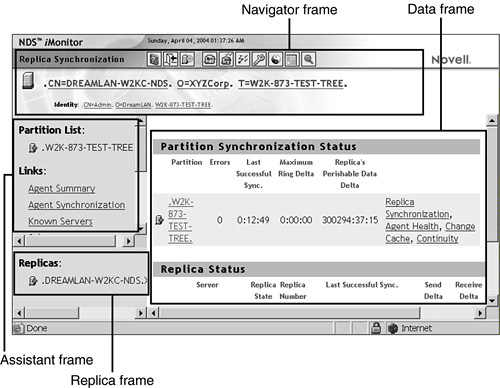
Similar to iManager, the amount and type of information you see in NDS iMonitor is dependent on the identity you used for authentication, as well as the version of the DSAgent with which you are currently working. As new versions of eDirectory are released, they will be updated to provide more information to iMonitor. Therefore, older versions of NDS/eDirectory, while still accessible via iMonitor, will not provide the same level of detail.
NDS iMonitor can be used in two modes of operation: Direct mode and Proxy mode, as illustrated in Figure 7.24. No configuration changes are necessary to move between these modes. iMonitor automatically moves between these modes, but you should understand them to successfully and easily navigate the eDirectory tree and properly interpret the data presented to you.
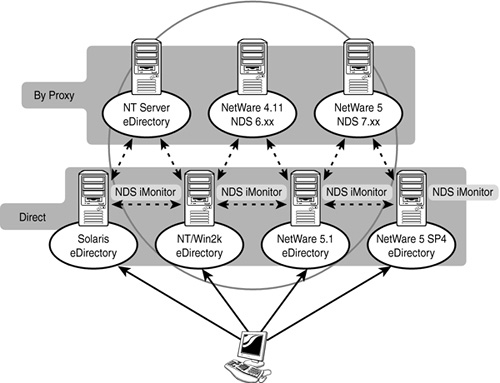
Direct mode is used when iMonitor is reading information or executing an operation on the same server from which iMonitor is running. In this mode, all iMonitor features are available on that machine, and they include the full server-centric feature set (such as DSTrace and Background Process Scheduler). Direct mode also reduces network bandwidth and provides faster access. Proxy mode is used when iMonitor is running on one machine but is gathering information or executing an operation on a different server. In this mode, iMonitor uses traditional eDirectory nonserver-centric protocols for nonserver-centric features and can access all previous versions of eDirectory beginning with NDS 6.x. This enables you to gather data from servers not running iMonitor. Server-centric features (such as DSTrace), on the other hand, use APIs that cannot be accessed remotely and thus are not available in Proxy mode.
Let’s say, for example, that you are examining the Title attribute value of a User object you suspect has not synchronized its change to other replicas. You used iMonitor to access the server on which you made the change to the Title attribute. iMonitor is running in Direct mode because the server has iMonitor running. Using the links presented in the Replica frame, you’ve switched to a different replica so you can check the value of the Title attribute to see whether it has synchronized to that server yet. iMonitor switches to Proxy mode for this operation. The Repair icon in the Navigation frame turns into a stick shift icon (see Figure 7.25). When you move the mouse pointer over this icon, you see a link to the remote iMonitor on the remote server. If the server on which you are gathering information by proxy is an earlier version of NDS or eDirectory, no stick shift icon is shown (and the Repair icon is removed). In this case, you always need to gather information on that server by proxy until it is upgraded to a version of eDirectory that includes iMonitor.
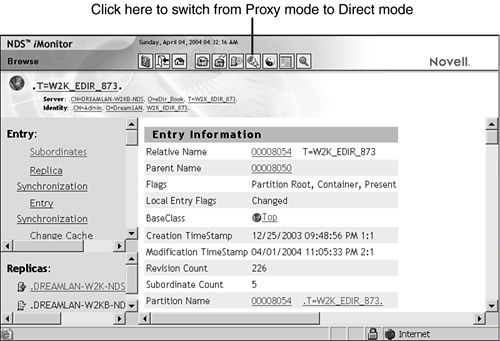
The advantage of using Proxy mode is that not every server in the tree must be running iMonitor to use most of the iMonitor features. In a tree running pre-eDirectory 8.7 servers, only one server must be upgraded to take advantage of iMonitor, and it can access data from previous versions of NDS/eDirectory via the Proxy mode. The main drawback, as previously discussed, is the lack of server-centric features, such as DSTrace, for troubleshooting and repair purposes.
NOTE
If you have NetWare Remote Manager (NoRM) installed on your NetWare server, iMonitor registers with NoRM (portal.nlm) so links to iMonitor and other eDirectory-specific information are available through the NoRM interface. These links are found under the Manage eDirectory section in the Remote Manager interface. Links to eDirectory agent health information are also found in the Diagnose Server section under Health Monitor in the eDirectory-related categories.
The default configuration of iMonitor is suitable for most environments. iMonitor offers two configuration files that allow you to customize it. The configuration files are text files containing configuration parameter tags together with their desired values. They allow you to change the general execution of iMonitor, as well as customize specific iMonitor features (such as location and maximum size of the DSTrace files).
NOTE
On NetWare 5.1 and higher servers, the trace files from iMonitor by default are stored as SYS:SYSTEMNDSIMONDSTRACE racex.htm. On Windows servers, the trace files are stored as drive:NovellNDS
dsimondstrace tracex.htm, and on Linux/Unix servers the trace files are stored as var
dsdstrace racex.htm.
The ndsimon configuration file lets you modify trace file settings, control access to the server, set the maximum number of objects to be displayed when listing a container or displaying search results, and specify the number of minutes of inactivity allowed before a connection is logged out. The ndsimonhealth configuration file lets you modify default settings for the Agent Health page. You can enable or disable Agent Health options, set reporting levels and ranges for options, and set server reporting levels. The names and locations of these two files are as follow:
|
NetWare |
SYS:SYSTEMNDSIMON.INI |
|
Windows |
drive:NovellNDS
dsimon.ini |
|
Linux/Unix |
|
NOTE
The ndsimonhealth configuration file is supported only by the versions of iMonitor shipped with eDirectory 8.7 or later.
Unlike iManager, NDS iMonitor does not rely on a Web server such as IIS or Apache. Instead, iMonitor uses its own HTTP server stack. On NetWare, it uses HTTPSTK.NLM, which is also used by NoRM. On Windows and Linux/Unix, it uses the HTTP stack built in to DHost.
iMonitor 2.1 (shipped with eDirectory 8.7.1) and above has an advanced mode that enables extra repair features, similar to the -A command-line switch for DSRepair. These additional options are especially useful when troubleshooting stuck obituaries. The general steps are as follows:
1. Log in to NDS iMonitor on a server in the replica ring running eDirectory 8.7.1 or higher.
2. Enable iMonitor’s Advanced Mode by clicking the NDS iMonitor logo in the upper-left corner of the browser window, and then select Enabled, Submit (see Figure 7.26). Keep in mind that when you choose to enable Advanced mode, this setting remains on the server until you disable it. Be sure to disable Advanced mode when you are finished with this process.
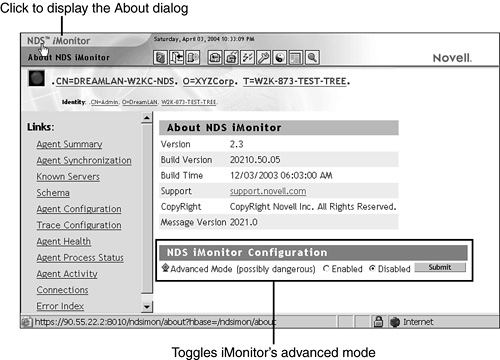
3. Go to the Reports page and click the Report Config link on the left side of the screen.
4. Configure the Obituary Listing report to look for the desired obituary types. Take note of the Obituaries Older Than field; if the sought-after obituaries are less than 7 days old, decrease the default value of 7 to 0.
5. Run the report. You should get a listing of obituaries similar to what is shown in Figure 7.27. If Advanced mode is enabled, you see the extra options to the right of each entry specified. If no obituary shows up in the report, the iMonitor server you are logged in to might not hold a real replica of the object with the obituary or a synchronization problem might have occurred. Be sure to select a server that has Advanced mode enabled.

6. Select one of the listed repair options or click the Advanced Options link to see additional choices (see Figure 7.28).
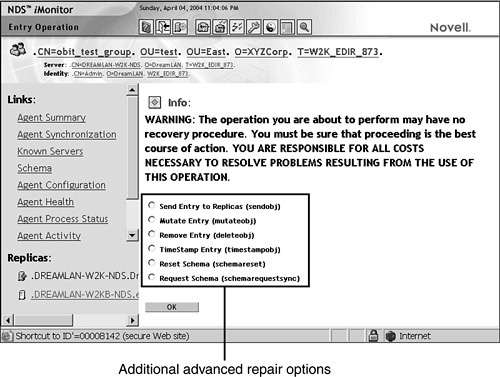
7. After selecting the desired option, you are warned that the operation is irreversible. Click OK if you are sure you want to do this. You are then presented with an info message stating success or failure.
NOTE
The advanced repair options are displayed only in reports that were run after Advanced mode was enabled. The additional links are not added to reports run prior to activating Advanced mode.
NDS iMonitor 2.3 included with eDirectory 8.7.3 has the capability to search the server’s local DIB for high values, similar to the function provided by DSBROWSE.NLM -CV### as discussed previously in this chapter. Use the following URL to access the high-value report:
https://server_address:8010/nds/valuecount?rptOption=config
You are prompted to enter the maximum value count—attributes that have more than this number in values are reported. Click the Run Report button to generate the listing. A sample report is shown in Figure 7.29.
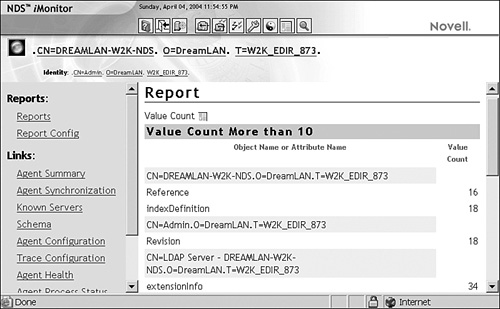
TIP
Refer to TID #10079971 for more iMonitor URL options and switches for advanced troubleshooting and reporting purposes.
For details on using the various iMonitor features and functions, refer to the “iMonitor Features” section in your eDirectory documentation.
The Novell eDirectory Management Toolbox (eMBox) ships with eDirectory 8.7 and higher and lets you access all the eDirectory backend utilities remotely as well as on the server. eMBox works with Novell iManager to provide Web-based access to eDirectory utilities such as DSRepair, DSMerge, Backup and Restore, and the DHost/eDirectory Service Manager.
NOTE
eMBox requires that RBS be configured (using iManager)—more specifically, eMBox looks for the RBS collection object—for the tree that is to be administered for eMBox tasks to be run. Furthermore, for all eDirectory Management Tools (eMTools), such as Backup, DSRepair, DSMerge, Schema Operations, and eDirectory Service Manager, to run, eMBox must be loaded and running on the target eDirectory server.
All functions are accessible, either on the local server or remotely, through a command-line client. Using the eMBox Client, you can perform tasks for multiple servers from one server or workstation. Using the client’s batch mode, you can automate many of your eDirectory management tasks using batch files and scripts.
The eMBox Client is a Java command-line client. It has two modes: interactive and batch. In the interactive mode, you run the eMBox commands one at a time. In the batch mode, though, you can run a group of commands unattended. The command-line client has logging service for both modes. Because the client is a Java application, you must have access to the Java Runtime Environment, Sun JVM 1.3.1 or higher, which is installed with eDirectory.
Use the following commands when running the eMBox Client in interactive mode from the eDirectory server:
![]() NetWare—At the server prompt, enter
NetWare—At the server prompt, enter edirutil -i.
![]() Windows—Enter
Windows—Enter drive:Novell
dsedirutil -i.
![]() Linux/Unix—At the terminal prompt, enter
Linux/Unix—At the terminal prompt, enter edirutil -i.
The edirutil file gives you a shortcut to running the eMBox Client. It points to the Java executable and the default location where the eMBox Client is installed with eDirectory. For NetWare, it includes the necessary -ns option (which is a Java option on NetWare meaning “new screen”).
NOTE
The -i switch starts the client in interactive mode; the -t switch starts the client in single command mode; and the -b switch puts the client in batch mode. In addition, the -g switch brings up a GUI. Although it is not officially supported by Novell, it is useful during troubleshooting because it helps to prevent issuing a wrong command.
The following is the online help of the eMBox Client in its interactive mode:
eMBox Client> ?
******** Novell eMBox Interactive Client Commands **********
Copyright 2001-2003 Novell, Inc. All rights reserved.
Patents Pending.
login [-s<server>] [-p<port>] [-u<user> -w<passwd>]![]() [-m<mode>] [-n]
[-m<mode>] [-n]
Open an eMBox command line client session.
-s <server> name or IP address of the eMBox server.
Default: 127.0.0.1.
-p <port> port number of the eMBox server.
Default: 80.
-u <user> suser DN, such as admin.novell.
Default: anonymous.
-w <password> password associated with the above user.
-m <mode> login mode. Default: dclient.
-n do not try and make an ssl connection.
set [-l<log file> [-o]] [-T<timeout>] [-L<languages>]
Set the log file, response timeout and/or the language
preferences.
-l <log file> name of the log file.
-o overwrite the log file when opening it.
-T <timeout> timeout in seconds to wait for responses
from the server. 0: unlimited; Default: 60.
-L <languages> list of comma delimited acceptable
languages in order of preference, such as
en-US,de_DE. Defaults to the client system
language.
setmode [-a] Set the mode to show advanced options.
-a set mode to advanced.
no option returns to regular mode.
list [-t<tools>] [-f] [-r] List available services.
-t <tools> comma delimited tool list. Use to list tool
service details.
-f display the command format only.
-r force refresh.
[<tool>.]<task> <options> Perform a particular service.
Run list command for details.
logout [-m<mode>] Close the current command line client
session.
-m <mode> login mode. Default: dclient.
exit Exit the eMBox client.
quit Same as exit.
version Display the eMbox client version information.
help Display this help information.
? Same as help.
**************************************************************
After starting the eMBox Client, you need to log in to the server. To do so, you must specify the server name or IP address and the port number—the port number must be provided because there is no default value for it—to connect to a particular server. A username and password are not needed for public logins. For example
login -s 10.65.123.244 -p 8008 -u admin.org -w password -n
After logging in to a server, you can use the list command to display a list of the services available on that server. The list command displays the following eMTools (tools within the eMBox) and their services dynamically:
eMBox Client> list
*************** List of Registered eMTools ***************
Use the option -t<tool>,<tool> to list the eMTool services.
’*’ is the wild card.
logger eMBox logging utility (1.1)
backup Novell eDirectory Backup eMTool (1.1)
dsmerge Novell eDirectory Merge eMTool (1.1)
dsrepair Novell eDirectory Repair eMTool (1.1)
dsschema Novell eDirectory Schema Operations eMTool (1.1)
service Novell eDirectory Service Manager eMTool (1.1)
You can use -r to force the refresh of the list, -t to list service details, and -f to list just the command format. The following shows the details of the backup service:
eMBox Client> list -t backup
*************** List of Registered eMTools ***************
In the format: (<tool> (<task> <format> <synopsis>![]() <options>)+)+. If <task> is ambiguous, use the
<options>)+)+. If <task> is ambiguous, use the
combination <tool>.<task> as the command name.
backup Novell eDirectory Backup eMTool (1.1)
backup -f<file name> -l<file name> [-s<size>][-u<file name>]
[-t][-e][-w][-b¦-i¦-c][-o][-d]
Perform an eDirectory backup
-f Backup file name
-l Log file name
-s Backup file size limit (MB)
-u User includes file name
-w Overwrite backup file
-t Backup stream files
-e Include security files in backup
-b Perform a full backup
-i Perform incremental backup
-c Perform a cold backup
-o Leave database closed after cold backup
-d Disable database after a cold backup
restore -f<file name> -l<file name> [-d<directory name>]
[-r][-a][-o][-e][-u][-n][-v]
Perform an eDirectory restore
-f Backup file name
-l Log file name
-d Roll forward log directory
-e Restore security files
-u Restore user included files
-r Restore DIB set
-a Activate DIB after verify
-o Open database when finished
getconfig No options needed
Retrieve backup configuration
setconfig [-L¦-l][-T¦-t][-r <directory name>][-n <size>]
[-m <size>][-s]
Set backup configuration
-L Start keeping roll forward logs
-l Stop keeping roll forward logs
-T Start logging of stream files
-t Stop logging of stream files
-r Set roll forward log directory
-n Set minimum roll forward log size
-m Set maximum roll forward log size
-s Start a new roll forward log
cancel No options needed
Cancel running backup or restore operation
You can perform tasks using each of the eMTool services after you have logged in to a server. The command syntax is servicename.taskname [options]. The following is a sample command for using the backup eMTool service to perform an eDirectory full backup file called april-1-2004.fullbackup that includes stream and security files and generates a log file called backup.log:
backup.backup -f april-1-2004.fullbackup -l backup.log -b -t -e
You can perform a single eMBox task in batch mode from the command line using the -t switch instead of -i, and you can specify the desired command as part of the command-line options. For example
C:>
ovell
dsedirutil -s 10.65.123.244 -p 8008 -u admin.org![]() -w password -n -t list
-w password -n -t list
Login successful.
*************** List of Registered eMTools ***************
Use the option -t<tool>,<tool> to list the eMTool services.
’*’ is the wild card.
logger eMBox logging utility (1.1)
backup Novell eDirectory Backup eMTool (1.1)
dsmerge Novell eDirectory Merge eMTool (1.1)
dsrepair Novell eDirectory Repair eMTool (1.1)
dsschema Novell eDirectory Schema Operations eMTool (1.1)
service Novell eDirectory Service Manager eMTool (1.1)
Logout successful.
If you have more than one eMBox task to execute, it might be easier to create a text file containing these commands and use the batch mode of the client:
C:>
ovell
dsedirutil -s 10.65.123.244 -p 8008 -u admin.org![]() -w password -n -b myCommands.txt
-w password -n -b myCommands.txt
The syntax of the text file is simple: There’s one command per line and lines beginning with a # are treated as comments. Such a command file is referred to as an eMBox internal batch file. The following is a sample internal batch file that performs two tasks:
# myCommands.txt
# Updated April 01, 2004
#
# Perform a local database repair
dsrepair.rld
# before backing up the DIB.
# Will overwrite fullbackup.file if exists.
backup.backup -f fullbackup.file -l fullbackup.log -b -t -e -w
If you want to run the eMBox Client on a workstation other than the eDirectory server, you simply need to copy the client Java file (eMBoxClient.jar) from the server to the workstation and then set up the correct Java classpath. The .jar file can be found in one of the following locations:
NetWare SYS:SYSTEMEMBOXeMBoxClient.jar
Windows drive:
ovell
dsemboxeMBoxClient.jar
Linux/Unix /usr/lib/nds-modules/embox/eMBoxClient.jar
You can run the eMBox Client from anywhere on your machine using the following procedure:
1. Add to your path the directory where the Java executable (for example, java.exe) is located, or make sure that Java is already running. If you are on a server, this is probably already done for you. On Windows and Linux/Unix servers, the directory needs to be in your path. On NetWare, instead of adding the directory to a path, Java needs to be running. On a workstation, you might need to set it up yourself. For example, on Windows, click Start, Settings, Control Panel, System. On the Advanced tab, click Environment Variables and add the path to the Path variable.
2. Add the path to the eMBoxClient.jar file to your classpath setting:
NetWare set ENVSET=patheMBoxClient.jar
Windows set CLASSPATH=patheMBoxClient.jar
Linux/Unix export CLASSPATH=path/eMBoxClient.jar
Alternatively, you can specify the classpath to use via the -cp flag for Java each time you want to run eMBox:
java -cp path/eMBoxClient.jar embox -i
For example, on Windows the command is
java -cp c:jarFileseMBoxClient.jar embox -i
WARNING
To avoid ABEND on a NetWare server, you must include -ns (a Java option on NetWare for “new screen”) in the command line. For example
java -ns -cp sys:jarFileseMBoxClient.jar embox -i
After completing both of the previous steps, you can run the client in interactive mode from anywhere on your machine using the following command:
java [-ns] embox -i
For information on Java commands, see the Java documentation on the Sun Web site (www.java.sun.com).
NOTE
If you have changed the location of Java or the eMBoxClient.jar file after installing eDirectory, edirutil might no longer work. In such case, you need to follow the previous procedure to set up the classpath to point to the new location of the .jar file.
TIP
When using a non-secure connection, all the information you enter, such as usernames and passwords, is sent over the wire in clear text. To establish a secure connection using SSL, be sure you don’t use the -n option in your command when logging in to a server because it specifies a non-secure connection; a secure connection is the default. You need to have the following Java Secure Socket Extension (JSSE) files in your classpath: jsse.jar, jnet.jar, and jcert.jar. If you don’t, the eMBox Client returns an error saying it cannot establish a secure connection.
You can get these files and information about JSSE from the Sun Web site (java.sun.com/products/jsse).
As you can see, the command-line client can be difficult to use, especially its interactive mode, due to the complexity in the command syntax. Although not officially supported by Novell, the eMBox Client has a built-in GUI that can be useful (see Figure 7.30). Use -g as the command-line switch instead of -i.
One of the nice features of the GUI mode is that, if you are unsure what the syntax of a specific service or task is, you can enable the command-line feature via the Settings menu. The command-line information is displayed as you select options and enter data.
As you can see, eMBox is a very powerful tool. For more information, including configuring the eMBox Logger that tracks events for all the eMTools operations, refer to the section “The eDirectory Management Toolbox” in the eDirectory documentation.
TIP
eMBox is heavily dependent on having RBS installed in the tree. If there is no RBS collection object in the tree, all eMBox utilities fail. You can log in and authenticate through eMBox without problem, but running any utilities results in a message stating Error -347156450. Ensure RBS is properly configured and make sure that the user you are authenticating as is a member of the eDirectory Maintenance Utilities Role in iManager. Regardless of the rights the user has logging in, he must be a member of this role for eMBox utilities to function properly.
Another possible cause can be having your tree name and your organization object named the same. For some reason, eMBox gets confused in certain circumstances if the tree and the organization have the same name. This seems to cause a problem only when you set the scope at the Tree level ([Root]). If you set the scope at the organization, it seems to work just fine. Unless you have multiple organization objects, you should not lose any functionality by moving the scope to the organization.
Sometimes you won’t have ready access to the server console to run any of the server-based tools mentioned in the previous section. This section describes how you can use workstation-based applications to accomplish similar, if not the same, goals as those server-based utilities.
NOTE
The DS rights of the user you’re logged in with determine the functionality you can perform as well as the number and types of objects you can see using workstation-based utilities.
TIP
When using workstation-based applications, the DS information is read from your current default server. For example, if you have a drive (F:) mapped to server NETWARE65-A and another drive (G:) mapped to NETWARE60-B, you’ll be reading DS data from NETWARE65-A if your current drive is F:. Otherwise, the data is retrieved from NETWARE60-B. When working from the Windows desktop, such as Windows 2000, and using Novell Client, you can easily change your default server: Right-click My Network Places, select NetWare Connections from the context menu, select the server you want to be your default server, and click Set Primary.
NetWare Administrator and ConsoleOne, which are mainly management applications, aren’t often utilized as crude diagnostic tools—but they can be. When you don’t have ready access to utilities such as DSBrowse and need to do a quick check on the data consistency or synchronization between servers in a replica ring, you can use NetWare Administrator or ConsoleOne. Suppose you suspect there’s something wrong with the synchronization between the replicas of a given partition. You can use the following steps to see whether DS changes are being sent from one replica to another:
1. Identify the servers that have a replica of the partition in question.
2. Ensure you’re only logged in to the server holding the Master replica.
3. Use NetWare Administrator or ConsoleOne to change an attribute value of one of the objects in this partition. For example, change the Location attribute of a User object.
4. At the server console of this server, issue the SET DSTRACE=*H command to force an immediate synchronization.
5. Back at the workstation, log in to each server in the replica ring separately (using LOGIN servername/username if logging in from DOS, or specify the server name in the Server field in the GUI login dialog box). Then use NetWare Administrator or ConsoleOne to check whether the changed attribute value has been propagated correctly to the server.
You can also use the same technique (logging in to each server in turn) and look for Unknown objects (because of schema inconsistency or corruption) or missing objects (perhaps due to obituaries). The key to this exercise is to log in to only one server at a time, or ensure you correctly set your default server so you know from which server you’re retrieving the data.
TIP
The old NWAdmn3X has a Use Master = True INI file parameter so that, when you create a user in NWAdmin, the Master replica is used. The same setting is available in Windows 9x and higher via the Registry key. The key that governs this use-master situation is HKEY_CURRENT_USERSoftwareNetWare ParametersNetWare AdministratorUserCreationUse Master. To enable the feature, create the key of the type String Value (if not already there) and set it to 1. If you know you have an inconsistent replica ring but NWAdmin isn’t showing any differences when you log in to specific servers, check whether this setting is enabled. This also works for NetWare Administrator (NWAdmn32).
ConsoleOne 1.3.4 and higher and iManager can also be run in a mode to force the utility to communicate with only the Master replica. Start ConsoleOne with the -forceMaster switch. This forces ConsoleOne to read only from the Master replica. For iManager 1.5 and higher, include &forceMaster=true in the URL when logging in.
With the popularity of the Open Database Connectivity (ODBC) technology, many data applications (including spreadsheet programs such as Excel) provide an ODBC interface for connecting to an ODBC data source. And because NDS/eDirectory is a database, you can use the Novell ODBC Driver for eDirectory to easily query and retrieve Directory data and generate reports either for management or diagnostic needs.
Although ConsoleOne, iManager, and NetWare Administrator provide a convenient interface for DS management, they are not the best applications when it comes to generating reports. This eDirectory ODBC driver serves as an independent interface for extracting and reporting specified DS information for use in the applications you use everyday. It allows you to populate reports, import data into your custom programs, or view data within a spreadsheet. In March 2004, Novell updated the driver to include the capability to perform simple update operations such as insert, modify, and delete on eDirectory objects.
The architecture behind the Novell ODBC Driver for eDirectory consists of the application, the ODBC.DLL Driver Manager, the Novell ODBCNDS.DLL driver, the network, and eDirectory itself. The driver employs the ODBCNDS.DLL to abstract the directory tree into accessible relational database tables, which hides the complexity of the underlying directory syntax. Information is selected and ordered from the relational tables using standard Structured Query Language (SQL) statements embedded into the application.
Using embedded SQL statements or ODBC functions, you can set queries and sort NDS/eDirectory information. For example, you can access the account information for each user. You can also set search conditions and sort directory entries to return specified entry attributes, such as the username, user description, telephone number, address, or other user-specific information. The retrieved user data can then be viewed in a report or used in programs. Figure 7.31 shows a Visual Basic program that uses the Novell ODBC Driver for eDirectory to access DS information.
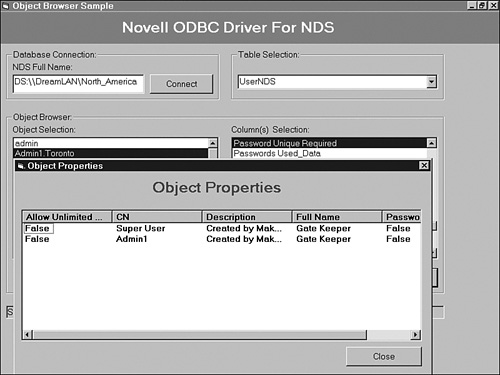
NOTE
You can download the Novell ODBC Driver for eDirectory, with read/write access, from developer.novell.com/ndk/odbcrw.htm.
Schema Manager is a ConsoleOne snap-in application that allows users with Supervisor rights to a tree (the [Root] object) to customize the schema of that tree. Schema Manager is available from the Tools menu.
You can use Schema Manager to perform the following functions:
![]() View a list of all classes and attributes in the schema (see Figure 7.32). Highlight a class or attribute and then click Info to obtain additional information.
View a list of all classes and attributes in the schema (see Figure 7.32). Highlight a class or attribute and then click Info to obtain additional information.
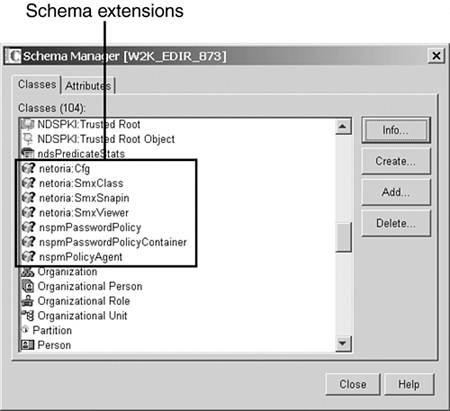
![]() View an attribute’s information, such as its syntax and flags.
View an attribute’s information, such as its syntax and flags.
![]() Extend the schema by adding a class or an attribute to the existing schema; you need to have Supervisor rights to
Extend the schema by adding a class or an attribute to the existing schema; you need to have Supervisor rights to [Root] for this operation.
![]() Create a new class by naming it and specifying applicable attributes, flags, containers to which it can be added, and parent classes from which it can inherit attributes. The class can be an auxiliary class if running NDS 8 or higher.
Create a new class by naming it and specifying applicable attributes, flags, containers to which it can be added, and parent classes from which it can inherit attributes. The class can be an auxiliary class if running NDS 8 or higher.
![]() Create an attribute by naming it and specifying its syntax and flags.
Create an attribute by naming it and specifying its syntax and flags.
WARNING
Any attributes added to a base class (that is, one that is part of the base schema, such as the User class), cannot be removed at a later time.
![]() Add an attribute to an existing class.
Add an attribute to an existing class.
![]() Delete a non-base class that is not in use or that has become obsolete.
Delete a non-base class that is not in use or that has become obsolete.
![]() Delete an attribute that is not in use or that has become obsolete.
Delete an attribute that is not in use or that has become obsolete.
Keep in mind that standard Novell-supplied management utilities, such as NetWare Administrator, cannot manage objects (such as create or update) that use extended schema definitions unless you have a snap-in for NetWare Administrator or custom applications that know about the extensions. Further discussions about NetWare Administrator snap-ins and a utility called ScheMax that allows you to extend the schema and create your own snap-ins can be found in Chapter 12, “eDirectory Management Tools.”
An excellent Windows application called NDS Snoop is easier to use and more powerful than ConsoleOne’s Schema Manager. Initially developed as an NDS developer tool by Novell Developer Support, it has since been enhanced with new features, including support for eDirectory. NDS Snoop has the following features:
![]() NDS Browser—It can be used to view any DS object and its corresponding attribute values. The browser allows you to browse any DS tree in your enterprise network. Continue to click the up arrow of the Containers list box until all the trees in your environment are displayed. If you select a tree to which you have not authenticated, you have
NDS Browser—It can be used to view any DS object and its corresponding attribute values. The browser allows you to browse any DS tree in your enterprise network. Continue to click the up arrow of the Containers list box until all the trees in your environment are displayed. If you select a tree to which you have not authenticated, you have [Public] access to that tree only.
![]() Schema Viewer—The Schema Viewer tool (see Figure 7.33) is used to read all the Attribute and Object class definitions from DS. Expand each definition name to see its corresponding attributes. The Object Class super class hierarchy includes its entire super class lineage all the way to Top. You can determine which attribute is derived from each super class by its icon displayed in the tree view. Matching icons indicate that those attributes were defined for the corresponding super class.
Schema Viewer—The Schema Viewer tool (see Figure 7.33) is used to read all the Attribute and Object class definitions from DS. Expand each definition name to see its corresponding attributes. The Object Class super class hierarchy includes its entire super class lineage all the way to Top. You can determine which attribute is derived from each super class by its icon displayed in the tree view. Matching icons indicate that those attributes were defined for the corresponding super class.
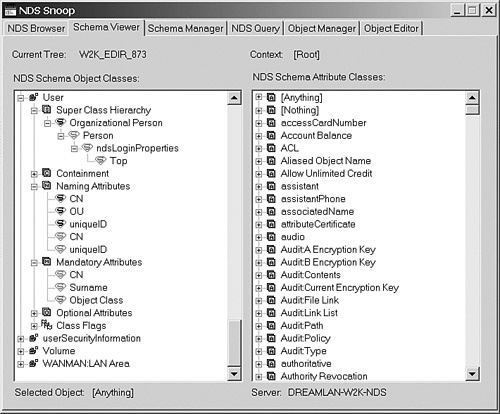
![]() Schema Manager—The Schema Manager tool is used to create DS schema attribute and class definitions. You must have sufficient rights to the
Schema Manager—The Schema Manager tool is used to create DS schema attribute and class definitions. You must have sufficient rights to the [Root] of the tree to use the Schema Manager. If you do not have sufficient rights, all fields are disabled and the message You must have Admin Equivalent rights to use the Schema Manager! is displayed at the bottom of the view. Populate the fields with the desired values and select the desired operation for the attribute or object class definition.
![]() NDS Query—The NDS Query tool can be used to build complex search filters to query DS for objects that adhere to specific search criteria. For example, you could search for all User objects that have a telephone number that begins with 123. This tool is useful to determine whether you can search for an attribute value or new object you have just added to the DS tree.
NDS Query—The NDS Query tool can be used to build complex search filters to query DS for objects that adhere to specific search criteria. For example, you could search for all User objects that have a telephone number that begins with 123. This tool is useful to determine whether you can search for an attribute value or new object you have just added to the DS tree.
![]() Object Manager—The Object Manager is used to create, delete, rename, or move any DS object. This tool can be used to create an object of a new custom DS Object Class schema extension you have just added. This tool automatically determines what the object’s Mandatory Attributes are and allows you to add values for each.
Object Manager—The Object Manager is used to create, delete, rename, or move any DS object. This tool can be used to create an object of a new custom DS Object Class schema extension you have just added. This tool automatically determines what the object’s Mandatory Attributes are and allows you to add values for each.
![]() Object Editor—The Object Editor can be used to add values for any attribute type for all DS object classes with the exception for
Object Editor—The Object Editor can be used to add values for any attribute type for all DS object classes with the exception for SYN_STREAM and SYN_OCTET_STRING. For example, you could add a value for a new attribute class definition, Student ID Number, to an existing DS object.
You can download NDS Snoop from www.novell.com/coolsolutions/tools/1005.html.
What do you do when a DS-aware application worked on one DS tree but doesn’t on another? When you’re encountering -625 communication errors, where should you start looking? Our favorite tools for diagnosing such problems are protocol analyzers. A protocol analyzer is either a combination of hardware and software or pure software that can capture and analyze individual packets on your network. Some protocol analyzer manufacturers require you to use their specific hardware, but others are software-only and can be used with a variety of network cards that can operate in the promiscuous mode.
NOTE
Promiscuous mode operation is the capability of a network adapter (or network interface card [NIC]) to make a copy of the packets that are not addressed to it. Not all NICs can operate in this mode; therefore, you should check with your NIC’s vendor if you’re unsure.
One of the first software-only protocol analyzers is Novell’s LANalyzer for Windows. It can monitor, capture, and analyze both Ethernet and Token-Ring data frames. It can decode all NetWare, AppleTalk, and TCP/IP protocol suites; for protocols it doesn’t support, you’re presented with the hex dump of the contents. A number of protocol analyzers are available commercially, such as Sniffer from Network Associates (www.networkassociates.com/us/products/sniffer/home.asp), and one of the more popular free protocol analyzers, Ethereal (www.ethereal.com). Although Ethereal is still technically beta software, it has a comprehensive feature set and many users have used it successfully for production use. Here is the list of features, current as of version 0.9.14, in no particular order:
![]() Data can be captured “off the wire” from a live network connection or read from a capture file.
Data can be captured “off the wire” from a live network connection or read from a capture file.
![]() Ethereal can read capture files from tcpdump (libpcap), NAI’s Sniffer (compressed and uncompressed), Sniffer Pro, NetXray, Sun snoop and atmsnoop, Shomiti/Finisar Surveyor, AIX’s iptrace, Microsoft’s Network Monitor, Novell’s LANalyzer, RADCOM’s WAN/LAN Analyzer, HP-UX nettl, i4btrace from the ISDN4BSD project, Cisco Secure IDS iplog, the pppd log (pppdump-format), the AG Group’s/WildPacket’s EtherPeek/TokenPeek/AiroPeek, or Visual Networks’ Visual UpTime. It can also read traces made from Lucent/Ascend WAN routers and Toshiba ISDN routers, as well as the text output from VMS’s TCPIPtrace utility and the DBS Etherwatch utility for VMS. Any of these files can be compressed with gzip, and Ethereal decompresses them on-the-fly.
Ethereal can read capture files from tcpdump (libpcap), NAI’s Sniffer (compressed and uncompressed), Sniffer Pro, NetXray, Sun snoop and atmsnoop, Shomiti/Finisar Surveyor, AIX’s iptrace, Microsoft’s Network Monitor, Novell’s LANalyzer, RADCOM’s WAN/LAN Analyzer, HP-UX nettl, i4btrace from the ISDN4BSD project, Cisco Secure IDS iplog, the pppd log (pppdump-format), the AG Group’s/WildPacket’s EtherPeek/TokenPeek/AiroPeek, or Visual Networks’ Visual UpTime. It can also read traces made from Lucent/Ascend WAN routers and Toshiba ISDN routers, as well as the text output from VMS’s TCPIPtrace utility and the DBS Etherwatch utility for VMS. Any of these files can be compressed with gzip, and Ethereal decompresses them on-the-fly.
![]() Live data can be read from Ethernet, FDDI, PPP, Token-Ring, IEEE 802.11, Classical IP over ATM, and loopback interfaces (at least on some platforms; not all those types are supported on all platforms).
Live data can be read from Ethernet, FDDI, PPP, Token-Ring, IEEE 802.11, Classical IP over ATM, and loopback interfaces (at least on some platforms; not all those types are supported on all platforms).
![]() Captured network data can be browsed via a GUI or via the TTY-mode tethereal program.
Captured network data can be browsed via a GUI or via the TTY-mode tethereal program.
![]() Captured files can be programmatically edited or converted via command-line switches to the editcap program.
Captured files can be programmatically edited or converted via command-line switches to the editcap program.
![]() More than 500 protocols can currently be dissected, including but not limited to AARP, AIM and its related protocols, ARP/RARP, BOOTP/DHCP, BOOTPARAMS, BROWSER, DHCPv6, DNS, DNSSERVER, EIGRP, FTP, FTP-DATA, FTSERVER, H.261, H.263, H1, H225, H245, H4501, IGRP, IP, IPX, IPX MSG, IPX RIP, IPX SAP, IPX WAN, IPv6, LDAP, MySQL, NBIPX, NCP, NDPS, NETLOGON, NFS, NFSACL, NFSAUTH, NIS+, NIS+ CB, NLSP, NMAS, NNTP, NTP, NetBIOS, OSPF, PPP and its related protocols, RIP, SMB, SMB Mailslot, SMB Pipe, SMPP, SMTP, SPX, SRVLOC, SRVSVC, SSH, SSL, Syslog, TCP, TELNET, TFTP, TIME, Token-Ring, and UDP.
More than 500 protocols can currently be dissected, including but not limited to AARP, AIM and its related protocols, ARP/RARP, BOOTP/DHCP, BOOTPARAMS, BROWSER, DHCPv6, DNS, DNSSERVER, EIGRP, FTP, FTP-DATA, FTSERVER, H.261, H.263, H1, H225, H245, H4501, IGRP, IP, IPX, IPX MSG, IPX RIP, IPX SAP, IPX WAN, IPv6, LDAP, MySQL, NBIPX, NCP, NDPS, NETLOGON, NFS, NFSACL, NFSAUTH, NIS+, NIS+ CB, NLSP, NMAS, NNTP, NTP, NetBIOS, OSPF, PPP and its related protocols, RIP, SMB, SMB Mailslot, SMB Pipe, SMPP, SMTP, SPX, SRVLOC, SRVSVC, SSH, SSL, Syslog, TCP, TELNET, TFTP, TIME, Token-Ring, and UDP.
![]() Output can be saved or printed as plain text or PostScript.
Output can be saved or printed as plain text or PostScript.
![]() Data display can be refined using a display filter.
Data display can be refined using a display filter.
![]() Display filters can also be used to selectively highlight and color packet summary information.
Display filters can also be used to selectively highlight and color packet summary information.
![]() All or part of each captured network trace can be saved to disk.
All or part of each captured network trace can be saved to disk.
To use a protocol analyzer effectively, you need to be versed in the protocols to understand what you’re seeing. The analyzer tells you what it sees on the wire, but it’s up to you, the user, to interpret the presented data and take appropriate action.
TIP
An excellent resource about protocol analysis is the Protocol Analysis Institute’s Web site at www.packet-level.com.
Oftentimes, the amount of useful information provided by the various utilities we’ve discussed in this chapter is limited because the tools assume you know what you’re looking for in the first place, which is often not the case. Also, knowing the cause of the error or understanding the error code doesn’t always automatically tell you what the solution is. Therefore, you need to combine the diagnosis of your problem with some type of knowledge base to formulate an action plan to fix your DS problem. This section introduces a number of information tools that can assist you in the task:
![]() LogicSource for NDS/eDirectory
LogicSource for NDS/eDirectory
![]() Novell’s technical support knowledgebase
Novell’s technical support knowledgebase
![]() Novell Internet newsgroups
Novell Internet newsgroups
![]() Novell’s Cool Solutions for eDirectory
Novell’s Cool Solutions for eDirectory
![]() Help files
Help files
In March 1998, during Novell’s annual BrainShare Conference in Salt Lake City, Utah, Novell released an electronic document called “Understanding, Identifying and Resolving NDS Issues” (code named the Phoenix Document) that offered in-depth explanations of the concepts, processes, and operations of NDS. In mid-1998, the product was enhanced with more information and searching for data was made easier. The document is now known as “LogicSource for eDirectory” (see Figure 7.34) and is available as part of the Novell Professional Resource Suite (support.novell.com/subscriptions/subscription_products/nprs16.html) and the eDirectory Toolkit (support.novell.com/subscriptions/subscription_products/product_toolkits17.html).
Designed to help you manage and support all versions of NDS and eDirectory, “LogicSource for eDirectory” includes descriptions of common error codes to help you learn why they occur and how to avoid them. “LogicSource for eDirectory” contains more than 1,500 pages of detailed information (perhaps more than you ever cared to know!) about the various DS processes and steps for setting up directory trees.
The information included in “LogicSource for eDirectory” covers the following subjects:
![]() Understanding Novell Directory Services
Understanding Novell Directory Services
![]() Novell Directory Services background processes
Novell Directory Services background processes
![]() Novell Directory Services background process requests
Novell Directory Services background process requests
![]() Novell Directory Services partition and object operations
Novell Directory Services partition and object operations
![]() Resources for supporting Novell Directory Services for different operating system platforms
Resources for supporting Novell Directory Services for different operating system platforms
![]() Identifying and resolving Novell Directory Services issues
Identifying and resolving Novell Directory Services issues
![]() Novell Directory Services Error Codes
Novell Directory Services Error Codes
![]() Novell Client, operating system, and other error codes
Novell Client, operating system, and other error codes
Over the years, Novell Technical Support (NTS) has collected and published reported issues and resolutions for all Novell products, including the NetWare operating system and its components. The information is available in the form of technical information documents (TIDs). You can access these TIDs, free of charge, 24 hours a day, 7 days a week over the Internet from Novell Technical Support’s Web site at support.novell.com/search/kb_index.jsp. The TIDs are stored in a searchable database. You can search using a single word, a phrase, or a TID number, and you can combine multiple words together using Boolean operators.
TIP
When searching for a DS error code, which is usually a negative number (such as -625), in the knowledgebase, do not enter -625 as the keyword. Instead, enter "-625" (putting quotes around the number). Without the quotes, the search engine matches on the number 625, which can appear in many TIDs.
The resulting hit list is graded by relevance. The better a TID matches your search criteria, the higher the assigned percentage. From the same Web site (support.novell.com), you can find and download the latest patches and file updates relevant to your problem.
The online knowledgebase is easy to use and readily available—if you have a reliable Internet connection. Have you ever been at a client site at 2 a.m. and needed the latest NetWare 6.5 DS.NLM update so you could install a NetWare 5 server into an existing NetWare 6 tree and there’s no RJ-11 jack in sight? Or have you needed to download NetWare 6’s Support Pack to get the new DS.NLM update to address an eDirectory error you have encountered, only to find your Internet connection is slower than molasses in winter because everyone is checking the Super Bowl Web site and eating up all available bandwidth? Yes, you can easily find and download these patches from the Internet, if you have a fast (T1 or better) link because the files are very large. (For example, NetWare 6.5 Support Pack 1.1 is 400MB!) But sometimes you simply can’t wait an hour for a file to be downloaded. The alternative is the Novell Support Resource Library (formally Novell Support Connection CD).
Other than ”LogicSource for eDirectory” (and for other products such as ZENworks), Novell also make the TIDs and patch files available on a set of CDs, known as the Novell Support Resource Library (support.novell.com/subscriptions/subscription_products/nsrl19.html). The Resource Library provides fast and easy access to the specific information you need and enables you to do onsite troubleshooting, acting as an immediate first point of reference for technical information.
NOTE
The Novell Support Resource Library is usable on any Windows (and soon also on Linux) desktop. No network access is required to fully utilize the monthly updates.
The one disadvantage of Resource Library versus the online knowledgebase is that the CDs are generally a few weeks behind what’s available on the Web site, due to lead time needed to produce and ship the product.
Not all knowledge is passed on in writing; some is simply passed verbally as whispered wisdom, and some knowledge can be gained from hands-on experience. Knowledgebases are wonderful tools, but they are only as complete as the number of issues reported to Novell Technical Support. For every reported problem, there’s probably five that are not reported.
To facilitate Novell customers around the world to share their experiences and tips and tricks for dealing with problems, Novell operates a set of Internet newsgroups, known as the Novell Product Support Forums (formerly Novell Support Connection forums). The main purpose of these message forums is to offer a place to discuss and obtain technical support related to released Novell products. Within these newsgroups, you’re free to ask questions, respond to any forum message that interests you, or tell others about your latest adventure with your Novell product. If you can assist a fellow user, feel free to jump into the conversation because peer-to-peer support is highly encouraged.
NOTE
You might have used the Novell Product Support Forums in their previous incarnation. Prior to being on the Internet, Novell sponsored a set of messaging forums on CompuServe Information Service (CIS; now part of America Online), known as NetWire. In 1997, Novell moved off CIS and implemented the current Internet newsgroups infrastructure.
You can access the Novell Product Support Forums either via the Web interface using your favorite browser or via an NNTP newsreader, the Internet news protocol. For more information, visit support.novell.com/forums/.
NOTE
A number of mailing lists on the Internet are devoted to Novell products. Perhaps the most well-known one is the [email protected] mailing list. Refer to www.nbd.dk/faq/nvfaq-b.htm for more information.
The Novell Cool Solutions Web site is the source of many real-world business and technology guidance and hands-on techniques for executives, managers, developers, and other professionals who must choose and use appropriate information and business technology, products, and services. Divided into a number of “communities” based on products, the Cool Solutions for eDirectory (www.novell.com/coolsolutions/nds/) is one of the founding communities.
From the Cool Solutions for eDirectory home page, you can access a large number of eDirectory-related articles and Q&As, as well as download tools to address any specific needs you may have in terms of eDirectory management. From time to time, you will also find announcements of new eDirectory TIDs and requests for participation in Novell’s beta test program for various products.
Other than the various knowledge sources discussed previously, many people often overlook the wealth of information available in the online help files included with many of the utilities. For example, NDS iMonitor includes context-sensitive help and can offer information about a reported DS error code (see Figure 7.35), such as possible causes and corrective actions. Also included with the NDS iMonitor help file is a list of DS and server error codes you might find useful.
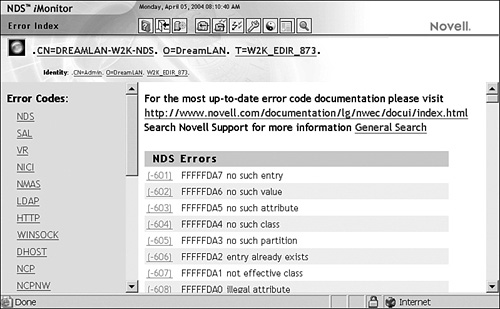
Frequently, by combining the help information offered by the utilities and the TIDs available from Novell, you’ll have a good starting point for your troubleshooting efforts.
NOTE
Novell’s Web site has a number of TIDs and documents that list error codes. None of them, however, are complete. Some codes are listed in one document but are missing from another. Therefore, taking all the error code documents that we can find and combining them with the information from the latest version of the Novell Development Kit results in Appendix A, “ eDirectory Error Codes.” We have expanded or added explanations for each of the listed error codes. At the time of this writing, the list of error codes presented in Appendix A is the most comprehensive compilation available anywhere.
This chapter introduced you to the various server- and workstation-based diagnostic tools and utilities included with the NetWare operating systems, such as DSRepair. Also covered were the new cross-platform tools included with eDirectory, such as NDS iMonitor, as well as information tools, such as LogicSource and Novell Product Support Forums newsgroup. In Chapter 8, you’ll read about a number of DS data recovery tools.