A major advantage included in ZENWorks for Desktops is software metering. ZENWorks for Desktops software metering gives organizations the capability to manage software licenses and track software usage through ZENWorks for Desktops application management and Novell's Licensing Services (NLS). Currently NLS cannot be administered in ConsoleOne, requiring that you administer the licensing in NWAdmin while managing ZENworks for Desktops 4 in ConsoleOne.
Once software metering is configured for an Application Launcher application, a license is used each time a user launches the application. In other words, every time a user runs the application, one of the licenses is also in use.
Note
Applications must be delivered to the user through Application Launcher in order to take advantage of software metering. Application objects must also be associated with license containers.
To set up and use ZENWorks for Desktops software metering, you need to become familiar with the following procedures.
The first piece of software metering you should be familiar with using is NWAdmin to install and administer licenses. You should use the NWAdmin utility to create metered certificates as well as to add new ones to existing license containers. You can also use the NWAdmin utility to generate reports and view information about software metering.
To access the licensing features from NWAdmin, select the Novell Licensing Services option from the Tools menu, as shown in Figure 16.1.

You first need to install a license certificate. When you install a certificate for an NLS-aware application, the system adds a License container object to the NDS database as well as a License Certificate object inside that container object.
To install a license certificate in NWAdmin, use the following steps from the tree browse view:
-
First select the container you want to install the license certificate into.
-
Then select Tools, Novell Licensing Services, Add Licenses (see Figure 16.1).
-
From the pop-up window, select License File and click OK. A window pops up enabling you to specify the license file you want to install.
-
From this window, navigate to the location of the license file you want to install and select it. Click OK and a window similar to the one in Figure 16.2 appears.
-
From this window, browse to the NDS context where the Certificate object should be installed. (The default is the currently selected container.)
-
Once both fields are completed, click the View button to view specific information about the license, or click the Add button to install the license certificate.

The next procedure you should be familiar with is creating a metered certificate. Metered certificates enable you to track application usage. Using metered certificates enables you to track and manage the licenses for user applications even if they are not NLS (Novell License Services)-aware.
To create a metered certificate using NWAdmin, follow these steps from a tree browse window:
-
First select Tools, Novell Licensing Services, Add Licenses.
-
From the pop-up window, select License Metering and click OK. A screen similar to the one in Figure 16.3 appears.
-
Enter the product name.
-
Enter the version.
-
Set the NDS context for the license certificate.
-
Set the number of licenses for the certificate.
-
Enter or select the number of grace licenses you will allow.
-
Set whether users will use a single license when launching an application multiple times from one workstation.
-
Click OK to finish.

Once you know how to install license certificates and create metering certificates you need to know how to assign licenses to users through NWAdmin.
The NDS user who installs the license certificate is the owner. An owner can assign the following objects access to the licenses:
• User
• Group
• Organization
• Organizational Unit
• Server
For example, if an owner assigns a container object to use a certificate, all users in and below that container can use the certificate. Once license assignments are made, only those objects that have been assigned to the license certificates can use the license.
To assign and delete access to licenses using NWAdmin, use the following steps from a tree browse window:
-
Select the license certificate that you want users to access.
-
Right-click the license certificate and select details.
-
Select the Assignments property page.
-
Click Add to add objects.
-
Locate and select the object that enables the correct users to access the certificate's licenses.
Here are the steps for deleting assignments on a license certificate in NWAdmin:
The next procedure you should be familiar with is assigning a new owner to a license certificate. Because the user who installs a certificate automatically becomes the owner of that certificate, you might want to reassign ownership at a later date.
NWAdmin enables you to assign a new owner to a license certificate by using the following steps:
The final procedure you should be aware of is the capability to create reports about licensed and metered products in the NWAdmin utility. Because NWAdmin tracks data about licenses and metered products, you can create reports that help you assess and monitor usage and compliance concerning these products for the past 15 months.
These reports can range in information about a single license certificate to information about all license certificates currently being used for a given product.
To create a report for license certificates, use the following steps from within NWAdmin:
-
Select Tools, Novell Licensing Services, Generate License Reports.
-
From this screen, shown in Figure 16.4, you can select to scan either the tree or a pre-defined catalog to generate the report.
-
Select a license container you want to begin the scan at and specify any specific publisher, product, or version filters you want to use for the scan. Click the OK button.
-
Once the scan is complete, a list of license certificates and containers appears. To create a report, simply select the license certificate you want to report usage on and select Actions, Create License Usage Report. A screen similar to the one in Figure 16.5 appears.


Once you have created a report using NWAdmin, you can toggle between a graphical view of the report and that report's text.
To use the graphical view, click Graph, as shown in Figure 16.6, and a graphical representation of the data in the report is displayed on the screen. This view displays the number of license units installed and the number used. The dates along the bottom of the graph show the start and end dates that the report covers. You can change these dates to make the data more informational.

To use the textual view, click Summary and a textual representation of the data in the report is displayed on the screen, as shown in Figure 16.7.
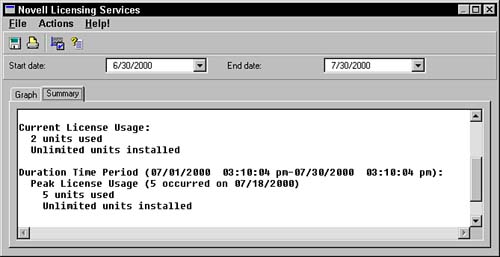
The textual view provides the following information:
• The date and time you created the report
• The product
• The location or NDS context of the object
• Current number of licenses being used and installed
• The range of dates being reported
• Peak usage of licenses, including date the peak occurred
• The number of units used and installed during peak usage
• A list of possible dates out of compliance
Now that you are familiar with using the NWAdmin utility, you need to understand how to set up software metering. Setting up software metering involves using the following procedures to verify the metering requirements and setting up metering certificates.
The first step in setting up software metering is to make certain that you have the correct system requirements met. The following are the current requirements for setting up software metering:
• You should have Supervisor rights to the [ROOT] of the eDirectory tree in which you install the Application Management portion of ZENworks for Desktops.
• Users must have Read and File Scan rights to the directory in which you install NAL.
• Users must have sufficient rights to the directories in which you install the applications they can access.
Once the system requirements are met, you must make certain that the application is delivered to the user through the Application Launcher via the Application Launcher window or via the Application Explorer. Although software metering does not care where an application's executable file is located, it must be delivered to the user through the Application Launcher.
The next step in setting up software metering is to ensure users have access to NLS. Users must always be attached to a NetWare server that provides licensing services.
Tip
By loading NLS on more than one server in your tree, and ensuring users have a connection to one or more servers with NLS loaded, you can ensure users have access to NLS. If a server running NLS goes down, NLS still works as long as it is running on another server and users have a connection to that server.
Once you have verified that the system and setup requirements for software metering have been met, you need to assign users to a license.
If no object is specifically assigned to a License Certificate object, anyone can use it. However, after assigning at least one user to a License Certificate Object, only the users, groups, or containers who are assigned to that license can use it. This limits access to the licenses.
To assign users to a License Certificate object, use NLS Manager or the following steps in the NWAdmin utility:
To set up software metering, you now need to create a license container and a Metered Certificate object. These objects enable ZENWorks for Desktops to track and control access to license objects.
The license container is a special container object in NDS to store Metered Certificate objects.
The Metered Certificate object contains the information you enter. License Containers can contain multiple Metered Certificate objects.
To create a Metered Certificate object and a license container, use the following steps in the NWAdmin utility:
-
Highlight the container where you want to create a Metered Certificate.
-
Select Tools, Novell License Metering, Add Licenses then License File; a screen similar to the one in Figure 16.8 appears.
-
From that screen, enter information about the application that you want to meter, such as software publisher name, software product name, and version or revision.
-
Click OK.

The last procedure you need to be aware of when setting up software metering is adding additional licenses; for example, if you originally installed a 50-user license of an application and want to extend this to a 75-user license. To extend the license of the application, you need to create another Metered Certificate object.
The license container is a container class object in eDirectory and cannot be renamed. The metered certificate is a leaf object of the license container. The metered certificate basically represents the individual license count. To get a total license count, the license container adds all leaf metered certificates beneath it.
To add licenses, you need to add Metered Certificates using the following steps in the NWAdmin utility:
-
Highlight the container where you want to add a license.
-
Select Tools, Novell License Metering, Add Licenses then License Metering.
-
From that screen, enter the same name as the original license container to which you want to add licenses.
If you enter the same software publisher name, software product name, and same version number, a new Metered Certificate is created below the license container. This metered certificate is added to those already located in the license container to form a new license total.