
In this appendix, you review an example of using the snAppShot utility to create an application object package for distribution to other workstations. This appendix is split into the following two sections:
• Using snAppShot to package GroupWise
• Review of the created object template
This example uses the custom mode in snAppShot to set specific options for snAppShot. It then uses snAppShot to capture the changes made in an application object template package when installing GroupWise on a client workstation. This way, you can use the created template later to distribute GroupWise to several other clients.
You will use the custom mode of snAppShot to perform the operations described in the following sections in order to create the application object template for GroupWise.
The first step to create an application object template for GroupWise is to launch the snAppShot utility by double-clicking the Snapshot icon located in the SYS:PUBLICSNAPSHOT directory, as shown in Figure B.1.
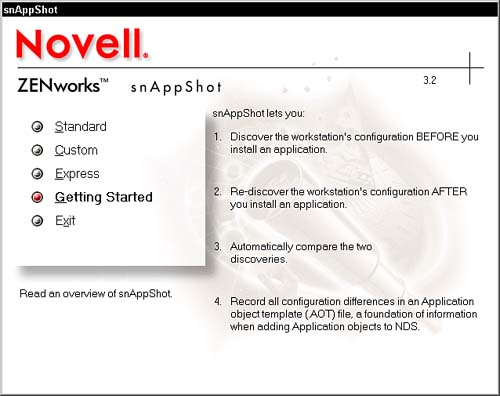
The next step is to select which mode you will use to create the application object template for GroupWise. This example uses the custom mode so that you can use some specific preference settings as shown in Figure B.2.
The first window that comes up after you select the custom mode in snAppShot allows you to choose a snAppShot previously saved preference file, or use the snAppShot default settings.
Because you have not previously created and saved a preferences file in a previous custom mode, use the default settings here.
Once you have selected to use the default preference settings in snAppShot, you input the name that the application object will have in the DS tree (GroupWise 5.5) and a title for the icon that represents the application object (GroupWise).
Once you set the name for the application object and title for its icon, you set the network location to store the application source files (.FIL) for the GroupWise object template to the following directory:
T:SnapshotGroupWise 5.5
Once you have specified a network location for the .FIL files, you set the network location to store the application template (.AOT and .AXT files) for the GroupWise object template to the following directory:
T:SnapshotGroupWise 5.5GroupWise.AOT
Note
By specifying a network location for these files, you can more easily access them when it comes time to create the Application object and distribute it to users. It's best to set the network location for both the source files and the application template files to the same directory. This makes for easier handling of the application object package.
Once you have selected the network location to store the application object support files, you use the snAppShot screen in Figure B.3 to select the parts of the workstation covered in the following sections.
Figure B.3. Window in the snAppShot utility that allows users to specify which parts of the workstation to include or exclude.

From the workstation scan customization menu in snAppShot, you can modify which files and folders you want to include or exclude. However, you do not need to ignore any specific files or folders in this example, so leave the setting at the default shown in Figure B.4.

From the workstation scan customization menu in snAppShot, you can modify which INI files to exclude. However, you do not need to ignore any specific INI files in this example, so leave the setting at the default.
From the workstation scan customization menu in snAppShot, you can modify which system configuration text files you want to include in the scan. You do have the NETWORK.BAT file that is executed when all workstations are booted, thus setting specific preferences. This file is specific to each workstation and even though the GroupWise install shouldn't affect it; you can add it to the list to be safe.
Once you have specified which parts of the workstation to include or exclude, you select which disk drive to scan on the workstation to determine changes. In this case, because you are installing GroupWise to the C: drive, you only need to select the C: drive for scanning.
Now that you have set all the preferences for the first discovery, a summary of the preferences appears in the next snAppShot window. The information displayed includes:
• Application Object Name
• Application Icon Title
• Template Filename
• Application Files Directory
• Snapshots Working Drive
• Scan Options
• Disks to Scan
• Directories to Exclude
• Files to Exclude
• System Text Files to Scan
Note
Notice that the file you selected as a system configuration text file to ignore is listed in the summary: C:NETWORK.BAT. This is a good example of points to check before proceeding with the first discovery.
You can click Save Settings to save the snAppShot preferences you have defined thus far to a file. Later, if you use snAppShot to create a template for a GroupWise upgrade, you can use that preference file in the express mode.
The first snAppShot discovery runs when you click next from the Preference Summary window. The screen shown in Figure B.5 shows the status of the discovery and a count of the following items that have been discovered:
• Folders and files
• Windows shortcuts
• INI files
• System configuration files
• Registry entries

Once the first snAppShot discovery is completed, a Run Application Install button is available.
When you select the Run Application Install button, a file pop-up menu will appear and you will be able to navigate to the application install executable and execute.
Once the GroupWise installation is complete, snAppShot allows you to specify how to handle the creation of entries for the application object. From the screen shown in Figure B.6, you can set the addition criteria for the entries described in the following sections.
Figure B.6. Window in the snAppShot utility that allows users to specify how snAppShot will handle the creation of file, folder, INI file, and registry entries in the application object template.

From the application object entry addition window in snAppShot, you can configure whether files and folders will be added to the application object by clicking the down arrow under the Files and Folders option and selecting the addition criteria shown in Figure B.7.

From the application object entry addition window in snAppShot, you configure whether INI files will be added to the application object by clicking the down arrow under the INI files option and selecting the addition criteria.
From the application object entry addition window in snAppShot, you configure whether Registry entries will be added to the application object by clicking the down arrow under the Registry entries option and selecting the addition criteria.
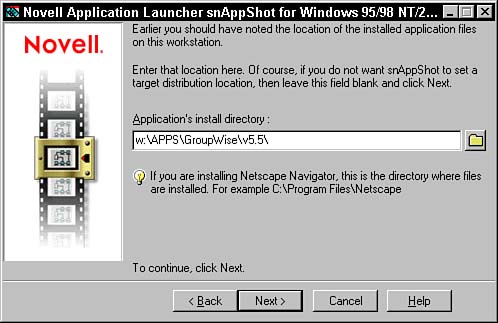
Once you have defined the addition criteria for entries into the application object, you specify a path to the application's executable on this workstation. To do so, enter the location of the GroupWise application installation files on this workstation in the text field as shown in Figure B.8.
Once you are finished with setting the path to the applications executable and you click the Next button, use the screen shown in Figure B.9 to define macros to control the distribution of application objects.
Figure B.9. Window in the snAppShot utility that allows users to add, edit, and remove macros to be used in the application object template.

Click the Add button in the macro definition window. You then need to specify a variable name and a string for the template data.
Once you are finished with defining macros to automate application object distribution, you click Next. snAppShot runs the second discovery, as shown in Figure B.10. Once again, you can monitor the status of the discovery by noting the count of the following items:
• Folders and files
• Windows shortcuts
• INI files
• System configuration files
• Registry entries
Figure B.10. Window in the snAppShot utility that shows the current status and statistics about the second discovery scan while it is running.

Once the discovery is finished, snAppShot will begin generating an object template. This is where the actual differences between the two discoveries are discerned and the template files are created.
Once the second snAppShot discovery is completed and the template files are generated, a completion summary describing what took place is displayed. The completion summary contains information about the application template creation, including:
• The location of the new application object template (.AOT)
• The location of the new .FIL files
• The location of the textual version of the application object template (.AOT)
• The steps necessary to create the application object
• Statistical totals from the second discovery
• Statistical totals from entries added to the application object template (.AOT)
Once you have reviewed the summary from running snAppShot and clicked Next, the process is complete and the application object template package has been created. You can now go to the network location where the application object template was created and review the items described in the following sections.
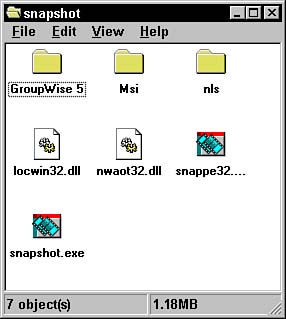
Figure B.11 shows a directory listing of the files in the application object template directory. These files represent the packaged object ready for distribution. You can see the following files:
• .AXT file
• .AOT file
• FILEDEF.TXT file
• Various .FIL files

Looking at the FILEDEF.TXT file in Figure B.12, you can see the mappings of .FIL files to the actual GroupWise application files.

Looking at the text version of the GroupWise object template, shown in Figure B.13, you can see all the changes that snAppShot recorded from the GroupWise installation. These changes can be applied to other workstations when the application object is distributed.
Figure B.13. Textual version of the application object template file for the GroupWise application object.

Looking at the FILEDEF.TXT file in Figure B.13, you can see the mappings of .FIL files to the actual GroupWise application files.