
Networking in the I/O Kit
The IONetworkingFamily of classes represents the bottom part of the kernel network stack. As previously discussed, the I/O Kit is the preferred layer for implementing drivers for hardware-based network devices. The class hierarchy of the IONetworkingFamily is shown in Figure 13-4.
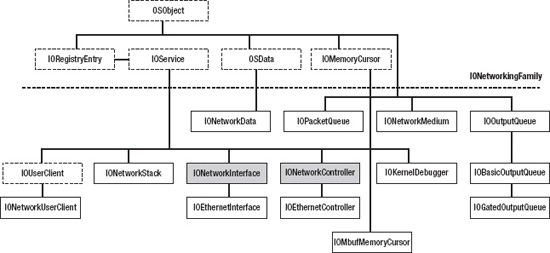
Figure 13-4. The IONetworkingFamily class hierachy
The family may look quite expansive, but many of the classes are auxiliary helper classes, and some, we do not need to worry about at all because they are only used internally in the family. The key classes in the family are the IONetworkController and IONetworkInterface. The former is used to represent a driver for network hardware, whereas the latter is used to interface with the data-link interface layer (DLIL) in the BSD layer. It serves as an adapter that allows I/O Kit network interfaces to be seen as BSD layer network interfaces, so you can use traditional UNIX tools, such as ifconfig, to configure the device. Let's have a look at the responsibilities of the individual classes:
IOEthernetControlleris the base class for all Ethernet-based devices, including 802.11-based wireless devices. You would normally subclass this when writing a driver for an Ethernet or Wi-Fi-based device driver.IOEthernetInterfaceacts as a client of anIOEthernetControllerand provides the glue between the controller and the BSD networking layer. If you are implementing an Ethernet driver, you do not normally need to subclassIOEthernetInterfaceunless you have special requirements.IOKernelDebuggeris a replacement driver, which will be used against anIONetworkControllerin lieu of anIONetworkInterfacewhen the kernel debugger is active. You do not need to support this if you are writing a third party network driver.IOMbufMemoryCursorprovides an object-oriented cursor around thembufstructure, which allows translation ofmbufclusters to physical addresses for the purpose of DMA. Several specialized subclasses are available:IOMBufBigMemoryCursor,IOMbufDBMAMemoryCursor,IOMbufLittleMemoryCursor,IOMbufNaturalMemoryCursor.IONetworkControlleris the base class ofIOEthernetController. You must subclassIONetworkControllerif you are writing a driver for a non-Ethernet compatible device.IONetworkDatarepresents a fixed size data buffer used byIONetworkInterfaceto export interface data to user space, notably, usage statistics such as information about dropped packets and collisions.IONetworkInterfaceprovides the glue to bind anIONetworkControllerto the BSD data-link layer (BDIL) and the rest of the network stack. TheIONetworkInterfaceis an abstract class and must be re-implemented if your driver is based onIONetworkInterface.IONetworkUserClientis a subclass ofIOUserClient, providing a user-client forIONetworkInterface.IOOutputQueueis a packet queue, which handles multiple producers and a single consumer (a device). Two specialized subclasses are available:IOBasicOutputQueueandIOGatedOutputQueue.IOPacketQueueimplements a FIFO queue ofmbufssynchronized by a spinlock.
You may have noticed the absence of any mention of 802.11x networking support. Apple does not publish a framework for development of wireless networking drivers. Apple's own AirPort drivers are located in the IO802Family.kext, but no source or header files are published for this. This does not preclude writing of wireless network drivers, but it does mean that you can't take advantage of pre-written classes, and you may have to provide your own IOUserClient and possible user space tools for configuration of the device. Apple's AirPort devices are subclasses of the private IO80211Controller, which, again, is a subclass of IOEthernetController. That being said all modern Macs have built-in wireless networking, so demand for third-party devices in this area is low.
Building a Simple Ethernet Controller Driver
Let's get our hands dirty with I/O Kit networking, by building a simple Ethernet driver. Since implementing a full working driver is highly complex and hardware-dependent, it is difficult to demonstrate in its entirety, and probably not that useful to someone having to implement a driver for a completely different device. We will instead focus on the fundamentals and on familiarizing ourselves with the tools an I/O Kit provides to aid in developing network drivers. We will do this by implementing a virtual Ethernet driver called MyEthernetDriver. The driver will demonstrate how core elements of an I/O Kit network driver are implemented and will show how packets flow through it to interact with the rest of the system. Figure 13-5 shows how MyEthernetDriver interacts with other I/O Kit classes.
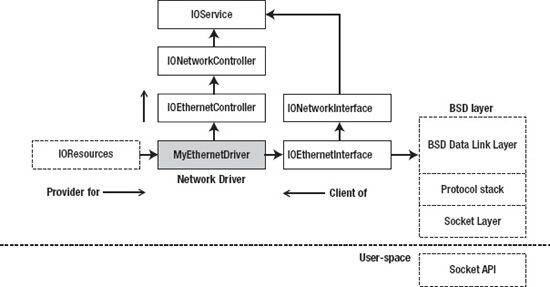
Figure 13-5. MyEthernetDriver: Interaction with I/O Kit and the network stack
In this case, MyEthernetDriver uses the IOResources nub as a provider, but for a real network device backed by a physical device, it would more probably use IOPCIDevice, IOUSBDevice, IOUSBInterface, or another nub representing a hardware device.
![]() Tip If you are curious to see a network driver for a real device, the
Tip If you are curious to see a network driver for a real device, the IOUSBFamily source distribution used to include the source code for AppleUSBCDCEthernet, which is the driver for devices that follow the USB Ethernet specification. The driver is not part of newer versions, but can still be found in older versions of IOUSBFamily at Apple's open-source website (opensource.apple.com). There is also source code available for a driver for the popular PCI based Realtek 8139 chipset called AppleRTL8139Ethernet. For an example of a network driver derived directly from IONetworkController, have a look at IOFireWireIP, which implements TCP/IP networking over FireWire.
The main driver class MyEthernetDriver will inherit from IOEthernetController, which again inherits from IONetworkController. The driver will also allocate an IOEthernetInterface instance, which will be used to interface with the network stack. The IOEthernetInterface class is not abstract and can be allocated and used directly.
The Design of MyEthernetDriver
To put the design of MyEthernetDriver into context, let's say we are employed to develop a driver for a new Ethernet device. The device will be a dongle that can be connected to a Mac's Thunderbolt port. As this is an emerging technology at this point, there is some delay in getting the needed parts, so we do not yet have access to a proper device. As much as we would all like to get paid to surf the net all day, we need to earn our bread and butter. So we get started on the driver without a working device. Our aim is to implement what can be done without having a hardware device. However, we quickly realize that a major component of the Ethernet device is going to be handling actual network I/O. While you can build a virtual device driver quite quickly, assign it an IP, and start talking to it, there is one major problem. Network packets destined to another interface or itself on the same host will not actually be forwarded to the device at all, but instead loop through the protocol stack without involving the I/O Kit driver. The I/O Kit was designed specifically to interface with actual hardware devices, so if you need a virtual network interface, the BSD layer is the best place for it.
Our solution to this problem will be to piggyback our virtual Ethernet device onto a real Ethernet interface and use it to send and receive packets on our behalf. The setup will look similar to the diagram in Figure 13-6.
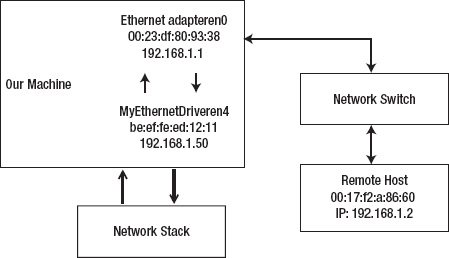
Figure 13-6. MyEthernetDriver test setup
When MyEthernetDriver receives a packet from the network stack, it will queue the packet and then transmit the packet out on the network using the interface en0, which is attached to a physical network switch. If you do not have a network switch, you can test this by using a straight through cat5 cable to connect directly to a remote machine. Each interface in the test setup is configured with its own IP address all on the same subnet. The network stack is responsible for framing the packet, so by the time MyEthernetDriver receives it, it will already have an Ethernet frame header attached, where the destination address will be 00:17:f2:0a:86:60 and the arbitrarily picked source address be:ef:fe:ed:12:11 of MyEthernetDriver. Most Ethernet based network devices allow sending a packet with a (fake) source address that differs from its own. Therefore, if everything is correctly configured, we should be able to receive the packet on the remote host received from MyEthernetDriver's MAC and IP address.
Getting the reply from the remote host back to our driver is somewhat more problematic, as the en0 interface will most likely ignore a frame not addressed to itself. To work around this, we will simply enable promiscuous mode on en0, which will enable it to receive packets not destined to itself. We will then install an interface filter on the input queue for en0 and check whether a packet is addressed to it, in which case, we leave it alone, or if it is addressed to MyEthernetDriver, steal it and divert it to its input queue instead. The end result is a virtual Ethernet bridge/switch. This is conceptually close to how virtual machine software, such as Parallels or VMWare fusion, enables a virtual machine guest's operating system to participate on the network in bridged mode. Because we have done this at the Ethernet level, the changes are completely transparent to higher-level protocols like IP, and we can even use an external DHCP server to obtain an IP address for our virtual interface.
This should leave us with a more or less working device driver, which, for all intents and purposes, is able to send and receive actual network traffic and provide a good approximation of a real device for us to play with. As much as possible, we will hide the fact that this bridging occurs from the driver by putting the code in a separate class called MyEthernetHwAbstraction. The class will handle communication with the “hardware” while the main driver will interface with I/O Kit. This design would allow us to quickly swap out the hardware abstraction class with one that talks to actual hardware instead. The design would also make it possible to subclass the abstraction class so that new variants of the hardware can be supported gracefully.
![]() Note
Note MyEthernetDriver needs a wired Ethernet device to piggyback onto. This is because a wireless device generally does not allow packets to be transmitted with a source address different from its own. This is a limitation of the device's firmware.
The header file for MyEthernetDriver is shown in Listing 13-6.
Listing 13-6. MyEthernetDriver Header File
#ifndef MyEthernetDriver_h

#define MyEthernetDriver_h


#include <IOKit/assert.h>

#include <IOKit/IOTimerEventSource.h>

#include <IOKit/IOBufferMemoryDescriptor.h>

#include <IOKit/network/IOEthernetController.h>

#include <IOKit/network/IOEthernetInterface.h>

#include <IOKit/network/IOGatedOutputQueue.h>

#include <IOKit/network/IOMbufMemoryCursor.h>

#include <IOKit/network/IONetworkMedium.h>

#include <IOKit/IOUserClient.h>


#include "MyEthernetHwAbstraction.h"


class com_osxkernel_MyEthernetDriver : public IOEthernetController

{

    friend class com_osxkernel_MyEthernetHwAbstraction;


    OSDeclareDefaultStructors(com_osxkernel_MyEthernetDriver);

public:

    virtual bool init(OSDictionary* properties);

    virtual bool start(IOService* provider);

    virtual void stop(IOService* provider);

    virtual void free();


    virtual bool configureInterface(IONetworkInterface* netif);
    virtual IOReturn enable(IONetworkInterface* netif);

    virtual IOReturn disable(IONetworkInterface* netif);


    virtual IOReturn getHardwareAddress(IOEthernetAddress* addrP);


    // Allow our driver's Mac address to be set

    virtual IOReturn setHardwareAddress(const IOEthernetAddress* addrP);


    virtual UInt32 outputPacket(mbuf_t m, void* param);


    virtual IOReturn setPromiscuousMode(bool active) { return kIOReturnSuccess; }

    virtual IOReturn setMulticastMode(bool active) { return kIOReturnSuccess; }


    bool createMediumDict();


private:


    static void  interruptOccured(OSObject* owner, IOTimerEventSource* sender);


    IOTimerEventSource*    fInterruptSource;  // Simulate HW rx interrupt

    IOEthernetInterface*   fNetworkInterface;

    OSDictionary*          fMediumDict;

    IOWorkLoop*            fWorkLoop;


    IONetworkStats*        fNetworkStats;

    IOEthernetStats*       fEthernetStats;


    com_osxkernel_MyEthernetHwAbstraction* fHWAbstraction; // Low-level hardware access.

};


#endif
Driver Initialization and Startup
Network drivers follow the usual IOService lifecycle. Initialization of a driver and the device happens in the driver's start() method. For a typical device, the following steps may be performed:
- Configure the device's provider and enumerate any needed resources. For PCI or Thunderbolt, this means mapping device memory or I/O regions. For USB devices, enumerate interfaces and pipes.
- Configure the device for operation—for example, take it out of sleep state by accessing the device's registers or sending control requests.
- Extract information from the device, such as the MAC address, and information about the device's capabilities, like supported media and speeds. Many Ethernet devices support the Media Independent Interface (MII) bus, which is a standard for accessing device status, information, and configuration in a consistent manner, decoupled from the part of the device that is concerned with physical transmission (usually referred to as the PHY). The MII registers contain information about the link status, supported network speeds, error reporting, and more. Gigabit or 10 Gigabit Ethernet devices are supported by the GMII and XGMII specifications, respectively. MII, GMII, and XGMII are all IEEE standards. These standards do not, however, dictate how the DMA engine is implemented or how I/O to the device should occur.
- Allocate and configure
IOInterruptEventSourceorIOTimerEventSourcesas needed, depending on requirements and underlying hardware. Many network devices use a software timer as a watchdog timer to continuously monitor the device for fault and attempt to reset the device should a fault occur. - Instantiate and register an instance of
IOEthernetInterface, which will make our network controller visible to the BSD networking stack and the rest of the system.
The start() method for MyEthernetDriver is shown in Listing 13-7.
Listing 13-7. MyEthernetDriver's start() Method
bool com_osxkernel_MyEthernetDriver::start(IOService* provider)

{

    if (!super::start(provider))

        return false;


    fHWAbstraction = new com_osxkernel_MyEthernetHwAbstraction();

    if (!fHWAbstraction)

        return false;

    if (!fHWAbstraction->init(this))

        return false;


    if (!createMediumDict())

        return false;


    fWorkLoop = getWorkLoop();

    if (!fWorkLoop)

        return false;

    fWorkLoop->retain();


    if (attachInterface((IONetworkInterface**)&fNetworkInterface) == false)

        return false;


    fNetworkInterface->registerService();


    fInterruptSource = IOTimerEventSource::timerEventSource(this, interruptOccured);

    if (!fInterruptSource)

        return false;


    if (fWorkLoop->addEventSource(fInterruptSource) != kIOReturnSuccess)

        return false;


    IOLog("%s::start() -> success
", getName());

    return true;

}
What needs to be done in the start() method is entirely dependent on the device's capabilities. In this case, we do not have a provider representing a hardware device, so we can bypass opening the provider. The next step performed is to allocate an instance of the class com_osxkernel_MyEthernetHwAbstraction and initialize it. The class contains code to interface with the hardware device, such as methods to read its registers and setup I/O transfers. In our case it instead contains code that allows us to piggyback on another device. This step is not technically required—you could easily all code in the main driver. However, we made the design decision so that in the future, when the “ MyEthernetDevice 2000 Pro” becomes available, we can simply handle the hardware differences by inheriting from our existing hardware abstraction class. This allows the main driver to be kept clean and makes it easy to support several hardware variants with the same driver. We will look at the hardware abstraction class shortly.
After the “hardware” is initialized, we call the createMedium() function to publish details about which transmission standards and speeds our device support. We will discuss this process further in the next section.
The next method called is attachInterface(), which will return an instance of an IONetworkInterface class, which provides the glue that exposes our driver to the kernel network layer. In our case, the returned instance will be an IOEthernetInterface instance. If you need to subclass IOEthernetInterace for any reason, you can override IONetworkController::createInterface(), which is called by attachInterface() internally to allocate the overrided class instead. Before attachInterface() returns, it will also call IONetworkController::configureInterface(), which you can also override to perform additional configuration for the interface class. MyEthernetDriver implements the configureInterface() method as follows:
bool com_osxkernel_MyEthernetDriver::configureInterface(IONetworkInterface *netif)

{

    IONetworkData* nd;


    if (super::configureInterface(netif) == false)

        return false;


    nd = netif->getNetworkData(kIONetworkStatsKey);

    if (!nd || !(fNetworkStats = (IONetworkStats *)nd->getBuffer()))

        return false;


    nd = netif->getParameter(kIOEthernetStatsKey);

    if (!nd || !(fEthernetStats = (IOEthernetStats*)nd->getBuffer()))

        return false;


    return true;

}
The method obtains pointers to the interface's network statistics buffers, which will be used to record information about received/transmitted packets, collisions, and other events. The information is used by user space in several places, such as the network tab in the Activity Monitor.
To register an IOEthernetInterface instance with the system, we call its registerService() method.
Our final action before start() returns is to create an interrupt source. We simulate interrupts using an IOTimerEventSource, however, a hardware device would likely use IOFilterInterruptEventSource or IOInterruptEventSource to respond to actual hardware interrupts.
Most network drivers will also want to use a timer to provide watchdog functionality that periodically monitors the device for erroneous conditions, and check for things like the current link status, so that the network system and user space can be notified of events such as a cable being unplugged. Many drivers trigger their watchdog timer once every second.
Medium and Status Selection
The createMedium() method creates a dictionary that will publish details about the device's media capabilities to the BSD stack and user space. Most modern Ethernet devices can also support older Ethernet standards and transmission speeds. For example, the Ethernet device in a Macbook Pro can support the 1000BaseT, 100BaseTX and 10BaseT/UTP in full or half duplex modes with or without flow control. If the device and the driver support it, the media can be controlled via the UNIX command line tool ifconfig or via the Network pane in System Preferences. Most devices are able to auto-detect current media. Media capabilities are represented by the IONetworkMedium class. The implementation of the createMedium() class is shown in Listing 13-8.
Listing 13-8. Method for Publishing Details about Supported Ethernet Media
static struct MediumTable

{

    UInt32      type;

    UInt32      speed;

}


mediumTable[] =

{

    {kIOMediumEthernetNone, 0},

    {kIOMediumEthernetAuto, 0},

    {kIOMediumEthernet10BaseT | kIOMediumOptionFullDuplex,  10},

    {kIOMediumEthernet100BaseTX | kIOMediumOptionFullDuplex, 100},

    {kIOMediumEthernet1000BaseT | kIOMediumOptionFullDuplex, 1000},

};


bool com_osxkernel_MyEthernetDriver::createMediumDict()

{

    IONetworkMedium*  medium;

    UInt32                            i;


    fMediumDict = OSDictionary::withCapacity(sizeof(mediumTable) /

                                             sizeof(struct MediumTable));

    if (fMediumDict == 0)

        return false;


    for (i = 0; i < sizeof(mediumTable) / sizeof(struct MediumTable); i++)

    {

        medium = IONetworkMedium::medium(mediumTable[i].type, mediumTable[i].speed);

        if (medium)

        {

            IONetworkMedium::addMedium(fMediumDict, medium);

            medium->release();

        }

    }


    if (publishMediumDictionary(fMediumDict) != true)

        return false;
    medium = IONetworkMedium::getMediumWithType(fMediumDict, kIOMediumEthernetAuto);

    setSelectedMedium(medium);

    return true;

}
The method builds an OSDictionary containing the supported medium. The medium dictionary must be published with the method publishMediumDictionary() to advertise the driver's capabilities to the OS. If you want your driver to support manual selection of media, you need to override the IONetworkController::selectMedium() method. The default method will simply return kIOReturnUnsupported. Your driver can call setSelectedMedium() to inform the system of its medium selection. The setLinkStatus() method can be used to set the medium and the link status together. The link status flags are: kIONetworkLinkValid or kIONetworkLinkActive, which, for an Ethernet device, can be used to indicate whether a cable is connected, as well as if the device is active.
Configuring the Device Hardware Address
Ethernet networks use the Media Access Control (MAC) address, which should be a 48-bit globally unique address identifying the network controller. A MAC address conflict on the network may cause confusion to switches, hosts, and other networking gear. The MAC address is usually programmed into the device's EEPROM when it is being manufactured in a range assigned to each manufacturer by IEEE. Our driver needs to publish the MAC address to the networking stack and user space. The address serves no other purpose in user space other than to help uniquely identify the device for informational and configuration purposes. However, the networking stack does need to know the address to properly format outgoing packets and for address resolution for other protocols such as IP (ARP/RARP). The network stack will call the getHardwareAddress() function of our driver to get the MAC address. MyEthernetDriver implements it as follows:
IOReturn com_osxkernel_MyEthernetDriver::getHardwareAddress(IOEthernetAddress *addrP)

{

    addrP->bytes[0] = fHWAbstraction->readRegister8(kMyMacAddressRegisterOffset + 0);

    addrP->bytes[1] = fHWAbstraction->readRegister8(kMyMacAddressRegisterOffset + 1);

    addrP->bytes[2] = fHWAbstraction->readRegister8(kMyMacAddressRegisterOffset + 2);

    addrP->bytes[3] = fHWAbstraction->readRegister8(kMyMacAddressRegisterOffset + 3);

    addrP->bytes[4] = fHWAbstraction->readRegister8(kMyMacAddressRegisterOffset + 4);

    addrP->bytes[5] = fHWAbstraction->readRegister8(kMyMacAddressRegisterOffset + 5);


    return kIOReturnSuccess;

}
The getHardwareAddress() method is the only mandatory method (pure virtual) in the IOEthernetController and, hence, must be implemented. As we don't have a valid MAC address for MyEthernetDriver, we arbitrarily chose the address: be:ef:6c:8e:12:11. The implementation shows how you would likely fetch the MAC address from a device's registers.
If your device supports changing the MAC address to a user-defined value, you can override the setHardwareAddress() method. The method should write the new MAC address to the device's registers and return kIOReturnSuccess, if it was changed successfully. The default implementation will return kIOReturnUnsupported.
Enabling and Disabling the Device
Although the start method could fully prepare and make the device operational, the preferred way is to make the device active (that is, in a state where it can receive and transmit) when the driver's enable() method is called. Similarly, the device should become as dormant as it can, even sleep, if possible, when the driver's disable() method is called. A driver should do this because a user may elect to turn the device off at times, in which case, it should refrain from using resources, which again is important to ensure it doesn't drain a device's battery or waste energy. MyEthernetDriver's enable() method is shown here:
IOReturn com_osxkernel_MyEthernetDriver::enable(IONetworkInterface* netif)

{

    IOMediumType          mediumType = kIOMediumEthernet1000BaseT | kIOMediumOptionFullDuplex;

    IONetworkMedium*      medium;


    medium = IONetworkMedium::getMediumWithType(fMediumDict, mediumType);


    if (!fHWAbstraction->enableHardware())

        return kIOReturnError;


    setLinkStatus(kIONetworkLinkActive | kIONetworkLinkValid, medium, 1000 * 1000000);

    return kIOReturnSuccess;

}
The exact implementation is highly hardware-dependent, of course. In our case, the implementation will call into the hardware abstraction class, which will attach to the “slave” network interface we will use to enable transmission and reception of packets. For a real device, the method would likely bring the device out of sleep, and then enable interrupts. The implementation of the hardware abstraction enableHardware() method is shown here:
bool    com_osxkernel_MyEthernetHwAbstraction::enableHardware()

{

    bool success = true;


    fRxPacketQueue = IOPacketQueue::withCapacity();

    if (!fRxPacketQueue)

        return false;


    if (ifnet_find_by_name("en0", &interface) != KERN_SUCCESS) // change to your own interface

        return false;


    ifnet_set_promiscuous(interface, 1);


    if (iflt_attach(interface, &interfaceFilter, &gFilterReference) != KERN_SUCCESS)

        success = false;


    filterRegistered = true;

    return success;

}
The method will look for the device network interface en0, which should be an Ethernet device. It then puts the device into promiscuous mode, which is needed to ensure it will accept packets destined for MyEthernetDriver's MAC address. Finally, an interface filter is installed on the slave interface to intercept incoming packets. We will examine each incoming packet and divert packets addressed to us to our own input queue: fRxPacketQueue, while ignoring all other packets, and allow them to be processed by the original interface.
The disable() method should reverse the actions we performed when we enabled the device, and bring the device back into its original state. For our purposes, this means removing the interface filter so that we will no longer get incoming packets:
void    com_osxkernel_MyEthernetHwAbstraction::disableHardware()

{

    if (filterRegistered == true)

    {

        iflt_detach(gFilterReference);

        while (filterRegistered);


        ifnet_set_promiscuous(interface, 0);

        ifnet_release(interface);


        fRxPacketQueue->flush();

        fRxPacketQueue->release();

        fRxPacketQueue = NULL;

    }

}
Transmitting Network Packets
Now that we have successfully configured and prepared the device, we are ready to start doing some actual I/O. Networking I/O is conceptually very simple for a network driver. The network stack handles the heavy lifting of formatting the packet as well as determining that a packet is actually destined for our interface. Our driver need only be concerned with transmitting the raw bytes to the device. Packets are delivered to a driver via IONetworkController::outputPacket(), which your driver should override to receive packets from the network stack. The outputPacket() method of MyEthernetDriver is shown here:
UInt32 com_osxkernel_MyEthernetDriver::outputPacket(mbuf_t packet, void* param)

{

    IOReturn result = kIOReturnOutputSuccess;

    if (fHWAbstraction->transmitPacketToHardware(packet) != kIOReturnSuccess)

    {

        result = kIOReturnOutputStall;

    }

    return result;

}
![]() Note A driver should free the
Note A driver should free the mbuf_t if a packet was accepted by the outputPacket() method. MyEthernetDriver does not need to do this because it passes the packet to another driver that will be responsible for freeing it.
An implementation should return kIOReturnOutputSuccess if the packet was handled successfully. If the hardware is busy and cannot accept another packet at this time, you can return kIOReturnOutputStall, which will retry the same packet again at a later stage. To drop packets, simply return kIOReturnOutputDropped. The outputPacket() method should not block or sleep.
By default, the outputPacket() method is called by the IONetworkInterface instance for the controller, unless an output queue was created manually by overriding the createOutputQueue() method, which should return a subclass of IOOutputQueue. It is highly recommended to implement an output queue (or provide your own queuing mechanism). If a queue is not present, you lose the ability to temporarily stall the queue, and you must handle the packet in your driver's outputPacket() method, otherwise it will be dropped. If the hardware is already busy transmitting packets at the time outputPacket() is called, the only way to handle this situation is to queue the packet until the hardware is ready again.
If you do implement a queue and it is stalled, the queue must be restarted when your hardware is ready to transmit packets again by calling IOOutputQueue::start(), or you will not receive further packets.
![]() Note Creating an output queue is highly recommended; however, MyEthernetDriver skips this step, as it transmits packets directly to another network interface, which implements its own queuing.
Note Creating an output queue is highly recommended; however, MyEthernetDriver skips this step, as it transmits packets directly to another network interface, which implements its own queuing.
Creating a queue can be done by overriding the createOutputQueue() method. When a device is disabled, you should call flush() on the queue to remove any queued packets.
A typical network device will issue an (TX) interrupt whenever the hardware has put a packet (or packets) out on the wire, which also indicates there is now more room in its transmit buffer, or that a new DMA transaction can now be performed. You can notify the queue that the device is now ready for more data by calling the output queue's service() method. A side-effect of this will be another call to the driver's outputPacket() method, which will deliver a new packet, if one is available.
The transmitPacketToHardware() method from the preceding section is implemented as follows:
IOReturn    com_osxkernel_MyEthernetHwAbstraction::transmitPacketToHardware(mbuf_t packet)

{

    if (ifnet_output_raw(interface, 0, packet) != KERN_SUCCESS)

        return kIOReturnOutputDropped;


    // Raise an interrupt to the driver to inform it the packet was sent.

    fRegisterMap.interruptStatusRegister |= kTXInterruptPending;

    fDriver->fInterruptSource->setTimeoutUS(1);


    return kIOReturnSuccess;

}
The method will inject the received packet to the slave device's output queue. We simulate a hardware interrupt by setting the TX interrupt flag in our dummy interrupt register and then invoking our timer function to simulate an interrupt received from a hardware device a microsecond later.
The transmission of the packet to the hardware is again hardware-dependent. A PCI or Thunderbolt-based device is likely to use DMA. In this case, there are two options:
- The first is to have a pre-allocated physically allocated buffer; for example, one allocated with
IOBufferMemoryDescriptor, using thekIOMemoryPhysicallyContiguousoption, which anmbufwill be copied into and then DMA'ed to the hardware. Because anmbufmay consist of several chained buffers, it is important to ensure that you walk the chain withmbuf_next()so that all the segments can be copied into the DMA buffer. - The second option, if the device supports it, is to create a scatter/gather list directly from the
mbuf, using a variant ofIOMbufMemoryCursor, which will avoid performing an extra copy. The cursor class takes care of generating the list of physical segments from thembuf. SeveralIOMbufMemoryCursorssubclasses exist; which one to use depends on the device and its limitations. For example, if you use a device that reads addresses in big-endian format, you can use theIOMbufBigMemoryCursor, which can be created with thewithSpecification()factory method:
static IOMbufBigMemoryCursor* withSpecification(UInt32 maxSegmentSize, UInt32 maxNumSegments);The
maxSegmentSizecan be used to limit the size of individual scatter/gather list elements. Similarly, themaxNumSegmentscontrols the length of the list.
Receiving Packets
Incoming packets arrive asynchronously from the network and a network driver's responsibility is to offload them from the hardware device when an RX interrupt occurs and deliver them to the network stack via its IONetworkInterface or IOEthernetInterface, in the case of an Ethernet driver. MyEthernetDriver's interrupt handler is shown in Listing 13-9.
Listing 13-9. Implementation of MyEthernetDriver's Interrupt Handler
void com_osxkernel_MyEthernetDriver::interruptOccured(OSObject* owner, IOTimerEventSource* sender)

{

    mbuf_t packet;


    com_osxkernel_MyEthernetDriver* me = (com_osxkernel_MyEthernetDriver*)owner;

    com_osxkernel_MyEthernetHwAbstraction* hwAbstraction = me->fHWAbstraction;

    if (!me)

        return;


    UInt32 interruptStatus = hwAbstraction->readRegister32(kMyInterruptStatusRegisterOffset);


    // Recieve interrupt pending, grab packet from hardware.

    if (interruptStatus & kRXInterruptPending)

    {

        while ((packet = hwAbstraction->receivePacketFromHardware()))

        {

            me->fNetworkInterface->inputPacket(packet);

            me->fNetworkStats->inputPackets++;
        }

        me->fNetworkInterface->flushInputQueue();

    }


    if (interruptStatus & kTXInterruptPending)

    {

        // Packet transmitted succesfully.

        me->fNetworkStats->outputPackets++;

    }

}
The interrupt handler is shared for RX and TX interrupts. To find out which interrupt occurred, we read the device's interrupt status register. Usually an interrupt status register is cleared on read, which will acknowledge and de-assert the interrupt. A quick note about the TX interrupt: we don't do anything other than record the packet as transmitted in our statistics structure, as we do not have a queue and also don't need to worry about setting up a new transaction.
When a packet is received, it needs to be transferred from an input buffer and passed to the IONetworkInterface class that was attached to the network controller driver. A packet is delivered to the network stack through the IONetworkInterface::inputPacket() method. The method accepts an mbuf_t. To get the data into an mbuf_t you can pre-allocate buffers using IONetworkController::allocatePacket(), which can then be used as a destination for the DMA of an incoming packet. An IOMbufMemoryCursor subclass can be used to handle translation of the mbuf data into physical addresses.
In the preceding example, we loop continuously until we have emptied the queue of incoming packets. A real hardware device may also receive multiple packets for a single interrupt. This process is often referred to as interrupt coalescing. Interrupt coalescing is necessary for modern network devices operating at speeds of 1 Gigabit or more, as network frames are often quite small and it would be inefficient to issue a hardware interrupt for every single packet received. Instead, the device may queue a number of packets in its onboard memory then issue an interrupt. Excessive queuing in hardware or by the driver should be avoided as it impacts latency, which may adversely affect some applications, such as real-time multiplayer games or audio/video conferencing. When inputPacket() is called, the packet is put in a queue internally by IONetworkInterface. We can drain this queue when we are ready by calling flushInputQueue(), which will forward packets to the BSD data-link layer for processing by protocol handlers.
Listing 13-10 shows the method that issues our pretend RX interrupt, once a packet has been retrieved from the slave device.
Listing 13-10. Method for Handling Incoming Packets from the Slave Device and Raising Virtual Interrupts
bool    com_osxkernel_MyEthernetHwAbstraction::handleIncomingPacket(mbuf_t packet,

                                                                    char** frameHdr)

{

    bool passPacketToCaller = true;

    bool copyPacket = false;


    struct ether_header *hdr = (struct ether_header*)*framePtr;

    if (!hdr)

        return false;


    // We only accept packets routed to us if it is addressed to our Mac address,

    // the broadcast or a multicast address.
    if (memcmp(&fMacBcastAddress.bytes, &hdr->ether_dhost, ETHER_ADDR_LEN) == 0)

    {

        copyPacket = true;

    }

    else if (memcmp(&fRegisterMap.address, &hdr->ether_dhost, ETHER_ADDR_LEN) == 0)

    {

        passPacketToCaller = false; // Belongs to our interface.

        copyPacket = true;

    }

    else if (hdr->ether_dhost[0] & 0x01) // multicast

    {

        copyPacket = true;

    }


    if (copyPacket)

    {

        mbuf_t newPacket;

        newPacket = fDriver->allocatePacket((UInt32)mbuf_pkthdr_len(packet) + ETHER_HDR_LEN);


        if (newPacket)

        {

            unsigned char* data = (unsigned char*)mbuf_data(newPacket);

            bcopy(*framePtr, data, ETHER_HDR_LEN);

            data += ETHER_HDR_LEN;

            mbuf_copydata(packet, 0, mbuf_pkthdr_len(packet),data);


            IOLog("input packet is %lu bytes long
", mbuf_pkthdr_len(packet));


            fRxPacketQueue->lockEnqueue(newPacket);

            fRegisterMap.interruptStatusRegister |= kRXInterruptPending;

            // Raise an interrupt to the driver to inform it of the new packet

            fDriver->fInterruptSource->setTimeoutUS(1);

        }

    }

    return passPacketToCaller;

}
In Listing 13-10, the packet is copied from the original packet in response to the input filter on the slave device being called, then queued using an IOPacketQueue that simulates the hardware receive buffer. We then raise an interrupt to the driver by first setting the RX interrupt pending flag in the status register, then setting the timeout of the interrupt timer function. When the interrupt handler runs, it will call receivePacketFromHardware(), which simply grabs a new packet from the queue under lock:
mbuf_t  com_osxkernel_MyEthernetHwAbstraction::receivePacketFromHardware()

{

    if (!fRxPacketQueue)

        return NULL;

    return fRxPacketQueue->lockDequeue();

}
Taking MyEthernetDriver for a Test-Drive
If you wish to test MyEthernetDriver, it is best to do so on an isolated network segment or with the blessing of your network administrator because, unlike other samples, it will actively interact with your network. Before you test it, you should modify MyEthernetHwAbstraction.cpp so that it points to the Ethernet device you wish to use to transmit and receive on behalf of MyEthernetDriver.
You can load MyEthernetDriver by using kextload. Unlike an NKE, which has to be manually loaded, MyEthernetDriver uses IOResources as a provider so that it will be loaded automatically during boot, if installed to the proper location. For the purpose of testing the driver, it is recommended that you do not keep it in your systems extensions directory in case there is a problem. When the driver is loaded, you can verify its presence using IORegisterExplorer, as shown in Figure 13-7.
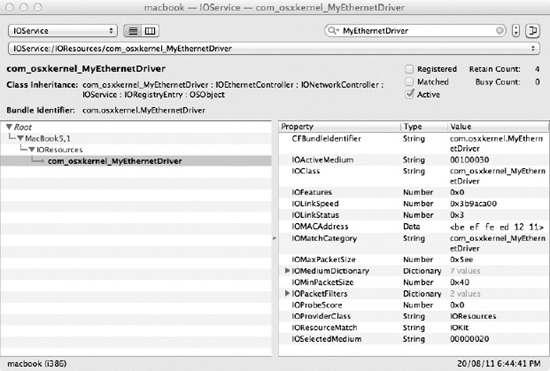
Figure 13-7. IORegisteryExplorer showing MyEthernetDriver attached to the IOResources nub
We should also be able to see the new network interface in System Preferences under the Network pane, as shown in Figure 13-8.
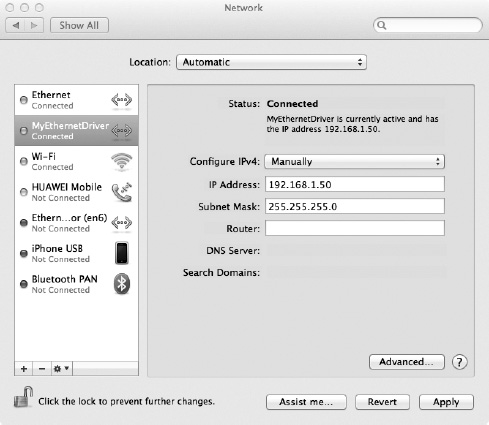
Figure 13-8. Network pane in System Preferences showing the configuration options for MyEthernetDriver
If you have a DHCP server on your network, you may see that MyEthernetDriver was automatically assigned an IP address. If not, you can manually configure an IP address using System Preferences or using the ifconfig command line tool:
$ sudo ifconfig en5 inet 192.168.1.50 netmask 255.255.255.0

$ ifconfig en5

en5: flags=8863<UP,BROADCAST,SMART,RUNNING,SIMPLEX,MULTICAST> mtu 1500

        ether be:ef:fe:ed:12:11

        inet6 fe80::bcef:feff:feed:1211%en5 prefixlen 64 scopeid 0x7

        inet 192.168.1.50 netmask 0xffffff00 broadcast 192.168.1.255

        media: autoselect (1000baseT <full-duplex>)

        status: active
Note that you may be assigned a different BSD network interface name, depending on how many interfaces you have installed on your system. In this case, en5 is used. Provided that you have configured an IP address that is reachable by another host on the network, you should now be able to reach that host even if the slave interface is using a different IP/subnet. We can verify that it works correctly by using the ping utility on another host:
othermac$ ping 192.168.1.50

PING 192.168.1.50 (192.168.1.50): 56 data bytes

64 bytes from 192.168.1.50: icmp_seq=0 ttl=64 time=0.855 ms

64 bytes from 192.168.1.50: icmp_seq=1 ttl=64 time=0.588 ms

--- 192.168.1.50 ping statistics ---

2 packets transmitted, 2 packets received, 0.0% packet loss

round-trip min/avg/max/stddev = 0.588/0.722/0.855/0.133 ms


othermac$ arp –a

? (192.168.1.50) at be:ef:fe:ed:12:11 on en0 ifscope [ethernet]

? (192.168.255.255) at ff:ff:ff:ff:ff:ff on en0 ifscope [ethernet]
You will see that the other system has picked up the hardware address (MAC) of MyEthernetDriver and is not using the MAC of the slave interface to reach us.
Going back to the system with MyEthernetDriver installed, we can check the statistics for our interface to see the amount of packets and data it has transferred:
$ netstat -i -I en5 Name Mtu Network Address Ipkts Ierrs Opkts Oerrs Coll en5 1500 <Link#7> be:ef:fe:ed:12:11 61 0 67 0 0 en5 1500 192.168.1 192.168.1.50 61 - 67 - -