E-mail is a primary method of communicating these days — so much so that many people are deluged with messages every day. Microsoft Outlook's Mail component enables you to view, respond to, forward, and compose new e-mails, as well as create folders for organizing the e-mails you send and receive.
With these basics mastered, you can graduate to using Outlook's more advanced e-mail functions. You can use Outlook to create distribution lists, which are useful if you frequently send e-mails to the same group of contacts — for example, to your team members at work — because they enable you to simply enter the name of the distribution list in the message's To field instead of adding each contact individually. You can also append a signature to the end of your messages, encrypt messages that contain sensitive data, recall messages sent in error, establish an automated message to be sent when you are out of the office, establish rules for managing messages, filter junk e-mail, archive e-mails to save space, and subscribe to RSS feeds.
Note that to use Outlook's Mail function, you must first set up an account with and obtain an e-mail address from an Internet service provider (ISP). Then, you can use Mail's Add New E-mail Account Wizard to automatically configure Mail to send and receive messages using that address.
Add Multiple E-mail Accounts. 266
Create Your Own Quick Steps. 268
Create a Distribution List. 270
Customize an E-mail Signature. 272
Encrypt a Message. 274
Recall a Message. 276
Set Up an Out-of-Office Reply. 278
Manage Messages Using Rules. 282
Clean Up Folders and Conversations. 286
Filter Junk E-mail. 288
Archive E-mails to Create Space. 290
View Archived E-mails. 292
Subscribe to RSS Feeds. 294
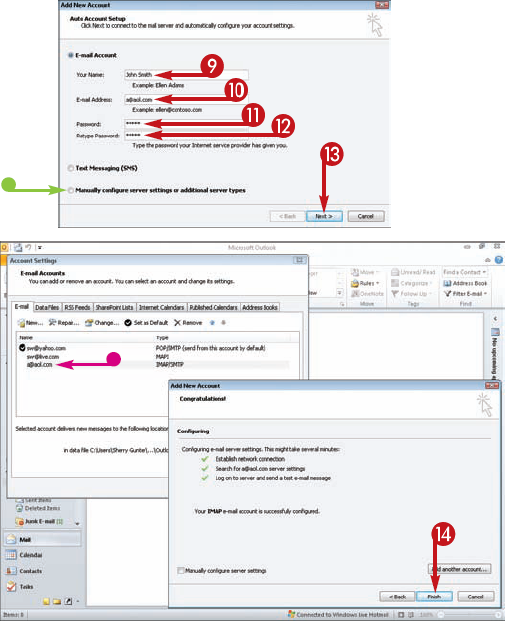
You can use Outlook to manage multiple e-mail boxes. You can easily add additional accounts to your existing Outlook setup. For example, you can synchronize services from Hotmail, Gmail, or other e-mail providers. When you add other e-mail accounts, Outlook lists them in the Navigation pane on the far left side of the Inbox view. You can select which e-mail account to view and work with in the Outlook window, expanding and collapsing accounts like folders.
When adding other accounts, Outlook attempts to connect to the server and retrieve the e-mail information required for you. If all goes well, the procedure works quietly in the background. However, depending on your e-mail provider, you may need to enter the information manually. Most e-mail accounts use a designated IMAP account type, an incoming mail server (POP3), and an outgoing mail server (SMTP). You need to know the server names, along with your logon information, typically your user name and password. Check with your service provider to find out specific details, or if you are using a different e-mail program, you can check its settings before migrating your e-mail to Outlook.

Note
You can press Ctrl+1 to quickly switch over to Mail view in Outlook.


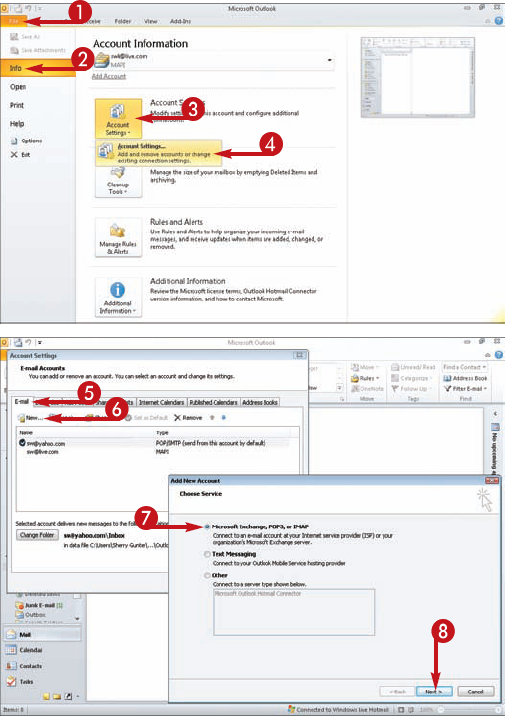
The Account Settings dialog box appears.


The Add New Account dialog box opens.


Outlook attempts to configure your e-mail server settings, establish a connection, and log onto the server.

Note
If the automatic configuration did not work, you can click the Back button and configure the account manually.

Tip
Important!
If you are a Hotmail or Windows Live user, Outlook may prompt you to download and install Outlook Connector, a program to help you use Outlook with your Hotmail or Windows Live account. Just follow the prompts to download the add-on, and then follow the prompts to install the software. You must restart Outlook to continue adding the Hotmail or Windows Live account.
More Options!
You can revisit the Account Settings dialog box to edit accounts, add new accounts, or remove old accounts. To remove an account, click its name in the list box and click the Remove button. To edit an account, click the Change button and change the settings. The top account listed is considered the default account. You can use the arrow buttons to move another account to the default position (
You can use the Outlook Quick Steps feature to turn routine tasks into a single action. New to Outlook 2010, you can use Quick Steps to send an e-mail to an archive folder, reply and delete e-mails, send meeting replies, and more. Quick Steps are a great way to increase your productivity and conquer several actions at once. You can even assign shortcuts to a Quick Step that let you activate the task with a keyboard shortcut key combination.
Outlook installs with several Quick Steps already in place and ready to activate with a click. For example, you can quickly move an e-mail, create a team e-mail, reply and delete e-mail, forward an e-mail to your manager, mark an e-mail as done, or create a new e-mail — all with a single click. You can find the Quick Steps listed in the Quick Steps group of the Home tab when you view your Inbox.
Just about any Quick Step you create requires some fine-tuning, such as specifying where to move an e-mail, or the name of a manager to forward a message to, but once you have set up the step, it is ready to go in the Quick Steps gallery on the Ribbon.
In this task, you learn how to move an e-mail. If you choose another type of Quick Step to create, similar steps are followed.


Note
If you choose another type of Quick Step, different steps are required.
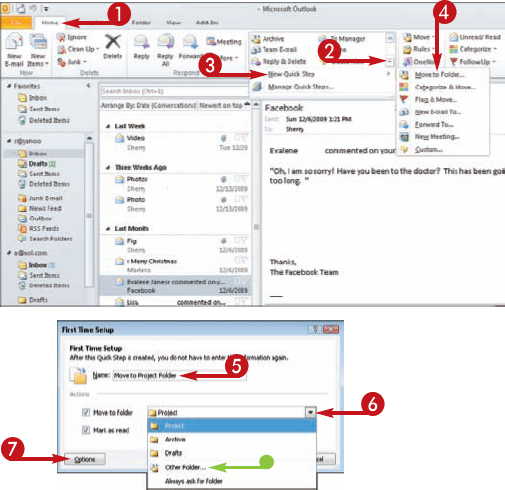
The First Time Setup dialog box appears.


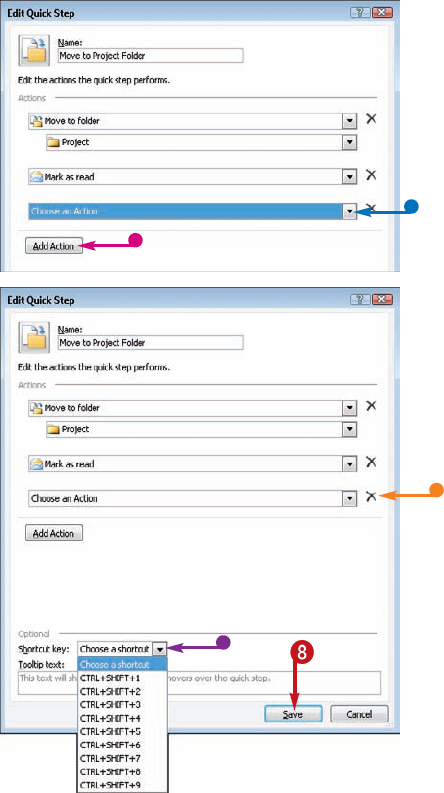
The Edit Quick Step dialog box opens.




Tip
More Options!
You can manage your Quick Steps using the Manage Quick Steps dialog box. You can edit existing Quick Steps, create a duplicate Quick Step, or remove Quick Steps you no longer need. You can also reorder the way in which Quick Steps are listed in the Quick Steps gallery on the Ribbon. To open the dialog box, click the More button on the Quick Steps group and click Manage Quick Steps.
More Options!
You can create a tooltip that appears when you position the mouse pointer over the Quick Step name in the gallery. In the Edit Quick Step dialog box, click inside the Tooltip text box, type a short description of the Quick Step, and save it. The next time you position the mouse pointer over the Quick Step name, a tooltip pop-up displays the description.
Normally, to send an e-mail to multiple people, you must enter each name in the To or Cc field individually, either by typing it or by clicking the corresponding To or Cc button and selecting the recipients from the contacts listed in the Select Names dialog box that appears. The task is tedious, especially if you frequently send e-mails to the same group of contacts — for example, to your team members at work. To speed up your work, you can place those people in a distribution list.
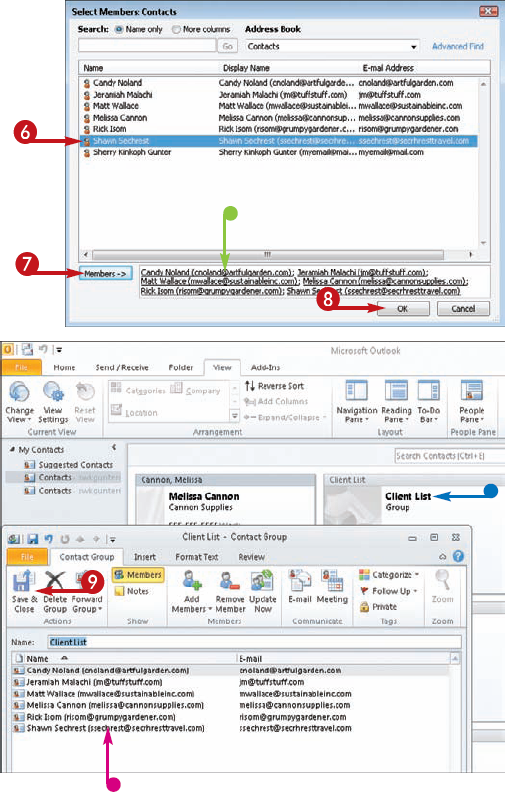
A distribution list in Outlook is stored as a Contacts group in your Address book. You can create a stored list of everyone in the group; then, any time you need to send a message to the group, you can simply type the name of the distribution list in the message's To or Cc field instead of adding each contact individually. Alternatively, you click the To or Cc button in the message window and, in the Select Names dialog box that appears, click the list's name.
Distribution lists are perfect for group e-mailing tasks, and you can easily edit the list to include new people or remove others from the group.


Note
You can press Ctrl+3 to quickly switch over to Contacts view in Outlook.
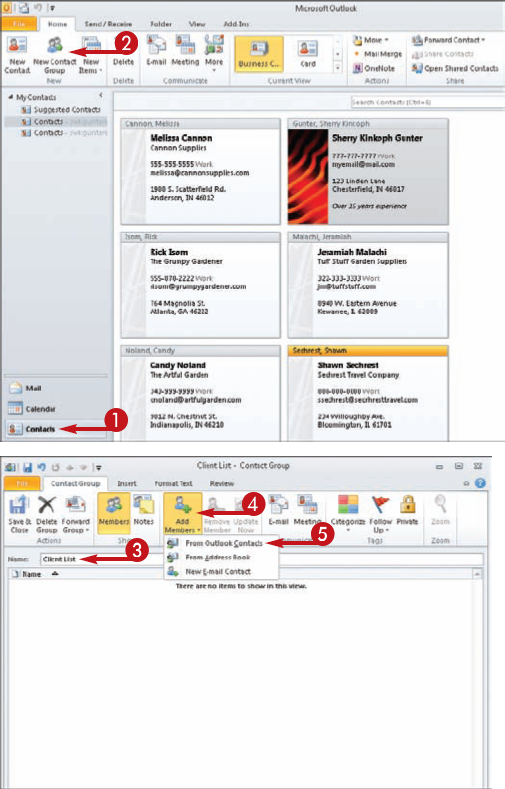
An empty Contact Group window opens.


The Select Members: Contacts dialog box appears.


Note
You can also click a name, and then click Members to add a contact one by one.




Tip
Apply It!
Now that you have created a distribution list, Outlook makes it easy to apply it to an e-mail message. Using Outlook Mail, open a new message window as you normally would and click the To button, double-click the name of the distribution list, and click OK. Outlook adds the list to the To box, and you can finish creating and sending the e-mail.
More Options!
To edit a distribution list, locate the list's entry in your Outlook Contacts and double-click it to open it. To add more recipients to your list, follow steps 4 to 8 in this task. To remove a member, click his or her entry in the list and then click Remove Member. Clicking Update Now updates the list to reflect changes to contacts included in the list. Click Save & Close to exit the window.
You can use Outlook to create a signature — that is, a string of text that appears at the bottom of messages you send. Also called a signature block, an e-mail signature acts as a sign-off at the end of your e-mail message. You may have noticed signatures used in other e-mails you receive. Signatures are a great way to promote yourself or your company, or add a bit of personality to your correspondence. Signature text might include your name, e-mail address, and other contact information; alternatively, it could spell out the name of your business, display a link to your Web site, or even include a picture. Some users even include a special quote or saying.
For best results, try to keep your e-mail signature to six lines or less. Although you can use a graphic in a signature, not all e-mail programs will display it based on security settings. The point of a signature is to make it easy for people to identify and contact you.


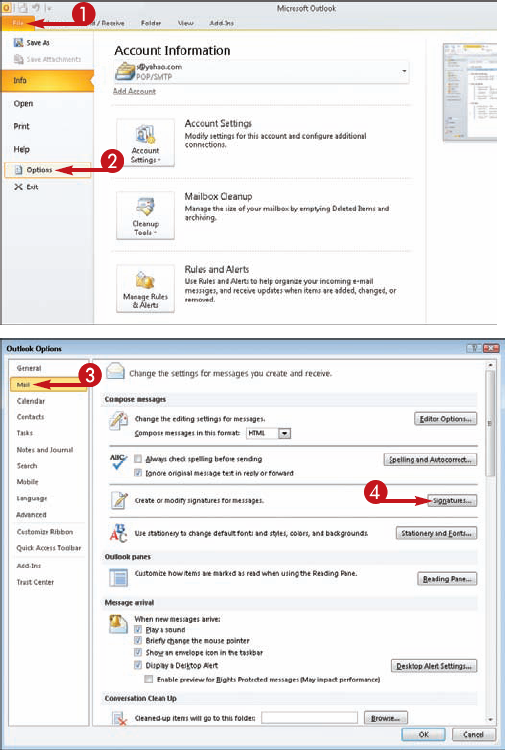
The Outlook Options dialog box opens.


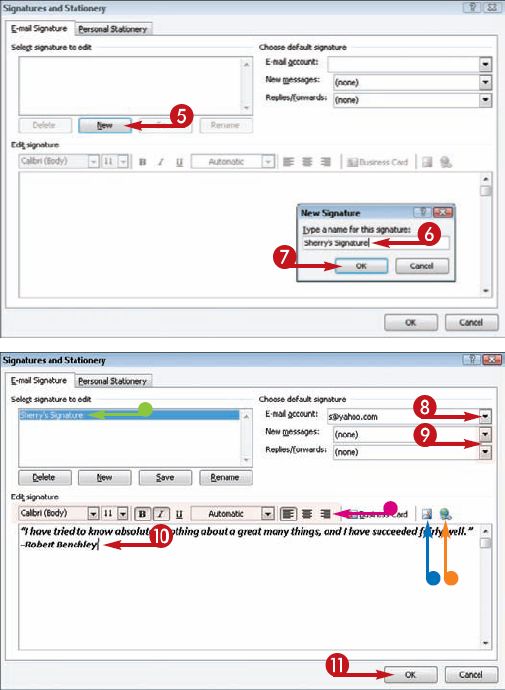
The Signatures and Stationery dialog box opens with the E-mail Signature tab open.

The New Signature dialog box opens.




Tip
Important!
To change your signature, simply open the Signatures and Stationery dialog box again, click the signature you want to edit in the list, and make the necessary changes. When you finish, click OK.
Try This!
To add your electronic business card to your signature, click the Business Card button in the Signatures and Stationery dialog box. In the Insert Business Card dialog box, click your contact entry to preview it, and click OK to add it to your signature. (You learn how to create an electronic business card in Chapter 12.)
If your message contains highly sensitive information meant for the recipient's eyes only, you can encrypt it. When you encrypt a message, Outlook scrambles the text it contains. Only recipients with the necessary "keys" can decipher the message.
To share the necessary keys with the recipient, you must exchange certificates. (A certificate is a digital ID.) Once you have obtained a digital certificate, you can use it to digitally "sign" your encrypted message. The recipient can then save your information, including the digital ID, to his or her contacts. For information about obtaining certificates and digitally signing your e-mail messages, see the tips at the end of this task.
You can encrypt your messages on an as-needed basis. You encrypt single messages from the Security Properties dialog box.


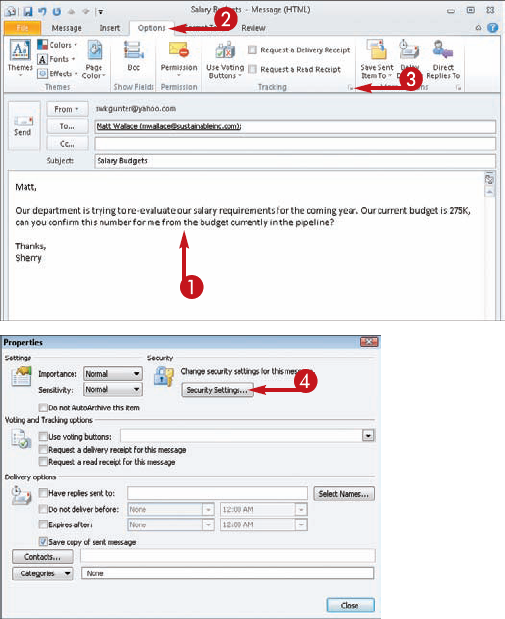
The Properties dialog box appears.

The Security Properties dialog box appears.


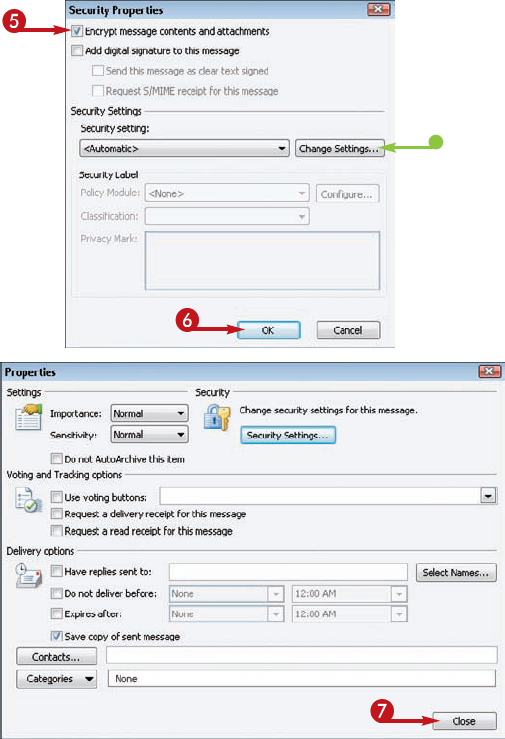

Tip
Important!
To obtain a certificate, or digital ID, click Get a Digital ID in the Outlook Trust Center's E-mail Security tab. To access this screen, click the File tab, click Options, click the Trust Center tab, and click the Trust Center Settings button. Click the E-mail Security tab. Under the Digital IDs (Certificates) section, click the Get a Digital ID button. Doing so launches a special Web page with links to several organizations that issue certificates.
More Options!
To encrypt all outgoing messages in Outlook, click the File tab and click Options. Click the Trust Center tab and click Trust Center Settings. From the Trust Center dialog box, click the E-mail Security tab and then click the Encrypt Contents and Attachments for Outgoing Messages check box (
Suppose after sending your message you realize it contains an error. Assuming the recipient has not yet received the message, you may be able to recall it. When you recall a message, Outlook gives you the option of replacing it with an updated version.
Note that to recall or replace a sent message, you and the message's recipient must be using a Microsoft Exchange 2000, 2003, 2007, or 2010 account. If your account is a home or personal account, chances are it is probably not an Exchange account.
To determine whether your Outlook account is a Microsoft Exchange account, press and hold Ctrl on your keyboard as you right-click the Outlook icon in the notification area in the Windows taskbar; then click Connection Status. The Microsoft Exchange Connection Status window opens, indicating whether you are indeed using an Exchange account.

Note
To open the message, double-click it in the Sent Items folder.

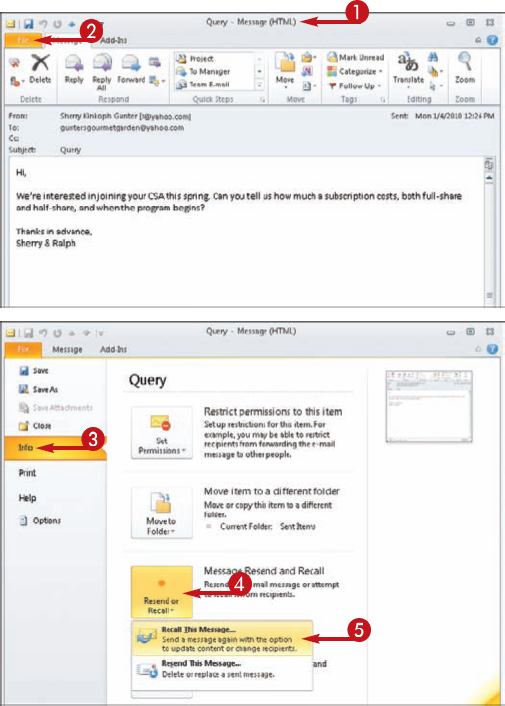


The Recall This Message dialog box appears.


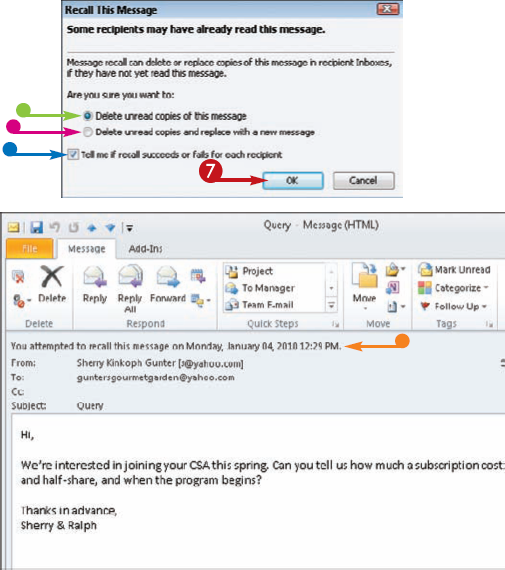

Tip
More Options!
By default, Outlook checks your messages for spelling errors as you type. You may want to check for grammar problems, too. The grammar checker is not turned on by default. To turn it on, click the File tab and click Options to open the Outlook Options dialog box. Click Mail, and then, under the Compose Messages section, click the Spelling and AutoCorrect button to open the Editor Options dialog box to the Proofing settings. Click the Mark Grammar Errors as You Type check box (
Suppose you will not have access to e-mail for a time — for example, if you are on vacation. You can configure Outlook to automatically send an out-of-office reply anytime you receive an e-mail during your absence, indicating that you do not have access to your account but will respond to the sender as soon as possible.
The first step when creating an out-of-office reply is to compose the message you want Outlook to send on your behalf and save it as a template. To compose the message, create a new message as normal (click the New E-mail button in Outlook Mail). Type the message you want to include in your out-of-office reply, including a subject such as "Out of Office" or something that signifies the automatic response. Finally, click the File tab in the message window, click Save As, type a name for the message (such as "Out of Office Reply"), click Save as Type, choose Outlook Template (*.oft) from the list that appears, and then click Save. (Note: If the message window does not close automatically, click its Close button to close it.) After you have created a reply message, you are ready to create a rule to use it.


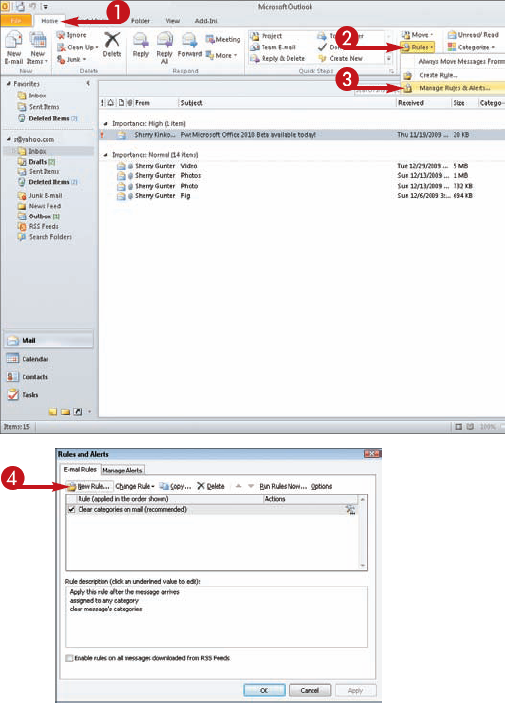
The Rules and Alerts dialog box appears.

The Rules Wizard dialog box appears. This is the first of several to walk you through the procedure.


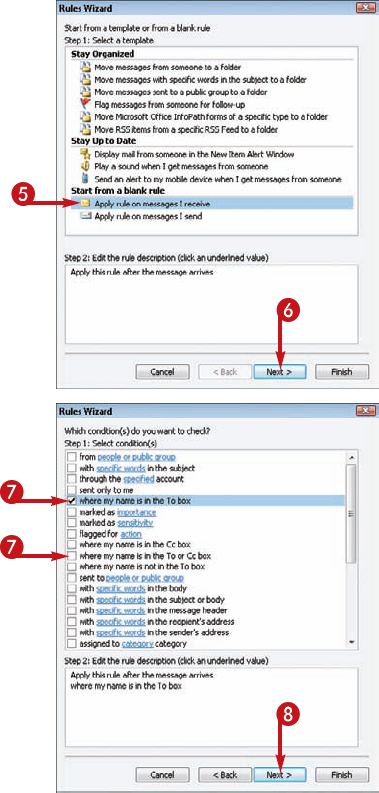


Tip
Did You Know?
Outlook rules are simply a set of instructions that tell the program what to do with the messages you receive in your Inbox. You can create rules to automatically delete e-mails, move them to other folders, or forward them to other people. By establishing conditions, exceptions, and actions, you can tell Outlook how to handle all of your e-mail messages. Learn more about creating rules in the next task, "Manage Messages Using Rules."
The precise steps for setting up an out-of-office reply differ depending on what type of Outlook account you have. This task outlines how to set up an automatic reply for a Post Office Protocol (POP) or Internet Message Access Protocol (IMAP) account, a process that involves setting up a message template and then creating a rule that employs that template.
If you use an Exchange account rather than a POP or IMAP account, you follow a different — and, frankly, simpler — series of steps to set up an out-of-office reply. Check out the Microsoft Exchange Help files to learn more about the process.
Note that in order for Outlook to send your out-of-office reply, your computer must be on with Outlook running. In addition, Outlook must be set up to periodically check for incoming messages.
Even if you receive more than one message from a sender while you are away, Outlook sends your out-of-office reply only once — provided the program is not restarted during your absence, in which case it resets the list it keeps of senders to which it has responded.


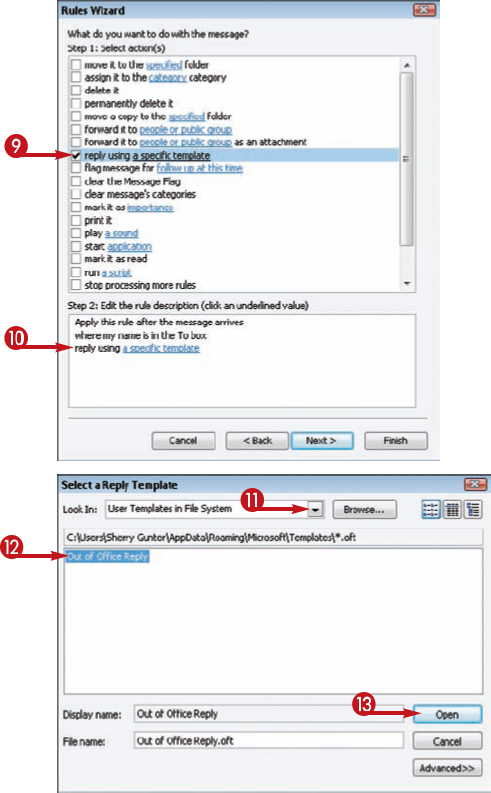
The Select a Reply Template dialog box appears.


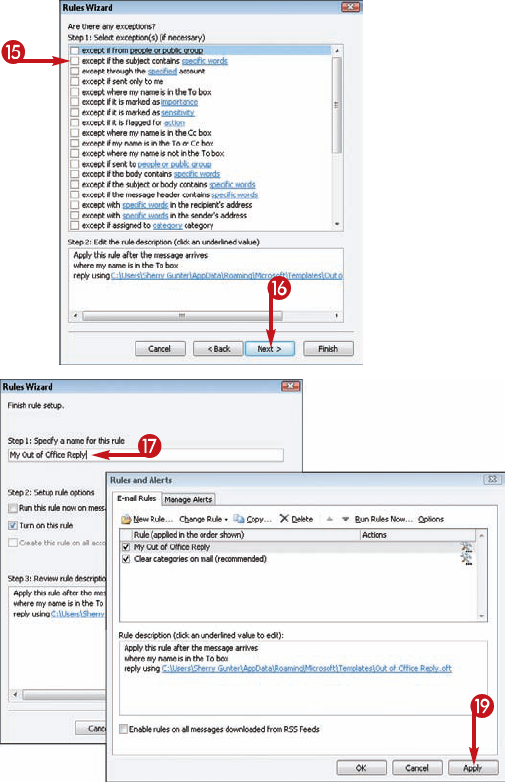


Outlook adds the rule to the Rules and Alerts dialog box.

Tip
Remove It!
To disable the out-of-office reply, revisit the Rules and Alerts dialog box (click the Rules button on the Inbox Home tab and click Manage Rules & Alerts). In the dialog box, deselect the rule you want to turn off (
Suppose you want all messages you receive from a specific sender to be filed in a particular folder automatically. To accomplish that, as well as many other automated Mail tasks, you can set up a rule. Any messages that meet the criteria defined in the rule are handled in the manner you specify.
Quite simply, rules are just sets of instructions that tell Outlook what to do with your messages. To create rules in Outlook, you use the program's Rules Wizard. The Rules Wizard walks you through the process of setting up automatic responses to messages in your Inbox, letting you customize how you want a message task handled through conditions, actions, and exceptions.
In this task, you learn how to create a rule to move messages from your Inbox to a designated folder. In addition to creating rules based on predefined templates provided by Outlook, you can create new rules from scratch. Alternatively, if you established rules in an earlier version of Outlook, you can import those rules into this version.


The Rules and Alerts dialog box appears.

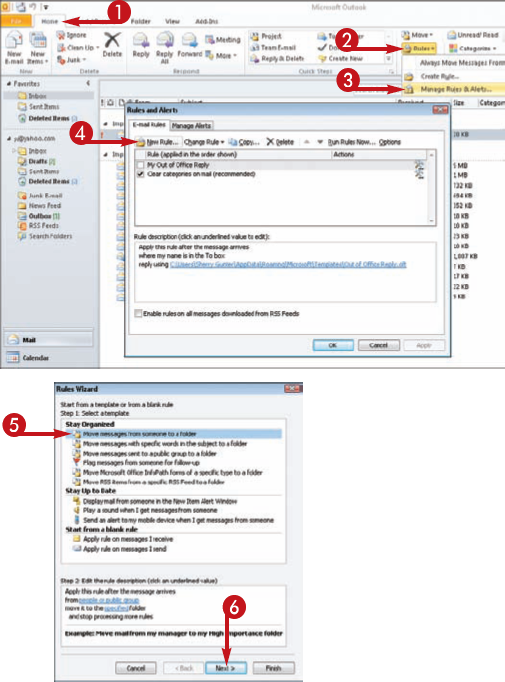
The Rules Wizard dialog box appears.


The Rule Address dialog box opens.


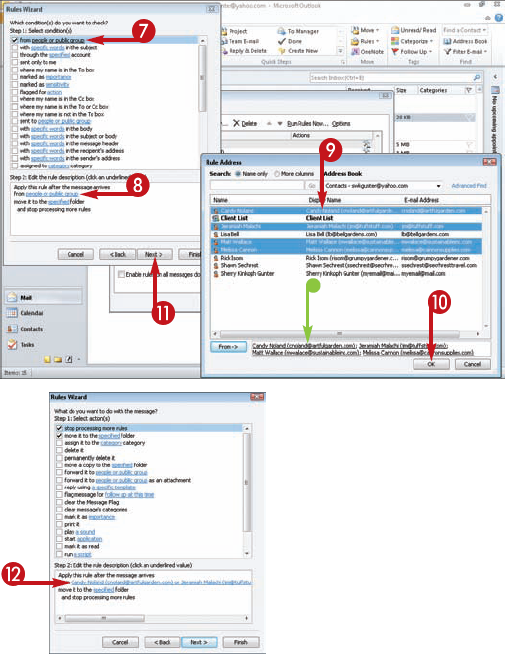

Tip
More Options!
In addition to creating rules based on predefined templates that Outlook provides, you can create them from scratch. To do so, launch the Rules Wizard dialog box, choose the desired option under Start from a Blank Rule, click Next, and follow the on-screen prompts. For example, see the previous task, "Set Up an Out-of-Office Reply," to learn how to generate an automated e-mail response for when you are out of the office. You might also create rules to pre-filter messages before they arrive in your Inbox, redirect them to other folders, or notify you when you receive an important message.
More Options!
If you established rules in an earlier version of Outlook, you can import those rules into this version. (Note that to import your rules from a previous version of Outlook, you must first export them from that earlier version.) To access the tools for importing and exporting rules, as well as for upgrading any rules you import for better performance in Outlook 2010, click the Options button in the Rules and Alerts dialog box.
You are not limited to creating rules that place messages from a certain sender in a specific folder. For example, you might create a rule that dictates that all messages from a particular sender (for example, your boss) be flagged for immediate attention. You can also set exceptions — that is, situations in which the rule you create is ignored. For example, you might specify that the rule be ignored when messages contain a certain word in the body text or subject line.
The advantage of using Outlook rules is that you control when a rule applies and any exceptions to the rule. You can keep a list of rules in the Rules and Alerts dialog box and turn them on or off as needed. You can also edit rules to change their settings and conditions.
The order in which rules are listed in the Rules and Alerts dialog box are the order in which Outlook carries them out. If you want a particular rule to take place first in the list, make sure the rule is listed first in the dialog box.
The Rules and Alerts dialog box opens.


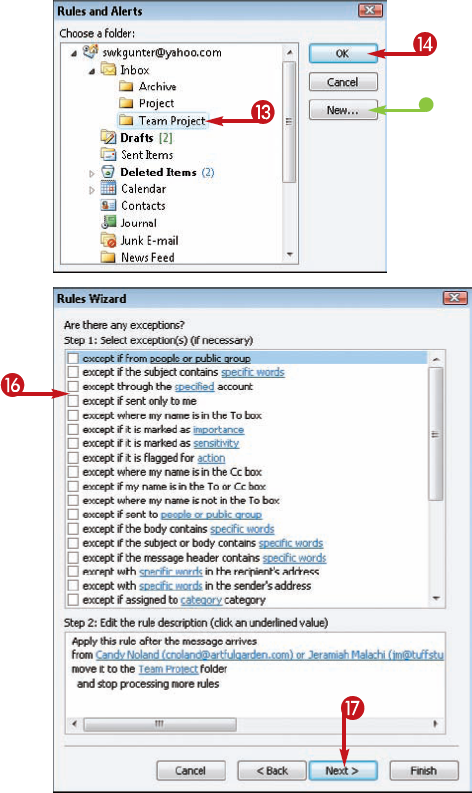


Note
To apply the rule to messages already in your Inbox, click Run This Rule Now on Messages Already in "Inbox."


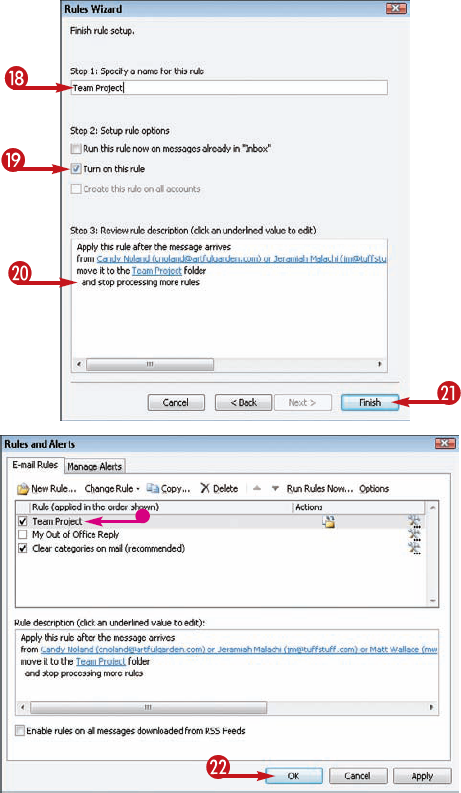


Outlook applies the rule to messages meeting the criteria you specified.
Tip
Try This!
If you want to create a rule that applies to a certain sender, and you have a message from that sender in your message list, you can expedite the rule-creation process. First, right-click a message from the sender and click Rules and then Create Rule in the shortcut menu. In the Create Rule dialog box, under When I Get E-mail with All of the Selected Conditions, select the check box next to the necessary conditions, such as the From check box. Next, under Do the Following, select the check box next to the actions you want Outlook to take when the conditions are met. Outlook may prompt you for additional information; respond as necessary. Finally, click OK, and Outlook creates the rule.
You can use Outlook 2010's new Clean Up tool to clean up your Inbox folders and messages. The Clean Up tool keeps your most recent messages in view, but moves older, redundant messages out of the way or allows you to delete them entirely. This can free up some much-needed space on your computer.
You can apply the Clean Up tool to a specific folder or to an ongoing e-mail conversation. For example, perhaps you are on a distribution list for your sales department. Usually a good thing, the list is also used to coordinate an office pizza party that you do not plan on attending. Instead of being inundated with a bunch of messages and replies, you can use the Clean Up tool to ignore the entire thread and all of its messages, or choose to delete the messages pertaining to the pizza party.
You can use the Clean Up feature's settings to control where message items go and what items are moved.


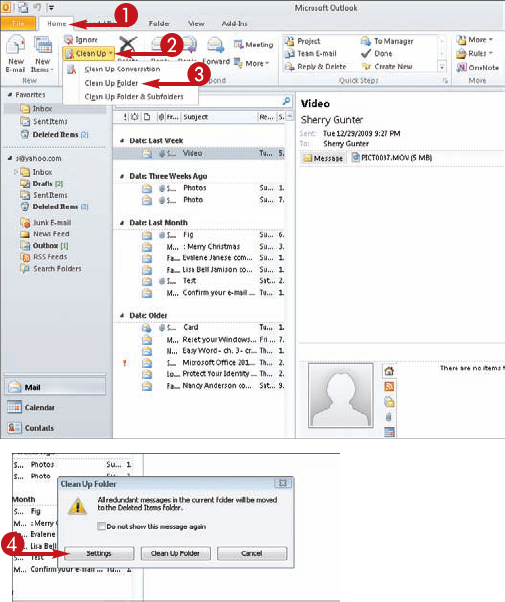
The Clean Up Folder dialog box opens.

The Outlook Options dialog box opens to the Mail options.


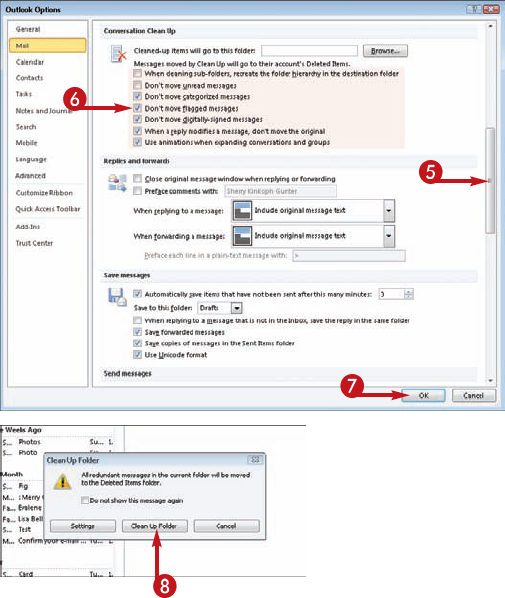

Outlook cleans up the Inbox folder as specified.
Tip
Try This!
If you ever have a distracting e-mail conversation in your Inbox that you prefer not to pay any attention to, apply the Ignore button to move it and any future iterations to the Deleted Items folder. To activate the feature, click the Home tab while in Mail view and click the Ignore button found in the Delete group of commands. To stop ignoring a conversation, open the Deleted Items folder, click the conversation, click the Ignore button again, and click Stop Ignoring Conversation. You can recover a conversation only if it has not been permanently deleted from the folder.
More Options!
Instead of removing conversations, you can also change how you view them. Click the View tab, click the Conversations button, and choose how you want to view the messages and threads.
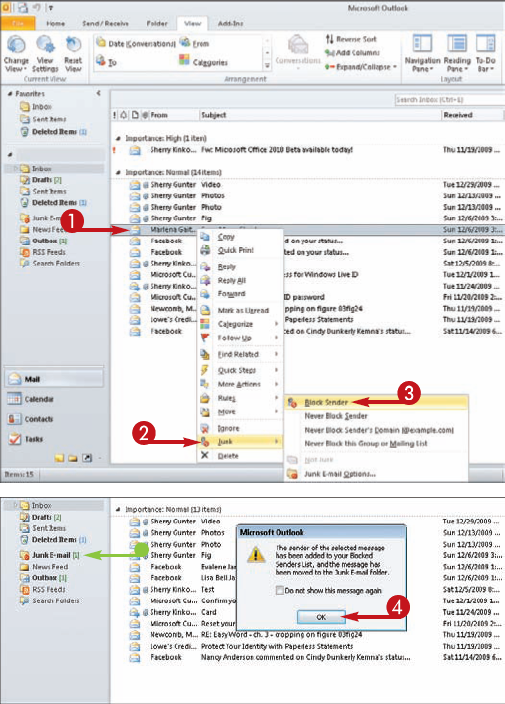
Using e-mail opens you up to a deluge of junk e-mail messages, called spam. Indeed, you probably sift through dozens of spam e-mails to locate "real" messages every day. You can use Outlook Mail's Junk E-mail Filter to automatically divert spam from your Inbox into a Junk E-mail folder.
By default, Outlook Mail applies a low level of protection from junk e-mail. To change the level of protection, click the Home tab, click Junk, and click Junk E-mail Options. The Junk E-mail Options dialog box opens; in it, you can specify the level of protection from junk e-mail that you want.
You should periodically check Outlook's Junk E-mail folder to ensure that no "authentic" messages have been diverted. If one is, you can mark it as "not junk"; this moves the message to the message list and, optionally, adds the sender to your Safe Senders list. On the flip side, if the Outlook filter fails to detect a junk e-mail message and allows it into your Inbox, you can set up Outlook to block all e-mail from the message's sender.

Outlook displays the contents of the Junk E-mail folder in the message list.


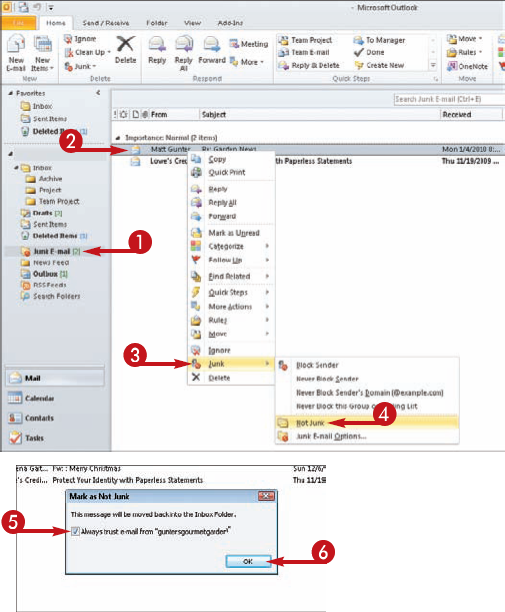
The Mark as Not Junk dialog box appears.


Outlook moves the message to your Inbox.
Tip
Try This!
To ensure that any sender who is listed in Contacts is considered "safe" by the Junk E-mail Filter, open the Junk E-mail Options dialog box. Click the Junk button on the Home tab, and then click Junk E-mail Options to open the dialog box. In the Safe Senders tab, verify that the Also Trust E-mail from My Contacts check box is checked. Optionally, click the Automatically Add People I E-mail to the Safe Senders List check box to select it. When you finish, click OK.
Did You Know?
Phishing typically involves an e-mail message that appears to be from a legitimate source, such as a bank, informing the user that his or her account information must be updated. When the user clicks the link provided, however, he or she is directed to a bogus site designed to mimic a trusted site in order to steal personal information. Outlook's anti-phishing features help detect these fraudulent messages automatically, disabling any links in messages it deems suspicious and alerting you to the problem in the message window's InfoBar.
If you use Outlook with any regularity, you quickly discover that the sheer volume of e-mail messages, not to mention calendar entries and other Outlook items, can prove overwhelming. To mitigate this, Outlook automatically archives old files. If the default settings for this automatic operation do not suit you, you can change them.
You can use Outlook's Options dialog box to access the AutoArchive settings. You can control the frequency in which messages are archived, how old they must be for archiving, and even where you want the archived messages stored. You can also choose to permanently delete the messages instead of storing them. By default, Outlook is set up to run the AutoArchive feature every 14 days.
In addition to changing Outlook's AutoArchive settings, as outlined here, you can also launch an archive operation manually. To do so, open Outlook's Folder tab, click AutoArchive Settings, and select the desired option in the Junk E-Mail Properties dialog box that appears.


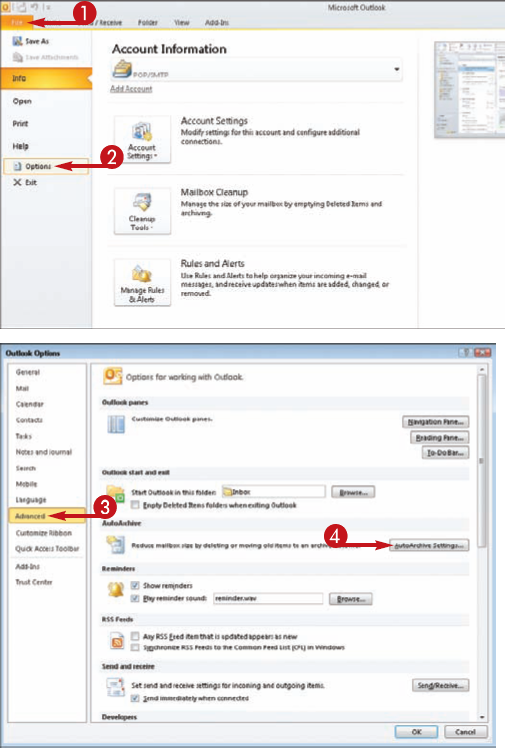
The Outlook Options dialog box opens.


The AutoArchive dialog box opens.


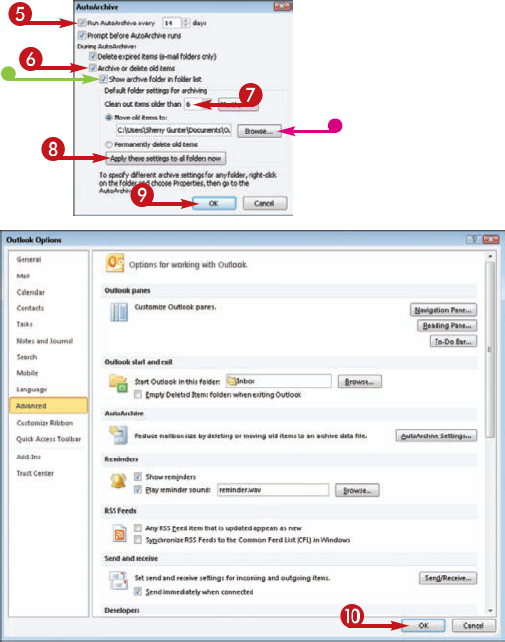

Tip
Remove It!
Alternatively, you may decide you want to disable Outlook's AutoArchive functionality altogether. To do so, click the File tab and then click Options. In the Outlook Options dialog box, click the Advanced tab and click AutoArchive Settings. Finally, in the AutoArchive dialog box, deselect the Run AutoArchive Every x Days check box (
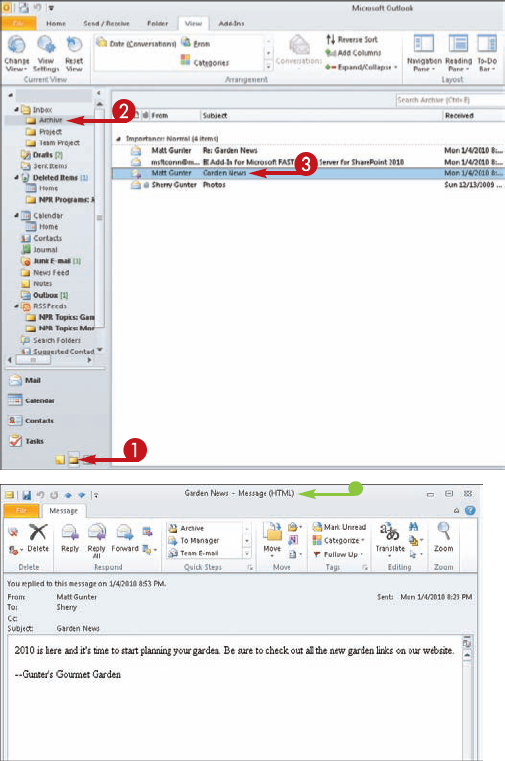
Just because an item has been archived does not mean you cannot view it if need be. For example, you may need to check on an e-mail message from your boss you archived three months ago, or locate an e-mail with a software code from an online store. You can view archived items from the Archive folder in Outlook's Navigation pane.
In addition to viewing archived items, you can restore archived items back to their original folder or to a different folder, either individually or as a group. The easiest method of retrieving a message is to simply drag it out of the archived folder and into the folder in which you want to keep the message. To move a group of messages, press and hold Ctrl while clicking each message in the group. You can also press and hold Shift and click the first and last message in the group to move.


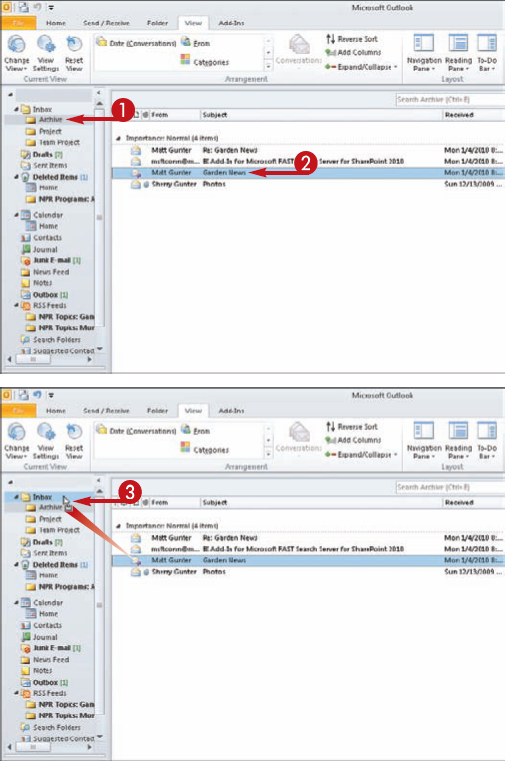

The message is moved to the designated folder.
Tip
Did You Know?
Where do your archived items go exactly? The first time AutoArchive runs, the archive file created depends on your operating system. If you are using Windows 7, archived e-mails are stored in the following path: C:UsersYourUserNameDocumentsOutlook Filesarchive.pst.
Really Simple Syndication, or RSS for short, is a technology that enables Web content to be syndicated — that is, converted to a Web feed. This content might include blogs, podcasts, news, and so on. When you use Outlook to subscribe to an RSS feed, Outlook automatically downloads new posts from those feeds. That means that instead of visiting several Web sites to stay informed, you can simply view these various feed posts in Outlook.
You can subscribe to a feed from the Web site that hosts the feed. (Note that if you use Internet Explorer 8 to subscribe to a feed, you can then access and manage the feed from within Outlook 2010. Internet Explorer 8 indicates when it has detected an RSS feed by changing its RSS Feed button from gray to orange.)
Alternatively, if you know the Web address, or URL, of the feed that interests you, you can subscribe to that feed from within Outlook. When you do, Outlook automatically checks for and downloads feed updates. Subscribing to a feed is typically free.


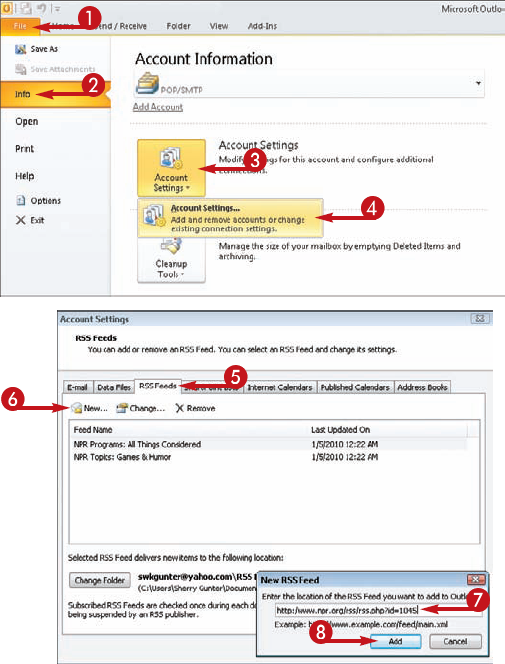
The Account Settings dialog box opens.


The New RSS Feed dialog box opens.


The RSS Feed Options dialog box appears.


Tip
Did You Know?
You can share a favorite RSS feed with others. With the RSS folder open, click the Share This Feed button on the Home tab. This opens a new message window with the RSS feed link attached. Simply fill in the rest of the message window components and send the e-mail.
Remove It!
If you find that a particular feed is not as interesting or useful as you would like, you can unsubscribe from it. To do so, right-click the RSS folder for the feed you want to remove, and click Delete Folder in the menu that appears. When prompted, click Yes to confirm the deletion.
