What exactly are "graphics?" Whether you call them pictures, photographs, images, or visual objects, graphic elements help you create a polished Office file and go the extra mile in conveying your message. This chapter uses the terms interchangeably. Graphics can include pictures you insert from a digital camera, clip art you insert from a clip art collection, shapes you draw using the Office Shapes feature, or even WordArt objects that turn text into artwork. For practical purposes, and unless stated otherwise, graphics are the elements you add to an Office file to create visual impact or further convey a message in some form or fashion.
In this chapter, you learn techniques to help you take your Office graphics to the next level. Included are tasks on how to use the new Screenshot tool to take a picture of your Office screen, and how to use the new Background Removal tool to apply a quick photo-editing technique to your digital images. You also learn how to take control of your clip art collections and keep things organized in the Clip Art Organizer, one of the extra applications installed in the Microsoft Office 2010 Tools folder, and how to assign new artistic effects to turn a regular graphic into something spectacular.
Ever wonder how to create a perfect watermark or wrap text around a problematic graphic element? This chapter shows you how. You also learn how to use the grouping and ordering commands to their best advantage, and apply the Ungroup command to customize clip art.
So if you are ready to get graphic, then dive in!
Capture a Picture of Your Screen. 328
Organize Clip Art. 330
Find More Clip Art Online. 332
Remove an Image Background. 334
Assign Artistic Effects to a Picture. 336
Control Graphic Placement with Ordering. 338
Group Graphic Objects. 340
Customize Clip Art with the Ungroup Command. 342
Add a Caption to a Graphic. 344
Turn a WordArt Object into a Picture File. 346
Add a Custom Watermark. 348
Wrap Text Around a Graphic. 350
Organize Pictures with Picture Manager. 352
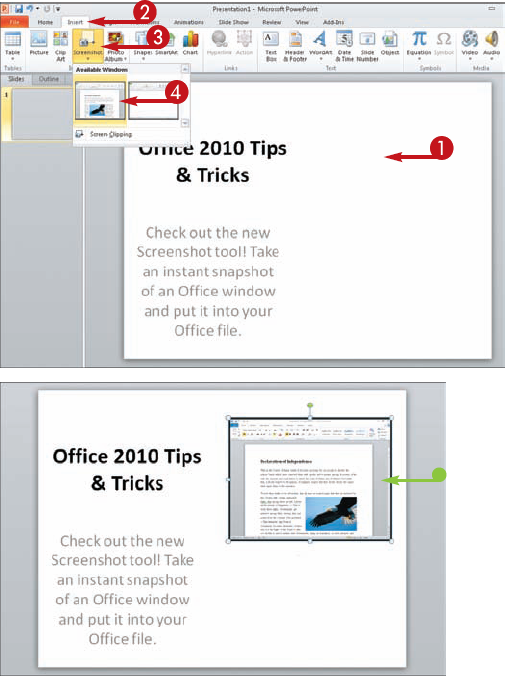
An exciting new feature to Office 2010 is the screen clipping tool, called Screenshot. The screen clipping tool lets you take a picture of your screen, also called a screen capture. The screen clipping feature first appeared with OneNote, and is now available in Word, Excel, PowerPoint, and OneNote with the new and improved Office 2010 features.
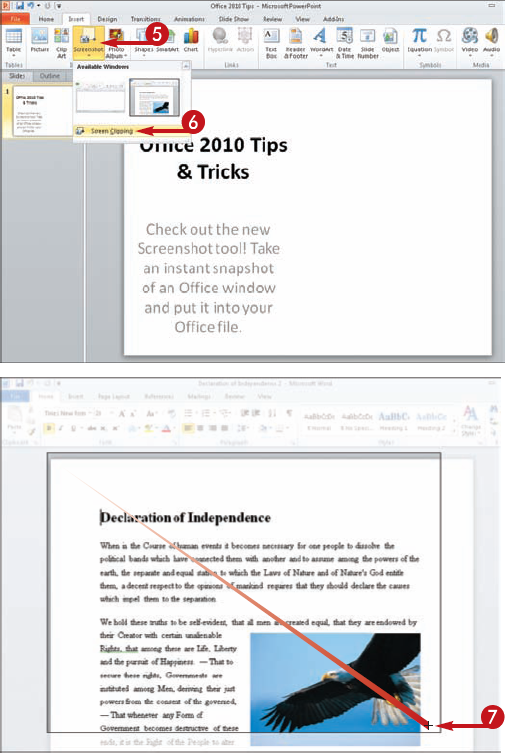
You can find the Screenshot tool on the Insert tab in Word, Excel, PowerPoint, or OneNote. When you activate this command, and you have any other application windows open, the Screenshot tool assumes you want to take a picture of one of the currently opened windows, so it displays the windows in a gallery of screenshots. To use one, just choose the one you want to insert into the current document.
The other option is to take a new screenshot by dragging over the area of the screen you want to capture. This technique lets you control exactly what to include in the screen clipping.
Once you grab a clipping, it is immediately inserted into the current document window wherever you have clicked in the file.
Tip
More Options!
Once you add a screen clipping to your file, you can treat it as any other image. You can resize it, move it, wrap text around it, add a caption, or save it as a graphic file to reuse again later. Resizing and moving are probably the first two tasks you will perform on the clipping. To move it, click the image and drag it to a new location in the file. To resize it, click and drag a corner icon of the selected image.
Try This!
A neat trick you can do with a captured image is turn it into a hyperlink that, when clicked, takes the user to the file from which the image was captured. To do so, right-click the image and choose Hyperlink. This opens the Insert Hyperlink dialog box. Navigate to the original file and click OK. The image now acts as a link to the original file.
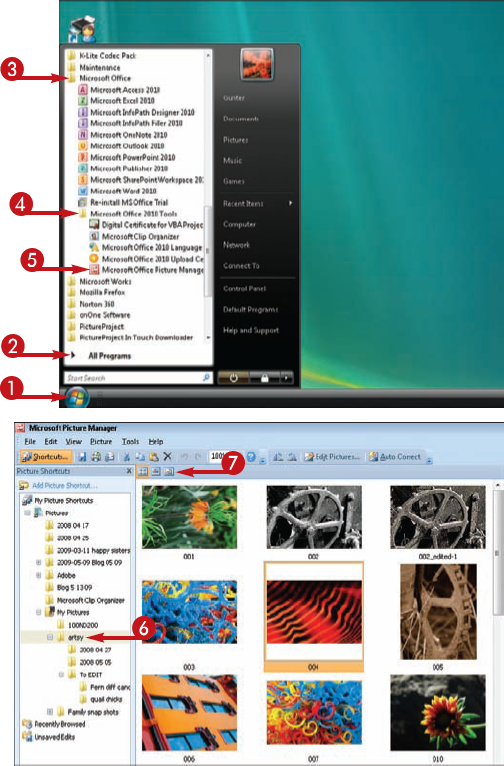
Hidden among the Microsoft Office 2010 Tools folder is a little gem of an organizer tool called, appropriately, Microsoft Clip Organizer. This stand-alone mini-application helps organize drawings, photos, sounds, videos, and other media clips as well as access clips from the Microsoft Office Web site. In previous renditions of Office, you could access the Organizer through the Clip Art pane; now you must go through the Windows All Programs menu.
Microsoft Clip Organizer is its own separate window complete with a menu and toolbar, a Collection List pane listing all the folders and categories of clip art, and a viewing pane for displaying the clips. By its very nature, the Clip Organizer keeps track of your clip art collections, including photographs, sound clips, video clips, and of course, clip art graphics. You can also use the Organizer's feature to access more clips online, organize clips into unique categories by moving and copying them into different categories and collections, or the Organizer's Search tool to look for specific clips in your collections.
Like other files and folders stored on your computer, the Organizer lists clip art collections in hierarchical order, with folders and subfolders, and categories you can expand and collapse to change the view.


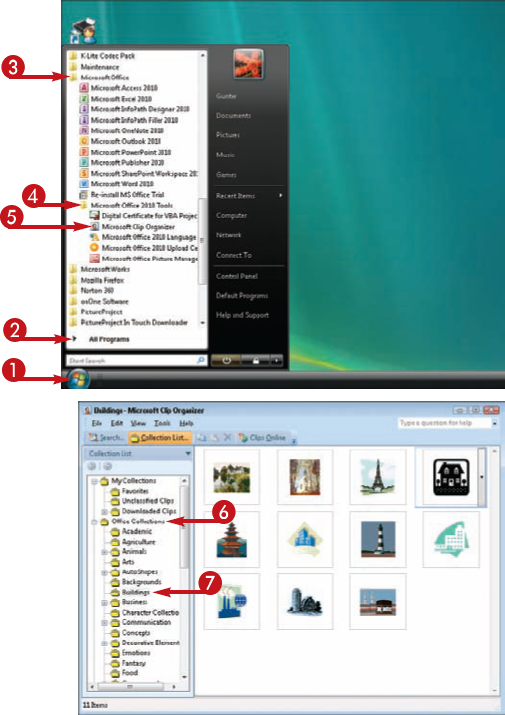
The Microsoft Clip Organizer window opens.


Some categories include subcategories; double-click the category name to display all the related subcategories.


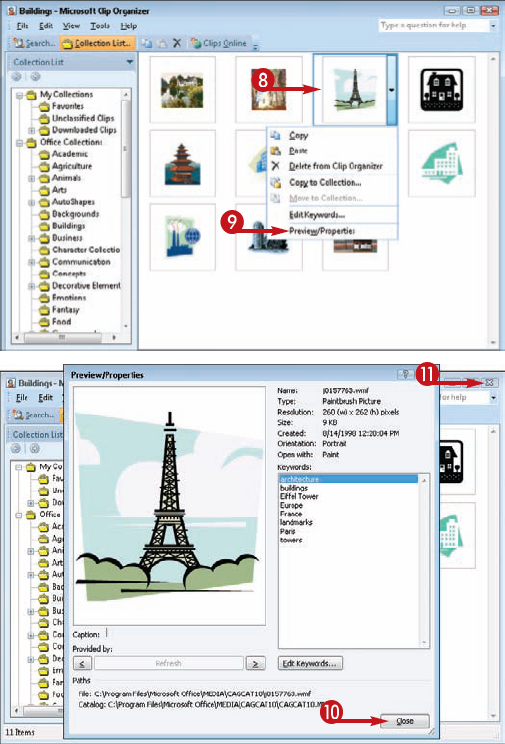
The Preview/Properties window opens.


Tip
Try This!
To search for a particular clip, click the Search button in the Microsoft Clip Organizer window to open the Search pane, type the keyword or words you want to search for, and then click the Go button. The window displays any matching results. Among the Search Options, you can search for all media file types, or just for certain types, such as clip art or photos. Click the Results Should Be drop-down arrow and click the media types you want to include in the search. If you want to include items from the Office.com Web site, leave the check box selected.
Apply It!
When you find a clip art or other media clip you want to use in an Office program, you can copy and paste it. Click the clip and choose Copy from the pop-up menu. Open the program where you want to insert the clip and click where you want it to appear. Right-click and choose Paste from the pop-up menu. The clip is pasted into place.
One of the best parts of using Microsoft clip art is being able to look for more clip art online. As an Office 2010 user, you are entitled to use any of the clip art from Microsoft's huge online clip art collection. With a connection to the Internet, the clip art is always at your disposal.
The first time you use the Office.com site to download clips, you may be asked to accept a service agreement. Once you pass this hurdle, you can download as many clips as you want.
Clip art is added to the Microsoft Clip Organizer, one of the Office 2010 stand-alone programs that installs with the suite. To learn more about this, see the previous task. With the clip art safely added to your computer, you can use it with any of the applications that utilize clip art. You can use the Clip Art pane to search for your downloaded clips and add them directly to your documents.


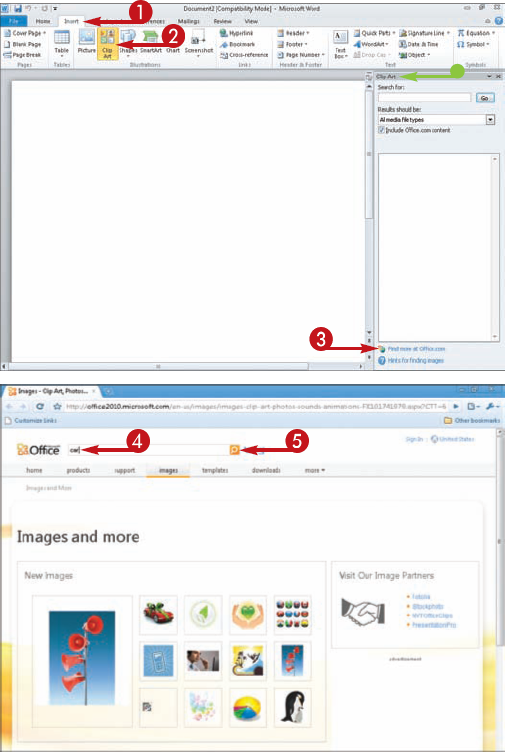
The default browser window opens to the Microsoft Office Clip Art site.


The browser window displays any matches.


To view details about a clip, click it to view a larger version of the clip and view dimensions, file size, and so on.
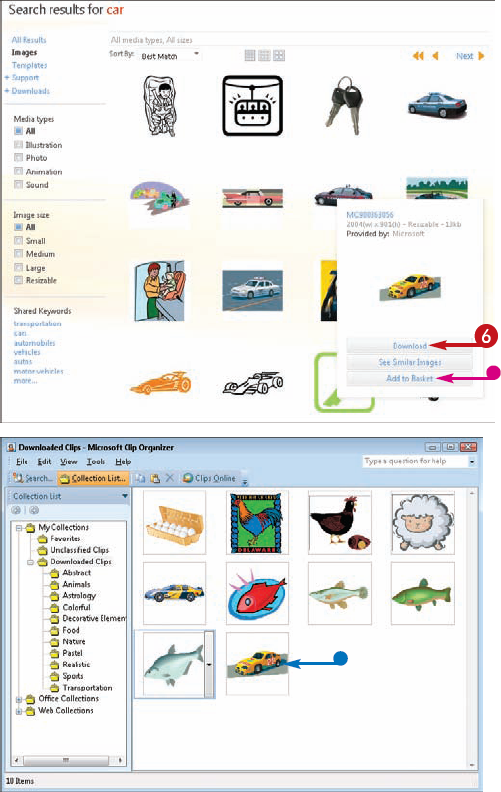
Note
Depending on whether you have used the Web site before, the Microsoft Service Agreement window may open. Click Accept to continue with the download.

Tip
Apply It!
Once you have downloaded a clip, you can use the Clip Art pane to look for the clip and insert it into your file. Type the clip's keyword into the Search field of the Clip Art pane and click Go or press Enter. The pane displays any matches. Click the one you want to insert into your document.
Try This!
You can search for a particular type of clip on the Office.com site. On the search results window, you can find a variety of options you can use to narrow down your search based on media type and image size as well as find links to other clips with shared keywords. Look on the left side of the page to find options you can turn on or off to narrow down your search results.
New to Office 2010, you can edit an image, such as a photo, and remove the background. This technique basically cuts out the subject of the image and allows you to use a different background behind the image, which opens a variety of possibilities. You might use the image with closely wrapped text, or place the image over a solid color background that matches your document's color scheme.
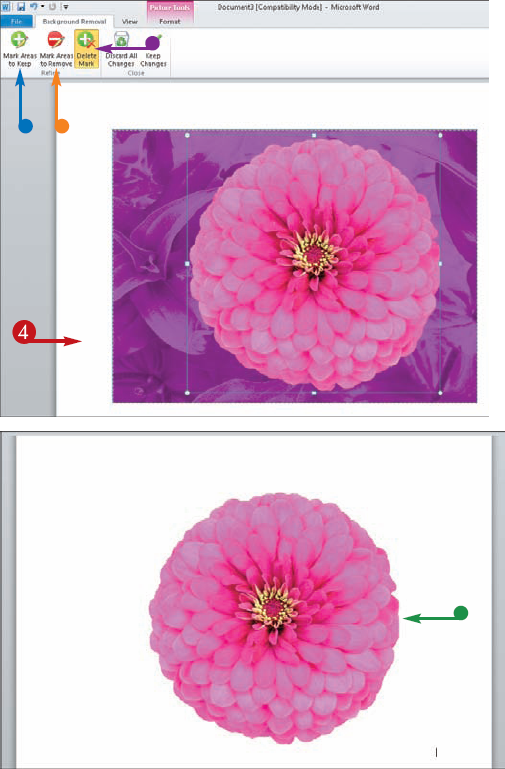
Normally you have to use a program like Photoshop to remove a background. With the new Background Removal feature, you can designate areas of the background to remove or use the marquee to cover what areas you want to keep. When you first open the feature, a magenta color overlays the image.
Background Removal tries very hard to figure out what part of the image you want to keep and what background to remove. The Background Removal tool includes a tab of tools you can use to fine-tune the procedure. You can then choose to keep your changes to the image, or discard them entirely. After editing an image, you can save it as a new picture file and reuse it again later.
The Background Removal feature is available in Word, Excel, PowerPoint, and Outlook.

The Picture Tools Format tab appears on the Ribbon.

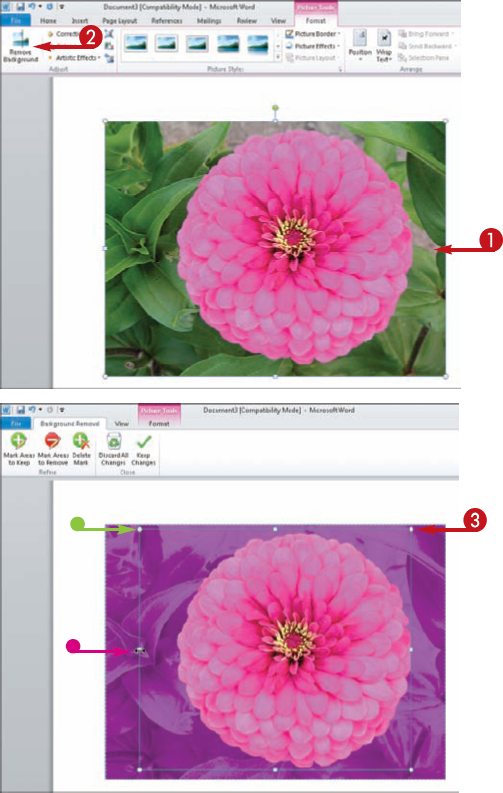
The Background Removal tools appear.


You can also move the marquee to a new location over the image.

You can connect the markers that each click creates to select an area to keep or single-click a spot in the area you want to keep.



Tip
More Options!
If you want to remove a background from a piece of clip art, you can use another technique. First you must ungroup the clip art and then delete the background element. To learn more about this, see the task "Customize Clip Art with the Ungroup Command" later in this chapter.
Try This!
The tighter the marquee around the area you want to keep, the better job the Background Removal tool does to keep the part you want in the image. Be sure to move the marquee as close as possible to the subject you want to keep. You can also use the Mark Areas to Remove button to mark along areas that prove to be difficult to remove on the first try.
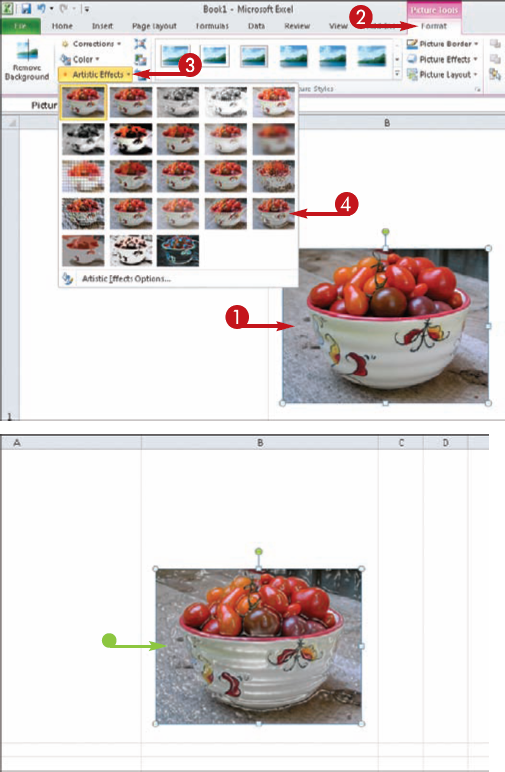
You can use the Office Artistic Effects to turn a regular picture into something eye-catching. For example, you can turn a photo into an instant chalk sketch or a negative glow with edges. If you are looking for ways to bring attention to pictures in your document, workbook, or presentation, artistic effects may be just the technique for you.
With Live Preview on, you can preview what each artistic effect looks like before you actually apply it. Live Preview is turned on by default, but if yours is not you can click the File tab, click Options, and then click the Enable Live Preview check box in the General tab to turn it on again.
With over 20 different effects you can try, it is not likely that you will run out of ideas anytime soon. However, if you do, you can also fine-tune each effect to create a new look. The Format Picture dialog box offers a tab for Artistic Effects with several tools to change settings pertaining to a particular effect, such as transparency, smoothness, and so on. Try experimenting with the options to see what kind of new looks you can create.


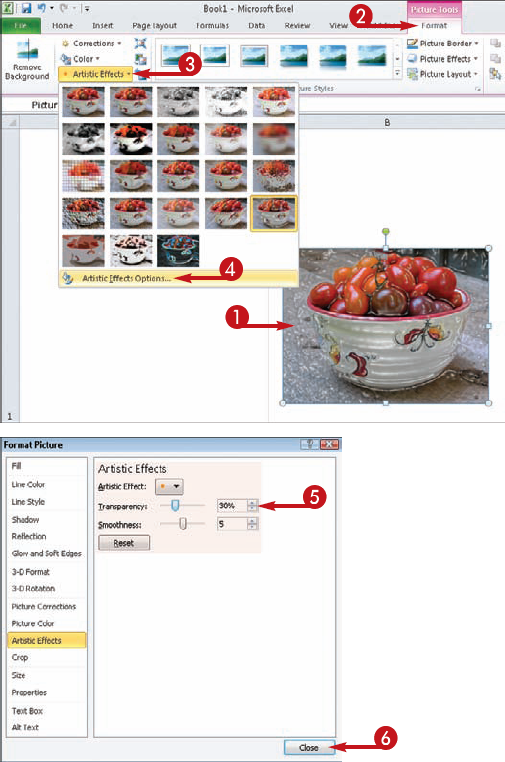
The Format Picture dialog box opens to the Artistic Effects tab.


Tip
Did You Know?
It is easy to confuse artistic effects with picture styles, especially because they are both located on the Picture Tools Format tab. Artistic effects change the entire appearance of a picture, whereas picture styles are specialized formatting for a picture that merely changes how it is presented in a document. Picture styles revolve mainly around borders and shapes, such as turning a picture into an oval by lopping off the corners, or adding a thick frame to create a border around a picture.
More Options!
You can use the Color button, also found on the Picture Tools Format tab, to change the color saturation of a picture. This feature is helpful if you want to match the image to a color scheme or theme in your document. To use the tool, click it to display a gallery of color tone, saturation, and recolor options.
Here is a technique often overlooked by Office users — the ability to change the order of elements in a document. You can create layers or stacks of graphic objects in your document, such as placing a shape on top of a photo, or moving a clip art object underneath a WordArt object. Using the ordering commands, you can control which object appears in which position in a stack. You can use this technique to create logos, letterhead, and other graphical elements.
You can apply ordering controls to text boxes, clip art, shapes, pictures, WordArt, charts, and just about any other graphic object you place in a document, workbook, presentation, or publication.
Ordering objects boils down to sending an object to the back of the stack, or to the front of the stack, or positioning it somewhere in between. To place an object at the very front, choose Bring to Front. To simply move it up in the stacking order, choose Bring Forward. To place an object at the very back, choose Send to Back. To move it backwards in the stacking order, choose Send Backward. The steps in this task show a shape object being moved through the stack of other objects.

In this example, an object is being moved from the middle of the stack.


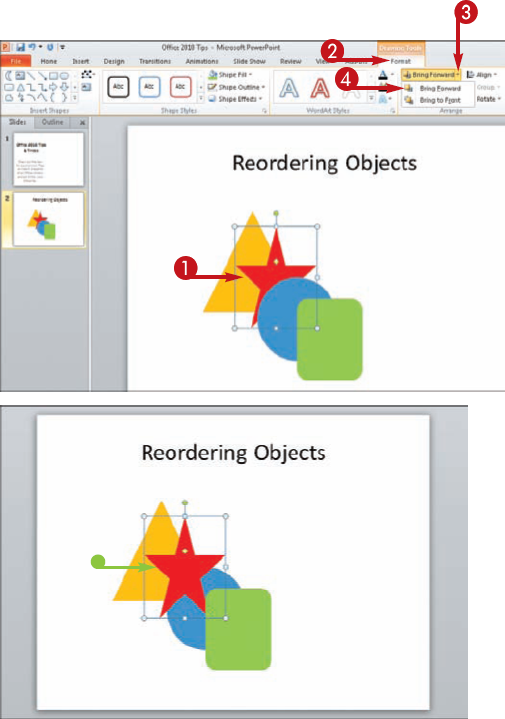
The object moves forward.


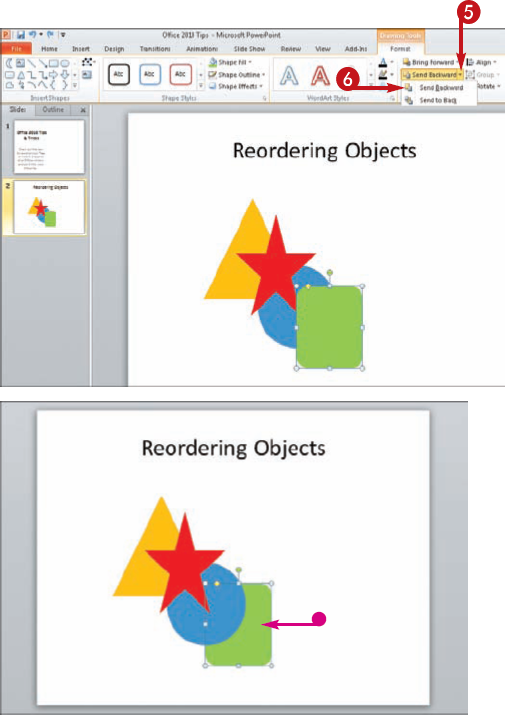

Tip
Try This!
If you are having trouble selecting objects on-screen, open the Selection and Visibility pane. Click the Selection Pane button on the Format tab for the Drawing Tools or Picture Tools. This opens the pane on the right side of the window, and you can click which item you want to select and then apply an ordering command. You can also use the Bring Forward (
Did You Know?
You can use the alignment tools on the Drawing Tools or Picture Tools tab to align shapes and other graphic elements in a document. You can align selected objects to the left, right, or center, or you can align them vertically to the top, middle, or bottom of the page. You can also choose to distribute the objects evenly across the page or up and down the page. To find all these controls, simply click the Align button and choose an alignment.
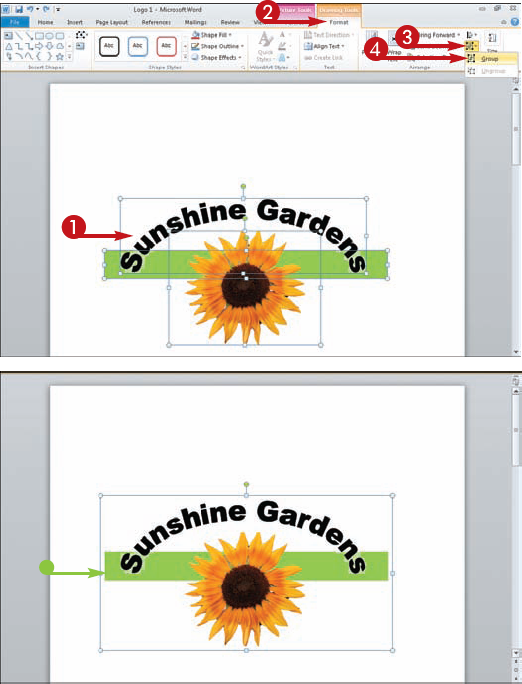
You can group several objects together in a document and perform formatting tasks to every item in the group at the same time. For example, perhaps you have a shape, a WordArt object, and a text box in your document that you want to reposition. Rather than move each object individually, you can place them all in a group and move them at the same time.
You can also group items to apply formatting, such as align them all at once, or add the same border to each one. You can even group items simply to create one large object in a document. For example, you might group three or four shapes and turn them into a graphic object you can reuse again later.
The key to grouping is learning to select multiple objects at the same time. You can do this by pressing Shift or Ctrl while clicking all the items to include in a group.
You can find grouping commands on the Format tab for Drawing Tools or Picture Tools on the Ribbon. Once you group objects, you can easily ungroup them again later to return them to their individual states.


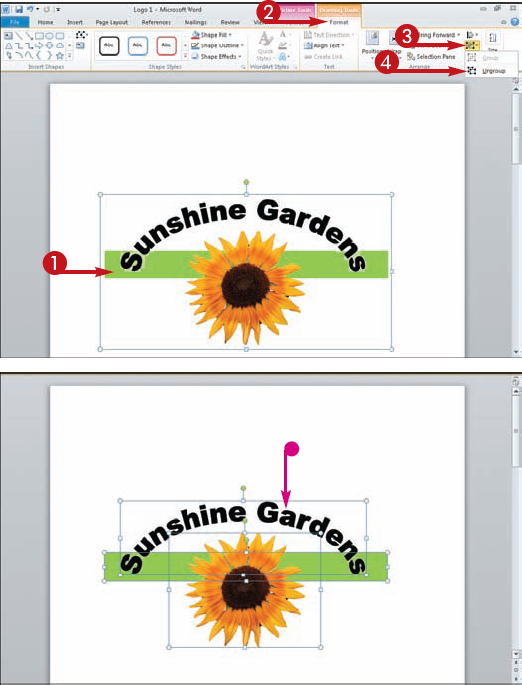

Note
If you use a lot of SmartArt graphics, you can apply the Ungroup command to ungroup the graphic into individual shapes. The only caveat to this, however, is once you ungroup SmartArt, you cannot turn the individual elements back into a SmartArt object again.
Tip
Caution!
In previous versions of Office, you used to be able to group WordArt objects with shapes and pictures. You cannot easily do so in Office 2010. The workaround for this is to pursue the steps shown in the task "Turn a WordArt Object into a Picture File" and utilize the Windows Paint program to turn the WordArt into a graphic. Copy the file back over to your Office 2010 document and paste it in; then apply the group command to group it with something else.
Did You Know?
You can nudge a selected object on-screen to position it in small increments. Simply press the appropriate keyboard arrow key. For example, press the right arrow key to nudge the selection to the right.
Do you ever have trouble finding just the right piece of clip art to illustrate your work? Maybe you can find one that is close to meeting your requirements, but it needs to be another color or lose a portion of the background. Fret no more. You can use the Ungroup command to customize a piece of clip art to meet your needs.
You can convert a clip art object into a Microsoft Office drawing object and make changes to the image's individual elements. To do this, you must apply the Ungroup command. Once you ungroup the various parts that comprise a clip art drawing, you can edit those parts to create a different piece of clip art. For example, you can change a shape's fill color, or remove an outline or delete an entire background behind the main subject.
After editing individual elements of the clip art, you can regroup the parts again to create a single object.
Note that this technique does not work for all clip art objects!


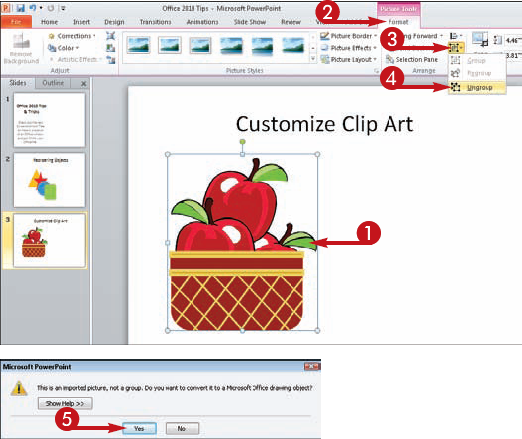
A prompt box appears asking if you want to convert the picture.

Even after okaying the conversion, you may have to repeat steps 2 to 4 again to fully ungroup the elements.
Note
Depending on the clip art's complexity, you may need to apply the ungroup command more than one time to break down individual components.


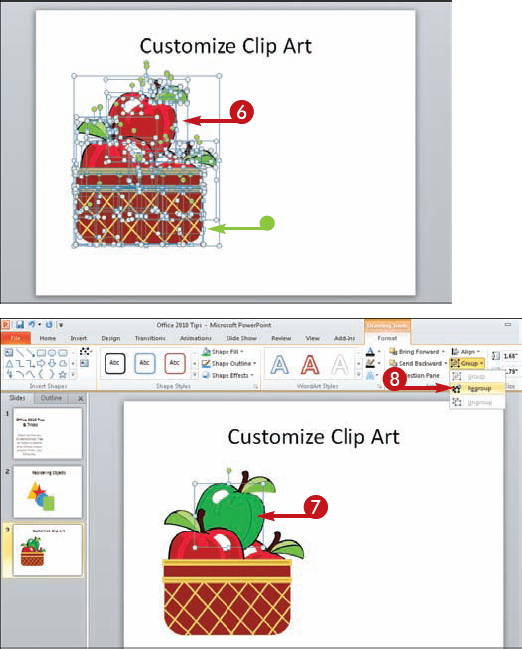


Note
You can remove all the edits you perform on a clip art image. You can use the Undo button (

Tip
More Options!
You can make adjustments to a clip art's brightness and softness settings through the Format Picture dialog box. Right-click the clip art you want to edit, and then click Format Picture. This opens the dialog box to the Picture Corrections tab. You can also find additional formatting options through all the other tabs in the dialog box, such as adding a glow or cropping the clip art.
Try This!
Looking to get rid of a background color in a clip art image? Use the Set Transparent Color tool. With the clip art selected and the Picture Tool's Format tab displayed, click the Color button and click the Set Transparent Color command. Next, click the background you want to make transparent. The background fill is immediately removed.
You can add captions to any graphics you insert into your Word or Publisher documents. Captions can really help explain what you are illustrating, such as a photo, a chart, or a graph. For a particularly long file, like a Word document, captions can help you keep track of figures by numbering them, such as Figure 1, Figure 2, or Table 1, Table 2.
The captioning feature offers you several preset captions to use, such as Figure, Equation, or Table. You can also enter your own label. You do not have to use a label. You can turn this feature off if you want.
Captions normally appear directly below the image. The captioning feature lets you control the location of your captions. For example, you might want to place a caption above a picture.
You can type your caption directly into the Caption dialog box and then apply it to the selected image.


In Publisher, click the Format tab and click the Caption button in the Picture Styles group.
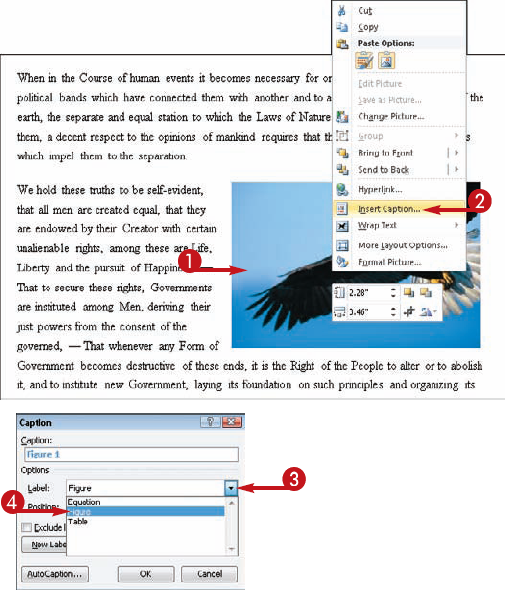
The Caption dialog box opens.


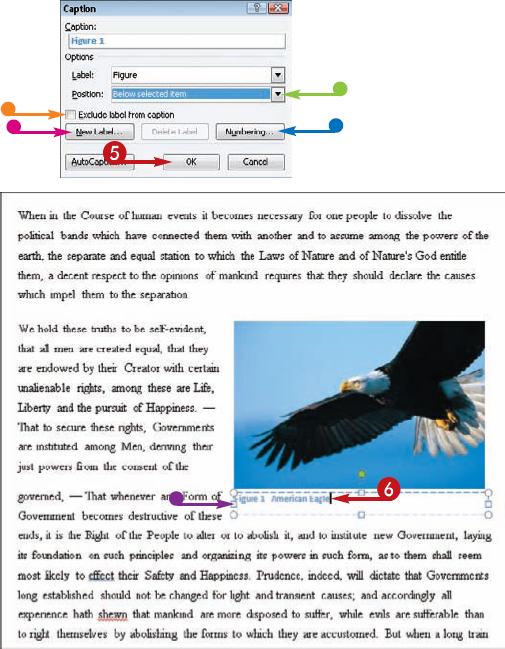


Tip
Did You Know?
You can use the AutoCaption button in the Caption dialog box to turn on the automated caption feature. This tool automatically inserts captions for you as you go. You can select from a list of items, such as Microsoft Excel Chart or Bitmap Image. Whenever you go to insert the designated object, AutoCaption adds the appropriate caption with the sequential number assigned.
Try This!
Another way to add a caption to an image is to insert a text box directly below the image. Use this method if you do not want to rely on a numbering system and prefer to just use text captions only. To add a text box, click the Insert tab on the Ribbon and look for the Text Box button. Once activated, you can click and drag where you want to insert a text box, and then fill it with the text you want to use.
You can use the Office 2010 WordArt feature to create custom text designs, such as arched text for a logo or shaded text for a document title. For example, if you create a company logo in a Word document using a WordArt object, you can convert the logo into an image file that you can use with another program, such as a page-layout application, or with another Microsoft Office program.
Although you cannot save a WordArt object as its own file type in Word or Excel, you can use another easy avenue to convert the object into an image format that non-Office programs can use. By using the Windows Paint program, an application that installs with Windows, you can copy the WordArt object and paste it into the Paint window, and then save the object as a graphic file. Popular graphic file formats include bitmap, GIF, JPEG, and PNG.
The real trick to this technique is remembering to crop the graphic in the Paint window so you end up with a properly sized graphic object.


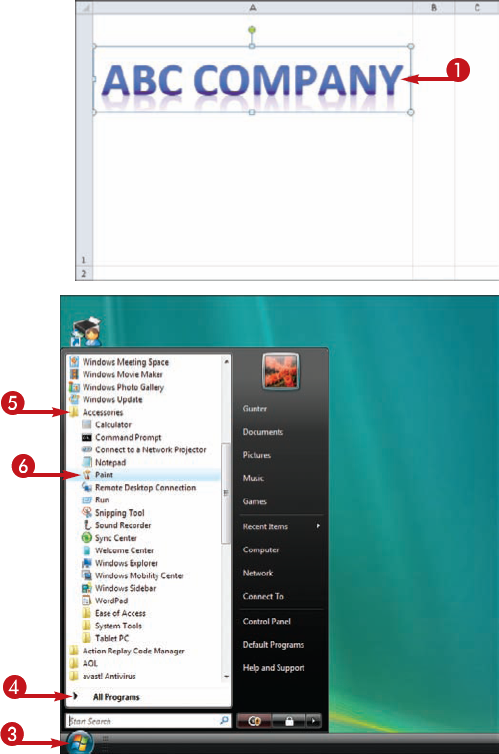


The Paint program opens.


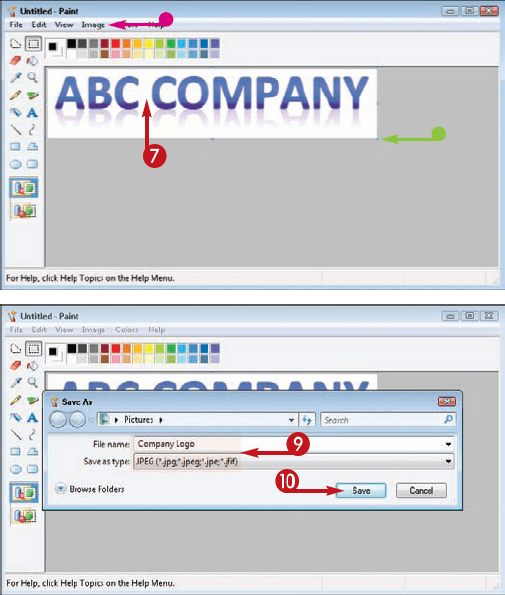

Note
If you are using Windows 7, you can use the Crop command on the Ribbon's Home tab to crop an image.


You can now insert it into other programs as a picture.
Note
When it comes to choosing a file format, you cannot go wrong with JPEG, GIF, TIFF, or PNG formats. Any of these four file types are commonly used among applications and the Web.
Tip
Try This!
PowerPoint and Publisher are the only Office 2010 programs that let you save a WordArt object as a picture file. Just right-click the object and choose Save As Picture. This opens the Save As Picture dialog box where you can name the file and save it as a specific file format.
More Options!
Windows Paint is not the only program you can use to turn a WordArt object into a graphic file. You may have other drawing programs installed on your computer you can use instead. Windows Paint, however, is already installed as part of the Windows applications that come with the operating system.
A watermark is a recognizable background image or words that appear faded yet still discernable behind the document's content. Apart from the realm of computers, watermarks are typically security features found on paper money, passports, and postage stamps, usually as a way to verify authentication and prevent counterfeiting. Over in the world of business and computer-generated documents, watermarks are commonly used in official letters, a way to brand output, or as Web page backgrounds.
In this task, you learn how to insert a graphic as a watermark. In Word, the Watermark feature is set up to insert text watermarks. You can use a text watermark to mark a document as a copy, an original, confidential, or urgent. Going the extra step of using a graphic takes a little more planning. For example, you might want to use a company logo as a watermark, or a branding logo.
When using an image as a watermark, legibility is the key issue. You want to make sure the document's text is clearly readable over the image. As you create a custom watermark in Word, you can control the scale of the image. The Washout setting is selected by default, to create the faded appearance for the background.


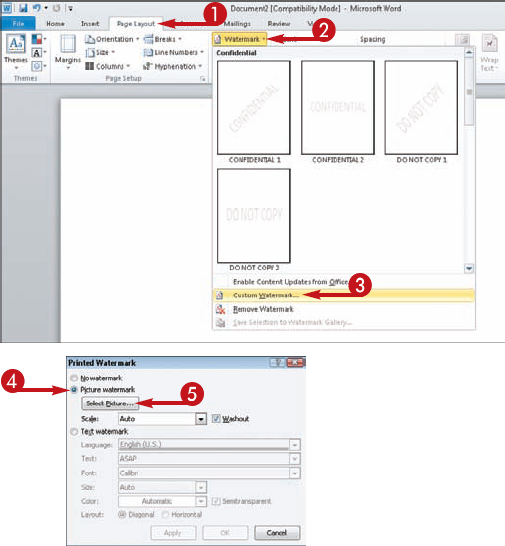
The Printed Watermark dialog box opens.


The Insert Picture dialog box opens.


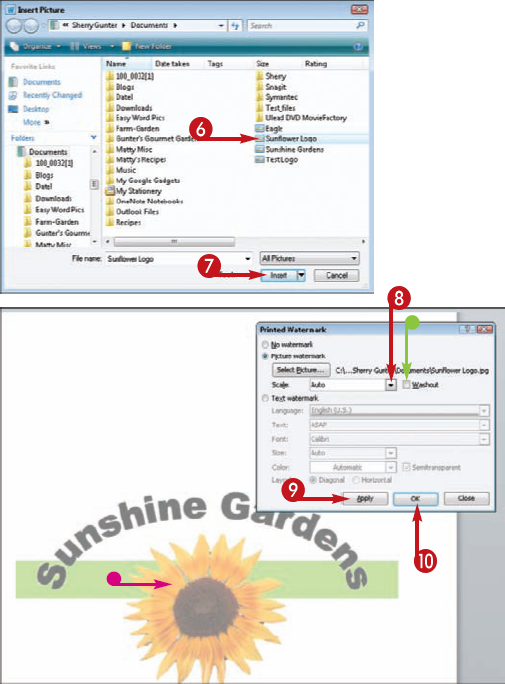


Tip
Try This!
You can also create your own text watermarks rather than choose from the preset list. To do so, open the Printed Watermark dialog box and click the Text Watermark option (
Try This!
You can simulate a watermark in Excel by assigning a picture as a workbook background. To do this, you must first make sure the image you want to use is set to the degree of transparency needed so your data is clearly legible on top of the image. You can use a photo-editing application to adjust the image transparency before using it in Excel. Once you have an image ready, click the Page Layout tab on the Ribbon, and then click the Background button. The Sheet Background dialog box opens, where you can navigate to the file you want to use.
If you plan on inserting graphic elements into your file, it is a good idea to learn the various ways in which you can wrap text around the graphic. Text wrapping refers to the way in which text flows around a graphic object in the document. Whether you insert a photograph, clip art, or a basic shape, you can use the text wrapping tools to assure just the right fit. You can find text wrapping tools in Word and Publisher.
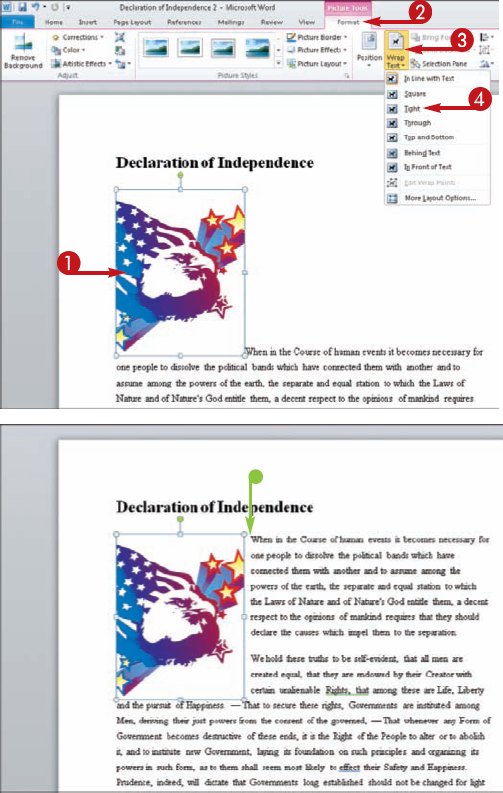
As far as wrapping options go, you can choose from a variety of settings. By default, text is set up to wrap an object inline, which simply means the object sits on the same horizontal line as the text. Alas, this setting is a bit limiting and the object sits there like a sore thumb without blending into the document. Instead, try choosing one of these text wrapping settings: Square, Tight, Through, Top and Bottom, Behind Text, or In Front of Text.
Thankfully, the names are pretty accurate as to how the text wrap is going to appear in the document. If you choose Tight wrapping, for example, the document text flows fairly closely to and around the object. Try them all to see what works best for your document.


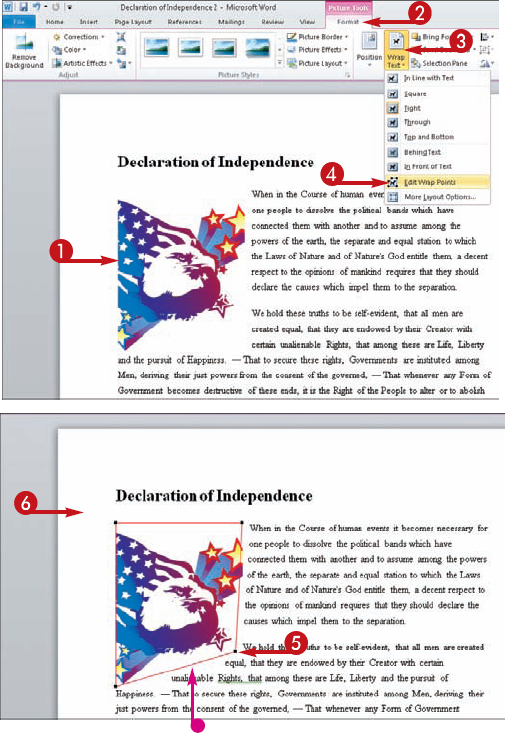


Note
To turn off text wrapping, click the Wrap Text button and choose In Line with Text.
Tip
Did You Know?
Excel also has a text wrapping option you can apply in cells, but it works a bit differently than wrapping around an object. If you type a line of text or numbers that exceeds the column width, you can tell Excel to wrap it to the next line rather than expand it across columns. Click the Wrap Text button located on the Home tab among the Alignment controls to turn the feature on.
More Options!
You can find a few more text wrapping controls in the Format dialog box for the object you are trying to wrap. To open the dialog box, select the object, click the Wrap Text button and click More Layout Options at the bottom of the menu. This command opens the Layout dialog box to the Text Wrapping tab, and you can find several additional controls for wrapping text on one side or the other, or specifying an exact distance (this option is available only when you choose Square text wrap).
When you install Microsoft Office, it includes several extra applications stored in the Microsoft Office 2010 Tools folder. One of these extra apps is Microsoft Picture Manager, a simple image-editing program that allows you to manage, edit, and share your digital picture files. The program provides you with a centralized location for viewing all picture files stored on your computer.
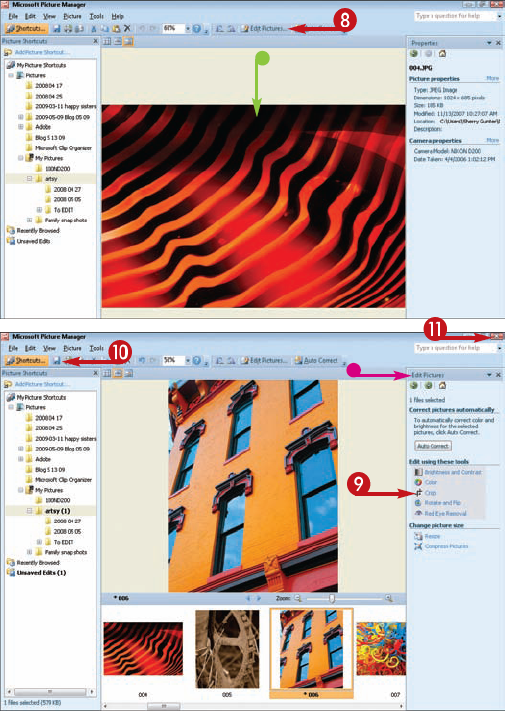
You can easily find pictures located in other folders on your computer and view them in the Picture Manager window. The program includes several useful tools for editing your pictures, such as cropping, reducing red eye, adjusting brightness and contrast, and resizing. After you edit your pictures, you can share them with others. Picture Manager includes tools for e-mailing pictures or placing them in a SharePoint Picture Library to share with a workgroup.
You can also send pictures directly to an Office program. You can insert a selected image directly into an open file, or add the image to a new file.
If you make changes to a picture, such as resizing or cropping, Picture Manager keeps track of your unsaved edits and keeps them in the Unsaved Edits folder.
Tip
More Options!
You can find a bevy of editing tools in the Edit Pictures pane. You can edit the brightness and contrast of an image, adjust the color, crop a picture, rotate and flip a picture, remove red eye, resize a picture, and compress the picture file size. Do not forget to save the changes before closing Microsoft Picture Manager. You can also save a copy of the picture and keep the original intact. Just click the File menu and click Save As.
Try This!
To remove a picture you no longer want, select it and click the Delete button (
