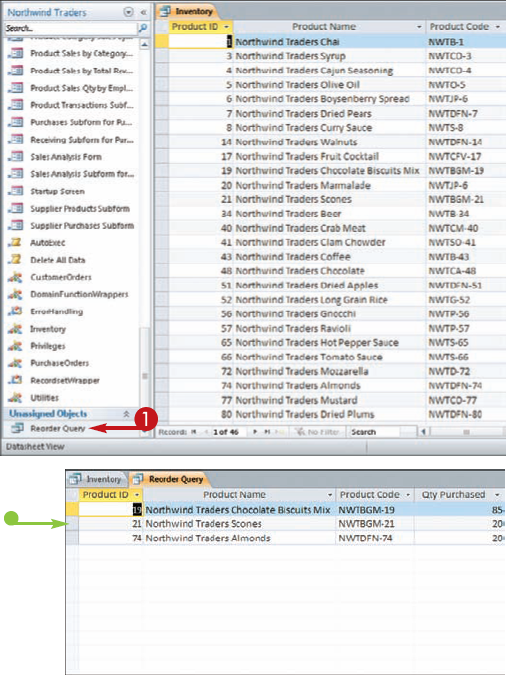
Access 2010 is a program for creating databases to store business or personal information. You can use Access to create, retrieve, and manage large or small collections of information. To make it easier for you to create databases, Access provides several built-in templates, as well as additional templates online.
In Access, data is stored in tables. Each individual entry in a table is called a record. For example, in a Customers table, the information about each customer is a separate record. Each record is composed of one or more fields, which contain individual pieces of data. For example, a customer field might include a name, address, city, state, or ZIP code.
By default, tables appear as spreadsheet grids called datasheets, similar to the worksheets found in Excel. You can type directly into a datasheet. To make data entry more convenient, however, some people prefer to use forms, which are like dialog boxes that prompt for field entries. You can also import data from other programs such as Excel and Outlook.
You can filter the tables in a database to display only certain records, only certain fields, or both. You can run a one-time filter or you can create a query, which is like a saved filter. Tables and query results appear in plain datasheets, which are not very attractive when printed. In contrast, a report presents data from tables and queries in an attractive, customizable format.
Save Time with Templates. 216
Import Data from Excel. 218
Collect Data from Outlook. 222
Type Less with Default Values. 226
Make a Field Required. 227
Set a Field Caption. 228
Copy a Previous Record. 229
Apply Input Masks. 230
Set Data Validation Rules. 232
Attach Files to Records. 234
Insert an OLE Object. 236
Save a Filter as a Query. 238
Display Summary Statistics. 240
View Object Dependencies. 241
Document the Database. 242
Export a Report to Word. 244
Create Mailing Labels. 246
Automate Access Tasks with Macros. 248
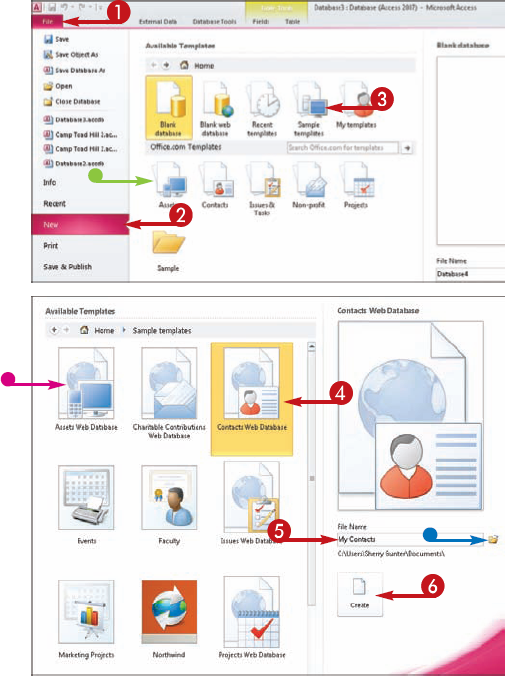
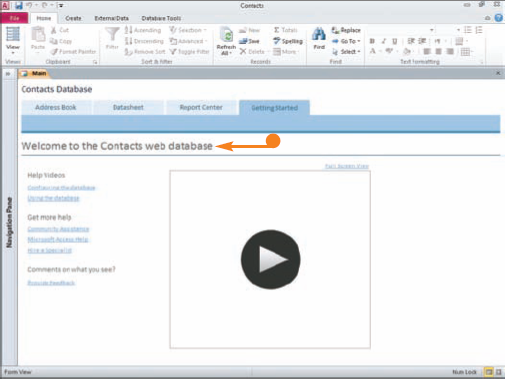
To expedite the database creation process, Access provides several built-in database templates. A template is a ready-to-use database that contains all the necessary components — tables, forms, reports, queries, macros, and relationships — to track a specific type of data. You can use a template database as is or customize it as needed.
In addition to the templates that install with Access, you can also use templates available on Office Online. To download an Office Online template, click a template category under the Office.com Templates area in Backstage view, click the desired template from the list that appears, and click Download on the right side of the screen. Access downloads the template for you and opens it when the download is complete.
In addition to creating databases with templates, you can create forms within a database by using a template. Each Access form template contains a pre-created set of fields, so you do not have to create fields manually. Templates work well when you need a standard form with common fields. To create a form from a template, click the Create tab in the Ribbon, click Application Parts, and choose from the list of templates that appears.
Tip
More Options!
Looking for more templates? With an online connection, you can conduct a search for more templates on the Office Web site. Click in the search box in Backstage view and type a keyword or phrase, and then click the search arrow or press Enter. Access connects to the Web site and any resulting matches appear listed. You can also conduct a search on the Internet for other sources of Access template files. Some sources charge a fee for special template files; others may be free for downloading. Always use caution when sharing files from unsecure sites, making sure your virus protection and other safety measures are on and functioning.
Did You Know?
You can share your Access database files on the Web with assistance from Access Services in Microsoft's SharePoint Server 2010. You can also export your database files to PDF or XPS file formats, making it easy to share across platforms. In previous versions of Access, PDF and XPS formats were supported only through the help of add-ins you had to install. With PDF and XPS formats, you can capture all of your database information in a way that is easy to distribute via e-mail, Web storage, or portable storage media. Be sure to check out all the export options found on the External Data tab on the Access Ribbon.
Suppose you have an Excel worksheet that contains data you want to include in an Access database. You can import the worksheet right into Access, creating a new table. This table becomes part of the Access database; it does not retain any ties to Excel. (Note that in addition to importing the spreadsheet in its entirety, you can also import portions of it.)
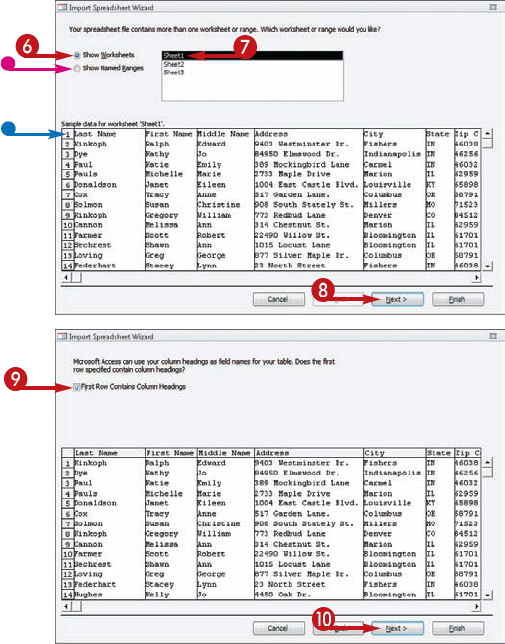
For Excel data to import correctly into Access, it must be set up to mimic a datasheet in Access. Specifically, field names should appear in row 1; each record should be on its own row; and no formulas or functions should be included.
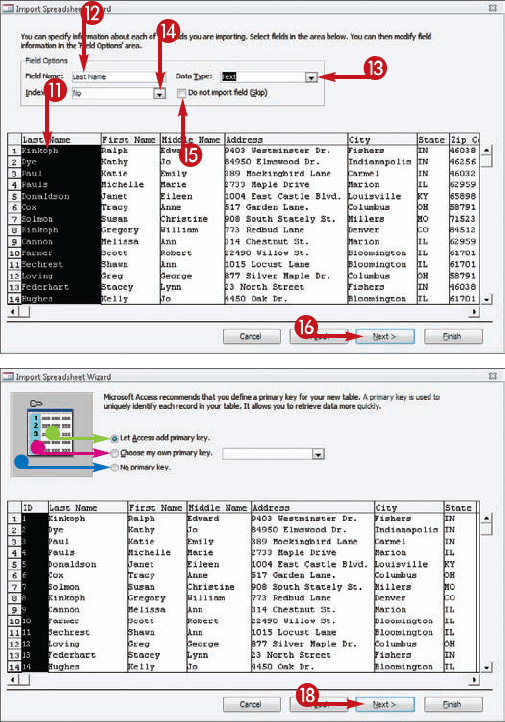
You use the Import Spreadsheet Wizard to import Excel data into Access. When you do, the wizard asks you various configuration-related questions, such as whether fields in the table you are creating should be indexed and whether duplicates are okay. It also gives you the option to name the table.


Note
Be careful not to confuse the Excel button in the Import & Link group with the Excel button in the Export group.
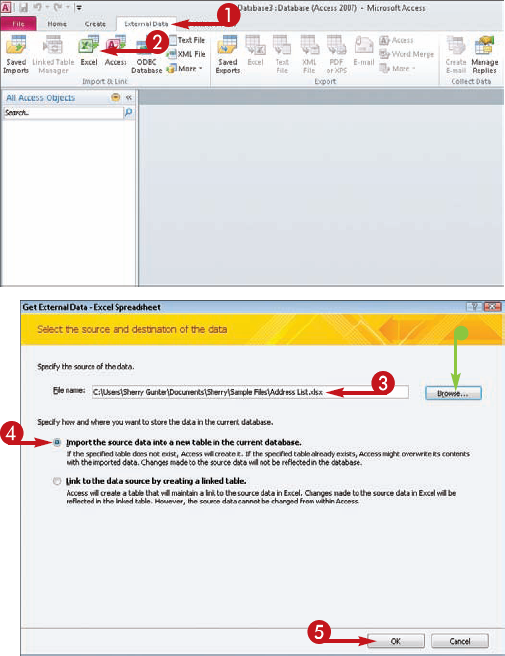
The Get External Data – Excel Spreadsheet dialog box opens.


The Import Spreadsheet Wizard starts.




Tip
More Options!
To link an Excel worksheet to your Access database rather than import it, use the Link Spreadsheet Wizard. To launch the wizard, choose the worksheet to which you want to link and then click to select the Link to the Data Source by Creating a Linked Table radio button in the Get External Data – Excel Spreadsheet dialog box and follow the on-screen prompts. After creating the link, any changes you make to the source data in Excel are immediately reflected in the linked table in Access. You cannot change the data in Access, however, to reflect back in the source data. The link works only in one direction.
Did You Know?
You can also export Access data into Excel in the structure of a table, form, query, or report. Although you cannot export multiple database objects in all at once, you can use the Excel tool on the External Data tab on the Access Ribbon to export objects into your workbook files. Click the Excel button in the Export group of tools on the tab to open the Export – Excel Spreadsheet Wizard to get started. The wizard walks you through the necessary steps to choose an object and a file format to export.
As you step through the Import Spreadsheet Wizard, you are given the option to set a primary key. A primary key is a field or set of fields in a table that contains a unique identifier for every record. For example, if your table contains customer information, the primary key would likely be the field that contains a unique ID number for each customer. If none of the fields in your imported data contain unique information, you can prompt the Import Spreadsheet Wizard to create a primary key for you; when you do, a new field is added that contains a unique number for each record.
If the data you are importing will be regularly updated in Excel, it might be wise to link your Access database to the Excel worksheet instead of importing the spreadsheet into the database. That way, each time you open the linked worksheet in Access, it will contain the most recent data. To link a worksheet to an Access database, you use the Link Spreadsheet Wizard.




Note
The default name is the name of the tab from the worksheet.

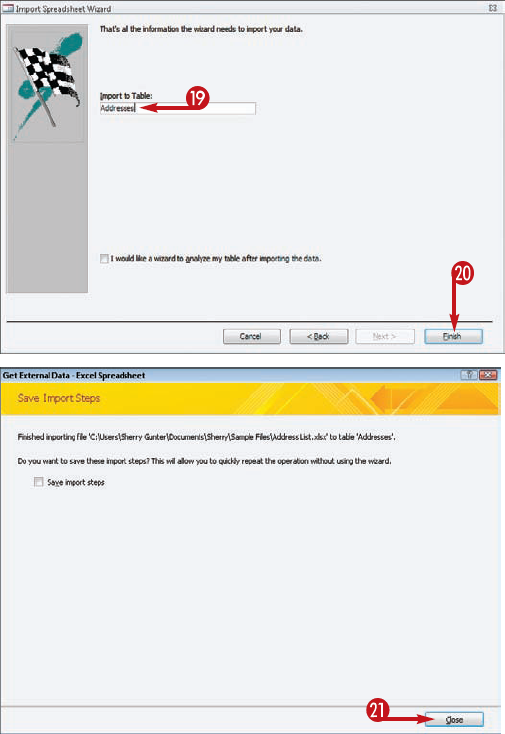
Excel prompts you to complete the import process.

The Excel worksheet is imported as a new table.
Tip
Did You Know?
You can prompt Access to analyze your imported data by selecting the I Would Like a Wizard to Analyze My Table after Importing the Data check box in the final screen of the Import Spreadsheet Wizard. When you click Finish, Access launches the necessary wizard to analyze your table. Not all of Excel's features import into Access. For example, graphical elements such as pictures and charts are not visible in Access. You can also open your data in Datasheet view any time you want to check the data over for possible errors later.
Did You Know?
You can also use the tried-and-true Cut, Copy, and Paste commands to move data from an Excel workbook file over to an Access database file. Anytime you cut or copy data using the Cut or Copy commands, the data is placed on the Windows Clipboard where you can paste it into other files, including an Access table.
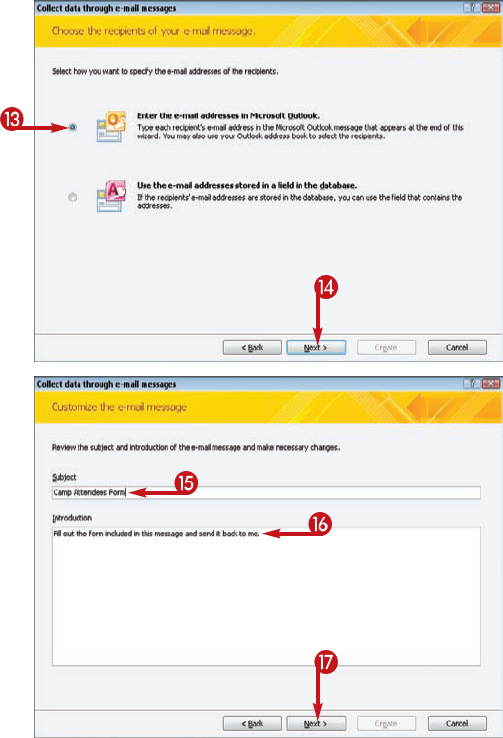
Suppose you want to conduct an e-mail survey and track the results using an Access database. In that case, you can create a data-entry form that can be e-mailed to others via Microsoft Outlook. When a recipient of your survey completes the data-entry form and returns it to you via e-mail, you can assimilate the data he or she has shared into your Access database the instant the message lands in your inbox. You create and distribute the data-entry form using the Collect Data Through E-mail Messages Wizard. Note that the recipient of your e-mail need not use Outlook in order to complete the data-entry form the e-mail contains; any e-mail program will do.
You have two options with regard to what types of forms to include in your e-mail message: HTML or InfoPath. If you are not certain whether all the recipients of your message have the necessary software to view and interact with InfoPath forms, opt for HTML.
Using Outlook as a data-collection tool also works well for gathering and tracking status reports and organizing an event.


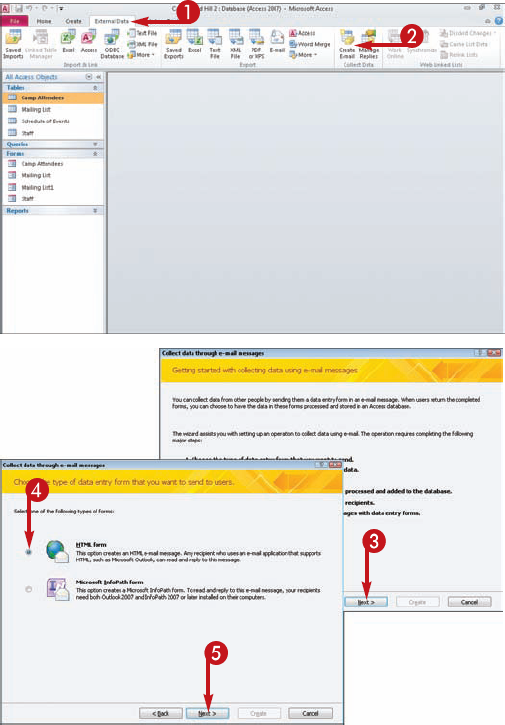
The Collect Data Through E-mail Messages Wizard starts.




Tip
More Options!
If you know that all the recipients of your e-mail form have the necessary software to handle InfoPath forms (for example, if you are polling users in your company only, and your IT department has assured you that their computers have been configured to handle InfoPath forms), then you might prefer to use that type of e-mail form over HTML. InfoPath forms are generally easier to use, and provide a better data-entry and editing environment. In addition, InfoPath forms can be configured to validate the data submitted by the user when he or she clicks Send. If any of the entered data is deemed invalid, InfoPath enables the user to correct his or her responses before submitting the form.
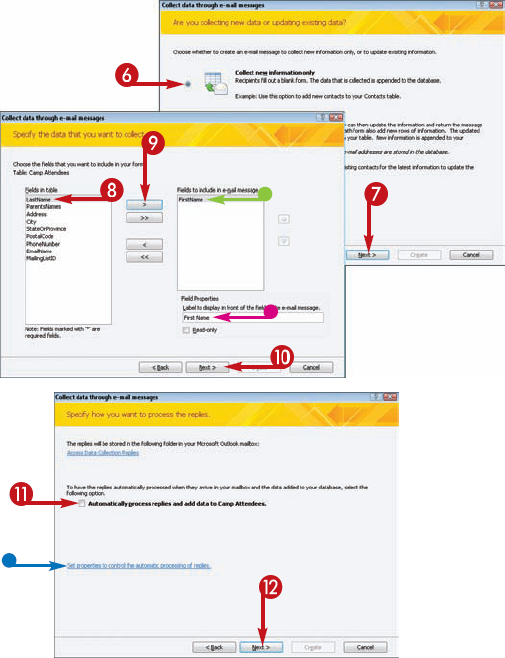
As you step through the Collect Data Through E-mail Messages Wizard, you are asked a series of questions. One is whether you want Access to automatically process replies to your e-mail when they arrive in your inbox and add the data those replies contain to your database. (Note that if you opt to process the data manually, you are not relegating yourself to tedious data entry; you simply launch the export operation that automatically transfers the collected data to your table by hand.)
You can also specify whether you want to enter the addresses of your recipients from within Outlook, or to use the addresses as they appear in your Access database. (Note that if you choose the latter, you are asked to indicate the table and field from which you want to draw the e-mail addresses.) When prompted, you can type a subject for the form e-mail, as well as any message text you want the e-mail to contain.
As you navigate the wizard steps, remember the options may vary based on the selections you make.




The wizard prompts you to create the e-mail message.

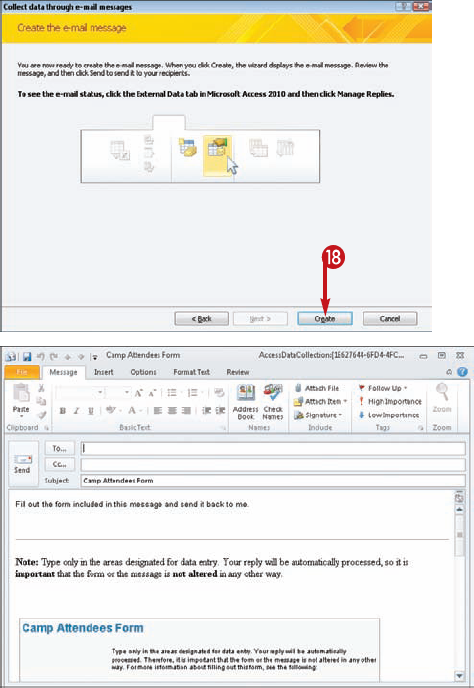
Access creates the e-mail form and launches an Outlook New Message window where you can address and send the message.
Tip
Important!
When someone receives your e-mail message containing a data-collection form, he or she can click Reply, respond to the prompts in the form, and then click Send. Depending on how you set up your form, either Outlook and Access will work together to automatically update your database with the submitted information, or you can manually launch an export operation from within Outlook to assimilate the data into your database. To do so, right-click the reply in your inbox that you want to process and click Export Data to Microsoft Office Access. Review the reply in the dialog box that opens and click OK.
Try This!
To resend a data-collection e-mail message, open the database containing the original message, click the Ribbon's External Data tab, and click Manage Replies in the Collect Data group of tools. The Manage Data Collection Messages dialog box opens; click the message you want to resend, click Resend This E-mail Message, and follow the on-screen prompts. You can use the Manage Data Collection Messages dialog box to view information about the messages, delete messages, and perform other management activities.
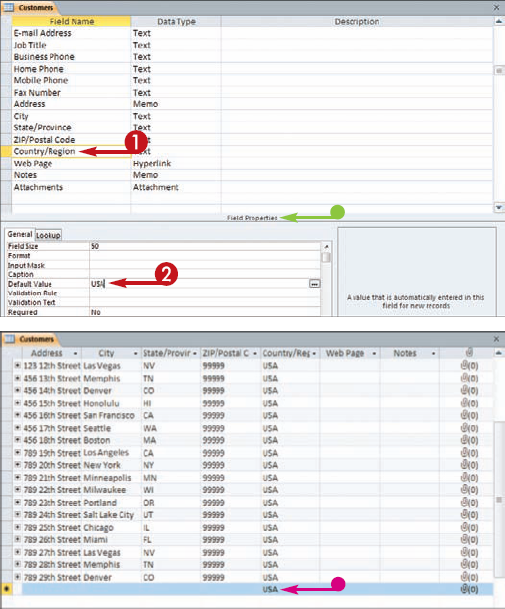
Suppose you are creating a form to record customers' contact information. If your business is limited to a certain state, you might make that state the default value in the State field. In this way, you can speed up data entry.
You can set default values for fields that use the following data types: Text, Memo, Number, Date/Time, Currency, Yes/No, and Hyperlink. If you do not set a default value, the field remains blank until a value is entered.
Note that in order to set a default value, you must open the table containing the field for which you want to set the value in Design view. To do so, right-click the table in the Navigation pane and choose Design View from the menu that appears. Alternatively, if the table is already open in another view, right-click the table's tab and choose Design View.


Note
When you move away from the text box, Access automatically adds quotation marks around what you typed.


Note
The default value does not automatically populate existing records.
A primary key field is always required for each record. (As mentioned in the task "Import Data from Excel," a primary key is a field or set of fields in a table that contains a unique identifier for every record. For example, if your table contains customer information, the primary key would likely be a field that contains a unique ID number for each customer.)
You are not limited to making the primary key field required, however. You can make other fields required as well. (Note that doing so does not change the primary key setting.) When a field is required, Access does not enable users to move past it during data entry until they have entered a value in the field.
In order to set a field as required, you must open the table containing the field in Design view. To do so, right-click the table in the Navigation pane and choose Design View from the menu that appears. Alternatively, if the table is already open in another view, right-click the table's tab and choose Design View.


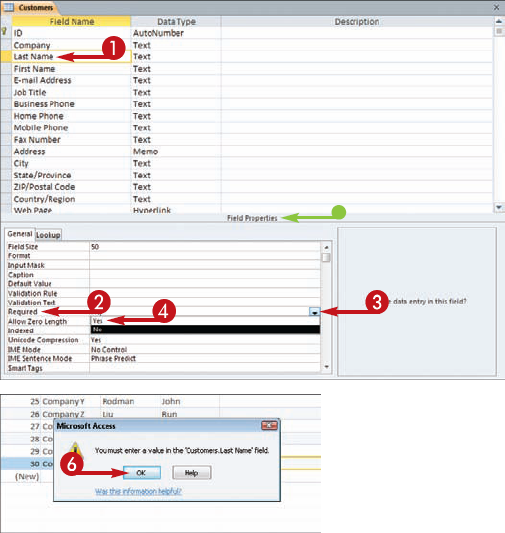
If you or another user attempts to enter a new record in the table, a warning appears if you do not enter a value in a required field.

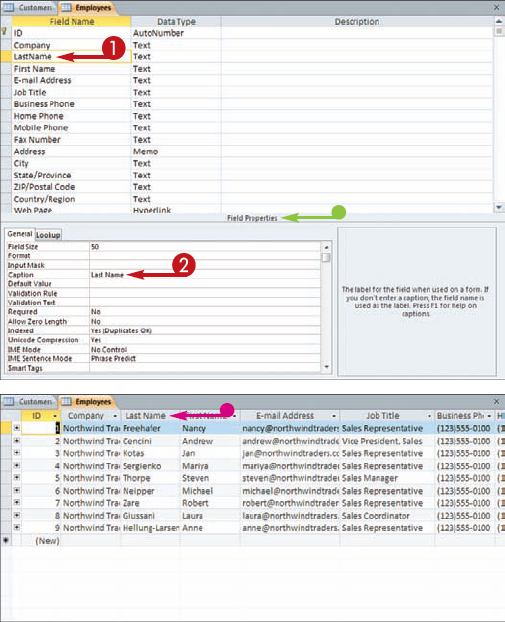
If a field in your table has an ambiguous or grammatically incorrect name, you can apply a caption to the field. For example, you might add the caption "Last Name" (note the space) to make a LastName field easier to identify. Captions appear in datasheet headings and on labels in forms and reports, so making them easy to understand can go a long way in speeding up the reading of your Access data.
To apply a caption to a field, you must open the table containing the field in Design view. To do so, right-click the table in the Navigation pane and choose Design View from the menu that appears. Alternatively, if the table is already open in another view, right-click the table's tab and choose Design View. You can also use the view tools on the Ribbon's Home tab to switch views, or the view icons in the lower right corner of the Access program window.
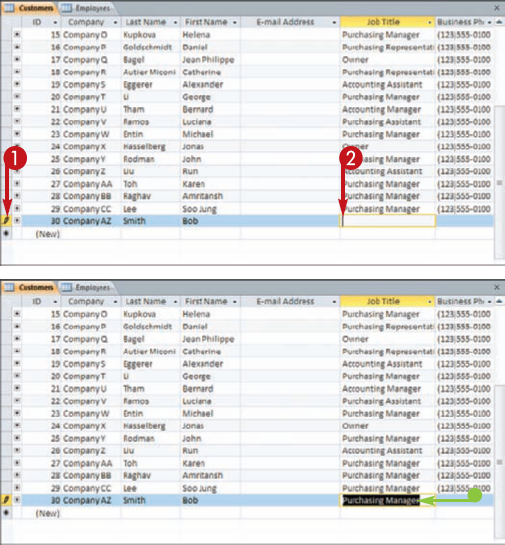
If you are entering the same value in the same field in a table or form over and over again, you can use a shortcut technique to copy the value of the previous record. Rather than retype it each time, you can summon the value with a keyboard shortcut. This can really reduce the amount of time you spend entering records into tables or forms.
To make the best use of this technique, type your record data in a table using Datasheet view. This allows you to easily see the previous record's values and determine if you need to re-enter the same information again.
This technique makes use of a little-known shortcut key. You can create all kinds of other custom shortcut keys to help you navigate through your database. For example, open a form in Design view and select the Caption property of a field name to which you want to navigate. Type an ampersand before the letter that you want to act as a shortcut key, such as P&hone. Save your changes and switch to Form view. Access adds an underscore to the letter you designate as your navigation shortcut. To navigate to the field in Form view, press Alt+H.
You can apply an input mask to a field to help minimize data-entry errors. Although it sounds rather like a beauty product you might smear onto your face, input masks help users enter the proper number and type of characters. They do so by providing a template for entering data in the field. For example, you might implement an input mask to include parentheses for the area code portion of a telephone number. Input masks act like quality control checks, helping users know what sort of data they are expected to enter into a table or form.
Access provides several predefined input masks from which you can choose. If none of these predefined input masks quite suits your needs, you can customize an input mask.
To apply an input mask to a field, you must open the table containing the field in Design view. To do so, right-click the table in the Navigation pane and choose Design View from the menu that appears. Alternatively, if the table is already open in another view, right-click the table's tab and choose Design View.


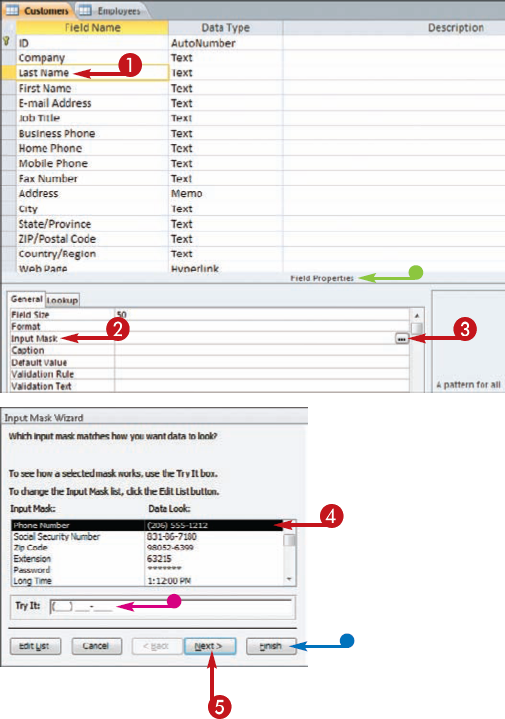
The Input Mask Wizard appears.


Note
See the tip for help.


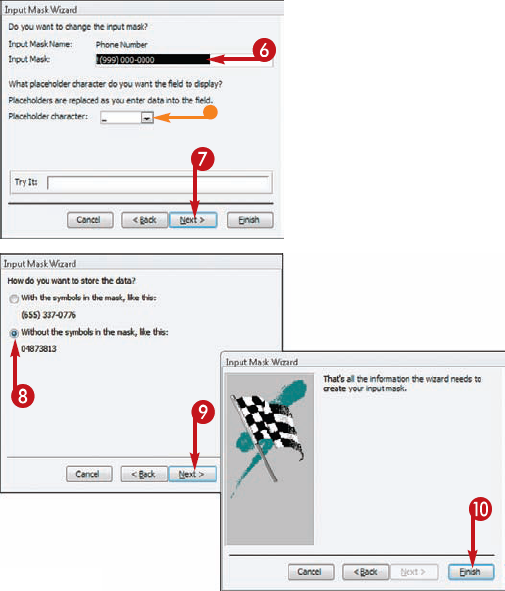

Note
The option you select here determines how the data looks if you export it. If you do not export it, your selection here does not matter.


Tip
Try This!
Input masks use special characters to represent the types of data they can accept. You use these special characters to customize an input mask. The following table contains the most commonly used characters; for more information, look up "Input Mask Character Reference" in Access Help.
Character | Use |
|---|---|
0 | Single digit, required |
9 | Single digit, optional |
# | A digit, space, plus sign, or minus sign |
L | Single letter, required |
? | Single letter, optional |
A | Single letter or number, required |
a | Single letter or number, optional |
& | Any character or a space, required |
C | Any character or a space, optional |
Input masks help users enter the proper number and type of characters, but they cannot restrict the field to certain entries based on logic. That is where data-validation rules come in. You can construct a validation rule that forces field entries to pass a logical test of their validity. For example, you could make sure that negative numbers are not entered into a numeric field. You can also create validation text, a custom message that appears when the rule is violated.
You create data-validation rules using Expression Builder. It can guide you in determining the correct syntax for an expression. There are many types of expressions available in Expression Builder, including functions, constants, and operators. For example, you can create an expression to primarily test data including checking for one in a series of data, such as "New York" Or "Los Angeles" Or "Tokyo." You can also use expressions to perform mathematical operations, such as >5 which forces the user to enter values greater than 5. The possibilities are endless.


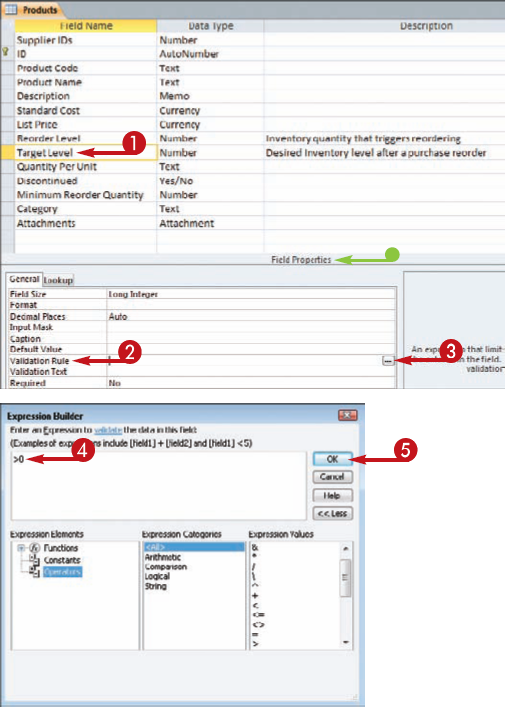
The Expression Builder dialog box opens.


Note
You could have simply typed the validation rule into the row and skipped steps 3 to 5, but Expression Builder's tools can be useful for complex expressions.


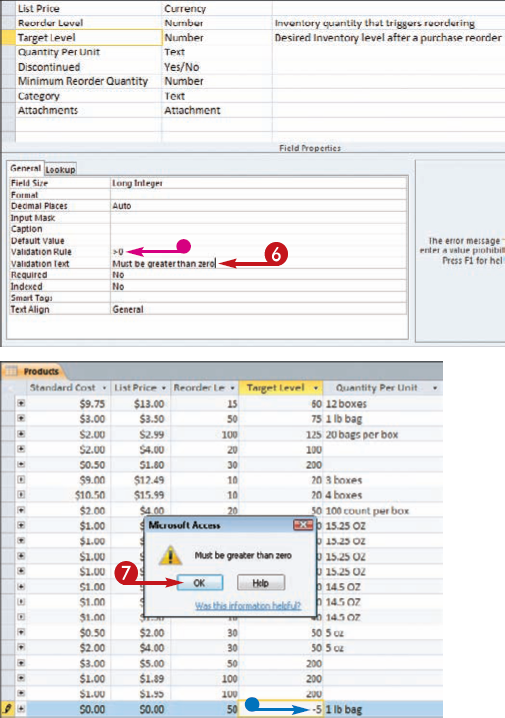


Tip
Did You Know?
You can create two types of data validation rules in Access: field validation rules and record (or table) validation rules. Field rules check the values entered into a field, whereas record rules control how you save a record in a table. As an example of a data validation rule, perhaps your table has a Date field, but you only want users to input dates on or after January 1, 2011. Your validation rule might look like this in the Expression Builder dialog box: >=#01/01/2011#. Such a rule prevents users from leaving the field until they enter the correct date. For a record validation rule, perhaps you are required to ship products within 30 days, so your record validation rule might ensure that no one ships anything with the wrong date. This type of rule might look like this: [RequiredDate]<=[OrderDate]+30.
Suppose you are maintaining a database of job candidates, and you want to attach each candidate's resume to his or her record. You can easily do so using Access. A single record can have multiple attached files of various types.
You can add an attachment to a record only if the table containing the record includes an Attachment field. To insert a field into a table, open the table in Design view, click the field above which the new field should appear, and click Insert Rows. Type a name for the new field in the Field Name column; then click in the Data Type column, click the drop-down arrow that appears, and choose Attachment.
To add an attachment to a record, the table containing the record must be open in Datasheet view. If it is not in Datasheet view, right-click the table's tab in the Access screen and choose Datasheet View in the menu that appears. Attachment fields are marked by a paperclip. The number in parentheses is the number of attachments the field currently contains.

The Attachments dialog box opens.

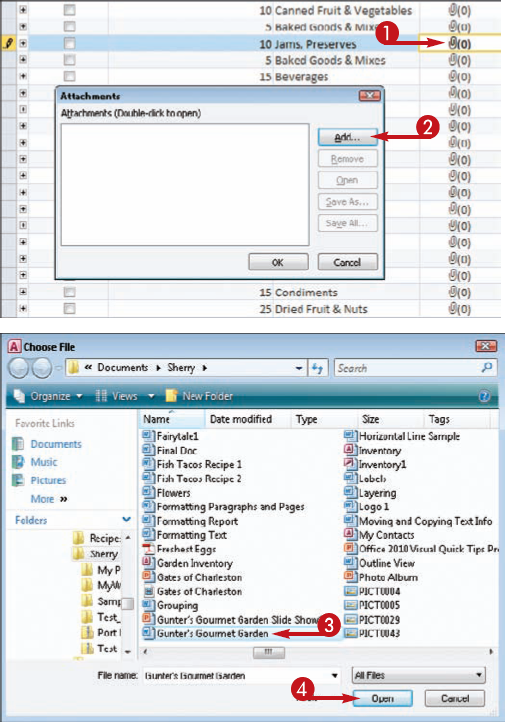
The Choose File dialog box opens.


You can repeat steps 2 to 4 to attach more files if necessary.

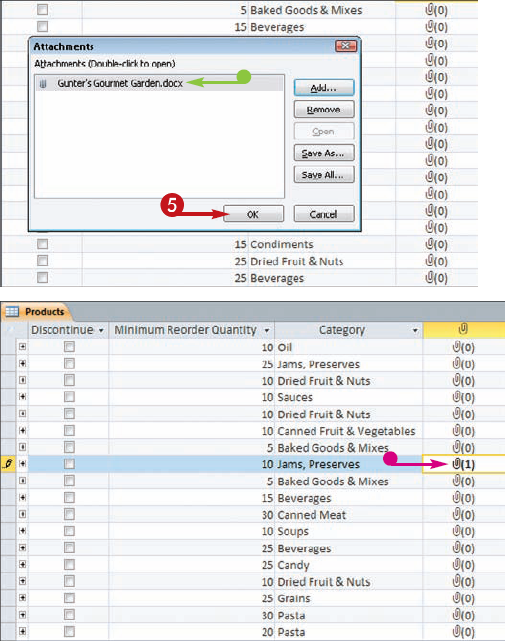

Tip
More Options!
After you have attached files to a record, you can open those files, save them as separate files outside of Access, or remove them from Access at any time. You do so from within the Attachments dialog box. To open the dialog box, double-click the Attachment field that contains the attachment you want to work with. Then click the attachment in the list and click Open, Save As, or Remove. Click Save All to save all files attached to the record to a new location; when you do, a Save Attachments dialog box appears, enabling you to either choose or create a folder in which to save the attached files.
Attaching a file to a database record works well if the file is static. If, however, it is dynamic — that is, it will be changed over time — you should insert the file as an OLE object rather than as an attachment. That way, the version of the file in the Access database will match the original, even if the original is changed in some way.
You can insert an OLE object into a record only if the table containing the record includes an OLE Object field. To insert a field into a table, open the table in Design view, click the field above which the new field should appear, and click Insert Rows on the Ribbon's Design tab. Type a name for the field in the Field Name column; then click in the Data Type column, click the drop-down arrow that appears, and choose OLE Object.
To insert an OLE object into a record, the table containing the record must be open in Datasheet view. If it is not in Datasheet view, right-click the table's tab in the Access screen and choose Datasheet View in the menu that appears.


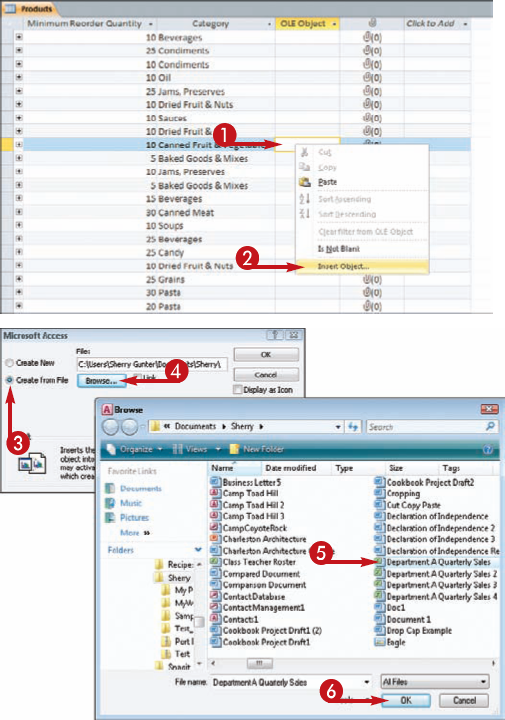
The Microsoft Access dialog box opens.


The Browse dialog box opens.


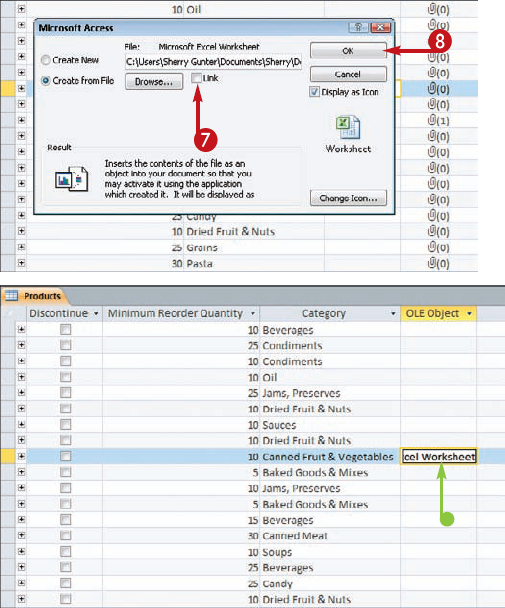

Tip
More Options!
In addition to inserting an existing file into a record as an OLE object, you can also create a new object to insert. To do so, click Create New instead of Create from File, select the type of object you want to create, and click OK. OLE objects can include charts, bitmap images, video clips, Word documents, sound clips, Excel worksheets, and more. Scroll through the Object Type list that appears in the Microsoft Access dialog box to see what you can create. When you choose to create a new OLE object, the necessary tools open to make the object. For example, if you choose a Microsoft Excel Chart, a window of Excel tools opens for you to create the chart.
Try This!
After inserting a file as an OLE object, you can open the file and edit it from within Access. To do so, double-click the field containing the object; the file opens in its native application. Make any necessary edits and simply close the native application's window to save your changes. To remove an OLE object from a record, click the field containing the object, click the Home tab in the Ribbon, and click Delete. Access immediately removes the OLE object, no questions asked.
You can use a filter to show only records that match criteria that you specify. For example, you can filter for blank or nonblank records, records containing a specific value in a particular field, multiple values, a particular text string, by form, and so on.
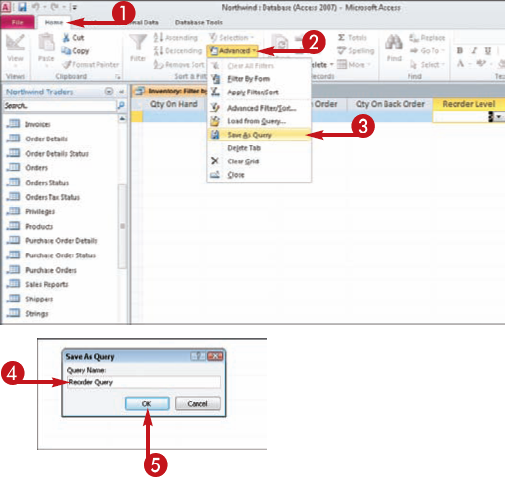
If you filter by form, you can save your filter parameters. That way, you can rerun the Filter By Form filter at a later time. When you save a filter, a new query is created in the database. A query is something you use to display data from a table in some modified way. Queries created from filters work just like any other query.
To create a Filter By Form filter, display the table you want to filter, click the Home tab, click Advanced, and click Filter By Form. Then click in the field by which you want to filter, click the drop-down arrow that appears, and choose the desired value. The results display only those records that have the value you chose in the corresponding field.
Tip
Did You Know?
In Access, it is not uncommon to find yourself working with the same type of filters on a regular basis. It makes sense to save these filters to reuse them again rather than rebuild them each time. Although you are not allowed to save more than one filter for each form or table, you can save them as queries instead and apply them when you need them. For example, with filters, only the most recent filter is saved in Datasheet or Form view, but with queries, you can apply one whenever you need it regardless of when it was created. What a handy little technique, yes?
One reason people create reports and queries is to extract summary statistics about data, such as the sum or average of the values in certain fields. A new feature introduced back in Access 2007 is the ability to display such information directly on the datasheet, without having to create a query or report.
Available statistic types include Sum (this results in a total of the values in the selected column), Average (this averages the values in the selected column), Count (this totals up the number of rows in the selected column that contain a value), Maximum (this reveals the maximum value in the selected column), Minimum (this reveals the minimum value in the selected column), Standard Deviation (this measures how widely values in the selected column are dispersed from an average value), and Variance (this measures the statistical variance of all values in the selected column).


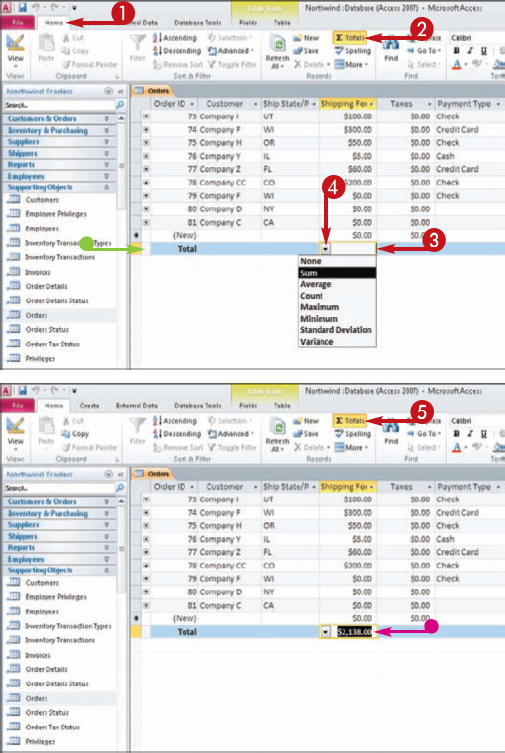


In this example, the SUM statistic is applied.


Access is a relational database. Relational databases are powerful because they can contain multiple related tables — for example, tables that share one or more fields.
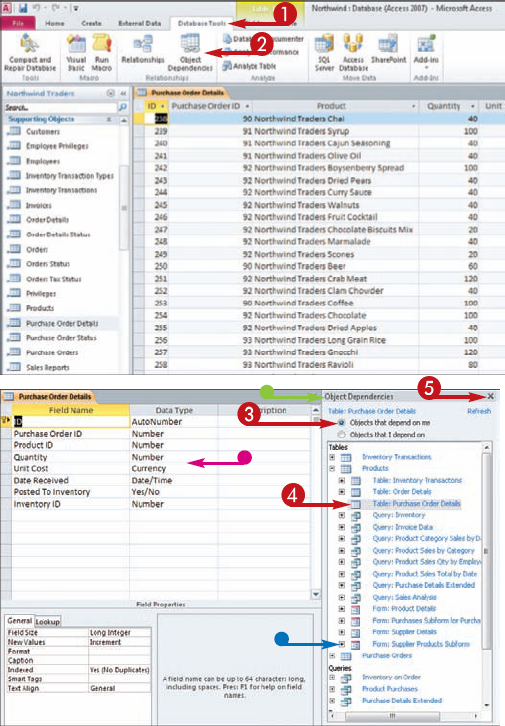
In a complex database, relationships are often created among the various objects in the database. Indeed, very rarely would a table or similar object stand alone. Therefore, you should not delete an object until you understand what other objects are affected by that deletion. For example, if you delete a table on which a form is based, the form based on the table is orphaned.
One way to view an object's dependencies is to use the Relationships window. To open this window, click the Database Tools tab and click Relationships. Another way is to use Access's Object Dependencies feature, which enables you to see all the dependencies of a particular object. (Note that to see all dependencies for all objects at once, you can use the Database Documenter feature, covered in the next task.)


Note
Access may notify you that generating object-dependency information may take a few moments. If so, click OK.


Whereas Access's Object Dependencies feature enables you to view all the dependencies of a particular object, the program's Database Documenter feature allows you to see all dependencies for all objects in a database. Using this feature results in a full report of the database, including details about each object in the database and how it relates to other objects the database contains. Generating such a report might help another database designer understand the structure of your database.
When you run the Database Documenter feature, the feature launches the report it generates in Print Preview mode, enabling you to print out the report with the click of a mouse. Alternatively, you can export the report to an Extensible Markup Language (XML) file or Hypertext Markup Language (HTML) document, or even merge it with Microsoft Word. To export, rather than print, the report, simply click More in the Print Preview tab's Data group and select the desired output from the menu that appears.


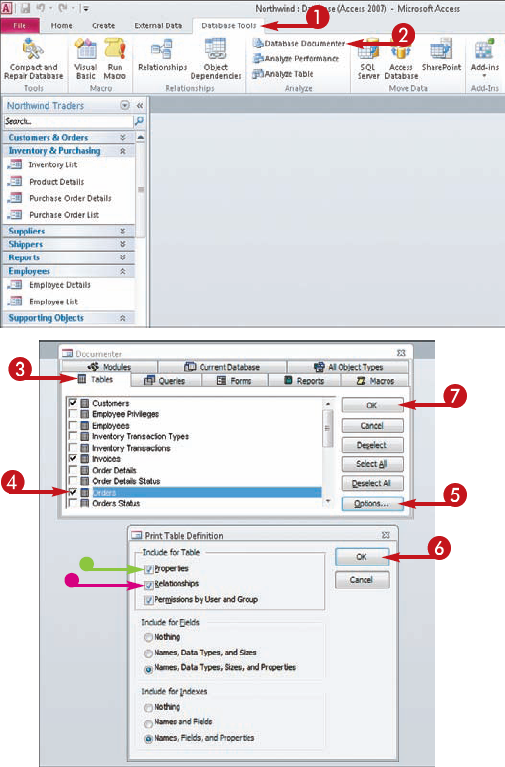
The Documenter dialog box opens.


The Print Table Definition dialog box opens.


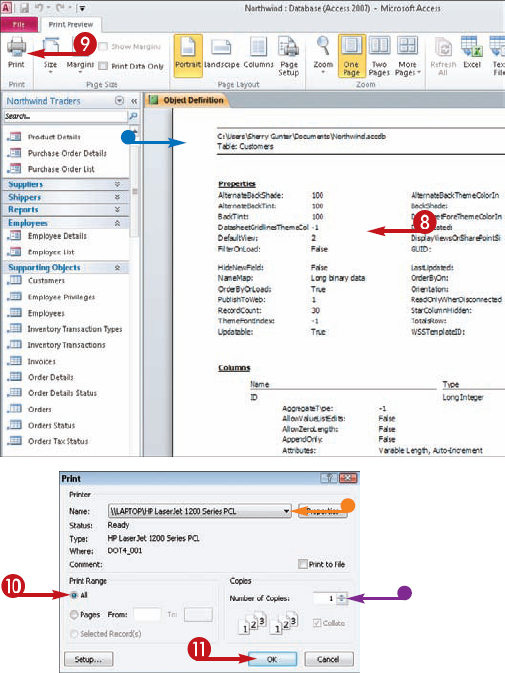

The Print dialog box opens.


Tip
Try It!
You can use the Database Documenter tool as a way to help you learn more about a particular database. This is especially helpful if you are new to the database you are working with or new to Access in general. By generating a report based on a particular object in a database, such as a query or form, you can view details about how the object works with various types of data and other objects, viewing properties for the various elements that comprise the object, such as buttons, labels, text boxes, and other controls.
Reports are simply special views of your data, which are designed to be printed. Reports can be created with very basic formatting settings or can involve complex, custom layouts.
Access enables you to generate reports very easily, especially if you use the default settings. To create a report, click the table or query for which you want to generate a report in the Navigation pane, click the Create tab, and click Report.
After you have created the report, you can export it to Word. Doing so enables you to apply Word's full-featured formatting functionality to the report. To export the report to Word, you launch the Export Wizard, which steps you through the process of converting the report to a Word document.
In addition to exporting reports to Word, you can also export other types of Access objects, such as tables and queries. As with reports, you launch the export operation from within Print Preview mode.


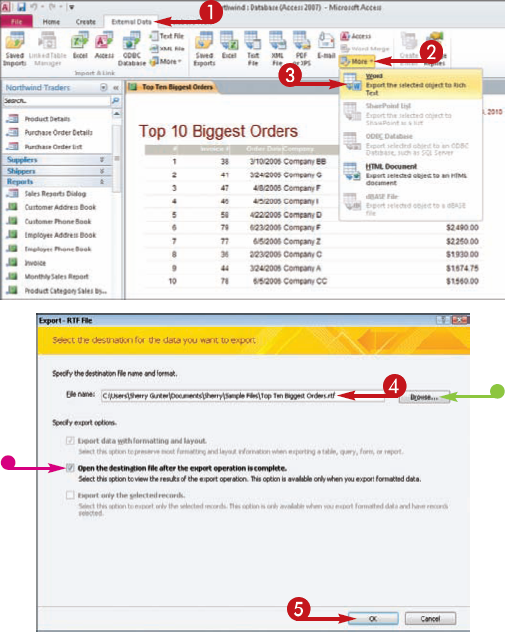
The Export – RTF File Wizard opens.


Access notifies you when the export is complete.

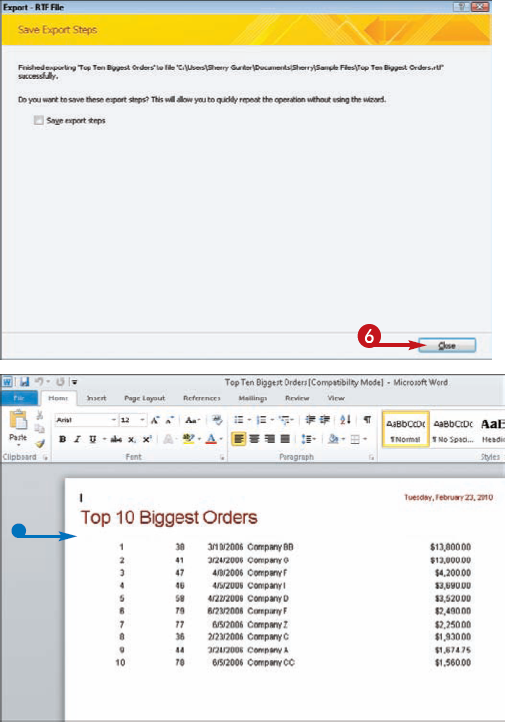

Tip
Did You Know?
If you will need to export this report to Word at some later date, you can save your export settings. Select the Save Export Steps check box in the Export Wizard's final screen. A series of additional fields appears; type a name for the export settings in the Save As field, type a description in the Description field, and click Save Export. (To automatically run the export operation at fixed intervals, such as once a week or once a month, select the Create Outlook Task check box before clicking Save Export; Access launches an Export Task dialog box, where you can set the necessary parameters.)
In addition to standard reports, Access can create mailing labels. This enables you to print labels without exporting the data first into a word-processing program and to set up reusable label definitions for recurring mailings.
Labels are a special type of report. They print multiple records per page, in a layout designed to correspond to self-stick labels that feed into your printer.
After choosing the size and formatting for the label, you set up the fields that should appear on it. These come from the table or query that you selected before you started the Label Wizard.
You can format the labels you create, changing the background color, adjusting the font and font color, and more. For additional formatting options, you can export the labels to Word. To do so, click the External Data tab, click More, click Word, and follow the on-screen instructions.


The Label Wizard appears.


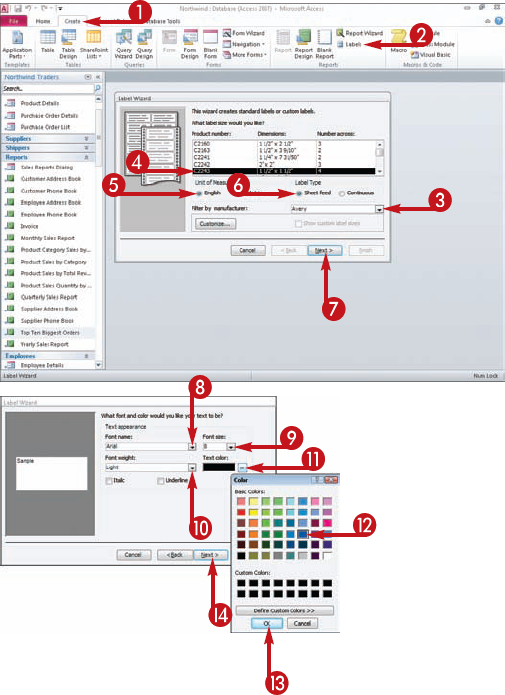


A Color dialog box opens.


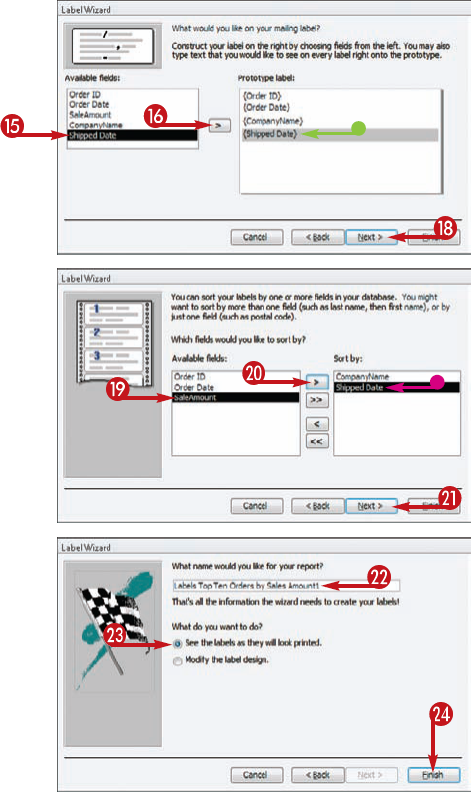


Access creates the label sheet.
Tip
Did You Know?
You can change the labels' formatting attributes, such as their font, color, and so on. To do so, double-click the label object in the Navigation pane to display the labels. Next, right-click the labels' tab and choose Design View. Then, click the portion of the label you want to change. For example, to change the font used in the top line of text, click the box containing that line; alternatively, click outside the text fields to select the entire label. Finally, use the tools in the Ribbon's Design tab to make the desired changes or use the text formatting tools on the Home tab.
If you frequently use Access to complete the same task — for example, to format the entries in a table a certain way — you can expedite the process by creating a macro. When you create a macro, you essentially record a series of actions. Then, you can run the macro you created to automatically perform the actions.
Unlike other Office programs, which enable you to "record" macros by essentially tracking the steps you take to complete a task, Access requires you to select the actions, arguments, and other elements of a macro from a list. You create a macro in Access by using Macro Builder, listing the actions you want Access to carry out when the macro is run, and in what order.
Once a macro has been created, you can easily run it with the click of a button. Using macros can save you loads of time and effort, automating tasks that might normally require dozens of keystrokes or clicks.


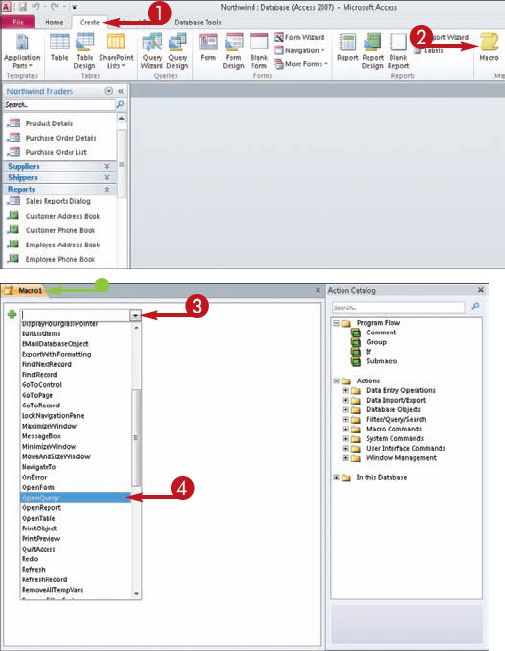


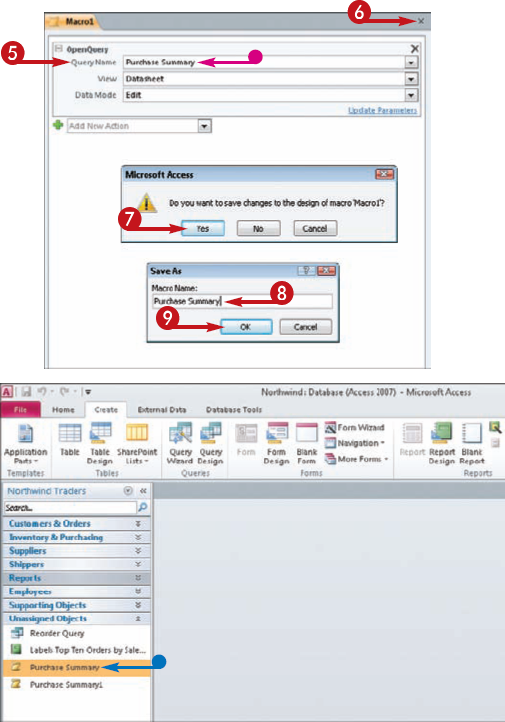
Access asks whether you want to save the macro.

A Save As dialog box opens.



Tip
Apply It!
To run a macro you have created, right-click it in the Navigation pane and choose Run from the menu that appears. (Macros are easily identified in the Navigation pane by their unique yellow, scroll-like paper icon, the same icon found on the Macro button on the Ribbon's Create tab as well as the Run Macro tool on the Database Tools tab.) Alternatively, you can also click the Database Tools tab on the Ribbon, click Run Macro, and, in the dialog box that appears, click the Macro Name drop-down arrow, choose the macro you want to run, and click OK.

