You can use PowerPoint to create presentations to convey all kinds of messages to an audience. For example, you might employ PowerPoint to present an idea to a prospective client, explain a concept or procedure to employees, or teach a class about a new subject. Your presentation can include words, graphics, media clips, charts, tables, and more.
When creating a presentation, you build an outline, with each first-level heading in the outline serving as the title of an individual slide. Second-level headings appear as bullet points; third-level headings appear as sub-bullets; and so on.
Once your presentation is set up, you can set a time length for the display of each slide, add narration, and insert action buttons and hyperlinks to link to other content. If, for example, you want the presentation to play back in a booth at a trade show, you can set it up to run automatically, such that it requires no external input or management. If, on the other hand, you are the presenter, you can print out speaker notes for your use during the show. To help your audience better follow along, you can also print handouts, which contain the slides in your presentation.
If you intend to deliver your presentation using a different computer, you can copy the presentation to a CD. You can also place your presentation on the Web, enabling you to widen your audience substantially.
Convert a Word Document into a Presentation. 158
Organize a Presentation into Sections. 160
Send a Presentation to Reviewers. 162
Reuse a Slide from Another Presentation. 164
Rehearse Timings. 166
Record Narration. 168
Insert Action Buttons. 170
Insert a Hyperlink. 172
Add an Equation. 174
Create a Self-Running Presentation. 175
Write on a Slide During a Presentation. 176
Create Speaker Notes. 178
Print Handouts. 179
Compress Media Files. 180
Turn a Presentation into a Video. 182
Copy a Presentation to a CD. 184
Save a Presentation on SkyDrive. 186
Broadcast a Presentation. 188
Perhaps you have invested significant time generating a document in Word, and your boss asks you to give a presentation about that document. Instead of retyping the information from the document and reproducing it all over again in PowerPoint, you can import it. This can really save you time and effort.
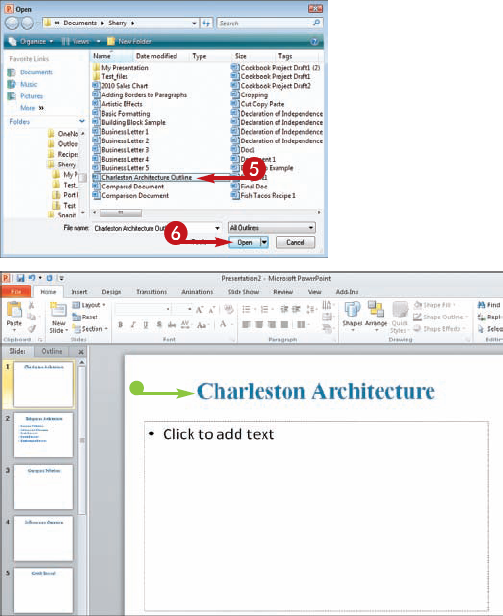
When you import a Word document into PowerPoint, PowerPoint translates any text in the Word document that is represented in Word's Outline view into a PowerPoint outline. Any heading in the document styled with Word's Heading 1 style appears as a slide title atop a new slide. Second-level headings become bullet points, third-level headings become second-level bullet points, and so on. Normal-style text between the headings is omitted.
You can edit a presentation generated from a Word document just as you would any other presentation: by selecting the slide you want to edit and making the necessary changes.


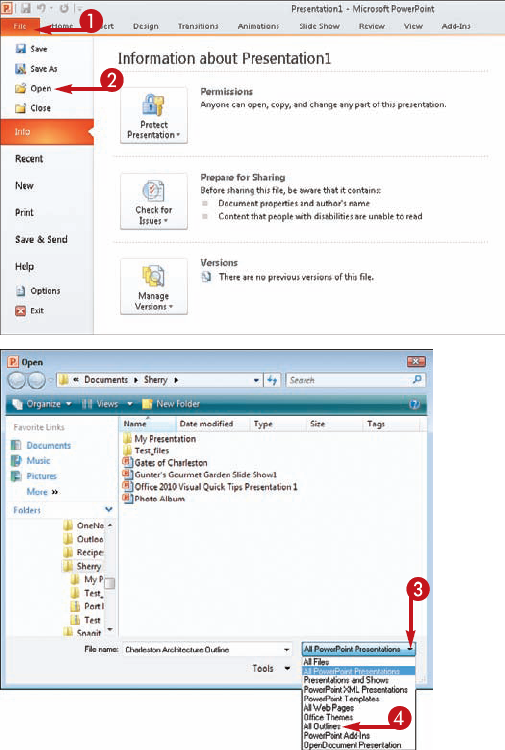
The Open dialog box appears.



Tip
Caution!
Before importing a Word document, make sure the appropriate headings are applied. You can use Word's Outlining feature to create easy outlines using heading styles, such as Heading 1, Heading 2, Body text, and so on. To switch to Outline view, click the View tab on the Ribbon and click Outline. This opens the Outlining tab where you can use the tools to create an outline for a presentation.
Giant presentations can be cumbersome and difficult to navigate when creating content and organizing slides. Thankfully, PowerPoint 2010 offers a new tool to make handling larger presentations easier by assigning sections. You can easily keep track of a group of slides that share the same section, or hand off a section to a colleague for collaboration. You can even use sections to help you systematize topics for a brand-new presentation.
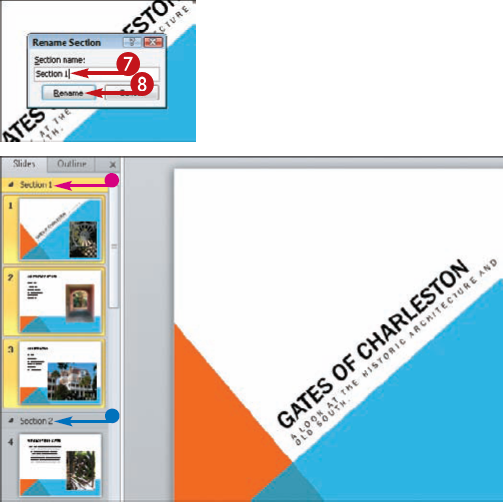
Sections are labeled as such in the Slides pane of Normal view as well as in Slide Sorter view. When you add a new section, PowerPoint assigns a default section name which you can then replace with something more meaningful.
You can expand and collapse the sections in the Slides pane in Normal view to help you view just the slides you want to work with, and you can move sections up and down in the slide order. To organize your slides, simply move them from one section or another by dragging them in the Slides pane or Slide Sorter view. You can also remove sections you no longer need.


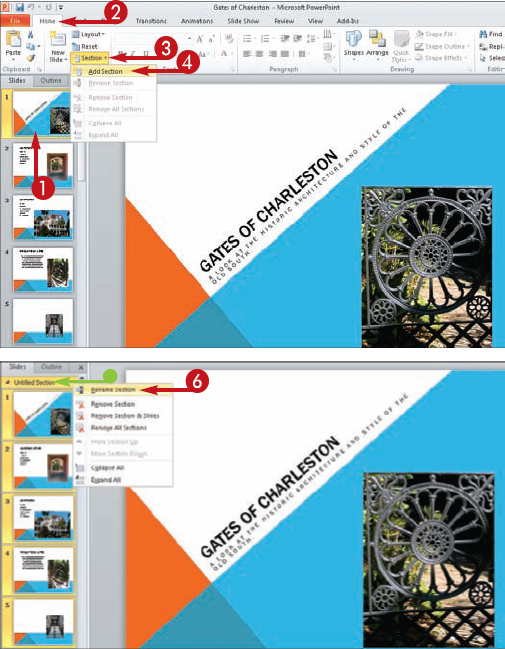


The Rename Section dialog box opens.




Tip
Try This!
To move a section to another spot in the presentation, right-click its name and chose Move Section Up or Move Section Down. You can also drag and drop section names in Slide Sorter view to move sections. Simply click and drag the section title to a new location in the presentation. All the accompanying slides move with the section head.
Remove It!
PowerPoint offers you several ways to handle removing a section in a presentation. To remove a section only, but leave the slides intact where they are, right-click the section name and choose Remove Section. To remove the section along with its associated slides, choose the Remove Section & Slides option. To take out all the sections in a presentation, leaving all the slides in place, choose Remove All Sections.
If your presentation involves a group effort, you likely need to share it with others before delivering it to your audience. An easy way to do so is to e-mail the presentation.
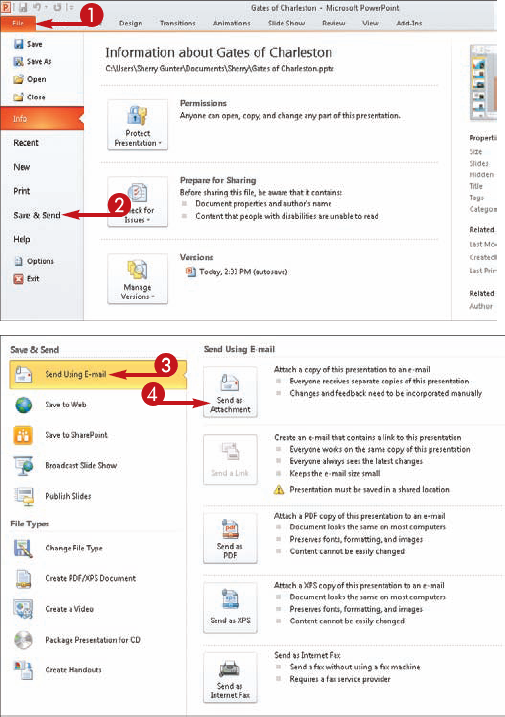
One way to e-mail a presentation is to simply send the presentation file as an attachment from within your e-mail program. If you prefer, however, you may be able to send the file from within PowerPoint, assuming you use a compatible e-mail program, such as Outlook.
When others review your presentation, they can use PowerPoint's comment features to provide feedback quickly and easily. With these tools, reviewers can insert, edit, and delete comments, as well as opt to show or hide edits. These tools are available from the Comments group under the PowerPoint Ribbon's Review tab.
Before sharing your presentation with others, consider running a spell check. To do so, click the Spelling button in the Review tab's Proofing group.




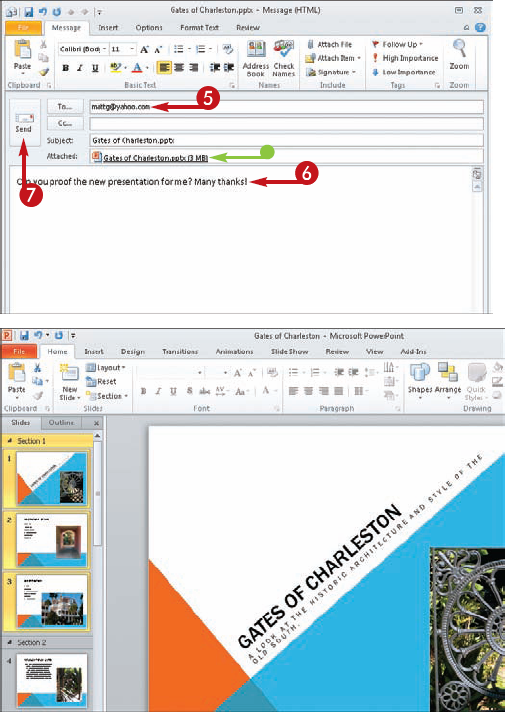
The message and attachment are sent and you are returned to the PowerPoint program window.
Tip
Try This!
You can also send a presentation as a file attachment in the PDF or XPS formats, two popular formats that are easy to view if someone does not have PowerPoint installed. When you click Save & Send in Backstage view and click the Send Using E-mail option, you are presented with options for sending the file as a PDF or XPS copy. With either format, the presentation looks pretty much like it does in PowerPoint, with the fonts and formatting preserved.
Try This!
If you save your presentation in a shared location, such as a shared folder or workgroup location, you can use PowerPoint's Send a Link command to offer a link to the file in an e-mail rather than send the entire presentation as a file attachment. To activate this command, click the File tab, click Save & Send, click Send Using E-mail, and then click the Send a Link button. This button is operable only if the presentation has been saved to a shared location.
Suppose you are working on a new presentation and you want to include information covered in an existing presentation. Instead of re-creating the content all over again, you can insert the relevant slide from the existing presentation into the new one.
This is a great timesaver if, for example, you have created a slide with a highly detailed chart, table, or diagram, because it saves you the trouble of reentering data and reformatting the object on the slide. When you insert a slide from a different presentation, the slide automatically adopts the colors, fonts, graphics, and other formatting attributes of the new presentation (although you can opt to keep the original formatting if you prefer).
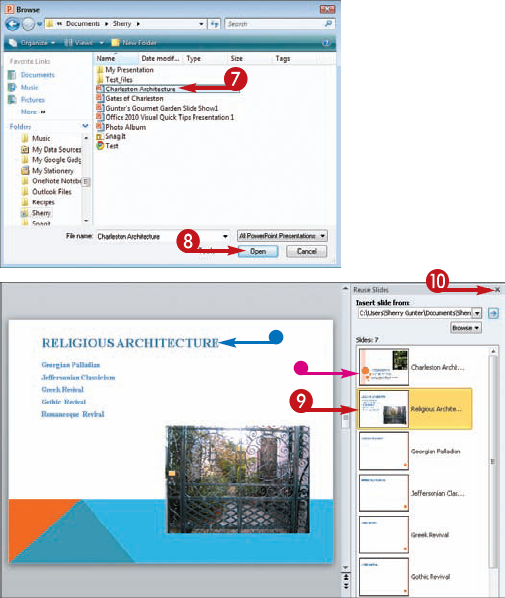
To reuse a slide from another presentation, you first locate the presentation containing the slide you want to reuse. This presentation might reside on your computer's hard drive, on a CD you insert in your CD drive, on a network to which your computer is attached, or in a Slide Library on a SharePoint Server. PowerPoint then displays the slides in the selected presentation in the Reuse Slides task pane.


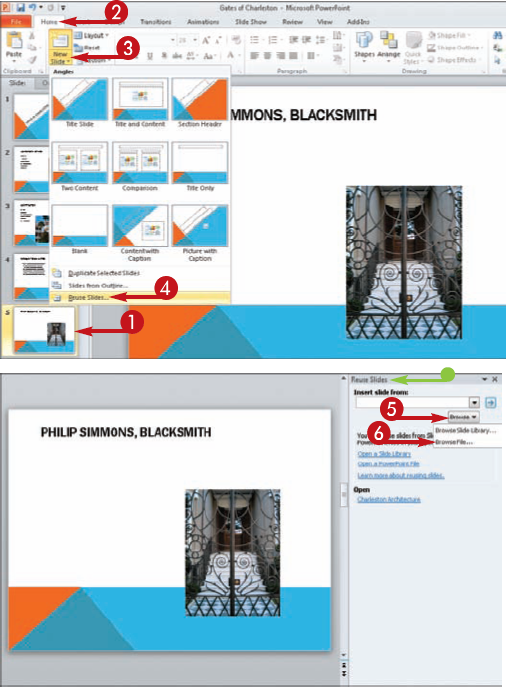


The Browse dialog box opens.




Tip
Try This!
To get a better look at the slides in the Reuse Slides task pane, position the mouse pointer over the slide thumbnail rather than the slide title. When you do, an enlarged version of the thumbnail pops up, providing enhanced visibility and readability.
Apply It!
If the slide you are looking for is not in the presentation you selected in the Browse dialog box, click the Browse button in the Reuse Slides task pane and choose Browse File to redisplay the Browse dialog box. Then locate and select the correct presentation file to reveal the presentation's slides in the Reuse Slides task pane.
When delivering a presentation, you typically advance the slides manually by clicking the mouse button. You can, however, set up your presentation to advance the slides automatically. That way, you are free to move as you speak instead of being tethered to your laptop throughout the presentation.
If you opt for automatic slide advancement, you must rehearse the timing of your presentation to ensure that the slides advance at the correct time. To do so, use the Rehearse Timings feature to record the amount of time you need for each slide. PowerPoint then uses the times you record during the presentation to determine when to advance from one slide to the next.
Note that the Rehearse Timings feature also works well for creating a self-running presentation — that is, a presentation that runs without narration (for example, in a kiosk at a trade show).
As far as slide timing goes, a good rule of thumb is to allow for enough time for your audience to read and view the contents, and if you are speaking along with the presentation, allow enough time to cover all of the necessary points you want to make.


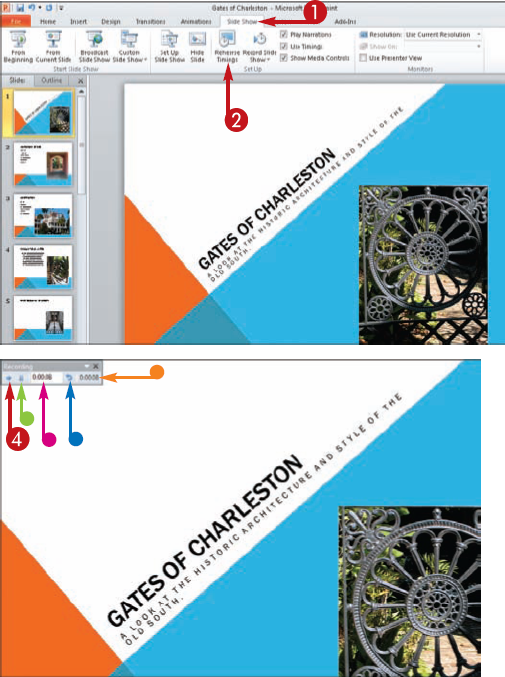
PowerPoint switches to full-screen view and displays the Recording toolbar.


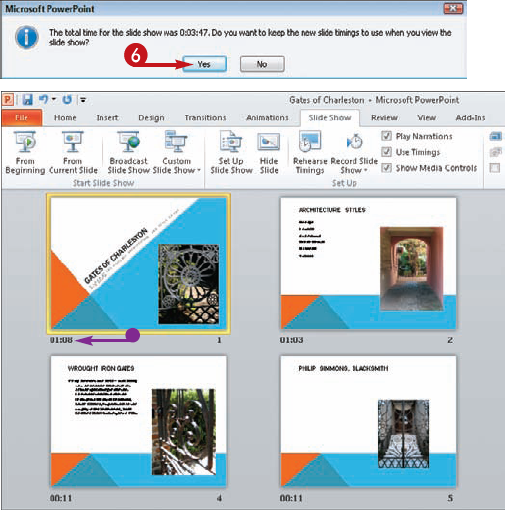
When you click the Next button after rehearsing the last slide, PowerPoint informs you of the total time for the presentation and asks whether you want to keep the new slide timings you created.


Tip
Try This!
You can apply transition effects to your PowerPoint presentations. When you do, PowerPoint plays a special effect when advancing from one slide to the next. For example, you can choose a wipe transition effect, where the next slide appears to wipe the current slide from the screen. You can also apply sound effects for transitions, and establish how quickly the transition should occur. You access these settings from the Transitions tab's Transition to This Slide and Timing groups.
More Options!
If you decide you want to advance the slides manually rather than use the timings you set, simply disable the timings by deselecting the Use Timings check box in the Slide Show tab's Set Up group (
If you do not intend to present your PowerPoint show live — for example, if you will show it at a kiosk or over the Web — you might want to record a narration that talks the viewer through your key points. When a presentation uses a recorded narration, it advances to the next slide automatically at the end of the previous slide's narration.
Before you record your narration, take time to jot down just what you want to say when each slide appears. When recording the narration, speak slowly, and be sure to enunciate.
Most computers today have a built-in microphone you can use, or you can plug in additional microphones. Be sure to check out what is available on your system (Control Panel) and make sure the microphone is functioning properly before recording.
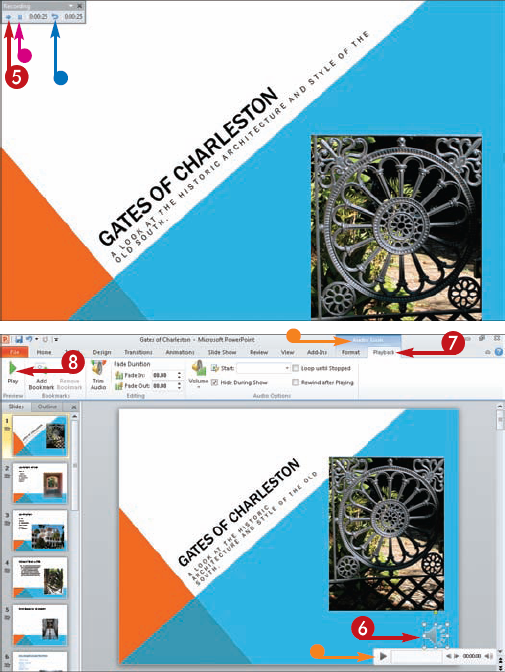
PowerPoint has combined the Rehearse Timings feature with the Record Narration feature so you can do both at the same time when recording narration. You can use the Recording toolbar that appears during your recording session to pause the show, redo the narration again, and keep track of how long the slide is in view as well as the overall length of the presentation.


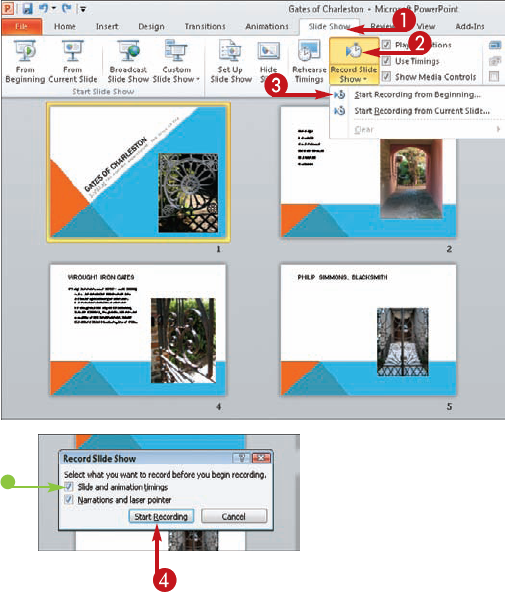
The Record Slide Show dialog box opens.


PowerPoint switches to full-screen view and displays the Recording toolbar.


Note
You can also click the Play button (

Tip
Remove It!
To clear the narration from a slide, select the slide and click the Slide Show tab. Click the Record Slide Show button, click Clear, and then click Clear Narration on Current Slide. To remove narration for the entire presentation, choose Clear Narration on All Slides. The Clear menu also lets you remove all slide timings, too.
More Options!
You can tinker with the audio options for your narration using the controls in the Playback tab. Click an audio icon on the slide in Normal view to display the Audio Tools on the Ribbon, and then click the Playback tab. Here you will find options for trimming an audio clip, adding fade in or fade out effects, adjusting volume, and more.
You can insert action buttons onto your slides to create interactivity. Action buttons enable you to quickly jump to related content while delivering a slide show. You might insert an action button that leads to another slide in your presentation, another presentation altogether, a Word document, a program, or a Web page. Alternatively, clicking an action button might result in the playing back of a sound file. (Note that the item to which the action button is linked must reside on the computer you are using to conduct your presentation. If the item is a Web page, then the computer must be connected to the Internet.)
PowerPoint offers several predesigned action buttons from which to choose; alternatively, you can create your own custom button. After you select the button type, you then choose what action will occur when the button is clicked during a show.
Action buttons are especially handy for self-running presentations (that is, presentations that do not use a presenter, which are often played back at a booth or kiosk). They enable the audience to access additional materials or simply navigate the presentation.


In this example, an informational button is selected.
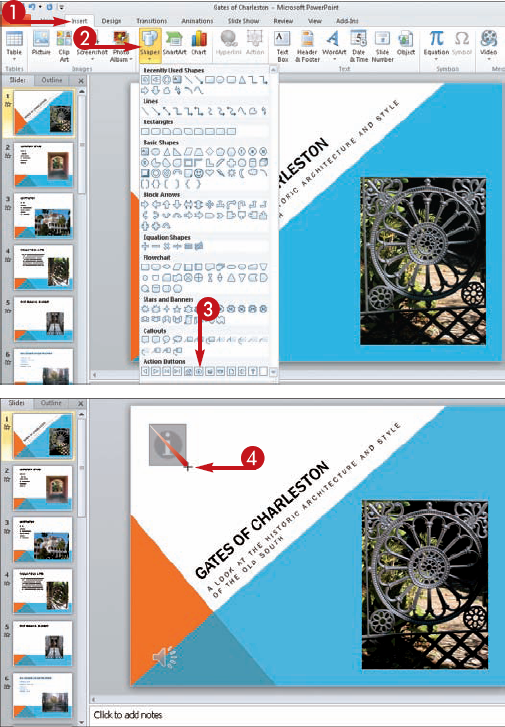
The mouse pointer turns into a cross hairs.


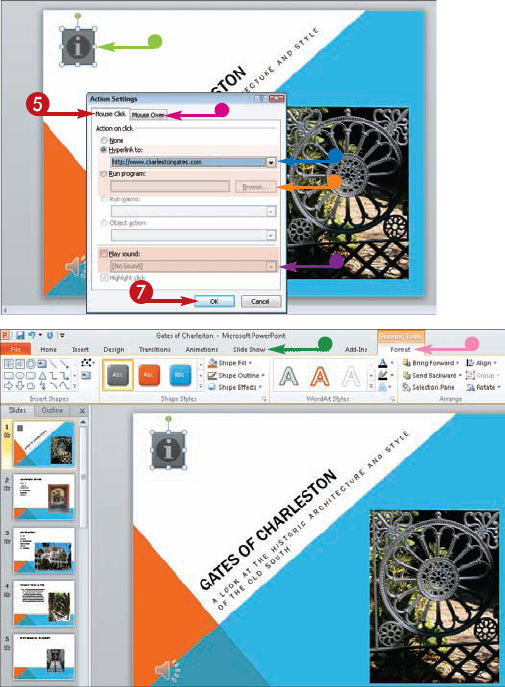
PowerPoint assigns the action to the button.


Tip
Try This!
PowerPoint installs with a variety of preset sound clips you can use with your slides. Click the Play Sound drop-down arrow to view a list of sound effects ranging from applause to a cash register sound. The clips are short in length and are especially handy if you want to try out your action button and see what it does. At the bottom of the drop-down list, you can select Other Sound to open the Add Audio dialog box and add sound files you have stored on your computer.
Apply It!
To edit your action, click the button and click the Insert tab. Then click the Action button in the Links group of tools. This opens the Action Settings dialog box where you can edit the action, changing the action or target associated with the action.
In addition to inserting action buttons, you can insert hyperlinks directly into your slides. These are similar to action buttons in that clicking them enables you to direct the viewer to another slide in your presentation, another presentation altogether, a Word document, a program, a Web page, or a sound file. Like action buttons, hyperlinks are especially handy for self-running presentations.
Unlike action buttons, however, hyperlinks do not clutter up your slide. Instead, you can use the text on your slide as a hyperlink. Then, the user need only click the text to engage the link.
Note that you can remove the hyperlink from text in a slide by selecting the text and clicking the Hyperlink button in the Insert tab. Then, in the dialog box that appears, click Remove Link.
The item to which the hyperlink is linked must be stored on the computer on which you are giving your presentation or, if the item is a Web page, the computer must be connected to the Internet.


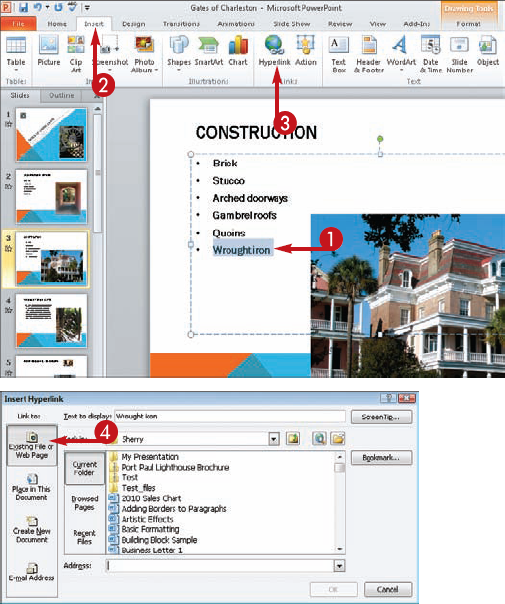
The Insert Hyperlink dialog box appears.

In this example, Existing File or Web Page is selected.
Depending on what you select in step 4, different options appear in the dialog box.

In this example, the target is another slide in the presentation.

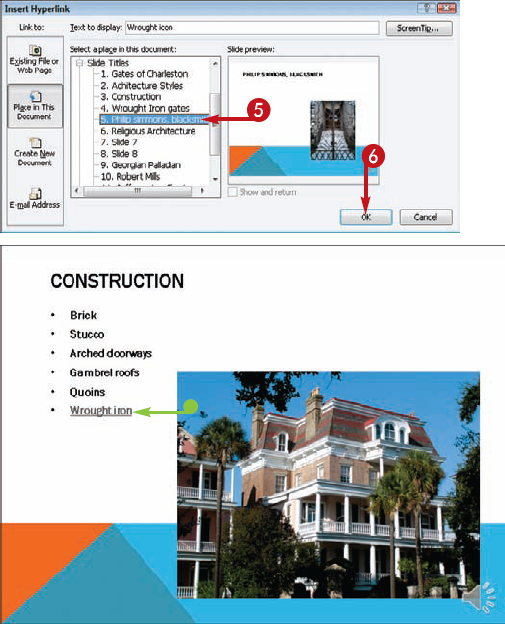

When you run the slide show, you can click the text to follow the link.
Tip
Try This!
To help you remember where the link leads, you can add a ScreenTip. To do so, click the ScreenTip button in the Insert Hyperlink dialog box and type some descriptive text in the dialog box that appears. Then, when you mouse over the link during a presentation, PowerPoint displays the ScreenTip.
Caution!
When linking to a Web site, you need to know the site's address, or URL. You can type the URL in the Address box that appears at the bottom of the Insert Hyperlink dialog box. Be sure to include the full address, including the http:// prefix, such as http://www.mysite.com.
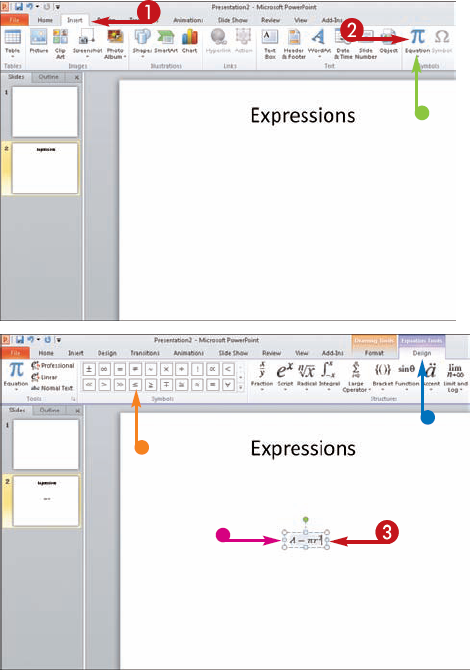
You can use the new Equation Editor to quickly insert common mathematical equations and expressions into your PowerPoint slides. You can also use it to create your own custom equations and expressions. Microsoft's Equation Editor was part of Word 2007 and Excel 2007, but it is now a part of the Office 2010 suite, including PowerPoint. Equation Editor is actually a separate program; it lets you construct equations or expressions without leaving the PowerPoint slide.
You can access the Equation Editor through the Insert tab on the Ribbon. When you activate the Equation Editor, a tab of Equation tools appear on the Ribbon, including operators and symbols, and equation structures.
When you add an equation, PowerPoint creates a text box for the equation on the slide. Like any other slide object you add, you can reposition the text box, resize, and format it.
If your presentation is destined for playback at, for example, a booth at a trade show, you can set it up to be a self-running show, with no presenter required. Alternatively, you might burn a self-running presentation to CD and send it to prospective clients. Self-running presentations are perfect in classroom situations, public venues, and as office training modules.
Your self-running presentation can include hyperlinks or action buttons to enable your audience to navigate the presentation; alternatively, you can set up the show to advance from slide to slide automatically. You can also include voice narration in your self-running presentation. (Follow the steps in the task "Record Narration" earlier in this chapter.) If you want, you can set up your show to loop — that is, run over and over again from beginning to end. This is handy if your presentation is running at a trade show booth or kiosk. You set up a presentation to be self-running from the Set Up Show dialog box.


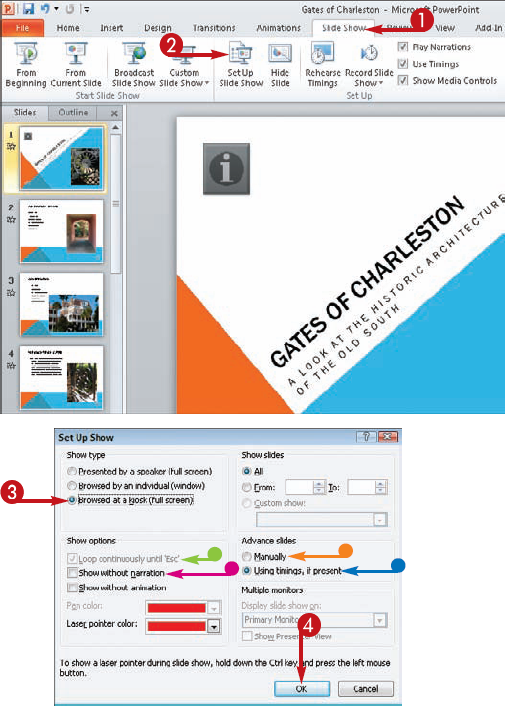
The Set Up Show dialog box opens.


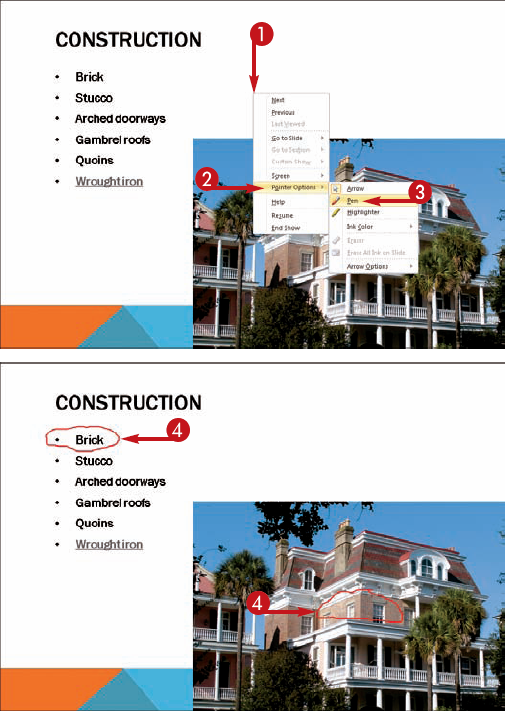
Have you ever given a slide show presentation and wished you could actually write or draw on the slide? You can! PowerPoint lets you draw freehand on your screen during a presentation by turning the mouse into a drawing tool. For example, you might use the highlighter tool to highlight text on a slide, or use the pen tool to annotate an important point or to jot down ideas contributed by your audience. Both tools let you draw or write freehand on the slide.
In addition to writing or highlighting, you can also control the color of your pen or highlighter tool. The color palette lets you pick a color that works best on your slide. For example, a red pen is not easy to view against a red slide background, so you might want to choose another, more visible color instead.
At the end of the presentation you can choose to keep the ink annotations or discard them all.
Tip
Remove It!
To rid a slide of any drawing or writing you have added with the pen or highlighter, simply right-click and click Pointer Options again. To erase only individual elements, choose the Eraser command and then drag over the writing you want to erase. To erase all the writing on a slide, click Erase All Ink on Slide.
More Options!
In addition to a pen or highlighter, you can also turn your mouse pointer into a laser pointer during the slide show. Press and hold Ctrl on the keyboard and then press and hold the mouse pointer. This turns the pointer into a red laser icon. You can also use this technique in Reading view.
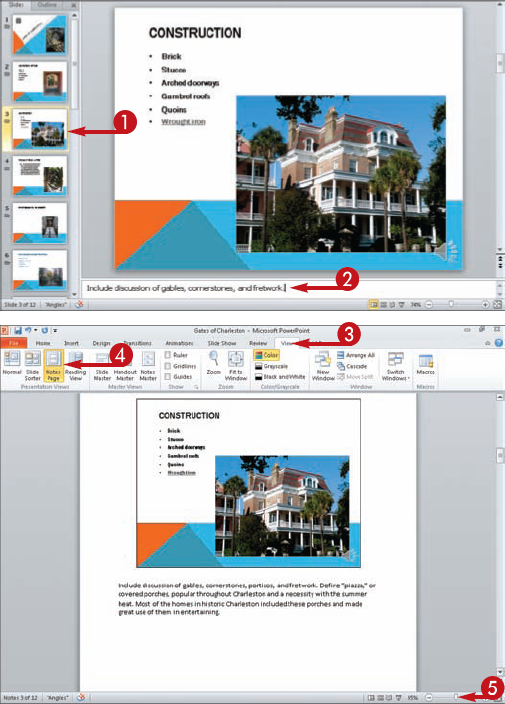
When giving a presentation, having a cheat sheet with additional facts, or with answers to questions the audience may ask, is handy. To create just such a cheat sheet, you can enter notes into PowerPoint slides, and then print them out. When you print out the notes you enter, the printout includes a small version of the slide to which the notes refer. You can preview your notes before printing using the Notes Page view.
If you need more room for typing in your slide notes in Normal view, you can resize the Notes pane. Just position your mouse pointer over the top border of the notes area until the pointer becomes a double-sided arrow pointer (
If you want, you can use PowerPoint's Notes Master to control how printouts of your notes are laid out. For example, you can use the Notes Master to change where the image of the slide appears, as well as to add placeholders for headers, footers, the date, or slide numbers. To use the Notes Master, switch to Notes Master view (click Notes Master in the View tab).


Note
You can repeat steps 1 and 2 for other slides to which you want to add notes.


To help your audience follow along as you perform your presentation, as well as provide a place for them to take notes for future reference, you can print presentation handouts. These handouts can contain one, three, five, six, or nine slides per page. (Printing several slides per page can help you save paper when printing handouts for a lengthy presentation.)
When selecting handout orientation, you can choose Horizontal or Vertical to indicate how the slides should be oriented on the printout. Choosing Vertical prints slides in order down the left column, continuing in order down the right column.
You can use PowerPoint's Handout Master to control how your presentation handouts are laid out. For example, you can use the Handout Master to change where the images of the slides appear, as well as add placeholders for headers, footers, the date, slide numbers, a company logo, and so on. To use the Handout Master, switch to Handout Master view (click Handout Master in the View tab). Then use the various tools available on the Handout Master tab to add or remove placeholders, change the fonts or colors used, and so on.


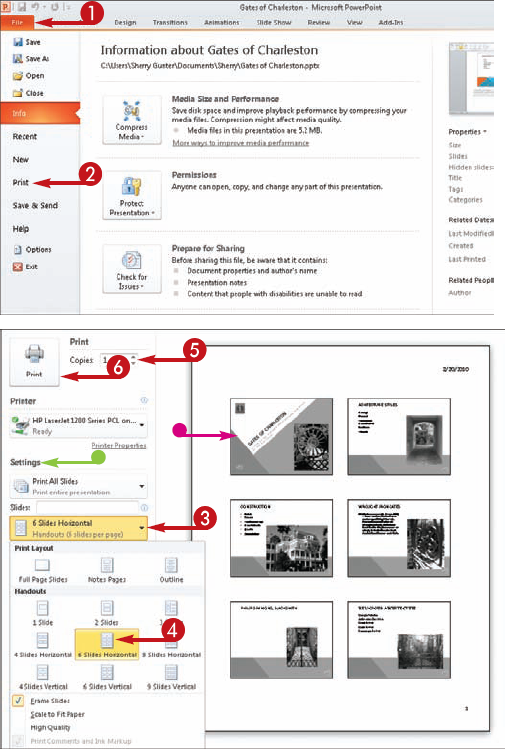


PowerPoint prints the handouts.
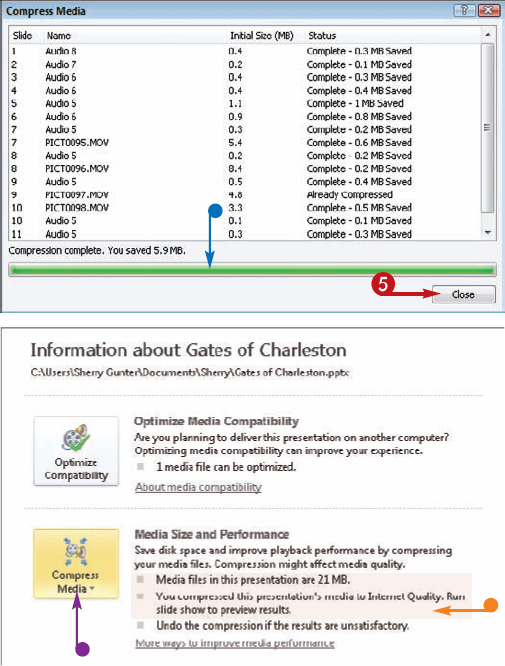
If your presentation includes a lot of embedded media files, such as soundtracks, narration, video and movie clips, you may end up with a presentation that consumes a great deal of file space. Media clips are notorious consumers of file size. Thankfully, PowerPoint 2010 offers a tool to help you save disk space. You can compress your media files and even improve playback quality.
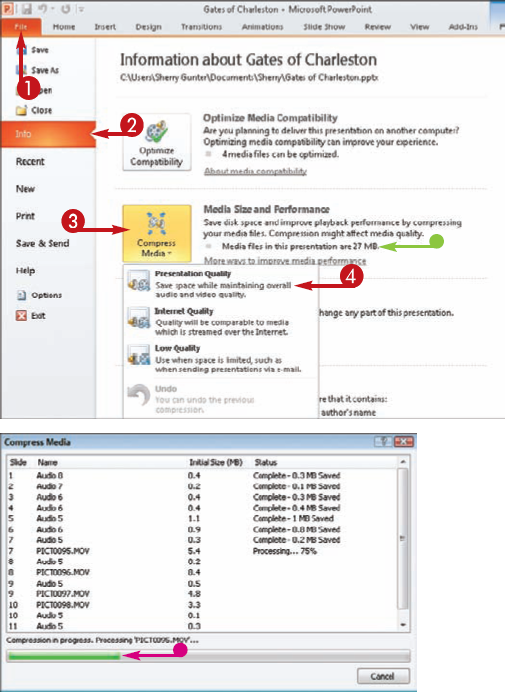
The Compress Media feature keeps track of your overall file size, and you can view this notation using the Info tab in Backstage view. You can choose from three quality settings: Presentation Quality, Internet Quality, and Low Quality. Choose Presentation Quality if you want to maintain high quality yet save some space. Choose Internet Quality to emulate streaming media found on the Internet. Choose Low Quality if you are sending the presentation as a file attachment.
After the compression process is completed, the Info screen displays information about what quality setting you applied. If the compression results were not to your liking, you can click the Compress Media button and choose Undo, and then try another quality setting.
Tip
More Options!
If your presentation is full of digital images instead of media files, you can use PowerPoint's Compress Pictures option to help cut down on file size. Select a picture in a slide to display the Picture Tools Format tab, and then click the Compress Pictures button. The Compress Pictures dialog box opens and you can choose a compression option and a target output. For example, you can discard cropped areas of your pictures to save space, and optimize the pictures for e-mailing or printing.
More Options!
You can also use the Optimize Media Compatibility feature to help ensure your files play back properly on other computers. To bypass problems encountered by end users who are unable to play your media clips properly because of missing decoders, activate the Optimize Media Compatibility feature. Click the File tab, click Info, and then click Optimize Compatibility.
PowerPoint has always offered users a variety of ways to share their presentations, such as sending them via e-mail, uploading them onto the Internet, or packaging them onto CDs for distribution. With PowerPoint 2010, you can now turn your slide show into a video.
Previously you had to use a special program to accomplish such a conversion. Most people have access to video players today, including through such devices as iPods and iPhones. You can easily turn your presentation into a Windows media video file (WMV). If you want to use another file format, you need a third-party utility to do so.
Using the Create Video feature, you can turn your presentation into a video file that includes all of your assigned transitions, narration, slide timings, and animations. You can choose from three quality settings ranging from larger to smaller in overall file size. Choose Computer & HD Displays to maintain the highest quality setting appropriate for monitors, projectors, or high definition television. Choose Internet & DVD quality if you plan to save the file to a DVD or the Internet. To prepare the presentation for a mobile device, choose the Portable Devices setting.


Note
By default, PowerPoint assigns a five second default time to slides without preset timings; you can change the timing here to increase or decrease the time.
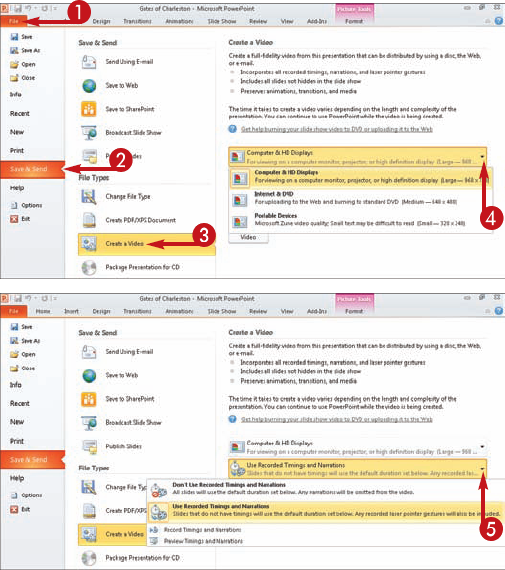

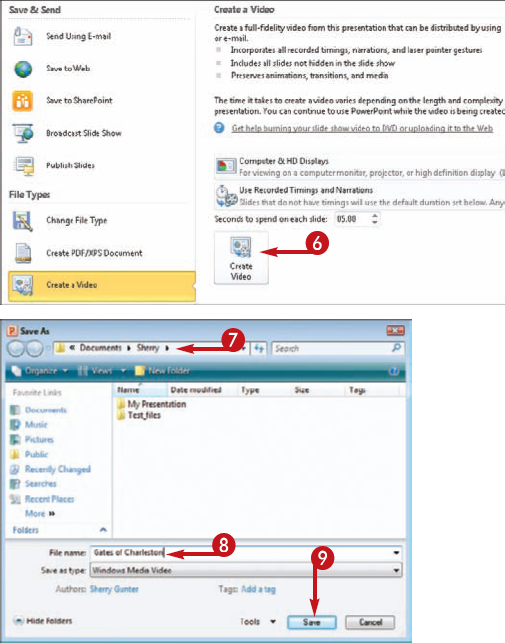
The Save As dialog box appears.


PowerPoint creates the video file.
Note
Depending on your presentation, the conversion process for turning a slide show into a video file can take several hours. You may prefer to set this process up to occur overnight so the video file is done and ready for use in the morning.
Note
To play a video, navigate to the folder where you saved the file and double-click the file name.
Tip
More Options!
You may prefer to save your presentation to a DVD so that anyone with a standard DVD or disc player can watch it. Start by saving the presentation as a video file as outlined in this task. Then open Windows DVD Maker, click Add Items, and select your newly created video file. Click the Add button, choose your burner, pop in a DVD, and burn the file to the disc. Windows DVD Maker is included in Windows Vista Home Premium and Windows 7 (Home Premium, Professional, and Ultimate editions).
Did You Know?
Just what parts of a presentation are not included in a video file? PowerPoint does not include any media clips you inserted into your slides from previous PowerPoint versions. Any QuickTime media clips are not included, no macros are included, and no OLE or ActiveX controls are stored either. Items definitely included are sounds, narration, animations, transitions, and slide timings.
If you know you will give your presentation using a computer other than your own, you can copy it onto a CD. Then, you can simply insert the CD containing your presentation into whatever computer is available and run it from there.
When you copy your presentation to CD, the computer also copies any files to which that presentation links by default. For example, if you set up an action button in your presentation to launch a program or document when clicked, the computer also saves the target program or document on the CD with your presentation.
In the event the computer on which you plan to run your presentation does not have PowerPoint installed, PowerPoint includes a copy of PowerPoint Viewer when you burn a presentation to CD. You can then use the CD to install PowerPoint Viewer on the machine on which the presentation will run.


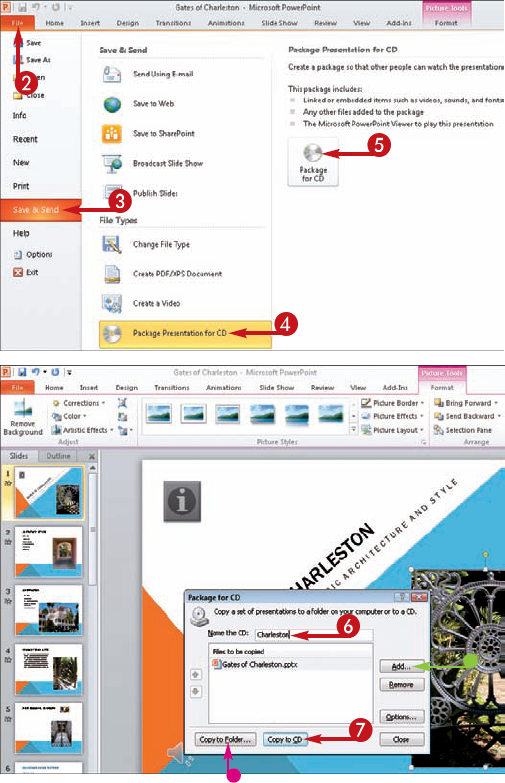
The Package for CD dialog box opens.


PowerPoint asks whether you want to include linked files on the CD.

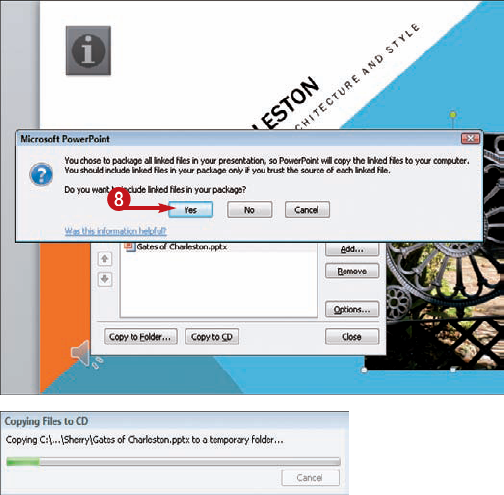
PowerPoint copies your presentation to CD and displays a progress bar to let you know how the process is going.
Tip
More Options!
Instead of saving the entire presentation to a CD, you can choose to save it to a special folder on your computer. To copy the presentation to a different folder on your computer or to a location on a network, click the Copy to Folder button in the Package for CD dialog box and select the desired folder in the Copy to Folder dialog box that appears. Click OK to start the copying. If you leave the Open Folder When Complete check box selected, the folder opens when you finish and you can view the file.
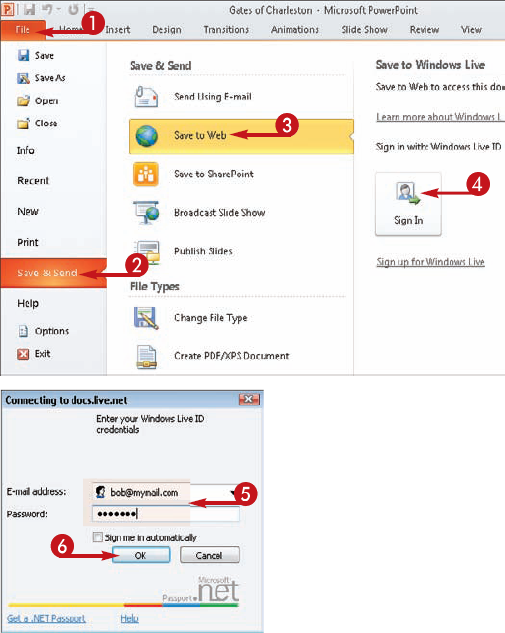
Another new way to share your PowerPoint 2010 presentation is to store it to the new Windows Live SkyDrive. Part of Windows Live, SkyDrive offers you free server storage space you can use to store Office 2010 documents, presentations, pictures, and more. After placing a presentation online, you can access it from any computer using an Internet connection. This handy feature makes it easy to share a presentation with friends or colleagues anywhere.
In order to use SkyDrive, you must sign up for a Windows Live account in with Microsoft. If you do not have a Windows Live account yet, visit the www.home.live.com Web site and follow the links for creating your own Windows Live ID.
When saving to SkyDrive, you can store your presentation in a personal folder or in a public folder where everyone can view it. SkyDrive offers up to 25GB of storage. Every folder you create on SkyDrive has a unique address, which means you can save the link in other files and e-mails.




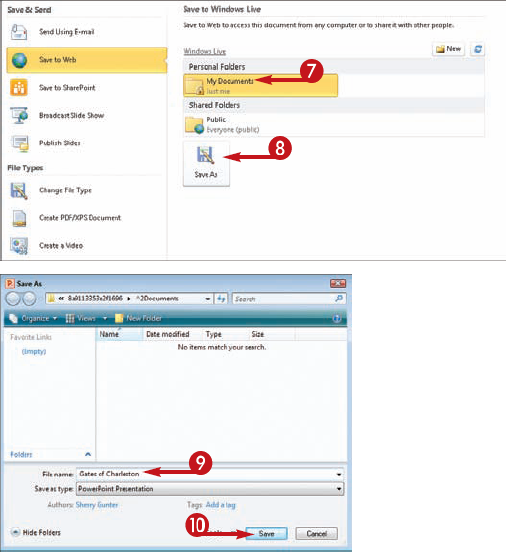
The Save As dialog box opens.


The file is uploaded to the specified SkyDrive folder.
Tip
Apply It!
In order to see where your presentation is stored on SkyDrive, you must open your Web browser and log onto your Windows Live account and navigate to the SkyDrive page. Using your Web browser, navigate to http://skydrive.live.com and click the My Documents folder or the folder in which you stored the file.
More Options!
If you set up a Windows Live ID and a SkyDrive connection, you can add more than just PowerPoint presentations. You can add files and folders to your account, upload photos, and customize a profile. On the Web site, click the Profile link to create a profile or change settings for your account. To return to the SkyDrive page at any time and view your folders and documents, click the SkyDrive link on the Profile page or click the More link at the top navigation bar and click SkyDrive.
New to PowerPoint 2010, you can broadcast a presentation to multiple participants. Similar to a live meeting broadcast, you can use the PowerPoint Broadcast Service to present a slide show, live and synchronized, to friends or colleagues regardless of their location. Simply send them a link provided by the feature and start the show when you are ready to present it. Best of all, the invitees do not need to have PowerPoint 2010 installed in order to view the show. They can use their default browsers to view the presentation.
You need a Windows Live account in order to use this service. If you are not logged on, you need to sign in first to use the service. If you do not have a Windows Live account, use your browser to navigate to www.home.live.com and follow the instructions for creating an account.
When you send out a link to recipients, they can share the link with others. Because the link is public, anyone with the link can view the show.


Note
You can also click the Broadcast Slide Show button on the Slide Show tab to start the process.
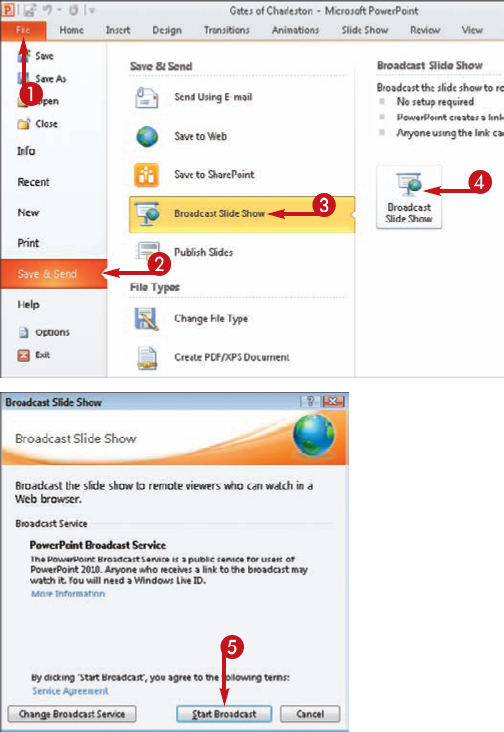
The Broadcast Slide Show dialog box appears.

PowerPoint connects you to the broadcast service and prepares your presentation.
Note
If you are not already logged onto your Windows Live account, you are prompted to do so before preparing the presentation.
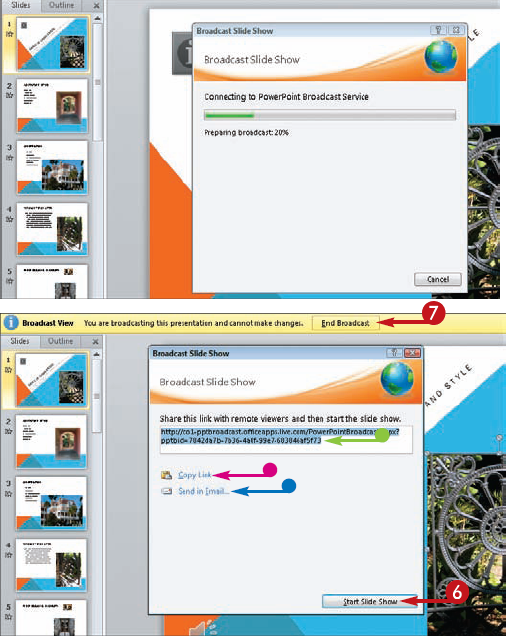


Tip
More Options!
If you are a SharePoint user, you can also save your PowerPoint presentation to a SharePoint site, which allows you to collaborate with others in your workgroup. SharePoint uses the same broadcasting tools described in this task to upload a presentation file to a designated spot on the Web. To save your presentation to a SharePoint site, click the File tab, click Save & Send, and then click the Save to SharePoint option. You can browse for a location, and then click Save As to start the process.
