Many Microsoft Office users go right for the big guns — Word, Excel, and PowerPoint — when using the applications, often overlooking the power and potential that lies within Publisher. Publisher is a desktop-publishing application geared to nondesigners. The program is easy to use and offers plenty of exciting tools and features for creating professional publications. You can use Publisher to whip up newsletters, brochures, flyers, stationary, calendars, catalogs, business cards, and just about any other printed media you can think of. The program includes dozens and dozens of templates you can use — just pop one open and fill in your own text or photos and you are ready to go.
Although it started out its history as a small-business and consumer-targeted program, each new version of Publisher has introduced more commercial features, making it a great alternative to pricier software that accomplishes the same thing.
New to Publisher 2010 is the Ribbon and other general enhancements to the user interface, along with the File tab, which offers you access to the Backstage view where all the file-related commands are grouped together. The Page Navigation pane lets you view page previews in the same way you view slide previews in PowerPoint. The Print and Print Preview features are joined in Publisher 2010, and you can view how your document is set up to print. You can also now save your publications as PDF and XPS files. Microsoft has also made improvements to the way in which users can work with pictures. With an online connection, you can immediately access loads of templates online at the Office.com Web site that you can download with a click. You can also find a greater number of building blocks to help you create professional-looking pages. In this chapter, you tap into a few techniques that can help you get more out of Publisher 2010.
Find Templates Online. 314
Insert a Text File. 316
Nudge a Text Box. 317
Move a Page. 318
Automatically Fit Text. 319
Control Hyphenation. 320
Send Your Publication as an E-mail. 322
Save a Publication for a Commercial Printer. 324
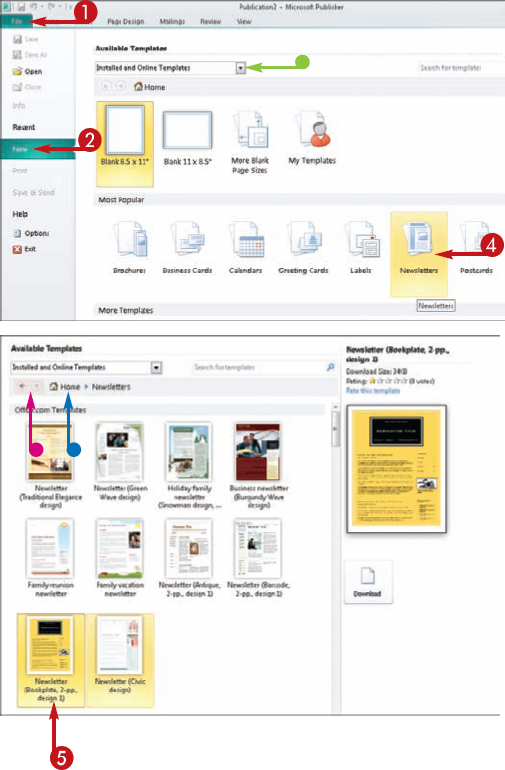
Microsoft Publisher comes with a seemingly endless supply of publications you can choose from, and you are bound to find one that meets your needs in some way. You can always edit any of the existing templates to create a custom template, deleting elements, adding new ones, and so on. With an online connection, you can access even more templates.
By default, Publisher displays both installed templates and online templates whenever you click the File tab and click New. Of course, the online templates appear only if you are connected to the Internet. As you begin to peruse the various categories, the Backstage view displays a navigation bar allowing you to move from one page to the next as you examine the templates and preview what they look like.
If you do not see a template you like, you can search for a particular kind of template using the Search tool. Whenever you encounter an online template you want, you must download it in order to use it. Depending on your connection speed, the process takes only a moment or two.




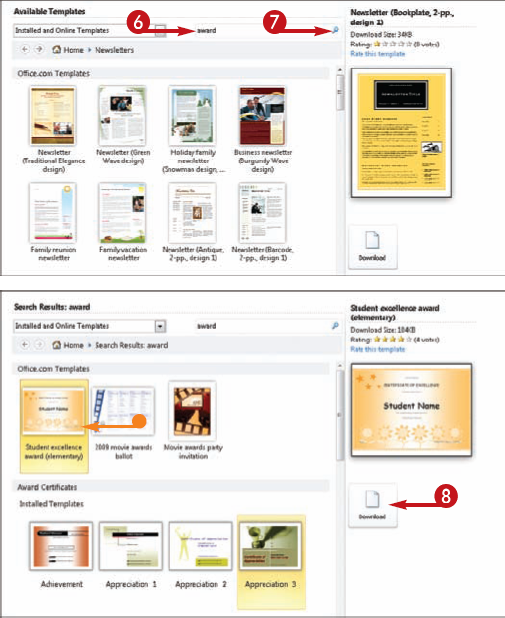


If the template is already installed on your computer, the Create button appears instead.
Tip
Did You Know?
If you create a particularly useful template, you can share it with others on the Office.com site. Submitting a template for consideration requires uploading the template file and filling out a form. You need a Windows Live ID to do this. It takes a couple of days for review, and then, if it passes, the template is posted for others to download. Use this Web address in your browser window to open the Submit a Template page: https://services.office.microsoft.com/en-us/templates/start.aspx. Be sure to check out the Templates Home page to find more resources, blogs, and partner sites.
More Options!
If you create a publication you really like, you can save it as a template you can reuse or share with others. Click the File tab and click Save As to open the Save As dialog box. Click the Save as Type drop-down arrow and select Publisher Template. Give the file a unique name and click Save to create the template file.
Many of the documents you create in Publisher require gathering content from another source. For example, you might be working on a newsletter and your colleague has composed a story in another program. You can import text-based files into Publisher to use as newsletter articles or to use in as content in other types of publications.
So how do you bring in a text file and place it into a publication? Ordinarily, you might think copying and pasting does the trick. However, Publisher offers you another method to use. You can import a text story without having to open the originating program. This saves you some time and steps.
When you import a text file with the Insert File command, it flows into the text box where you want it to appear. Any extra text that does not fit into the text box flows into the next frame or into overflow.


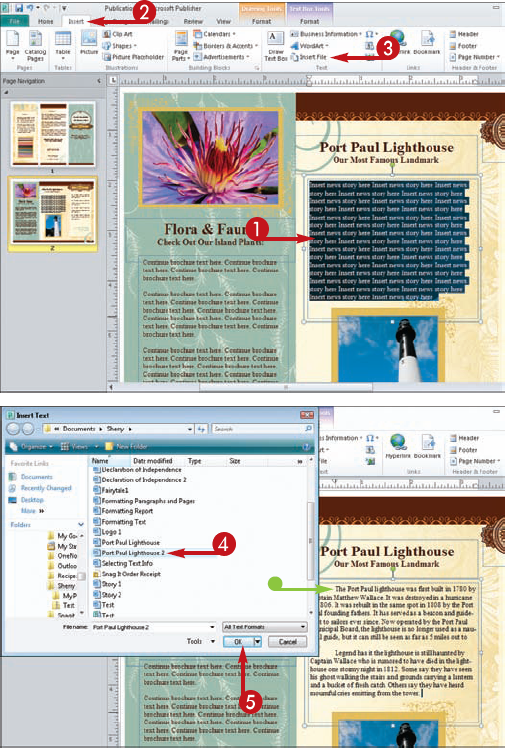
The Insert Text dialog box opens.


When you select a text box in Publisher, you can move it around the document wherever you want it. Sometimes, however, you need to move it only a small amount of space. With the box selected, you can press the keyboard arrow keys to nudge a text box ever so slightly up, down, to the left, or to the right, depending on which arrow key you press. This is a handy little trick for when you need to move a box, but dragging it moves it too much or not precisely enough.
The nudge feature is set up to move a selected box 0.13" every time you press the arrow key for the direction you want to move. You can change this setting to be more or less. Using the program's Options dialog box, you can specify a different amount to suit the way you work. You may want to nudge boxes more or less than the default setting. Just enter your own value into the field.


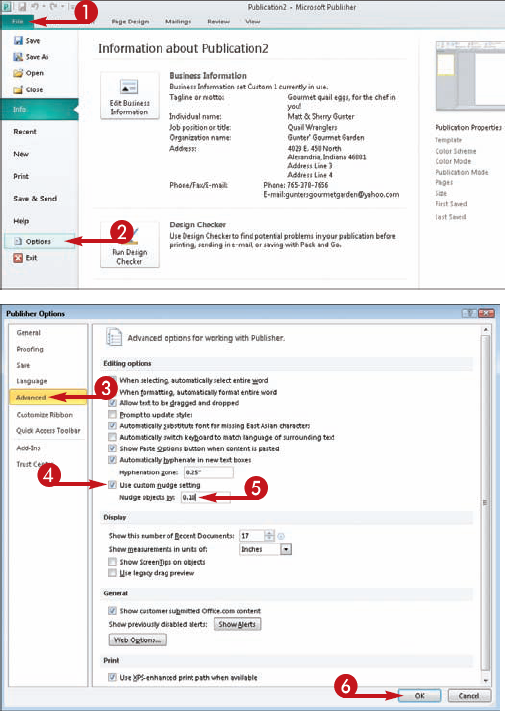
The Publisher Options dialog box opens.


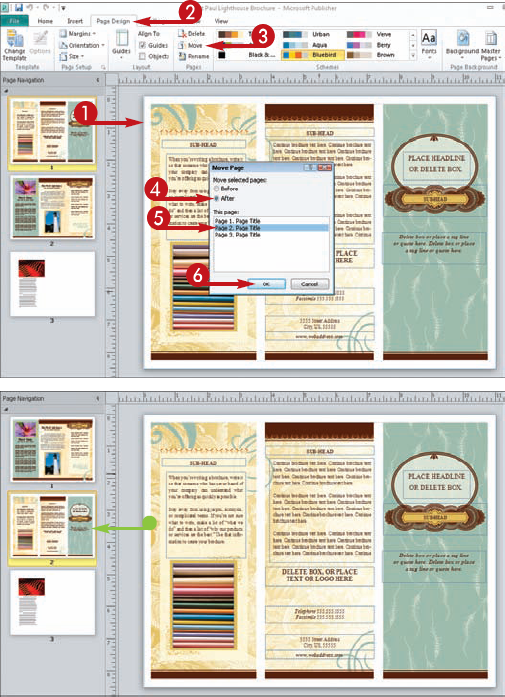
You may find yourself working on a longer publication using lots of pages, such as a newsletter or brochure. What happens if you need to move a story, associated graphics, and all the other objects found on the page to another location in the document? For example, maybe the story you placed back on page four is now a front page story. You can certainly use the tried-and-true practice of copying and pasting each element to its new location on a new page, but you may prefer a more direct method. Thankfully, Publisher has just the tool for the job — the Move Page dialog box.
You can specify exactly where you want the page inserted, either below or above another page. If your document has a two-page spread, both of the pages move as a unit.
If you want to move a single story instead of a page, use the Cut and Paste commands instead.


The Move Page dialog box opens.



Note
If your publication has a few pages, you can just drag and drop the page into a new location on the Page Navigation pane.
Text boxes are the receptacles for your publication stories and content, and depending on the template you use, how much text fits into a box is limited by the box size. If you try to place too much text into a box, it overflows to another. When this is not a solution, you can try Publisher's Text Fit commands to remedy the problem.
The Text Fit control gives you four distinct options to try for fitting text into a text box. The Best Fit option automatically resizes the text to fit every time you resize the text box. The Shrink Text On Overflow option shrinks the text inside the text box if any overflow text exists. The Grow Text Box to Fit option does just what its name implies: It resizes the text box to fit the text. The Do Not Autofit option tells Publisher not to automatically adjust the text size to fit.


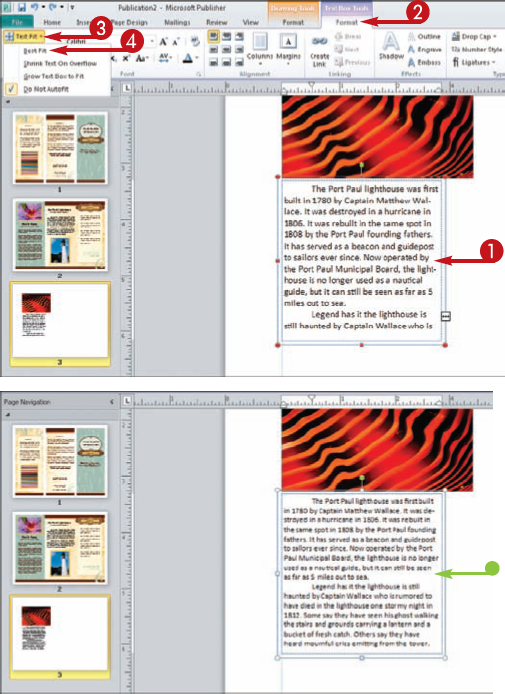
Publisher immediately applies the new setting.

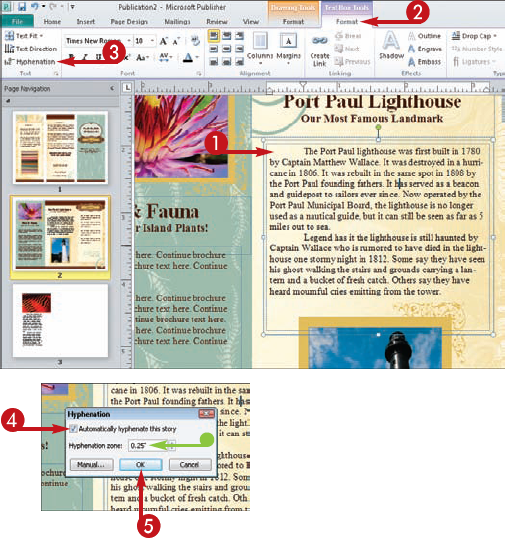
Publisher automatically hyphenates text to help display as much text as possible in a text box. Hyphens break up words that do not fit at the end of a line. As a space-saver idea, this is a good one. However, not every publication you create needs or warrants hyphenated text, and in some cases, the hyphenation ends up looking far worse than the space it saves. You can control whether hyphenation is applied or not, and even control it manually.
The Hyphenation dialog box offers controls for turning off automatic hyphenation or controlling it manually on a case-by-case basis. By default, hyphenation is set up to occur when text breaches the 0.25" area at the right border of the text box. You can set a smaller hyphenation zone, such as 0.05" to achieve less hyphenation. If you enter a larger value, you can expect more hyphenated words.
When you turn off the feature, hyphenation is no longer applied to the selected text box at all. You can also activate the Manual feature and manually determine what hyphenated words you keep or dismiss in a text box.
If you insert your own hyphens, Publisher does not remove them if you turn off the automatic hyphenation feature. You must remove them yourself.


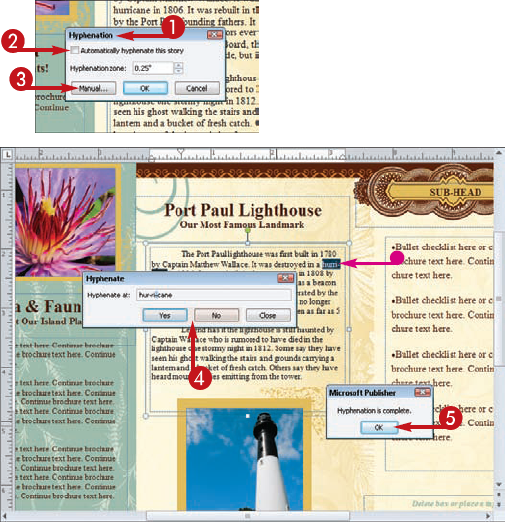


Repeat step 4 to continue editing each occurrence.

Tip
More Options!
You can turn off the hyphenation settings for new text boxes you add in Publisher. To do so, you must open the program's Options dialog box. Click the File tab and click Options to open the Publisher Options dialog box. Click the Advanced tab and uncheck the Automatically Hyphenate in New Text Boxes check box (
Did You Know?
If hyphenation is causing you problems, you can always try resolving the issue by resizing your text box or adjusting the Hyphenation Zone setting.
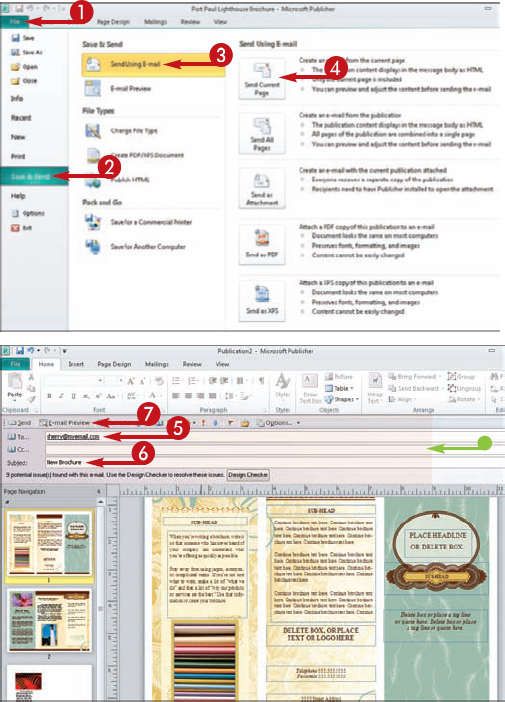
You can e-mail your publication to share it with a colleague or boss, or even a friend. Microsoft Publisher gives you a variety of options for e-mailing files. If you have a multipage publication, for example, you can choose to e-mail just the current page. This option inserts the page in the message body of your e-mail as an HTML element. You can also e-mail all the pages and insert them as a single page into the message body.
Another option is to simply e-mail the publication as a file attachment. When you select this option, the publication is attached to the message, and in order for recipients to open the file, they, too, must have Publisher installed.
If the recipient does not have Publisher installed, you can try sending the publication as a PDF or XPS file. Both formats retain the formatting of the publication, but the contents cannot be easily edited. The recipient must open the file before viewing its contents.
This task demonstrates the Send Current Page option and the E-mail pane that opens for filling in a recipient. If you choose the Send All Pages option, Publisher prompts you to save your file in a separate dialog box first, and then opens the E-mail pane.




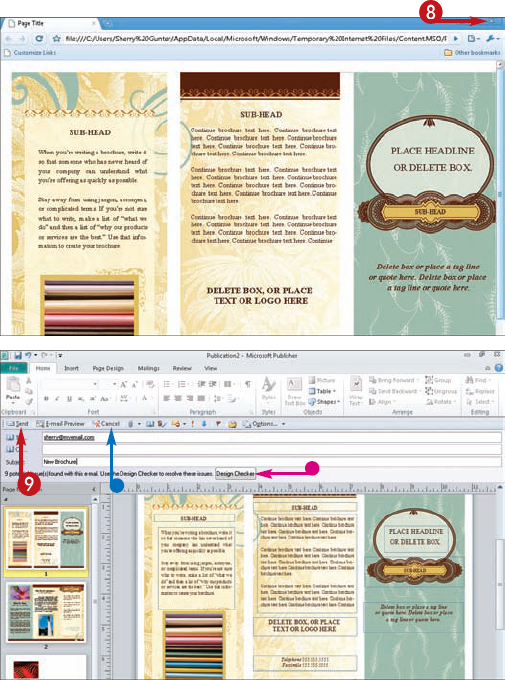
The default browser window opens and displays the publication page.



Note
You must be logged onto your Internet account in order to send the e-mail.
Tip
Try This!
You can also preview a publication for e-mailing before you open a particular e-mail option. Display the File tab, click Save & Send, and then click the E-mail Preview option. Click the E-mail Preview button that appears in order to view your publication as an HTML e-mail message using your default browser window.
More Options!
If you choose to send the publication as an attachment, regardless of whether it is a Publisher file, a PDF file, or an XPS file, a separate default Message window opens for including a personal message along with the file attachment. In the case of sending a PDF or XPS file, Publisher first converts the file to the designated format and then attaches the file to the message.
Some of your Publisher publications may require professional printing, especially if your desktop printer cannot handle all the binding, trimming, and finishing required, or if you need to print out large quantities of materials. Commercial printers can take over and help you reproduce your work on professional printing presses and various equipment. Thankfully, Publisher 2010 can assist you in starting the process with options to help you prepare the publication.
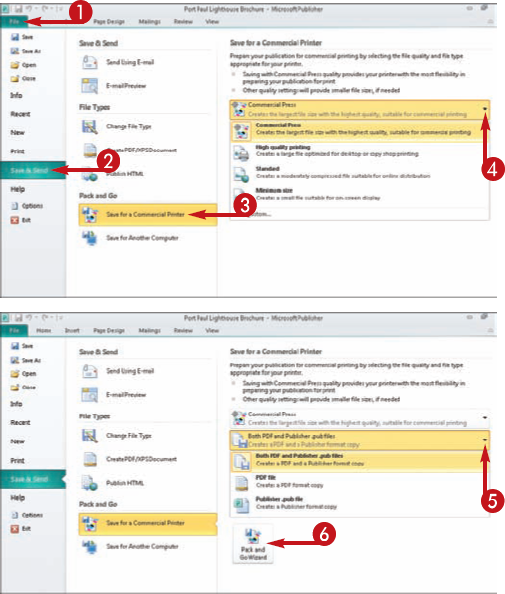
You can choose from several quality settings when preparing your file. The Commercial Press setting creates the largest file and saves the file to the highest quality settings for offset printing. If you prefer to optimize the publication for desktop printing at a high-end copy shop, choose the High quality printing option. Use the Standard option to create a compressed file suitable for online viewing, or the Minimum size option for regular old computer display.
In addition to a quality settings, you can also specify whether you want to create a PDF or Publisher format file or both.
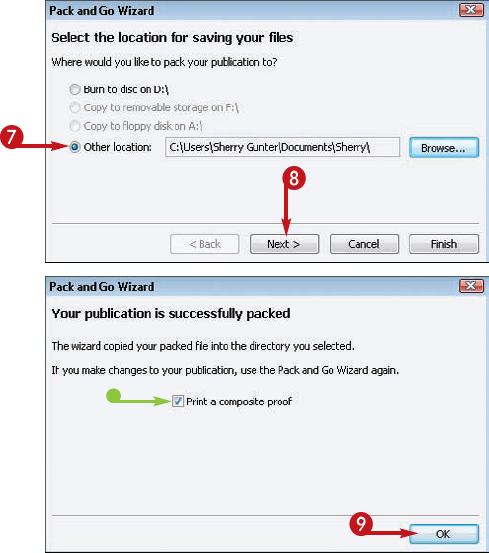
After deciding on your commercial printer options, you can then follow the Pack and Go Wizard prompts to copy your publication to a disk or other location. The wizard packs the publication and its linked files into a single file you can take or send to a commercial printer.




The Pack and Go Wizard opens.




Tip
Did You Know?
When preparing a publication for commercial printing, first and foremost you need to find out if the commercial printer can handle your Publisher file. Most printers do. If not, you can save the file as a PDF or XPS file, other common formats for printing. Saving publications to Publisher 98 or Publisher 2000 is also a good idea to make sure everything is compatible. You should also be very clear about what you need regarding the printing project, such as paper size, quality, deadlines, file size limitations, and so on. Publisher's help files offer some great tips on readying your file for professional printing.
More Options!
You can utilize Publisher's Design Checker to check your publication for any potential printing issues. Design Checker looks over your document for problems like overflow text, or pictures scaled disproportionately. To activate the Design Checker, click the File tab, click Info, and then click the Run Design Checker button. Publisher opens the Design Checker pane and lists any issues it finds. You can address each one as needed.
