The various applications in Microsoft Office 2010 — in particular, Word, Excel, PowerPoint, Access, and Outlook — share a common look and feel. Indeed, you can find many of the same features in each program, such as the Ribbon feature, the Quick Access toolbar, various program window controls, and the File tab.
This common look and feel is helpful when you perform certain tasks within Office applications. For example, creating a new document in Word is similar to creating a new document in Excel. The same goes for more complicated tasks, such as encrypting documents, tracking changes to a document, adding a digital signature, marking a document as final, and so on. This commonality makes mastering Office 2010 a snap.
This chapter focuses on tasks that transcend applications. That is, these tasks can be performed in more than one Office program. Although some of these tasks do apply to Access and Outlook, most relate only to Word, Excel, and PowerPoint.
Customize the Quick Access Toolbar. 4
Customize the Ribbon. 6
Control the Ribbon Display. 8
Share a Customized Ribbon. 10
Preview Paste Options. 12
Automate Office Tasks with Macros. 14
Change the Default Font and Size. 16
Organize Notes with OneNote. 18
Located in the top left corner of the program window sits the often underutilized Quick Access toolbar. The Quick Access toolbar provides easy access to often-used commands such as Save and Undo. In fact, it starts out with just a few default buttons. You can customize the Quick Access toolbar to change what commands are available and essentially make the toolbar into something that works for you.
Office enables you to add commands to the Quick Access toolbar three different ways. One is to select the desired command from the Customize Quick Access Toolbar menu. The menu only lists a few of the popular commands and displays check marks next to each button that is actively in the toolbar. You can choose which of the common commands you want to display or hide.
Another way to add commands is to use the program's Options dialog box. You can simply right-click the command you want to add in the Ribbon and click Add to Quick Access Toolbar.
In addition to adding commands to the Quick Access toolbar, you can also move it from its default spot above the Ribbon to a spot below the Ribbon. To do so, click the arrow in the Quick Access toolbar and click Show Below the Ribbon from the menu that appears.

Office displays the Customize Quick Access Toolbar menu.

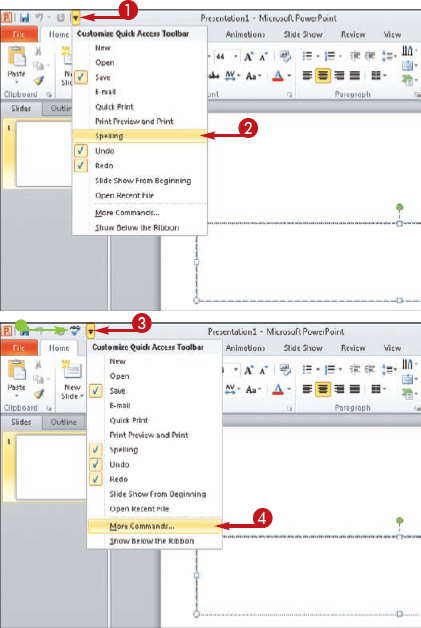

In this example, the Spelling button was added.


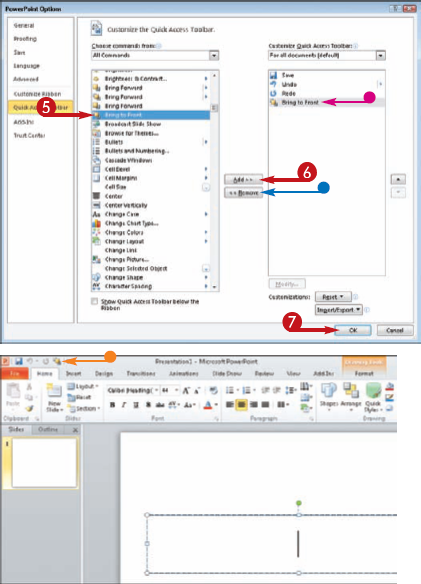
The program's Options dialog box opens with Quick Access toolbar options displayed.

Note
If the command you want to add is not shown, click the Choose Commands From drop-down arrow and select All Commands.



Tip
Did You Know?
You can add groups of commands in the Ribbon to the Quick Access toolbar. To do so, right-click the group name in the Ribbon and click Add to Quick Access Toolbar. The group is stored under a single button; click the button to reveal the available commands in the group.
Customize It!
You may want the customized toolbar for use with the current document only. In the program's Options dialog box with the Quick Access Toolbar settings showing, you can specify whether you want the customized toolbar available for all documents or just the current one you are working on. Click the Customize Quick Access Toolbar drop-down arrow located over the right pane listing all the buttons you have added and choose an option. In PowerPoint, for example, you can customize the toolbar for the current presentation, or in Word, you can apply the toolbar to the current document. The exact wording of the option varies based on what Office program you are using.
In Office 2010, the Ribbon is back and better than ever. The Office 2010 suite now offers a Ribbon of tools in every program. Designed to enable you to find the command necessary to complete a task more quickly and more intuitively than the menus and toolbars of old, the Ribbon is the go-to spot for accessing commands.
The Ribbon groups related commands together, placing them under clickable tabs. Each tab pertains to a certain type of task, such as formatting text, inserting items into a document, laying out a page, reviewing a document, and so on. The tabs shown depend on what Office program is open, and what type of task is being performed.
You will be happy to know you can retool the Ribbon to suit the way you work in an Office program. You can add your own tab and populate it with buttons for not-so-common commands, add new groups to existing tabs, and reorder the tabs in the Ribbon. All buttons you add to a tab are organized into groups.

Office displays a context menu.

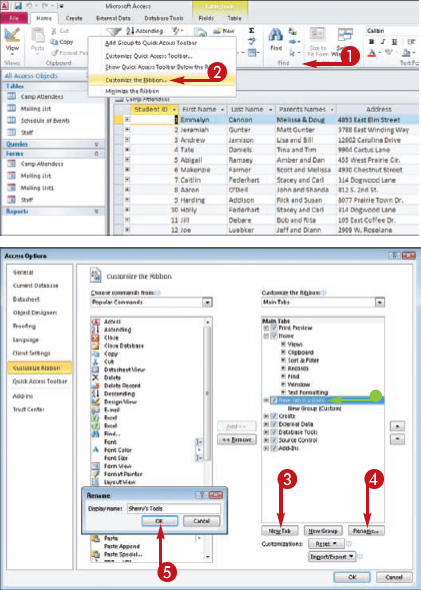
The program's Options dialog box opens with Ribbon options displayed.


Note
You can also rename any groups you add to the new tab; click the group name and click the Rename button.
The Rename dialog box opens.

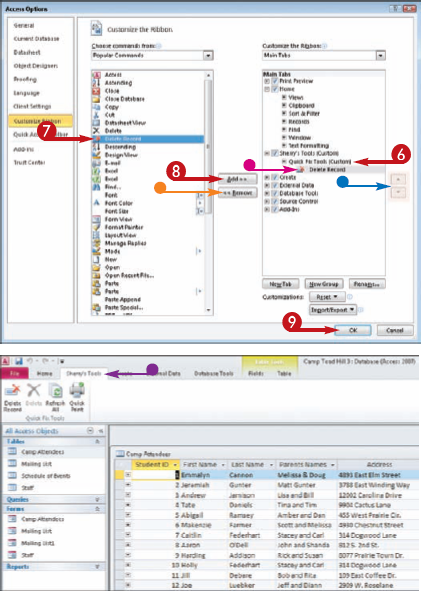


Note
If the command you want to add is not shown, click the Choose Commands From drop-down arrow and select All Commands.


Tip
Reverse It!
If you ever want to revert back to the original default Ribbon, open the program's Options dialog box and click the Reset button and choose whether you want to restore a single customized tab or all the customizations. If you choose the latter option, a prompt box opens and asks if you really want to delete all Ribbon and Quick Access Toolbar customizations. Click Yes to complete the process.
Did You Know?
Another way to open the program's Options dialog box is through the File tab. Click the File tab on the Ribbon, and then click Options. The nice thing about using the right-click method to open the dialog box is that it displays the Customize Ribbon settings automatically for you. If you use the File tab to open the dialog box, it displays the last set of options you edited.
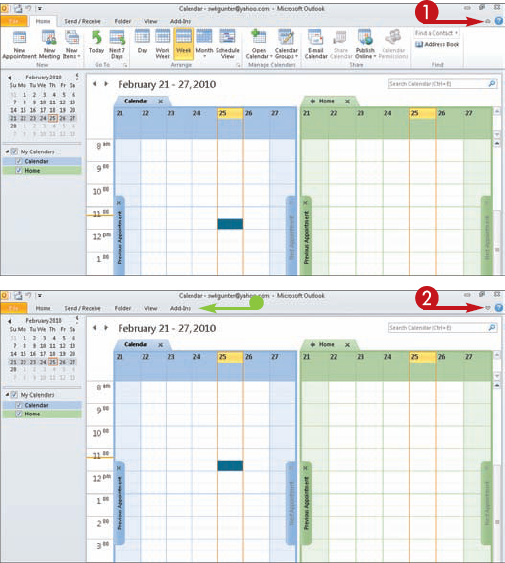
The Ribbon feature in Office 2010 is docked at the top of the program window where you can easily access all the many commands and features it offers. This location seems practical and efficient, but there may be times when the Ribbon is simply in the way. For example, you may want to view more of the document window you are working on. Although you cannot permanently remove the Ribbon, move it, or turn it off like you used to do with toolbars in Office 2003 and earlier, you can minimize it to get it out of the way. Anytime you need to utilize the commands again, you can summon the Ribbon back for display.
You can use two techniques to quickly minimize and summon the Ribbon. You can use the button located on the Ribbon itself, or you can right-click to display a context menu. Regardless of which method you employ, the Ribbon is significantly reduced in size, displaying only the tab names. This makes it extremely easy to bring the full Ribbon back again; just click a tab name.

A context menu appears.

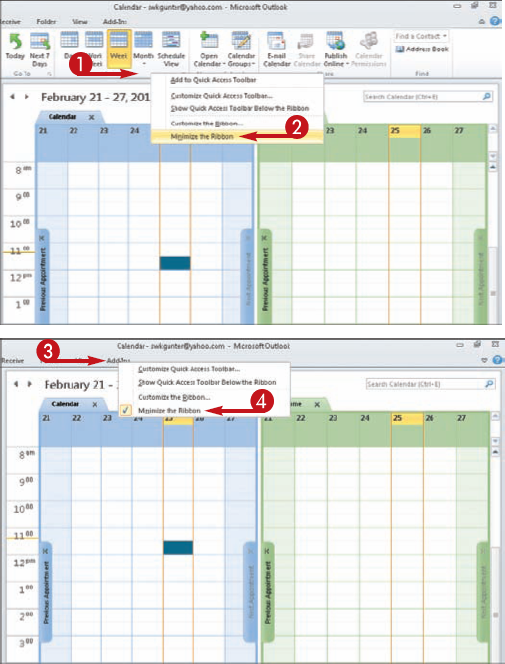
The Ribbon is minimized.


Tip
Did You Know?
Once you minimize the Ribbon, it stays that way even after you activate it to use a command. As soon as you finish the task at hand and move the mouse pointer off the Ribbon, it is minimized again automatically. To turn this minimizing effect off, click the arrow button (
Customize It!
If Microsoft's order of tabs on the Ribbon does not fit into your left-handed style, you can move the tabs around on the Ribbon to better work for your personal usage. In the Options dialog box for customizing a Ribbon, you can use the Move Up and Move Down buttons (
Perhaps you tackled the previous task and spent a great deal of time customizing a Ribbon with a new tab and groups of buttons. After all that work, you may want to share your efforts. Perhaps you want to share your personalized Ribbon with your laptop computer, or share it with other people who use Office. For example, if you build a custom tab with unique tools tailored for a group work project, you can share the customized Ribbon with others on the project team. How handy is that?
When you save a customized Ribbon, you are actually creating an Office user interface file which someone else can import into his or her Office program to use. The exported Ribbon file is saved as an XML file. Recipients of your personalized Ribbon can use the same Options dialog box you used to create the personalized Ribbon to import the customized file into their Office suite.

Office displays a context menu.

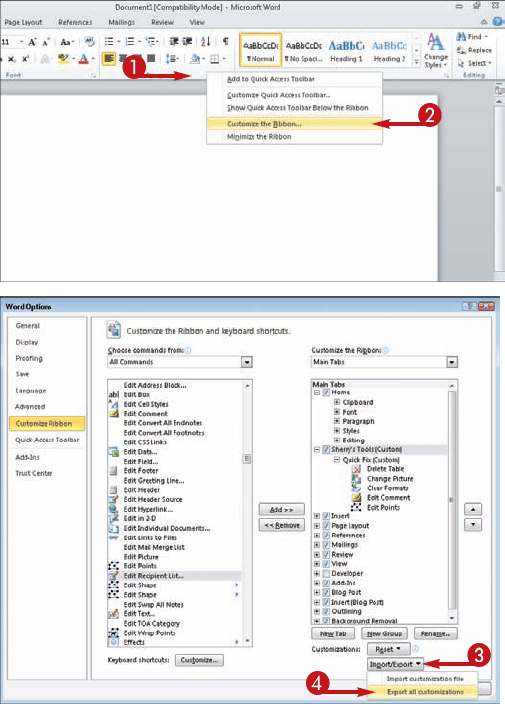
The program's Options dialog box opens with Ribbon options displayed.


The File Save dialog box opens.


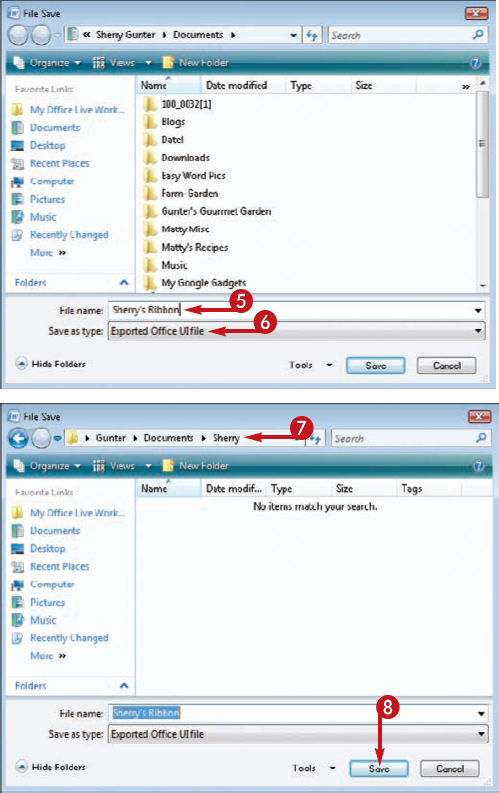


The file is saved and ready to share.

Tip
Apply It!
If you are the recipient of a customized Ribbon, simply open the Options dialog box to retrieve the file. Click the Import/Export button, click Import Customization File, and navigate to the XML file you want to open and use.
Remove It!
To remove a customized Ribbon, open the Options dialog box and click the Reset button, and then click Reset All Customizations.
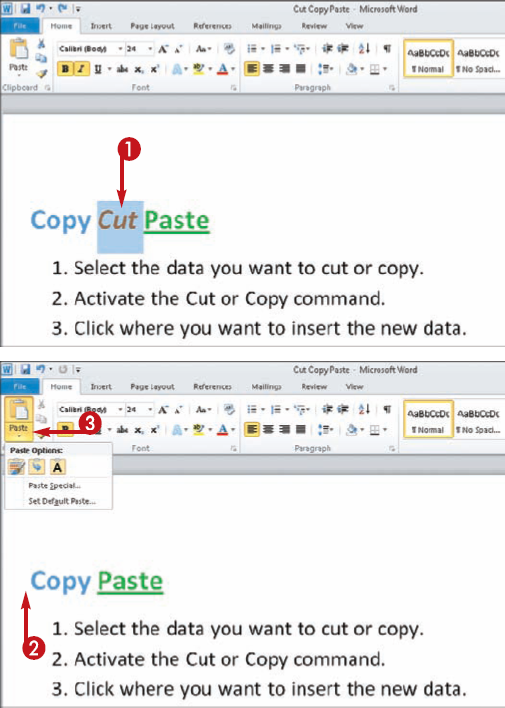
Pasting text, data, and other elements is one of the most-used Office commands. Cutting, copying, and pasting are basics in just about every computer application today. In past renditions of Office, however, it was not always easy to paste an item just the way you wanted. Sometimes formatting was included in the paste action, other times it was not. To help alleviate some of the frustration, Office 2010 has improved the Paste command to include a Paste Options gallery.
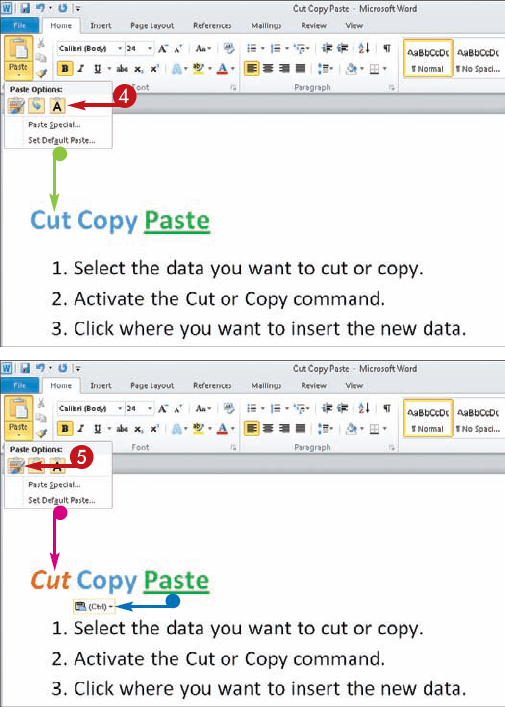
You can now choose exactly how you want the pasted data to appear. For example, you can choose to paste only the text without any formatting (
You can view the Paste Options gallery in three locations: through the Paste button on the Ribbon, through the pop-up that appears as soon as you paste an item, or through the right-click context menu. The options that appear in the Paste Options gallery are based on the type of data you are pasting.

You can find the Cut, Copy, and Paste commands on the Home tab of the Ribbon or on the right-click context menu.






Tip
Customize It!
You can also control Paste options — such as whether to keep source formatting when pasting data between documents or between programs — through the Options dialog box, even setting up default paste preferences. To display the dialog box, click the Paste button's drop-down menu and click Set Default Paste. This opens the program's Options dialog box directly to the cut, copy, and paste options.
More Options!
If you prefer using keyboard shortcuts to cut, copy, and paste, you will be happy to know the Paste gallery is available through a keyboard shortcut. After pasting data using the Ctrl+V shortcut, press Ctrl again to view the Paste Options gallery.
If you frequently use an Office program to complete the same task — for example, to format the cells in a spreadsheet a certain way, or to insert a table in a Word document that contains a certain number of rows and columns — you can expedite the process by recording a macro. When you record a macro, you essentially record a series of actions; then you can run the macro you recorded to automatically perform the recorded actions.
One way to access the controls for recording a macro is from the Developer tab on the Ribbon. This tab is not shown by default, however. To display the Developer tab, right-click an empty area of the Ribbon and click Customize the Ribbon to open the Options dialog box. Click the Developer tab check box in the right pane to turn the tab on. Click OK and you are ready to record your own macros.
Note that recording a macro in Access differs somewhat from recording macros in other Office programs, such as Word, Excel, and PowerPoint. For information on creating macros in Access, see Chapter 9.


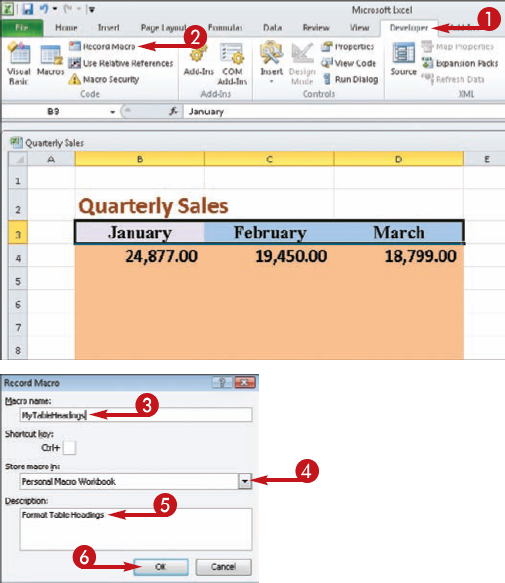
The Record Macro dialog box opens.

Note
No spaces are allowed in macro names.


This example formats a series of headings.


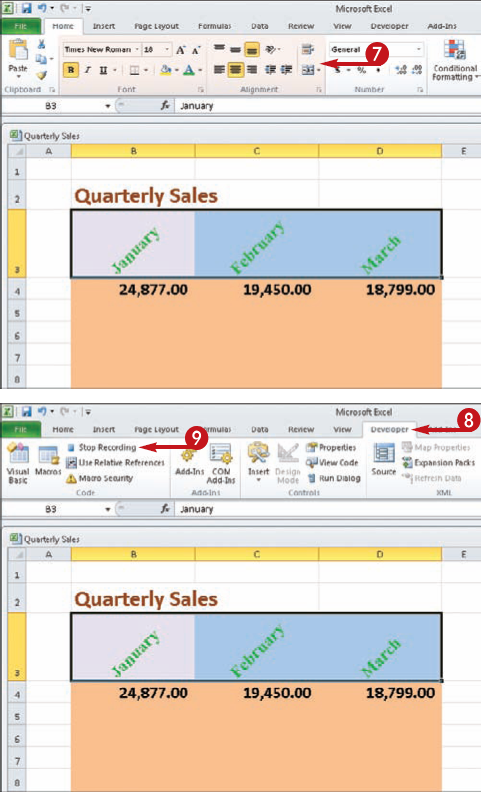
The application saves the macro.
Tip
Apply It!
To run a macro you have recorded, click the Developer tab and click Macros in the Code group. In the Macros dialog box that appears, click the macro you want to run, and then click Run.
Caution!
Because macros can be created for malicious purposes, they are often disabled by default. To enable the use of macros in a particular document, click the File tab, click the Options button, click Trust Center, click Trust Center Settings, and then click Macro Settings. Finally, click Disable All Macros with Notification (
You can control the font and size that Office automatically applies to every Word document or Excel workbook you open. By default, both programs apply a pre-set font and size to every new document or workbook you create. These settings are in place and ready to go so you can start entering data right away. You can certainly apply formatting to change the font and size as you add data, but if you use the same font and size for every file you create, why not instruct the program to assign those settings at startup?
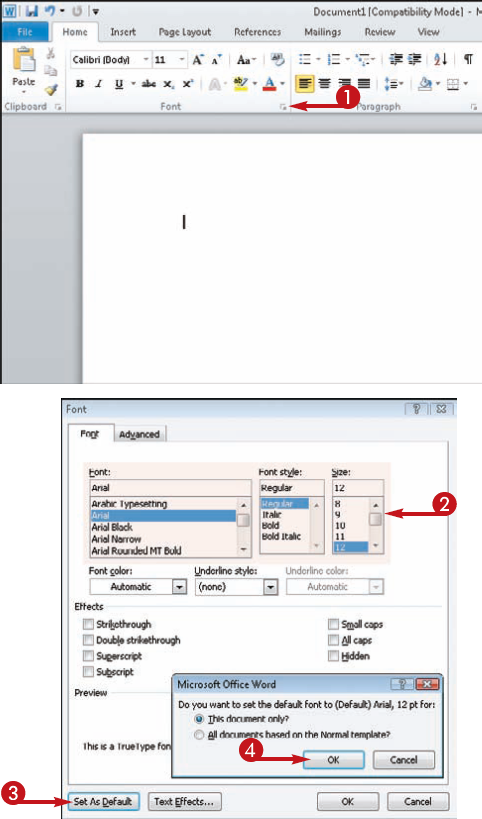
In Word, you use the Font dialog box to assign new default settings. In Excel, you use the Excel Options dialog box to assign a new default font and size. Access, PowerPoint, Outlook, and Publisher do not utilize default sizes; however, you can set a default font and size for some of Outlook's features, such as the Calendar, Notes, and Journal. Use Outlook's Options dialog box to adjust settings.
Once you specify new default settings, those settings are in place for any new files you create.

Note
Many of the tool groups in the Office Ribbons have icons in the corners you can click to open associated dialog boxes. In this example, the icon in the Font group, also called the Font dialog box launcher, opens the Font dialog box.
The Font dialog box opens.


A prompt box appears asking you whether you want the settings to apply to the current document or all documents.


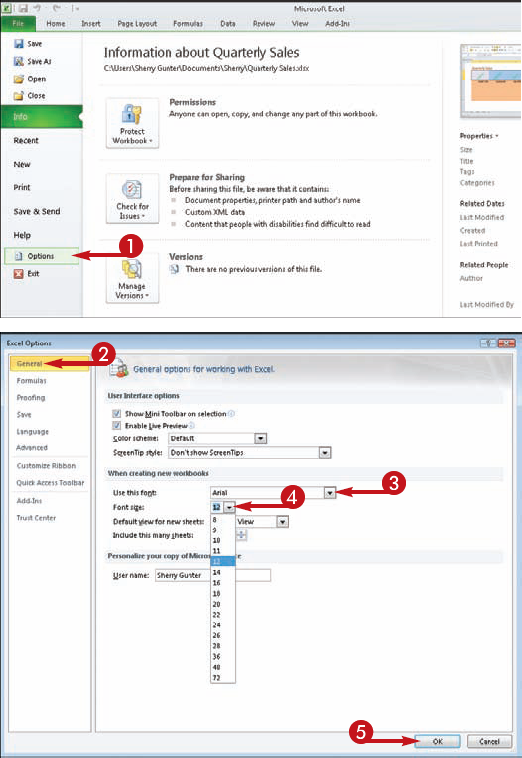
The Excel Options dialog box opens.


The new settings are assigned.
Tip
More Options!
Speaking of fonts, Word 2010 now supports OpenType ligatures. Ligatures refer to typography characters whose shape depends on surrounding characters, such as the letter f combined with the letter l or i. OpenType is a format for scalable fonts. OpenType ligatures are not enabled by default. To turn them on, open the Font dialog box by clicking the dialog box launcher in the Font group on the Home tab of the Ribbon. Click the Advanced tab and select a ligature from the OpenType features. Click OK to exit the dialog box and apply the new setting.
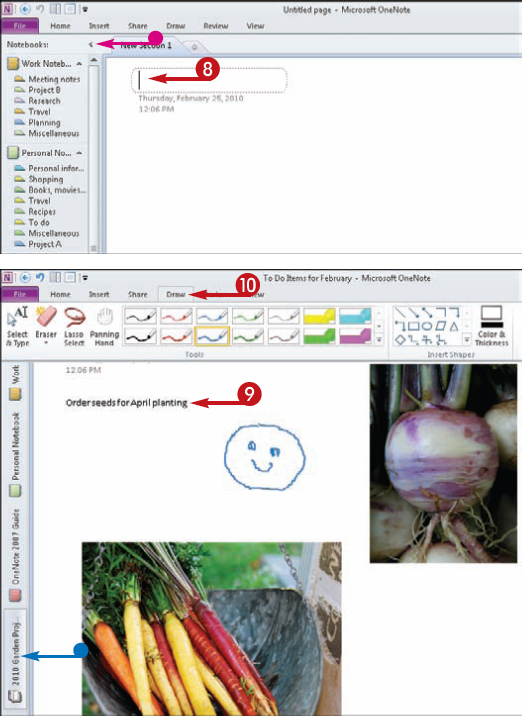
Often overlooked among the many programs in the Office suite, OneNote is a handy little organizer that may be just the thing you need to keep track of various pieces of information. Microsoft's OneNote application is a digital version of a 3-ring binder notebook. OneNote allows you to collect, store, and share notes, thoughts, scraps of information, text, and video and audio files, and organize all these various items so they are easy to find again. You can use OneNote to gather all kinds of elements into one place, then use word processing and annotation tools, search and indexing features, and drawing tools to work with the various elements.
Workbooks are organized into sections and tabs. Pages are stored in tabs and saved automatically. You can move pages in and out of a notebook, and share them with other users, making it ideal for collaborating with workgroups.
OneNote may look a little intimidating at first, but it is actually quite easy to use. The Getting Started information appears first thing, and you can view the various pages, learn how to use the features, and then start creating your own notebooks. Read through the pages to learn how to drag items from other windows into your notebook, insert screen clippings, paste pictures, and much more.


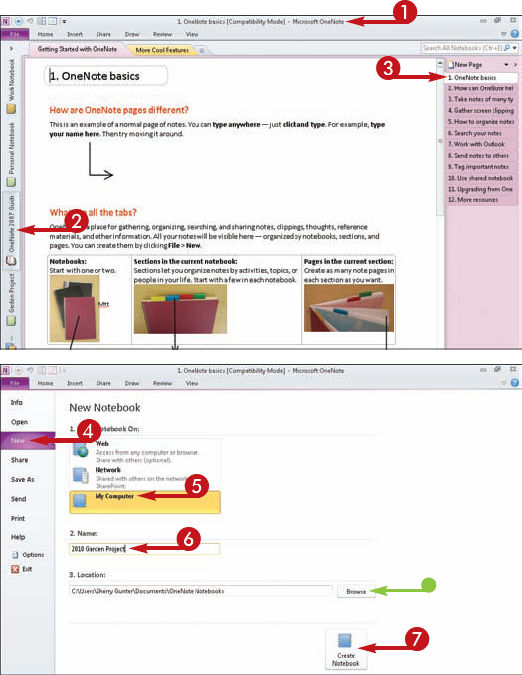


A new notebook opens with a blank page.


Items you organize in your notebook do not have to be saved — OneNote does this automatically.

Tip
Apply It!
To make it easier to add items to your notebook from other sources, you can dock OneNote to the side of your desktop, keeping it handy but slightly out of the way. You can then drag items over to it as needed. To dock OneNote, click the Dock to Desktop button (
Try This!
You can use the View tab on the Ribbon to change the ways in which you view your Notebook. Normal view, the default view when you first open OneNote, includes the navigation bar on the left and the page tabs bar on the right. You can also find the docking command and Full Page View command on the View tab, too.
