
Chapter 7
Implementing Parallelism
What's in This Chapter?
Parallelizing loops
Parallelizing sections and functions
Parallelizing recursive functions
Parallelizing pipelined applications
Parallelizing linked lists
There are a number of different ways to add parallelism to a program. Figure 7.1 shows how you can use Intel Parallel Studio XE to make your code parallel by using:
- Libraries, such as the Math Kernel Library (MKL) and the Integrated Performance Primitives (IPP) library.
- Automatic parallelism, asking the compiler to automatically parallelize your code using the /Qparallel option; you can also use the guided auto-parallelization of the compiler (enabled with the /Qguide option) to help tune the auto-parallelism. You can find more about auto-parallelism in Chapter 6, “Where to Parallelize.”
- Programmatic parallelism, adding parallel constructs to your code using Cilk Plus, OpenMP, Threading Building Blocks (TBB), or native threads (POSIX or WIN32).
Figure 7.1 Adding parallelism using Intel Parallel Studio XE
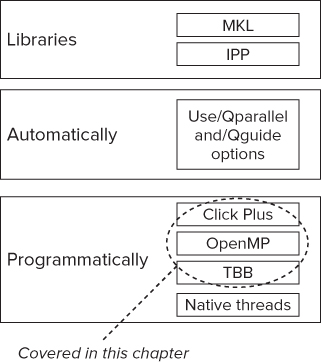
This chapter shows how to add parallelism to five of the more common serial code patterns: loops, sequential code, recursive functions, pipelined applications, and linked lists. For each pattern, examples are shown using Cilk Plus, OpenMP, and TBB. The MKL, IPP, and native threading examples are not discussed.
Note that the chapter is not a full treatise for each of these parallel languages. The focus here is on is how you can quickly and easily introduce parallelism into your code.
![]()
C or C++, That Is the Question
One implementation detail can have a big impact on which parallel construct you decide to use — C or C++.
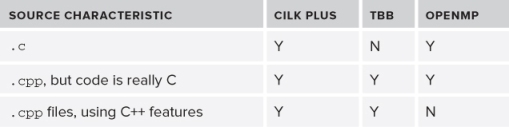
Cilk Plus and TBB are very C++ friendly, whereas OpenMP is not. Table 7.1 gives some suggestions on which parallel models to use depending on how C++-like your code is.
Table 7.1 Parallel Model Suggestions
Other factors that might influence which mode you choose include:
- When using Cilk Plus in .c files, Cilk reducers are awkward to use, requiring use of many C macros.
- Multiple OpenMP programs running on the same system do not always share the threading resources very well, and can lead to oversubscription.
- TBB is heavily C++ oriented. Use TBB only if you are comfortable with concepts such as classes and templates and operator overloading. Having said that, you will easily understand most of the TBB examples in this chapter even if you are uncomfortable with C++.
Taking a Simple Approach
All three of the programming models used in this chapter — Cilk Plus, OpenMP, and TBB — support different levels of complexity and abstraction. The intention of this chapter is to keep to a higher level of abstraction as possible by:
- Thinking in terms of tasks, not threads. All the programming examples concentrate on what work needs to be done without being concerned about threads. Emphasis is on work-sharing and relying on automatic scheduling. The question “How many threads do I have?” is not asked.
- Using lambda functions rather than body objects (TBB specific). When TBB was first released, the snippets of parallel code had to be embedded within new C++ classes, which in turn were used to create body objects. Since the introduction of the C++11 standard, you can now use lambda functions instead for many of the TBB templates. This reduces the amount of boilerplate code you have to write, leading to much simpler code.
- Keeping it simple. There is no attempt made to describe solutions that are complex. All the examples use high-level abstractions, avoiding anything that is intricate. If your parallel programming requires that you have a fine level of control, or if you need to use a different kind of scheduling, the higher-level parallel abstractions used in the examples may not suit your requirements.
- The code examples are ANSI C-like rather than fully blown C++. If you are passionate about writing good C++ programs, this will no doubt annoy you. The reason for doing this is so that the code can be accessible to non-C++ programmers. The code examples here are fairly easy to classify (as in writing C++).
This chapter is not intended to teach you everything about Cilk Plus, OpenMP, or TBB. You can read more on how to deal with data races in Chapter 8, “Checking for Errors,” and more on scheduling and tuning in Chapter 9, “Tuning Parallel Applications.”
The Beauty of Lambda Functions
Lambda functions are included in the C++11 standard (formerly known as C++0x) and provide a means of declaring the body of a function in-place. They are sometimes referred to as anonymous functions or functors.
Figure 7.2 shows the syntax of a lambda function. Within the body of the function you can refer to external variables; the capture_mode options define how these variables get their values.
Figure 7.2 The syntax of the lambda functions

Listing 7.1 shows an example of using a lambda function with the Standard Template Library (STL) for_each method. The program examines each character of the Message string and counts how many spaces there are.
 Listing 7.1: Using a lambda function
 1: #include <iostream>
 2: #include <algorithm>
 3: using namespace std;
 4: int main()
 5: {
 6:   int Spaces = 0;
 7:   char Message[]="The Beauty of Lambda!";
 8:
 9:   for_each(                                // use STL for_each
10:     Message,                               // beginning of string
11:     Message + sizeof(Message),             // end of string
12:
13:     // The lambda function
14:     [&Spaces] (char c) { if (c == ‘ ‘) Spaces++;}
15:   );                                       // end of for_each
16:
17:   cout "‘"<< Message << "’"<< " has " << Spaces <<" spaces <<endl;
18: }
code snippet Chapter77-1.cpp
Line 14 contains the lambda function, which takes the c parameter and checks to see if it is a space. If so, the function increments the Spaces variable, which has been explicitly captured in the lambda function by reference. You don't have to capture variables explicitly; you can rely on the compiler to capture them for you automatically. For example, you could use the following code in place of line 14:
[&] (char c) { if (c == ‘ ‘) Spaces++;}
The beauty of lambda function in the context of parallelism is that you can wrap existing code in a lambda function and then use the wrapped function in your parallelism strategy. This leads to fewer code changes when parallelizing your code and can simplify the use of some parallel constructs.
![]()
Parallelizing Loops
Loops provide one of the most natural places to add parallelism. The following two requirements need to be satisfied before a loop can be usefully parallelized:
- There must be a sufficient amount of work being done in each loop. Any loop being parallelized should be a hotspot. See Chapter 6, “Where to Parallelize,” to find out more about hotspots in your code.
- Each loop iteration must be independent of any other. For example, iteration n must not depend on iteration n-1 to be able to perform correctly.
The order in which the loops are executed is not important.
This chapter considers two loop constructs, the for loop and the while loop, along with two variants, the nested for loop and the reduction for loop.
The for Loop
You can use the Cilk Plus cilk_for, the OpenMP #pragma omp for, and the TBB parallel_for to parallelize a C/C++ for loop.
The Cilk Plus cilk_for Loop
Cilk Plus has its own equivalent of the serial for loop. By replacing a standard for loop with the cilk_for loop, the iterations within the loop are shared between the available workers. The following code shows a simple cilk_for loop:
#include <cilk/cilk.h>

cilk_for (int i=0; i < 100;i++)
{
  work(i);
}
Here's an example of a cilk_for loop that uses STL vectors and iterators:
cilk_for (T::iterator i(vec.begin()); i != vec.end(); ++i)
{
    Work(i);
}
A cilk_for loop must follow these guidelines:
- The loop variable can be declared in advance in C, but not in C++.
- There must be only one loop control variable.
- The loop control must not be modified in the body of the loop.
- Termination conditions should not be changed once the loop has started.
- No break or return statement is allowed in the loop body.
- You can use a goto as long as the target is within the loop body.
- Loops cannot wrap around.
- Infinite loops are not allowed.
Load balancing is carried out automatically by the Cilk Plus run time. The cilk_for loop uses a divide-and-conquer strategy. The loops are repeatedly divided into chunks, until a minimum size, known as the grain size, is reached. Each chunk is then shared among the available workers.
You can influence the performance of the loop by changing the grain size and the number of workers.
Grain Size
The grain size is used to control the maximum number of loops each chunk can contain. Normally, you do not need to be concerned about setting a value for the grain size; the Cilk Plus run time sets the value automatically. You can specify the grain size using the cilk_grainsize pragma:
#pragma cilk_grainsize = 1
Increasing the grain size reduces the overhead of parallelization, but can lead to poorer parallelism.
The default grain size will have a value between 8 and 512, and is calculated using the following formula:
![]()
Number of Workers
You can set the number of workers using the environment variable CILK_NWORKERS or by using the Cilk Plus API command _cilkrts(). This command sets the number of workers to 20:
_cilkrts("nworkers", "20");
Loop Control Variable
You can use different types, including your own custom types, for the loop control variable. Whatever type you use, it must have:
- A means of determining the loop range size
- An operator to work out the difference between two such variables
- An operator to increment or decrement the variable
For more information on this topic, refer to the Intel Composer XE online help.
The OpenMP for Loop
The #pragma omp for statement is a work-sharing construct that causes the loops to be executed in parallel by a pool of threads. In the following code example, a pool of threads is created by the #pragma omp parallel statement. The loops of the for statement are then executed in parallel by the different threads.
#pragma omp parallel
{
  #pragma omp for
  for (int i=0; i < 100;i++)
  {
    work(i);
  }
} // end of parallel region
The two pragmas in this code can be concatenated into a single pragma, #pragma omp parallel for.
At the end of the loop, there is an implicit barrier where all the threads wait until the last thread has completed. If you add a nowait clause to the #pragma omp for statement, there will be no barrier and the threads will be free to continue on to the next section of code.
Influencing the Scheduling
You can modify the runtime behavior of the for loop with the schedule clause. The following are the three most common clauses used:
- #pragma omp for schedule(static, chunk_size) — The number of threads is divided into chunk_size and scheduled in a round-robin fashion among the pool of threads. When no chunk_size is specified, the number of chunks is the same as the number of threads.
- #pragma omp for schedule (dynamic, chunk_size) — The chunks are requested by the threads. When a thread becomes free, it requests a new chunk. When no chunk_size is specified, the chunk_size is 1.
- #pragma omp for schedule (guided, chunk_size) — Each thread is assigned a chunk of work that is greater than the chunk_size. As each thread requests new chunks, the size of the chunk is decreased until it becomes chunk_size. When no chunk_size is specified, the chunk_size is 1.
Number of Threads
You can set the number of threads by using the environment variable OMP_NUM_THREADS or the API call omp_set_num_threads(num). If you build an application that includes the following code, and then set the environment variable to be two (set OMP_NUM_THREADS=2), the first loop will be shared between two threads, and the second loop will be shared between five threads.
void do_work()
{
  #pragma omp parallel for
  for (int i=0; i < 100;i++)
  {
    work(i);
  }
  omp_set_num_threads(5)
  #pragma omp parallel for
  for (int j=0; j < 100;j++)
  {
    work(j);
  }
} // end of parallel region
Loop Control Variable
The loop control variable can be a signed/unsigned integer, a C++ iterator, or a pointer type. For example, the following code uses a pointer as the control variable:
#include <stdio.h>
int main()
{
  char mem[10] = {‘a’,‘b’,‘c’,‘d’,‘e’,‘f’,‘g’,‘h’,‘i’,‘j’};
  #pragma omp parallel for
  for (char *p = &mem[0]; p < &mem[10]; p++)
  {
    printf("0x%p:%c
",p,*p);
  }
  return 0;
}
The TBB for Loop
The following example uses a compact version of the parallel_for construct that can iterate over a range of integers. The code being executed is wrapped in a lambda function.
#include <tbb.h>
.
.
parallel_for (size_t(0), 100,[=](size_t i) {
    work(i);
  } // end of lambda code
); // end of parallel _for
Nested for Loops
When you parallelize a nested loop, it is usually to parallelize just the outer loop. However, on some occasions you should consider parallelizing the inner loop as well as, or instead of, the outer loop. Consider, for example, the following code:
for(int i = 0; i<5;i++)
  for(int j = 0; j < 100; j++)
{
  Work(i*100 + j);
}
You can see that
- The outer loop has a low trip count, much lower than the inner loop.
- The outer loop trip count could well be less than the number of hardware threads that can be supported.
If you were to run the code on a 24-core PC, the maximum speedup you could obtain by parallelizing the outer loop would only be 5, even though the hardware can support a speedup of up to 24.
A variation on this example might be if the inner and outer loops both have a low trip count:
for(int i = 0; i<5;i++)
  for(int j = 0; j < 5; j++)
{
  Work((i*5) + j);
}
To achieve a better parallelization of these kinds of nested loops, you should do one of the following:
- Parallelize the inner loop instead of the outer loop.
- Parallelize both inner and outer loops.
- Rewrite the loops so the inner and outer loops are swapped, and then parallelize the new outer loop.
In OpenMP, you can collapse loops together using the COLLAPSE clause. In the following code example, the outer two for statements are collapsed together:
#pragma omp parallel for collapse(2)
for (int i=0; i < 2;i++)
  for (int j=0; j < 10;j++)
    for (int k=0; k < 100;k++)
    {
      Work(k);
    }
Using nested parallelism in Cilk Plus and TBB should not cause a problem as long as the inner loop does a sufficient amount of work. The act of work-stealing performed by their respective schedulers will automatically load-balance the work.
In OpenMP, the situation is slightly more complicated. If nested parallelism is enabled, a fresh pool of threads is created for each parallel region. Nested parallelism can lead to oversubscription, where the number of threads running exceeds the number the hardware can support.
By default, nested parallelism is disabled. If you want, you can enable nested parallelism by using the omp_set_nested(expression) API command or the environment variable OMP_NESTED. Likewise, you can check if nested parallelism is enabled using the omp_get_nested() API command.
For more information on this and other OpenMP features, look at the OpenMP standard, which you can download from www.openmp.org.
The for Loop with Reduction
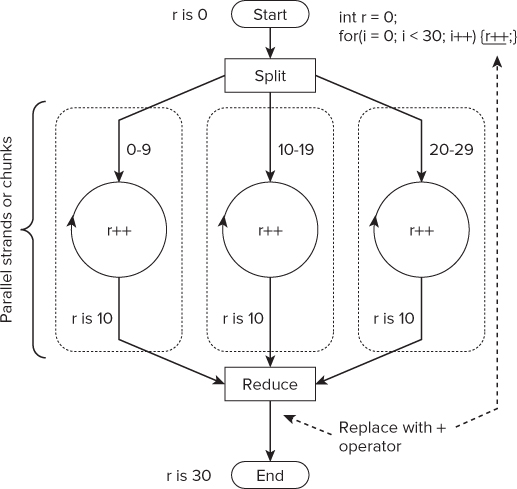
On some occasions you will want to combine the results of several parallel computations — a technique known as reduction. In loop reduction, each parallel strand manipulates its own reduction variable(s), which are combined at the end of the parallel region.
Take, for example, the loop in Figure 7.3. Here the loops are split into three chunks and executed in parallel. When each parallel strand has completed, the value of each r is combined together using the addition operator. You can perform reduction using different operators as well as the addition operator. Cilk Plus, OpenMP, and TBB all support reduction.
Figure 7.3 A for loop with reduction
Cilk Plus Reduction
Cilk Plus provides special objects known as reducers to support reduction. You can find a list of reducers in Chapter 2 (Table 2-3), along with a code example in Listing 2-2, “An example of using a Cilk Plus reducer.”
OpenMP Reduction
The following code gives an example of reduction:
int r = 0;
#pragma omp parallel for reduction(+:r)
for (i=0; i < 29; i++)
{
  r++;
}
The reduction clause causes each thread to have its own private copy of the r variable. The values of each private copy are combined back together using the + operator at the end of the for loop. You can use the following operators with the reduction clause: +, *, -, &, |, ∧, &&, ||, max, and min.
TBB Reduction
TBB provides the parallel_reduce template to support reduction. Listing 7.2 shows how to use it with lambda functions. You must provide two lambda functions: one for the code you want to execute in the loop, and a second one that provides the reduction operator.
Listing 7.2: Parallel reduction using TBB
#include "tbb/parallel_reduce.h"
#include "tbb/blocked_range.h"
using namespace tbb;
float ParallelSum( float array[], size_t n )
{
  return parallel_reduce(
    // range
    blocked_range<float*>( array, array+n ),
    // identity
    0.f,
    // lambda function
    [](const blocked_range<float*>& r, float init)->float
    {
      for( float* a=r.begin(); a!=r.end(); ++a )
      init += *a;
      return init;
    },
    //lambda function providing the reduction operator
    []( float x, float y )->float
    {
      return x+y;
    }
  );
}
code snippet Chapter77-2.cpp
The while Loop
You can use the Cilk Plus cilk_spawn, the OpenMP #pragma omp task, and the TBB parallel_do to parallelize a C/C++ while loop.
Cilk Plus
The simplest way to make a while loop parallel is to use the cilk_spawn keyword in each iteration. However, if the amount of work done in a loop is low, you may find that the program runs slower than the original serial version. In the following code, the Prime function is cilk_spawned 100 times:
    int j = 0;
    while (j < 100)
    {
      cilk_spawn Prime(Pri);
      j++;
    }
If your while loop has a precomputable trip count, as in the preceding example, you could consider converting it to a cilk_for loop, which employs a divide-and-conquer work-stealing algorithm.
In some circumstances part of the while loop will need to stay sequential because of some loop dependency, with only part of the while loop being able to run in parallel. In the following example, the traversal through the linked list has to be sequential, but as each link is traversed, the call to Work() can be parallelized by using cilk_spawn:
#include <cilk/cilk.h>
// linked list iteration
void RunThoughLinkedList()
{
  node *pHead = Head;
  while(pHead != NULL)
  {
    cilk_spawn Work(pHead);
    pHead = pHead->next;
  }
}
OpenMP
Prior to OpenMP 3.0, while loops were difficult to make parallel, requiring the programmer either to convert the loops to a standard for loop or to write some handcrafted code. The following code uses OpenMP tasks that were introduced in OpenMP 3.0. The bold lines show where extra code has been added to make the while loop parallel.
- The #pragma omp parallel forms a team of threads and starts parallel execution.
- Within the parallel region, the code marked with #pragma omp single runs only on one thread.
- On each iteration of the while loop (that is running on one thread), the #pragma omp task statement causes an OpenMP task to be created. The moment a task is created it is free to start executing. Each task has its own initialized copy of the counter variable.
- When the single thread has completed creating all the tasks, the thread becomes available for use by the OpenMP run time. This only happens because of the nowait clause.
- There is an implicit barrier at the end of the parallel region. Once all the threads have completed, code execution can continue beyond the end of the parallel region.
#pragma omp parallel
{
  #pragma omp single nowait
  {
    int counter = 0;
    while(counter < 10)
    {
      counter++;
      #pragma omp task firstprivate(counter)
      {
        work(counter);
      }
    }
  }
}  // implicit barrier
A do-while loop can also be made parallel using the same technique.
TBB
You can use the parallel_do template to perform, as the TBB manual describes it, a “cook until done” algorithm. You can use this when you don't know how much data has to be processed. A parallel_do creates TBB tasks from a list, finishing when the list is empty and all tasks have completed their execution.
Listing 7.3 shows parallel_do iterating through the items in vector s and calling the Work() function. The first two parameters of parallel_do are STL iterators describing the beginning and end of the vector. The third parameter is the code that is executed within the loop — in this case, a lambda function.
Listing 7.3: TBB parallel_do
#include <tbb.h>
#include <vector>
.
void Work(int Val){ // do some work here}

Func()
{
  std::vector<int> s;
  s.push_back(0);
  s.push_back(1);
  s.push_back(2);
  s.push_back(3);

  tbb::parallel_do(s.begin(), s.end(),
   [&](int Val) { Work(Val);});
}
code snippet Chapter77-3.cpp
Parallelizing Sections and Functions
You can parallelize sections of code or a series of function calls using Cilk Plus, OpenMP, or TBB. A sequence of code can be made parallel as long as each block:
- Is independent of any other block
- Performs enough work
This kind of parallelism is not scalable — that is, the program's performance will not keep increasing once you have matched the number of cores with the number of parallel strands. It is still worth considering, especially if you have two or more blocks of code that consume a significant amount of time. In this section, a short series of function calls are parallelized in two different ways, as shown in Figure 7.4.
Figure 7.4 Functional parallelism
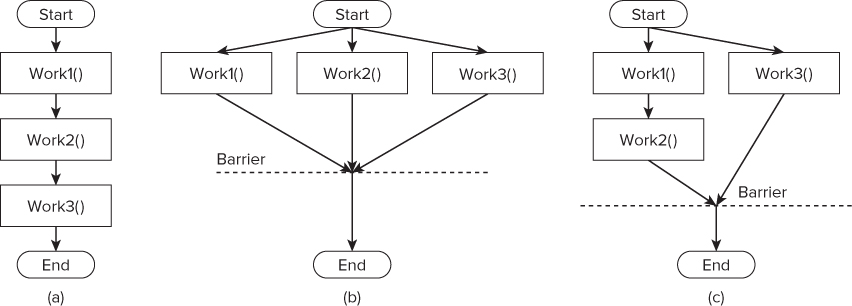
Figure 7.4 (a) shows the layout of the serial program, alongside two parallel patterns. In Figure 7.4 (b) all three functions are run in parallel. Figure 7.4 (c) assumes Work1() and Work2() have a dependency, and so their order of execution must be maintained by running them in the same parallel strand.
The potential speedup for each solution is limited by the number of parallel strands in the program. Figure 7.4 (c), for example, has only two parallel strands, with its maximum potential speedup being achieved on a 2-core CPU. If you ran same the code on a 3-core CPU, it wouldn't run any faster. Similarly, Figure 7.4 (b)'s maximum speedup will be achieved on a 3-core CPU.
At the end of the parallelized sections, there is a barrier that can be crossed only after all the threads have completed executing the individual strands.
The Serial Version
Listing 7.4 holds the serial version of the code and has three functions: Work1(), Work2(), and Work3(). Each function prints a message at its entry and exit. The Delay() function slows down the execution time by iterating through a large loop.
If you decide to build any of the examples in this section, build them unoptimized using the /Od (Windows) or -O0 (Linux) compiler flag; otherwise, the compiler will “optimize-away” most of the code.
Listing 7.4: Serial version of code
#include <stdio.h>
void Delay(){for (int i=0; i < 1000000000; i++);}
void Work1(){printf("Start 1
");Delay();printf("End 1
");}
void Work2(){printf("Start 2
");Delay();printf("End 2
");}
void Work3(){printf("Start 3
");Delay();printf("End 3
");}

int main()
{
  Work1();
  Work2();
  Work3();
}
code snippet Chapter77-4.cpp
Cilk Plus
You can use the cilk_spawn keyword to parallelize sections of code. Listings 7.5 and 7.6 show the two versions (b) and (c), respectively. At the end of both examples, the cilk_sync keyword is used to place a barrier, as shown in Figure 7.4. In this particular example, cilk_sync is not really needed, because the compiler automatically inserts an implicit cilk_sync at the end of every function that contains a cilk_spawn.
In the first example, all three functions execute in parallel, subject to there being sufficient workers available.
In the second example, you can see how useful lambda functions are in wrapping together Work1() and Work2() so they execute serially within the same strand, which, in turn, executes in parallel with Work3().
Listing 7.5: Cilk Plus functional parallelism version (b)
#include <cilk/cilk.h>
.
.
int main()
{
  cilk_spawn Work1();
  cilk_spawn Work2();
  Work3();
  cilk_sync;// not really needed, because there is an implicit sync here
}
code snippet Chapter77-5.cpp
Listing 7.6: Cilk Plus functional parallelism version (c)
#include <cilk/cilk.h>
.
.
int main()
{
  cilk_spawn []{
    Work1();
    Work2();
  }
  Work3();
  cilk_sync;// not really needed, because there is an implicit sync here
}
code snippet Chapter77-6.cpp
OpenMP
In OpenMP, you can use the sections construct to divide and execute blocks of code, as shown in Listings 7.7 and 7.8. The sections construct has to reside in a parallel region. In the following examples, the parallel and section constructs are concatenated together into a single statement.
In the first example, Work1(), Work2(), and Work3() execute in parallel. In the second example, the first block of code containing Work1() and Work2() runs in parallel with Work3().
Listing 7.7: OpenMP functional parallelism version (b)
int main()
{
  #pragma omp parallel sections
  {
    #pragma omp section
    Work1();
    #pragma omp section
    Work2();
    #pragma omp section
    Work3();
  }
}
code snippet Chapter77-7.cpp
Listing 7.8: OpenMP functional parallelism version (c)
int main()
{
  #pragma omp parallel sections
  {
    #pragma omp section
    Work1();
    Work2();
    #pragma omp section
    Work3();
  }
}
code snippet Chapter77-8.cpp
TBB
Listings 7.9 and 7.10 show how to use the TBB parallel_invoke template to run the three functions in parallel. At the time of writing, the maximum number of parameters you can pass to parallel_invoke is ten.
Listing 7.9: TBB functional parallelism version (b)
#include <tbb/tbb.h>
.
.
int main()
{
  tbb::parallel_invoke(
    []{Work1();},
    []{Work2();},
    []{Work3();}
  );
}
code snippet Chapter77-9.cpp
Listing 7.10: TBB functional parallelism version (c)
#include <tbb/tbb.h>
.
.
int main()
{
  tbb::parallel_invoke(
    []{
        Work1();
        Work2();
    },
    []{Work3();}
  );
}
code snippet Chapter77-10.cpp
Again, you can see how useful the lambda functions are in simplifying the calls to parallel_invoke.
Parallelizing Recursive Functions
Recursion is a very common pattern found in many programs and is relatively easy to parallelize. Figure 7.5 shows a recursive function, Work().
Figure 7.5 The recursive construct
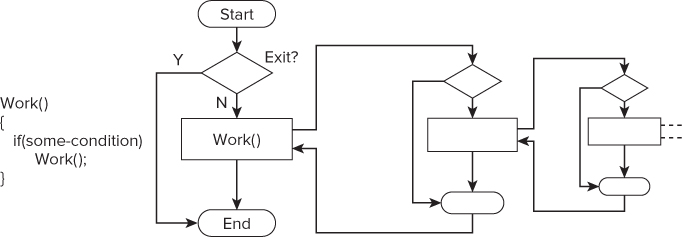
A recursive function has three features:
- The function calls itself.
- There is an exit condition that is eventually reached.
- As in any C function, each called function has its own stack, holding its own variables and parameters.
Like any body of code that is to be threaded, the body of your recursive function should perform a decent amount of work; otherwise, you may end up just slowing down the code. If the body of your recursive function does not do much work, you might find it better to convert your recursive code to be loop-oriented, and then use one of the parallel loop structures that have already been discussed.
The Serial Version
Listing 7.11 shows a recursive function, Work(). When the function is first called, it is passed the i parameter, which has been initialized to zero. Each time Work() makes a call to itself, it passes in the value i + 1.
On entry to the function, the exit condition if(i>4) is queried. If the test is satisfied, the function returns; otherwise, it proceeds with the recursive call. Work() prints a message before and after the recursive call.
In this example the recursion will nest four levels deep before returning, unrolling its stack as it returns through the recursive calls.
Listing 7.11: A serial recursive function
#include <stdio.h>
void Delay(){for (int i=0; i < 1000000000; i++);}
void Work(int i)
{
  if(i > 4)
    return;
  printf("S%d
",i);
  Work(i + 1);
  Delay();
  printf("E %d
",i);
}

int main()
{
  int i = 0;
  Work(i);
}
code snippet Chapter77-11.cpp
Cilk Plus
You can use the cilk_spawn keyword to parallelize a recursive function. In Listing 7.12, the only modification to the serial version is the addition of cilk_spawn in front of the recursive call to Work().
Listing 7.12: A Cilk Plus recursive function
#include <cilk/cilk.h>
void Delay(){for (int i=0; i < 1000000000; i++);}

void Work(int i)
{
  if(i > 4)
    return;
  printf("S%d
",i);
  cilk_spawn Work(i + 1);
  Delay();
  printf("E %d
",i);
}

int main()
{
  int i = 0;
  Work(i);
}
code snippet Chapter77-12.cpp
OpenMP
The recursive OpenMP example in Listing 7.13 uses tasks. In the main() function, a parallel region is declared containing a single threaded brace. Within the brace is a call to the Work() function.
The recursive call within Work() is encapsulated in an OpenMP task. The moment the task is created, it is free to start execution. Each recursive call results in a new task being created, which is then free to be run in parallel with any existing tasks.
Listing 7.13: An OpenMP recursive function
void Work(int i)
{
  if(i > 4)
    return;
  #pragma omp task firstprivate(i)
  {
    printf("S%d
",i);
    Work(i + 1);
    Delay();
    printf("E %d
",i);
  }
}

int main()
{
  int i = 0;
#pragma omp parallel
#pragma omp single
  {
    Work(i);
  }
}
code snippet Chapter77-13.cpp
TBB
The recursive program in Listing 7.14 uses TBB tasks. The code is parallelized in three steps:
- By declaring of the task_group variable g.
- By wrapping the body of the Work() function in a lambda function, which is then spawned as a new task using the g.run() method.
- By adding a g,wait() barrier in main(), after the call to Work().
Listing 7.14: A TBB recursive function
#include <stdio.h>
#include <tbb/tbb.h>
void Delay(){for (int i=0; i < 1000000000; i++);}
tbb::task_group g;

void Work(int i)
{
  if(i > 4)
    return;
  g.run(
    [=]{    // spawn a task
      printf("S%d
",i);
      Work(i + 1);
      Delay();
      printf("E %d
",i);
    }
  );
}

int main()
{
  int i = 0;
  Work(i);
  g.wait();     // wait for tasks to complete
}
code snippet Chapter77-14.cpp
Parallelizing Pipelined Applications
The software pipeline pattern mimics a common assembly line in a factory. During the manufacturing process, the object being made is passed from one station to the next, with each station being responsible for carrying out a specific task.
Figure 7.6 (a) shows a pipelined application. The complete pipeline reads a set of numbers from the fileTest.data, calculates the square root of the numbers, and then stores the results in a second file, Root.data.
Figure 7.6 The recursive construct
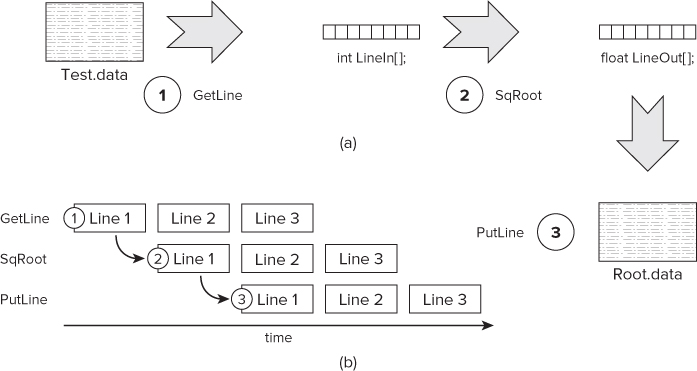
The pipeline consists of three phases, or steps, as shown in Figure 7.6 (b). In the first phase, GetLine reads a line of numbers from the input file. In the second step, SqRoot calculates the square root for all the numbers in the line. Finally, PutLine writes the results into an output file.
The relation between each pipeline stage is that of producer/consumer. The first stage, GetLine, produces data that is consumed by the second stage, SqRoot. This second stage then becomes the producer for data that will be consumed by the last stage, PutLine.
Parallel Pipelined Patterns
To make a pipeline parallel, you allocate each pipeline station to a separate thread. You should only consider parallelizing course-grained pipeline applications, where each pipeline stage is doing a reasonable amount of work.
Within a particular pipeline stage you may also be able to introduce parallelism. In the example used in this chapter, stages 1 and 3 use file I/O and are therefore kept serial. The middle stage, however, performs calculations that are independent of each other, so parallelism can be added here. Figures 7.7 and 7.8 show two different approaches you can take to parallelizing the middle stage:
- In Figure 7.7, a single consumer/producer is threaded, so the contents of the current line are manipulated in parallel.
- In Figure 7.8, multiple consumer/producers are spawned, and so can manipulate multiple lines at the same time.
Figure 7.7 Using a single consumer/producer
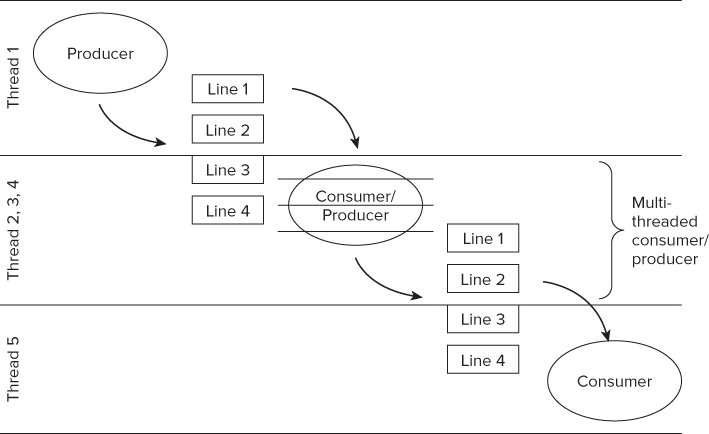
Figure 7.8 Using multiple consumer/producers
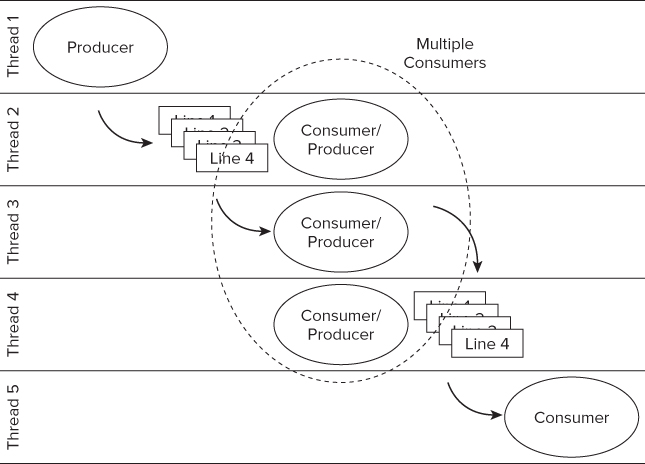
The thread IDs in the two diagrams are not significant; they merely indicate that the different pipeline stages are running on different threads or parallel strands.
When parallelizing a pipelined application, you have to take care how you pass the data between the different stages. In the serial version (see Listing 7.15), a single array is used to hold the current line. Once the pipeline is made parallel, several lines may need to be queued or stored, so they can be manipulated in parallel without causing data races.
The parallel examples in this chapter simply make the LineIn and LineOut arrays two-dimensional so that each line has its own storage area. Another approach to storing the data that is passed along the pipeline is to dynamically allocate separate variables for each line as they are read in. Once the data has been consumed, the variable can then either be freed or passed back to the first pipeline for reuse.
The two parallel examples are based on OpenMP and TBB. There is no Cilk Plus example, but you can find an example of a pipelined application at http://software.intel.com/en-us/articles/a-parallel-bzip2/.
The Serial Version
Listing 7.15 shows the serial version of the pipelined application. The outer for loop in main() applies the three pipeline stages, one line at a time.
- In the first stage, a line of the file Test.data is read, and the data is placed in the array LineIn.
- The second stage of the pipeline calculates the square root of all the integers stored in LineIn. Rather than using a library call to calculate the square root, a slower, hand-rolled sqroot() function is used. Using this slower function helps to give the pipeline sufficient work to do, which is helpful for demonstration purposes. The results of the square root operation are stored as floats in LineOut.
- The last stage of the pipeline writes the results held in LineOut to the file Root.data.
Listing 7.15: A serial pipelined application
#include <stdio.h>
#include <stdlib.h>

#define LINE_LENGTH 8000
#define NUM_LINES 100
#define NUM_ENTRIES LINE_LENGTH * NUM_LINES

int LineIn[LINE_LENGTH];
float LineOut[LINE_LENGTH];

float sqroot(int n)
{
  float i = 0;
  float x1, x2;
  while( i*i<= n )
    i+=0.1;
  x1 = i;
  for(int j=0; j<10; j++)
  {
     x2 = n;
     x2 = x2/x1;
     x2 = x2+x1;
     x2 = x2/2;
     x1 = x2;
  }
  return x2;
}

int main()
{
  FILE *pFile = fopen(".\Test.Data","r");
  if(!pFile){ printf("Couldn't open Test.Data");exit(999);}

  FILE *pOutputFile = fopen("Squared.Data","w");
  if(!pOutputFile){ printf("Couldn't open Squared.Data");exit(999);}

  // for every line in file …
  for (int i = 0; i < NUM_LINES; i++)
  {
    // Pipeline STAGE 1
    for (int j = 0; j < LINE_LENGTH; j++)
      fscanf( pFile,"%d ",&LineIn[j]);

    // Pipeline STAGE 2
    for (int j = 0; j < LINE_LENGTH; j++)
      LineOut[j]=sqroot((float)LineIn[j]);

    // Pipeline STAGE 3
    for (int j = 0; j < LINE_LENGTH; j++)
      fprintf(pOutputFile,"%f ",LineOut[j]);
    fprintf(pOutputFile,"
");
  }
  fclose(pFile);
  fclose(pOutputFile);
  return 0;
}
code snippet Chapter77-15.cpp
OpenMP
Listing 7.16 implements a pipeline using OpenMP. You will see that
- The first and third stages of the pipeline need to run on single threads because of the file I/O operations that are serial in nature.
- The second stage of the pipeline uses a single consumer/producer. The processing of the individual numbers in the LineIn array is performed in parallel using the #pragma omp for construct.
- The nowait clauses in the first and third stages are added to improve performance.
- The arrays LineIn and LineOut that are used to pass data from the different pipeline stages are converted to a two-dimensional array so that each line can be manipulated without causing a data race.
- The first line from the file is read before the start of the parallel region and the subsequent reads fetch the line number i + 1.
Listing 7.16: An OpenMP pipelined application
int main()
{
  FILE *pFile = fopen(".\Test.Data","r");
  if(!pFile){ printf("Couldn't open Test.Data");exit(999);}

  FILE *pOutputFile = fopen("OpenMP_Squared.Data","w");
  if(!pOutputFile){ printf("Couldn't open OpenMP_Squared.Data");exit(999);}

  // preload line 0
   for (int j = 0; j < LINE_LENGTH; j++)
        fscanf( pFile,"%d ",&LineIn[0][j]);

  #pragma omp parallel
  {
    for (int i = 0; i < NUM_LINES; i++)
    {
      // Pipeline STAGE 1
      #pragma omp single nowait
      {
        // start reading the next line
        // Don't read beyond end

        if(i <  NUM_LINES-1);
        {
          for (int j = 0; j < LINE_LENGTH; j++)
          fscanf( pFile,"%d ",&LineIn[i+1][j]);
        }
      }

      // Pipeline STAGE 2
      #pragma omp for schedule(dynamic)
        for (int j = 0; j < LINE_LENGTH; j++)
          LineOut[i][j]=sqroot((float)LineIn[i][j]);

      // Pipeline STAGE 3
      #pragma omp single nowait
      {
        for (int j = 0; j < LINE_LENGTH; j++)
          fprintf(pOutputFile,"%f ",LineOut[i][j]);
        fprintf(pOutputFile,"
");
      }
    }
  }
  fclose(pFile);
  fclose(pOutputFile);
  return 0;
}
code snippet Chapter77-16.cpp
![]()
TBB
You can use the TBB parallel_pipeline template to parallelize the pipeline code, as shown in Listing 7.17. The different pipeline stages are handled by filters, which can operate either in serial or in parallel.
To construct a pipeline using TBB, you should
Notice that the outer loop from the original serial code no longer exists. Iteration through the Test.data file is controlled by incrementing variable i in the first stage of the pipeline.
You can pass tokens between the filters. In the example here, the value of the variable i is passed in and out of the different filters.
The ntoken parameter controls the level of parallelism. In Listing 7.17, all the filters are of type filter::serial_in_order, so the value of ntoken has no effect.
Listing 7.18 shows an alternate middle filter, which is of type filter::parallel. By doing this you will be changing the design so that the middle pipeline stage is using multiple consumer/producers, as shown in Figure 7.8. When this filter is used, multiple tokens can be processed by the filter. In this situation the parameter ntokens limits the number of tokens that can be in flight at any one time.
The flow_control fc object is used to control the pipeline and indicates to the scheduler when the pipeline should stop.
As in the OpenMP version, the LineIn and LineOut arrays are promoted to be two-dimensional arrays.
Listing 7.17: A pipelined application using TBB
using namespace tbb;

int main()
{
  int i = 0;
  int ntokens = 24;
  FILE *pFile = fopen(".\Test.Data","r");
  if(!pFile){ printf("Couldn't open Test.Data");exit(999);}

  FILE *pOutputFile = fopen("TBB_Squared.Data","w");
  if(!pOutputFile){ printf("Couldn't open OpenMP_Squared.Data");exit(999);}

  parallel_pipeline(
     ntokens,
     tbb::make_filter<void,int>(
        filter::serial_in_order, [&i,&pFile](flow_control& fc)->int {
           if (i < NUM_LINES)
           {
             for (int j = 0; j < LINE_LENGTH; j++)
               fscanf( pFile,"%d ",&LineIn[i][j]);
             return i++;
           }
           else
              fc.stop();

           return -1;
        }) &

     tbb::make_filter<int,int>(
       filter::serial_in_order, [](int i)->int {
         parallel_for (size_t(0), (size_t)LINE_LENGTH,[&](size_t j){
           LineOut[i][j]=sqroot((float)LineIn[i][j]);
          });
          return i;
        }) &

     tbb::make_filter<int,void>(
        filter::serial_in_order, [&pOutputFile](int i) {
        for (int j = 0; j < LINE_LENGTH; j++)
          fprintf(pOutputFile,"%f ",LineOut[i][j]);
        fprintf(pOutputFile,"
");
        })
   );
}
code snippet Chapter77-17.cpp
Listing 7.18: Using an alternate TBB filter
.
.
          tbb::make_filter<int,int>(
        filter::parallel, [](int i)->int {
          {
            for (int j = 0; j < LINE_LENGTH; j++)
             LineOut[i][j]=sqroot((float)LineIn[i][j]);
            return i;
          }
        }) &

.
.
code snippet Chapter77-18.cpp
Parallelizing Linked Lists
A linked list consists of a number of data nodes that are daisy-chained together via a pointer, as shown in Figure 7.9. The end of the iteration space is not known in advance, and has to be detected by looking for a NULL value in the Next pointer. Linked lists can have nodes inserted or deleted dynamically.
Figure 7.9 The linked list construct
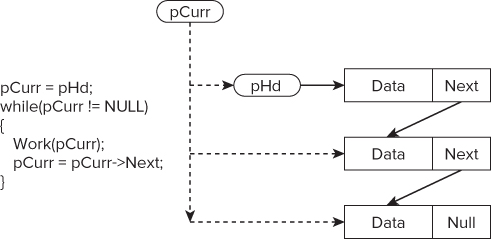
Listing 7.19, which is taken from Listings 7.23, 7.24, and 7.25 at the end of the chapter, traverses through the linked list until the pointer pHead has the value NULL.
The parallel versions use techniques that have been described earlier in this chapter.
Serial Iteration of the Linked List
Listing 7.19 shows the serial code to iterate through the linked list. You can find the complete version in the source code at the end of this chapter.
Listing 7.19: Serial iteration of linked list
// linked list iteration
void RunThoughLinkedList()
{
  node *pHead = Head;
  while(pHead != NULL)
  {
    Work(pHead);
    pHead = pHead->next;
 }
}
code snippet Chapter77-19.cpp
Parallel Iteration of the Linked List
Listings 7.20, 7.21, and 7.22 show how to parallelize the linked list iteration using Cilk Plus, OpenMP, and TBB, respectively. All three listings follow the same strategy:
- The iteration of the linked list is done in serial.
- As each node is visited, a task that runs the function Work() is launched.
- The tasks can run in parallel.
Listing 7.20: Linked list iteration using Cilk Plus
#include <cilk/cilk.h>
// linked list iteration
void RunThoughLinkedList()
{
  node *pHead = Head;
  while(pHead != NULL)
  {
    cilk_spawn Work(pHead);
    pHead = pHead->next;
  }
}
code snippet Chapter77-20.cpp
Listing 7.21: Linked list iteration using OpenMP
// linked list iteration
void RunThoughLinkedList()
{
  #pragma omp parallel
  {
    #pragma omp single
    {
      node *pHead = Head;
      while(pHead != NULL)
      {
         #pragma omp task firstprivate(pHead)
         {
           Work(pHead);
         }
         pHead = pHead->next;
      }
    }
  }
}
code snippet Chapter77-21.cpp
Listing 7.22: Linked list iteration using TBB
void RunThoughLinkedList()
{
  tbb::task_group g;
  node *pHead = Head;
  printf("Starting Linked List
");
  while(pHead != NULL)
  {
    g.run([=]{Work(pHead);});
    pHead = pHead->next;
  }
  g.wait();
}
code snippet Chapter77-22.cpp
Building the Program
icl  /O2 main.cpp prime.cpp wtime.c
(LINUX: icc -O2 main.cpp prime.cpp wtime.c)
[sblairch@localhost ssa]$ ./main
Start of application
*** glibc detected *** ./main: double free or corruption
    (top): 0x0000000007078010 ***
Implementing Parallelism
Moving on to the Next Model
Source Code
Using the techniques highlighted in this chapter, you should be able to speed up the source code in Listings 7.23, 7.24, and 7.25. The source code is split into three files: main.cpp, wtime.cpp, and prime.c.
The code is somewhat artificial, in that it doesn't do anything particularly useful. Its sole purpose is to provide a “playgound” for you to experiment with parallelization.
With the source code you will find loops and linked lists that you can make parallel using Cilk Plus, OpenMP, and TBB. Activity 7-1 gives some suggestions for you to try out.
Listing 7.23: Serial version of the example application
#include <stdio.h>
#include <memory.h>
extern int Prime(int end);
extern int PrimeRecursive(int end);
extern "C" double wtime();
#define PRIME_NUMS 1000000
#define PRIME_NUMS_RECURSE 20000
#define NUM_NODES 5
enum Op { OpPrime,OpPrimeRecursive};
struct node
{
int ValueIn;
Op Operation;
int NumPrimes;
double Start; // time
double End; // time
node *next; // the reference to the next node
void Init(int v,Op o,node* n){ValueIn = v;Operation=o;next=n;}
node(){Start=0;End=0;next=NULL;};
};
node List[NUM_NODES];
node * Head;
void Init()
{
memset(List,‘�’,sizeof(List));
// set up the link
List[0].Init(PRIME_NUMS,OpPrime,&List[4]);
List[1].Init(PRIME_NUMS_RECURSE,OpPrimeRecursive,&List[2]);
List[2].Init(PRIME_NUMS,OpPrime,NULL);
List[3].Init(PRIME_NUMS_RECURSE,OpPrimeRecursive,&List[1]);
List[4].Init(PRIME_NUMS,OpPrime,&List[3]);
Head = &List[0];
}
void Work( node * pHead )
{
pHead->Start = wtime();
switch(pHead->Operation)
{
case OpPrime:
pHead->NumPrimes=Prime(pHead->ValueIn);
break;
case OpPrimeRecursive:
pHead->NumPrimes=PrimeRecursive(pHead->ValueIn);
break;
};
pHead->End = wtime();
printf("Work Time %7.2f
",pHead->End-pHead->Start);
}
// linked list iteration
void RunThoughLinkedList()
{
node *pHead = Head;
while(pHead != NULL)
{
Work(pHead);
pHead = pHead->next;
}
}
// manual iterations
void RunExplicit()
{
Work(&List[0]);
Work(&List[1]);
Work(&List[2]);
Work(&List[3]);
Work(&List[4]);
}
int main()
{
Init();
double start = wtime();
double start_linked_list = wtime();
RunThoughLinkedList();
double end_linked_list = wtime();
double start_explicit = wtime();
RunExplicit();
double end_explicit = wtime();
double end = wtime();
printf("Time through Linked List %7.2f
"
"Time through explicit %7.2f
"
"Total Time taken %7.2f
",
end_linked_list-start_linked_list,
end_explicit-start_explicit,
end-start
);
}
Chapter7\main.cpp
Listing 7.24: A utility to measure time taken
#ifdef _WIN32
#include <windows.h>
double wtime()
{
  LARGE_INTEGER ticks;
  LARGE_INTEGER frequency;
  QueryPerformanceCounter(&ticks);
  QueryPerformanceFrequency(&frequency);
  return (double)(ticks.QuadPart/(double)frequency.QuadPart);
}
#else
#include <sys/time.h>
#include <sys/resource.h>
double wtime()
{
  struct timeval time;
  struct timezone zone;
  gettimeofday(&time, &zone);
  return time.tv_sec + time.tv_usec*1e-6;
}
#endif
Chapter7 wtime.c
Listing 7.25: Code to check if a number is prime
#include <math.h>
long  gPrimes[1000000];


bool isPrimeRecurse(int p, int i=2)
{
  if (i==p) return 1;//or better  if (i*i>p) return 1;
  if (p%i == 0 || p == 1) return 0;
  return isPrimeRecurse (p, i+1);
}


bool isPrime(int val)
{
    int limit, factor = 3;
    limit = (long)(sqrtf((float)val)+0.5f);
    while( (factor <= limit) && (val % factor))
        factor ++;
    return (factor > limit);
}

int Prime(int Num)
{
  int NumPrimes = 0;
  for( int i = 3; i <= Num; i += 2 )
  {
      if( isPrime(i) )
          gPrimes[NumPrimes++] = i;
  }
  return NumPrimes;
}

int PrimeRecursive(int Num)
{
  int NumPrimes = 0;
  for( int i = 3; i <= Num; i += 2 )
  {
    if( isPrimeRecurse(i) )
      gPrimes[NumPrimes++] = i;
  }
  return NumPrimes;
}
Chapter7prime.cpp
Summary
This chapter demonstrated that making code parallel is not as difficult as it initially may seem. Cilk Plus, OpenMP, and TBB all offer ways of parallelizing loops, recursive calls, blocks of code, and pipelined applications.
Note that this chapter has not addressed the thorny problem of data races and how to deal with shared variables.
In earlier chapters you saw how reducers in Cilk Plus and private and shared variables in OpenMP can be used to prevent data races. The next chapter shows how to detect memory and threading errors using Intel Parallel Inspector XE, and how you can fix such errors in Cilk Plus, OpenMP, and TBB.