1 Getting Started with Corel PaintShop Pro X5

© Cengage Learning®, All Rights Reserved.
© Cengage Learning®, All Rights Reserved.
THIS CHAPTER GETS YOU STARTED DOWN THE PATH of photo restoration and retouching using Corel PaintShop Pro. I’ll cover some general aspects of restoration and retouching, introduce PaintShop Pro, review the new features of PaintShop Pro X5, and take a look at the different interface elements of the program.
Photo Restoration and Retouching
THIS BOOK IS ABOUT PHOTO RESTORATION and retouching.
When I say “photo restoration,” I am referring to repairing scanned photo prints—the prints that have been converted to digital files on your computer. You’ll run into a number of problems as you retouch these photos. They may have dust, cracks, scratches, tears, blemishes, color problems, brightness, contrast, sharpness, or other issues. They may have been poorly handled, improperly stored, torn, worn, or are just plain old.
Boxes of photos and photo albums are steadily deteriorating as I type this sentence. They take up a lot of space and are prone to loss and damage from acid (from your hands as you handle them), humidity, fire, water, light, mold, and other dangers. Photo restoration saves, restores, and preserves these memories in a modern form that you can back up and store for hundreds of years.
You don’t have to be an art expert or have a degree in antiquities conservation to start restoring photos.
Photo retouching is more of a digital exercise. We’ve all pretty much got at least one digital camera now. Digital pictures (normally JPEG files, but you could have a camera that stores photos in a RAW format) are stored on memory cards, optical discs, and hard disk drives, so they won’t have torn corners or faded colors. Common problems are poor lighting, color, sharpness, and composition. Photo retouching corrects, adjusts, and enhances digital photos.
One of the biggest lessons I’ve learned with digital photos is that even good ones need our helping hand to look their best. Don’t think of photo retouching as only making bad photos better. It’s not. You don’t have to be a professional photographer to start retouching photos.
Photo restoration and retouching don’t take place in a vacuum. In this case, our tool is Corel PaintShop Pro, which is what the rest of this chapter is about.
Getting Acquainted with PaintShop Pro X5
PAINTSHOP PRO IS A POWERFUL PHOTO, image, and graphics editing program that has been available in one form or another since 1992. PaintShop Pro (its original name) began life in 1992 as a shareware program and was owned by Jasc Software Inc. PaintShop Pro was enthusiastically embraced from the beginning because of its low cost and practical feature set. (People were beginning to create Web pages for the first time in 1992.) PaintShop Pro (as it is now known) continues the tradition of offering tremendous power to amateur and professional photographers and graphic artists at a very reasonable price.
Jasc?
Jasc stands for Jets and Software Company, two of the passions of Robert Voit, PaintShop Pro’s inventor and the founder of Jasc Software, Inc.
If you have PaintShop Pro installed, go ahead and fire it up as I take you on a quick tour around the interface. You’ll learn about the elements of the program that make it particularly useful for photo restoration and retouching.
Learning PaintShop Pro
I don’t have room to start at the beginning and show you everything you need to know about installing, running, and working with PaintShop Pro. To get the most out of this book, you should be familiar with things like how to use the Selection tools, the Layers palette, the Materials palette, and so forth. My purpose is to show you how to use elements of the program in the context of photo retouching and restoration. Having said that, I will try to ease you into many of the tools I use and tell you how to get started with them.
What’s New in X5
PaintShop Pro X5 has several new features that make the program even more exciting to use for photo restoration and retouching. This section summarizes the major changes from the previous version.
Location Information
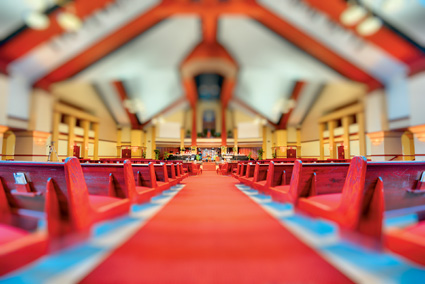
PaintShop Pro X5 can now display location information in the Manage tab (which is covered later). If you have a camera that stores the latitude and longitude where you take each photo in the photo’s EXIF data, PaintShop Pro can place it on the map. All you have to do is switch to Map mode, as shown in Figure 1.1. I took the photo shown in the Organizer right beside the fountain on Belle Isle, which is right by downtown Detroit. As you can see from the map, the red locator points at the location on the map that corresponds to the photo’s internal coordinates. I love the fact that the map and satellite views are provided in the program.
Figure 1.1
The fountain at Belle Isle.
© Corel® Corporation, All Rights Reserved. © 2013 Cengage Learning®, All Rights Reserved.
If you have an older camera or one that doesn’t receive GPS (Global Positioning Signals), you can enter the location information yourself and map photos (even .pspimage files) to your heart’s content.
Face Tagging
Face Tagging is a new PaintShop Pro feature that enables you to identify people in your photos. As you identify new people, PaintShop Pro builds a database of faces that appear in the Navigation palette. You can click a person’s name and see all the photos they are in.
I am tagging my family in Figure 1.2. We went to a local air show on Labor Day, and I took a photo of them posing in front of one of our unit’s A-10s. You can manually tag faces or rely on the program’s automatic face recognition routine. All you need to do in that case is name the person PaintShop Pro has identified. I have typed in “Anne.” As you can see from the list of people on the left, I have already identified the kids.
Figure 1.2
Face tagging creates a database of people in your photos.

© Corel® Corporation, All Rights Reserved. © 2013 Cengage Learning®, All Rights Reserved.
HDR From a Single RAW Exposure
High Dynamic Range (HDR) photography has become more popular than ever. Normally, digital cameras have a hard time capturing really bright lights or reflections and really dark shadows at the same time. What happens is that the bright areas become washed out and turn white. This is called being “blown out.” Darker areas lose detail as well when they turn black.
HDR involves taking more than one photo of a scene, each with a different exposure. One is normally dark, which reveals details that would otherwise be too bright. Another is in the middle. A third is brighter than it should be, which reveals details that would otherwise be too dark. PaintShop Pro merges the photos together and lets you fiddle with a number of settings (see the HDR example in Chapter 10, “The Good, the Bad, and the Artistic”) that control properties like brightness, contrast, and color.
What’s new in this version is being able to work from a single RAW photo instead of a number of shots. Select a RAW image in your Organizer and then select File ![]() HDR
HDR ![]() Single RAW Photo. Next, split the shot into separate images. PaintShop Pro will use them just as if you took more than one photo. Figure 1.3 illustrates a single photo of an aircraft on static display that I split into three parts and am now “tone mapping” to make it look cool.
Single RAW Photo. Next, split the shot into separate images. PaintShop Pro will use them just as if you took more than one photo. Figure 1.3 illustrates a single photo of an aircraft on static display that I split into three parts and am now “tone mapping” to make it look cool.
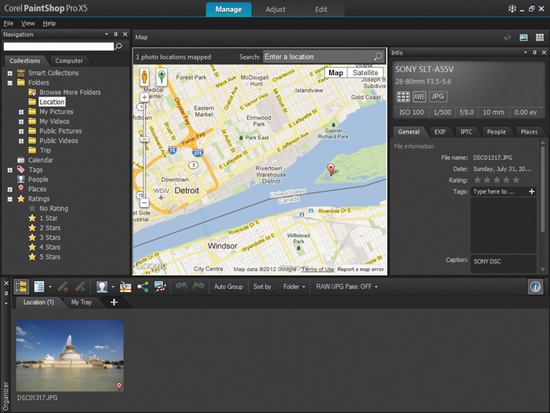
Retro Lab
The Retro Lab (Effects ![]() Photo Effects
Photo Effects ![]() Retro Lab) combines a number of cool effects into a single large dialog box. I’m working on a photo of the business end of the A-10’s GAU-8/A Avenger gun in Figure 1.4.
Retro Lab) combines a number of cool effects into a single large dialog box. I’m working on a photo of the business end of the A-10’s GAU-8/A Avenger gun in Figure 1.4.
Figure 1.3
Single-exposure HDR opens a new world of processing options.

© Corel® Corporation, All Rights Reserved. © 2013 Cengage Learning®, All Rights Reserved.
As you can see from the figure, I’ve selected the Contrast preset. This has identified an area to keep sharp and an area to blur, adjusted the color, and loaded a curve that enhances the photo’s contrast. There are quite a few presets to explore. If none suits your needs, experiment with the settings on your own.
Figure 1.4
Making a good shot look even better.
© Corel® Corporation, All Rights Reserved. © 2013 Cengage Learning®, All Rights Reserved.
Graduated Filter Effect
The Graduated Filter effect is like applying a gradient fill layer on top of your photo. There are a number of settings involved, which work just like gradients in the Materials palette. I recommend creating a new raster layer, applying the graduated filter, and then experimenting with Blend modes, opacity, and masking, in order to maximize the precision by which you can target the effect. However, if you want to apply what amounts to a duotone or color layer effect, you can’t beat its speed and simplicity.
Figure 1.5
Exploring an artistic effect.

© Corel® Corporation, All Rights Reserved. © 2013 Cengage Learning®, All Rights Reserved.
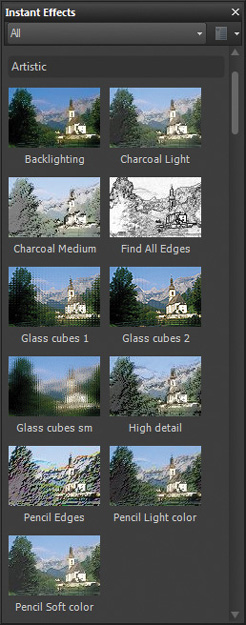
Instant Effects Palette
The Instant Effects palette, new to PaintShop Pro X5, is shown in Figure 1.6. You can use this feature to quickly decide what effect you want to try out on a photo. Apply it by double-clicking the effect’s name. Scroll down to see more effects. You can also display effects by categories.
Figure 1.6
The Instant Effects palette is a convenient location from which you can apply effects.
© Corel® Corporation, All Rights Reserved. © 2013 Cengage Learning®, All Rights Reserved.
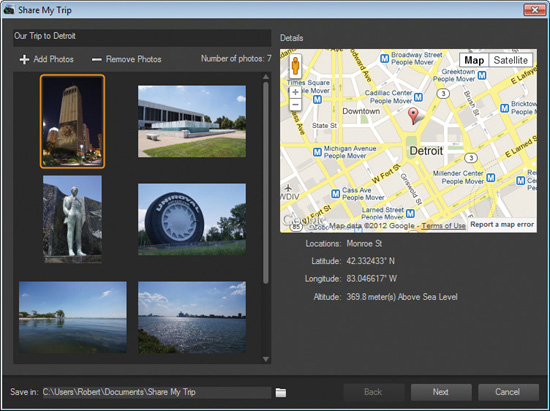
Share My Trip
Share My Trip is a new feature that’s really cool, but more involved than I have space to show you here. Basically, you identify a number of photos, and PaintShop Pro collects and organizes them into a Web page with cool thumbnails and navigation buttons. You can upload the package and show it off online or keep it on your computer.
I am starting the process in Figure 1.7. I have named the trip as “Our Trip to Detroit” and have loaded several photos. If you select a photo in this dialog box and it has location information, you’ll see it appear on the map to the right.
Figure 1.7
Use Share My Trip to showcase trips you take.
© Corel® Corporation, All Rights Reserved. © 2013 Cengage Learning®, All Rights Reserved.
You might use this feature to show how your family migrated from one place to another over time. You could also show where people lived in a single town. The possibilities are pretty exciting.
New and Improved Sharing
The Sharing option has been improved in version X5. In addition to some minor menu and dialog box changes to streamline your workflow, you can now upload Google+ in addition to Facebook and Flickr.
Workspace Color
If you don’t like the dark gray, you can now change PaintShop Pro’s interface color. Select View ![]() Workspace Color and choose your color. There are four options: Dark Gray, Medium Gray, Light Gray, and Blue. As soon as you do, PaintShop Pro dynamically changes to the new appearance you have selected.
Workspace Color and choose your color. There are four options: Dark Gray, Medium Gray, Light Gray, and Blue. As soon as you do, PaintShop Pro dynamically changes to the new appearance you have selected.
Rationale
I’ve made the decision not to extend coverage of some elements of PaintShop Pro (new and old) that automate tasks, such as removing things from photos or blending elements from different photos together. That’s not an editorial comment on my part. Given a fixed amount of space, I want to teach you how to perform tasks such as these manually. I encourage you to experiment with all the features included in PaintShop Pro on your own to see if they work with your photos.
Enhancements
PaintShop Pro X5 features several enhancements from X4. Here is a quick summary of them:
![]() HDR: There have been several improvements made to the Exposure Merge feature, which is located under the File
HDR: There have been several improvements made to the Exposure Merge feature, which is located under the File ![]() HDR menu. You can preview the alignment before you process it and adjust your settings if things don’t look right. As you adjust your HDR image, you can now choose between using the Color or B&W tabs. What’s more, you can now assign a preset when using HDR
HDR menu. You can preview the alignment before you process it and adjust your settings if things don’t look right. As you adjust your HDR image, you can now choose between using the Color or B&W tabs. What’s more, you can now assign a preset when using HDR ![]() Batch Merge, and as already mentioned, process a single RAW photo as HDR.
Batch Merge, and as already mentioned, process a single RAW photo as HDR.
![]() Text tool: Some improvements to the Text tool have been made. These appear to be improvements that make selecting and editing text easier, as well as making the Text and Pick tools work better together. If this has been a problem for you, you may see an improvement. Otherwise, this may be a transparent upgrade.
Text tool: Some improvements to the Text tool have been made. These appear to be improvements that make selecting and editing text easier, as well as making the Text and Pick tools work better together. If this has been a problem for you, you may see an improvement. Otherwise, this may be a transparent upgrade.
![]() Sharing options: Sharing your files online has never been easier. Select the photos you want to share from the Organizer palette and then press the Share button. Select what sites you want to upload to (Facebook, Flickr, or Google); then choose an album or create a new one. Add or change photo information, choose a quality option, and upload.
Sharing options: Sharing your files online has never been easier. Select the photos you want to share from the Organizer palette and then press the Share button. Select what sites you want to upload to (Facebook, Flickr, or Google); then choose an album or create a new one. Add or change photo information, choose a quality option, and upload.
![]() Crop tool: This Crop tool has a few improvements. In addition to the standard set of predefined crop sizes and aspect ratios, you can keep the original proportions or select a square. Take a look at the Tool Options toolbar with the Crop tool selected. You can crop the current photo as a new image, change the crop rectangle by entering new pixel dimensions, specify a print size, and numerically change the rotation angle and pivot point.
Crop tool: This Crop tool has a few improvements. In addition to the standard set of predefined crop sizes and aspect ratios, you can keep the original proportions or select a square. Take a look at the Tool Options toolbar with the Crop tool selected. You can crop the current photo as a new image, change the crop rectangle by entering new pixel dimensions, specify a print size, and numerically change the rotation angle and pivot point.
![]() Layer styles: Although they remain the same, there is a dedicated Layer Styles button on the Layers palette. Click it to open the selected layer’s Layer Properties dialog box with the Layer Styles tab preselected.
Layer styles: Although they remain the same, there is a dedicated Layer Styles button on the Layers palette. Click it to open the selected layer’s Layer Properties dialog box with the Layer Styles tab preselected.
![]() Multi-Script support: If you’re into running scripts, you can run more than one now, consecutively. Select File
Multi-Script support: If you’re into running scripts, you can run more than one now, consecutively. Select File ![]() Script
Script ![]() Run Multiple Scripts to get started.
Run Multiple Scripts to get started.
What’s the Same
What’s the same between PaintShop Pro X4 and X5? Quite a bit, actually, especially when it comes to the program interface and specific support for photo retouching and restoration. The program tabs work the same, HDR works pretty much the same, the Camera RAW Lab is the same, and the Edit workspace remains fundamentally unchanged (with regard to the essence of editing photos). There are differences, of course, but the tools are the same, most of the menus are the same, and layers, masks, selections, effects, most palettes, and so forth are the same. If you have dual monitors, you can expand your work area by choosing View ![]() Dual Monitor. The Manage tab will open on one monitor while the Adjust/Edit tabs open on the other.
Dual Monitor. The Manage tab will open on one monitor while the Adjust/Edit tabs open on the other.
If you’re used to X4, you should be able to use X5 without any problem.
If you’re upgrading from an older version, you will have to get used to the workspace tabs (which, in my opinion, are a great improvement), the new color schemes, the Learning Center palette being on the right side of the screen, the drop cues you get when dragging and dropping palettes, a slightly different Camera RAW Lab, the HDR Exposure Merge, and other new features.
The Adjust workspace takes the place of the Express Lab. If you liked working in the Express Lab, you should find yourself comfortable in the Adjust workspace.
Likewise, although the name has changed to the Manage workspace, most of the functionality was present in X3. It was simply called the Organizer.
In the end, there’s not much to worry about if you love working in X3 or earlier versions and are thinking of upgrading to X5.
Working with the Manage Workspace
THE MANAGE WORKSPACE ENABLES YOU to track all your files, organize them, rate photos, browse thumbnails of your collection, and add other tags and captions to your files and photos. It’s a built-in management and organization tool.
When you’re working with thousands of digital photos or working with a number of scanned photos that you’re restoring, being able to organize them automatically is a wonderful timesaver.
Unless you’re working with dual monitors, you can’t use the Manage workspace at the same time as the other two (Adjust and Edit). You can, however, switch back and forth using the tabs at the top of the program interface (see Figure 1.8).
Notice the folder list on the left of the window. This is where you manage the folders and where PaintShop Pro watches for new pictures and keeps them organized. In the center, there is a large space to preview a single photo at a good size.
Figure 1.8
The Manage workspace.

© Corel® Corporation, All Rights Reserved. © 2013 Cengage Learning®, All Rights Reserved.
The area to the right is where you can see information about the photo, such as its name, the date you took it, the file size, and other EXIF info. You can also tag photos, rate them, and create captions here.
Finally, the bottom window has thumbnails of the photos in the folder you’ve selected from the Collections or Computer tab at the top left. When in Preview mode, the thumbnails occupy the bottom of the screen. When in Thumbnail mode, they take up the entire central part of the window. The preview area shrinks and is put below the Navigation palette.
Notice the buttons at the top-right portion of the screen, just above the General Info area (see Figure 1.9). This is where you can change between Map mode (new to X5), Preview, and Thumbnail modes for the Organizer. The button beside the minimize button at the top of the screen is for the Corel Guide.
Figure 1.9
Change from Preview to Thumbnail mode here.

© Corel® Corporation, All Rights Reserved. © 2013 Cengage Learning®, All Rights Reserved.
PaintShop Pro X5 starts out in the Manage workspace. If you would prefer to start in the Edit or Adjust workspace, or launch in whatever mode you last used, change the Default Launch workspace preference from File ![]() Preferences
Preferences ![]() General Program Preferences (see Figure 1.10) to whatever you want. Since there is no Adjust option, however, you will need to switch to Keep Last View and then exit the program from the Adjust workspace.
General Program Preferences (see Figure 1.10) to whatever you want. Since there is no Adjust option, however, you will need to switch to Keep Last View and then exit the program from the Adjust workspace.
Figure 1.10
Choose your default workspace.

© Corel® Corporation, All Rights Reserved. © 2013 Cengage Learning®, All Rights Reserved.
The main components of the Manage workspace are the following:
![]() Title bar: This area contains the Manage, Adjust, and Edit tabs. On the right are the window controls, and to the left of them is the Corel Guide icon. Click it to launch Corel Guide, which contains additional helpful information.
Title bar: This area contains the Manage, Adjust, and Edit tabs. On the right are the window controls, and to the left of them is the Corel Guide icon. Click it to launch Corel Guide, which contains additional helpful information.
![]() Menu bar: There are only three menus in the Manage workspace: File, View, and Help.
Menu bar: There are only three menus in the Manage workspace: File, View, and Help.
![]() Navigation palette: Think “search and organize.” You can navigate folders on the left by clicking a folder in the list. It works just like Windows Explorer. The Collections tab is a hierarchical way to present the folders and photos on your system. Create Smart Collections, add folders, and organize files by date, tag, or rating. Use the Computer tab to find things on your computer.
Navigation palette: Think “search and organize.” You can navigate folders on the left by clicking a folder in the list. It works just like Windows Explorer. The Collections tab is a hierarchical way to present the folders and photos on your system. Create Smart Collections, add folders, and organize files by date, tag, or rating. Use the Computer tab to find things on your computer.
Photos in the folder you have selected in the Navigation palette show up in the Organizer as thumbnails.
![]() Preview palette: This is where you see your photos and files. The default setting shows the Preview palette in large form. You can change this so that thumbnails take up most of the space and the Preview palette is shown smaller and to the right.
Preview palette: This is where you see your photos and files. The default setting shows the Preview palette in large form. You can change this so that thumbnails take up most of the space and the Preview palette is shown smaller and to the right.
![]() Info palette: This palette shows you camera information, exposure parameters, general photo information, and EXIF data. You can tag and rate photos and add captions here.
Info palette: This palette shows you camera information, exposure parameters, general photo information, and EXIF data. You can tag and rate photos and add captions here.
![]() Organizer: Think “thumbnails and sorting.” After you have selected a folder from the Navigation palette, photo thumbnails show up in the Organizer. PaintShop Pro scans select folders when you start it up and creates resizable thumbnails of the files in those folders. This allows you to access photos quickly, sort, tag and categorize, print, and edit them.
Organizer: Think “thumbnails and sorting.” After you have selected a folder from the Navigation palette, photo thumbnails show up in the Organizer. PaintShop Pro scans select folders when you start it up and creates resizable thumbnails of the files in those folders. This allows you to access photos quickly, sort, tag and categorize, print, and edit them.
The Organizer is available in all three workspaces.
![]() Trays: Trays are customizable collections. Use them to further organize photos without moving the files around. For example, if you have several photos to retouch, add them to a “To Do” tray. Remove them when you’re done working on them. Trays are workflow helpers and time-savers.
Trays: Trays are customizable collections. Use them to further organize photos without moving the files around. For example, if you have several photos to retouch, add them to a “To Do” tray. Remove them when you’re done working on them. Trays are workflow helpers and time-savers.
Trays are also available in all three workspaces.
Using the Adjust Workspace
THE ADJUST WORKSPACE IS A HANDY place to adjust photos quickly. You’ll find it most helpful for working with digital photos. After you transfer the files to your computer, use the Adjust workspace to tweak brightness, contrast, color, and perform other fairly straightforward photo-editing operations.
The big thing to remember when working with the Adjust workspace is that changes you make with tools on the left are applied when you change tools and “stick” immediately. In other words, you can’t press Cancel as if you were in a dialog box and make the changes go away. You have to use Undo or set the controls back to their defaults (before changing tools) to back out of changes. When you’re done with the photo, you’ll have a chance to save everything to the file.
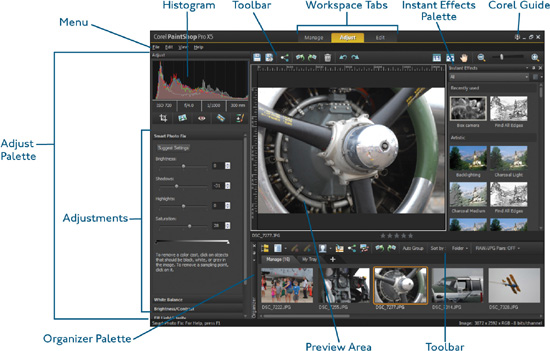
Figure 1.11 shows the interface with everything labeled.
![]() Adjust palette: This is where it’s located. At the top of the Adjust palette is a histogram, which shows you the photo’s distribution of pixels by brightness and color. Beneath that is an area that shows the exposure data taken from the camera, then a mini-toolbar with Crop, Straighten, Red Eye, Makeover, and Clone tools.
Adjust palette: This is where it’s located. At the top of the Adjust palette is a histogram, which shows you the photo’s distribution of pixels by brightness and color. Beneath that is an area that shows the exposure data taken from the camera, then a mini-toolbar with Crop, Straighten, Red Eye, Makeover, and Clone tools.
Beneath those tools are several adjustment areas. They are the Smart Photo Fix, Color Balance, Brightness/Contrast, Fill Light/Clarity, Local Tone Mapping, High Pass Sharpen, and Digital Noise Removal.
Click the adjustment name to switch to that control, and then make changes to the options as you would an ordinary dialog box. The other controls minimize. You can’t save or load settings from preset files.
You have everything you need here to spruce up most digital photos.
![]() Toolbar: The toolbar has a collection of handy tools such as Save, Save As, Rotate, Delete, and viewing controls for easy access.
Toolbar: The toolbar has a collection of handy tools such as Save, Save As, Rotate, Delete, and viewing controls for easy access.
![]() Preview window: This is where you see your photo. It’s pretty self-explanatory. You can zoom in and out and rate the photo. The file name appears on the bottom left.
Preview window: This is where you see your photo. It’s pretty self-explanatory. You can zoom in and out and rate the photo. The file name appears on the bottom left.
![]() Instant Effects: By default, the Instant Effects palette is visible on the Adjust tab. It sits right next to the Preview window.
Instant Effects: By default, the Instant Effects palette is visible on the Adjust tab. It sits right next to the Preview window.
![]() Organizer palette: This works the same as in the Manage workspace. It’s handy.
Organizer palette: This works the same as in the Manage workspace. It’s handy.
The only downside to the Adjust workspace is that it doesn’t have the complete toolset of the Edit workspace. Then again, it’s not supposed to. You can’t create or work with levels, masks, and perform other complex editing tasks. If you need those, switch to the Edit workspace and continue working.
Figure 1.11
The Adjust workspace.
© Corel® Corporation, All Rights Reserved. © 2013 Cengage Learning®, All Rights Reserved.
Using the Edit Workspace
THE EDIT WORKSPACE IS WHERE I spend most of my time when I am working in PaintShop Pro to retouch and restore photos. I have all the power of the program at my fingertips.
It is well structured, and once you learn where things are, it is easy to use. And if that’s not enough for you, you can customize it by turning palettes on and off, dragging them around the workspace, and docking them to various sides—you can even change the menus and toolbars. Figure 1.12 shows PaintShop Pro X5 in Edit mode with several of the palettes turned on.
Figure 1.12
The Edit workspace is powerful and flexible.

© Corel® Corporation, All Rights Reserved. © 2013 Cengage Learning®, All Rights Reserved.
I’ve annotated the interface elements in order to provide a quick overview of what each piece does.
![]() Menu bar: Most commands and many options are located here.
Menu bar: Most commands and many options are located here.
![]() Standard toolbar: The toolbar that has many common commands within easy reach, such as New, Open, File Save, Undo Last Command, Resize, Palettes, and so forth.
Standard toolbar: The toolbar that has many common commands within easy reach, such as New, Open, File Save, Undo Last Command, Resize, Palettes, and so forth.
Reclaiming Space
I turn off the Learning Center palette, Organizer, and Photo Trays but keep the Materials and Layers palettes visible all times. This gives me more room to work and keeps information I use a lot on-screen. Give yourself even more room to work by turning off the Materials and Layers palettes when you are working on a photo intensely and don’t need to change materials or layers quickly.
![]() Tool Options palette: Looks like a toolbar, but is really a palette. The Tool Options palette changes, based on what tool you have selected, and it displays the options applicable to that tool. You can select brushes, enter pertinent data (such as the dimensions of a selection box), make adjustments (such as the line thickness of a vector object), and accept or reject an operation here. This is one of the most important interface elements in PaintShop Pro. Master it!
Tool Options palette: Looks like a toolbar, but is really a palette. The Tool Options palette changes, based on what tool you have selected, and it displays the options applicable to that tool. You can select brushes, enter pertinent data (such as the dimensions of a selection box), make adjustments (such as the line thickness of a vector object), and accept or reject an operation here. This is one of the most important interface elements in PaintShop Pro. Master it!
![]() Learning Center palette: Gives assistance to quickly lead you through various tasks. It is context sensitive. When you click on different tools, the content changes to match what you are doing.
Learning Center palette: Gives assistance to quickly lead you through various tasks. It is context sensitive. When you click on different tools, the content changes to match what you are doing.
![]() Tools toolbar: Known as the “bad boy” of the entire program. You’ll use this to choose and select from the many tools PaintShop Pro has to offer.
Tools toolbar: Known as the “bad boy” of the entire program. You’ll use this to choose and select from the many tools PaintShop Pro has to offer.
![]() Other palettes: View the other visible palettes; their importance depends on what you are doing. If you are painting or entering text, for example, you’ll need the Materials palette to select the color and material of the object you are creating. The Layers palette is another important interface element to master. I use layers all the time, even when I am working to restore or retouch a photo.
Other palettes: View the other visible palettes; their importance depends on what you are doing. If you are painting or entering text, for example, you’ll need the Materials palette to select the color and material of the object you are creating. The Layers palette is another important interface element to master. I use layers all the time, even when I am working to restore or retouch a photo.
The Menus
The Edit workspace organizes most of the photo retouching and restoration features into several menus. It will help if you know the general organization so you can quickly find things when you need them.
![]() File: Open, Close, Save, and that sort of thing. There are a number of other commands here as well: Photo Blend, HDR, Export, Script, Preferences, and Workspace, to name a few.
File: Open, Close, Save, and that sort of thing. There are a number of other commands here as well: Photo Blend, HDR, Export, Script, Preferences, and Workspace, to name a few.
![]() Edit: Cut, Copy, Paste. The Copy Special option is important if you want to use Copy Merged, and there are a number of different Paste options.
Edit: Cut, Copy, Paste. The Copy Special option is important if you want to use Copy Merged, and there are a number of different Paste options.
![]() View: Zoom, Full Screen Preview, Rulers, Grid, Guide. Also, this is where you open toolbars and palettes, change docking options and customize menus, keyboard shortcuts, toolbars, and other options. If you have a dual monitor, select Dual Monitor here.
View: Zoom, Full Screen Preview, Rulers, Grid, Guide. Also, this is where you open toolbars and palettes, change docking options and customize menus, keyboard shortcuts, toolbars, and other options. If you have a dual monitor, select Dual Monitor here.
![]() Image: This is a big menu. Rotate, Resize, Canvas size are some of the more important options. You can also launch the Smart Carver and Object Extractor here, view EXIF data from the Image Information command, and change color options. Don’t forget that the Split Channel and Combine Channel submenus are also here.
Image: This is a big menu. Rotate, Resize, Canvas size are some of the more important options. You can also launch the Smart Carver and Object Extractor here, view EXIF data from the Image Information command, and change color options. Don’t forget that the Split Channel and Combine Channel submenus are also here.
![]() Adjust: This is the single most important photo-retouching menu. At the top, you have a few instant options like One Step Photo Fix and One Step Noise Removal, but you also can access Smart Photo Fix and Digital Noise Removal here. Beneath these options are submenus for Color, Brightness and Contrast, and Hue and Saturation adjustments. Beneath that are many more menus like Depth of Field, Add/Remove Noise, Blur, Sharpness (Unsharp Mask is located under the Sharpness submenu), Softness, Skin Smoothing, Backlighting, Fill Flash, Red Eye Removal, and distortion correction tools.
Adjust: This is the single most important photo-retouching menu. At the top, you have a few instant options like One Step Photo Fix and One Step Noise Removal, but you also can access Smart Photo Fix and Digital Noise Removal here. Beneath these options are submenus for Color, Brightness and Contrast, and Hue and Saturation adjustments. Beneath that are many more menus like Depth of Field, Add/Remove Noise, Blur, Sharpness (Unsharp Mask is located under the Sharpness submenu), Softness, Skin Smoothing, Backlighting, Fill Flash, Red Eye Removal, and distortion correction tools.
Yes, that’s a lot, and I didn’t even list them all. Study the Adjust menu and learn it.
![]() Effects: The Effects menu has all the different photo and other types of effects. (You may hear them called filters.) They are organized by type. Photo Effects are practical and useful. Many others won’t be. They are more useful for graphic artists; however, explore and have fun learning what they do.
Effects: The Effects menu has all the different photo and other types of effects. (You may hear them called filters.) They are organized by type. Photo Effects are practical and useful. Many others won’t be. They are more useful for graphic artists; however, explore and have fun learning what they do.
![]() Layers: This is a practical menu that collects all the Layers commands. Create and manage layers here. Don’t forget, this is where the Mask commands are as well.
Layers: This is a practical menu that collects all the Layers commands. Create and manage layers here. Don’t forget, this is where the Mask commands are as well.
![]() Objects: You won’t use objects that much, unless you are working with text, shapes, or other vector objects. If you are, then this menu has alignment, grouping, properties, and other important commands.
Objects: You won’t use objects that much, unless you are working with text, shapes, or other vector objects. If you are, then this menu has alignment, grouping, properties, and other important commands.
![]() Selections: I use this menu to load and save selections when I am retouching and restoring, as well as creating selections from a mask. Additionally, it’s got useful selection commands.
Selections: I use this menu to load and save selections when I am retouching and restoring, as well as creating selections from a mask. Additionally, it’s got useful selection commands.
![]() Window: The Window menu is where you go to arrange your windows in the Edit workspace. I like working with Tabbed Documents, but you may prefer working with image windows. Aside from the window and view commands, the Duplicate command is here. That is a very practical command that helps you pursue alternate paths without affecting your original file. Don’t forget it’s here.
Window: The Window menu is where you go to arrange your windows in the Edit workspace. I like working with Tabbed Documents, but you may prefer working with image windows. Aside from the window and view commands, the Duplicate command is here. That is a very practical command that helps you pursue alternate paths without affecting your original file. Don’t forget it’s here.
![]() Help: Standard help options. Manually update the program from this menu.
Help: Standard help options. Manually update the program from this menu.
Many of these commands are also located on other toolbars and palettes. Whichever way you choose to access these commands is purely a personal preference.
The Tools
PaintShop Pro sure has a lot of tools, and I’ve found that I use quite a few of them for many different tasks. Sure, you’ll develop your favorites like I have, but you need to be able to use any tool in the arsenal. The Tools toolbar is illustrated in Figure 1.13. You’ll notice that many of the tools have a light triangle in the lower-right corner. This indicates that there are tools grouped together to save space. Click on the arrow to show the tool group.
Figure 1.13
PaintShop Pro’s tools.
© Corel® Corporation, All Rights Reserved.
The specific tools are the following:
|
Pan: Click and drag around an image that’s zoomed in. I rarely use it because most of the time I just zoom out and then back in where I want to see. Lots of people swear by panning, though. |
|
Zoom: Click in the image to zoom; right-click to zoom out. Another tool I rarely use. I like to use my mouse wheel to zoom in and out quickly. I also use the wheel on my Wacom pen tablet. There are times, however, when the wheels don’t want to work so I select this tool to get back to zooming. |
|
Pick: Click to pick. A finicky tool if there ever was one. Make sure you are picking the right object. There are times when it’s a good idea to hide a layer to get at the object you want on another layer. Despite what the name implies, you can move, scale, rotate, and deform objects with this tool. I often use this to resize a layer at the end of the process instead of cropping. |
|
Move: Seemingly redundant, but I do find myself using it at times. If you have linked layers, this is the only way to move them together. In addition, if you hold the Shift key down when you click and drag, only material on the current layer is moved. That prevents a lot of inadvertent selections in complicated files. |
|
Selection: Muy importante for a graphic artist. Less so for a photo retoucher. Selections can help you selectively apply effects or modify parts of an image. This tool is “many tools in one” because you can change the type of selection in the Tool Options palette. |
|
Freehand Selection: Can be Freehand, Point to point, Edge Seeker, or Smart Edge. Each has its advantages. I use Point to point when I want to make a selection quickly where the borders don’t need to be exact. Freehand is more exacting, and Edge Seeker and Smart Edge find edges for you. Try each of them out and compare. |
|
Magic Wand: Selects by matching pixels of an image (can be adjacent, not adjacent, and even on different layers) within a certain tolerance. Most of the time, you’ll use color as the criterion, but you can change this. |
|
Dropper: Loads the color you click in your photo into the Materials palette. Left-click for foreground; right-click for background. |
|
Crop: Crops an image to the size and aspect ratio you choose. There are a lot of cool little features to the Crop tool, such as “Crop as New Image,” which creates a new image with what you’re cropping and leaves the original intact. You can also rotate the crop window or rotate the photo upon cropping. |
|
Straighten: Used after scanning or with digital photos where you accidentally had the camera out of alignment. Straightens an image. Be careful to select the right options. You can straighten individual layers and automatically crop. |
|
Perspective Correction: Useful in retouching when it’s obvious that the perspective is a bit out of whack. |
|
Red Eye: Pretty self-explanatory. Click to correct someone’s red eyes. |
Makeover: Five tools in one. The original Makeover tools are the Blemish Fixer, Toothbrush, Eye Drop, Suntan, and Thinnify. Sounds like a pretty good spa treatment to me! I can’t wait for Nose Wiper and Waxer. |
|
|
Clone: My all-time favorite tool. Take parts of a photo and paint them to another part. You’ll use this to cover up things, remove things, clean up dust and specks, and even clone from other photos. Know it. Trust it. Clone it. |
|
Scratch Remover: Pretty good tool, actually. It’s like applying the Clone brush in a straight line. |
|
Object Remover: I’ve used this, and it’s very good for removing objects quickly. Your mileage may vary, depending on the complexity of the background. |
|
Paint Brush: Paints what you have in the Materials palette onto the canvas. Lots of options and different choices for brushes. |
|
Airbrush: To be truthful, I’ve never really figured out why this is needed. I just use the brushes. However, if you want to get technical, the longer you hold the mouse button down, the more paint is applied with the Airbrush. With the Paint brush, the full amount is applied immediately. |
|
Lighten/Darken: Very useful when you want some artistic control over what you want to lighten or darken. Change brush properties and opacity to get different effects. Left-click to lighten and right-click to darken. |
|
Dodge: Not as strong as Lighten, and with different tool options. Very effective when you modify the opacity. |
|
Burn: Not as strong as Darken, and with different tool options. The terms, Dodge and Burn, come from the photographer’s darkroom. Dodging is the technique used to lighten a print by underexposing it, and burning is used to darken the print by exposing it longer. Very effective when you modify the opacity. |
|
Smudge: Smudge pushes paint around with a brush and smudges it. Try it out for some interesting effects. |
|
Push: Push smudges paint around with a brush and pushes it. I couldn’t resist that. Push is identical to Smudge, except that Smudge picks up new colors as it smudges (like sticking your finger in wet paint), and Push doesn’t as it pushes. |
|
Soften: A very useful tool. I use it when I clone and want to soften the edges of pixels or a border region between where I’ve cloned and the original photo. |
|
Sharpen: Another very useful tool for sharpening exactly what you need without applying an effect to the entire photo. |
When Selected
My entries in this list assume that you have selected the tool you are reading about at the time, and it is active. I got tired of typing, “When selected...,” so I thought one note would do the trick.
Emboss: Cool effect where you brush over parts of the photo and it appears as if they are embossed. |
|
|
Saturation Up/Down: Changes the saturation where you brush. Left-click and brush to saturate; right-click and brush to desaturate. |
|
Hue Up/Down: Changes the hue where you brush. Left-click and brush to change hue in one direction on the color wheel; right-click and brush to go the other direction. This effect is best when it is used very subtly and the opacity is very low. |
|
Change to Target: Left-click to change where you brush to the foreground color in the Materials palette; right-click to use the background color. My first reaction to this tool was ambivalent, but I’ve been won over. Make sure to set the mode correctly in the Tools Options palette. |
|
Color Replacer: Replaces the color where you click with the foreground color. |
|
Eraser: Erases things. This doesn’t work on vector objects or text created as a vector. Until you resize, transform, or warp the layer you erase on, you can right-click with the Eraser and material will be “unerased.” This is very nice, but don’t count on it as you work your photos. Think of it as a short-term feature that adds convenience. |
|
Background Eraser: Detects the border between where you click and the edge of the brush and erases the background (which is where you should be clicking). |
|
Flood Fill: Fills an area with the current foreground color, pattern, or texture. You guessed it: If you right-click, it fills an area with the background color, pattern, or texture. |
|
Color Changer: This replaces color ranges (as opposed to replacing a single color) pretty realistically. The Color Changer also preserves a photo’s details as it changes the color. |
|
Picture Tube: Allows you to squish preset images out of a Picture Tube onto your canvas. |
|
Text: If a picture is worth a thousand words, this is where you add the words. I rarely use text when I am restoring or retouching. About the only time I use it is when I want to re-create text in a border, which was a common feature of photos in the 1960s and early ‘70s, or when I retouch house numbers. |
|
Preset Shape: Enables you to choose a preset vector shape, such as an arrow or thought balloon, and draw it on your canvas. |
|
Rectangle: Not surprisingly, this is the tool you should use to draw rectangles (and squares). |
|
Ellipse: Draws ellipses and circles. |
|
Symmetric Shape: Draws shapes. You can set the number of sides from 3 (triangle) to 1,000 (who knows what it’s called, but it looks like a circle). |
Pen: Creates vector lines and nodes. A very powerful tool. I use it when I want to make a precise selection, most often when I am working with a mask. |
|
|
Warp Brush: Warps the photo in the mode of your choice. Modes include Push, Expand, Contract, Right Twirl, Left Twirl, and Noise. Great for losing weight or adding muscle. |
|
Mesh Warp: Instead of brushing a warp, use a mesh to drag nodes that warp the photo. This is an easy way to make people skinny. |
|
Oil Brush: Art Media tool that emulates oil painting. You must use this and the subsequent tools on an Art Media layer. |
|
Chalk: Art Media tool that emulates chalk drawing. |
|
Pastel: Art Media tool that emulates pastels. |
|
Crayon: Art Media tool that emulates crayons. |
|
Colored Pencil: Art Media tool that emulates drawing with colored pencils. |
|
Marker: Art Media tool that emulates marking with a marker. |
|
Palette Knife: Art Media tool that emulates using a palette knife to lay down oil paint on a canvas, much like Bob Ross, my favorite PBS personality of all time. |
|
Smear: Art Media tool you should use to smear paint (or the other mediums) around the canvas. |
|
Art Eraser: The tool you use to erase Art Media. |
Other Useful Tips
You’ll find the Enhance Photo button on the Standard toolbar. Click to expand and choose a command. This is a faster way to select specific menu options than digging down through the menu bar. The available options are the following:
![]() One Step Photo Fix
One Step Photo Fix
![]() Smart Photo Fix
Smart Photo Fix
![]() One Step Noise Removal
One Step Noise Removal
![]() White Balance
White Balance
![]() Local Tone Mapping
Local Tone Mapping
![]() High Pass Sharpen
High Pass Sharpen
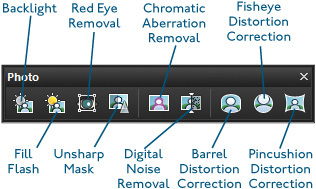
There are a number of toolbars that you can use that will help you retouch and restore photos. The Photo toolbar, shown in Figure 1.14, is among the most important for photo work (not surprisingly).
Figure 1.14
The Photo toolbar has some handy buttons.
© Corel® Corporation, All Rights Reserved.
You can also create your own toolbars. Select the View ![]() Customize menu and select the Toolbars tab, as shown in Figure 1.15.
Customize menu and select the Toolbars tab, as shown in Figure 1.15.
Figure 1.15
Customizing toolbars.

© Corel® Corporation, All Rights Reserved.
Press the New button to create a new toolbar and give it a name, as shown in Figure 1.16.
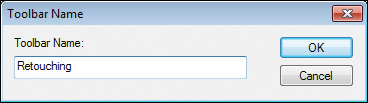
© Corel® Corporation, All Rights Reserved.
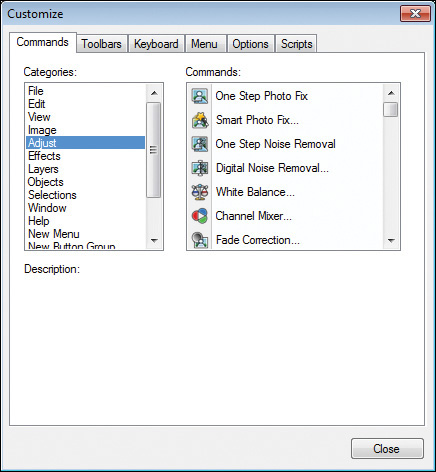
Now, select the Commands tab and then select the menu you want to choose commands from, as shown in Figure 1.17. The Command list on the right will update to show you what’s under each menu choice.
Figure 1.17
Select the menu item first.
© Corel® Corporation, All Rights Reserved.
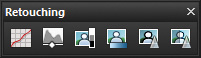
Drag the specific commands from the Command list to your new toolbar (see Figure 1.18) and enjoy!
Figure 1.18
Drag and drop on your new toolbar.
© Corel® Corporation, All Rights Reserved.
Updating the Program
COREL CONTINUES TO PROVIDE support for each version of PaintShop Pro after it is released. Their team of developers release updates, called patches or updates, which continue to improve the program. Take advantage of this free service by keeping your version of PaintShop Pro in tip-top, updated shape. You don’t have to obsess over it, but you should consider updating PaintShop Pro whenever there is a patch available.
To manually check for updates, follow these steps:
1. Make sure that your computer has a working, active connection to the Internet.
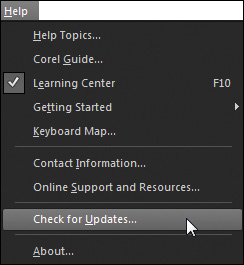
2. Select the Help menu and choose Check for Updates, as shown in Figure 1.19. PaintShop Pro will connect to Corel and determine whether or not there are new patches available for download. If not, you will see a message box telling you there are no updates available. You can click it away and continue with the knowledge that you’ve got the latest version of the program.
Figure 1.19
Manually checking for updates.
© Corel® Corporation, All Rights Reserved.
3. If there are updates, you’ll see a message from Corel. Download and install the updates to your version of PaintShop Pro.
To turn auto updating on or off, follow these steps:
1. Click the Corel Guide icon to bring up the guide.
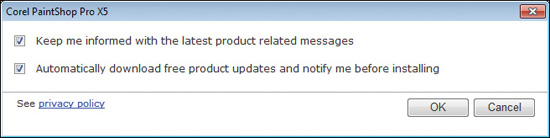
2. Click the little gears at the top of the window (it’s called Program information and preferences) and choose Message preferences. This opens another dialog box, shown in Figure 1.20.
Figure 1.20
Uncheck auto update if you want to handle it yourself.
© Corel® Corporation, All Rights Reserved.
3. Click to uncheck the Automatically download free product updates and notify me before installing (could that be any longer?) option to turn it off.
There you have it. You’re ready to start retouching and restoring photos with your fully updated copy of Corel PaintShop Pro X5.