A More Useful Information
© 2013 Cengage Learning®, All Rights Reserved.

© 2013 Cengage Learning®, All Rights Reserved.
THIS APPENDIX HAS A LOT OF USEFUL information in it that directly and indirectly touches photo restoration and retouching. Scanning, for example, is how you transform photo prints into computer files. You’ll also find helpful tips on using a pen tablet, not to mention organizing, printing, and archiving your photo collection.
Using a Pen Tablet
I USED TO USE A MOUSE for all my computer pointing and clicking needs, but that changed after I spoke with a friend of mine who is a radio, TV, and film professor at a college in California.
We were talking about his experiences as an animator for Disney when I brought up the fact that I had seen a behind-the-scenes segment on Disney animators. This “DVD extra” showed the animators using their pen tablets to draw actual animations from the movie. I asked him about tablets, and he said he used one all the time.
I was sold. I did some research and budgeting, and then bought a Wacom pen tablet (www.wacom.com). I love it. My wife loves it. Our kids love it. The tablet integrates perfectly into PaintShop Pro and is very easy to use.
You can choose different sizes to suit your needs and budget. Wacom (pronounced “wok-um”) also offers larger and more expensive models priced for professionals.
Practice That Thang
A pen tablet takes some getting used to. Your mind and muscles have been indoctrinated into mousing so much that you have to retrain yourself. It’s worth it. Once you get the hang of it, you will have more control than you did using a mouse. As an added bonus, you can use the pen tablet in many other applications besides PaintShop Pro.
Make sure that you look at tablet specifications to ensure that it’s compatible with your system and that you read and follow the installation instructions. When your system recognizes the pen tablet as a valid pointing device, you’ll be off and running.
Scanning Photos
SCANNERS ARE WONDERFUL. I love them. I’ve filled up many gigabytes of hard drive space with scanned photos, pictures from books, maps, patches, and more. You can even scan negatives and slides. Scanners are the only way to digitize (strange how old-fashioned that sounds) material that exists in the physical world and make it available to use on your computer.
If you scan a photo print, you can view, edit, and archive it using PaintShop Pro.
How Scanners Scan
Scanners shine a powerful light through a clear glass plate onto something reflective, such as a photo. The light bounces off the photo and is captured by photo-sensitive receptors in the scanner. These are called charge-coupled devices, or CCDs. Your typical flatbed scanner has three arrays of CCDs, each of which senses a different wavelength of light that corresponds to the colors red, green, and blue. After the scanner scans the photo, it saves the information as an image file.
Scanner Types
There are many types of scanners. Aside from the flatbed scanner (the most common, and the subject in these sections), there are hand-held scanners, rotary, drum, planetary, 3D scanners, and probably more. They all have different strengths and weaknesses.
Choosing the Right Resolution
Scan resolution for the typical flatbed consumer scanner is measured in dots per inch (dpi). Dpi is a measure of how many discrete color and brightness measurements the scanner makes per inch. When it comes to scanning, more dots per inch capture finer details. Fewer dots per inch capture less information.
The trade-off to higher quality and detail is space. Greater scan resolutions produce much larger files (more dots means more data, which takes up more space). They push your system and PaintShop Pro to their limits as you edit them because the sheer number of pixels changing or being displayed is tremendous. They also take up more space on your hard drive.
It is reasonable, therefore, to choose a scanning dpi based on what you’re doing. Think along these lines:
![]() Typical photo work: 200–300dpi. I use 300dpi regularly. Scanned at 200dpi, a 4×6 photo has 800×1200 pixels, which is just shy of a megapixel. Scanned at 300dpi, the same photo consists of 1200×1800 pixels, or over 2 megapixels.
Typical photo work: 200–300dpi. I use 300dpi regularly. Scanned at 200dpi, a 4×6 photo has 800×1200 pixels, which is just shy of a megapixel. Scanned at 300dpi, the same photo consists of 1200×1800 pixels, or over 2 megapixels.
![]() Small photos or higher quality scans: 300–1200dpi. If the photo is on the small size, you can use a larger dpi and not end up with too large a file. Scale the dpi to the size of the photo. A 4×6 photo scanned at 600dpi has 2400×3600 pixels, or well over 8 megapixels.
Small photos or higher quality scans: 300–1200dpi. If the photo is on the small size, you can use a larger dpi and not end up with too large a file. Scale the dpi to the size of the photo. A 4×6 photo scanned at 600dpi has 2400×3600 pixels, or well over 8 megapixels.
![]() Very small photos or ultimate quality scans: 1200–2400dpi. Use as much dpi as you can muster to scan your most treasured photos and save them as permanent, archival quality files. It’s harder to work with them, but you can resize them and save a smaller working copy using PaintShop Pro. Very high dpi is also useful for very small photos.
Very small photos or ultimate quality scans: 1200–2400dpi. Use as much dpi as you can muster to scan your most treasured photos and save them as permanent, archival quality files. It’s harder to work with them, but you can resize them and save a smaller working copy using PaintShop Pro. Very high dpi is also useful for very small photos.
One adverse effect of higher scan resolutions is that you start to scan the surface details (and defects) of the photo, not just the photo itself. Sometimes, it’s good not to know all the pits, specks, and microscopic dust that are present on a photo. You’ll be tempted to want to restore things that, to be honest, won’t be caught if you scanned the photo in at 300dpi. Figure A.1 shows the difference between a photo scanned at 300dpi versus 2400dpi.
Notice the trade-off that occurs. At 300dpi, the photo is clearly not as sharp as at 2400dpi. However, there are far more scratches on the 2400dpi version.
Figure A.1
The visible difference between 300 and 2400 dpi.

© 2013 Cengage Learning®, All Rights Reserved.
You’ll have to experiment to find the precise resolution you prefer working with. I’ve found that the resolutions I use the most are those that my computer can handle without choking. That’s somewhere between 300 and 1200dpi, depending on the photo size. There are times when I scan at 2400, but for the most part this is to save a high-res scan for archival purposes only. I reduce the resolution when I plan on restoring the photo.
We tend to focus on dpi as the single measure of scan quality. While it is very important, don’t forget to use an appropriate bit-depth. This ensures that you scan the photo with enough colors (or levels of grayscale detail). For the highest quality, scan at 48 bits and save your files as 16 bits/channel TIFFs (16 bits per channel times three channels equals 48 bits). While less capable than 48 bits, 24-bit scans (also called 8-bit images, because 8 bits per channel times three channels equals 24 bits) are acceptable in most instances. If your scanner has the ability, experiment with each type and examine the trade-offs between image quality and file size (48 bits will be much larger).
Not All Scanners Are the Same
We bought a printer some time ago that’s one of those “all-in-one” types. It wirelessly prints, copies, scans up to 1200dpi, and connects to the Internet. It’s incredibly versatile. I copy things all the time. Our kids print coloring and activity pages using the built-in touch screen. My wife prints plans and school schedules from her computer. I routinely scan things I have signed and need to email.
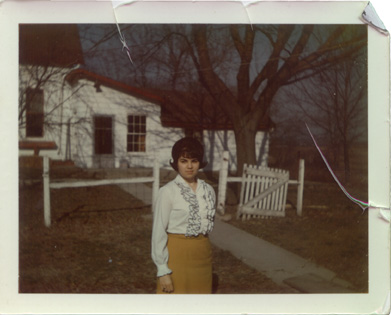
Despite the fact that it is more than adequate for all these tasks, it is not up to producing high-quality photo scans that I can use to retouch or restore. Figure A.2 shows a small portion of a 1200dpi scan of my wife’s grandmother sitting in a yard. It looks terrible. The edges look fuzzy and sometimes “jumpy.” (I think this is due to oversharpening that I can’t disable, which creates harsh edges that seem to jump back and forth.) This type of scan limits your effectiveness as a photo retoucher.
Figure A.2
A poor scan from an all-in-one printer/scanner.
© 2013 Cengage Learning®, All Rights Reserved.
Figure A.3 shows the same photo scanned in with our new scanner, the Canon CanoScan 9000F. It’s what I would call a mid-range consumer scanner. It’s not the cheapest scanner out there (try and avoid these, for the most part), nor is it the most expensive (professional scanners can cost well over a thousand dollars). The results are clearly better. At the same resolution (and with auto enhancements off), this scan has more detail, fewer artifacts, and a much better tone to it. It may not appear as sharp, but that’s part of the point. You should see the photo as it is, not something that you can’t keep from being artificially enhanced. Although the photo wasn’t perfect to begin with, this scan is a much better source to work from.
Figure A.3
This is more like it.

© 2013 Cengage Learning®, All Rights Reserved.
Scanning Photos and Other Objects
ALTHOUGH I MOSTLY REFER TO PHOTOS, this information applies to other objects as well. Don’t forget about old newspaper clippings, obituaries, baseball cards, postcards, letters, patches, maps, diplomas, and other historical objects. Be creative with objects that are larger than your scanner bed. Try scanning a small portion at a time and putting the pieces together like a puzzle using PaintShop Pro.
Cleaning Your Scanner
Be fanatical about cleaning your scanner. Clean it before every use. I use a popular brand of glass cleaner and unused coffee filters to wipe with. Coffee filters are lint-free and neater than newspapers. Experiment with the filter size to find out what you like best. Smaller ones get dirty and there isn’t much to fold over to use a new section. On the large side, there are commercial coffee machines that take huge filters. Those filters are big enough to clean sliding glass doors with.
Cleaning Photos
If your photos need to be cleaned, consult a professional or research photo cleaning on the Internet and follow the advice that best suits your problem. To dust photos off, I use a dust blower and brush I bought to clean my digital SLR cameras.
![]() Don’t use anything that will scratch the photo, such as a rough paper towel.
Don’t use anything that will scratch the photo, such as a rough paper towel.
![]() Don’t rub or buff vigorously, or you’ll scratch or fade the photo.
Don’t rub or buff vigorously, or you’ll scratch or fade the photo.
![]() Don’t use a cleaner that could chemically interact with the print and destroy it.
Don’t use a cleaner that could chemically interact with the print and destroy it.
![]() Be careful with “canned air,” as it can condense water out of the air and blow it all over the photo. Make sure to get a variety that says “moisture and residue free.” Regardless, be careful and do some test runs with plain paper on humid days.
Be careful with “canned air,” as it can condense water out of the air and blow it all over the photo. Make sure to get a variety that says “moisture and residue free.” Regardless, be careful and do some test runs with plain paper on humid days.
Handling Photos
Handle all of your photo prints with care. Clean your hands prior to touching old photos, or better yet, wear protective gloves. The oil your skin naturally produces will damage photos over time. If you decide not to wear gloves (or don’t have them with you), handle the photos by the edges and support them from beneath. This will prevent your fingerprints from getting all over the photos.
Be very careful when you handle photos or other documents that are in albums. Older albums are especially prone to grabbing onto photos and not letting them go. The first step in restoring an old photo is often rescuing it from a poorly designed storage environment. (If the photo sticks, scan it in while still in the album.)
Be Careful How You Treat Other People’s Photos
If you plan on restoring or retouching other people’s photos, especially if you are going to do it for money, take every possible safety precaution to protect the photos and yourself. Wear gloves when you handle the photos, scan them carefully, put them in a rigid sleeve, and get them back to their owner safely and quickly.
The plastic “protective” sheet (or sleeve, as the case may be) may stick to the photo, or the sticky paper of the album may be sticking too much. If this is the case and the photo is important, you should seek the assistance of a professional conservator or photographer with this type of experience. If you are going to remove the photo yourself, carefully try to peel the protective sheet back, but if you feel the surface of the photo starting to give way, stop immediately. Never try to peel the photo off the page. You may bend and damage the photo.
Running Your Scanner Software
Make sure that your scanner is plugged in, powered on, and connected to your computer or network. You must have installed the scanning software that came with your scanner.
Here is a general scanning workflow. Use it as a baseline to fit your situation and to jog your memory so you don’t forget things:
1. Open the lid and clean the scanner bed.
2. While the scanner glass is drying, gather the material you want to scan. Make sure that the scanner bed is clean and dry before continuing.
3. Place your ruler or other straightedge on the scanner bed to give yourself a square, straight photo placement helper.
It’s quite hard to place a photo or other object on the scanner perfectly straight. If you put your photo at the edge of the scanner bed, you’re very likely going to lose a little bit of your photo because it’s outside of the scanning area. Try it and see. That’s why I use a plastic ruler that rests against the bottom or any side of the bed. It gives me a straight offset from the border of the bed, and I can crop it out later.
4. Place the photo against the rest. Make sure that it doesn’t go under or over it.
5. Close the scanner lid. If the ruler or straightedge you use keeps the scanner from closing properly and securing the photo to the glass, you may have to put the photo in by hand and straighten it later in PaintShop Pro.
6. If you haven’t started your scanner software, do so now.
7. Depending on your software, you may have different options here, but you’ll probably want a preview or overview scan of what is on the scanner bed. This is done very quickly at a much lower resolution than the final scan.
8. Select the area you want to scan. When you are scanning small photos, this really helps keep file sizes down. For sizes of 8×10 or so, you won’t save on file size, but it will keep cropping down to a minimum. I like to leave a little border around each side that’s larger than the photo itself so I can decide later exactly how I want to crop it.
9. Select a scan resolution and bit depth (sometimes called image type).
10. Make sure that automatic corrections are turned off. The thing is, you’re scanning in photos so that you can restore them, not the scanner.
11. Scan. You can normally select to scan to a file or image type. If you choose .jpg, make sure that the image quality is set to “highest,” or 100%. I always choose uncompressed .tiff, which is a high-quality image format.
12. Bask in the glow of a job well done.
Choosing a Commercial Solution
Believe it or not, you don’t have to scan everything yourself. You can choose to have photos commercially scanned at a fairly reasonable rate. This would be most cost-effective if you were restoring and retouching photos as a small business and could offset the expense by including scanning costs in your quotes, but in small batches, paying a professional to scan your photos isn’t too costly. If you’re working on family photos, take up a collection from your relatives if it gets too costly. You can also take your photos to photo-printing kiosks, but this is no better than scanning at home (unless, of course, you don’t have a scanner).
I use a local print and copy business that I became familiar with when I was freelancing in the marketing and design industry. We would send them quite a bit of professional printing business and had a good working relationship. When my wife’s grandfather died, we used them to scan in several old photos so that the family could concentrate on other, more important matters.
Search your local area for print and copy companies that might perform this service, call them up, and ask for their rates. If you plan on using them a lot, ask for a discount. Verify what dpi they are capable of scanning and what format you want the files to be saved in before closing the deal.
Organizing Your Digital Photo Collection
WE’VE GOT MANY THOUSANDS of digital pictures that we’ve taken over the last several years. They pile up like crazy with one digital camera. If you have more than one camera and more than one photographer in your household, you’ve got some serious managing to do.
Organization is the key to being able to access, edit, and not lose them. There is a long-term component to organization as well. When it’s time for you to pass your family photos down to your children or other family members, how are they going to make sense of things? Are things logically organized so that generations to come can spend their time reminiscing and not fighting the system?
Folder and File Organization
I’ve gone through several organizational schemes over the years.
First, there was the “Throw the photos in subject folders” idea. It seems ridiculous now, but those were the days of 8MB memory cards. Digital photos were a new thing, and I don’t think my wife and I averaged taking more than 25–30 pictures in a month. We just didn’t think about it the same way. At that time, we organized our pictures in subject folders within one overall digital photo folder and left the names alone.
Digital Photo Downloading Options
Programs that automatically download pictures to your computer from your digital camera normally come with the camera you have. These programs can also be associated with a graphics application or photo-editing program, such as PaintShop Pro.
When we had our first child. I decided to try and organize things a bit because the subject folder scheme was getting too complicated. When I took a picture of my wife and my son and the cat all together, did the file go in the “Robert” folder, the “Anne” folder, the “Cats” folder, or the “Ben” folder? That’s when I implemented my “Year-Month-Day” scheme on the folders, and it seemed natural to start renaming the files, too.
Therefore, I created folders by year and month, and then downloaded the photos into them, renaming each photo afterwards.
I really liked this system because I could look at a photo and tell you exactly when I took it from the name.
Know Your Digital Camera
Check the documentation that came with your digital camera and see what file-naming options you have. You might have several to choose from, find one that fits your needs, and never have to manually name a file again.
Again, the reason this worked was the fact that we had one camera and took maybe 50 photos a month.
When we got a new, 3MP camera, I changed organizational schemes again. By this time, I was tired of naming every single file, so I dropped that. I was also tired of putting photos by month into folders. So I just copied the folder the camera used on the memory card over to the computer and left it alone. I call this my “I give up” scheme. The problem with this scheme is that it gave me no usable information.
Today, I have several dSLRs, compact digital cameras, and super zooms with more on the way. I also rent cameras for certain shoots. I don’t have time to spend messing around overorganizing and renaming. However, to keep things straight, I do need some form of organization.
Therefore, I use the following process:
1. I have dedicated an entire drive to photos. I download new digital photos here. I keep them separate from scanned photos that I am retouching or restoring.
2. I create a folder for each camera. You only have to do this once, each time you get a new camera. I put the manufacturer and mode. For the Canon EOS 5D Mark III, I would use “Canon 5D3.”
3. I create folders as needed when transferring photos from the camera’s memory card to the computer. My particular naming scheme is to put the camera name, year (so the folders sort by year), month, day, and a sequence number. I separate the month and day to make them easier to spot when I’m looking at the folders.
Here’s an example of how I would name a folder to receive the first batch of photos from a Canon 5D Mark III taken on May 27, 2012: 5D3-2012-05-27-01.
4. I then manually transfer the photos from the memory card to the folder I just created.
5. If I have more than one download that day, I create more folders and assign new sequence numbers (02, 03, etc.), as required.
6. I then make a copy of the download folders to remind myself I need to archive them to an external drive. This preserves a temporary copy in case I accidentally delete a photo or do something I can’t undo. Over time, I move the original folder to an external hard drive for long-term storage and protection and delete the copy. (The space the copies take up prompts me to quickly archive the originals and free up the space.)
You can load the original folders into whatever organizational software you use. Then edit, tag, and continue to organize to your heart’s content.
Protecting Your Files
Unlike physical photo prints that are developed from negatives, digital photos have no negative. The image file is the original source. Protect it at all costs!
I made the mistake of changing my original photos a few times when I got my first digital camera. I rotated, cropped, or resized a photo, then saved it, only to realize that I had just overwritten my master copy. My original source was gone forever. It was as if I had held up the negative and burned it, leaving me with a resized print that would never be as good as the original. I learned my lesson.
My wife will attest to my rigorous efforts to protect one copy of our digital photos from ever being edited, resized, cropped, or otherwise tampered with. I suggest you get into the habit, at least for important pictures (weddings, births, birthdays, and so forth), of always making a “Do-Not-Edit” copy of the photos you transfer to your computer and placing all of those files into one folder that is clearly marked. Leave them in there for safekeeping and later archive them away.
Printing Photos
PRINTING PHOTOS THAT you’ve worked on is one of the most rewarding aspects of photo retouching. Hang them on your wall, put them in new photo albums or scrapbooks, or sell them.
You can do this from the comfort of your own home using your own printer or seek out other professional or commercial solutions. There are quite a few ways to print your material. This is an idea section meant to help you choose which one is right one for you.
Printing at Home with the Right Printer
With the advent of affordable color inkjet printers, printing photos at home has become the new normal.
Most of us now have high-quality inkjet printers that can print 1200dpi or more. You can even buy specialized photo inkjet printers for under $100. Because there are so many types, it can be confusing about which one to select. There are general printers, as well as those that are specifically targeted at a particular user group, such as photo enthusiasts. Some photo printers print only a few specifically sized prints, such as 4×6 or 5×7. If you need to print 8×10 or other sizes, you should note that and buy a printer with that capability. Many printers now are all-in-one printer/scanner/fax–capable. You can also buy a combo digital camera and printer dock!
From a technical standpoint, you should focus on at least four different areas: type, compatibility, connectivity, resolution, and “other.”
![]() Type is type. Is it just a printer or is it a photo printer? Is it an inkjet or laser printer or an all-in-one contraption? Personally, I think inkjets are fine if they are high quality, and if you buy the right ink and paper for the specific model of printer you have. Photo inkjets tend to have features that make sense for photo restorers, like borderless printing, panoramic photo printing, and color photo ink cartridges. Color laser printing can get really expensive. If you have limited funds, I would buy the best scanner you can and save the printer for later. You can always take your file to a print shop to get the job done, but the scanner will enable you to get prints into your computer to edit. If you work totally with digital photos, you won’t need a scanner at all.
Type is type. Is it just a printer or is it a photo printer? Is it an inkjet or laser printer or an all-in-one contraption? Personally, I think inkjets are fine if they are high quality, and if you buy the right ink and paper for the specific model of printer you have. Photo inkjets tend to have features that make sense for photo restorers, like borderless printing, panoramic photo printing, and color photo ink cartridges. Color laser printing can get really expensive. If you have limited funds, I would buy the best scanner you can and save the printer for later. You can always take your file to a print shop to get the job done, but the scanner will enable you to get prints into your computer to edit. If you work totally with digital photos, you won’t need a scanner at all.
![]() Compatibility is whether or not your printer is compatible with your computer and operating system version. Most are, but you always want to make sure, especially when new operating systems hit the market like Microsoft Windows 8 (especially if you’re running 64-bits). Another consideration is whether or not you are running Windows on an Intel-based Mac with Bootcamp. Always confirm compatibility.
Compatibility is whether or not your printer is compatible with your computer and operating system version. Most are, but you always want to make sure, especially when new operating systems hit the market like Microsoft Windows 8 (especially if you’re running 64-bits). Another consideration is whether or not you are running Windows on an Intel-based Mac with Bootcamp. Always confirm compatibility.
![]() Connectivity is how you send data to the printer to print. Most often, this will be USB, although wireless network printers are now available (we just bought one). Make sure that your printer is up to the latest specification if you want to take advantage of the highest speeds.
Connectivity is how you send data to the printer to print. Most often, this will be USB, although wireless network printers are now available (we just bought one). Make sure that your printer is up to the latest specification if you want to take advantage of the highest speeds.
![]() Resolution is how detailed your prints will be. In most cases, the printers you will be looking at will have more than enough. Non-photo printers, however, might have less.
Resolution is how detailed your prints will be. In most cases, the printers you will be looking at will have more than enough. Non-photo printers, however, might have less.
![]() Other is a catch-all category of points to ponder. Do you need auto red-eye removal in a photo printer? No, not if you are going to do it yourself. Do you want an automatic 5×7 photo paper tray? Maybe. Do you need Bluetooth? Possibly, but Bluetooth is not really necessary for photo restoration and printing. Find a printer that has only what you need. You’re paying for a lot of stuff you don’t need otherwise. If the printer has RAM slots to upgrade its memory, go for it! I would soup it up as much as I could. Printing 1200dpi 8×10 photos is very memory intensive.
Other is a catch-all category of points to ponder. Do you need auto red-eye removal in a photo printer? No, not if you are going to do it yourself. Do you want an automatic 5×7 photo paper tray? Maybe. Do you need Bluetooth? Possibly, but Bluetooth is not really necessary for photo restoration and printing. Find a printer that has only what you need. You’re paying for a lot of stuff you don’t need otherwise. If the printer has RAM slots to upgrade its memory, go for it! I would soup it up as much as I could. Printing 1200dpi 8×10 photos is very memory intensive.
There are so many printers out there today that you almost can’t go wrong. They are very capable. The key is to know what you want and get the printer that meets your needs. Spend time on the Web or in a store looking at printers and comparing prices.
Retail Outlet Printing
Printing your photos at retail outlets is a viable option, even for high-quality restorations. Today, you can stop by your neighborhood supermart and drop your digital photos off to be printed and picked up in an hour. Just like the old days of dropping off negatives.
There are a ton of places that develop (I mean, print) digital photos: Wal-Mart, Meijers, Walgreens, Sams Club, Target, Kmart, CVS Pharmacy, and Sears (just to name a few) all offer digital photo printing services. Take your digital photos to the store on a memory card or CD-ROM and have them printed while you shop. For a pretty reasonable price, too. Most places give you the option of sending your files over the Internet and then picking them up or having them mailed to you when they’re done. Talk about convenient!
Whether you use a kiosk or hand things over to a person behind the counter, ask whether the prints will be glossy or matte. At some places, your options change based on how fast you want the prints or their size. Don’t be surprised (like we were).
We take advantage of these services when we print a large number of digital photos. Anne loves putting together and sending photo albums, especially for my dad and other long-distance family and friends. The albums catch everyone up on what’s been happening in our lives. You can also put together theme albums that cover events like birthday parties or holidays. Dare I mention scrapbooking? There’s something about having a real photo album to look through that’s nice.
The benefits of having someone else print your photos are obvious: fast, cheap, timely, and hassle-free. It’s far cheaper for us not to use our own ink and photo paper for large-scale operations. The store prints are normally very good quality.
Look around at the stores you frequent and ask for their prices and printing options. Some may not be able to print .tif files. Others may. JPEGs should be universally accepted. You probably won’t be able to take a .pspimage in to have it printed. Make sure to save a copy of your work in a format the store will accept.
You can decide for yourself whether or not you like sending your files over the Internet. The store doesn’t even have to be in your town. Kodak has services that are entirely Internet-based, and they will mail you the prints.
Anne has one more thing for me to add. We had an experience at one store where the overall product was very different, depending on how fast we wanted the prints. If we wanted them done in an hour, they printed them in-house—without making any adjustments whatsoever to the photos. We learned that we had to tweak the lighting ourselves the next time to make the photos better. If we ordered them to be picked up in a few days, the printing was done in a different city, and they made lighting adjustments. If you’ve restored a photo and everything is exactly the way you want it, you probably don’t want someone else changing it. Ask and test. Send some test photos to be printed and evaluate them critically. Printing is a funny thing. What you see on your monitor has to be calibrated so that you’re seeing what is present in the photo, and then it has to be translated from ones and zeros to ink and paper.
Professional Printing
Even if you’ve got a fantastic setup at home, I doubt you’ll be able to match the equipment that a professional print company has. The professional printing avenue is the solution that will achieve the highest quality printouts.
Yes, it costs money, but even if the per-page printing costs are more than what you would pay at your local supermart, it’s offset by two factors. You’re going to have a reasonably low volume, which means you should be able to afford to pay more per copy. Secondly, the quality and features a print and copy business have are astounding.
Here are a few of the products and services available from the print and copy company I use:
![]() Booklets
Booklets
![]() Brochures
Brochures
![]() Calendars
Calendars
![]() Catalogs
Catalogs
![]() Digital Copies
Digital Copies
![]() Note Pads
Note Pads
![]() Binding
Binding
![]() Cutting
Cutting
![]() Folding
Folding
![]() Lamination
Lamination
![]() Offset Printing
Offset Printing
![]() Pickup and Delivery
Pickup and Delivery
![]() Shrink Wrapping
Shrink Wrapping
Call a marketing or design agency (whoever you think needs a good printer) in town and see where they get their printing done. Ask around. Talk to people.
Visit them on the Web first and then call them. Tell them what you’re doing and what sort of production you’ll need (numbers, sizes, format). Ask them for a price list or quote. Before you send anything in, make sure you’ve asked what format they require and be clear on what sort of output you want (mainly size, but also paper, cutting or folding, and finish).
I’m sure you can develop a good relationship with someone. These people know a lot about printing. They may even have some suggestions that you can use to prepare your work to be printed. Send them a file and try them out. Evaluate the product and your experience, and then go from there.
Archiving
WHEN I SAY “ARCHIVING,” I’m talking about preserving your photos electronically and then protecting those digital backups. Your photos could have been digital to start with, scanned photos that are now graphics files, scanned film or negatives, and, of course, the PaintShop Pro files that you generate as you work on restoring and retouching your photo collection. The whole shebang.
For this edition of the book, I can only recommend one approach: buy external (or swappable) hard drives. They’re the cheapest and most reliable media. They hold tons of data, and external USB, FireWire, and eSATA drives can be swapped easily. I have several external eSATA/USB drives that I swap as if they were floppy disks.
I’ve looked into all the alternatives: tape backup (too clunky, proprietary, and expensive), DVD/CDs (far too little capacity, although BluRay discs are promising), and online storage (for my purposes, this would take far too much Internet bandwidth). No other solutions are as inexpensive, reliable, and compatible. You copy files normally—nothing to decode to reverse the process.
Don’t lose all your great work because you didn’t think about this. Don’t lose your family’s history because you never backed anything up!