Chapter 5. Edit Your Photos
Photo editing encompasses a broad spectrum. You may only need to crop a photo to focus on someone in the scene, or you may want to radically change the tone and color of the shot to match a mood or compensate for less than ideal shooting conditions. The Photos apps for OS X and iOS offer surprisingly sophisticated controls for correcting images.
I say “surprisingly” because Apple could have made the editing tools extremely basic to appeal to the widest array of customers. They didn’t. In fact, the tools in Photos for OS X are some of the best I’ve seen in terms of applying sophisticated adjustments using a simple interface.
This chapter goes into detail about the Photos for OS X editing capabilities and also covers those in Photos for iOS. There’s a lot of overlap between the two, as well as features that are unique to each platform.
Edit Images in Photos for OS X
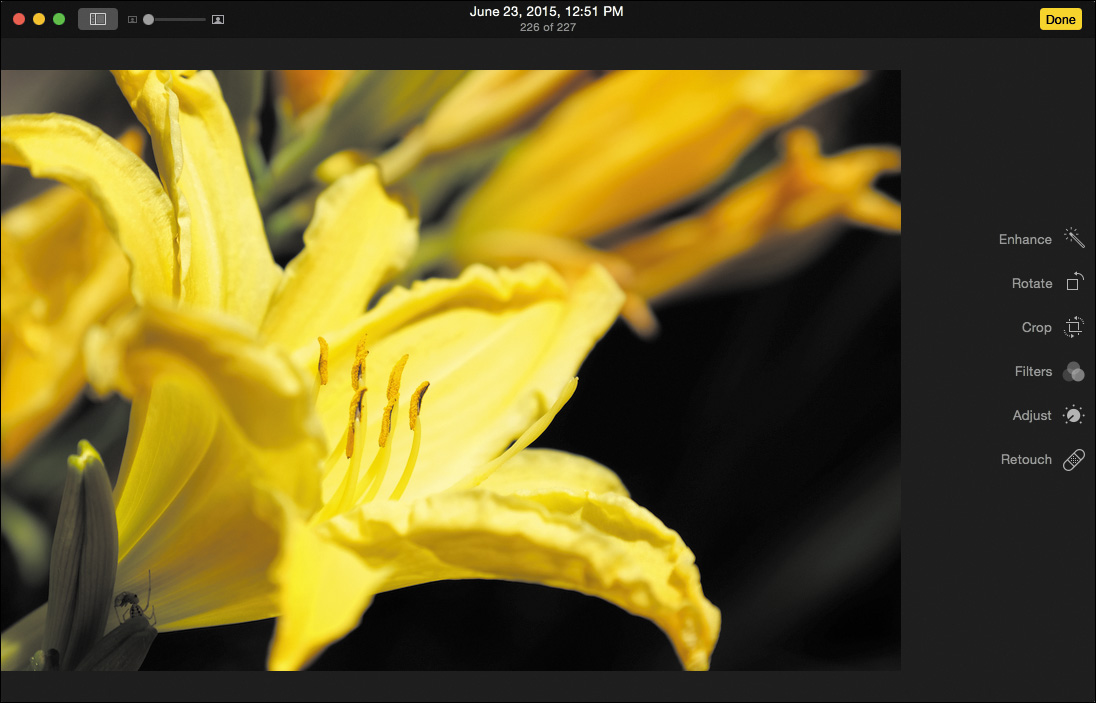
When you’re viewing a single photo, click the Edit button at the upper-right corner—but wait, there’s a better way: In single view mode or with a photo selected in the Moments view, press the Return key to jump to the editing view. The application’s background turns black and the editing tools appear to the right of the image (5.1).
![]() Note
Note
If Photos is storing optimized versions of images, the original is downloaded before it can be edited.
Working in the editing view
I’ll jump into the individual tools as we proceed, but first we need to cover some important features of editing photos, such as non-destructive editing, making duplicates, and accessing additional adjustments that aren’t immediately apparent.
![]() Tip
Tip
At any point while you’re editing a photo, press and hold the M key to compare the edits with the original version of the image.
Access editing tools
The options at the right are a mix of tools and categories: Clicking Rotate, for example, turns the photo 90 degrees, and clicking Adjust brings up controls for editing light, color, and black and white tones (5.2).
![]() Tip
Tip
You can also press keys to quickly access the tools: C for Crop, F for Filters, A for Adjust, R for Retouch, and E for Red-eye.
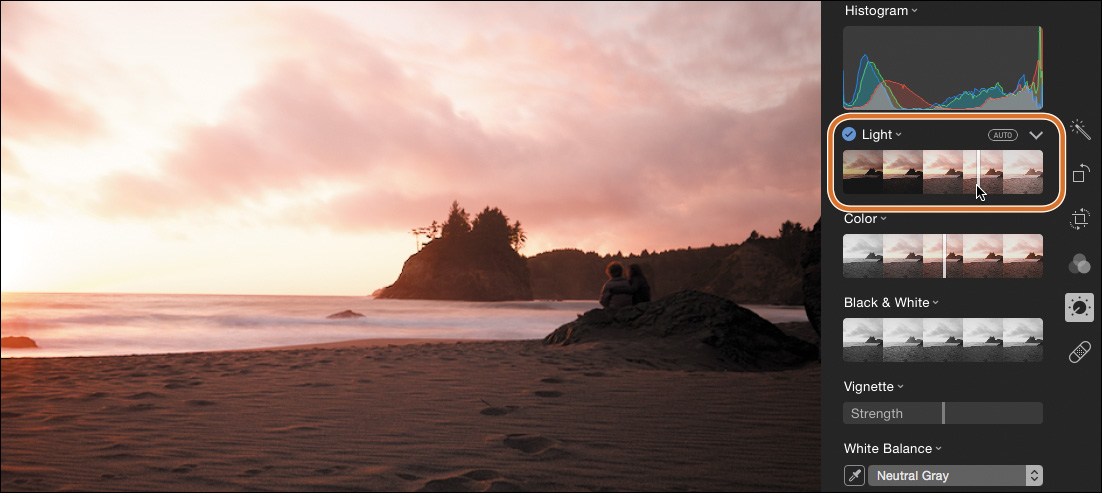
In the Adjust tools, what you initially see are the “easy” controls. For finer-grained control over each adjustment type, click the arrow to the right of the tool name (which appears when you move the mouse pointer near it); additional sliders appear for specific edits (5.3).

![]() Note
Note
All of the adjustments in the editing view apply to the entire image, with one exception: the Retouch tool. There’s no way to make just the sky portion of a photo darker, for example.
Full screen mode
Working in the editing view is a good opportunity to take the Photos app full screen to see more of what you’re working on. Click the green Zoom control at the top-left corner of the window, choose View > Enter Full Screen, or press Command-Control-F.
![]() Tip
Tip
Full Screen mode moves the Photos app to its own screen, a feature in OS X that creates virtual environments that work side by side. You can switch between full-screen apps by pressing Control and the left or right arrow key or, if you have a trackpad, swiping left or right with three fingers. If you want to use your entire screen but not go into Full Screen mode, hold Option and click the Zoom control: the application’s window resizes to fill the screen without switching to a new space.
In order to present as much of the image as possible, the toolbar is hidden in Full Screen mode. Move the mouse pointer to the top of the screen to reveal it. Or, choose View > Always Show Toolbar in Full Screen.
To exit Full Screen mode, click the Zoom control, choose View > Exit Full Screen, or press the Esc key.
Add adjustments
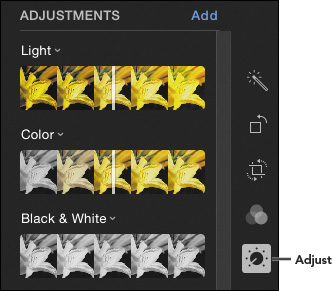
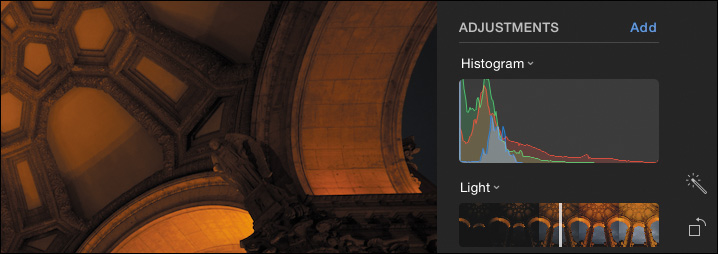
One of the editing environment’s best features is almost invisible. When you click the Adjust button to reveal the Adjustments controls, Photos shows Light, Color, and Black & White. But the application is capable of several more tools. Click the Add button to reveal a pop-up menu containing more options and choose one (5.4).
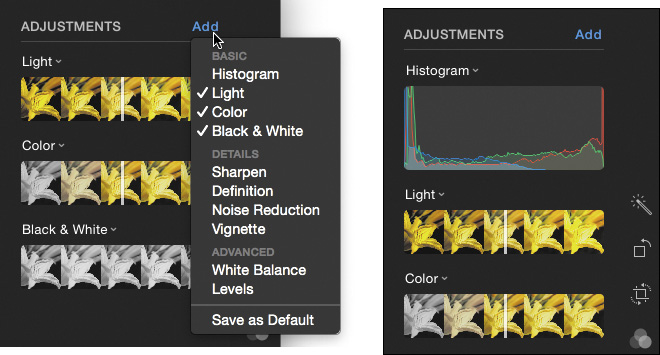
For example, I recommend turning on the histogram, which details the levels of light and dark pixels in each color channel (red, green, and blue). It’s a good reference to make sure your photo is balanced well. Unlike the other options in the Add pop-up menu, Histogram doesn’t offer any controls for manipulating the image, but it’s helpful regardless.
If you find yourself turning to other tools often (such as White Balance), make sure the ones you want are visible and then choose Save as Default from the pop-up menu. That set appears whenever you use the Adjust tools.
![]() Tip
Tip
The Photos for iOS app doesn’t include all of the same editing controls as Photos for OS X, which can lead to some odd behavior when editing on both platforms. See the sidebar “How Edits Transfer Between OS X and iOS,” later in this chapter.
Revert to original and undo adjustments
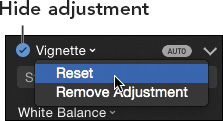
Just as important as knowing how to edit a photo is being able to back out of those changes if necessary. Edits made to photos in the Photos app are non-destructive, which means the adjustments aren’t permanently burned into the image file. You can always discard the edits and return to the image as it was imported into your library by clicking the Revert to Original button that appears (5.5).

However, reverting is the nuclear option: it removes all adjustments from a photo. When you make an adjustment, a blue checkbox appears next to the name. To hide the adjustment without removing its settings, click that checkbox to turn it off (5.6). To reset the adjustment to its unapplied state, click the adjustment name and choose Reset.
Experiment on duplicates
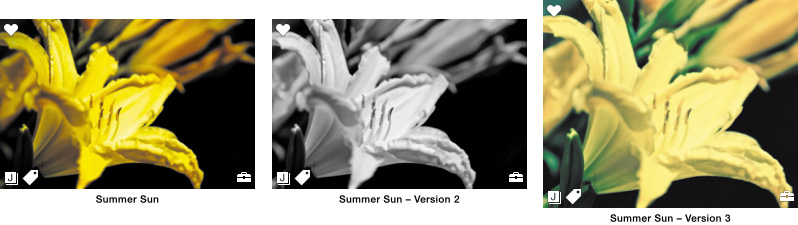
Since edits are non-destructive, feel free to make any types of adjustments you like. In fact, you may want to create several versions of a photo—one color, one black and white, one cropped a different way. In that case, duplicate the image: With it selected or viewed on its own, choose Image > Duplicate Photo, press Command-D, or choose Duplicate Photo from the contextual menu. (You can also select multiple files in the Moments view and duplicate them at once.)
A new image appears with “Version 2” appended to the title. When you edit that new version, either build upon the edits you made on the first one or click Revert to Original and start over. Making duplicates doesn’t create new image files on your hard disk—each revision is based on the original file (5.7).
Work with Raw+JPEG images
Photos for OS X works with JPEG images created by most cameras (the format used by the iPhone and iPad) as well as raw formats used by many cameras. JPEG images are optimized and compressed within the camera; raw files include all the data recorded by the camera’s sensor, and therefore contain more image information than Photos can work with.
![]() Note
Note
For whatever reason, camera manufacturers create new versions of their raw formats with the release of every camera. When a new model comes out, there may be a delay while software makers like Apple and Adobe add support for that format. Apple adds to its list of supported raw file formats on a regular basis as updates to Mac OS X.
Most cameras that support shooting in raw also include a Raw+JPEG mode, which makes two image files for each capture: the raw file and a separate JPEG file. When imported into Photos for OS X (or Photos for iOS), the Raw+JPEG pair are treated as a single image. On the Mac, a badge in the lower-left corner tells you which version you’re seeing (5.8).

![]() Note
Note
The format badge appears only for Raw+JPEG photos. Individual JPEG and raw files don’t show a badge at all. Look in the Info window for the filename to check the format. If it’s JPEG or JPG, it’s a JPEG file; raw files use names such as NEF (Nikon), CR2 (Canon), or RAF (Fuji).
The JPEG version is the default, but you can edit the raw version instead. That can be done only when the editing view is active: Open a photo in the editing view, and choose Image > Use RAW as Original. Or, right-click or Control-click the image in the editing view and choose Use RAW as Original from the contextual menu (5.9).

The appearance of the image will likely change (as you can see in the previous figure), because Photos for OS X processes the file using the raw profile for that camera’s raw format. That happens because the JPEG portion of the Raw+JPEG pair represents how the camera did its own processing of the image data.
To switch back to the JPEG version, go to the same menu and choose Use JPEG as Original.
![]() Note
Note
Unfortunately, there’s no way to set the raw version as the editable choice for multiple Raw+JPEG photos at once; you must do it each image at a time. Similarly, there’s no direct way to import only the raw portions of the Raw+JPEG pairs; you’d have to copy the files from the memory card to your hard disk, delete the JPEGs, and then import the raw files into Photos.
Automatically enhance the photo
I freely admit that some readers probably just glossed over the previous few pages—and that’s fine (it’s there for when you want to refer back to it). Editing photos can prompt a brain-lock: I just want to make my photo better. I don’t want to become an image-processing expert! Many aspects of the Photos application are designed specifically for this desire. At the top of the list is the Enhance tool.
Enhance is literally a one-click “make better” tool. Open a photo in the editing view and click the Enhance button. Photos evaluates the image and makes whatever corrections it deems appropriate.
If you don’t like the result, Choose Edit > Undo (or press Command-Z), or click the Revert to Original button.
![]() Tip
Tip
Here’s a not-so-secret secret: I use the Enhance tool all the time. It’s usually not the last tool I use, but it’s almost always a good first step to figuring out what other adjustments need to be made.
Crop, straighten, and rotate
Two of the most common photo adjustments deal not with color or lighting but with composition. Often the camera is angled just a little (or a lot) off-axis, leading to sloping horizons. Or sometimes the image includes distractions around the edges that you want to remove.
The Crop tool deals with both situations. In the editing view, click the Crop button and do any of the following:
• Click the Auto button to let Photos attempt to straighten the image for you.
• Drag the wheel control to the right of the image to straighten the image manually (5.10). Photos crops the edges automatically so the entire photo fills the frame.
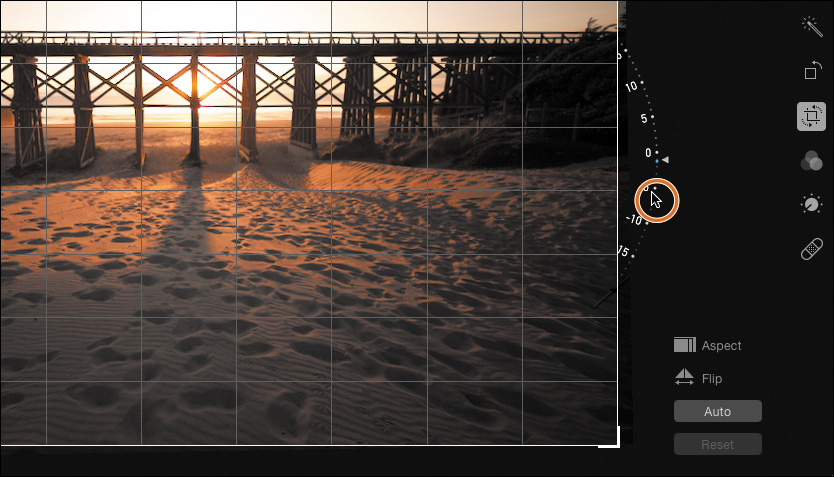
• To crop the photo, drag an edge or the corner of the bounding box. Remember, the edits are non-destructive, so you can change the crop later if you want.
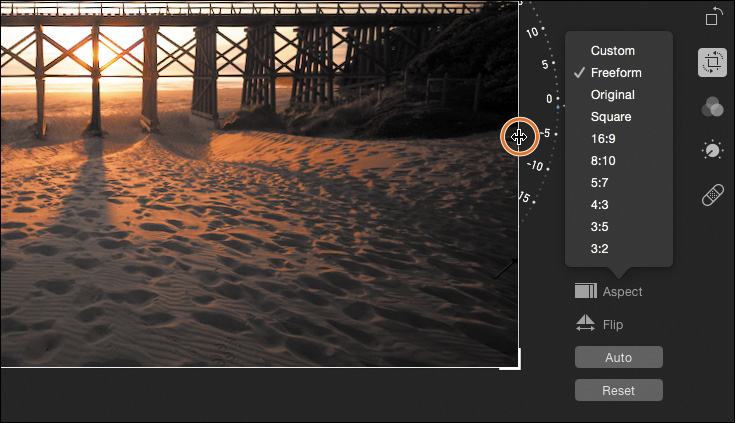
• Normally, the crop control is freeform, meaning you can change the border to any size you’d like. If you’d prefer to use a specific aspect ratio, such as square or a common photo print size, click the Aspect button and choose from the options that appear (5.11). When you make any selection other than Freeform, the bounding box locks to that aspect ratio as you drag an edge or corner.
• To reposition the photo within the frame, drag the middle of the image.
• Click the Flip button to flip the photo horizontally; Option-click it to flip vertically. You can also choose Flip Horizontal or Flip Vertical from the Image menu.
![]() Tip
Tip
If you’re planning on making prints of a certain size, you can crop the image here to that aspect ratio. However, you don’t need to. When ordering prints from within Photos, you have the option of repositioning the image within a print size’s constraints during the ordering process. I’d rather make the photo the best it can be when editing it in general, and then deal with print sizes at the printing stage.
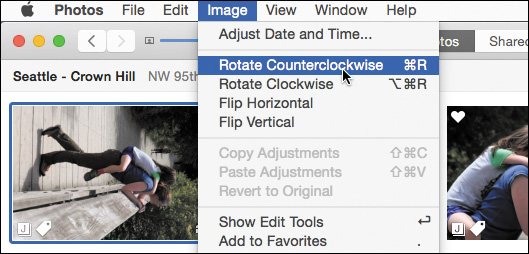
In the event that Photos didn’t properly register the orientation of a photo during import, you can rotate it in 90-degree increments. The Rotate button, just below the Enhance button, turns the image counterclockwise; hold Option and click it to turn clockwise.
However, you don’t need to wait until you switch to the editing view to rotate one or more photos. In the Moments view or the single-photo view, choose Image > Rotate Counterclockwise (or press Command-R) or Image > Rotate Clockwise (or press Command-Option-R) (5.12).
Apply filters
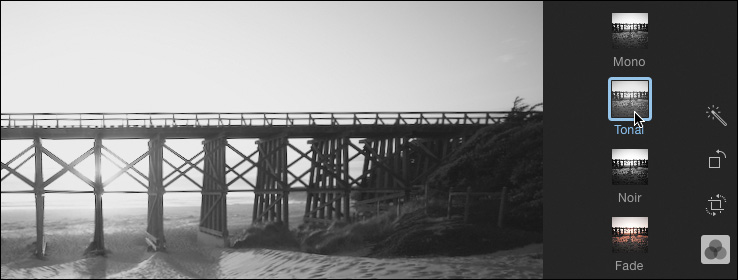
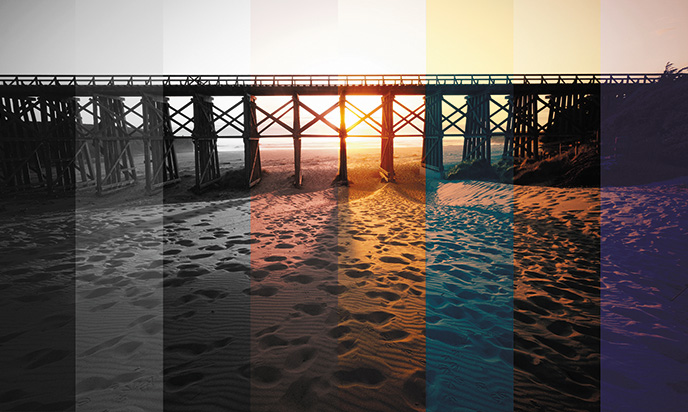
Just as the Enhance button is a one-click tool for correcting a photo in general, the Filters tool provides one-click access to eight preset stylized looks. Click the Filters button and then a filter type to apply it (5.13).
Adjust light
The sensor and processor in your camera work together to create good exposures, but sometimes conditions conspire against them: photos with areas of extreme dark shadows and bright highlights, or shots underexposed accidentally (or on purpose). The Light controls in the Adjust tool work on the light levels within your photos.
As with the other main Adjust controls—Color and Black & White—Light is presented in two ways: as a single slider and also broken down into component sliders that target specific areas like shadows and contrast.
The Light slider
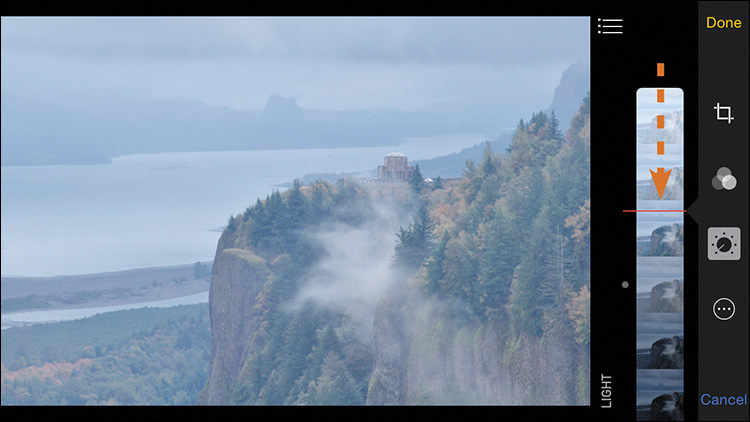
In the editing view, click the Adjust button to reveal the controls, and then drag the Light slider to the right (to brighten the photo overall) or left (to darken it) (5.14).
![]() Tip
Tip
When you move the mouse pointer over the control, an Auto button becomes visible. Clicking it adjusts only that control automatically.
Now, click the expansion arrow at the upper-right corner of the control to view the different components. You’ll see that Photos hasn’t merely increased the Exposure or Brightness levels to make the image lighter; the Exposure value was even reduced from its original zero setting (5.15).
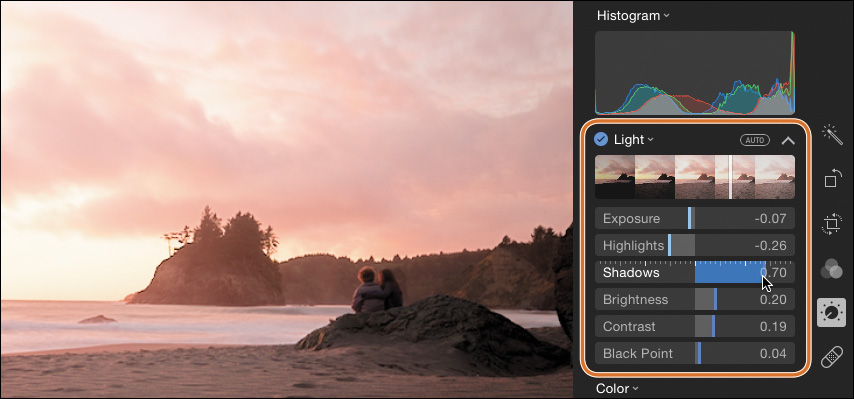
Photos calculates how each setting affects the image and adjusts them independently to end up with an image that’s still pretty well balanced. In this case, making the shot brighter could easily blow out the bright areas of the sky to pure white, but instead, it’s not overdone. Drag the main Light slider—the controls below fluctuate as you drag as Photos works to make a good exposure.
![]() Tip
Tip
If you hold the Option key, you can access a greater range of adjustments in the sliders. For example, the Exposure range is from –1.00 to +1.00. With Option held, you can select from –2.00 to +2.00.
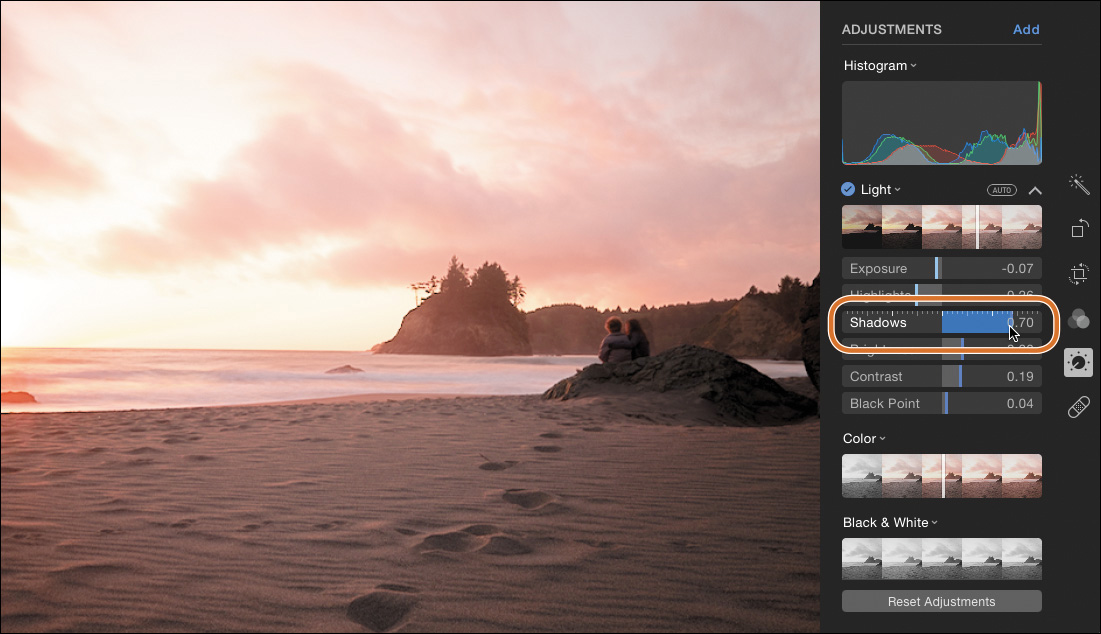
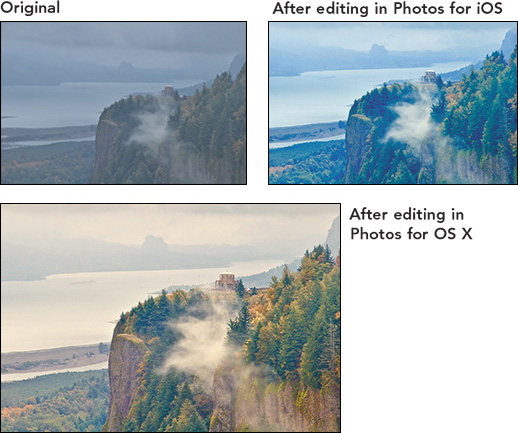
The photo in the previous figures is a good example of how the camera compensates for a bright light source (the sunset) by making the overall image dark. To bring up the light levels in the foreground so we can see the beach and the couple better, drag the Shadows slider to the right (5.16). You can also hold the mouse pointer over the number at right until it turns white, and then click it to enter a numerical setting. Although the sky does get brighter, it doesn’t blow out completely to white. (And in this case, I’m fine with the sun and the immediate area around it being brighter—because it’s the sun!)
![]() Tip
Tip
To reset just one control to zero, double-click anywhere in the slider.
![]() Note
Note
If you make an adjustment to a single control and then move the general Light slider, your edit is incorporated into the new values. So in this case, I increased the shadows; if I then decrease the overall Light value, the shadows are still kept brighter relative to the image’s original tone.
Experiment with the other Light controls until the photo looks the way you’d like. Here’s a description of what each slider does:
• Exposure: This control affects the overall light levels within the photo.
• Highlights: The brightest areas of a photo are controlled with this setting. Pulling the Highlights value back can often avoid blown-out areas when you increase exposure, shadows, or brightness.
• Shadows: Increasing the Shadows value reveals detail in dark areas.
• Brightness: This control affects the overall brightness of the image. Exposure and Brightness appear to be overlapping controls, but they do work differently; Exposure affects all tones in the image, whereas Brightness affects the general lightness of the shot (5.17).
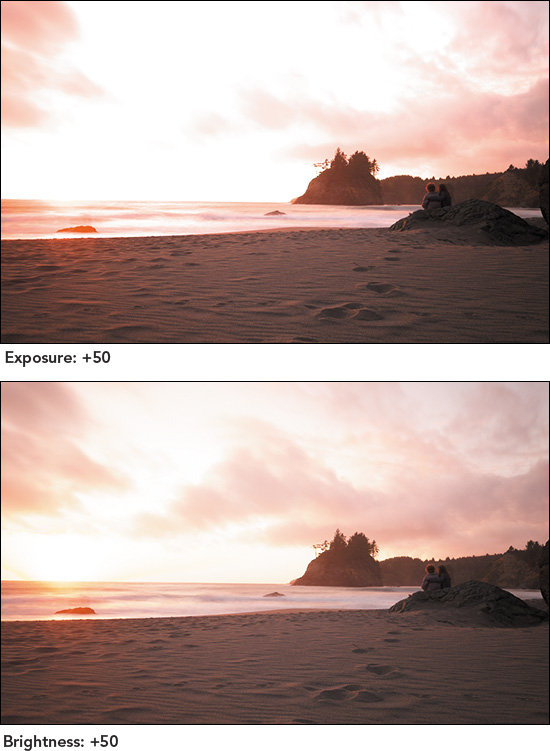
5.17 Comparing Exposure and Brightness, starting from the photo’s original unedited values: Brightness retains more detail in the sky and some color from the sun on the horizon.
• Contrast: This control affects the difference between light and dark values.
• Black Point: The black point of an image is the level at which dark pixels turn to pure black. By changing the black point, you can make dark areas darker, without resorting to adjusting the exposure for the entire photo.
![]() Note
Note
As you edit a photo, you can repeatedly choose Edit > Undo to undo previous adjustments. However, after you click Done to stop editing, that undo history is discarded. The next time you open the image in the editing view, the undo history is reset.
Histogram
As you make adjustments to an image, the histogram changes to reflect the light and dark values of the scene. (If you don’t see the histogram, choose Histogram from the Add pop-up menu. I recommend leaving it on all the time as reference: make sure it’s visible and then choose Set Default from the bottom of the Add pop-up menu.)
The left side of the histogram represents black pixels, and the right side represents white pixels. In the histogram in Photos for OS X, you also see the brightness values of each color channel (red, green, and blue). A photo is generally considered balanced when the histogram looks like a mountain: low on each edge and rising in a bump in the middle (the midtones).
A quick look at the histogram can tell you a lot about what’s going on—and what can be improved—in the image. For example, let’s take a photo that is underexposed (5.18). The values are bunched up against the left side of the histogram; there are a lot of black and dark tones, and little or no white or bright tones.
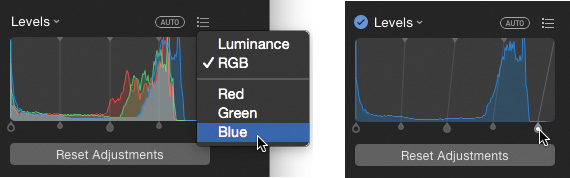
Levels
For much more control over the photo’s light, click the Add pop-up menu and choose Levels. The histogram in the Levels control represents the photo’s original values, and doesn’t change. Instead, the handles in the control affect the photo’s values. The histogram at the top of the list reflects the adjustments (and also remains visible, even if you scroll down).
Move the handles to edit the photo (5.19): In this case, I dragged the right-most handle, which represents the image’s white point (note the white dot on the handle). Any pixels on the spectrum to the right of the white point are turned to pure white, and everything else is shifted lighter.
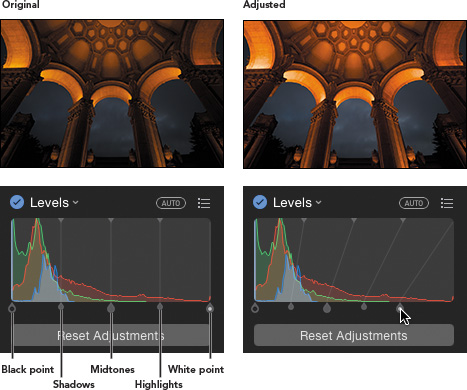
The center handle adjusts the midtones, and the smaller in-between handles affect shadows and highlights.
The handles at the top allow even finer adjustments, based on the setting of the handles at the bottom: For example, drag the top shadows handle to affect the shadows in smaller increments. You can also hold Option and drag a handle to move the top and bottom handles in unison, keeping the relationship steady between the shadows and the fine-tuned shadows settings.
The Levels tool also affords a degree of specificity in working with the image’s luminosity—its overall brightness—as well as working with the individual red, green, and blue color channels, which I detail in the next section.
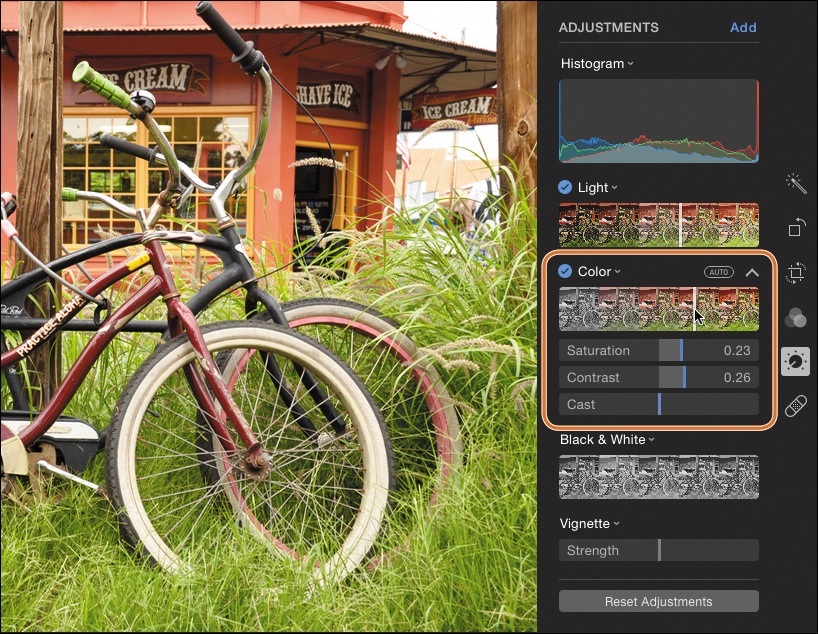
Adjust color
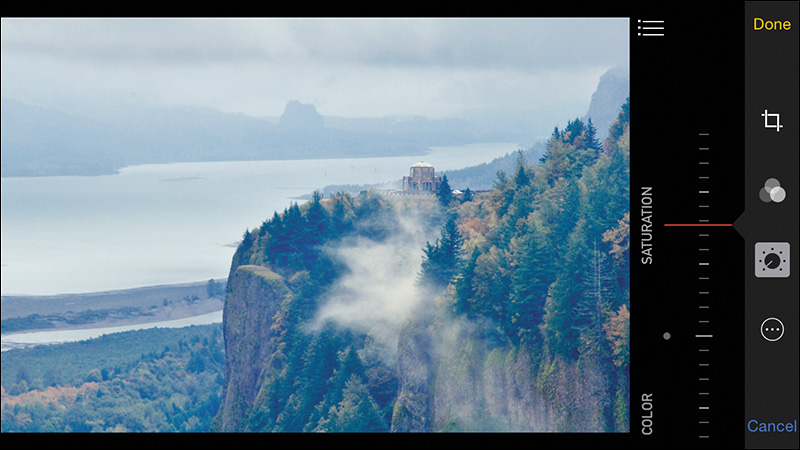
The Color control, like its companion Light, can be adjusted using one central slider or broken down into three components: saturation, contrast, and cast (5.20); click the expansion arrow to reveal the individual controls:
• Saturation: This control adjusts the intensity of color in the image. Boosting saturation can give life to muted photos or give regular shots some kick, but it’s also easy to overdo.
• Contrast: Color contrast involves increasing the separation between similar colors.
• Cast: If a photo has a color cast—in many cases, being too warm or cool—the Cast slider can help compensate.
White Balance
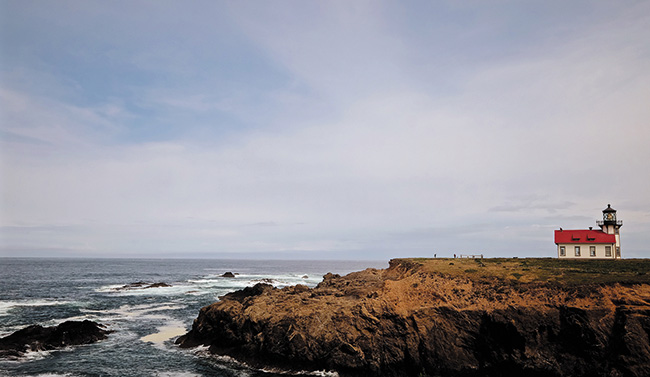
When a photo has a color cast, sometimes it takes more than the Color slider to adjust. The White Balance control examines an area that’s neutral gray and modifies the color cast such that white areas appear actually white, and not other colors (hence the name). If photos are muted due to overcast skies, for example, the White Balance control can warm them up.
1. From the Add pop-up menu, choose White Balance.
2. Click the Auto button to attempt an automatic fix. Or, if you don’t like the result, click the eyedropper button to select it and go to the next step.
3. Click a neutral gray area of the photo (5.21, on the next page). Don’t worry if it’s not strictly a neutral gray; the software will accommodate. You can also click other areas until the image looks right.
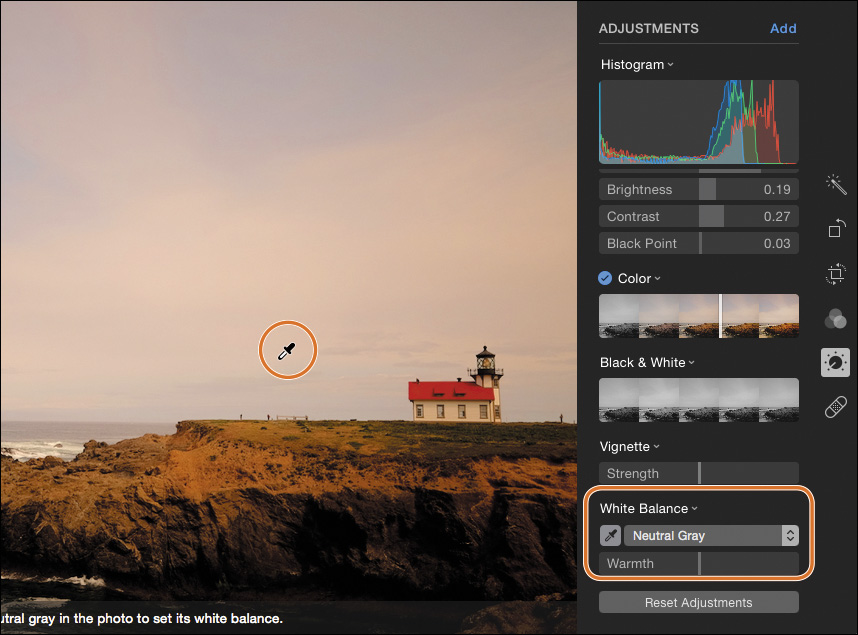
Expanding the tool reveals a Warmth slider that you can use for manually adjusting the warmth or coolness.
Neutral Gray is only one method of setting white balance. Click the pop-up menu to reveal two other options:
• Skin Tone: Use the eyedropper tool and click a person’s skin to ensure that the skin tone remains natural and the rest of the scene’s color adjusts accordingly.
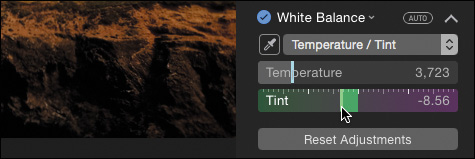
• Temperature/Tint: Choose this option to set a specific color temperature or to balance a green or magenta tint in the image (5.22).
The Levels control
Coming back to the Levels control from a few pages ago, the color options for the tool enable you to adjust levels for the red, green, and blue channels individually. If your photo suffers from a green cast, you can reduce just the green tones. Or, for a more creative spin, you could accentuate a blue sky with a little blue push. Click the Levels tool’s pop-up menu to choose the mode, and then adjust the values using the control points below the histogram (5.23).
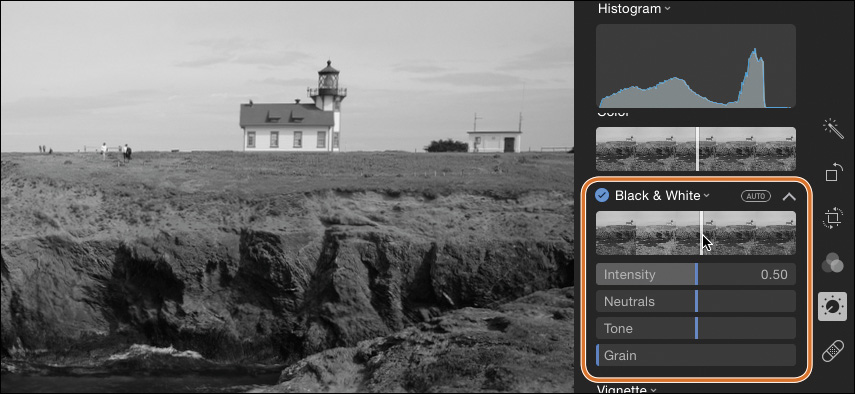
Black and white
Converting a photo to black and white involves more than just removing its color (technically making it grayscale, but no one says they make grayscale photos). Behind the scenes, there’s even a bit of color involved, as the software treats the colors in the image with differing hues of gray. In Photos, the Black & White slider presents a range of treatments for your shot, plus some additional controls to fine-tune a few aspects of the conversion.
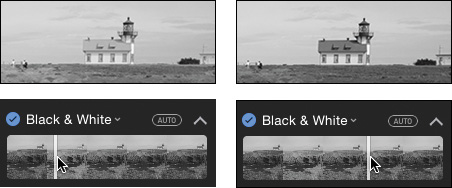
In the Adjust tool, click anywhere on the Black & White slider to apply the effect (5.24). (This is also a good opportunity to click the Auto button and see what Photos comes up with.)
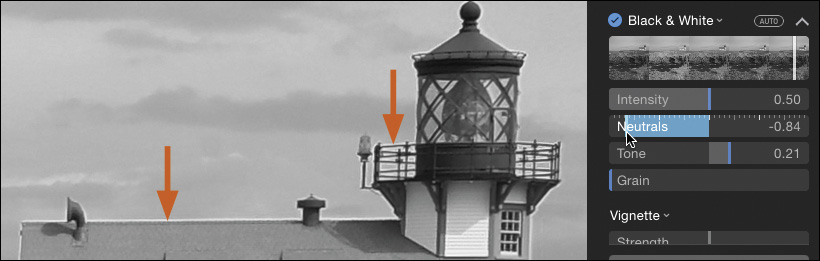
Now, drag the slider left and right—you’ll notice some dark areas turn light and vice versa (5.25). Depending on the image, the effect may be subtle or dramatic.
5.25 Note the change in the tone of the lighthouse roof, which is red in the original photo, as the slider is moved.
Don’t forget that the Filters tool offers three black and white presets if you’re looking for those particular looks. See “Filters,” earlier in this chapter.
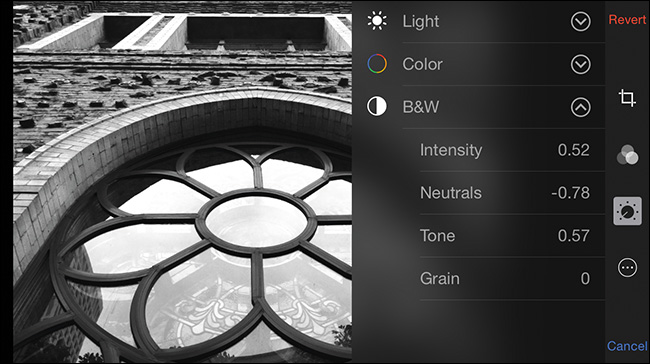
Unlike the sliders found under the Light and Color controls, which reflect the setting in the main slider, the ones that support the Black & White control are there to build upon the slider’s setting:
• Intensity: This adjustment increases or decreases the black and white effect you’ve chosen. With a dark treatment, increasing Intensity makes it darker; with a light treatment, increasing Intensity makes it lighter.
• Neutrals: Drag this slider to darken or lighten the gray midtone areas.
• Tone: The Tone adjustment increases or decreases the contrast.
• Grain: This slider adds simulated grain that approximates the look of some black and white film stock.
Detail adjustments
Four other adjustments in the editing view are designed for enhancing details: sharpening soft images, adding a vignette to the edges, and removing unwanted digital noise. Click the Add button to add the following adjustments; they’re automatically enabled when you add them.
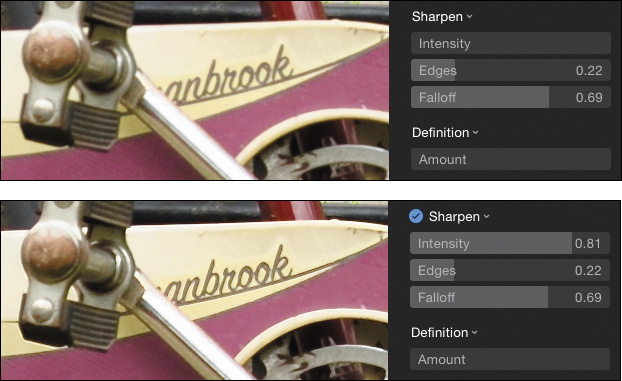
Sharpen
The Sharpen control helps you make fuzzy edges more crisp. It can’t help with blurry shots that suffer from camera shake, but it’s great when you want details to shine. Change the Intensity slider to adjust the effect’s amount (5.27); too much can lead to aliasing or halos, so be conservative in its application.
![]() Tip
Tip
Sharpening is where the Zoom command is most helpful. Press the Z key to quickly zoom in and view the photo at actual size.
You can fine-tune the sharpening by expanding the control to reveal the following options:
• Edges: To sharpen an image, the software looks for edges within a photo. The Edges control tweaks how the adjustment defines an edge; increase the value to be more aggressive about how the tool sees those borders.
• Falloff: This slider softens or accentuates the sharpening effect.
Definition
Definition at first sounds like another word for sharpening, but its implementation is broader. Allow me to quote Apple’s Photos Help reference: Definition “add(s) contour and shape to photos as well as midtone definition and local contrast.” Great! Wait, what?
It’s ironic that the Definition tool’s effects should be so vague. Think of it as a general “make better” tool that increases contrast and sharpens the image at the same time. The Definition tool has just one slider, Amount, which dictates how much definition is applied to the photo.
Vignette
A vignette is the darkening around the edges of a photo that camera manufacturers spend a lot of time and money trying to eradicate from their lenses. However, a vignette can also serve to add atmosphere to a photo or help draw the viewer’s eyes to the center. Click the Auto button or anywhere on the Strength slider to apply the vignette (5.28).
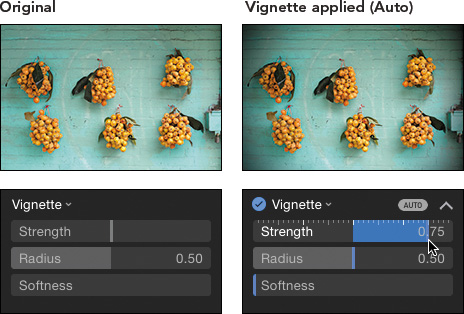
The Strength slider makes the vignette darker as you drag it to the right. Dragging it to the left, however, can be corrective: Apply a negative Strength setting to a photo with an existing vignette caused by a lens to undo the effect.
Clicking the expansion arrow reveals two more controls for changing the appearance of the vignette (5.29):
• Radius: The Radius slider determines how tight or wide the middle of the vignette appears. A higher value makes the visible area smaller; a lower value pushes the vignette to the outer edges.
• Softness: This slider changes whether the vignette is tight and dark or diffused.

In the figure below, I’ve pushed the Radius and Softness sliders further than I’d normally be comfortable with in order to show their effects.
![]() Tip
Tip
One cool thing about the Vignette tool is that it acts like an overlay on your photo. If you decide to crop the shot later, the vignette isn’t also cropped; it’s reapplied to the new size.
Noise Reduction
When you increase the ISO on your camera, you increase the image sensor’s light sensitivity, allowing you to capture low-light photos that would be more difficult at low ISO settings. The tradeoff is noise—a graininess that presents itself especially in dark areas of a photo. The Noise Reduction control can help: Click the Amount slider (the tool’s only option).
Noise Reduction has its own tradeoff: The control softens and merges noisy pixels so they don’t stand out as much, which leads to an overall softening of the image. So as you experiment with the Amount slider, find an acceptable compromise between noise and smudge.
Retouch problem areas
The Retouch tool can repair blemishes caused by dust on the camera sensor or lens, or remove objects in the scene that are distracting. Click the Retouch tool in the editing view (or press R).
The tool fixes circular areas, so after you’ve identified a problem spot, drag the Size slider to make it just a bit bigger than the spot (5.30). Then simply click; the tool fixes the spot.
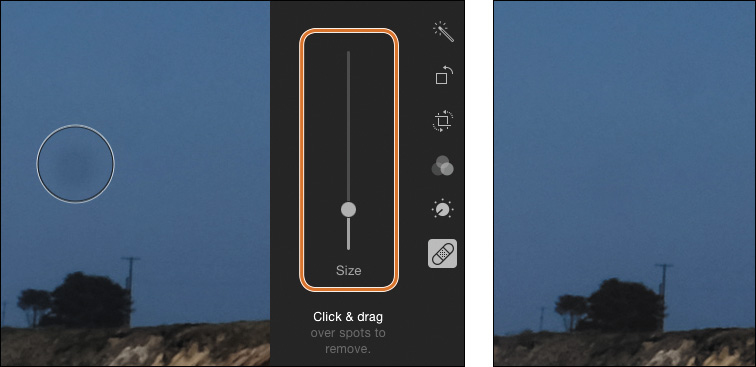
![]() Tip
Tip
A faster way to resize the tool is to use the bracket keys ( [ and ] ). Or, if you’re using a trackpad, hold Shift and swipe two fingers up or down. If you own an Apple Magic Mouse, hold Shift and drag one finger up or down.
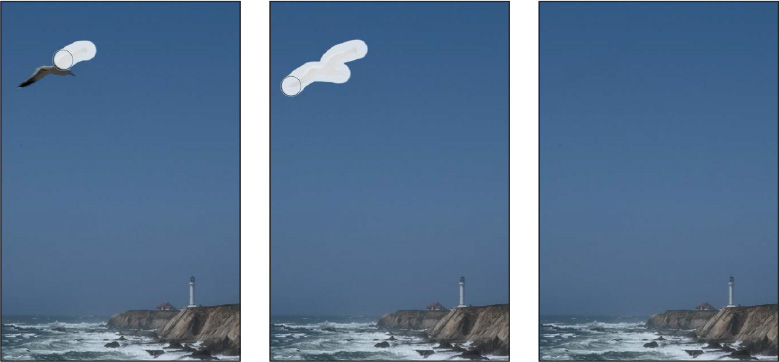
In addition to making spot-fixes, you can drag the tool over an area to remove something that doesn’t fit into a nice, clean circle (5.31).
![]() Tip
Tip
While the mouse pointer is acting as the Retouch tool, you can move around the image by holding the spacebar, which turns the pointer into a hand icon, and dragging.
If you’re familiar with other programs’ retouching tools, there are usually two separate types: one that attempts to fix an area automatically when you click it, and a Clone tool that lets you sample a nearby source area to replicate over the spot you want to fix. The clone approach is good when you want to preserve textures; sometimes the spot-fix technique ends up with a soft blob that’s almost as annoying as the thing you tried to remove.
Photos smartly combines the two into one tool. To clone an area, hold Option and click to define a source. Simply doing that tells the software that you’ll be copying from the source area. Then, click the area you want to fix.
Although Retouch won’t match the more sophisticated features found in something like Adobe Photoshop, you may be surprised at what it can do. Maybe you noticed in “Adjust light,” earlier in the chapter, that the beach photo included a ghosted image of the woman watching the sunset, because she moved during a long exposure. (The couple was enjoying the moment; I wasn’t going to be a jerk and ask them to hold still for my camera.) Here’s how to correct it:
1. Press Z to zoom in on the area you want to edit. In this case, I’ll press Command-+ to zoom in one more step, too.
2. Choose a size for the control.
3. Option-click the source area; the mouse pointer becomes a plus sign (+) to indicate you’re adding a source (5.32). Fortunately, there’s a block of trees in the background that will provide a good pattern.
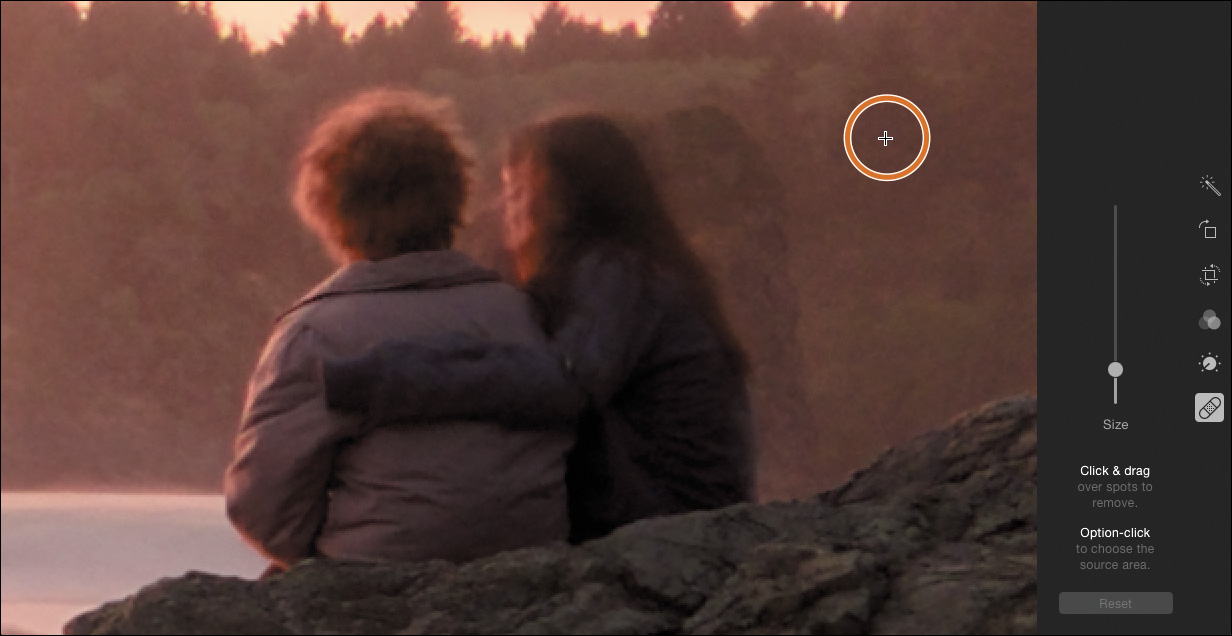
4. Drag to paint the area to remove (5.33).
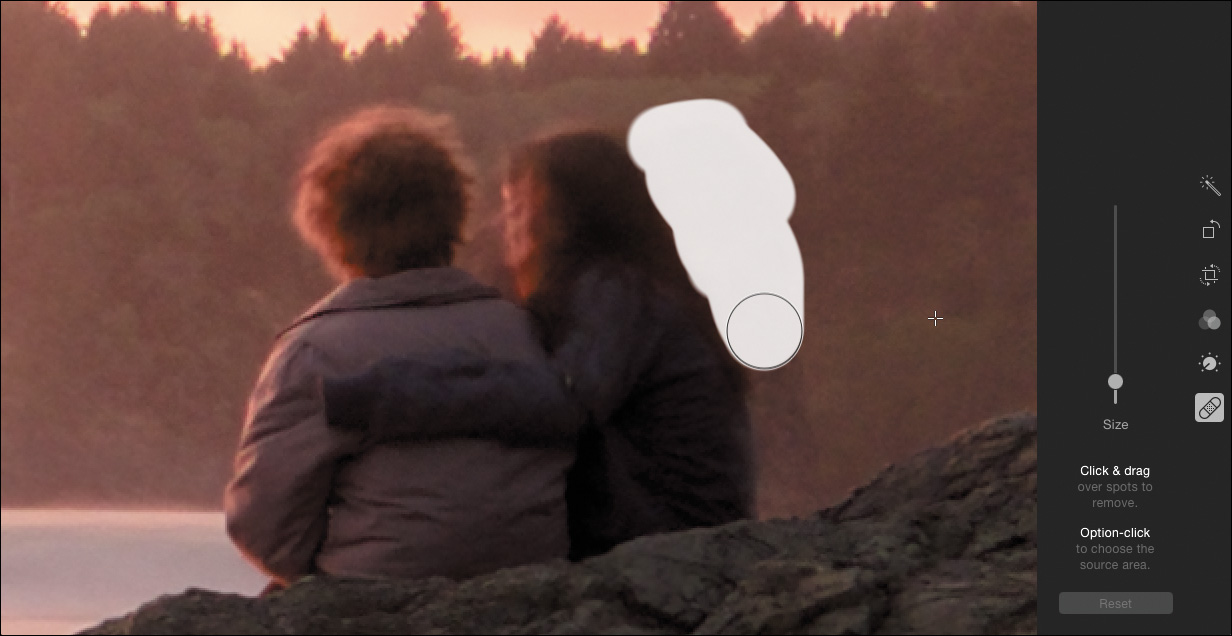
Photos uses the texture of the source area to fill the area (5.34). You may need to re-clone the area to clean up the area, or to do the area in a couple of passes. If the cloning doesn’t work, click the Reset button to undo the retouch work.

![]() Tip
Tip
If you Option-click to define a source point but then change your mind, right-click or Control-click the image and choose “Clear manual Retouch source point” from the contextual menu to return to the Retouch tool’s normal state.
In this example, I wasn’t able to completely remove the ghost using Photos, but it’s certainly minimized and looks more like subtle movement during a long exposure than like a noticeable shift (5.35).
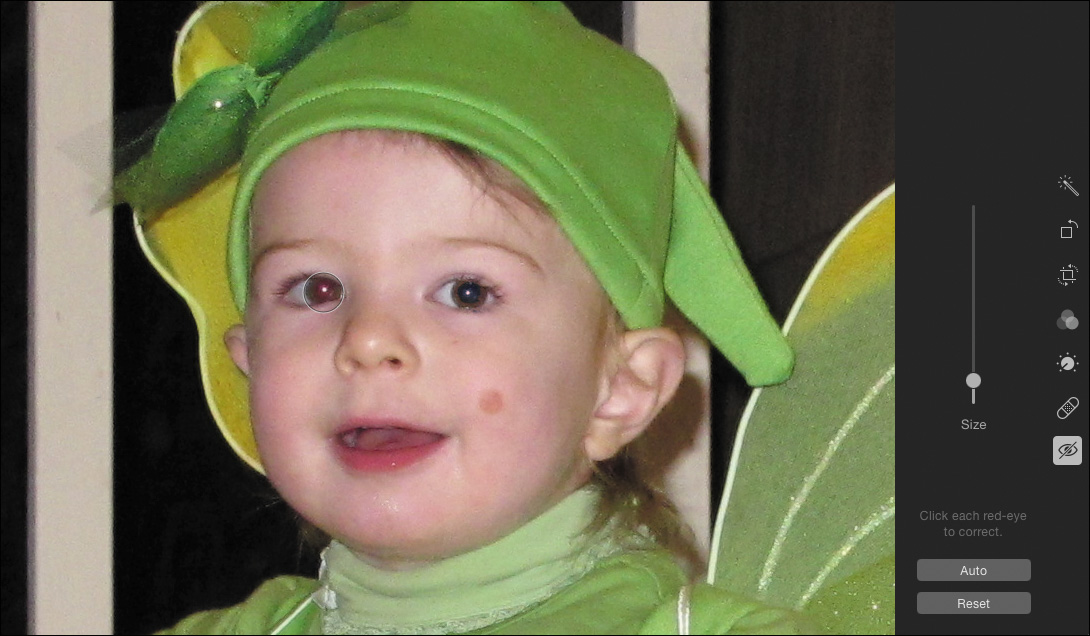
Fix red-eye
When you take a photo of someone straight-on and use a flash, often the person will appear in the image with glowing red eyes—the light bounces off the back of the eyeballs and is picked up by the camera sensor. We’ve all seen it, and we’ve probably all made photos that contain red-eye. And the Red-eye tool in Photos is here to fix it.
Normally, the Red-eye tool doesn’t even appear in the editing view. My guess is that it comes up so infrequently that Apple’s designers didn’t want to clutter the interface with something you’d hardly use. That’s why it was a surprise the first time I loaded a red-eye photo and saw the Red-eye tool automatically show up—Photos detects red-eye automatically. You can also opt to see the tool each time you open the editing view by choosing View > Always Show Red-eye Control. Or, press the E key. (I recommend that you also zoom in.)
To make the correction, click the Auto button to let Photos try first (it’s pretty accurate). Or, use the Size slider to match the mouse pointer’s circle to an eye’s diameter, and then click the eye (5.36).
![]() Tip
Tip
You don’t need to be accurate about matching the size of the eyes. The tool is smart enough to pick out the affected areas.
Copy and paste adjustments
When you’ve edited a photo to your liking and then move on to another image shot near the same time, you don’t want to have to start over from scratch. In the editing view, you can copy adjustments from the first image and paste them onto the other quickly. This feature works only in the editing view, and you can paste onto just one photo at a time, but it’s a start:
1. After you’ve edited a photo, choose Image > Copy Adjustments or press Command-Shift-C. You can also right-click or Control-click to choose Copy Adjustments from the contextual menu (5.37).
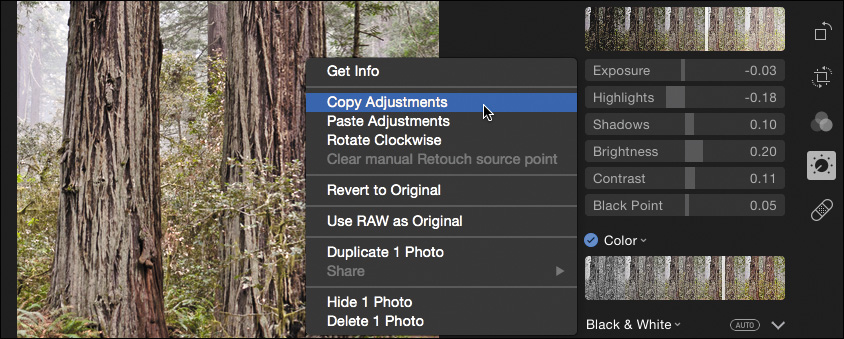
2. Open the photo to which you want to apply the same edits.
3. Choose Image > Paste Adjustments (Command-Shift-V), or choose Paste Adjustments from the contextual menu (5.38). The settings are applied to the image. You can paste the same adjustments on other photos until you copy another image’s settings.
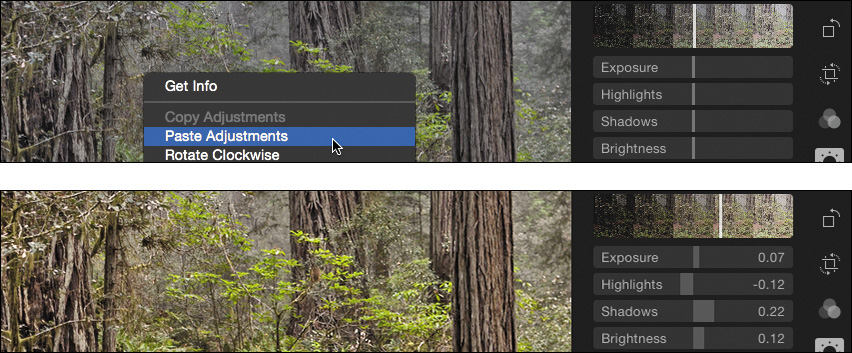
5.38 Adjustments are pasted (top) to make the treatment of the new photo match the previous one (bottom).
Edit Videos in Photos for OS X
The name of the app is Photos, but it can import and work with video clips, too. After all, the iPhone is one of the best video cameras on the market. It’s not designed to assemble clips together or apply visual filters—that’s what iMovie is for—but you can trim unwanted sections from the ends of clips, control which part of a Slo-Mo clip is in slow motion, save video frames as still photos, and more.
When you open a video clip and move the mouse pointer in the window, the video controls appear (5.39).
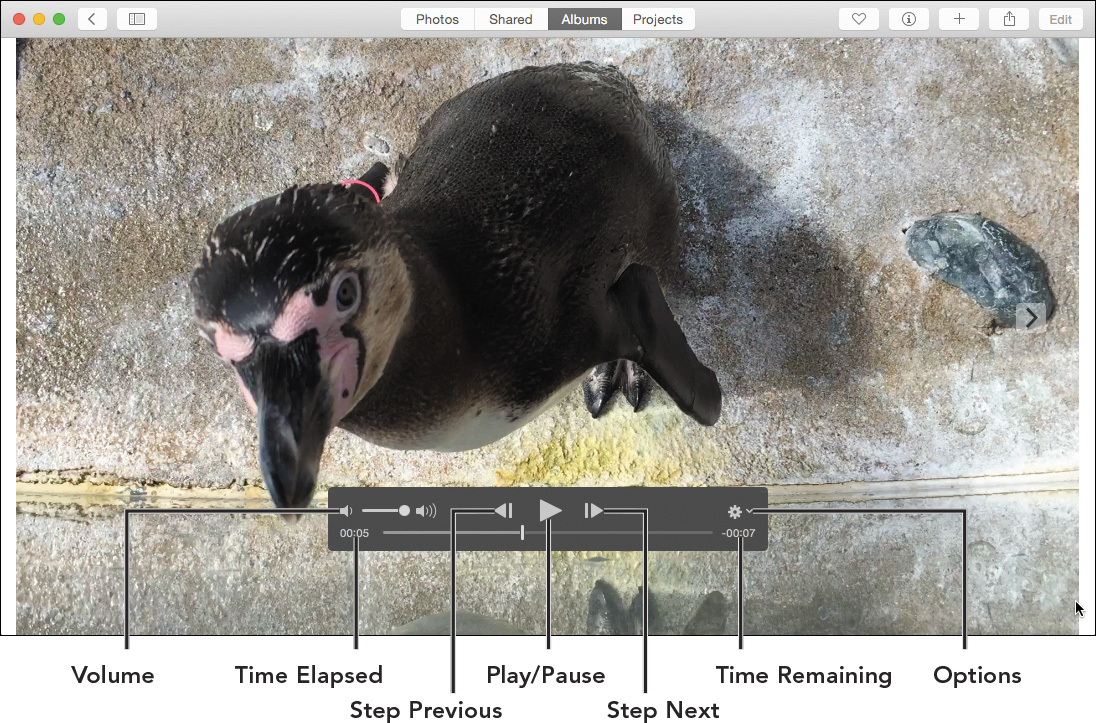
Pressing the Step Previous and Step Next buttons take you through the video one frame at a time. If you’d prefer to review the video using fast-forward and fast-rewind buttons, click the Options button and choose Show Scanning Buttons. With those active, repeatedly clicking one accelerates the speed: 2x, 5x, 10x, 30x, and 60x.
![]() Tip
Tip
When you close a video, the volume level and playback position aren’t saved. So if you turned the volume down or stopped watching midway, the next time you view the video you’ll be greeted with full volume at the beginning of the clip.
Trim a clip
When you want to share a video clip with someone, shorter is usually better—especially if there’s footage at the beginning or end of the clip that’s just waiting for the main action to happen. Photos for OS X can trim those sections:
1. Click the Options button in the playback controls and choose Trim. The controls change to a filmstrip surrounded by a yellow border.
2. Drag the handles at the start and end to define the footage you want to keep (5.40). Clicking the Play button plays only the selected portion so you can preview the new clip.
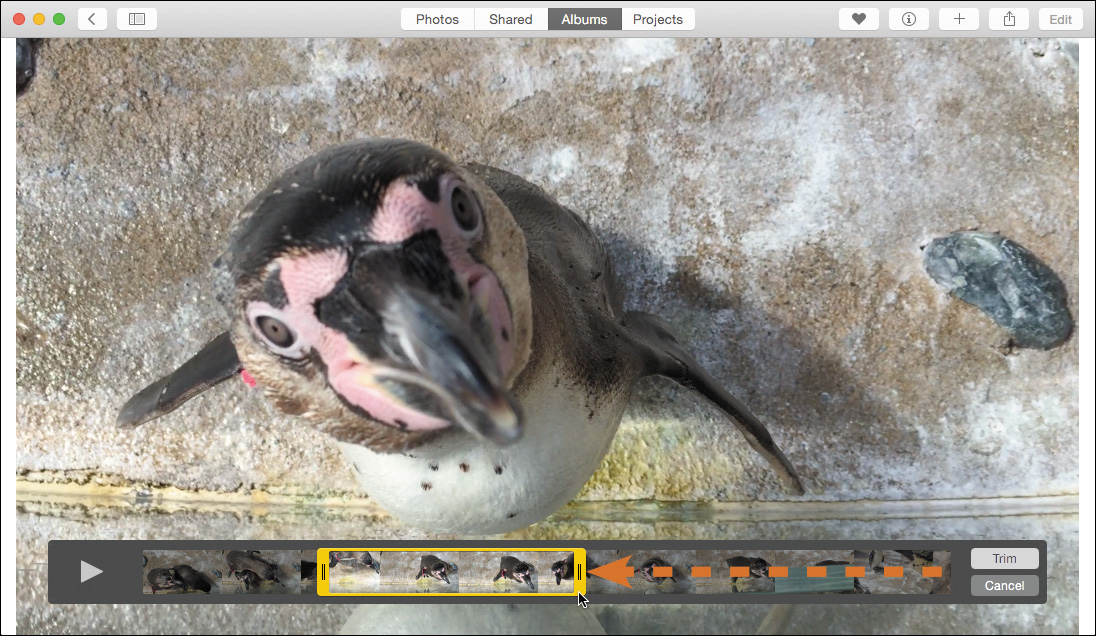
3. Click the Trim button to remove the footage outside the selection.
Remember that video edits are non-destructive, just like photo edits, so you can adjust the trim later by choosing Trim from the options pop-up menu. Or, choose Reset Trim from the menu to return the clip to its original length.
![]() Tip
Tip
What if you want to split a long clip into two separate clips? Select it, choose Image > Duplicate Video (Command-D), and then trim both clips.
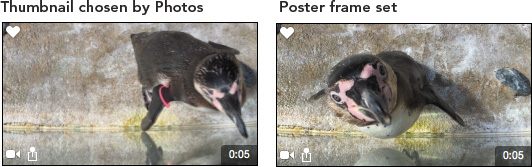
After you’ve trimmed the clip, optionally choose which frame appears as the preview in Photos and when shared with others. In the playback controls, move the playhead to the frame you want to use and then choose Set Poster Frame from the Options pop-up menu. That frame is used as the clip’s thumbnail (5.41).
Edit Slo-Mo video
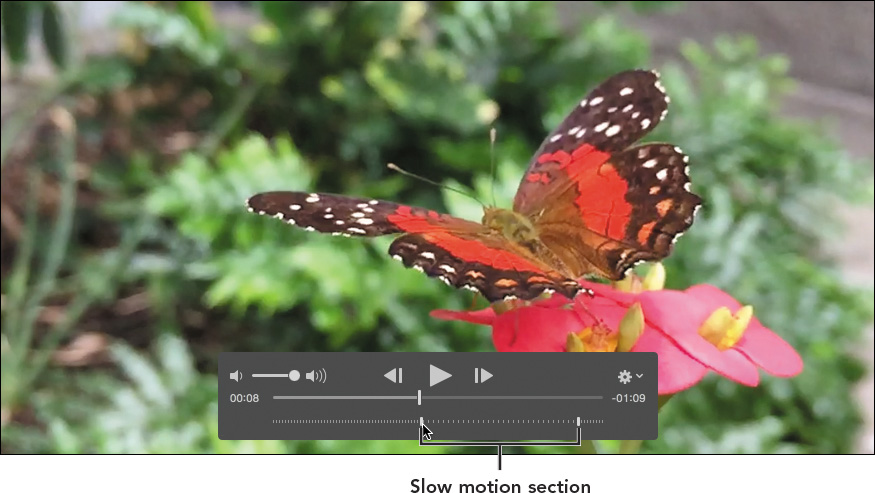
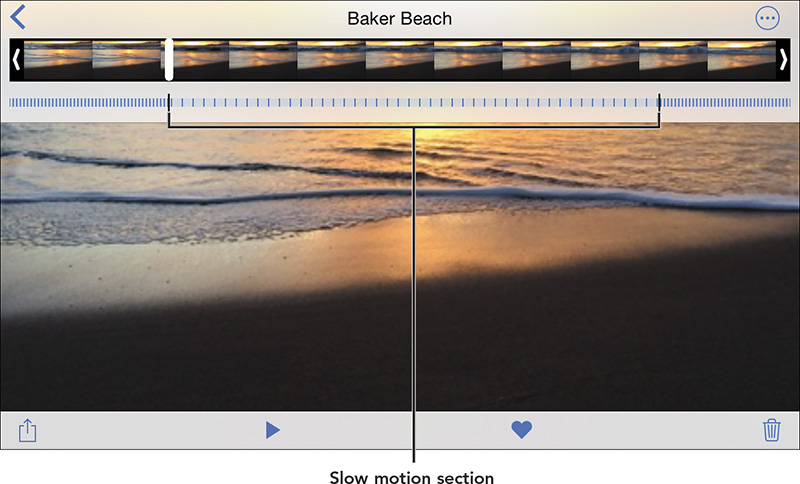
Slo-Mo video has an additional element: You can choose which portion of the clip plays in slow motion. The iPhone and iPad capture the entire clip at 240 frames per second (fps) or 120 fps, so you can make the whole thing slow or transition from regular speed to slow speed and back. (See Chapter 1 for more on shooting Slo-Mo video.)
Drag the handles of the slow motion controls to indicate where the effect begins and ends (5.42).
Save video frames as stills
A video is made up of thousands of individual frames, any of which could be suitable as a still photo—especially in Slo-Mo videos, which exhibit less motion blur than regular-speed videos. To export a video frame as a still, do the following:
1. Using the playback controls, locate the frame you wish to export.
2. Click the Options button and choose Export Frame To Pictures (5.43).
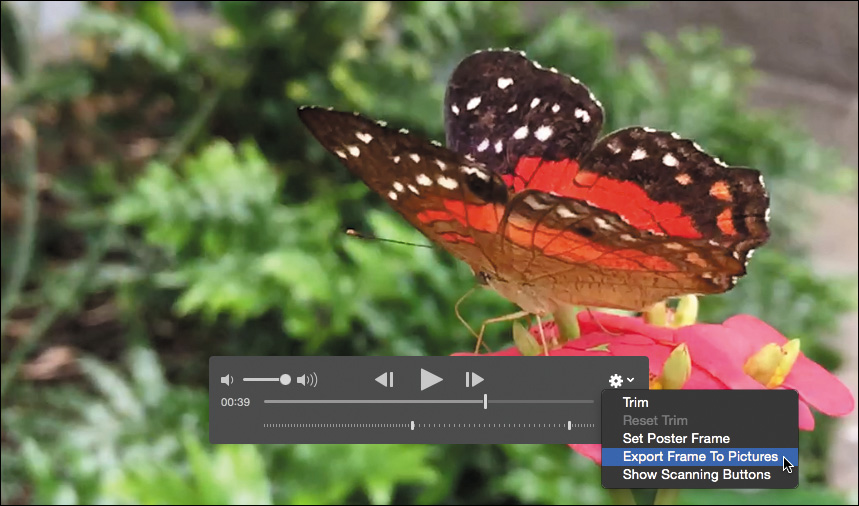
3. The image file is not added to your photo library; instead, go to the Finder and locate the image in the Pictures folder within your Home folder (choose Go > Home). The filename is the timestamp of when you exported the image, such as “Frame-29-06-2015-11-09-51.tiff” (which translates to June 29, 2015 at 11:09:51 a.m.).
4. If you want to include the still image in your photo library, import it by dragging it to Photos or choosing File > Import and selecting the file.
![]() Note
Note
Keep in mind that a frame extracted from a video has less resolution than a photo taken with a still camera, and will be constrained to the video aspect resolution.
Edit Images in Photos for iOS
If you have been following along so far (and didn’t immediately jump to this section), you’ll see that the editing tools in Photos for iOS are similar in many ways. The interface is different in places to accommodate smaller screens, but the general ideas behind the actions are the same. Of course, that’s no accident: The iOS version of Photos was released much earlier than the OS X version.
Not all of the same tools are available on both platforms, though. The iOS version doesn’t include the Retouch tool, for example, and several of the additional controls in the Adjust tool, such as Vignette, don’t have a mobile counterpart. However, you’ll have no trouble picking up the techniques.
Working in the editing view
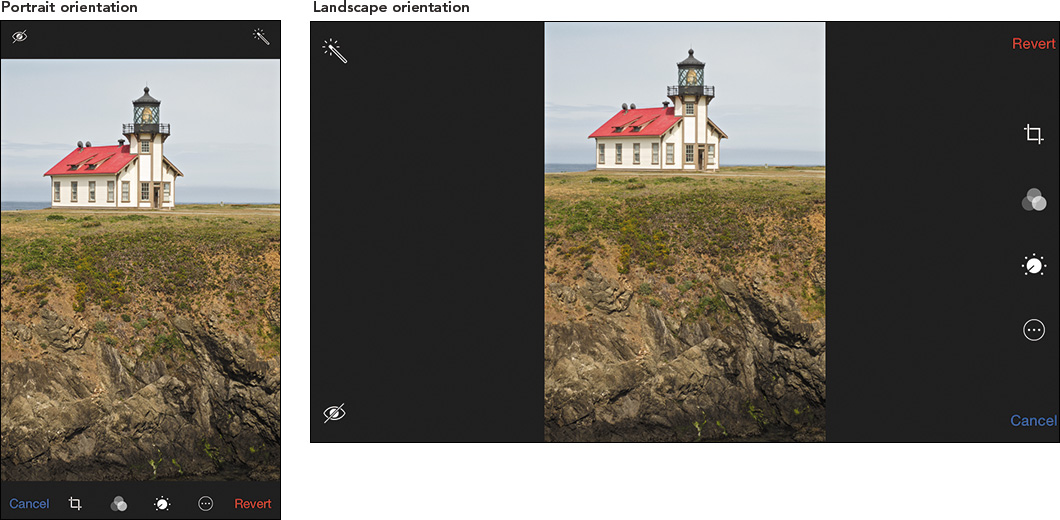
In the Moments view, choose a photo and tap the Edit button. The placement of the editing tools depends on the device and its orientation: in portrait orientation, the tools appear at the bottom of the screen, and in landscape orientation, the tools appear at the side of the screen; on the iPhone, the Enhance and Red-eye tools are separate (5.44).
With iCloud Photo Library enabled (see Chapter 4), your edits transfer between the Mac and mobile devices. Since adjustments are non-destructive, what gets passed through iCloud are the instructions to make the edits, not revamped versions of the images themselves. That makes edits update quickly and allows you to revert to the original photo at any time, on any device (but read the sidebar on the opposite page for an important limitation).
Work with Raw+JPEG images
Earlier in this chapter, I discussed how Photos for OS X treats Raw+JPEG image pairs when it comes to editing. On iOS, the situation is a little different.
You can import Raw+JPEG photos to an iPad using one of Apple’s camera adapters, or you can import the files to an iPad or iPhone wirelessly using a variety of methods (some cameras include built-in Wi-Fi that can be controlled via apps; another option is to shoot using a Wi-Fi–enabled Eyefi card). The Photos app doesn’t indicate which are Raw+JPEG, raw, or just JPEG—they’re all just photos in the library.
However, iOS itself doesn’t directly support raw files. Apple didn’t build in the system-level translators that read raw files and construct images from the data. So, instead, when you import just a raw file, iOS uses the JPEG preview that the camera created (for you to review on its LCD). Often, that’s a lower-resolution file than if you were shooting JPEG directly.
The advantage of shooting Raw+JPEG is that Photos for iOS displays and edits the high-resolution JPEG image that’s bundled with the raw file. When you import and edit on an iPad, for example, you’re working with a better image file.
If you’ve enabled iCloud Photo Library, the raw and JPEG files for each photo are stored at iCloud and delivered to your other devices—including Photos for OS X, which can work directly with the raw files. Any edits you make on iOS are transferred and apply to the raw version, as well, once you choose Image > Use RAW as Original.
What’s good about this arrangement is that you don’t need to worry much about what’s going on in the background. The only complication arises when you’re editing only raw files, only on iOS, where you’re likely working with low-resolution versions.
Crop, straighten, and rotate
To straighten or recompose a photo, open it in the editing view, tap the Crop button, and do any of the following:
• When you tap the Crop button, Photos automatically tries to straighten the image if there’s a clear horizon line. If that doesn’t happen, click the Auto button or drag the wheel control at right to manually straighten the shot (5.47).
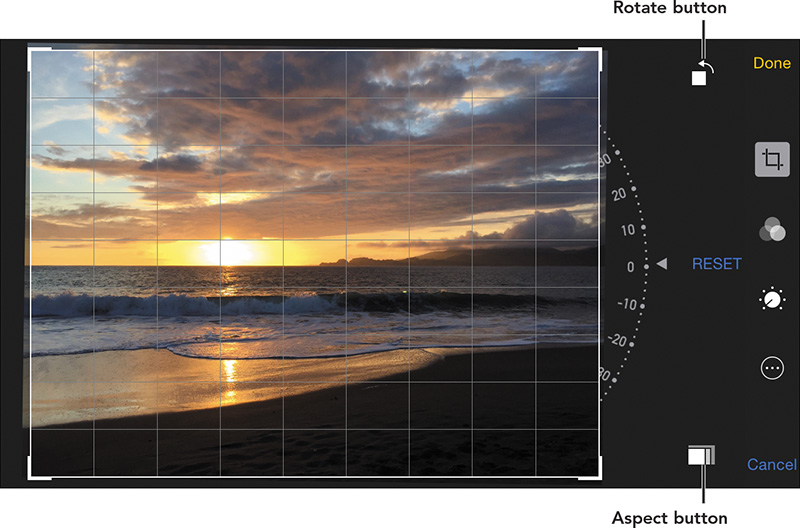
• To recompose the photo by cropping it, drag the image borders. Click the Aspect button to select an aspect ratio and choose a size you want the border to be constrained to when you drag.
• If the photo was imported with the wrong orientation, tap the Rotate button to turn the photo 90 degrees counterclockwise. There’s no clockwise option, so you may need to tap the button three times to turn an image right-side up.
![]() Tip
Tip
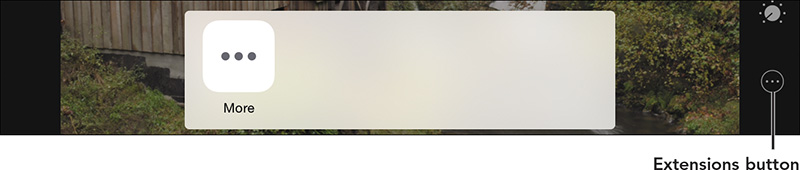
In the editing view in iOS, you may see an extra button that isn’t found in Photos for OS X. The Extensions button appears if other photo-editing apps are installed on the same device and offer some of their features within the Photos app. See “Edit using other iOS apps’ tools,” later in this chapter.
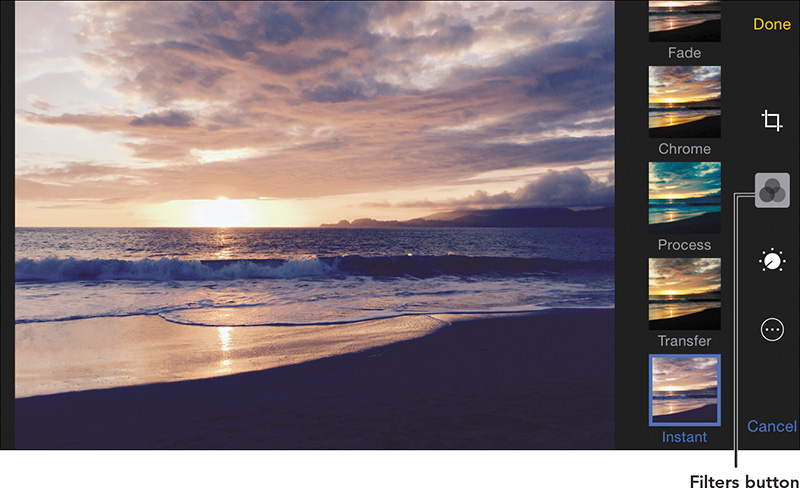
Apply filters
When you want to apply a quick and easy look to your photo, apply a filter to it. In the editing view, tap the Filters button and choose one of the eight built-in presets (5.48).
![]() Tip
Tip
To remove a filter and go back to the photo’s previous state, you can scroll back to None—or simply tap the filter you just applied a second time.
Automatically enhance the photo
Tap the Enhance button to let Photos perform its analysis and automatic correction to the image. The tool turns blue to indicate that it is active. Tap it again if you want to remove the automatic edit.
![]() Tip
Tip
Hold three fingers on the screen to view the unedited “before” version of your photo, then release them to see your current edits.
![]() Tip
Tip
When you adjust photos on your iOS device, make sure the screen brightness is set as high as it can go so you don’t mistake a dim display for a lackluster photo. Swipe up from the bottom of the screen to open Control Center, and then drag the brightness setting all the way to the right.
Adjust light
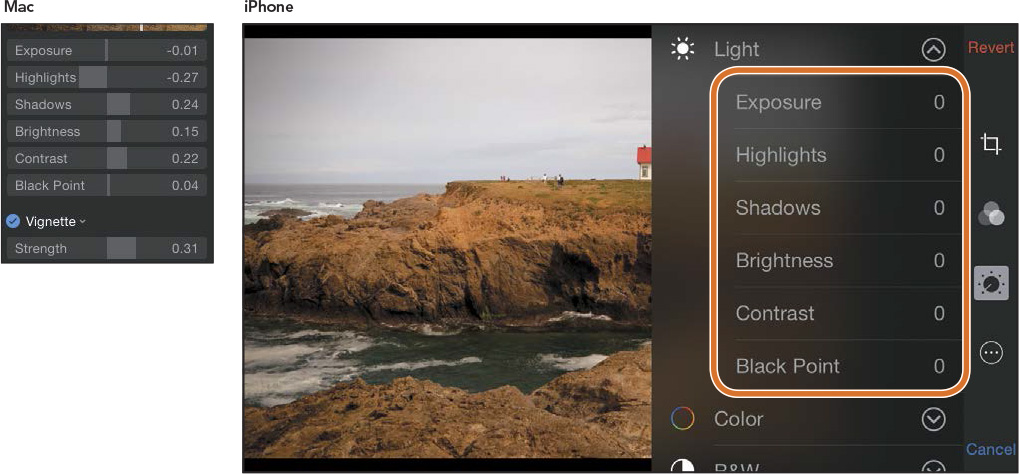
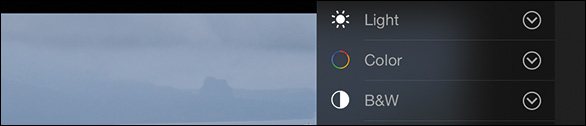
Despite having less visual space to work in, the Adjust tools include both a main slider and individual controls for fine-tuning aspects of the tool’s category. When you tap the Adjust button, the three main types of adjustments appear: Light, Color, and B&W (Black & White) (5.49).
![]() Note
Note
The placement and appearance of the controls vary depending on whether you’re using an iPhone or iPad. If you’re using an iPad, don’t be concerned if it looks different than what you see here; look for the same controls.
Tap the name of an adjustment to view its slider (5.50). Unlike on the Mac, under iOS the slider itself moves; the red line indicating the current setting stays in place in the middle of the screen. The gray dot indicates the photo’s original setting.
Drag the slider to adjust the overall light levels of the scene.
To edit using the individual Light controls, do the following:
1. Tap the list button (![]() ).
).
2. Tap the specific control you want to use (5.51).

3. Drag the slider for that control until you like how it affects the photo.
4. To choose a different control, tap the list button again and choose the one you want.
5. When you’re finished using the controls, tap Close.
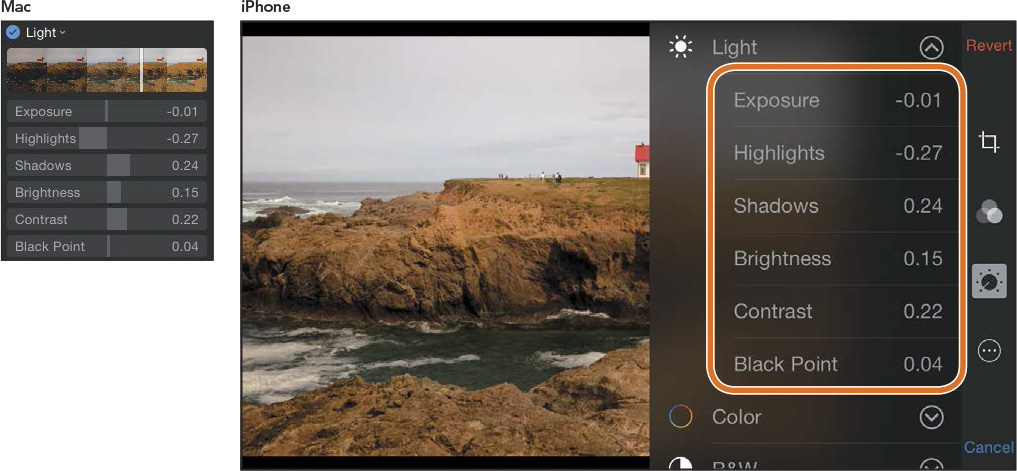
The other Light controls function the same as they do in Photos for OS X. Here’s a recap of what each slider does:
• Exposure: This control affects the overall light levels within the photo.
• Highlights: The brightest areas of a photo are controlled with this setting. Pulling the Highlights value back can often avoid blown-out areas when you increase exposure, shadows, or brightness.
• Shadows: Increasing the Shadows value reveals detail in dark areas.
• Brightness: This control affects the overall brightness of the image. Exposure and Brightness appear to be overlapping controls, but they do work differently; Exposure affects all tones in the image, whereas Brightness affects the general lightness of the shot.
• Contrast: This control affects the difference between light and dark values.
• Black Point: The black point of an image is the level at which dark pixels turn to pure black. By changing the black point, you can make dark areas darker, without resorting to adjusting the exposure for the entire photo.
![]() Tip
Tip
When you’re adjusting sliders, you don’t have to move your finger on the slider itself. You can drag within the image, too, to change the settings.
Adjust color
The Color control operates like the Light control—you can choose to adjust a master slider for easy editing, or expand it to reveal the list of individual controls that cover the following characteristics:
• Saturation: This control adjusts the intensity of color in the image (5.52).
• Contrast: Color contrast involves increasing the separation between similar colors.
• Cast: If a photo has a color cast—in many cases, being too warm or cool—the Cast slider can help compensate.
What you won’t find is a dedicated White Balance tool; the Cast slider compensates for that.
Black and white
If you recall the discussion of the Black & White tool on OS X, you no doubt remember that the individual sliders are used to accentuate the setting of the main slider, instead of merely storing the values. The same is true with the B&W tool on iOS (5.54).
Once you’ve settled on a black and white treatment you like, use the following controls to enhance it:
• Intensity: This adjustment increases or decreases the black and white effect you’ve chosen. With a dark treatment, increasing Intensity makes it darker; with a light treatment, increasing Intensity makes it lighter.
• Neutrals: Drag this slider to darken or lighten the gray midtone areas.
• Tone: The Tone adjustment increases or decreases the contrast.
• Grain: This slider adds simulated grain that approximates the look of some black and white film stock.
![]() Tip
Tip
In the editing view, you can zoom in by pinching outward with two fingers to get a closer look at an area of the photo. When you tap an edit tool, however, the image is zoomed out to fit the entire photo onto the screen.
Edit using other iOS apps’ tools
The iOS version of Photos has a feature that its Mac sibling doesn’t (yet) possess. Developers can create extensions of their apps that work within Photos, adding or replacing functionality in Photos without requiring you to switch to the other app.
If you have apps installed that offer extensions, you need to enable them:
1. Tap the Extensions button in the editing view.
2. In the dialog that appears, tap the More button (5.55).
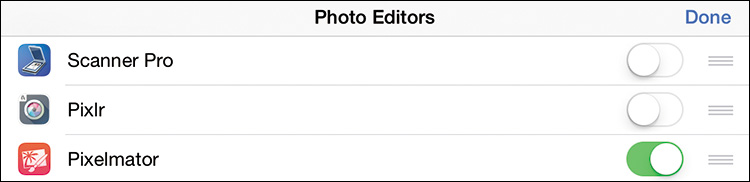
3. Choose which app extensions to include by tapping the activation switches at right (5.56). Tap Done.
Now that the dialog is populated with more options, you can use one to edit your photo. Here’s how:
1. Tap the Extensions button.
2. Tap the icon of the editor you want to use (5.57).

3. Choose a tool from the bottom of the screen (5.58) and use it to adjust your image.
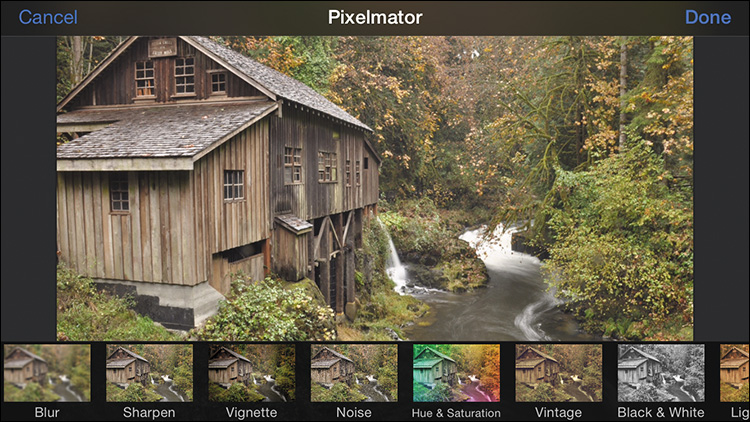
4. Tap Done to exit the extension and return to the Photos editing view.
Edit Videos in Photos for iOS
I shoot more video on my iPhone now than I ever did when I owned a camcorder. Being able to quickly trim clips makes them easy to share (and I can lop off the parts where I forgot to stop recording after the main action occurred).
Trim a clip
Open a video clip in Photos and do the following to trim a clip:
1. Tap the Edit button.
2. Touch and drag one edge of the filmstrip at the top of the screen to enter the Trim mode; the filmstrip gains a yellow border.
3. Drag the edges of the filmstrip to define the portion of the clip you want to keep (5.59).
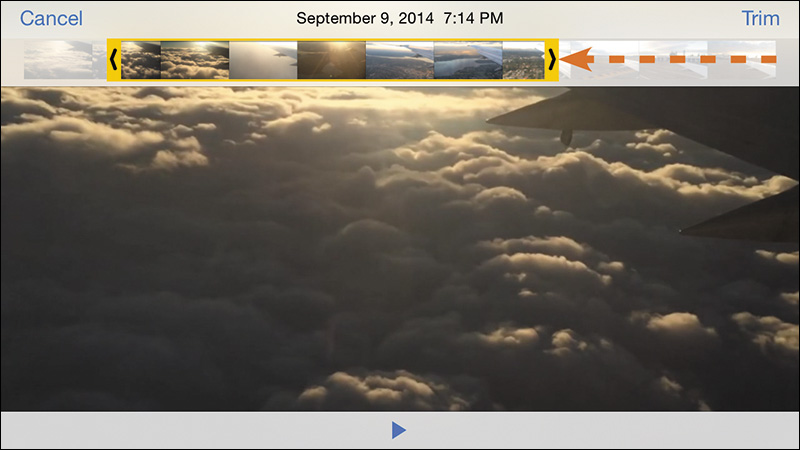
4. Tap the Trim button.
5. When asked, tap Save as New Clip to continue. Photos automatically saves the original clip.
Edit Slo-Mo video
Slo-Mo videos add the ability to choose which section of the clip plays at the slow speed. (Remember, the entire video is shot at 240 fps or 120 fps.) When editing a video, the slow motion controls appear below the filmstrip; drag the handles to specify the duration of the slow section (5.60).
![]() Note
Note
When you want to do more than just trim clips, look into iMovie for true video editing. Its main benefit is being able to assemble clips on a timeline, edit audio, apply effects, and otherwise build a movie. I cover all of that and more in my book iPad and iPhone Video.
Edit video using other apps’ tools
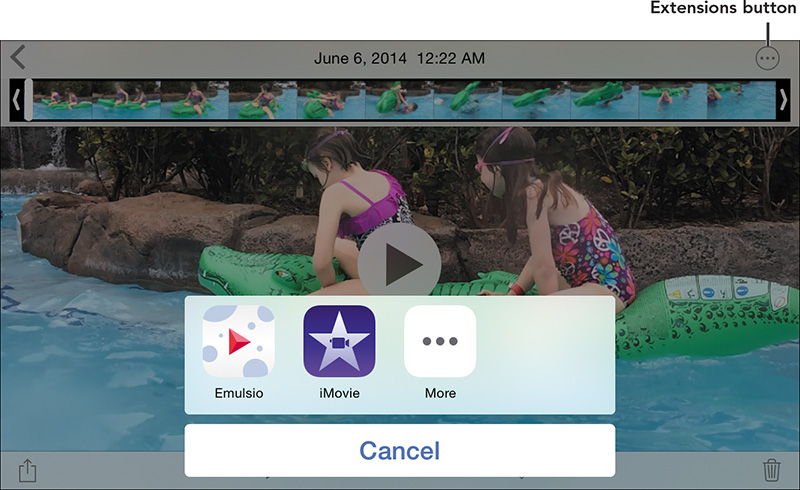
Just as you can edit photos using tools from other apps, video clips can be edited, too. In fact, I like the video aspect of editing extensions because I can do something as simple as adding a title from iMovie without starting an entirely new project in the app. Or, for example, I can use the extension provided by the app Emulsio (www.creaceed.com/emulsio) to stabilize shaky footage, right in the Photos app! Here’s how:
1. Open a video and tap the Edit button.
2. Tap the Extensions button.
3. Tap the app whose features you want to use (5.61).
4. Edit the clip using the tools from the other app (5.62).
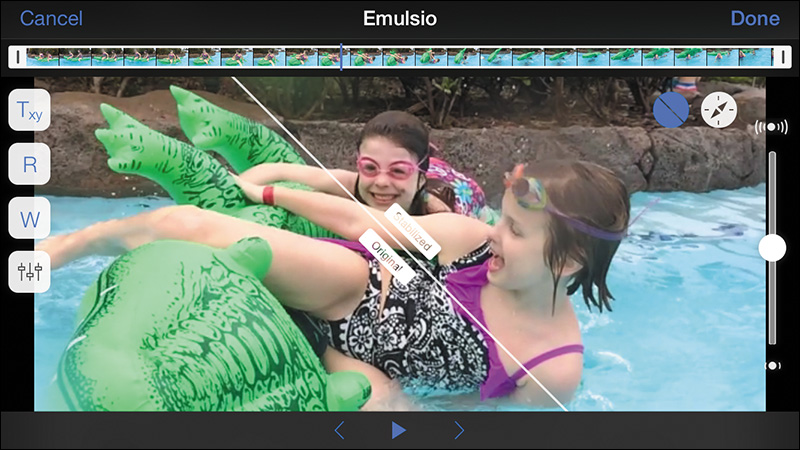
5. Tap Done when you’re finished.