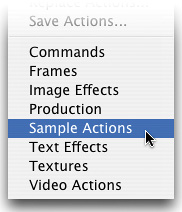
If you miss the old default set of actions that has been shipping with Photoshop for years, you can get it back fairly easily. Just go to the Actions palette's flyout menu and choose Sample Actions to reload that old default set.
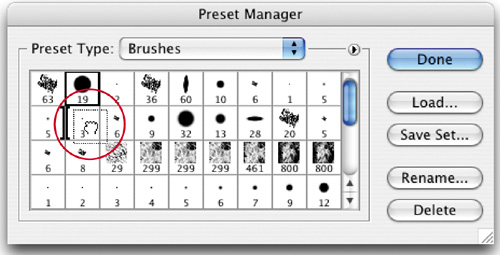
One of the things in Photoshop that just didn't make sense to us was that you couldn't easily rearrange the order of your brushes in the Brushes palette or Brush Picker. Oh sure, you could create a whole new custom set with the brushes you wanted, in the order you wanted them, but it would take a while, and frankly, was such a pain that we only know a handful of people who actually went through the trouble. Well, our wish for easily rearranging brushes is finally here, but the process is a bit hidden beneath the surface. To move a brush from one spot in the palette to another, go under the Edit menu, and choose Preset Manager. In the Preset Manager dialog, under Preset Type, choose Brushes. Then, click-and-drag the brush of your choice to the location of your choice. At last, we are free to move brushes among the herd.
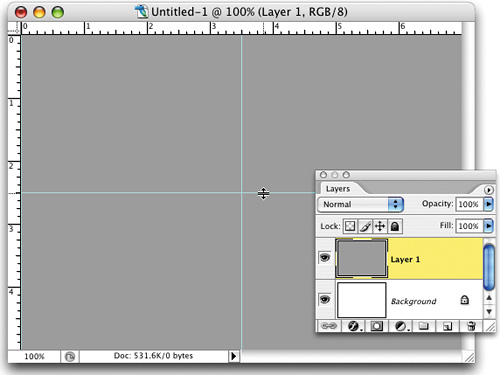
Need to find the exact center of your image? All you need is a layer filled with your Foreground color, and Photoshop will do the rest (okay, you have to do a little, but Photoshop will certainly help). First, click on the Create a New Layer icon in the Layers palette and press Option-Delete (PC: Alt-Backspace) to fill it with your Foreground color. Make your rulers visible (press Command-R [PC: Control-R]) and drag a guide down from the top ruler. When you get close to the center of the image, the guide will automatically snap to the exact horizontal center. Do the same with the side ruler, and it automatically snaps to the vertical center of your image. (Note: If there's not any snapping going on, be sure Snap is turned on under the View menu.)
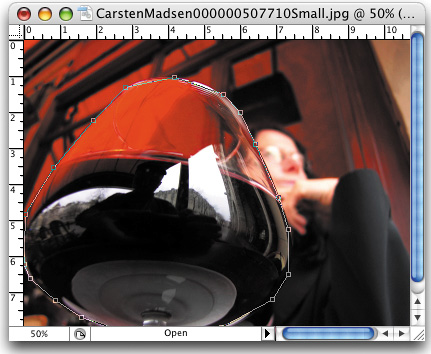
Have you ever tried to create a smooth selection using the Lasso tool? It's just about impossible, right? (If it sounds like it isn't, give it a try—open a new document, take the Lasso tool, and draw any random selection, and then look at the selection. It's jaggy—not crazy jaggy, but it's certainly not smooth.) If you were trying to create a selection for an interface design, or a realistic element of some sort, it would just be too jaggy to use. Here's a tip:
Press L to get the Lasso tool and draw around the area you want to use as your selection.
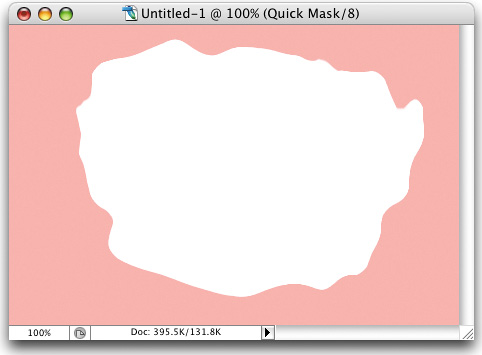
Press the letter Q to enter Quick Mask mode (your selection will now be surrounded with a reddish hue).
Go under the Filter menu, under Noise, and choose Median. As you move the Radius slider to the right, you'll see your edges smooth out.
When it looks nice and smooth, click OK then press the letter Q again to return to Standard mode, and you'll have nothing but a nice rounded selection.
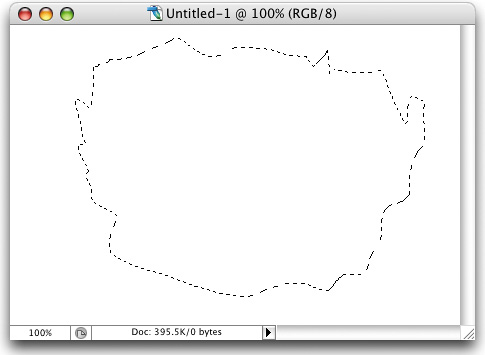

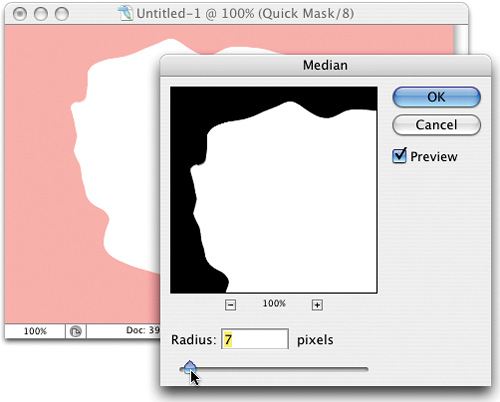
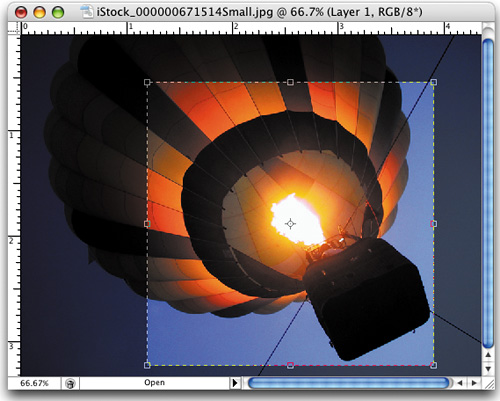
Look at the selection in the first image above. See how those jaggies have been replaced by the smooth edges—courtesy of the Median filter?
A lot of times when you're working on a project, your screen can get really cluttered with palettes (Photoshop is an especially palette-heavy application). If you want all the palettes out of the way for your convenience while you're working, just press Shift-Tab to hide them, or Shift-Tab to bring them back. The menu bar, the Options Bar, and the Toolbox will still be visible.
©ISTOCKPHOTO/INES GESELL
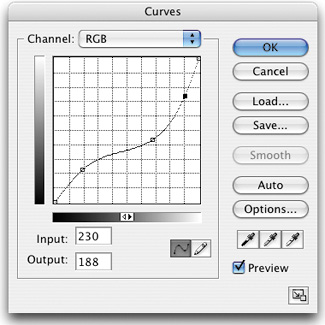
Let's say you're using the Curves dialog for correcting images and you have an image where you're trying to adjust the color of some green plants. How do you know where that particular green “lives” on the curve so you can dial in and adjust it? Photoshop can tell you—in fact, you can have Photoshop automatically plot that color on the curve for you. With the Curves dialog open, just Command-click (PC: Control-click) on that color within your image. Photoshop will then add a point to the curve that represents the spot you sampled, and now you're ready to tweak it.
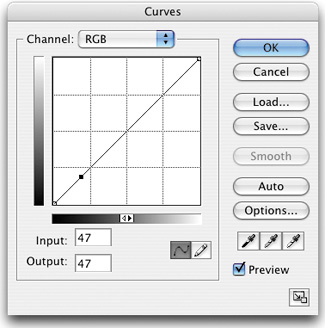
While we're talking Curves, by default the Curves dialog displays a 25% grid. If you'd like a finer grid, you can Option-click (PC: Alt-click) once within the grid, and it will then display a 10% grid.
In Photoshop CS2 you can increase or decrease the size of your brush by 10 pixels by pressing the Left or Right Bracket keys when the Brush tool (B) is selected. Once your brush is more than 100 pixels in size, it then moves in 25-pixel increments; if you go higher than 200 pixels, it moves in 50-pixel increments until you reach 300 pixels, at which point it moves in 100-pixel increments.
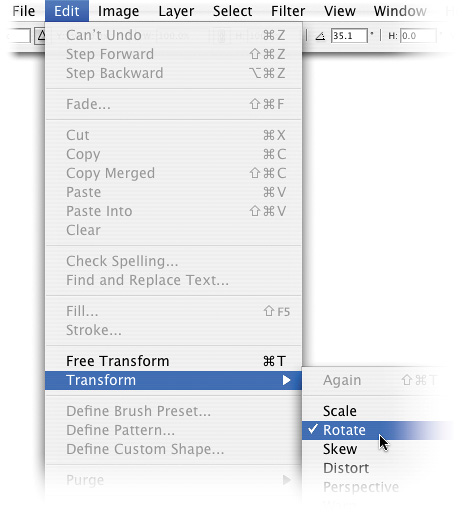
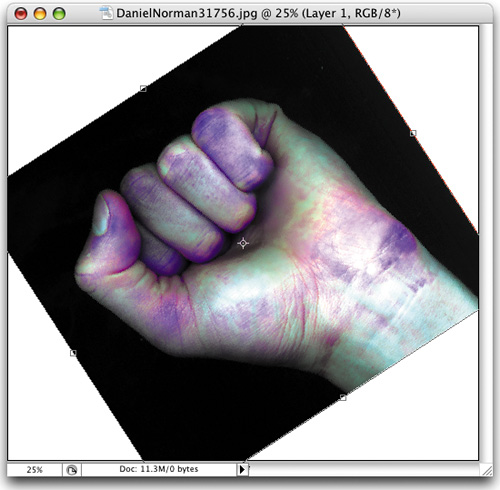
If you have a specific angle that you'd like to rotate a layer to, it's easy. Get the Measure tool (it looks like a ruler and is in the Eyedropper tool's flyout menu in the Toolbox), and click-and-drag out a line at the desired angle. Then go under the Edit menu, under Transform, and choose Rotate. Your layer will instantly rotate to match the angle that you drew with the Measure tool. Note: To rotate the Background layer, you must first select it (Command-A [PC: Control-A]).
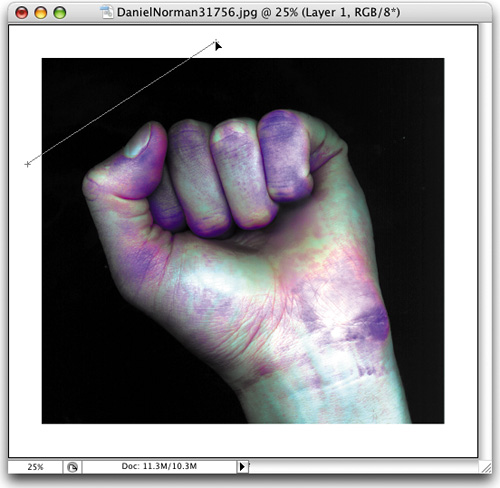
©ISTOCKPHOTO/DANIEL NORMAN
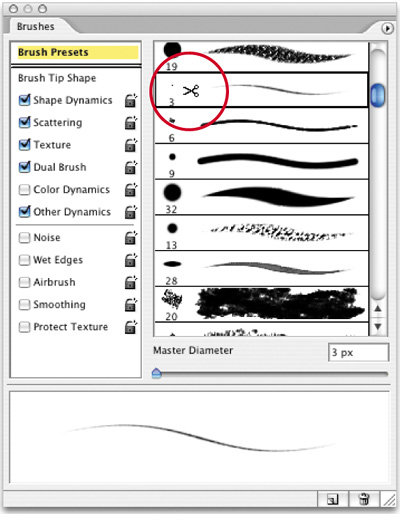
You probably already know that you can add a brush to the Brushes palette, but did you know that it's even easier to delete them? Just hold the Option key (PC: Alt key) and you'll notice that your cursor changes into a pair of scissors. Click once on the brush you want to delete and that baby's gone—no warning dialog, no chance to change your mind—it's gone.
Here's a tip that gives you a faster and more convenient way to switch to another preset brush without using the Brushes palette—and you might find that you like it even better. Just press the Control key, then click within your image (PC: Right-click) and the Brush Picker will appear directly under your cursor. Plus, you can even change the Master Diameter of the brush that you choose in the Picker. This is one you'll have to try to appreciate the sheer speed and convenience of putting your brushes at your fingertips anytime.
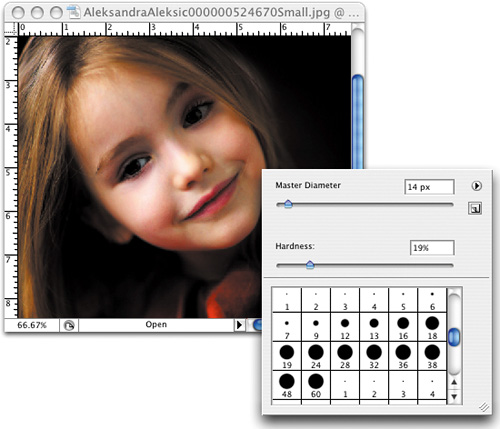
©ISTOCKPHOTO/ALEKSANDRA ALESKSIC
Now that you've learned how to bring up the Brush Picker right where you want it, it wouldn't hurt to learn this quick navigation tip to keep you from spending more time there than necessary. Once you've selected a brush in the Picker, just use the Arrow keys on your keyboard to navigate up, down, left, or right to other brushes in the Picker. Once you choose a brush and you are no longer in the Brush Picker, you can use the Period and Comma keys to move forward and backward through the different brushes. Shift-Comma and Shift-Period will jump you to the first and last brushes in the Brush Picker, respectively.
Photoshop lets you affect a brush stroke even after you've painted it by using Photoshop's Fade command (found under the Edit menu). Fade works like “undo on a slider,” and dragging the Opacity slider all the way to the left will completely undo your freshly painted brush stroke, but if you stop anywhere before the far-left side, it will instead simply lighten the stroke. You can also use the Mode pop-up menu to alter how your stroke blends with the object below it.

Have a bunch of images open on your screen and can't see the one you want? Just press Control-Tab to move from one open image to the next, cycling through all of your open documents.
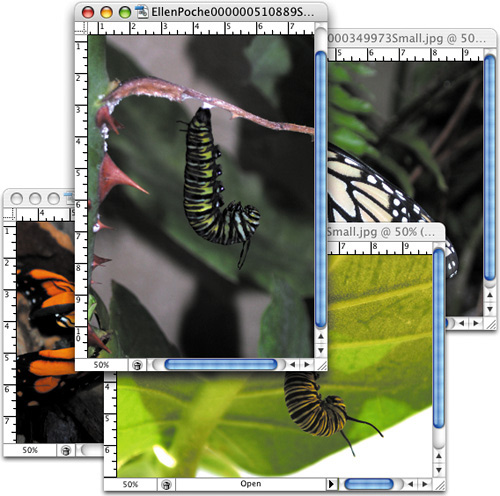
©ISTOCKPHOTO/ELLEN POCHE
This is a great tip for quickly finding the exact center of any object on its own layer. You start by pressing Command-T (PC: Control-T) to bring up the Free Transform bounding box. The bounding box has a handle in the center of both sides and center handles at both the top and bottom. Now all you have to do is make Photoshop's rulers visible (Command-R [PC: Control-R]), and then drag out a horizontal and a vertical ruler guide to these handles to mark the center. Better still, if you have the Snap command active in the View menu, the guides will snap to the center of your object as you drag.
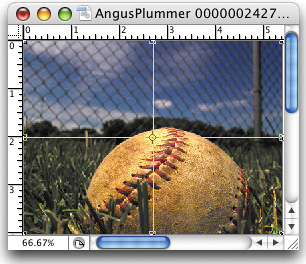
©ISTOCKPHOTO/ANGUS PLUMMER
Just like most page-layout applications, Photoshop has non-printing guides you can pull out anytime you need to align objects or type, but there's also a trick for flipping the guides. To access the guides, make your rulers visible by pressing Command-R (PC: Control-R), then click-and-hold within one of the rulers and drag out a guide. If you pull out a horizontal guide from the top ruler, but really wanted a vertical guide, just press the Option key (PC: Alt key) as you drag and your guide will flip from horizontal to vertical (pretty slick). You can pull out as many guides as you need (there's probably a limit to how many you can use, but we've never reached it). When you're done using a guide, just use the Move tool (V) to drag it back to the ruler where it came from. To remove all of your guides at once, choose Clear Guides from the View menu.
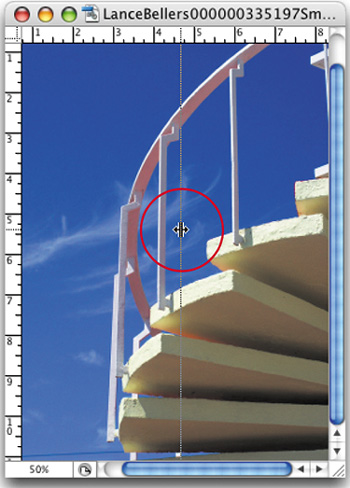
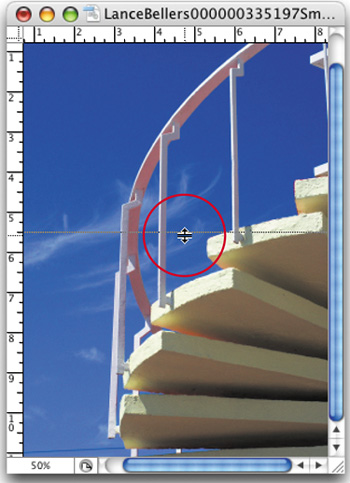
©ISTOCKPHOTO/LANCE BELLERS
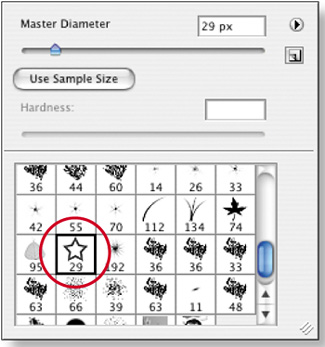
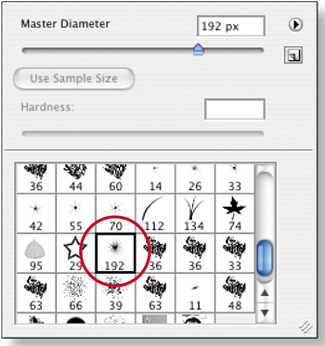
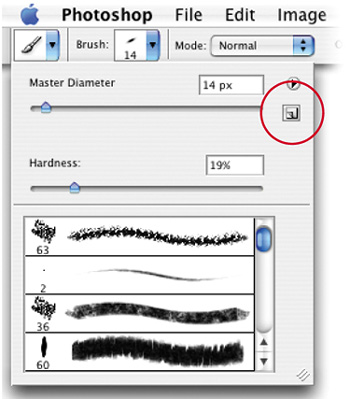
It's easy to create a temporary brush based on your preset brushes in Photoshop. Just click on the Brush thumbnail in the Options Bar to bring up the Brush Picker. Using the Master Diameter slider, you can change your brush size from 1 to 2500 pixels. If you like the size of your new brush and you want to save it, just click the Create a New Brush Preset icon at the top right of the dialog. The Brush Name dialog will appear so you can name your new brush. When you click OK, the new brush will immediately be added to your Brush Picker (and Brushes palette).
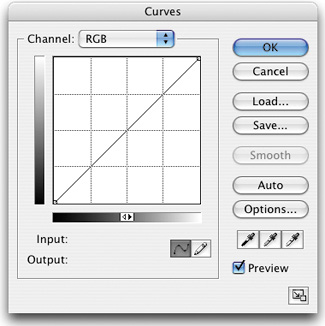
Once you've applied a curve setting to an image, it's very possible that you'd like to use that exact same setting again, or maybe you'd just like to tweak that setting a bit. Well, you can. To bring up the Curves dialog with the last curve you used still in place, press Command-Option-M (PC: Control-Alt-M).
When you're using the Crop tool (C) to crop images, you'll find that you actually have some options on how the area you're cropping away is handled after the crop. For example, in the Options Bar (as long as you're not on the Background layer) you'll see an option that lets you either Delete the cropped areas or simply Hide them from view (in other words, the areas are still there, they just expand out into the canvas area). If you choose the Hide option, it crops the image window down to the size of the crop, but since the cropped-away areas are still really there, you can use the Move tool (V) to drag these cropped areas back into view.

©ISTOCKPHOTO/ANDRES ORTIZ MASSO
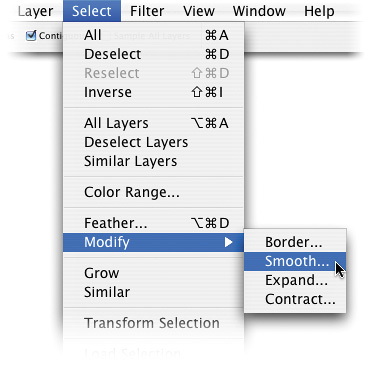
Sometimes when making a selection with the Magic Wand tool (W) or Color Range command (under the Select menu), Photoshop will leave little stray pixels unselected. You can tell where they are because they appear to twinkle on and off, kind of teasing…nay, taunting you, because your selection is not complete. Luckily, there's a quick way to rein in those renegade stray pixels. Go under the Select menu, under Modify, and choose Smooth. Enter a Sample Radius of 1 pixel and click OK. That will usually do the trick—those stray pixels are now selected.
By default, the Eyedropper tool's Sample Size feature (in the Options Bar) is set to Point Sample, which comes into play if you're using it to read values for color correction. But for now, it's important to know that the Sample Size option chosen for the Eyedropper tool (I) actually affects how the Magic Wand tool (W) makes its selection (the two have an undocumented relationship). If you increase the Eyedropper's Sample Size to 3 by 3 or 5 by 5 Average, the Magic Wand will select an average of a much larger range of pixels in the sample area. This is important to know, because if you don't have Point Sample chosen and you set the Magic Wand Tolerance to 0, it won't just select the individual pixel you click on—it will select all of the pixels that match any of the pixels in a 3 by 3 or 5 by 5 area. The next time your Magic Wand isn't behaving the way it used to, check to see if you have changed the Eyedropper tool's Sample Size.

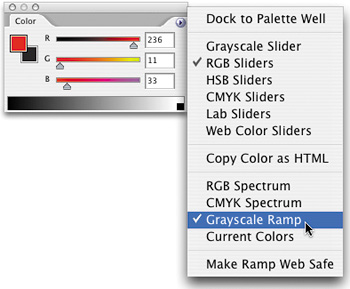
If you use the Color palette (under the Window menu) to select colors, you're probably already using the color ramp at the bottom of the palette for making quick color selections, but here are two tips that make using the ramp faster and easier. First, the color ramp doesn't have to use the same color mode as the color sliders above it; for example, you can have RGB for your sliders and grayscale as your ramp. This is great because it gives you two different models to choose from without digging through menus. You can choose the color modes for both the sliders and the ramp from the Color palette's flyout menu. The second tip is that if you quickly want to change color ramps, Shift-click on the ramp. Every time you Shift-click, it will rotate to the next color mode.
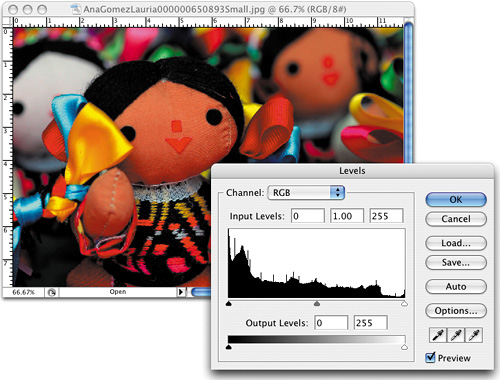
This is a tip that will save you time when you're making tonal adjustments using Levels, Curves, Color Balance, etc. (most anything that appears under the Adjustments submenu under the Image menu). When you bring up one of the tonal adjustment dialogs, it always displays its default settings, but if you hold the Option key (PC: Alt key) when choosing it from the Adjust-ments menu, instead of coming up with the default settings, it will display the last settings you used in that particular dialog. You can also add the Option (PC: Alt) key to the keyboard shortcuts. For example, the shortcut to bring up the Levels dialog is Command-L (PC: Control-L), but if you add Option (PC: Alt) to those keys, the Levels dialog will open with your last-used settings.
©ISTOCKPHOTO/ANA GOMEZ LAURIA
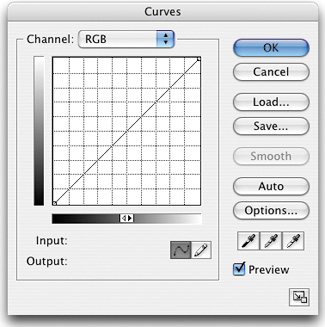
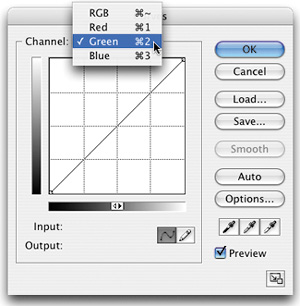
When you're in the Curves dialog (Command-M [PC: Control-M]), if you're charging by the hour, you can certainly travel up to the Channel pop-up menu and choose each individual channel you want to work on, but if you want to do it the fast way, just press Command-1 for Red, Command-2 for Green, and Command-3 for Blue (PC: Control-1, Control-2, etc.). If you need to return to the composite RGB channel, press Command-Tilde (PC: Control-Tilde). By the way, the Tilde key looks like ~, and it lives right above the Tab key on your keyboard. Don't feel bad. Nobody knows what the Tilde key is. We're not sure it's a real symbol at all. We think it was made up so there wouldn't be an empty space there on your keyboard. Hey, it's somewhat plausible.
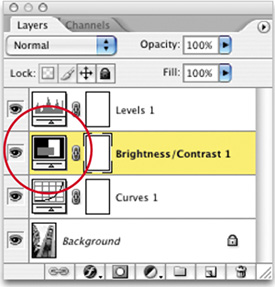
As you probably already know, the History palette keeps track of the last 20 changes to your document, and you can use it for multiple undos when working on a project. The only bad part is that when you close your document, your undos (in History) are automatically deleted. However, there is a way to save an undo, as long as it's a tonal adjustment (such as Curves, Levels, Color Balance, etc.), by creating adjustment layers. Just click on the half-white/half-black circle icon at the bottom of the Layers palette and choose your tonal adjustment from the pop-up menu to create an adjustment layer. These adjustment layers are saved along with your file. That way, the next time you open the file, you can go back and edit your Curves, Levels, etc., adjustment by double-clicking on the adjustment layer's thumbnail. The last-applied adjustment will appear, and you can edit it live. If you decide you don't want the original adjustment applied at all, you can drag the adjustment layer into the Trash icon at the bottom of the Layers palette. You can also add a Gradient fill, a Pattern fill, and even a Solid Color fill as an adjustment layer, giving you an undo at a later date, because again, they're saved as layers with the file.
Want to save trips to the Toolbox when using the Pen tool (P)? You're in luck. Better yet, you don't even have to hold down any modifier keys (such as Option/Alt, etc.), because Photoshop will do the work for you. Here's why: When you draw a path, move your cursor over a line segment and your Pen cursor automatically changes to the Add Anchor Point tool, so you can click anywhere along that path to add a point. Move your cursor over an existing point, and it changes into the Delete Anchor Point tool (click on the point, and it's deleted). This is called Auto Add/Delete, and it's on by default (you can turn it off, should you want to, using the checkbox in the Options Bar).
©ISTOCKPHOTO/CARSTEN MADSEN

Want to make the Gradient Picker appear where your cursor is in your image window? You can do this when you have the Gradient tool (G) active, allowing access to your gradient library, by Control-clicking (PC: Right-clicking) within your image area. It also works with the Custom Shape Picker. Here's an even slicker trick: You can use the Return or Enter key instead to bring up the Gradient or Custom Shape Pickers.
©ISTOCKPHOTO/ANITA PATTERSON
Those tiny little fields up in the Options Bar can really be a pain sometimes, especially if you're trying to highlight a field, delete the current value, and type in a new one. Instead of doing all that, just click on the field's name and Photoshop will automatically highlight the entire field for you. That way, you can just type in new values and it will automatically replace the old values. Great thing is, this doesn't just work in the Options Bar; it works in many of Photoshop's palettes, including the Character and Paragraph palettes.
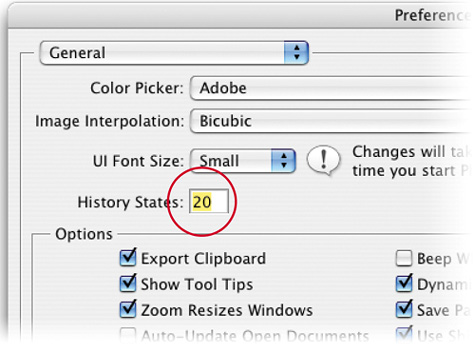
Here's a tip for avoiding those nasty out-of-memory warning dialogs. One of the reasons Photo-shop needs so much memory is that by default it keeps a snapshot of the last 20 things you did to your document, thus allowing you to undo your previous 20 steps. (You can see the running list of your last 20 steps in the History palette.) As you might expect, storing 20 steps takes a mighty chunk of memory, and if you're running a little low (or getting those evil out-of-memory warnings), one thing you might try is lowering the amount of steps Photoshop stores. In Mac OS X, go under the Photoshop menu, under Preferences, under General, and you'll find a field for History States. (In Windows you'll find Preferences under the Edit menu.) You can lower this number (try 8 States for starters), and you may avoid the dreaded memory warnings. Just remember, by lowering the States, you don't have 20 undos anymore.
You probably already know that you can use the History Brush (Y) as an “undo” on a brush, and that by default, the History Brush paints back to how your image looked when you first opened it. But did you know that the Eraser tool has a similar function? That's right; the next time you've got the Eraser tool (E) active, look up in the Options Bar and you'll see a checkbox for Erase to History. Normally, the Eraser tool erases to your Background color, but when you turn on this checkbox, it erases back to what the image looked like when you opened it.
©ISTOCKPHOTO/JOHANNA GOODYEAR
That's right—straightening is totally automated in Photoshop CS2. In fact, try out this ideal situation: Toss two or three photos casually onto your scanner bed, without taking the time to carefully align them, and scan them all with just one pass of your scanner. Then, open the single scan of the three photos in Photoshop, go under the File menu, under Automate, and choose Crop and Straighten Photos. Photoshop will then crop, straighten, and even put each photo into its own separate document. Nice.

If you're working on a layered document, and you make a selection and copy that selection, by default Photoshop only copies the information on your currently active layer (and that's a good thing). However, there may be times when you want to copy your selection as if the image was flattened (in other words, you want to copy everything on all visible layers). If that's the case, press Command-Shift-C (PC: Control-Shift-C), and you'll copy as if the image was flattened, not just on the active layer.
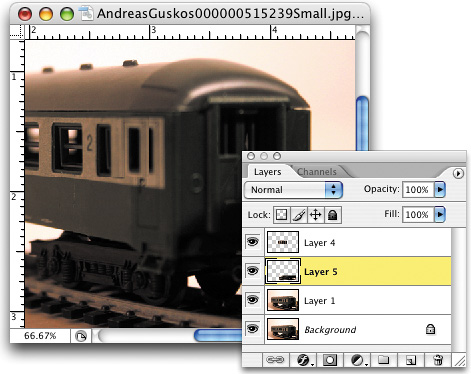
©ISTOCKPHOTO/ANDREAS GUSKOS
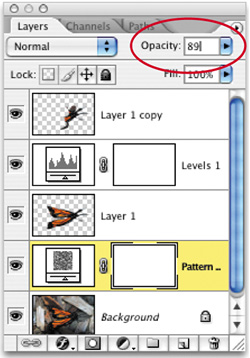
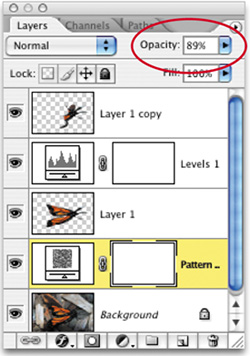
This is one of those tips that keeps you from pulling your hair out. Sometimes when you're editing values in a field (for example, you're typing numbers in the Opacity field for a layer) and you've entered the number you want, Photoshop doesn't automatically take you out of that field (meaning your cursor is still flashing in the Opacity field). It gets worse if you've switched to another layer (besides the Background layer) and you want to use a keyboard shortcut to switch tools. For example, you press the letter T to switch to the Type tool, but instead of getting the Type tool, you get an error sound because your cursor is still in the Opacity field (you can't type letters in a number field). Here's how to get around it: Just press the Return (PC: Enter) key on your keyboard to lock in the change in your field and release your keyboard for other tasks.
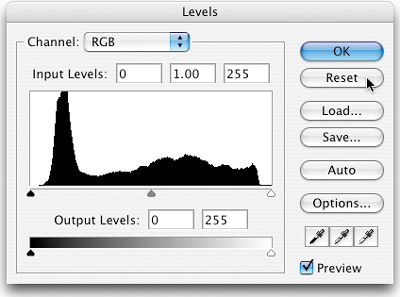
Most of Photoshop's dialogs (but not all) will let you use this little tip, which can save you loads of time. When you're making changes in a dialog (let's use the Levels dialog as an example) and decide that you don't like the changes you've made, one option is to click the Cancel button to close the dialog, leaving your image unchanged. Then you can reopen the dialog and try again. This is an incredible waste of valuable time, so instead, Photoshop lets you “reset” the dialog—putting the settings back to what they were when you first opened it. Just hold the Option key (PC: Alt key) and look at the Cancel button—it changes into the Reset button. Click it, and it resets the dialog automatically, as if you hadn't made any changes at all. Big, big time saver.
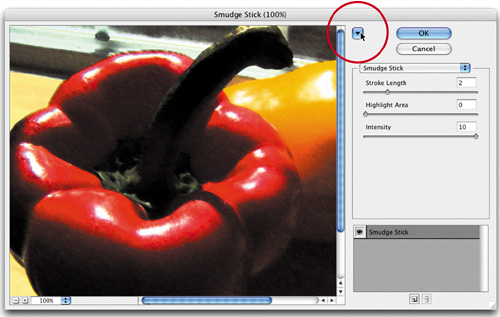
Once you've chosen a filter from the Filter Gallery (under the Filter menu), you'll probably want to spend some time tweaking the settings. If that's the case, you'll also need to see a larger preview of your work so you can really see the effects of each little tweak. You can do that by clicking on the triangle button, to the left of the OK button. This hides the center column (the list of filters) and expands the Preview pane into its space, giving you the full preview experience.
©ISTOCKPHOTO/ANGUS PLUMMER
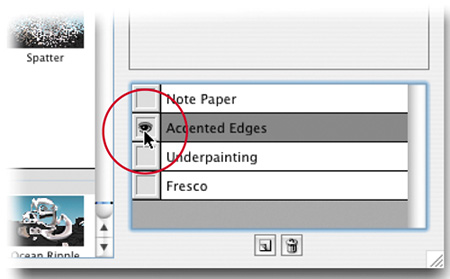
The idea behind the Filter Gallery (under the Filter menu) is the stacking up of one filter on top of the next, but if you want to see any one of the filters by itself, just Option-click (PC: Alt-click) on the Eye icon beside that filter in the filter stack, and all the other filters will be hidden from view. Option-click (PC: Alt-click) on the same Eye icon to bring them all back into view.
When you're using just about any of Photoshop's tools, you can temporarily switch to the Move tool at any time by simply holding the Command key (PC: Control key). It's temporary, and as soon as you release it, you're back to the tool you started with.
©ISTOCKPHOTO/ELVIRA OOMENS