2. Organizing Photos
Digital photography can be a bit of a doubleedged sword. Ironically, its greatest advantage to the amateur photographer—the ability to quickly and easily capture a large number of images, and then instantly download them to a computer—can also be its greatest source of frustration. Once hundreds of images have been downloaded, photographers find themselves faced with the daunting task of sorting through myriad files, with incomprehensible filenames, to find those dozen or so “keepers” to assemble into a collection or post to the Web for friends.
Photoshop Elements includes Adobe Bridge CS4, a separate application that comes to the rescue with a relatively simple and wonderfully visual set of tools and functions to help you locate, identify, and organize your photos.
Another option is to use Apple’s iPhoto as a front end organizer, handing off the image editing duties to Photoshop Elements.
But first, let’s start by importing photos from your digital camera.
Importing Images
Digital cameras have revolutionized photography and are one of the main forces driving the need for products like Photoshop Elements. Typically, these cameras come with their own software to help you browse and manage photos—but don’t even bother breaking the seal on the disc’s envelope. You can access your camera from within Bridge CS4 and then download your images, or download photos from the camera to your hard drive and then open them in Elements.
To import images from a digital camera (Standard dialog):
1. Connect your digital camera to your computer using the instructions provided by the camera manufacturer.
2. Open Adobe Bridge CS4 and choose File > Get Photos from Camera. Or, from Photoshop Elements, choose File > Adobe Photo Downloader.
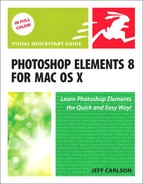
The Photo Downloader dialog opens in its Standard mode (Figure 2.1). For more importing options, see “To import images from a digital camera (Advanced dialog)” just ahead in this chapter.
3. Your camera will likely be selected in the Get Photos from drop-down menu, but if not, choose your camera.
Listed below the menu are the number of pictures available and their combined size.
4. By default, images are saved to your Pictures folder; hold your mouse pointer over the truncated path listed next to Location to view the full destination.
If you want to save the files to a different location, click the Choose button and choose a folder or create a new one. Then click OK to return to the dialog.
Figure 2.1 The Photo Downloader’s Standard dialog makes it easy to import all photos in one fell swoop.
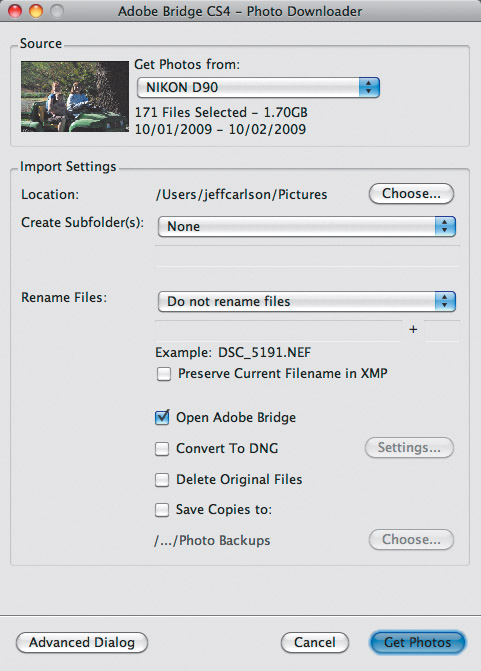
Figure 2.2 To make it easier to find images later, you can specify a custom name for subfolders.
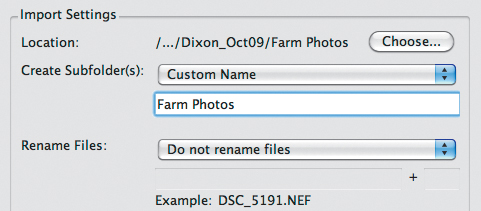
Figure 2.3 Choose a date format for naming subfolders with the images’ shot dates.
5. The Photo Downloader dialog is set to create new subfolders to store each batch of imported images, named according to the shot dates. From the Create Subfolder(s) drop-down menu, you can customize this behavior by choosing one of the following options:
![]() None saves the files in the folder specified by Location, normally your My Pictures folder.
None saves the files in the folder specified by Location, normally your My Pictures folder.
![]() Custom Name creates a folder with a name that you enter (Figure 2.2).
Custom Name creates a folder with a name that you enter (Figure 2.2).
![]() Today’s Date automatically creates a folder named with the current date.
Today’s Date automatically creates a folder named with the current date.
![]() Shot Date creates folders with the date the images were captured; choose your preferred date format from one of the options (Figure 2.3).
Shot Date creates folders with the date the images were captured; choose your preferred date format from one of the options (Figure 2.3).
6. The Rename Files drop-down menu gives you the option of automatically naming the imported files something more descriptive than what your camera assigns. Choose an option from the dropdown menu.
For example, your camera’s default naming scheme is probably something like “IMG_1031.JPG.” With a Rename Files option selected, you can name and number a set of photos “Vacation,” for instance. Then your photos will automatically be saved and named “Vacation001.jpg,” “Vacation002.jpg,” and so on.
Click the Preserve Current Filename in XMP check box to store the original image filenames in XMP (Extensible Metadata Platform) files that the Photo Downloader may create alongside imported Raw files.
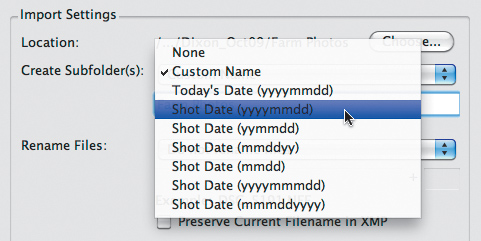
7. The remaining items in the dialog provide options for handling files after importing (Figure 2.4):
![]() Open Adobe Bridge takes you to Bridge for viewing.
Open Adobe Bridge takes you to Bridge for viewing.
![]() Convert To DNG makes a copy of each image and saves it in Adobe’s Digital Negative file format. DNG is an open format that retains the same information as camera Raw files, but isn’t restricted by camera manufacturers’ encoding schemes (which vary between companies and models).
Convert To DNG makes a copy of each image and saves it in Adobe’s Digital Negative file format. DNG is an open format that retains the same information as camera Raw files, but isn’t restricted by camera manufacturers’ encoding schemes (which vary between companies and models).
Click the Settings button to choose DNG options such as the size of the file’s preview image, whether compression is applied, and how the original Raw data is handled.
![]() Delete Original Files removes the images from the camera’s memory after importing. I recommend keeping this option turned off; it’s better to format memory cards within the camera in which they’re being used.
Delete Original Files removes the images from the camera’s memory after importing. I recommend keeping this option turned off; it’s better to format memory cards within the camera in which they’re being used.
![]() Save Copies to creates a backup of each image during import, saving you the trouble of remembering to make backups later. Click the Choose button to specify a location for the files.
Save Copies to creates a backup of each image during import, saving you the trouble of remembering to make backups later. Click the Choose button to specify a location for the files.
8. Click the Get Photos button to download the selected images to your computer.
To import images from a digital camera (Advanced dialog):
1. Follow steps 1 through 8 in the previous sequence, but click the Advanced Dialog button in step 2 to switch to the Advanced dialog (Figure 2.5).
2. Click to deselect the check box under any photos you do not want to download.
By default, the Photo Downloader assumes you want to import every image.
Figure 2.4 Choose how the imported files are handled, including making backups during the transfer.
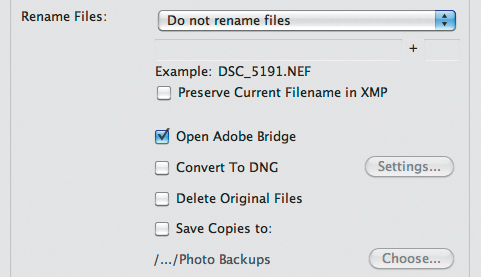
Figure 2.5 Preview all photos on your camera before importing them in the Advanced dialog (left side of window shown here).

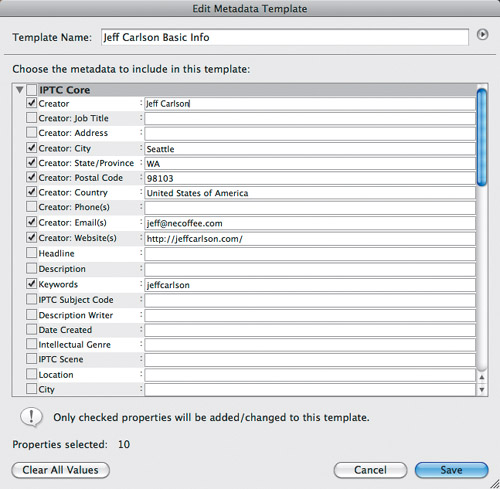
Figure 2.6 Add Creator and Copyright information to the metadata of every imported file.
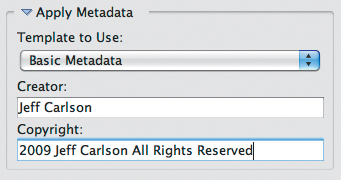
Figure 2.7 Make a metadata template to include more information than just Creator and Copyright.
3. Type a name and a copyright notice in the Apply Metadata fields (Figure 2.6). This text is embedded with the image files.
![]() Tips
Tips
![]() You may want to import only some of the photos on a memory card, but clicking each check box is tedious. Instead, first click the UnCheck All button to deselect everything. Select the photos you want: Click an image and Shift-click another to select all photos between them; or, Command-click photos to select them. Then, click the check box of just one selected image to select all of them.
You may want to import only some of the photos on a memory card, but clicking each check box is tedious. Instead, first click the UnCheck All button to deselect everything. Select the photos you want: Click an image and Shift-click another to select all photos between them; or, Command-click photos to select them. Then, click the check box of just one selected image to select all of them.
![]() Photoshop Elements can import photos stored in Camera Raw formats, which are the unprocessed versions of the captured images. Raw enables more adjustment possibilities than JPEG (which is processed and compressed in the camera). Bridge imports Raw files without editing the image information. When you bring the photo into Elements, the Camera Raw dialog appears to set initial edits before opening the image. For more information, see “Adjusting Camera Raw Photos” in Chapter 7.
Photoshop Elements can import photos stored in Camera Raw formats, which are the unprocessed versions of the captured images. Raw enables more adjustment possibilities than JPEG (which is processed and compressed in the camera). Bridge imports Raw files without editing the image information. When you bring the photo into Elements, the Camera Raw dialog appears to set initial edits before opening the image. For more information, see “Adjusting Camera Raw Photos” in Chapter 7.
![]() The contents of the Creator and Copyright metadata fields are applied to all photos imported in that batch. To avoid entering your information at each import, open Bridge and choose Tools > Create Metadata Template. Enter the data you want to use in the appropriate fields (Figure 2.7) and click Save. The next time you import images, choose the template you created from the Template to Use drop-down menu.
The contents of the Creator and Copyright metadata fields are applied to all photos imported in that batch. To avoid entering your information at each import, open Bridge and choose Tools > Create Metadata Template. Enter the data you want to use in the appropriate fields (Figure 2.7) and click Save. The next time you import images, choose the template you created from the Template to Use drop-down menu.
![]() To save a step, open the Bridge preferences and, in the General panel, choose When a Camera Is Connected, Launch Adobe Photo Downloader.
To save a step, open the Bridge preferences and, in the General panel, choose When a Camera Is Connected, Launch Adobe Photo Downloader.
The Bridge Work Area
The most important thing to understand about Adobe Bridge CS4 is that it acts as a window to your image files. Unlike a photomanagement tool like iPhoto or Aperture, Bridge doesn’t organize your files on disk or maintain a catalog. You specify file locations when you import photos using the Photo Downloader utility, but Bridge can view media files anywhere you direct it to look.
The Bridge work area is divided into several components that include information about your photos (Figure 2.8):
![]() The Favorites and Folders panes are used to navigate your hard disk.
The Favorites and Folders panes are used to navigate your hard disk.
![]() The Content panel shows image thumbnails of the files located in whichever folder is selected in the Favorites or Folders panel.
The Content panel shows image thumbnails of the files located in whichever folder is selected in the Favorites or Folders panel.
![]() The Preview panel displays a larger version of a selected item, or thumbnails of just items you’ve selected.
The Preview panel displays a larger version of a selected item, or thumbnails of just items you’ve selected.
![]() The Filter panel limits what appears in the Content panel based on criteria such as ratings, file types, keywords, and other metadata (Figure 2.9).
The Filter panel limits what appears in the Content panel based on criteria such as ratings, file types, keywords, and other metadata (Figure 2.9).
![]() The Collections panel stores collections of photos you specify, including Smart Collections whose contents change based on search criteria.
The Collections panel stores collections of photos you specify, including Smart Collections whose contents change based on search criteria.
![]() The Metadata panel reveals technical information about each file.
The Metadata panel reveals technical information about each file.
![]() The Keywords panel lets you assign keyword tags to images to locate them easier.
The Keywords panel lets you assign keyword tags to images to locate them easier.
![]() Tip
Tip
![]() Normally the Content panel displays subfolders as folders that must be opened. If you choose View > Show Items from Subfolders, you see all images, no folders.
Normally the Content panel displays subfolders as folders that must be opened. If you choose View > Show Items from Subfolders, you see all images, no folders.
Figure 2.8 The Bridge workspace makes it easy to browse any photo on your computer.
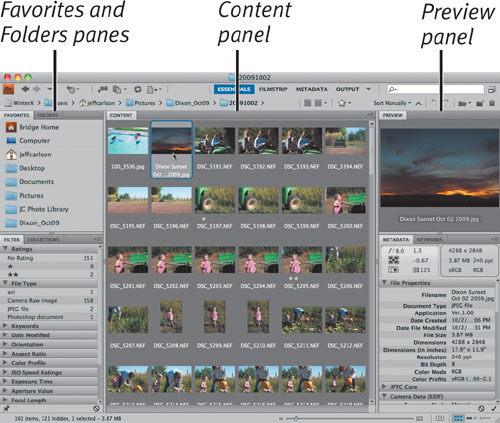
Figure 2.9 The Filter panel acts on data found in the Metadata panel to help you find the files you want.
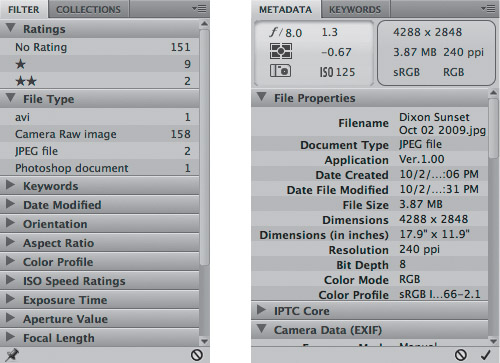
Figure 2.10 Two examples of other workspaces.
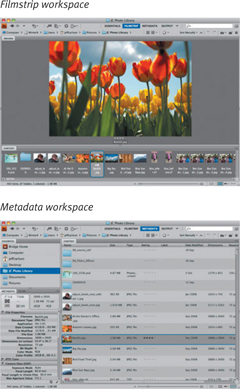
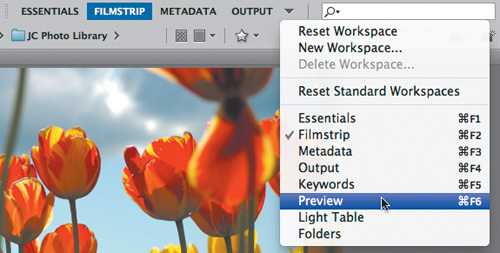
Figure 2.11 Choose a different workspace.
Switching between workspaces
You probably noticed the teeny Preview panel on the opposite page and thought, “How can I review my photos with that?” Bridge offers several layouts, called workspaces, that focus on different aspects of media files. The Filmstrip workspace, for example, displays a large preview of an image with the Content panel arranged in a narrow row along the bottom of the window (Figure 2.10).
To switch to another workspace:
![]() Click a workspace name in Bridge’s options bar at the top of the window.
Click a workspace name in Bridge’s options bar at the top of the window.
![]() Click the drop-down menu to the right of the workspace names and choose one of the other workspaces (Figure 2.11).
Click the drop-down menu to the right of the workspace names and choose one of the other workspaces (Figure 2.11).
To customize and save a workspace:
1. Drag the dividers between panes to resize them.
2. From the drop-down menu to the right of the workspace names, choose New Workspace.
3. Enter a name for the space; it appears as the first item in the workspace list.
![]() Tips
Tips
![]() Open the Bridge preferences (choose Adobe Bridge CS4 > Preferences) and, in the Thumbnails panel, choose to display up to four additional fields of metadata for each photo in the Content panel.
Open the Bridge preferences (choose Adobe Bridge CS4 > Preferences) and, in the Thumbnails panel, choose to display up to four additional fields of metadata for each photo in the Content panel.
![]() The strip of workspace names that appears at the top of the window can easily be changed. Drag the vertical bar to the left of the names to show or hide them. You can also click and drag the names to reorder them, or Control-click to bring up the shortcut menu and replace that workspace name with another.
The strip of workspace names that appears at the top of the window can easily be changed. Drag the vertical bar to the left of the names to show or hide them. You can also click and drag the names to reorder them, or Control-click to bring up the shortcut menu and replace that workspace name with another.
Browsing Photos
The centerpiece of Bridge is the Content panel, a flexible workspace that provides a number of options for customizing how you manage and view your image files. Throughout this chapter, I’ll cover a variety of ways to label, identify, and organize your photos. But first it’s important to know how best to select, sort, and display your image thumbnails within the main Content panel.
To navigate to a folder:
![]() If the folder you want is in the Favorites panel, click it to display its contents. The Favorites panel includes your Pictures folder, since that’s a preferred location for images.
If the folder you want is in the Favorites panel, click it to display its contents. The Favorites panel includes your Pictures folder, since that’s a preferred location for images.
![]() You can also click the Folders tab to display the Folders panel, which lets you navigate the hierarchy of your hard disk (Figure 2.12).
You can also click the Folders tab to display the Folders panel, which lets you navigate the hierarchy of your hard disk (Figure 2.12).
To add a folder to the Favorites panel:
1. Navigate to a directory that contains a folder you wish to access frequently.
2. Drag the folder to the Favorites panel, making sure to drop it between existing items, indicated by a solid blue line (Figure 2.13). Dragging onto a folder moves your content to that folder.
To select photo thumbnails:
![]() Click to select a thumbnail in the Content panel. A heavy blue line appears around it.
Click to select a thumbnail in the Content panel. A heavy blue line appears around it.
![]() Command-click to select several nonadjacent thumbnails at once (Figure 2.14).
Command-click to select several nonadjacent thumbnails at once (Figure 2.14).
![]() Shift-click to select a group of thumbnails in sequence.
Shift-click to select a group of thumbnails in sequence.
![]() From the Edit menu, choose Select All, or press Command-A to select every thumbnail in the Content panel.
From the Edit menu, choose Select All, or press Command-A to select every thumbnail in the Content panel.
Figure 2.12 View any directory on your computer using the Folders panel.
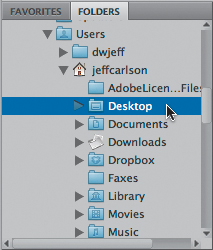
Figure 2.13 Drag a folder to the Favorites panel to access it easily whenever you’re in Bridge.

Figure 2.14 Command-click to select thumbnails that are not consecutive. The Preview panel shows which files are selected, which is helpful when not all items appear on the same screen’s worth of content.
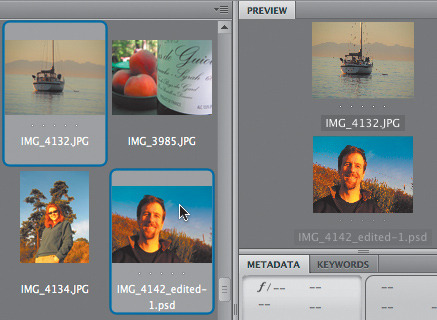
Figure 2.15 Select an option to sort thumbnails in the Content panel.
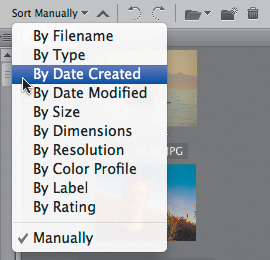
Figure 2.16 When you drag the thumbnail slider to the right, the thumbnails grow larger (top). When you drag the slider to the left, they become smaller (bottom).
To deselect photo thumbnails:
![]() Command-click to deselect a single thumbnail.
Command-click to deselect a single thumbnail.
![]() From the Edit menu, choose Deselect, or press Command-Shift-A to deselect every thumbnail in the Content panel.
From the Edit menu, choose Deselect, or press Command-Shift-A to deselect every thumbnail in the Content panel.
To sort photo thumbnails:
![]() From the Arrangement drop-down menu above the Content panel, choose a sorting option (Figure 2.15). The icon to the right of the menu indicates whether the items appear in ascending or descending order.
From the Arrangement drop-down menu above the Content panel, choose a sorting option (Figure 2.15). The icon to the right of the menu indicates whether the items appear in ascending or descending order.
![]() In the Content panel, drag an item to a new location. Doing so changes the sort method to Manually.
In the Content panel, drag an item to a new location. Doing so changes the sort method to Manually.
To resize photo thumbnails:
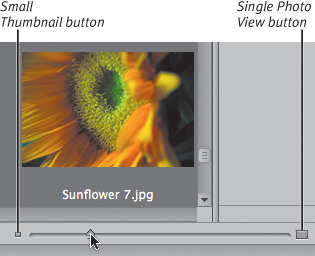
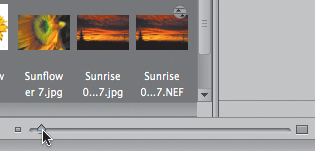
![]() Below the Content panel, drag the thumbnail slider to the right to increase the size of the thumbnails, or to the left to make them smaller (Figure 2.16).
Below the Content panel, drag the thumbnail slider to the right to increase the size of the thumbnails, or to the left to make them smaller (Figure 2.16).
![]() Click the Smaller thumbnail size button to the left of the slider to decrease the size of the thumbnails.
Click the Smaller thumbnail size button to the left of the slider to decrease the size of the thumbnails.
![]() Click the Larger thumbnail size button to the right of the slider to increase the thumbnail sizes.
Click the Larger thumbnail size button to the right of the slider to increase the thumbnail sizes.
![]() Tips
Tips
![]() Shift-click the thumbnail slider icons to jump to the smallest or largest settings.
Shift-click the thumbnail slider icons to jump to the smallest or largest settings.
![]() With a selection made in the Content panel, choose Edit > Invert Selection (or press Command-Shift-I) to select all other items and deselect the ones you first highlighted.
With a selection made in the Content panel, choose Edit > Invert Selection (or press Command-Shift-I) to select all other items and deselect the ones you first highlighted.
![]() To see where a file is located, check the Path Bar, which shows the file’s location hierarchy. This feature can be turned off by choosing Window > Path Bar.
To see where a file is located, check the Path Bar, which shows the file’s location hierarchy. This feature can be turned off by choosing Window > Path Bar.
1. In the Content panel, click an image thumbnail to select it.
2. Click once on the title to make it editable.
3. Type a new name for the file (Figure 2.17) and press Return.
To rename multiple photos:
1. Select the thumbnails of the files you want to rename.
2. Choose Tools > Batch Rename to bring up the Batch Rename dialog (Figure 2.18).
3. In the Destination Folder area, specify how the renamed files are handled: saved in the same folder, moved to another folder, or copied to another folder.
4. Using the drop-down menus and fields in the New Filenames area, set a new naming scheme. In addition to inserting text, you can include the file’s capture date, various metadata, and a sequence number. A preview of the result appears at the bottom of the dialog.
5. In the Options area, mark the Preserve current filename in XMP Metadata check box to keep a record of the original name.
6. Click the Rename button to process the files.
To add a description to a photo:
1. Click an image thumbnail to select it.
2. In the Metadata panel, click the IPTC Core heading to reveal the fields for that metadata category.
3. Click the pencil icon to the right of the Description field and enter your text (Figure 2.19).
4. Press Enter or click the Apply button (the check mark icon) to make the change.
Figure 2.17 Click to rename a file in the Content panel.
Figure 2.18 If you didn’t apply a naming scheme during import, you can rename files in a batch.
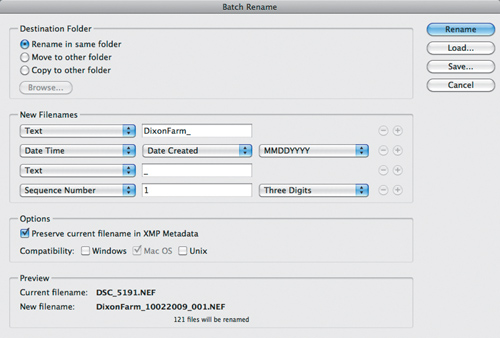
Figure 2.19 Add a description (or other information) in the Metadata panel.
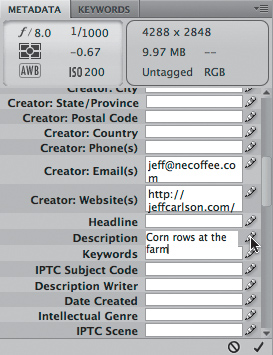
Figure 2.20 Apply a rating to quickly identify your higher-quality photos.

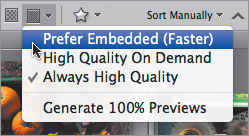
Displaying hundreds or thousands of photos requires a lot of horsepower. Depending on your Mac’s capabilities, you may find yourself waiting for images to load or for the Content panel to scroll. To speed things up, specify how much detail Bridge should display for thumbnails. Click the Thumbnail Quality and Preview Generation drop-down menu and choose Prefer Embedded (Faster), which uses low-resolution thumbnails. To use the embedded previews for a temporary speed boost, click the button to the left of the drop-down menu (Figure 2.21).
Figure 2.21 Speed up browsing by viewing lower-resolution previews.
Rating and Reviewing Photos
In addition to importing and looking at your photos, Bridge is designed to help you identify the good shots out of the entire group. By applying ratings to your images, you can display only the ones you like and build Smart Collections (described later) by filtering the ratings. You can rate photos in the Content panel, but you’ll probably want to do it in Bridge’s Review mode or Full Screen Preview so you get a better look at the images.
To rate a photo:
1. In the Content panel, position your mouse pointer over the gray dots below the thumbnail.
2. Click to select the rating you wish to apply (Figure 2.20).
or
1. Select a photo in the Content panel.
2. Choose a rating from the Label menu, or press Command and a number between 1 and 5. To mark a photo as Rejected, press the Delete key; the file isn’t deleted.
One star typically denotes a low-quality photo, while five stars is excellent. You can choose your own values, of course. This feature provides an easy way to separate good from bad photos, as you’ll see later in “Using Smart Collections.”
![]() Tip
Tip
![]() The Label menu also offers a separate subset of labels that you can apply. The default options are designed to help you track photos as they move through a project: Select, Second, Approved, Review. However, you can create your own labels in the Labels panel of the Bridge preferences window.
The Label menu also offers a separate subset of labels that you can apply. The default options are designed to help you track photos as they move through a project: Select, Second, Approved, Review. However, you can create your own labels in the Labels panel of the Bridge preferences window.
Review and Full Screen Preview
When you’re looking over a set of photos, you want to see the photos, not everything else around them. Bridge offers two interfaces that let you see just your images with a minimal set of controls for ranking and sorting. The Review mode is designed to rate and remove photos, resulting in a set that you can build into a new collection. For casual review, I prefer the Full Screen Preview mode because it lets me see my photos at their highest resolutions.
To use Review mode:
1. Choose a folder from the Favorites or Folders panels, or select one or more photos in the Content panel.
2. Choose View > Review Mode, or press Command-B. The Review mode interface appears (Figure 2.22).
3. Use the left and right arrow keys to switch between the images.
4. As you’re viewing the photos, use any of the following commands to rate or ignore images. (Press H in the Review mode to display a handy cheat sheet of commands.)
![]() Press a number key (with or without holding the Command key) to apply a rating or label (see the previous page).
Press a number key (with or without holding the Command key) to apply a rating or label (see the previous page).
![]() Click anywhere in the image to display a loupe for zooming in on that portion (Figure 2.23).
Click anywhere in the image to display a loupe for zooming in on that portion (Figure 2.23).
![]() Bridge treats the group of images as a potential collection (see “Using Collections to Group Photos,” later in this chapter). Press the down arrow key or click the down arrow icon in the lower-left corner of the screen to remove an image from the group.
Bridge treats the group of images as a potential collection (see “Using Collections to Group Photos,” later in this chapter). Press the down arrow key or click the down arrow icon in the lower-left corner of the screen to remove an image from the group.
Figure 2.22 The Review mode offers few controls and larger previews of your images.
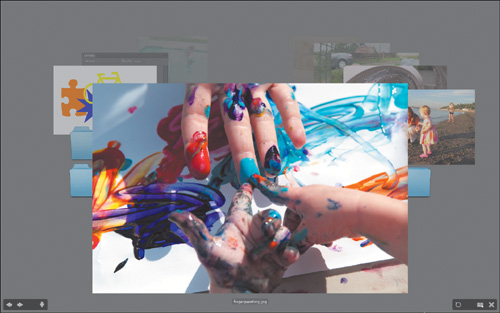
Figure 2.23 The loupe zooms in on an area to reveal more image detail.
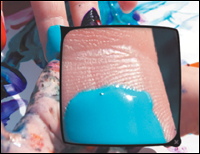
Figure 2.24 The Review mode controls.
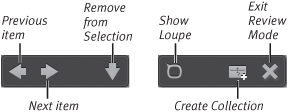
![]() Click the New Collection button to create a collection containing the remaining photos (Figure 2.24).
Click the New Collection button to create a collection containing the remaining photos (Figure 2.24).
5. Press Esc to exit the Review mode.
To preview photos full screen:
1. Select one or more images.
2. Press the spacebar to enter full-screen preview mode.
3. Use the arrow keys to switch between the images. You can also press Command and a number key to apply a rating or label.
4. Press Esc to exit full-screen mode.
![]() Tips
Tips
![]() Press the [(left bracket) key to rotate an image 90 degrees counter-clockwise; press the ] (right bracket) to rotate it 90 degrees clockwise. Press R to open the image in Adobe Camera Raw, or Option-R to open all images in Camera Raw. And press O to open the frontmost image in Photoshop Elements; Option-O opens all images in the collection in Elements.
Press the [(left bracket) key to rotate an image 90 degrees counter-clockwise; press the ] (right bracket) to rotate it 90 degrees clockwise. Press R to open the image in Adobe Camera Raw, or Option-R to open all images in Camera Raw. And press O to open the frontmost image in Photoshop Elements; Option-O opens all images in the collection in Elements.
![]() Clicking an image in the Preview pane also brings up the loupe. In fact, with multiple files selected, you can view loupes for each one. Command-click or Command-drag one loupe to move all of them with the same relative positions.
Clicking an image in the Preview pane also brings up the loupe. In fact, with multiple files selected, you can view loupes for each one. Command-click or Command-drag one loupe to move all of them with the same relative positions.
![]() Opening two, three, four, or five images in Review mode displays them side-by-side instead of stacked.
Opening two, three, four, or five images in Review mode displays them side-by-side instead of stacked.
Using Stacks to Organize Similar Photos
You’ve spent a day on the valley floor of Yosemite shooting picture after picture, and when you return home in the evening and download all those photos, you realize you have about a dozen shots of the same waterfall: some lit a little differently than others; some with different zoom settings; but all very similar just the same.
Stacks serve as a convenient way to group together those related photos. When you’re ready to take a careful look at all of those waterfalls and weed out the greats from the not-so-greats, you simply expand the stack to view all of the stacked photos at once.
To create a stack:
1. In the Content panel, Command-click or Shift-click to select the photos you want to include in a stack (Figure 2.25).
2. Choose Stacks > Group as Stack, or press Command-G. You can also right-click inside any of the selected photo thumbnails and choose Stack > Group as Stack from the shortcut menu.
The photos are stacked together, indicated by a numbered icon in the upperleft corner of the top photo in the stack (Figure 2.26).
To view all photos in a stack:
![]() In the Content panel, click the numbered icon on the stack. Or, right-click on a stack thumbnail, and choose Stack > Expand Photos in Stack; or press Command-right arrow. The photos in the stack appear (Figure 2.27).
In the Content panel, click the numbered icon on the stack. Or, right-click on a stack thumbnail, and choose Stack > Expand Photos in Stack; or press Command-right arrow. The photos in the stack appear (Figure 2.27).
Figure 2.25 Select similar photos to organize them into a stack.
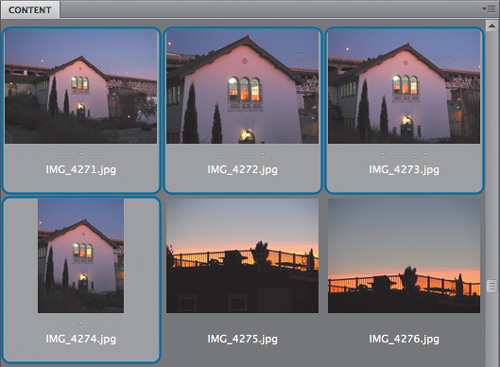
Figure 2.26 When stacked, the photos occupy just one thumbnail, and are indicated by the Stack icon.
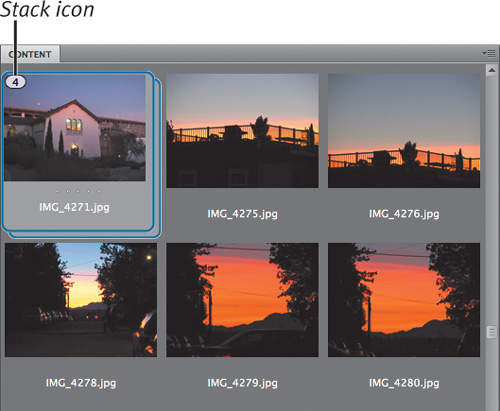
Figure 2.27 An expanded stack reveals the photos that have been grouped together.
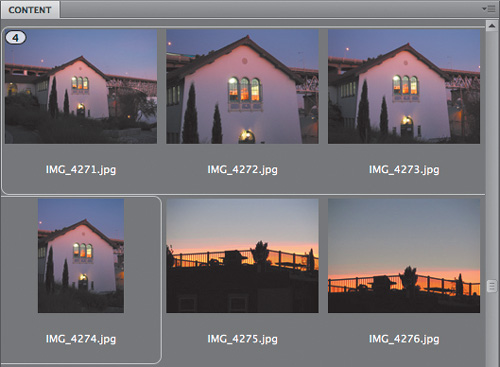
Figure 2.28 The Onion Skin feature displays all images within a stack as the stack’s thumbnail.
To unstack photos in a stack:
![]() Select a stack and choose Stacks > Ungroup from Stack or press Command-Shift-G. You can also right-click on a stack thumbnail and choose Stack > Ungroup from Stack from the shortcut menu.
Select a stack and choose Stacks > Ungroup from Stack or press Command-Shift-G. You can also right-click on a stack thumbnail and choose Stack > Ungroup from Stack from the shortcut menu.
The stacked photos return to their original locations in the Content panel window.
![]() You can also remove just one or more photos from a stack without removing the entire stack. With the stack expanded, select the photos you want to remove and then choose Stacks > Ungroup from Stack.
You can also remove just one or more photos from a stack without removing the entire stack. With the stack expanded, select the photos you want to remove and then choose Stacks > Ungroup from Stack.
To change the top photo in a stack:
![]() While you’re viewing the expanded stack, you can designate a new photo to be the top photo (the photo that appears at the top of the stack in the Content panel). Select the photo and choose Stacks > Promote to Top of Stack.
While you’re viewing the expanded stack, you can designate a new photo to be the top photo (the photo that appears at the top of the stack in the Content panel). Select the photo and choose Stacks > Promote to Top of Stack.
![]() Tips
Tips
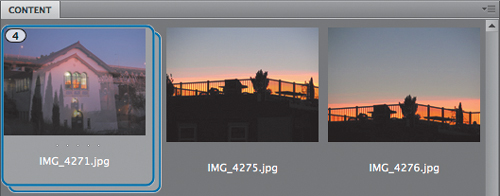
![]() Here’s a feature you won’t find in the Stacks menu: Select a closed stack and right-click it to bring up the shortcut menu. Choose Stack > Enable Onion Skin. The images within the stack appear partially transparent so you can get a sense of how they differ just by looking at the stack’s thumbnail icon (Figure 2.28).
Here’s a feature you won’t find in the Stacks menu: Select a closed stack and right-click it to bring up the shortcut menu. Choose Stack > Enable Onion Skin. The images within the stack appear partially transparent so you can get a sense of how they differ just by looking at the stack’s thumbnail icon (Figure 2.28).
![]() From the Stacks menu, choose Expand All Stacks (or press Command-Optionright arrow) or Collapse All Stacks (or Command-Option-left arrow) to affect the visibility of all stacks in the Content panel.
From the Stacks menu, choose Expand All Stacks (or press Command-Optionright arrow) or Collapse All Stacks (or Command-Option-left arrow) to affect the visibility of all stacks in the Content panel.
Creating Keywords
The humble little keyword serves as an important component of Bridge’s sorting and filing system. Keywords are added to image files to help identify them later, for Bridge and other applications, as well as for online services such as Flickr. Create keywords that are descriptive, but not so specific that they apply only to a few photos.
Bridge lets you create keywords and sub keywords; the latter help you organize your keywords into hierarchies so you don’t end up with a giant clump of words.
To create a new keyword:
1. At the bottom of the Keywords panel, click the New Keyword button (the plus sign). An empty keyword appears in the list (Figure 2.29).
2. Type a name for your keyword into the field and press Return.
To create a new sub keyword:
1. Click the name of an existing keyword to select it.
2. At the bottom of the Keywords panel, click the New Sub Keyword button. An empty keyword appears below your selection (which is now a parent keyword) in the list (Figure 2.30).
To import keywords from other images:
1. Select one or more photos that already have keywords, such as those sent to you by someone else or processed in other software.
The keywords from those files appear in italics in the Keywords panel to indicate that they’re temporary.
2. Control-click or right-click a temporary keyword and choose Make Persistent from the shortcut menu (Figure 2.31). The keyword becomes part of your permanent keyword list.
Figure 2.29 Click the New Keyword button to create a blank keyword.
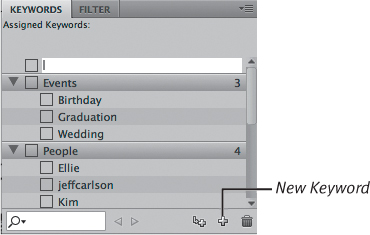
Figure 2.30 Click the New Sub Keyword button to create a nested keyword.
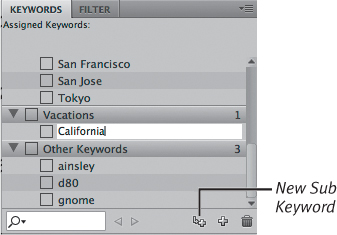
Figure 2.31 Make a temporary keyword persistent to use it for future images.
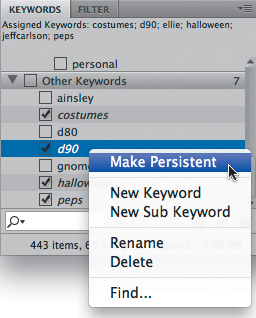
Figure 2.32 Confirm that you want to delete a keyword from the Keywords panel.
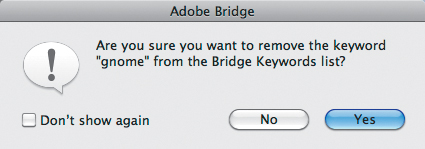
To remove a keyword from the panel:
![]() In the Keywords panel, select the tag you want to delete and click the Delete button (the trash can icon).
In the Keywords panel, select the tag you want to delete and click the Delete button (the trash can icon).
or
1. In the Keywords panel, right-click on the keyword you would like to delete.
2. From the shortcut menu, choose Delete.
3. In the dialog that appears, click Yes if you’re certain you want to delete the keyword (Figure 2.32).
The keyword is removed from the Keywords panel and any files that are selected in the Content panel. However, other files tagged with that keyword retain it—the term becomes temporary.
To re-order a keyword:
![]() Drag a keyword elsewhere in the hierarchy. Dropping it onto another keyword changes it to a sub keyword. Going the other direction, you can turn a sub keyword into a keyword by dragging it to the bottom of the list.
Drag a keyword elsewhere in the hierarchy. Dropping it onto another keyword changes it to a sub keyword. Going the other direction, you can turn a sub keyword into a keyword by dragging it to the bottom of the list.
![]() Tips
Tips
![]() A slightly faster method of creating keywords is to first select a parent in the list, type your new term in the search box at the bottom of the Keywords panel, and then press Return
A slightly faster method of creating keywords is to first select a parent in the list, type your new term in the search box at the bottom of the Keywords panel, and then press Return
![]() You can make sub-sub-sub keywords if you want, which is helpful when grouping related items. This approach lets you apply many keywords at once by Shiftclicking sub keywords, instead of laboriously clicking each word (see the next page for details).
You can make sub-sub-sub keywords if you want, which is helpful when grouping related items. This approach lets you apply many keywords at once by Shiftclicking sub keywords, instead of laboriously clicking each word (see the next page for details).
Applying Keywords
Keywords operate independently from where photos are located on your computer, which means you can attach a keyword to photos in different folders—even on different hard drives—and then use that tag to quickly find and view those photos all at once. And since you can attach more than one tag to a photo, tags serve as great cross-referencing tools. For instance, if your daughter plays softball for the college she attends, a photo of her pitching on her home field might include tags called “Emily”, “Softball”, and “UCSD”.
To attach a keyword to photos:
1. Select one or more photos to which you want to apply a keyword.
2. In the Keywords panel, click the check box for each keyword you want to apply (Figure 2.33).
To select all higher-level (parent) keywords in a nested list, Shift-click a sub keyword.
To quickly locate keywords:
1. After you’ve created dozens or hundreds of keywords over time, you won’t want to scroll through the Keywords panel trying to find the ones you want. Instead, start typing in the Search field within the panel.
2. Click the magnifying glass icon to change the scope of the search (Figure 2.34): the term Contains the letters, Equals the letters as an exact match, or Starts With the letters. Possible matches appear yellow, with the first match highlighted in green. Click the arrow buttons to the right of the field to jump between matches.
Figure 2.33 Clicking a keyword check box applies the term to a photo.
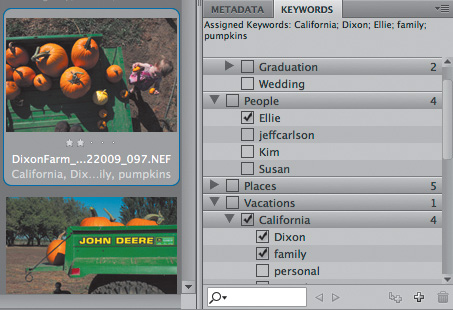
Figure 2.34 Use the Keywords panel’s Search field to quickly find keywords.
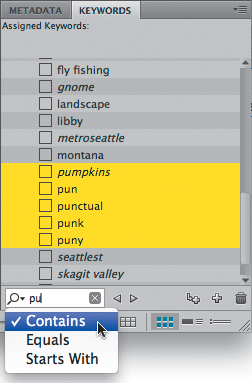
Figure 2.35 Export your keywords to import into another program or re-import to Bridge later.
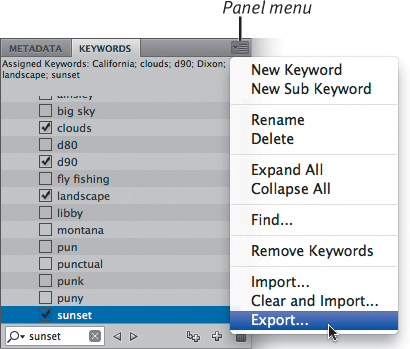
Figure 2.36 Option-click a keyword marked with a dash to remove it from selected items immediately.
To remove a keyword from a photo:
1. Select one or more photos that contain the keyword you want to remove.
2. Click the check box for the keyword you want to remove.
To export keywords:
![]() In the Keywords panel, click the panel menu and choose Export (Figure 2.35). This command creates a tab-delimited text file containing the keywords and their hierarchy, which you can use to import into other software or to re-import into Bridge later.
In the Keywords panel, click the panel menu and choose Export (Figure 2.35). This command creates a tab-delimited text file containing the keywords and their hierarchy, which you can use to import into other software or to re-import into Bridge later.
To import keywords:
![]() In the Keywords panel, click the panel menu and choose Import Keywords to add the contents of a tab-delimited file to your list of keywords.
In the Keywords panel, click the panel menu and choose Import Keywords to add the contents of a tab-delimited file to your list of keywords.
![]() Another option is to choose Clear and Import from the panel menu, which removes your existing keywords and replaces them with the contents of the imported file.
Another option is to choose Clear and Import from the panel menu, which removes your existing keywords and replaces them with the contents of the imported file.
![]() Tips
Tips
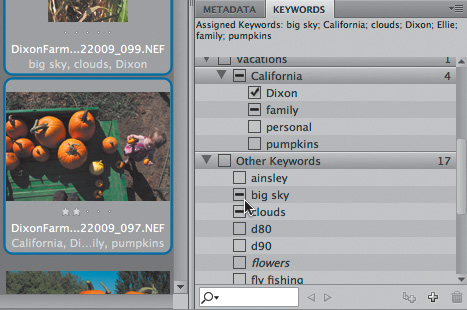
![]() If you have several items with different tags selected in the Content panel, a keyword may appear with dashes instead of checkmarks to indicate that it’s applied only to some (Figure 2.36). Option-click the checkbox to immediately remove the keyword from all selected files.
If you have several items with different tags selected in the Content panel, a keyword may appear with dashes instead of checkmarks to indicate that it’s applied only to some (Figure 2.36). Option-click the checkbox to immediately remove the keyword from all selected files.
![]() Select one or more photos and choose Remove Keywords from the Keyword panel’s menu to clear all of their keywords.
Select one or more photos and choose Remove Keywords from the Keyword panel’s menu to clear all of their keywords.
Using Collections to Group Photos
Photos have gone digital, but we don’t have to discard our analog thinking. Just as you store your Polaroids and prints in a photo collection, you can collect your digital photos in albums, which Bridge calls collections.
A collection can be composed of photos from several different sources, so you don’t need to move files on disk when working on a project that uses assets from several locations.
To create a new collection:
1. Click the New Collection button at the bottom of the Collections panel. An empty collection appears (Figure 2.37).
2. Enter a name for the collection and press Return.
3. Select a folder in the Favorites or Folders panel to view photos and then drag the photos you want to the collection (Figure 2.38).
To view a photo collection:
![]() Click a collection name in the Collections panel. The Content panel displays only the photos in that collection.
Click a collection name in the Collections panel. The Content panel displays only the photos in that collection.
To rename a collection:
1. In the Collections panel, select a collection and click its title once to make it editable.
2. Type a new name and press Return.
![]() Tip
Tip
![]() To save a step when creating a collection, first select the photos you want to include before clicking the New Collection button. The collection is created with the items already in place.
To save a step when creating a collection, first select the photos you want to include before clicking the New Collection button. The collection is created with the items already in place.
Figure 2.37 Click the New Collection button to create an empty collection.
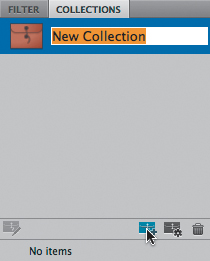
Figure 2.38 Drag items to a collection to populate it.
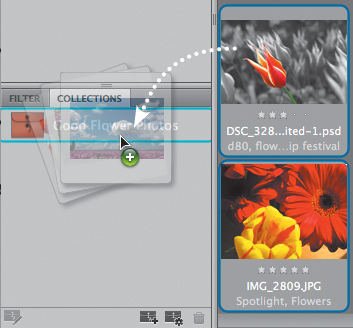
Figure 2.39 Add a collection to the Favorites panel for quick access.
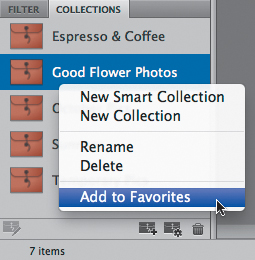
Figure 2.40 You can’t just delete an image from a collection—Bridge thinks you’re rejecting or deleting the file. Instead, click the Remove From Collection button.
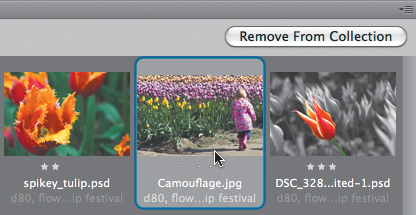
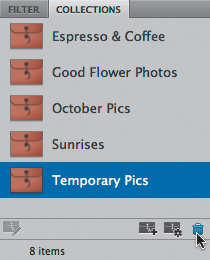
Figure 2.41 Click the Delete Collection button to remove a collection.
To add a collection to the Favorites panel:
![]() Right-click a collection in the Collections panel and choose Add to Favorites (Figure 2.39).
Right-click a collection in the Collections panel and choose Add to Favorites (Figure 2.39).
To remove photos from a collection:
1. With a collection displayed in the Content panel, select one or more items.
2. Do one of the following:
![]() Click the Remove From Collection button at the top of the Content panel (Figure 2.40).
Click the Remove From Collection button at the top of the Content panel (Figure 2.40).
![]() Right-click one of the selected items and choose Remove From Collection from the contextual menu.
Right-click one of the selected items and choose Remove From Collection from the contextual menu.
To delete a collection:
1. Do one of the following:
![]() In the Collections panel, select a collection and click the Delete Collection button (Figure 2.41).
In the Collections panel, select a collection and click the Delete Collection button (Figure 2.41).
![]() Right-click the collection you would like to delete and choose Delete.
Right-click the collection you would like to delete and choose Delete.
2. In the dialog box that appears, asking if you really want to proceed, click Yes. The collection is removed from the Collections panel (but all of the images are still intact in the Content panel).
Using Smart Collections
What if you had an assistant who could organize your photos for you? Not just once, but ongoing, changing the albums’ contents based on new photos or keywords or other criteria? Smart collections operate just like that (and they don’t mind the workload).
To create a smart collection:
1. Click the New Smart Collection button at the bottom of the Collections panel. The Smart Collection dialog appears (Figure 2.42).
2. In the Source area, choose a directory in which to look for photos.
3. In the Criteria area, choose an attribute from the first drop-down menu. The other drop-down menu and field change depending on the criteria.
4. To add more criteria, click the plus button (Figure 2.43) and specify the attributes.
5. By default, the collection picks up photos containing any of the criteria you specify. To view only photos that match every attribute, click the Match drop-down menu and choose If all criteria are met (Figure 2.44).
6. Click Save. Only the images matching the criteria are displayed (Figure 2.45).
7. Give the new Smart Collection a name in the Collections panel.
To modify a smart collection:
1. Select a smart collection in the Collections panel to view its contents.
2. Click the Edit Smart Collection button at the bottom of the Collections panel.
3. In the Smart Collection dialog that appears, edit the search criteria and then click Save.
Figure 2.42 Clicking the New Smart Collection button brings up the Smart Collection dialog.
![]()
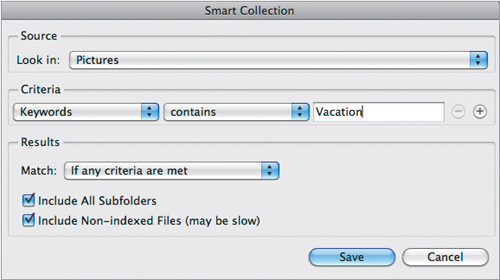
Figure 2.43 Click here to add additional criteria.
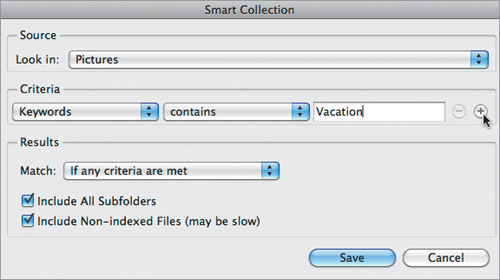
Figure 2.44 This smart collection will display only photos marked with the Vacation keyword and having a rating of 3, 4, or 5 stars.
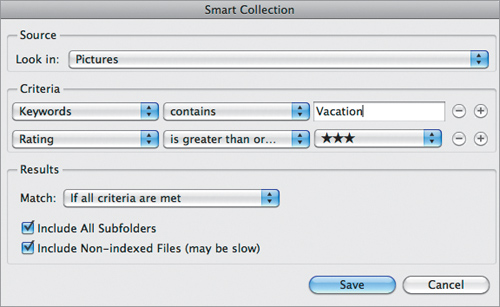
Figure 2.45 After the smart collection is created, the pictures that match its criteria are displayed.
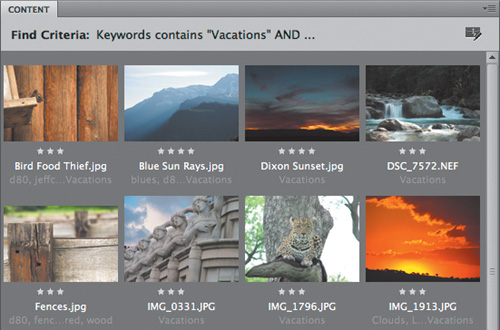
Figure 2.46 Type a word in the Quick Search field to view photos that include that term.
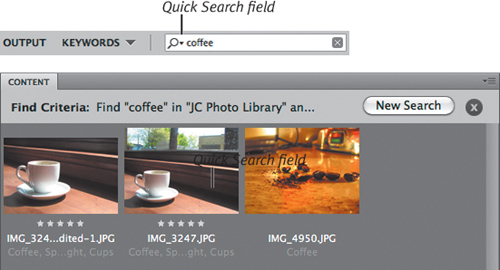
Figure 2.47 Turn a search result into a Smart Collection for finding similar items later.
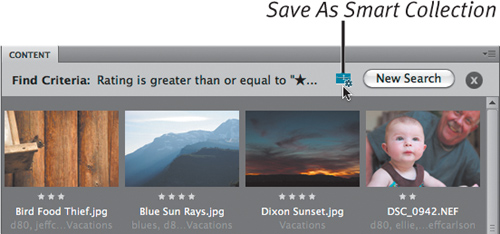
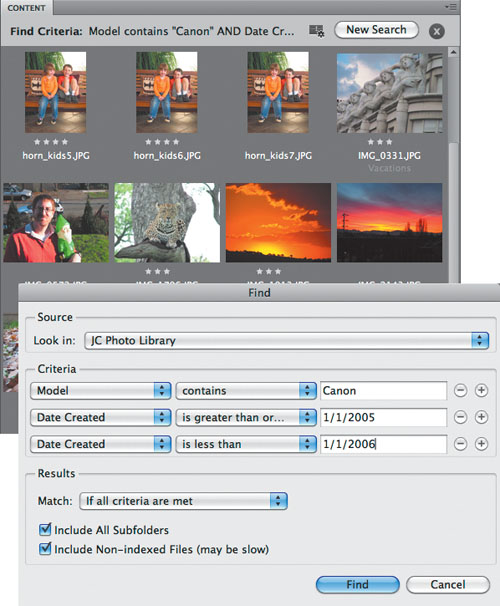
Figure 2.48 Here I’ve used three criteria to define a more specific search (photos shot with a Canon camera sometime in 2005).
Finding Photos
In addition to locating photos using the Keyword Tags and Collections panes, Bridge offers a host of other options for searching, finding, and viewing photos in your catalog. I’ll touch on just a couple of the more popular methods here for locating photos by their embedded date information. For example, the new text search capability takes advantage of the keyword tags you applied earlier (and that’s just the start).
To find photos using a text search:
![]() Type a term into the Quick Search field in the options bar. After searching the photos’ metadata, Bridge displays matches (Figure 2.46).
Type a term into the Quick Search field in the options bar. After searching the photos’ metadata, Bridge displays matches (Figure 2.46).
![]() Click the magnifying glass icon in the Quick Search field to choose the type of search to perform: a Bridge search of the current folder; a Spotlight search of the current folder; or a Spotlight search of the entire computer. This drop-down menu also includes recent searches.
Click the magnifying glass icon in the Quick Search field to choose the type of search to perform: a Bridge search of the current folder; a Spotlight search of the current folder; or a Spotlight search of the entire computer. This drop-down menu also includes recent searches.
To find photo based on other criteria:
1. Choose File > Find (or press Command-F) to bring up the Find dialog.
2. Use the text boxes and drop-down menus to enter your search criteria, as described on the opposite page.
![]() Tips
Tips
![]() Since the Find dialog uses the same controls as creating a Smart Collection, this won’t come as a surprise: When viewing the search results, click the Save As Smart Collection button to save the criteria as a collection (Figure 2.47).
Since the Find dialog uses the same controls as creating a Smart Collection, this won’t come as a surprise: When viewing the search results, click the Save As Smart Collection button to save the criteria as a collection (Figure 2.47).
![]() Bridge can find files using many types of criteria, including metadata like camera model (Figure 2.48).
Bridge can find files using many types of criteria, including metadata like camera model (Figure 2.48).
Using iPhoto to Organize Photos
Adobe includes Bridge CS4 with Photoshop Elements, but you may prefer a photomanagement application already on your computer: Apple’s iPhoto. In fact, I’d hazard a guess that you may have moved up to Photoshop Elements after having used iPhoto and felt limited by its editing features. You can keep your existing iPhoto library and make it work with Elements, while still using iPhoto features such as facial recognition and mapping photo locations. This involves setting iPhoto to use Photoshop Elements as its image editor.
iPhoto vs. Bridge
The main difference between the approach taken by Bridge and iPhoto is that iPhoto handles all of the file organization. When you import photos into iPhoto, it stores them in a central database that’s not normally accessible in the Finder. So, in order to use Elements as the image editor of choice, you need to specify it within iPhoto instead of opening the files directly.
To set Photoshop Elements as iPhoto’s default editor:
1. Open iPhoto’s settings window by choosing Preferences from the iPhoto menu.
2. In the General pane, click the Edit photo drop-down menu and choose In application (Figure 2.49).
3. In the dialog that appears, locate the Photoshop Elements application in your Applications folder and click Open.
4. Close the iPhoto preferences window.
Figure 2.49 Specify a different editing application in iPhoto’s preferences.
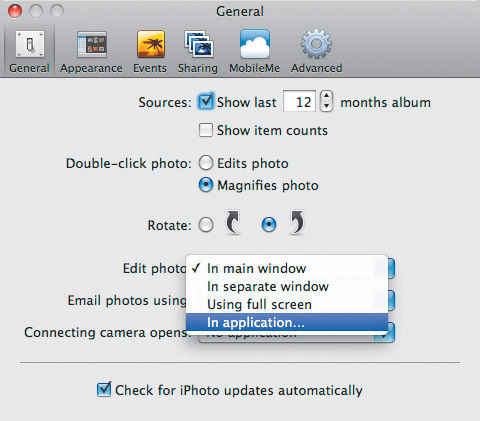
Figure 2.50 When you click the Edit button in iPhoto, the selected photos open in Photoshop Elements.
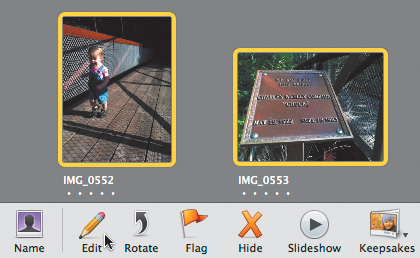
Figure 2.51 Specify the JPEG quality when saving the image in Elements. The new version appears in iPhoto.
To edit a photo in Photoshop Elements:
1. Select one or more photos in iPhoto. (If the images are saved as Raw files, see below.)
2. Click the Edit button (Figure 2.50). Elements launches if it wasn’t already running and opens the files.
3. Apply your edits in Photoshop Elements.
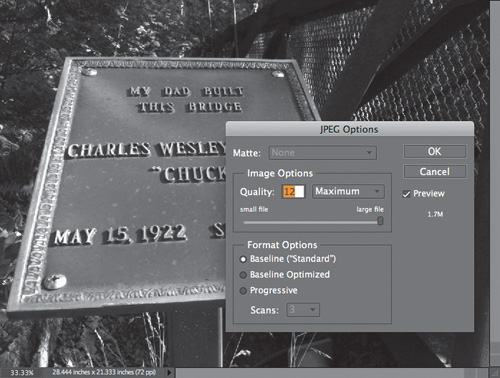
4. When you’re finished editing, choose File > Save to save the changes.
If you’ve applied a basic edit to a JPEG image, choose a compression setting from the JPEG Options dialog and click OK (Figure 2.51). The version in iPhoto is replaced (but see the tip below).
Dealing with Raw files
The edited version of a Raw image is saved as a separate file (because Elements doesn’t change the Raw version), so iPhoto isn’t aware of its existence. You need to import it into iPhoto as a separate photo. That’s fine for working with a few images, but inelegant for processing a large batch.
To process a Raw file:
1. In iPhoto, select the file you want to open and click the Edit button. The image opens in the Camera Raw dialog (see Chapter 7).
2. Apply any Camera Raw settings and save the file.
3. To bring the edited version into iPhoto, either import that file (choose File > Import to Library), or export a JPEG version and bring that into iPhoto.
![]() Tip
Tip
![]() iPhoto keeps the original source image, even if it’s not visible: choose Photos > Revert to Original.
iPhoto keeps the original source image, even if it’s not visible: choose Photos > Revert to Original.