5. Making Selections
Photoshop Elements offers many sophisticated options for enhancing and retouching your image. Those options include colors, filters, resizing tools, vignettes, and all sorts of special effects. But before you can start tinkering, you need to learn how to make selections. Once you select a specific area of an image, you can change its color, copy and paste it into another image, or change its size and rotation.
You can also use selections to create a protective mask for specific portions of an image. It’s easy to select one area of an image, apply a change to the rest, and keep the selected area untouched.
In this chapter, you learn about all of Photoshop Elements’ selection tools and when to choose one tool over another. You also learn how to use these tools in tandem to make the quickest and most accurate selections, depending on your specific needs.
About the Selection Tools
Often, you’ll want to make changes and adjustments to just a portion of an image. For example, you may want to eliminate a distracting element in your photo, change the color of a specific item, or adjust the brightness of the background. Photoshop Elements gives you a wide variety of selection tools from which to choose.
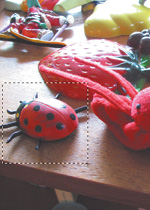
The selection tools are all grouped near one another at the top of the toolbar (Figure 5.1). You make rectangular and elliptical selections using the marquee tools. When you select one of the marquee tools, the selection area is indicated by a row of moving dots, like the sign outside an old-style movie theater—hence the name (Figure 5.2).
You select free-form, or irregularly shaped, areas using the lasso tools (Figure 5.3). These include the regular Lasso tool; the Polygonal Lasso, which is great for selecting areas that include straight sections; and the Magnetic Lasso, which can select the edge of an area based on its color or tonal values.
Figure 5.1 Access additional tools by clicking and holding on a menu item or right-clicking the selection tools in the toolbar.
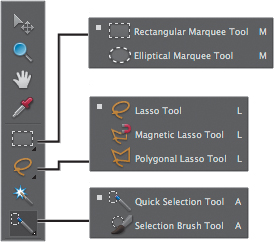
Figure 5.2 A selection border is represented by a row of moving dots, called a marquee.
Figure 5.3 Each of the three lasso tools works best in a particular situation.

Figure 5.4 The Magic Wand lets you select areas based on color.

Figure 5.5 The Magic Wand also lets you set the tolerance, or range of colors selected.
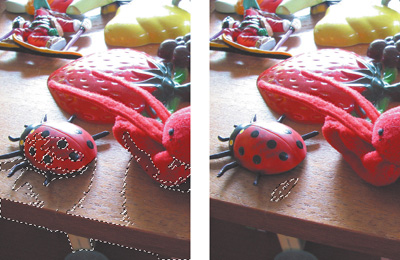
Figure 5.6 Here, the black background was selected with the Magic Wand, and then the selection was inverted to capture the buttons.
The Magic Wand lets you select areas with the same (or similar) color or tonal value. This tool is probably the most difficult to master, but with a little practice it allows you to make selections that would be difficult to make with any of the marquee or lasso tools (Figure 5.4). For example, if your photo displays a field of yellow poppies, you can select all of them at once, rather than having to select each flower individually.
The selection tools work well on their own, but often the area you want to edit includes all sorts of angles and edges. In these situations, you can use the tools in combination to expand and change the selection area.
You can also expand or contract a selection area using the same tool with different settings. For example, the Magic Wand allows you to alter the range of your selection by adjusting the tolerance using the options bar before making a selection (Figure 5.5).
When a photo includes an object surrounded by a large background area, it’s often easier to select the background and then invert the selection to select the object. Once the selection is made, you can copy and paste it into another composition or make any other changes (Figure 5.6).
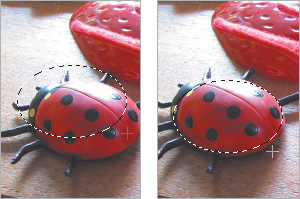
With a selection area made, you can add to or subtract from the selection. Using one tool to make your initial selection and then editing the selection area using another selection tool is often easier than trying to make a perfect selection with a single tool all at once (Figure 5.7).
The Selection Brush allows you to make selections simply by dragging across any area or object in an image. Like the lasso tools, it works especially well for selecting irregular areas. Unlike the other selection tools, you actually “paint on” the selection using any of the brush shapes available in Elements’ vast collection of brush sets (Figure 5.8). This method of selection affords you great control and flexibility, although you need quite a bit of dexterity.
The Quick Selection tool works in much the same way as the Magic Wand tool—selecting areas based on similar color and tonal values. What distinguishes the Quick Selection tool from the other selection tools is the method you use to make the selections. By painting a series of scribbles and dots on the image, Photoshop Elements creates a selection area based on the color or tonal values below the painted marks (Figure 5.9). Selections are additive: As you paint, the selection grows larger; use other selection tools to shrink the area.
Figure 5.7 Here, the Elliptical Marquee tool was used to select the ladybug’s main body, and then the Magic Wand tool was used to add the legs and head.
Figure 5.8 The Selection Brush can be used in either Selection or Mask mode, selectable from the Mode menu in the options bar.
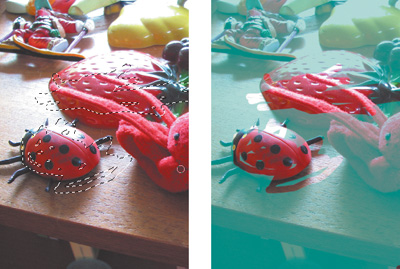
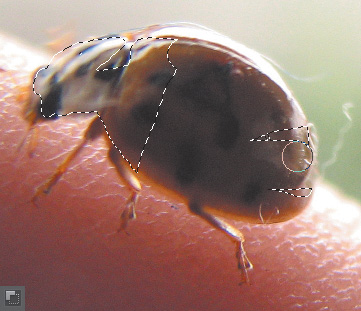
Figure 5.9 When you “paint” through an area with the Quick Selection tool (a small area painted at left, and a larger area at right), any pixels similar in color or tonal value to those you brush over will be selected.
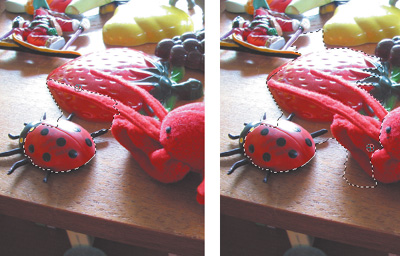
Figure 5.10 Simple geometric selections can be made with the Rectangular or Elliptical Marquee Tool.
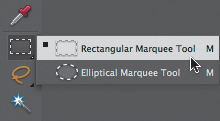
Figure 5.11 The default setting on the options bar creates a new selection.
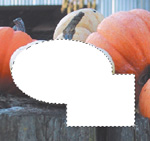
![]()
Figure 5.12 After selecting one of the marquee tools, just click and drag to make a selection.
Using the Marquee Tools
The Rectangular and Elliptical Marquee tools are the easiest and most straightforward selection tools to use. With these tools, you can select rectangular or oval (elliptical) areas. You can also select a perfectly square or circular area. You’ll often want to move a selection area (or marquee) to align the area perfectly, and Photoshop Elements offers a couple of quick and simple ways to make these kinds of adjustments.
To make a rectangular or elliptical selection:
1. From the toolbar, choose either the Rectangular Marquee tool (or press the M key) or Elliptical Marquee tool (M again) (Figure 5.10).
The default setting on the options bar creates a new selection (Figure 5.11). See “Adjusting Selections” later in this chapter for more information on other options when creating selections.
2. Click and drag to choose the selection area (Figure 5.12).
![]() You can create a perfect circle or square selection using the marquee tools by holding down the Shift key as you drag (Figure 5.13).
You can create a perfect circle or square selection using the marquee tools by holding down the Shift key as you drag (Figure 5.13).
![]() You can draw the marquee from the center outward by holding down the Option key (Figure 5.14).
You can draw the marquee from the center outward by holding down the Option key (Figure 5.14).
![]() To toggle between marquee tools, press the M key. In fact, this works for any tool with hidden tools—simply press the keyboard shortcut key repeatedly to toggle through all of the choices.
To toggle between marquee tools, press the M key. In fact, this works for any tool with hidden tools—simply press the keyboard shortcut key repeatedly to toggle through all of the choices.
![]() To select all pixels on a layer, press Command-A. This creates a selection around your entire image window, and is useful when you want to make universal color corrections or add special effects to your image.
To select all pixels on a layer, press Command-A. This creates a selection around your entire image window, and is useful when you want to make universal color corrections or add special effects to your image.
Figure 5.13 To select a perfect square or circle, hold down the Shift key while dragging.
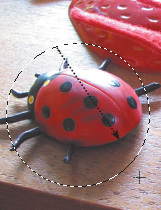
Figure 5.14 To draw a selection from the center outward, hold down the Option key.
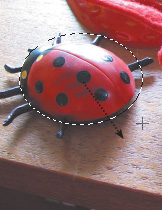
Figure 5.15 To move the selection area, position the pointer within the selection boundary.
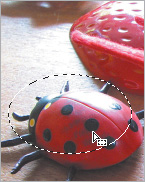
Figure 5.16 Drag the selection border to a new location.
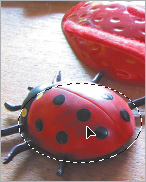
Figure 5.17 To move the marquee during a selection, just press the spacebar while holding down the mouse button and adjust the border’s location.
To reposition a selection border:
1. Once you’ve made a selection, with the New selection icon active, position the pointer anywhere inside the selection area. The pointer becomes an arrow with a small selection icon next to it (Figure 5.15). Note that if the Add to, Subtract from, or Intersect with icons are active, the pointer indicates that choice and the selection can’t be moved.
2. Click and drag to reposition the selection area.
The pointer arrow changes to solid black as you move the selection (Figure 5.16).
To reposition a selection border while making a selection:
1. Click and drag to create the selection area.
2. While keeping the mouse button pressed, press the spacebar. (The pointer arrow shows a set of crosshairs whether or not the spacebar is pressed.)
3. Move the selection area to the desired location and release the spacebar and mouse button (Figure 5.17).
![]() Tip
Tip
![]() You can use the arrow keys on your keyboard to move a selection in 1-pixel increments. Holding the Shift key at the same time moves the selection in 10-pixel increments.
You can use the arrow keys on your keyboard to move a selection in 1-pixel increments. Holding the Shift key at the same time moves the selection in 10-pixel increments.
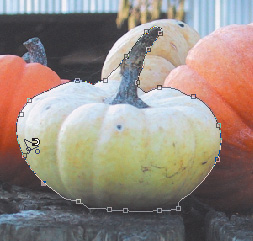
Selecting Areas Using the Lasso Tools
Use the lasso tools to select areas with irregular shapes. The standard Lasso tool lets you draw or trace around an object or area freehand, much as you would draw with a pencil. This method takes patience, but with practice you can use the Lasso tool to make accurate selections.
The Polygonal Lasso tool is useful for selecting areas that include straight edges; you can toggle between the freehand and straight-edge mode when your object includes both irregular and straight edges.
With the Magnetic Lasso tool, you trace around an area, and the tool automatically “snaps” the selection border to the edge of an area based on differences in color and tonal values in adjoining pixels. For this reason, the tool usually works best on high-contrast images. Experiment with the settings on the options bar to get the best results.
To select with the Lasso tool:
1. From the toolbar, choose the Lasso tool (or press L).
2. Keeping the mouse button pressed, drag all the way around an object or area in your image (Figure 5.18).
When you release the mouse button, the open ends of the selection automatically join together (Figure 5.19).
![]() Tips
Tips
![]() To keep a selection active without keeping the mouse button pressed, hold down the Option key before releasing the button.
To keep a selection active without keeping the mouse button pressed, hold down the Option key before releasing the button.
![]() Use the Option key to switch between the Polygonal Lasso and regular Lasso tools.
Use the Option key to switch between the Polygonal Lasso and regular Lasso tools.
![]() Making lasso selections is much easier with a pressure-sensitive drawing tablet.
Making lasso selections is much easier with a pressure-sensitive drawing tablet.
Figure 5.18 Select any area by tracing around it with the Lasso tool.
Figure 5.19 When you release the mouse button, the ends of the selection automatically join together.
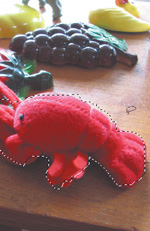
Figure 5.20 The Polygonal Lasso tool creates a border made of straight-line segments.
Figure 5.21 For a selection with both freehand and straight lines, press Option to switch between the regular Lasso and Polygonal Lasso tools.

To select with the Polygonal Lasso tool:
1. From the toolbar, choose the Polygonal Lasso tool (L).
2. Click points along the edge of the object to create straight-line segments for your selection (Figure 5.20).
3. Click back at the original starting point to join the open ends of the selection.
You can also Command-click or double-click anywhere on the image to close up the selection.
![]() Tips
Tips
![]() Be warned: The Polygonal Lasso tool can sometimes slip out of your control, creating line segments where you don’t want them to appear. If you make a mistake or change your mind about a line selection, you can erase line-segment selections as long as you haven’t closed the selection. Just press the Backspace or Delete key, and one by one the segments will be removed, starting with the most recent one.
Be warned: The Polygonal Lasso tool can sometimes slip out of your control, creating line segments where you don’t want them to appear. If you make a mistake or change your mind about a line selection, you can erase line-segment selections as long as you haven’t closed the selection. Just press the Backspace or Delete key, and one by one the segments will be removed, starting with the most recent one.
![]() To use both the regular Lasso and Polygonal Lasso tools together, select the Lasso tool, and hold down the Option key before releasing the mouse button. Option-click creates new polygonal segments, while Option-drag lets you draw freehand (Figure 5.21).
To use both the regular Lasso and Polygonal Lasso tools together, select the Lasso tool, and hold down the Option key before releasing the mouse button. Option-click creates new polygonal segments, while Option-drag lets you draw freehand (Figure 5.21).
To select using the Magnetic Lasso tool:
1. From the toolbar, choose the Magnetic Lasso tool (L).
2. Click on or very close to the edge of the area you want to trace to establish the first fastening point (Figure 5.22).
3. Move the pointer along the edge you want to trace.
The Magnetic Lasso tool traces along the selection border to the best of its ability and places additional fastening points along the way (Figure 5.23).
4. If the selection line jumps to the edge of the wrong object, place the pointer over the correct edge and click the mouse button to establish an accurate fastening point (Figure 5.24).
5. To close the selection line, click the starting point, or do one of the following:
![]() Command-click.
Command-click.
![]() Double-click anywhere on the image.
Double-click anywhere on the image.
![]() Press Enter.
Press Enter.
![]() Tip
Tip
![]() Press Option and click to use the Polygonal Lasso tool while the Magnetic Lasso tool is selected. Press Option and drag to use the Lasso tool.
Press Option and click to use the Polygonal Lasso tool while the Magnetic Lasso tool is selected. Press Option and drag to use the Lasso tool.
Figure 5.22 To start a selection border with the Magnetic Lasso tool, click the edge of the area you want to trace to create the first fastening point.
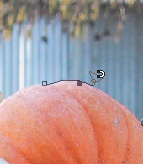
Figure 5.23 As you trace with the Magnetic Lasso tool, it places additional fastening points along the edge of the selection.
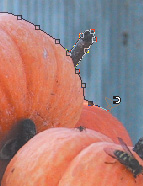
Figure 5.24 Sometimes the Magnetic Lasso tool jumps to another edge (left). To correct the path, just click the correct edge to bring the border back to the right location (right).
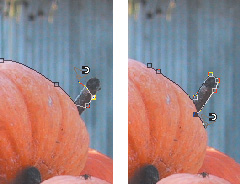
Figure 5.25 Look at the options bar while the Magnetic Lasso tool is selected; you’ll find options that are unique to this tool.
![]()
![]()
Figure 5.26 The Edge Contrast setting makes it easy to find an edge in high contrast areas (left, set to 80 percent) and low contrast areas (right, set to 5 percent).

Figure 5.27 The Frequency option lets you determine how closely the fastening points are spaced: top is set to 7; bottom is set to 70.

To set Magnetic Lasso tool options:
1. Select the Magnetic Lasso tool.
2. Set any of the options visible on the options bar (Figure 5.25).
![]() Width sets the size of the area the tool scans as it traces the selection line. You can set this option to a value from 1 to 40 pixels. Wide widths work well for high-contrast images, and narrow widths work well for images with subtle contrast and small shapes that are close to each other.
Width sets the size of the area the tool scans as it traces the selection line. You can set this option to a value from 1 to 40 pixels. Wide widths work well for high-contrast images, and narrow widths work well for images with subtle contrast and small shapes that are close to each other.
![]() Contrast establishes the amount of contrast required between shapes for an edge to be recognized and traced (Figure 5.26).
Contrast establishes the amount of contrast required between shapes for an edge to be recognized and traced (Figure 5.26).
This option is indicated by the percentage of contrast (from 1 to 100 percent). Try higher numbers for high-contrast images, and lower numbers for flatter, low-contrast images (just as with the Width option).
![]() Frequency specifies how close the fastening points are to each other. For Frequency, enter a number from 1 to 100. In general, you will need to use higher frequency values when the edge is very ragged or irregular (Figure 5.27).
Frequency specifies how close the fastening points are to each other. For Frequency, enter a number from 1 to 100. In general, you will need to use higher frequency values when the edge is very ragged or irregular (Figure 5.27).
![]() If you are using a stylus tablet, you can select Stylus Pressure to increase the stylus pressure and so decrease the edge width. That’s right: With the button enabled, pressing harder on the stylus will yield a smaller, more precise edge.
If you are using a stylus tablet, you can select Stylus Pressure to increase the stylus pressure and so decrease the edge width. That’s right: With the button enabled, pressing harder on the stylus will yield a smaller, more precise edge.
Making Selections by Color
The Magic Wand and Quick Selection tools allow you to make selections based on a selected color or tonal value. These tools can seem truly magical—or wildly unpredictable—at first. When you select an area of an image with either tool, it selects all of the pixels within a color or tonal range close to the pixel you’ve initially selected.
The Magic Wand tool provides options for setting tolerance (the range of color or tonal values included in the selection around the pixel where you’re clicking or dragging), anti-aliasing (smoothing), contiguousness (whether the pixels need to be connected to that first selected pixel), and whether to include all layers in the selection.
The Grow and Similar commands, found in the Select menu, can be used with the Magic Wand to expand the selection area. The Grow command expands the range of adjacent pixels, and the Similar command expands the selection based on the pixel colors.
Although the Quick Selection tool doesn’t offer the options available with the Magic Wand, it will often make an accurate selection based solely on the areas you mark with the brush.
To use the Magic Wand:
1. From the toolbar, choose the Magic Wand (or press W) (Figure 5.28).
2. On the options bar, choose whether to create a new selection, add to or subtract from an existing selection, or intersect with an existing selection (Figure 5.29).
The default setting on the options bar creates a new selection.
Figure 5.28 The Magic Wand icon is located just below the Lasso tool on the toolbar.
![]()
Figure 5.29 The Magic Wand options bar.
![]()
![]()
Figure 5.30 The Tolerance setting determines how wide a range of colors is included in the selection.
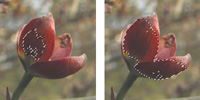
Figure 5.31 Uncheck Contiguous if you want to select similar colors throughout the image.
3. Select the tolerance (a range of pixels from 0 to 255) to establish how wide a tonal range you want to include in your selection.
The default tolerance level is 32 pixels. To pick colors or tonal values very close to the selected pixel, choose lower numbers. Entering higher numbers results in a wider selection of colors (Figure 5.30).
4. If you want your selection to have a smooth edge, select Anti-alias.
5. If you want only pixels adjacent to the original pixel to be included in the selection, select Contiguous (Figure 5.31).
6. If you want the selection to include pixels on all the layers, select All Layers (see Chapter 8 for more on working with layers).
7. Click a color or tone in the image. Based on your settings, a group or range of pixels will be selected.
![]() Tip
Tip
![]() When you make your original selection with the Magic Wand, it takes a color “sample” from your image. You can adjust the sample size with the Eyedropper tool. The options bar lets you sample 1 pixel, or the average of a 3-by-3-pixel area (9 pixels total), or a 5-by-5-pixel area (25 pixels total). Whichever option is active determines how the Magic Wand establishes the sample color.
When you make your original selection with the Magic Wand, it takes a color “sample” from your image. You can adjust the sample size with the Eyedropper tool. The options bar lets you sample 1 pixel, or the average of a 3-by-3-pixel area (9 pixels total), or a 5-by-5-pixel area (25 pixels total). Whichever option is active determines how the Magic Wand establishes the sample color.
1. From the toolbar, choose the Magic Wand tool.
2. Click a color or tonal value in the image.
3. From the Select menu, choose Grow to expand the selection of adjacent pixels. Each time you select Grow, the selection is expanded by the tolerance amount displayed on the Magic Wand options bar (Figure 5.32).
To include similar colors:
1. From the toolbar, choose the Magic Wand.
2. Click a color or tonal value in the image.
3. From the Select menu, choose Similar to expand the selection of nonadjacent pixels. The selection is extended through the image to similar tonal values using the tolerance amount set on the Magic Wand options bar (Figure 5.33).
![]() Tip
Tip
![]() You can also access the Grow command by right-clicking after you have made a selection with the Magic Wand. A contextual menu appears in the image window, which includes the Grow and Similar commands plus a number of other useful selection options (Figure 5.34).
You can also access the Grow command by right-clicking after you have made a selection with the Magic Wand. A contextual menu appears in the image window, which includes the Grow and Similar commands plus a number of other useful selection options (Figure 5.34).
Figure 5.32 Making a selection at left covers just part of the desired image; choose Grow to expand to adjacent similarly colored areas.
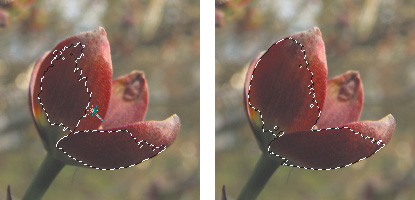
Figure 5.33 Choose Select > Similar to add pixels to your selection throughout the image.
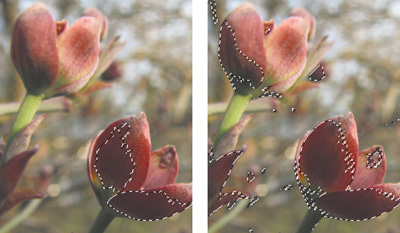
Figure 5.34 After making a selection with the Magic Wand tool, right-click to access selection options.
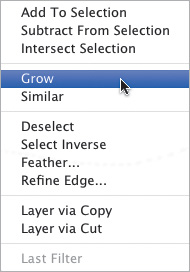
Figure 5.35 The Quick Selection tool.
Figure 5.36 Buttons in the options bar supply different functions for the Quick Selection tool.
![]()
Figure 5.37 Painting through an area with the Quick Selection tool creates a new selection.
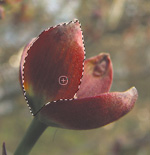
Figure 5.38 To add to a selection, paint in additional brushstrokes (Add to Selection is chosen by default).
To use the Quick Selection tool:
1. From the toolbar, choose the Quick Selection tool (or press A) (Figure 5.35).
2. In the options bar, choose a brush size (Figure 5.36).
3. In the image window, click, or click and drag in the area where you want to make your selection. As you drag, the selection is created (Figure 5.37).
4. To add to the selection, drag an area outside the current selection (Figure 5.38).
5. To subtract from a selection, choose the Subtract from Selection button or hold down the Option key, and click (or drag) inside the selection area (Figure 5.39).
Figure 5.39 Use the Subtract from Selection button in the options bar to delete a portion of a selection.
Using the Selection Brush Tool
The Selection Brush tool lets you make a selection by painting over an error; it differs from the Quick Selection tool by selecting only the areas covered by the brush’s “paint,” instead of contiguous areas of similar tonal values.
The Selection Brush tool’s options resemble those offered for the normal Brush tool. You can choose among a wide range of brush styles and sizes.
When you use the Selection Brush tool in the default Selection mode, simply click and drag through an area of your image to create a free-form, brushed selection. Unlike the other selection tools, the Selection Brush offers a Mask mode, which allows you to create a “protected” or unselected area. To work more easily with masked areas, you can control the opacity and color of the mask overlay. The two modes can be used together with great results. It’s easier to make your initial selection in the default mode, and then switch to Mask mode to tune your selection.
To make a selection with the Selection Brush:
1. From the toolbar, choose the Selection Brush (or press A) (Figure 5.40).
2. Make sure the Mode menu on the options bar is set to Selection (Figure 5.41).
3. Choose a brush style and optionally choose values for the brush size and hardness (Figure 5.42).
You can either enter values for the size and hardness, or drag the sliders (Figure 5.43) until you get the setting you want.
Figure 5.40 The Selection Brush.
![]()
Figure 5.41 To make a selection, choose the Selection mode.
![]()
Figure 5.42 Choose from a wide variety of prebuilt brushes.
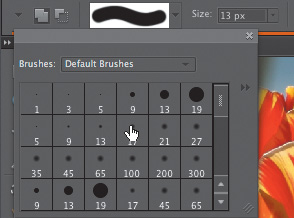
Figure 5.43 The brush size can be set from the options bar.
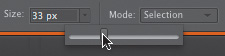
Figure 5.44 To make a selection, just “paint” over your image with the Selection Brush.
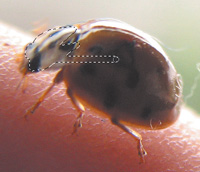
Figure 5.45 You can expand the selection by brushing around and through the original selection.
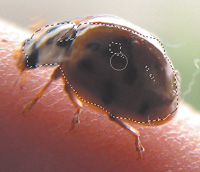
Figure 5.46 Use the Subtract from Selection button in the options bar to remove areas of your selection.
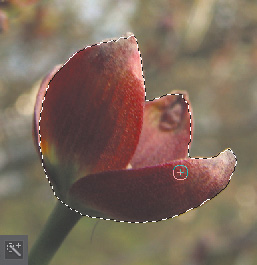
4. Drag the brush tool over your image to make a selection (Figure 5.44).
5. To expand your selection, brush on the edge of the selected area (Figure 5.45). To make a selection in another portion of your image, click and drag away from the original selection.
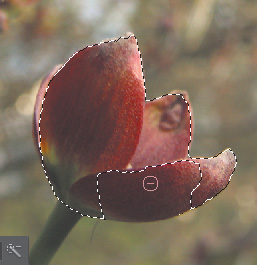
6. To subtract from your selection, choose the Subtract from Selection button in the options bar, and then click and drag through any portion of the selection (Figure 5.46).
![]() Tips
Tips
![]() Like other brushes, the Selection Brush tool works well with pressure-sensitive tablets that let you paint more naturally.
Like other brushes, the Selection Brush tool works well with pressure-sensitive tablets that let you paint more naturally.
![]() A quick way to change the size of the Selection Brush is to press the bracket keys on your keyboard: [ to reduce size and ] to increase size.
A quick way to change the size of the Selection Brush is to press the bracket keys on your keyboard: [ to reduce size and ] to increase size.
To make a mask with the Selection Brush:
1. Choose the Selection Brush tool.
2. From the Mode menu on the options bar, choose Mask (Figure 5.47).
3. Choose a brush style and optionally enter values for the brush size and hardness.
4. Set the overlay opacity with the slider, or enter a percentage in the text box (Figure 5.48).
5. Set the overlay color by clicking the Overlay Color box in the options bar, and then choose a color from the Color Picker. The default color is red, so if your selection area is also red it may be hard to see. Just choose a color that works best for each image.
6. Drag the brush tool over your image to make a mask (Figure 5.49).
As soon as you select another tool, the mask overlay area changes to a selection border. The area is protected from any changes you apply to the image (Figure 5.50). If you want to modify the mask, select the Brush Selection tool again. The mask will automatically appear over the image, and you can continue to paint in additional masked areas.
![]() Tip
Tip
![]() The mask overlay is a very handy tool for inspecting your selections and can be used with any selection tool. Whenever you have an active selection, just click the Selection Brush tool and select the Mask option to see the masked area. When you’re done viewing it in Mask mode, choose Selection from the Mode drop-down menu.
The mask overlay is a very handy tool for inspecting your selections and can be used with any selection tool. Whenever you have an active selection, just click the Selection Brush tool and select the Mask option to see the masked area. When you’re done viewing it in Mask mode, choose Selection from the Mode drop-down menu.
Figure 5.47 To make a mask, first select the Mask mode option.
![]()
Figure 5.48 The opacity of your mask overlay can be set with the slider or entered into the text box.
Figure 5.49 When you paint with the Mask option on, the area becomes filled with the mask overlay.
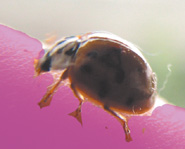
Figure 5.50 In Mask mode, you paint a mask through any areas that you do not want to be selected.
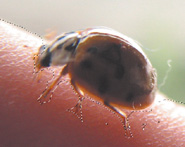
Figure 5.51 To add to the current selection, either click the Add to Selection icon on the options bar or hold down the Shift key while making another selection.
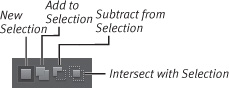
Figure 5.52 In this example, two selections are combined to form a single selection.

Adjusting Selections
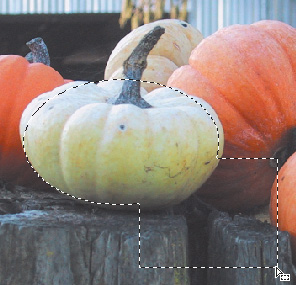
You can probably tell by now that a little fine-tuning is needed to make selections just the way you want them. For example, imagine you’re using the Magnetic Lasso tool to trace the outline of a face, but then realize you didn’t include the ear in your selection. Rather than start again from scratch, you can add to or subtract from your selection until you’ve included every part of the image you want. Photoshop Elements even lets you select the intersection (or overlapping area) of two independent selections. This feature offers an effective solution for constructing interesting selection areas that would be difficult to create with a single selection tool.
To add to a selection:
1. Make a selection in your image with any of the selection tools.
2. With the selection still active, do one of the following:
![]() Using the same selection tool or after selecting another one, click the Add to Selection button (Figure 5.51) in the options bar.
Using the same selection tool or after selecting another one, click the Add to Selection button (Figure 5.51) in the options bar.
If the Add to Selection button is already highlighted, skip to step 3.
![]() Hold down the Shift key, and, if desired, select a different selection tool.
Hold down the Shift key, and, if desired, select a different selection tool.
A plus sign appears, indicating that you are adding to the current selection.
3. Make a new selection in your image. If you want to add to your existing selection, make sure your new selection overlaps the original. If you want to create an additional selection, make sure you click outside of your original selection. The new selection area is added to your first selection (Figure 5.52).
1. Make a selection with any of the selection tools.
2. With the selection still active, do one of the following:
![]() Select the Subtract from Selection button on the options bar, optionally choosing a different selection tool.
Select the Subtract from Selection button on the options bar, optionally choosing a different selection tool.
![]() Hold down the Option key.
Hold down the Option key.
A minus sign appears, indicating that you are subtracting from the current selection.
3. Drag the pointer through the area you want to subtract.
The area you defined is removed from the selection (Figure 5.53).
To select the intersection of two selections:
1. Make a selection with any of the Marquee or Lasso selection tools.
2. With the selection still active, do one of the following:
![]() Select the Intersect with Selection button on the options bar and create a new selection that overlaps the current selection.
Select the Intersect with Selection button on the options bar and create a new selection that overlaps the current selection.
![]() Hold Option-Shift and create a new selection that overlaps the current selection. An X appears, indicating that you are selecting an area of intersection.
Hold Option-Shift and create a new selection that overlaps the current selection. An X appears, indicating that you are selecting an area of intersection.
3. A new selection area is formed based on the intersection of the two selections (Figure 5.54).
Figure 5.53 In this example, a pie-shaped cutout is left where the rectangle selection has been subtracted.

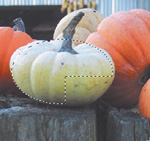
Figure 5.54 In this example, only the area of intersection remains.
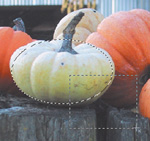
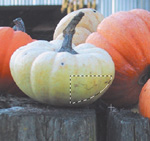
Figure 5.55 When you delete a selection, the selected area disappears, and your current background color shows through.
To deselect the current selection:
![]() From the Select menu, choose Deselect, or press Command-D.
From the Select menu, choose Deselect, or press Command-D.
To reselect the last selection:
![]() Choose Select > Reselect, or press Command-Shift-D.
Choose Select > Reselect, or press Command-Shift-D.
To delete a selection:
Choose one of the following methods:
![]() From the menu bar, choose Edit > Cut, or press Command-X.
From the menu bar, choose Edit > Cut, or press Command-X.
![]() Press Backspace/Delete.
Press Backspace/Delete.
When you delete a selection, the portion of the image within your selection disappears entirely, leaving a hole in your image (Figure 5.55). If you accidentally delete a selection, choose Undo from the Edit menu or press Command-Z.
To hide a selection border:
![]() From the View menu, uncheck Selection, or press Command-H.
From the View menu, uncheck Selection, or press Command-H.
Sometimes, after you’ve made a selection, you want to hide the selection marquee while you edit the image; this prevents the selection border from obscuring your view. Be sure to press the same keyboard shortcut to display the selection once you’re done—otherwise, you might lose track of it.
![]() Tip
Tip
![]() You can deselect an entire selection at any time by pressing the Esc key.
You can deselect an entire selection at any time by pressing the Esc key.
Softening the Edges of a Selection
Selections often work best when their edges are smooth, instead of hard. Anti-aliasing adds blended pixels to create a smooth edge instead of a stairstepped or jagged edge (Figure 5.56). Most selection tools offer an Anti-Alias check box in the options bar. That option is usually checked by default, and you almost always want to leave anti-aliasing enabled. When compositing images (combining several pieces into one), anti-aliasing smooths the border between elements.
Feathering blurs the edges of a selection. Set the amount of blurring on the options bar in the Feather box. Unlike anti-aliasing, which affects just the very edge of a selection, feathering creates a more dramatic, soft transition or halo effect around an image. Depending on the image selection, you may want to experiment with different feathering settings, because some detail is usually lost around the edges of a feathered selection.
Figure 5.56 Anti-aliasing automatically smooths a selection edge by adding pixels that blend the color transition.
The Refine Edge dialog combines several softening and selection modification tools in one place (Figure 5.57). Refine Edge appears as a button in the options bar for several tools, but the dialog can be brought up via the Select menu for all selection tools as long as a selection has been made.
With the Preview button checked, changes are interactive as you combine Smooth, Feather, and Contract/Expand options. You can zoom in or out or pan the image.
The red Custom Overlay Color button provides a mask; double-click the button to set the overlay color.
Figure 5.57 The Refine Edge dialog combines softening and selection options.
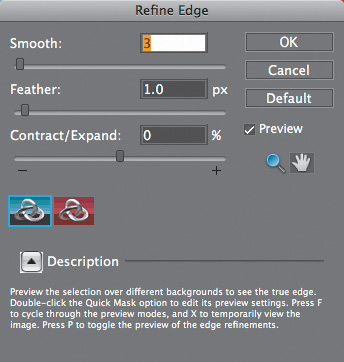
Figure 5.58 Select Anti-alias on the options bar before you make a selection to create a smooth edge, even on curved shapes.
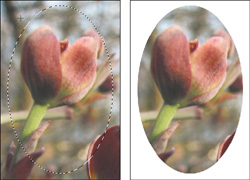
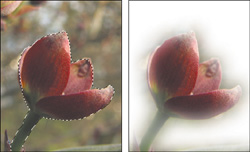
Figure 5.59 The dogwood blossom at left was highlighted through the Quick Selection tool, and then Inverse was chosen from the Select menu. A 25-pixel Feather was applied, and the background deleted to create the image at right.
To smooth jagged edges with anti-aliasing:
1. From the toolbar, choose any selection tool other than the Rectangular Marquee tool.
The Rectangular Marquee tool’s edges are composed of straight right angles, so no anti-aliasing is necessary. A rectangle selection’s edge can still be softened with the Feather option.
Anti-alias is checked by default on the options bar. If you unchecked the option, check it before making the selection.
2. Make a selection using the desired tool.
3. Cut or copy and then paste the selection into a new file.
The resulting selection edge is automatically smoothed, with no jaggies (Figure 5.58).
To feather the edge of a selection:
1. From the toolbar, choose from any of the Marquee or Lasso tools.
2. On the options bar or in the Refine Edge dialog, select a value for the feather radius (from 0.1 to 250.0 pixels).
3. Make a selection.
The resulting edge appears blurred, based on the number you entered for the Feather option (Figure 5.59).
![]() Tips
Tips
![]() You can apply feathering after you make a selection, unlike anti-aliasing. With your selection active, from the Select menu choose Feather or Refine Edge, and then enter a feather radius.
You can apply feathering after you make a selection, unlike anti-aliasing. With your selection active, from the Select menu choose Feather or Refine Edge, and then enter a feather radius.
![]() You can also apply feathering effects to your image by applying the Vignette effect, available in the Effects panel. For more detail, see “Applying Filters and Effects” in Chapter 9.
You can also apply feathering effects to your image by applying the Vignette effect, available in the Effects panel. For more detail, see “Applying Filters and Effects” in Chapter 9.
Modifying Selection Borders
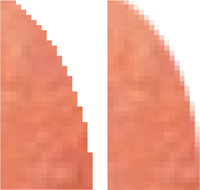
You can make subtle—or not so subtle—changes to a selection border with options found on the Select > Modify menu and in the Refine Edge dialog. The Border feature lets you change the width of the selection border. The Smooth command smooths out a jagged or irregular selection edge. To increase or reduce the size of a selection, use Expand or Contract. (In the Refine Edge dialog box, Expand/Contract is a slider from –100% to 100%.)
To change the width of the border:
1. Make a selection in your image with any of the selection tools.
2. From the Select menu, choose Modify > Border or Refine Edge.
3. Enter a value for the border width.
The selection border changes based on the number you enter (Figure 5.60).
To smooth the edge of a selection:
1. From the Select menu, choose Modify > Smooth or Refine Edge.
2. Enter a value for the radius of the smoothing effect.
The radius values range from 1 to 100 and define how far away from the current edge the selection will move to create a new, smoother edge.
To expand or contract the selection area:
1. From the Select menu, choose Modify; then choose Expand or Contract.
2. Enter a value for the number of pixels you would like the selection to either grow (expand) or shrink (contract) (Figure 5.61).
Figure 5.60 The Border command lets you control the width of a selection border. In this example, a 15-pixel border is selected at left, then filled with color at right.
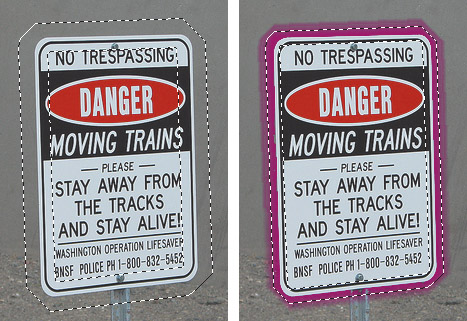
Figure 5.61 You can expand or contract the size of a selection border from the Modify menu.