Chapter 1
Safety1
1.1 Introduction
This laboratory will cover the aspects of working outdoors with emphasis on extreme weather conditions, personal protective equipment (PPE), power tool safety, working at heights, electrical safety, carrying and lifting, and some other general safety guidelines. This chapter is NOT a substitute for an Occupational Safety and Health Administration (OSHA) 10 construction safety course, and students are strongly advised to take an OSHA 10 course as well as a first aid and CPR course offered by qualified providers. Students are encouraged to download and review the OSHA safety publications cited at the end of this chapter.
1.2 Student Learning Objectives
At the end of this lab the student will be able to
- Appraise a job situation and take appropriate measures to mitigate adverse safety conditions related to heat stress, including dressing appropriately for different outdoor environments
- Recognize symptoms of heat stress and respond appropriately
- Appraise working conditions at heights
- Demonstrate proper use of extension ladders
- Implement fall prevention and fall protection procedures employing appropriate equipment
- Identify and understand electrical hazards and how to mitigate them
- Identify and properly use appropriate personal protective equipment
1.3 Working in Extreme Weather Conditions
In California, we have the full gamut of extreme weather with the exception of tropical storms. The tallest peak is Mt. Whitney, at 4,421 m (14,505 ft.), and the lowest point is Badwater Basin in Death Valley at –82 m (–282 ft.). Furthermore, Furnace Creek in Death Valley holds the record for the highest recorded temperature on the face of the Earth at 56.7°C (134°F). I personally find it remarkable that Mt. Whitney and Badwater Basin are only 210 km (131 mi.) apart.
More germane to the topic of extreme weather is the fact that some of the best sites for photovoltaic (PV) systems in the United States are in the Mojave Desert and neighboring “high desert” areas. The annual insolation for the high desert is approximately 7.6 kWh/m2/day. The average high temperature for Barstow, California in July is 41°C (105°F), while average daytime low temperature is 3°C (37°F). In addition to these temperature extremes, the high desert also has very low humidity and can experience wind gusts to 70 km/h (43 mi./h) during summer afternoons. To prepare for temperature extremes, low humidity, and occasional high winds is a significant safety challenge.
The first step in addressing this challenge is to employ appropriate clothing for the climate and time of year. The second step is to understand the hazards associated with extreme heat and cold, and to mitigate them to a point where the hazards are manageable. The third step is to recognize heat stress symptoms and take appropriate action.
1.3.1 The Hot, Dry Climate
Appropriate clothing includes long-sleeved, light-colored shirts (Figure 1.1) and long pants, headgear, and sunblock.
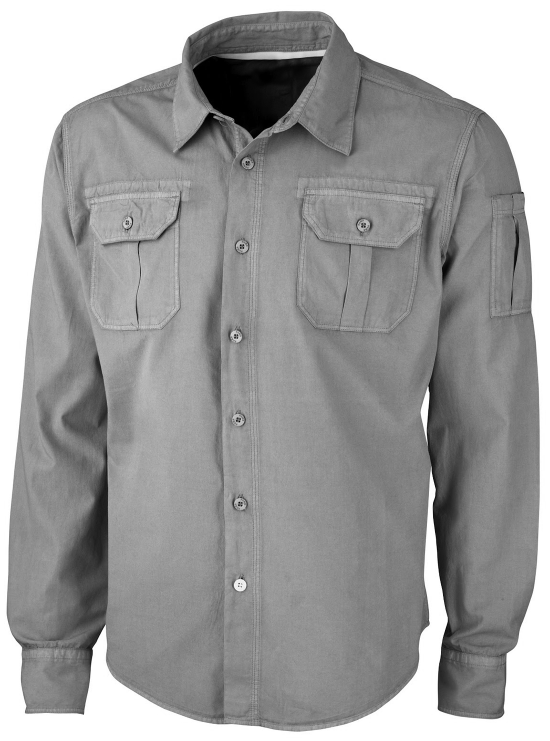
A lightweight, light-colored, long-sleeve shirt is the best choice for hot, dry climates.
Since the mornings can be as cool as 5°C (50°F) in the summer, a second layer of clothing, such as an insulated vest or a fleece jacket, is a good idea.
Hats with broad brims and a “cape” to cover the ears and neck are a good choice. See Figure 1.2 as an example. In windy areas, a chin strap will keep your hat on your head. Some installers who spend most of their time on the roof like to use knee pads, which in addition to being comfortable provide some insulation from the heat of the roof.

A cap with a cape will protect the head, ears, and neck (Torrey Hat, courtesy of the Village Hat Shop).
I recommend the use of sneakers, which provide ventilation and tend to cause less damage to asphalt and tile roofs. The sneakers shown in Figure 1.3 have ventilation panels and a sturdy rubber front toe. The only drawback is a slightly aggressive tread. Workers on the ground are advised to use work boots, which provide some ankle support and protect the feet in rough terrain. Steel-toed work boots are advisable if workers are involved in moving or carrying heavy objects.
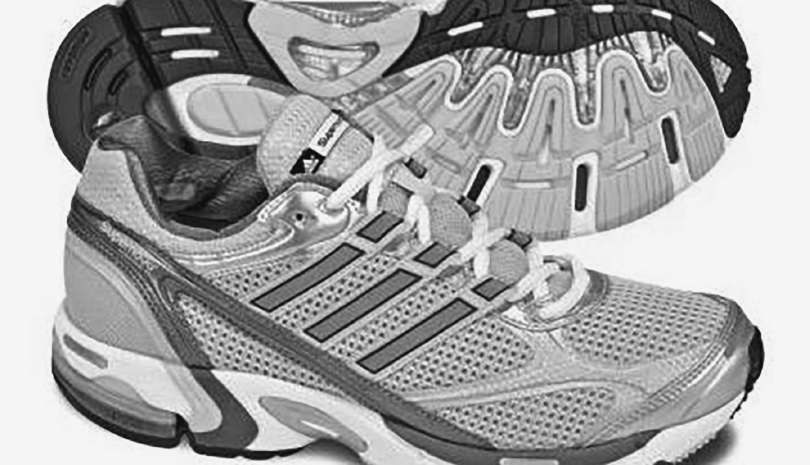
Sneakers designed for hiking and backpacking will provide ankle support and ventilation and will outlast those designed for racquet sports or cross training.
1.3.2 The Cold Climate
Appropriate clothing can start with the preceding choices, but should also include a fully insulated top garment (e.g., parka); a rainproof, ventilated outer garment with hood; wool cap; insulated gloves; and warm socks. Ventilation is still important to make sure that body perspiration can be wicked away from the body and vented and not condense on the inner garments.
One of the best places to purchase appropriate clothing for extreme climates is—not surprisingly—a US outdoor retailer such a REI, L. L. Bean, or Big 5.
1.4 Understanding Heat Stress
To begin, we need to understand risk factors and types of heat illness, which include heat exhaustion, heat stroke, dehydration, hypothermia, and frostbite.
The causes of heat exhaustion and heat stroke are the following:
- High ambient temperatures
- Low wind speed
- Radiant heat sources (such as a roof)
- High humidity
- Strenuous physical activity
In the absence of illness causing fever, vomiting, or diarrhea the cause of dehydration is quite simple:
- The body is using up more water through breathing, sweating, and urination than water is being taken in.
The causes of hypothermia and frostbite are generally the same and include the following
- Cold ambient temperatures, especially accompanied by wind
- Dampness and water
- Rain, sleet, or snow
- Wind
- Contact with cold surfaces
1.4.1 Heat Exhaustion—Symptoms and Appropriate Responses
It is important to be able to recognize heat exhaustion in yourself and in your co-workers. The latter case is extremely important for supervisors. The symptoms of heat exhaustion include the following:
- Headache, nausea, dizziness, weakness (self-diagnosis)
- Irritability, confusion, slow/slurred speech (supervisor responsibility)
- Heavy sweating
- Cramps
- Flushed face
- Heat rash
If you develop one or more of these symptoms or recognize them in a co-worker, you should respond as follows:
- If on a roof, remove worker immediately to ground level.
- Move to a cool, shady area.
- Provide water to drink.
- Alert supervisor.
- Call 911 if symptoms do not improve or worsen.
- Do not return worker to work on that job site that day.
1.4.2 Heat Stroke—Symptoms and Appropriate Responses
Heat stroke is a much more severe condition than heat exhaustion and can lead to death if not recognized and treated quickly. The symptoms of heat stroke include the following:
- Sweating stops
- Confusion
- Loss of consciousness
- Seizures
If you recognize one or more of these symptoms in a co-worker, you should respond as follows:
- Alert supervisor.
- Call 911 immediately.
- Move worker to cool, shady area.
- Remove extra clothing, loosen remaining clothing, remove shoes, apply cold packs/cold water, provide water to drink.
1.4.3 Dehydration—Symptoms and Appropriate Responses
Moderate symptoms of dehydration include:
- Increased thirst
- Dry mouth, swollen tongue
- Decreased urine output
- Dry skin
- Headache
- Dizziness or lightheadedness
Severe symptoms of dehydration include:
- Extreme thirst
- Irritability and confusion
- Very dry mouth, skin, and mucous membranes
- Lack of sweating
- Little or no urination
- Sunken eyes
- Shriveled and dry skin that lacks elasticity
- Low blood pressure
- Rapid heartbeat
- Rapid breathing
- Fever
- Delirium or unconsciousness
If you recognize one or more of these symptoms in a co-worker, you should respond as follows:
- If on a roof, remove worker immediately to ground level.
- Move to a cool, shady area.
- Alert supervisor.
- Provide cool water to drink.
- Sports drinks containing electrolytes, and a carbohydrate solution also may be helpful.
- There is no need for salt tablets.
- Call 911, if symptoms do not improve or worsen.
- Do not return the worker to work on that job site that day.
1.4.4 Hypothermia—Symptoms and Appropriate Responses
Hypothermia symptoms include:
- Cold, pale/blue-gray skin
- Shivering
- Lack of interest, coordination, or concern (apathy)
- Poor judgment
- Mild unsteadiness in balance or walking
- Slurred speech
- Numb hands and fingers and problems performing tasks
If you recognize one or more of these hypothermia symptoms in a co-worker, you should respond as follows:
- Move worker to a warm area.
- Keep worker active.
- Remove and replace any wet clothing.
Severe symptoms of hypothermia include:
- Trunk of the body cold to the touch
- Muscles becoming stiff
- Slow pulse
- Shallow, slow breathing
- Weakness or sleepiness
- Confusion
- Loss of consciousness
- Shivering, which may stop if body temperature drops below 90°F
- A body temperature of 85°F or less, which may render a worker unconscious
- A body temperature of 78°F or less, which may result in death
If you recognize one or more of these severe hypothermia symptoms in a co-worker, you should additionally respond as follows:
- Alert supervisor.
- Call 911 immediately.
1.4.5 Frostbite—Symptoms and Appropriate Responses
Frostbite is a serious condition and is better considered an injury rather than an illness. Hypothermia may accompany frostbite. Frostbite typically affects the smaller and more exposed body parts: nose, ears, fingers, and toes. Frostbite occurs when the skin and body tissue directly beneath the skin freeze and lose water. The skin color turns red, then purple, and then white and is cold to the touch. If frostbite is not recognized and treated promptly and appropriately, the result may be permanent damage to the affected body parts. The symptoms of frostbite are as follows:
- Cold skin
- Numbness
- Pale skin
- Hardened skin
If you recognize one or more of these frostbite symptoms in yourself or a co-worker, you should respond as follows:
- Remove worker to a warmer, less exposed area.
- Protect the affected skin from further exposure.
- Call supervisor.
- Call 911.
- Gradually warm the affected part using warm water (104°F–107°F).
- Tuck frostbitten fingers into the armpits.
- Cover affected areas with blankets or other insulating clothing.
- Do not use direct heat (e.g., heat lamps) and do not rub affected parts.
- Do not walk on frostbitten toes or use hands with frostbitten fingers.
Frostbite must be treated by a physician as soon as possible. If it is not treated promptly and appropriately, the result may be permanent damage to the affected body part and may require surgery or even amputation of portions of toes and fingers in severe cases.
1.4.6 Preventing Heat or Cold Stress
The best course of action is to prevent heat or cold stress and this is facilitated by training. Preventative training includes being made aware of the causes of heat stress and how to reduce worker exposure to the risk factors. The general techniques include the following:
- Avoid working in extreme weather; examples include:
- Start a forecasted hot day early in the morning (6:00 a.m.) and quit early (2:00 p.m.).
- Do not work during heavy rain, sleet, or snow or high winds.
- During hot weather:
- Work in the shade, if possible.
- Wear light-colored clothing, long-sleeved shirts, and head gear.
- During cold weather:
- Wear layered clothing.
- Protect the head, ears, nose, fingers, and toes.
- Take work breaks every 2 hours.
- In all circumstances, provide fluids.
1.5 General Safety Training
According to estimates from the Survey of Occupational Injuries and Illnesses (SOII) conducted by the US Bureau of Labor Statistics (BLS), each year there are 3.4 cases of significant injury per 100 equivalent full-time workers.
The US BLS (2005) states that there were 12 fatal injuries a day in the construction industry.
According to a BLS report (2009), the leading causes of death in construction are as follows:
- Falls (34%), of which 33% were from roofs and another 16% from ladders
- Transportation injuries
- Being struck by objects and equipment
- Electrocution (9%) due principally to contact with overhead power lines, contact with energized sources (e.g., live parts, damaged or bare wires), and improper use of extension and flexible cords
It is highly recommended that anyone who plans to work outside on a regular basis (whether an installer, supervisor, site surveyor, Q/A personnel, or troubleshooter) or who works in a warehouse or similar environment take an OSHA 10 training course and a combination of first aid and CPR training. OSHA 10 training is offered by many organizations and can be taken online for as little as $75. First aid/CPR is also offered by many organizations, including the Red Cross and colleges, and is often highly subsidized or is free.
The North American Board of Certified Energy Practitioners (NABCEP™) now requires OSHA 10 construction training for all of its installer and PV technical sales certificates.
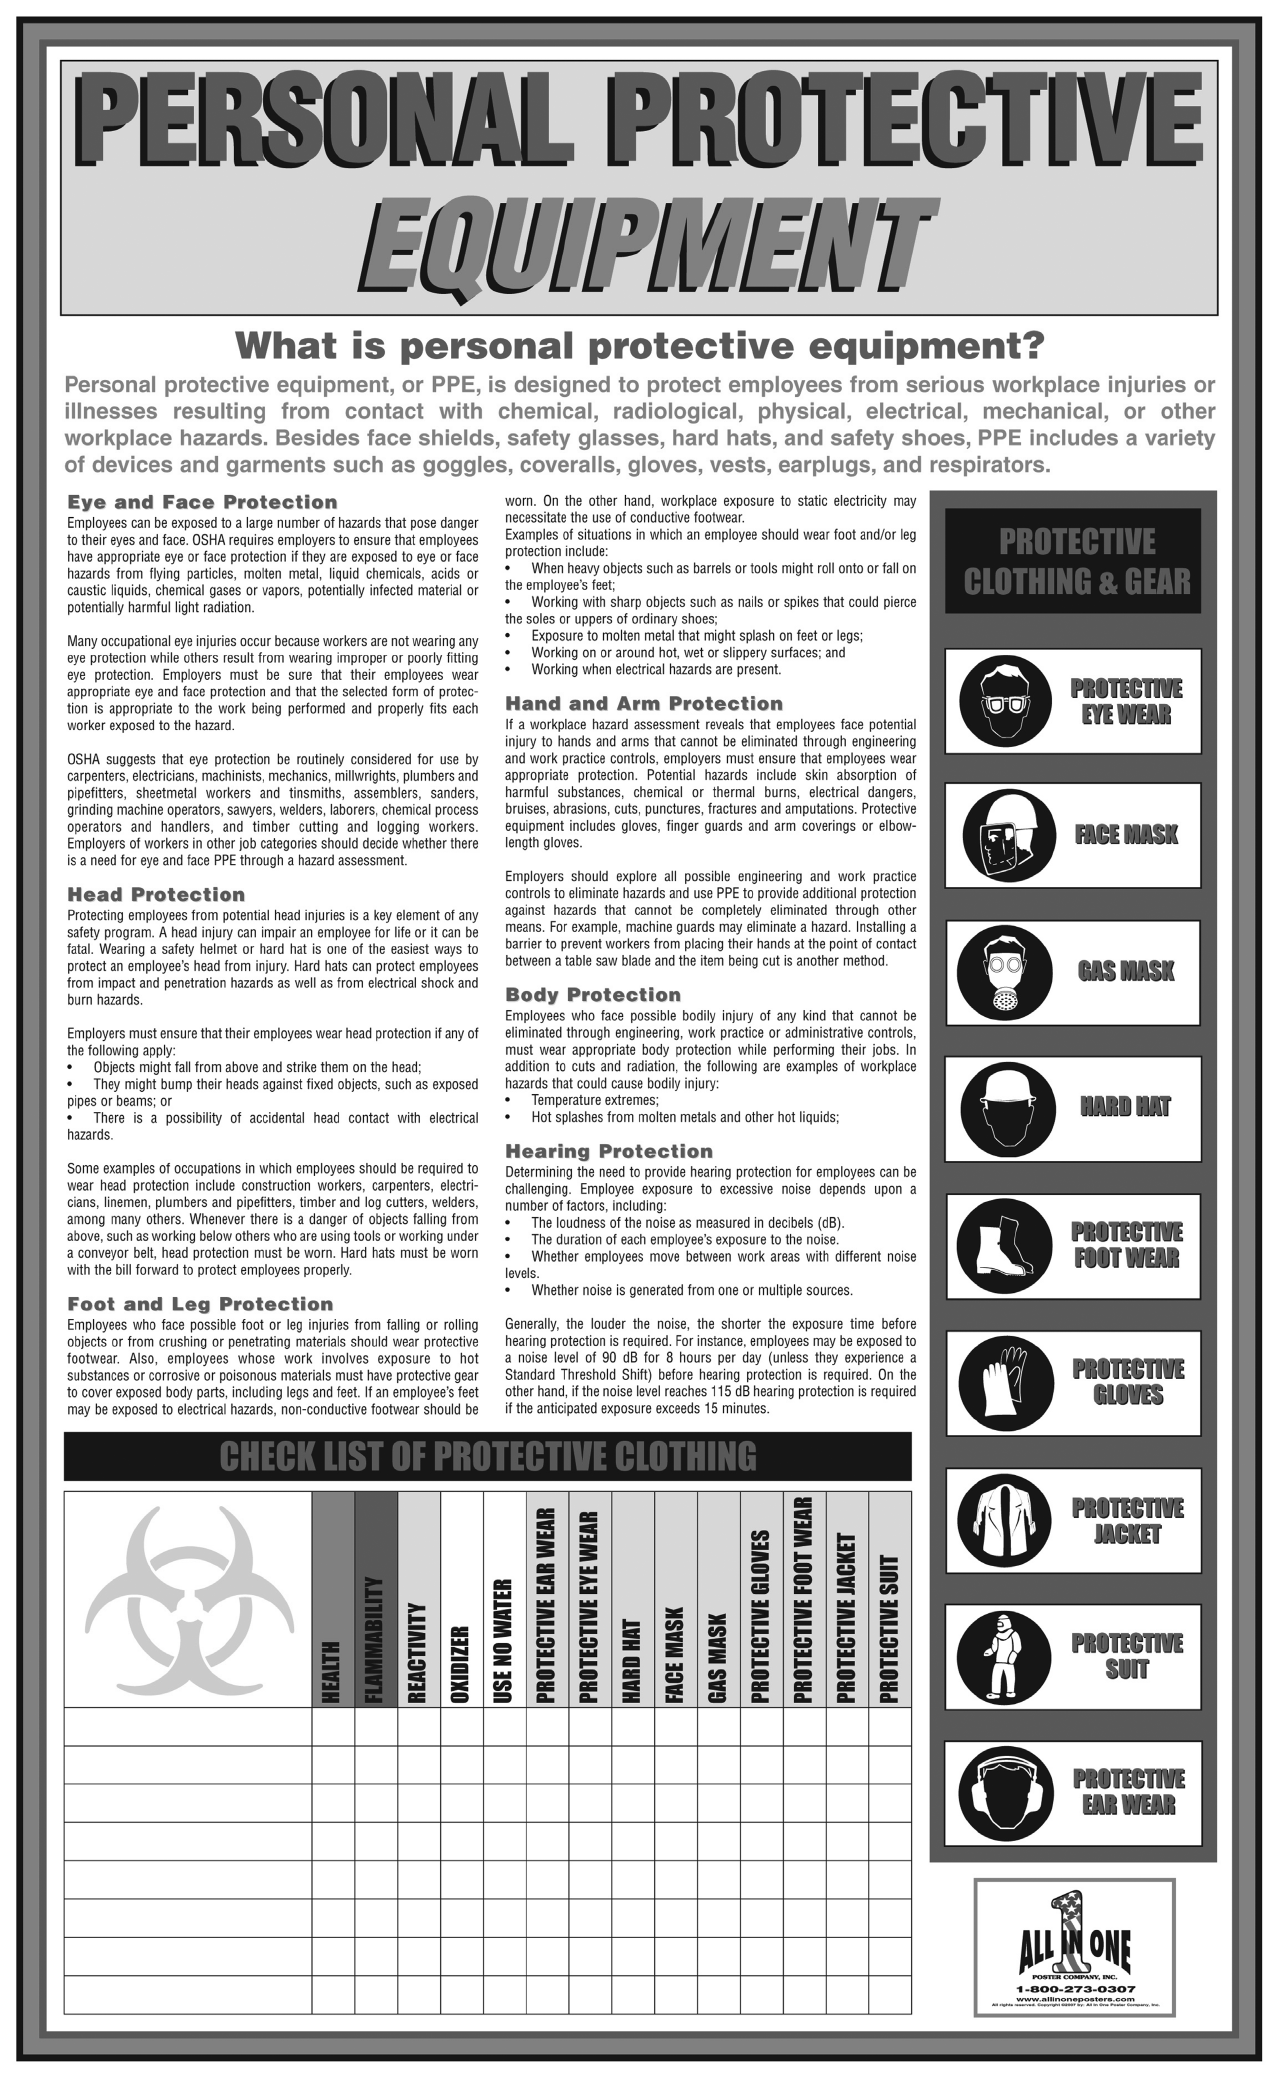
1.6 Personal Protective Equipment (PPE)
1.6.1 Eye Protection and Gloves
All members of this laboratory are required to purchase and use eyewear and gloves. Eyewear, either glasses or goggles (for those wearing prescription glasses), needs to be OSHA approved. OSHA-approved eyewear is available at Grangers and many other supply stores and can be purchased for as little as $5 to $10. Gloves can be leather or synthetic fabric, with the latter slightly more comfortable when using hand tools and assembling equipment. Students should find a brand that is comfortable for them. Gloves can be found at many stores, including The Home Depot, for as little as $6 or $7.
In addition, hard hats should be used to protect from head impact, penetration injuries, and electrical injuries due to the following hazards:
- Falling or flying objects
- Fixed, sharp objects
- Contact with electrical conductors
1.6.2 Protective Helmets (a/k/a Hard Hats)
OSHA states that “employees shall wear protective helmets when working in areas where there is a potential for injury to the head from falling objects” and that “protective helmets designed to reduce electrical shock hazard shall be worn by each such affected employee when near exposed electrical conductors which could contact the head” (29 Code of Federal Regulations 1910.35 and 1926.100). The classifications for hard hats include “type” and “class”:
- Type I helmets provide protection from blows to the top of the head.
- Type II helmets provide protection from blows to both the top and sides of the head.
- Class G (general) helmets are proof tested at 2,200 V.
- Class E (electrical) helmets are proof tested at 20,000 V.
- Class C (conductive) provide no electrical insulation.
Work on a roof involving the installation of PV modules in proximity to an overhead electrical service feed of 2,200 V or less should use hard hats rated type II and class G. The same applies to workers on the ground working near or on live electrical circuits. Workers with no exposure to live electrical circuits should use hard hats rated type II. Hard hats will be provided for the students for all work in our PV installation laboratory.
1.6.3 Aprons
Aprons will be provided for students when hazardous liquids such as battery acid are used.
1.6.4 Footwear
As mentioned before, appropriate footwear depends on the working conditions: sneakers on the roof, work boots on the ground. Work boots with steel toes are strongly recommended when moving or carrying objects weighing more than 11 kg (25 lb.)
1.7 Working at Heights
OSHA has very specific guidelines regarding working at heights:
Each employee on a walking/working surface (horizontal or vertical surface) with an unprotected side or edge which is 1.8 m (6 feet) or more above a lower level shall be protected from falling by the use of guardrail systems, safety net systems, or personal fall arrest systems. (OSHA 1926.501(b)(1,2,3,4)
In California, the height specification is 2.3 m (7.5 ft.).
There are two approaches to fall hazards: fall prevention and fall protection. Fall prevention prevents people from reaching the fall hazard by creating a barrier (e.g., guardrail) between the person and the fall hazard. Fall protection includes customized personal protective equipment (safety harnesses, lanyards, tie-off points, safety nets) that can prevent the worker from reaching the hazard and thus arresting a fall in progress.
In our lab we will work at less than 1.8 m or we will employ ladders or guardrail systems (see following).
Ladders represent the most frequent opportunity to work at heights. There are a variety of ladder types, construction, and working loads. Setting up and taking down a ladder is usually the responsibility of the person who is going to use the ladder and, as such, ladders differ from guardrail systems, scaffolding, safety nets, and safety barriers.
1.7.1 Safety Barriers
Safety barriers prevent a worker from reaching a hazardous area. They should be complemented by signage that warns the worker about the hazard and makes it clear that the worker should not approach the hazard.
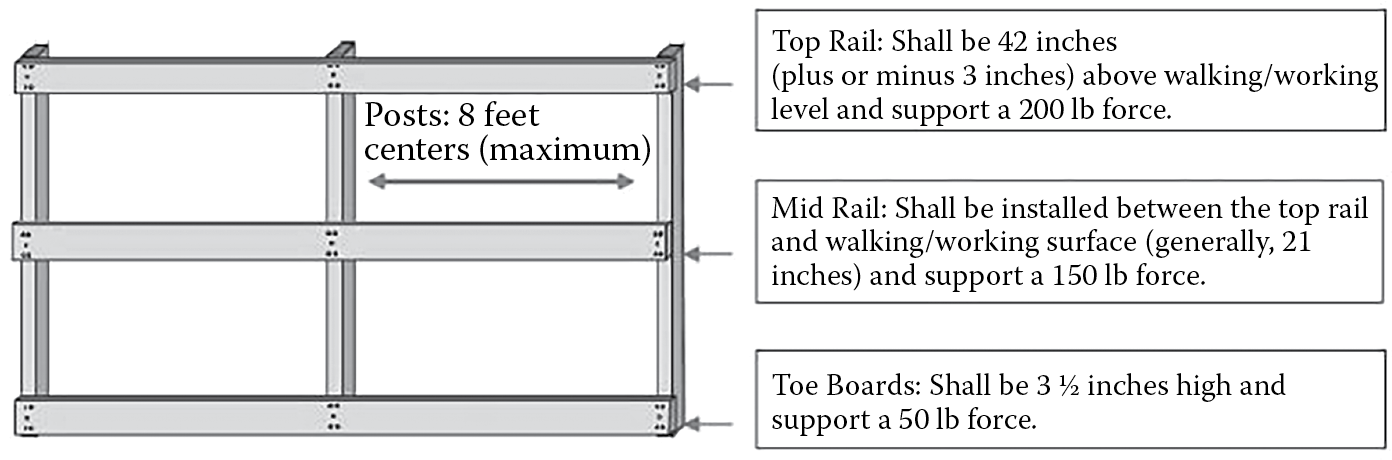
1.7.2 Guardrail Systems
Guardrail systems are made up of vertical rails, top rails, mid rails, and toe boards. See Figure 1.4. They are designed to keep workers from getting too close to the leading edge of a roof. They must be 42 in. (±3 in.) above the walking/working level and must be able to withstand a sideways force of at least 200 lb. as applied 2 in. from its top edge. Additionally, it must be able to withstand a downward force of 150 lb. or in any other direction. Intermediate vertical members, between posts, must be no more than 19 in. apart.
1.7.3 Safety Netting
Safety netting is used to catch a fallen worker. See Figure 1.5. There are specific instructions as to the deployment of safety netting and testing conditions. Information on safety netting is beyond the scope of this class, but can be found in OSHA publications.

1.7.4 Personal Fall Arrest: Body Harnesses
The use of body harnesses and related hardware is the standard approach to arresting falls. See Figure 1.6. There are four components that make up a fall arrest system based on body harnesses: anchor point or tie-off point, the body harness itself, lifeline connecting the harness to the tie-off point, and suspension trauma safety straps (stirrups).

A safety harness should be worn whenever there is risk of falling from heights (Courtesy of University of California, San Diego).
The anchor point for pitched residential roofs is usually a plate with clearance holes for attachment to the roof and a large “D-ring.” See Figure 1.7. There is a companion D-ring on the harness and these two D-rings are connected together by the lifeline. The lifeline should incorporate a shock-absorbing lanyard, which tears out and reduces the maximum force experienced during a fall.

The anchor plate needs to be fastened to a structural member such as a rafter, using the manufacturer’s installation instructions (Courtesy of Werner Company).
After a fall the involved worker will experience “suspension trauma” due to the pressure that straps at the bottom of the harness exert on the crotch. Pressure on the femoral artery causes blood to be trapped in the legs, reducing the volume of blood circulating through the body. This trapped blood rapidly loses oxygen and accumulates toxins, which need elimination by the kidneys, and the heart and lungs may experience difficulty dealing with this “dirty blood” once the pressure is relieved and the blood is circulated through the rest of the body. I recommend the use of suspension trauma safety straps, which are contained in pouches attached to the harness at the hips and can be deployed after a fall. Each of these straps usually has two loops that can be stepped in, relieving pressure on the femoral artery while waiting to be rescued. The student in Figure 1.8 can be seen using stirrups to good effect.

Strrups (a/k/a suspension trauma safety straps) are a simple addition to a body harness and prevent the stress-related effects of a fall.
1.7.5 Rescue Plan
Even with a well-designed fall protection system employing a body harness with suspension trauma safety straps, it is imperative to have a fall rescue plan: You need to know how to rescue yourself or have someone else rescue you promptly.
It is beyond the scope of this class to describe, let alone instruct in, the area of rescues, self or assisted. There are “self-rescue” methods, including rappelling and assisted general methods using pulleys and tackle. Included in the handouts for this laboratory is an excellent article published by the state of Washington, titled “Fall Protection, Responding to Emergencies” (F417-208-000).2 A section on rescues includes six different rescue techniques.
Nonetheless, as part of studying this chapter, each student will be fitted with a safety harness and will experience a “fall” by stepping off a step ladder. The student will deploy and use stirrups—technically called “suspension trauma safety straps”—to take the stress off the crotch. During class, this stress will be discussed in some detail, including the maximum time an individual can remain suspended by a harness without lanyards. We will discuss the need for a rescue plan in addition to a safety plan.
1.7.6 Ladders and Ladder Safety
Falls from portable ladders (step, straight, combination, and extension) are one of the leading causes of occupational fatalities and injuries. Figure 1.9 depicts two setup rules. The first rule requires that the ladder be tilted at approximately 75°. At this angle, the ratio of the distance from the ground to the top support to the distance of the setback of the ladder from vertical should be 4:1. The second rule requires that the ladder extend 3 ft. above the edge of the roof. Ladders with fiberglass rails have become the norm; they generally weather well and are nonconductive. Other commonsense guidelines include the following:
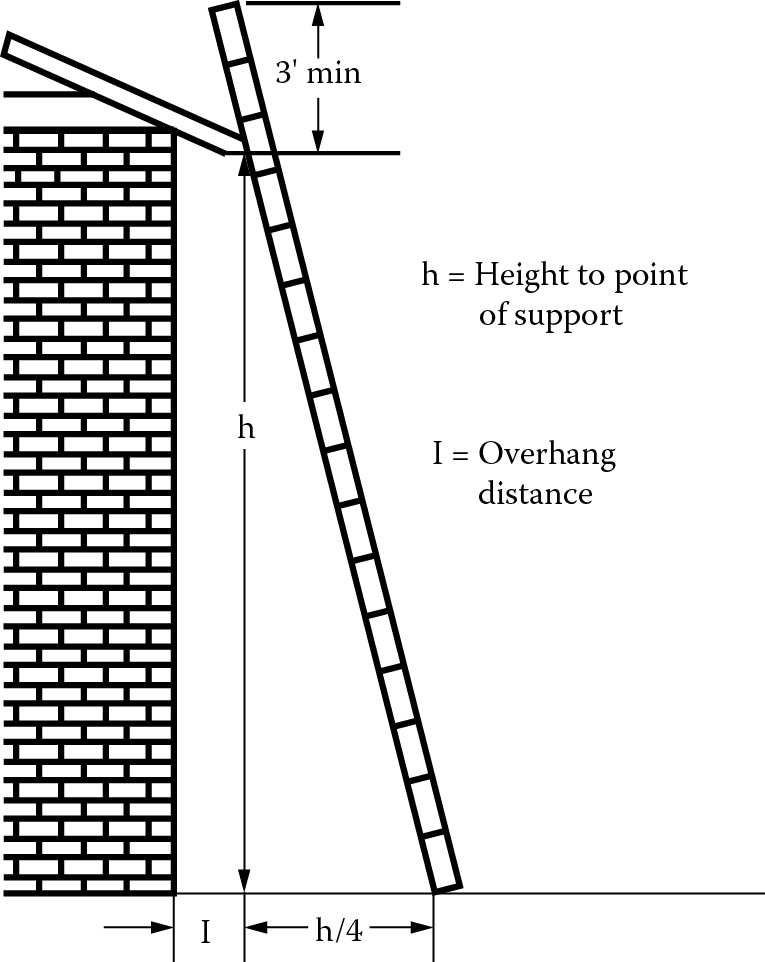
Proper setup for an extension ladder includes angle with respect to the ground and extension above the roofline.
- Read the complete ladder manual.
- Do not exceed the maximum load rating of a ladder.
- Inspect ladder before use.
- Use a ladder only on a level and stable surface.
- Ladders should be tied-in to prevent their movement. This can be done by attaching the ladder to the eaves using an eye-bolt, or some sort of secure blocking where the ladder contacts the horizontal surface.
Always maintain a “three-point contact” (two hands and a foot or two feet and a hand) with the ladder when climbing a ladder. This rules out carrying anything in your hand(s) while climbing a ladder. Gear can be hoisted up to the roof using rope, or a small backpack can be used. Refer to the OSHA Portable Ladder Quick Card for more information.3
1.8 Electrical Safety
Almost all of the work in this laboratory will be performed on unenergized circuits. We will, however, use electrical tools and there will be times when live circuits are present. In addition, in the construction industry, overhead power lines and energized circuits are the norm, so it is extremely important that students be trained in the recognition of electrical hazards and power tool safety. There are three general types of electrical hazards: burns, shock, and electrocution (death).
1.8.1 Overhead Power Lines
Assume at all times that overhead power lines are energized. Stay at least 3 m (10 ft.) from a power line, especially on a roof.
1.8.2 Operating Electrical Equipment
Before using, make sure that all electrical equipment is in good working order. Look for frayed power cords and extension cords and damaged strain relief fittings. All cords should be of the three-wire type and designated for “hard usage” or greater). Use ground fault circuit interrupters (GFCIs) on 120 V, single phase 15 and 20A receptacles, and when working in damp locations. Use double-insulated tools wherever possible.
Electrical equipment must be repaired by a qualified and authorized individual. Never operate electrical equipment while standing in water.
When installing or servicing equipment with live circuits it is recommended that a full face shield be considered, as this type of protection mitigates the hazards of arc-flash to a greater degree than safety glasses or goggles. In addition, specialized rubber gloves should be used as well as insulated tools such as screwdrivers and pliers. These gloves, rated for electrical work, are mandatory when working around live electrical circuits with voltages exceeding 50 V. They should be purchased from a reputable electrical distributor such as CED and should be clearly marked as rated to 1000 V. Look for markings to indicate that these gloves meet ASTM D 120, IEC EN60903, NFPA 70E1 standards. The gloves will cost in the neighborhood of $100. They should be stored in a cool place away from sunlight and should be replaced as often as once a year or when showing any wear, a tear, or a hole.
If there is any concern about live circuits, the best technique is to de-energize the circuit by means of disconnection accompanied by lockout and tag-out mechanisms (see following). One can also use a noncontacting alternating current (AC) voltage sensor.
1.9 Moving and Carrying Heavy Objects
Generally speaking, workers moving heavy objects should use specialized equipment such as dollies, hand trucks, wheelbarrows, and carts. A single worker should avoid lifting or carrying objects weighing more than 23 kg (50 lb.). When lifting a heavy object, a worker should bend his or her knees, keep his or her back upright, and lift the object straight up from directly in front of or between the feet.
1.10 Roofs and Attics
Roofs can be 15°C hotter than ambient temperature due to heating from sunlight. The roof then reradiates in the infrared, adding to the direct solar radiation experienced by a worker.
Perhaps the most extreme environment regularly encountered is an unventilated attic space. I have personally recorded an attic temperature of 60°C (140°F) in a 7:12 Tudor-style roof on a sunny summer day in Los Angeles. I was in the process of installing three solar-powered attic fans. I restricted my working time to 30 minutes at a time. After 4 hours in this attic space, all of my clothes were completely soaked and my tennis shoes were filled with sweat.
Students should be particularly careful when working on rooftops or in attics, monitoring each other and making sure that everyone is hydrated.
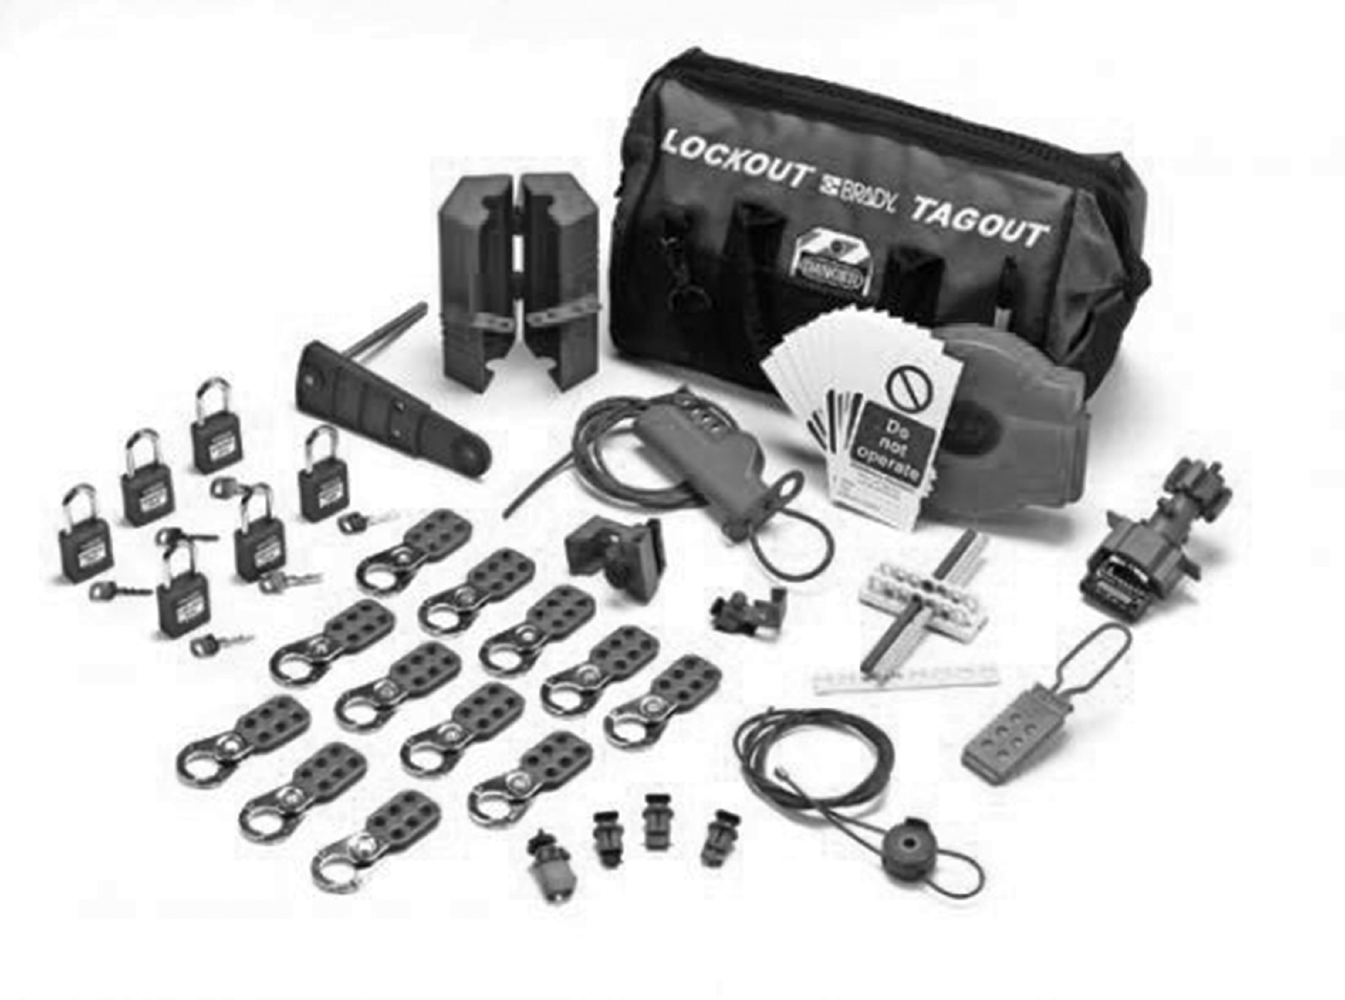
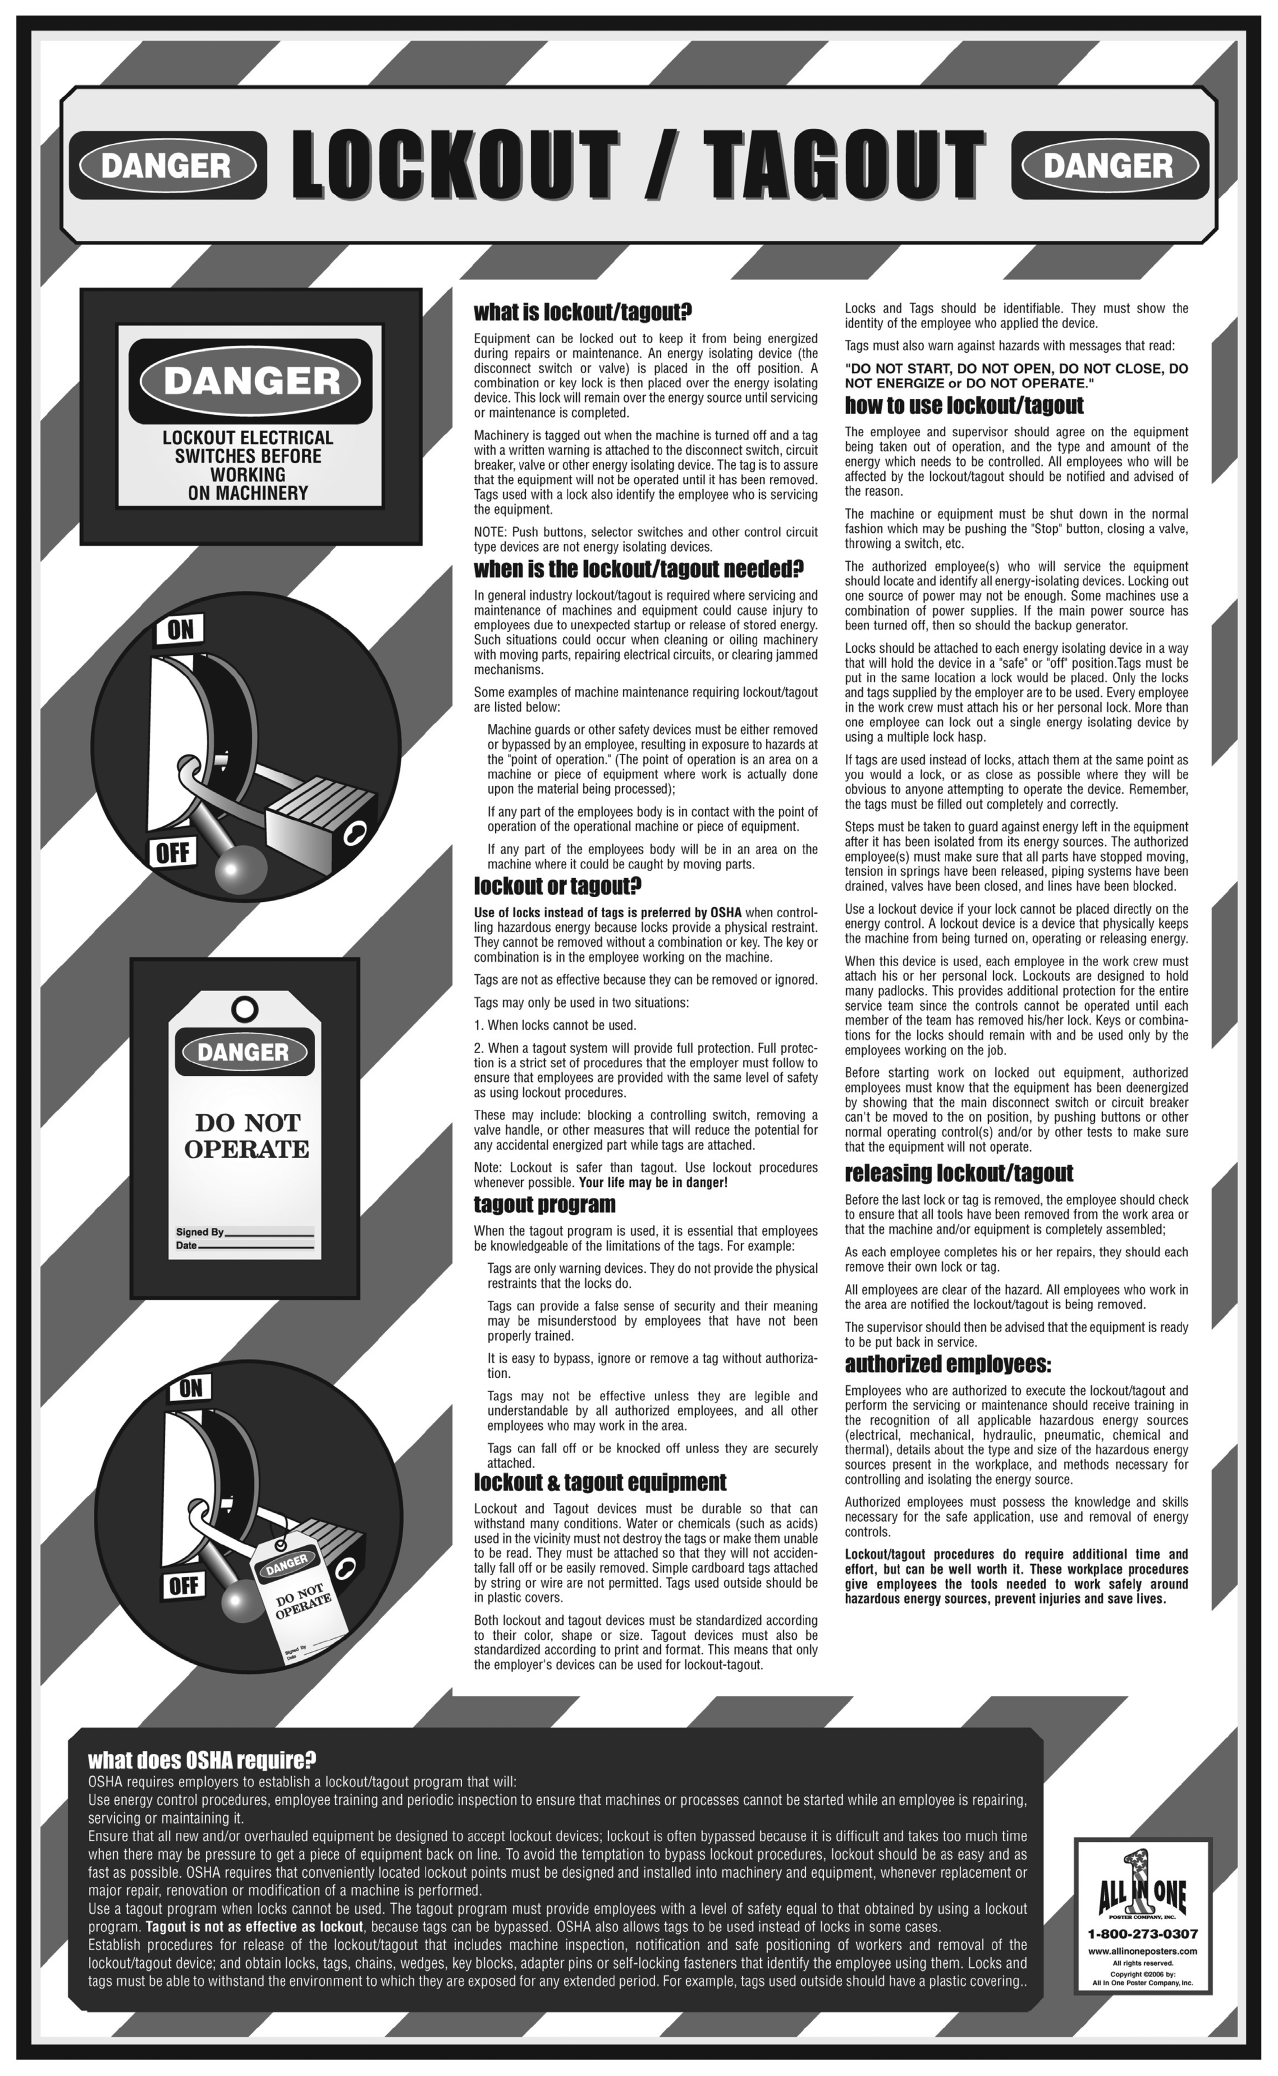
1.11 Lockout/Tagout
Lockout/tagout (LOTO) is an important safety procedure to ensure that dangerous equipment is turned off and not activated until work is completed. Specifically, LOTO is followed when installing, repairing, or replacing PV systems. It is also applied generally to electrical systems and dangerous machinery. It is a less well known fact that LOTO is also a recommended practice in the plumbing industry and when securing equipment such as backhoes and graders.
The kit shown in Figure 1.10 includes scissors clamps with multiple padlock holes, four padlocks, tags, and specialty items such as lockouts for electrical breakers. All affected parties place their own padlocks on the hasp and keep the key. Only when all parties agree that the work has been completed are all of the locks removed. This procedure is usually accompanied by a written log including a clear recitation of the procedures involved and the entities involved.
The scissors clamp shown in Figure 1.11 has room for six padlocks. It can be attached directly to the hasp on a piece of equipment or it can be used to secure a cable.

The LOTO device shown in Figure 1.12 is locking out a single breaker in a service panel while work is being performed on the branch circuit.

The LOTO device shown in Figure 1.13 is locking out a disconnect switch.

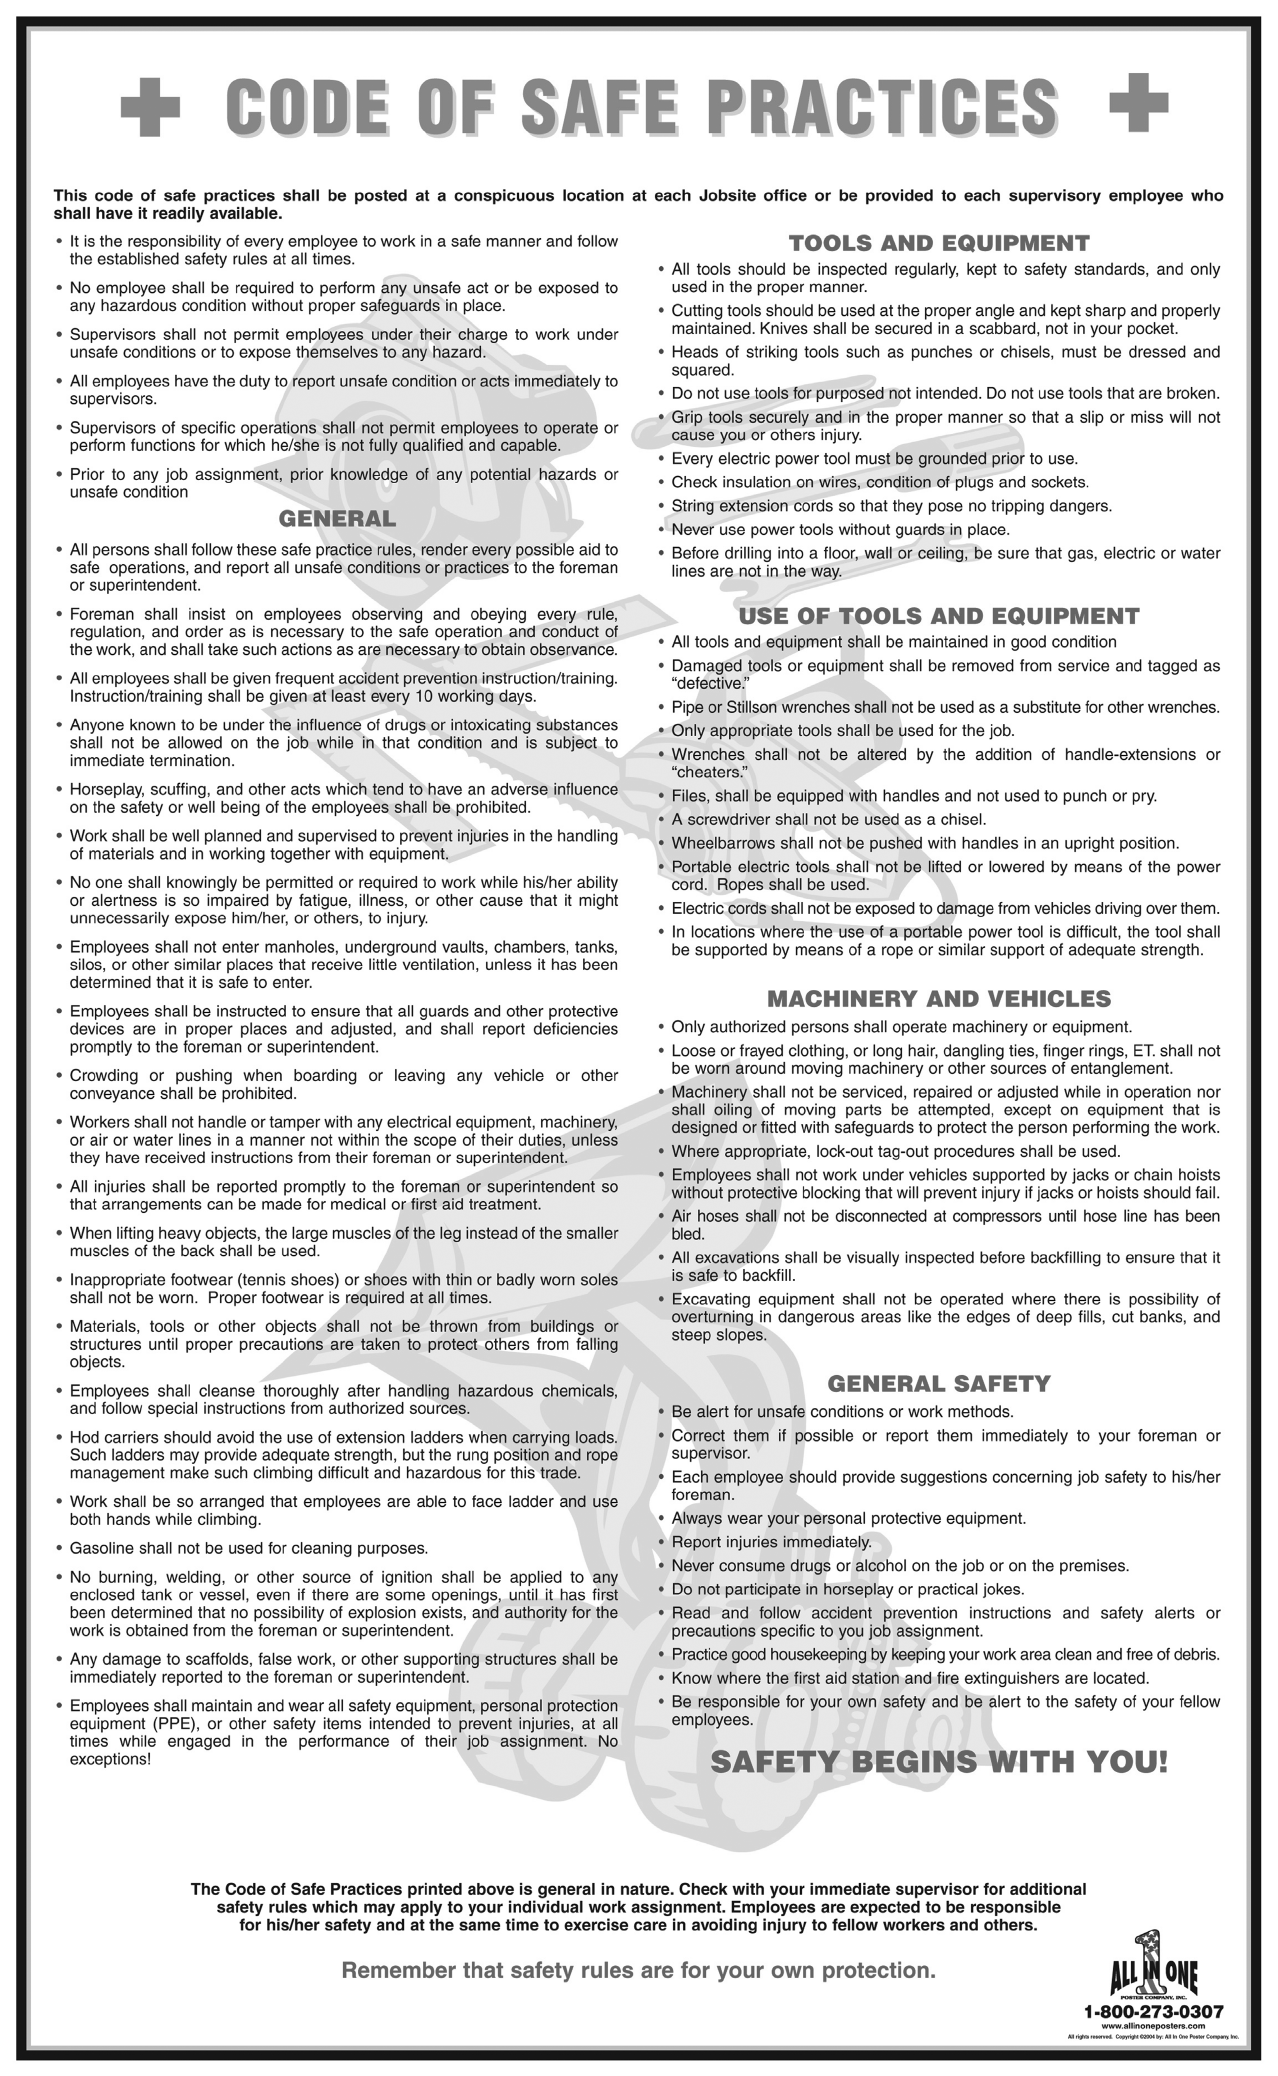
1.12 Safety Posters
We have prominently displayed a total of eight safety posters on the walls of the solar laboratory. See Figure 1.14. Each of them covers an important topic regarding photovoltaic installation. They include the following:

Wall-mounted safety posters (From the All in One Poster Company, Buena Park, CA, [email protected] ).
- Code of Safe Practices—Figure 1.15
- Heat Stress—Protecting Yourself in the Sun—Figure 1.16
- Safe Lifting Practices, Slips, Trips and Falls—Figure 1.17
- Emergency First Aid—Figure 1.18
- Lockout/Tagout—Figure 1.19
- Forklift (Federal or California)—Figure 1.20
- Personal Protective Equipment—Figure 1.21
- Portable Power Tools Safety and Use—Figure 1.22
These posters are reproduced in the following pages. The following OSHA and NIOSH sources should be printed out and maintained as references:
Code of safe practices (From the All in One Poster Company, Buena Park, CA, sales@allinone posters.com).

Heat stress—protecting yourself in the sun (From the All in One Poster Company, Buena Park, CA, [email protected] ).

Safe lifting practices; slips, trips, and falls (From the All in One Poster Company, Buena Park, CA, [email protected] ).
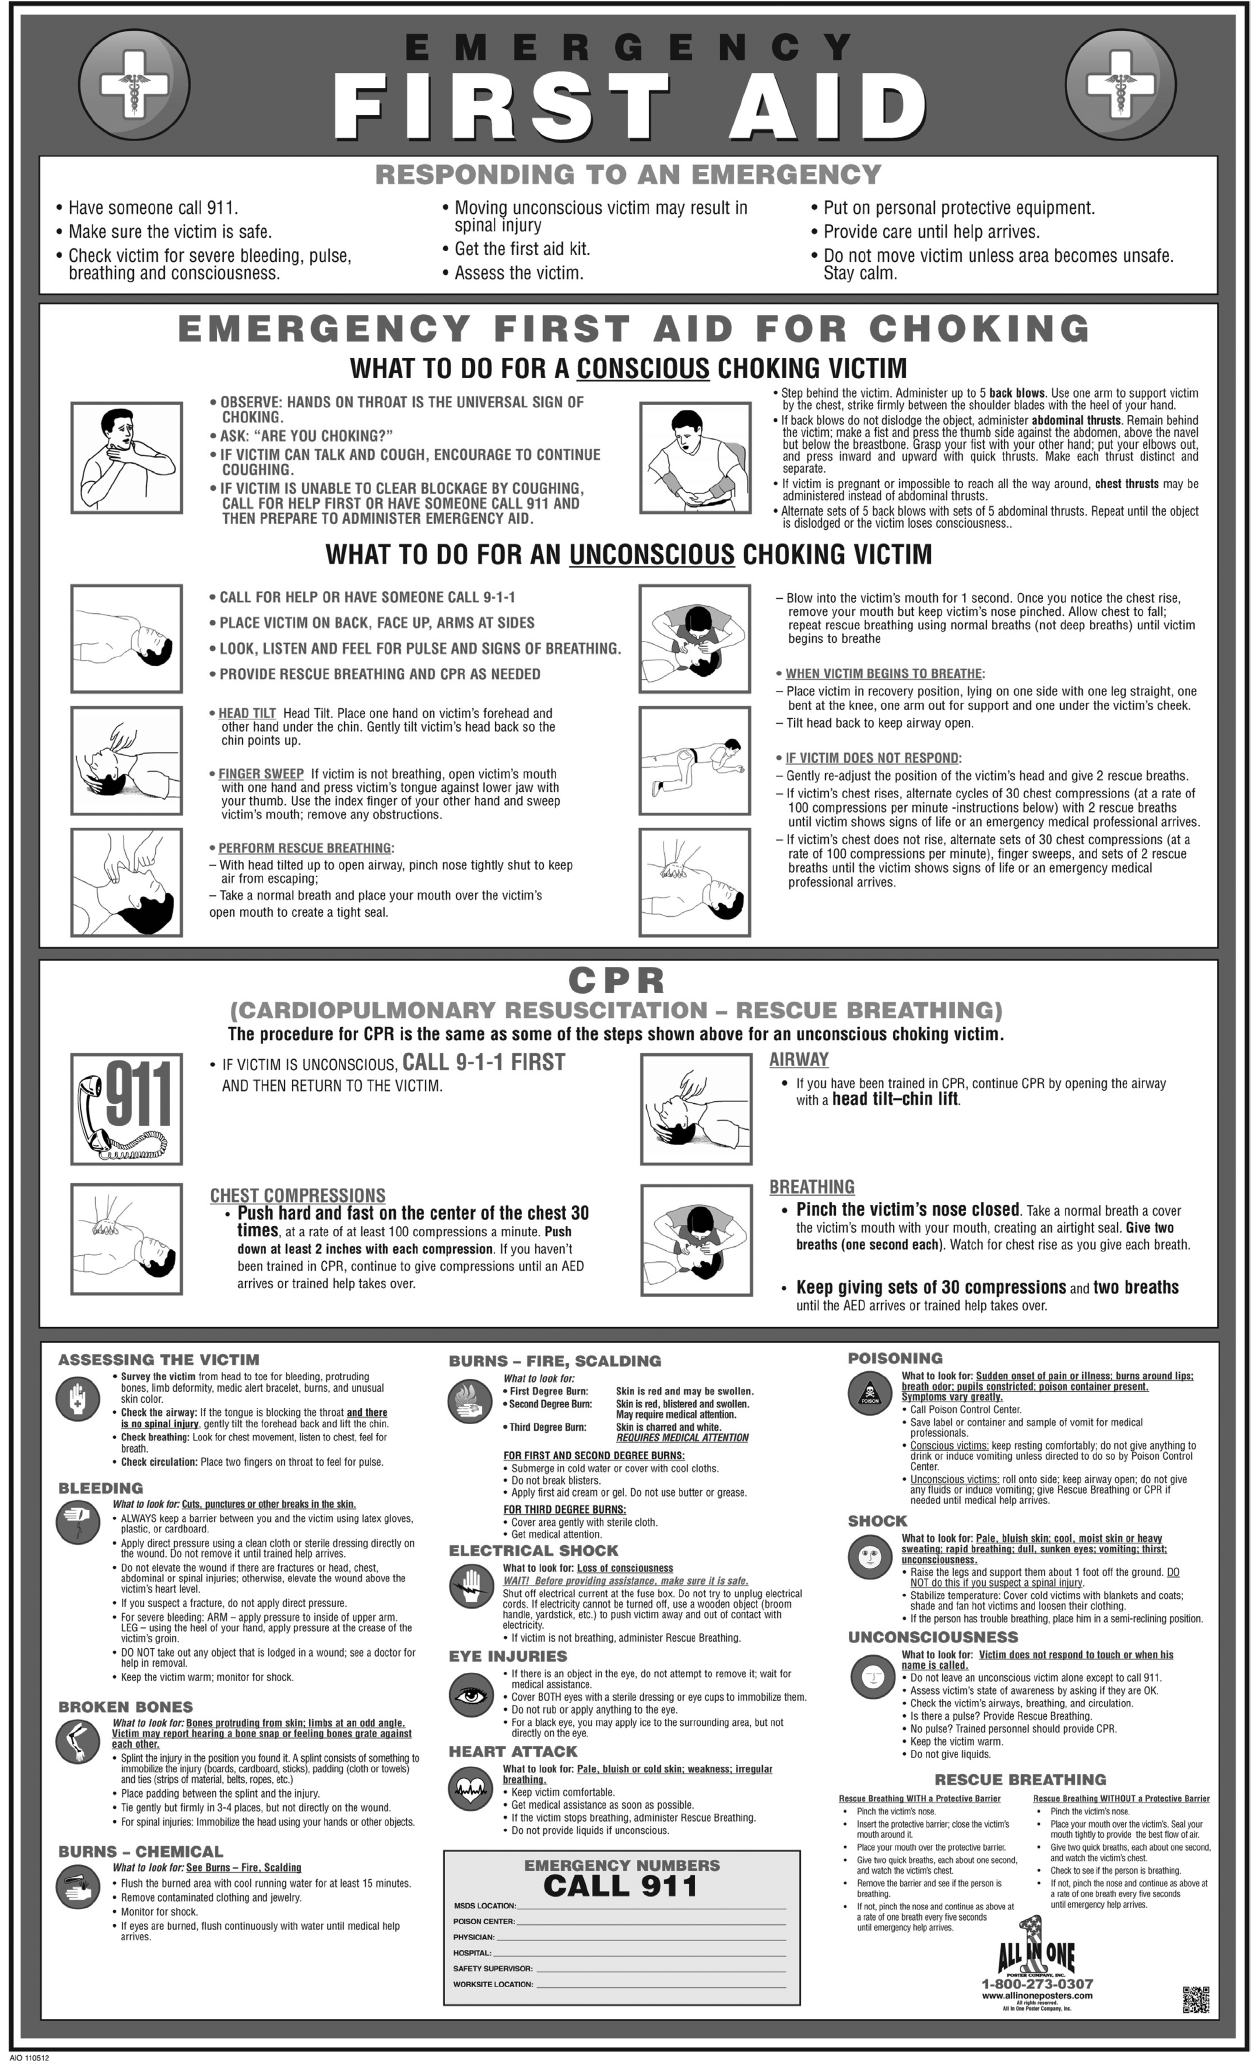
Emergency first aid (From the All in One Poster Company, Buena Park, CA, [email protected]).

Forklift (federal or California) (From the All in One Poster Company, Buena Park, CA, [email protected] ).
Personal protective equipment (From the All in One Poster Company, Buena Park, CA, [email protected] ).

Portable power tools: safety and use (From the All in One Poster Company, Buena Park, CA, [email protected] ).
- OSHA occupational heat exposure
- Heat exposure worksite posters
- OSHA Quick Card
- NIOSH heat stress
- Heat stroke
- Cold stress
Notes
1. This information is not intended to replace the advice of a doctor. The author and Taylor & Francis Group disclaim any liability for the decisions you make based on this information.
2. FallProtectionEmergencies.pdf