Power Apps provides many configurable components that you can configure based on your business needs. Its model-driven apps have personalization and advanced settings.
Using the personalization settings, you can set your personal preferences, which are applicable to you only. Using the advanced settings, you can configure settings that are applicable to all users.
Admin Centers and Their Uses
Admin Center Links
Microsoft 365 Admin Center: Use this Admin Center to add/modify users and products and to add licenses to users. | |
Power Platform Admin Center: Use this to manage environments and add users to the environment and other settings. | |
Power Apps Admin Center: Points to the same Power Platform Admin Center. | |
Dynamics 365 Advanced Settings: Use this to manage the advanced settings. | https://[orgname].[region].dynamics.com/main.aspx?settingsonly=true |
Power Apps Maker Portal: Use this to create and manage Power Apps. | |
Azure Active Directory: Use this to manage the Azure app registration and the Azure settings. | |
Power BI Admin Center: Use this to define the Power BI settings. | |
Preview App Maker: Use this to see the preview features. | |
Office Home Page: Use this for all apps on the Office dashboard. |
Personalization Settings

A window has the settings option selected with a context menu that has options in rows labeled personalization settings, advanced settings, about, privacy and cookies, and software license terms.
Settings in Power Apps
In the Personalization Settings, you will see many options, such as General, Synchronization, Activities, Formats, Email Templates, Email Signatures, Email, Privacy, Language, and so on.
Set the Default Pane Option
You can set a default pane so that when you log in, your default pane automatically loads.

A segment of a window titled set personal options has two dropdown boxes on the same row, each is boxed. On the left, the default pane has students info selected, and on the right, the default tab has students selected.
General personalization settings
Now when you open the app, the Student Info area and Students tab will load as the home page by default.
Change Record Count Per Page in Views

A segment of a window has text that reads Set the number of records shown per page in any list of records. On the left, it has a label, records per page, with a dropdown box on the right, where 100 is selected.
Changing the per page record count

A window of Dynamics 365. From the top, it has a search and menu bar. Below, on the left, it has a navigation pane, where accounts is selected. Accounts page is at the right side, listed with 9 rows of account names. On the bottom part, a label that reads 1-100 of 101 is boxed.
Per page record count has been changed to 100
Time Zone and Default Currency Setup

A segment of a window has two text labels that read set the time zone you are in, with a dropdown box below, where G M T, plus sign, 05.30, Chennai, Kolkata, Mumbai, New Delhi is selected, and set a default currency, where Canadian Dollar is selected.
Time zone and currency options
Email Templates and Signatures
You may find that you often send very similar emails to customers, with some dynamic values being the exception. For example, when you send a welcome email to customers, the content might be the same except for the salutation and the customer’s name. For these types of scenarios, you don’t want to have to re-type the same content every time. Instead, you can configure email templates that contain reusable content in the email body with dynamic values. You simply need to click Send. This is a time-saving tool you can use in your day-to-day business dealings when sending emails.

A segment of a window has the email template on the menu column selected. Below, a column labeled new is boxed.
Creating a new email template

A dialog box titled Email Template type, with details below that reads select a template type to use for this new email template has a dropdown box below, where row 1, global, is selected.
Creating a global template
For the global type, you can use dynamic field values from the User entity only. For the entity-specific type, you can use user entities and targeted entity-specific field information in the template. This example sets the Type to Contact and shows how to configure the template.
Give the template a name and set the Permission level to Individual. If you set Permission level to Organization, anyone from your organization can use the template.

A window with a column labeled insert dynamic text is boxed. Atop is a dialog box titled Edit dynamic test with a box that has two dropdown boxes, with contact and full name selected. Then followed by an empty text box for default text. Below, on the bottom right corner are two command buttons labeled insert, and cancel. Insert is boxed.
Inserting dynamic content inside a template

A window titled Welcome Email Template for New Contact. It is in the template section with 2 boxes named details and the Template editor below. Under details, it has details, which are name, permission level, category, language, and description. Under template editor is a text box for the subject and the body of the email.
Individual scope template

A segment from a window has a column labeled email signatures selected and boxed. Below, an option labeled New is boxed.
Email signature configuration options

A window of Dynamics 365 has a menu and search bar at the top, and a navigation pane on the left, where row label email signatures are selected. On the right, the option labeled save, row label set as default with yes, and salutation on the email body that reads regards, Sanjay Prakash, Microsoft M V P are boxed.
Saving a template record with the Default option set to Yes

A window of an email page has box labels, from top to bottom, which are contact dot contact, activities, new activity, and email on the fourth row in a context menu.
Adding email activity for a customer

A window has a column labeled insert template boxed. Atop is a dialog box with a navigation pane on the left with a row labeled welcome email template for new contact selected and boxed. On the right, the email is boxed.
Choosing an email template while sending an email
Advanced Settings

A window has a menu bar at the top, followed by icons of Microsoft Excel and S Q L on the left, below, and a navigation pane of settings with advanced settings boxed on the right.
Advanced find option

A window of Dynamics 365 under the settings section. It has 7 column headers, which are business with 6 row labels, customization with 5 row labels, system has 2 columns with 6 and 5 row labels, process center with 2 row labels, portals, extensions, and application.
Advanced find screen with links
In this chapter, you will learn about some of the important settings for model-driven Power Apps.
Data Import in Power Apps
Using the Data Import feature, you can import data from Excel files into Dataverse entities. Say you store student records in an Excel sheet and want to import them to the Dataverse. You can use the import feature to do this. Use the following steps to do this.
Step 1: Prepare a Raw Excel Sheet

An Excel worksheet. Under A column in rows 1 to 3 are full name, Clyde Richards, and Robin Richards. Under B column are email, clyde at gmail dot com, and robin at gmail dot com. Under C column are mobile, 1111222211, and 8888666677. Under D column are gender, female, and male.
Importing Excel data into a Dataverse table
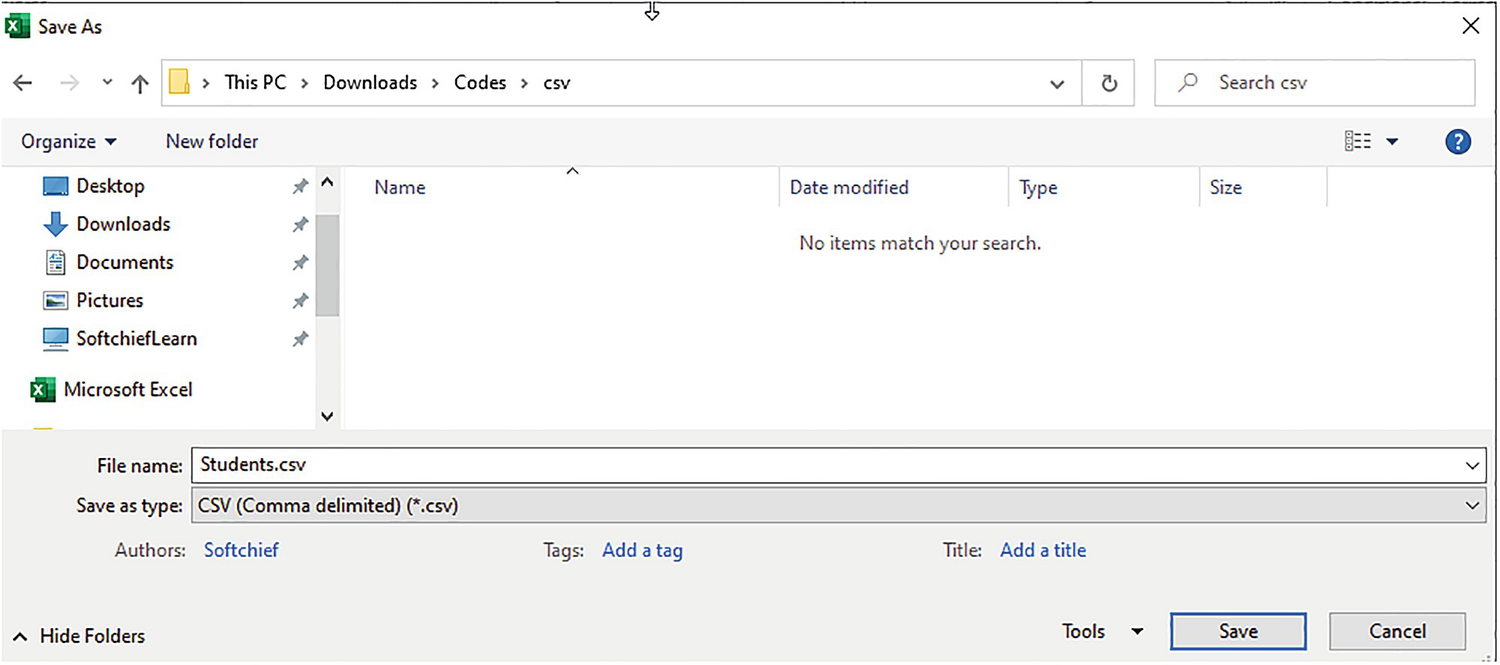
A dialog box, with the file path in the address bar in order, which are this P C, downloads, codes, and c s v. On the left, it has a navigation pane. At the bottom part, it has a text box of file name labeled students dot c s v, and a dropdown box of file type, with C S V selected. On the bottom right corner are 2 command buttons save and cancel.
Saving a file as a .CSV file
Step 2: Upload a CSV File

A window of Dynamics 365 under the settings section. It has 7 column headers, which are business with 6 row labels, customization with 5 row labels, system with 2 columns with 6 and 5 row labels. Data management, under column system is boxed.
The Data Management option
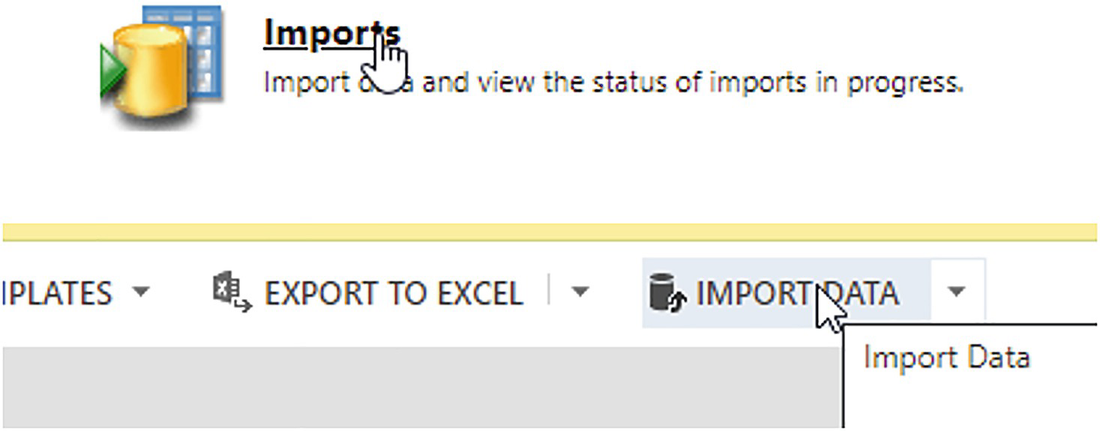
A segment of a window has header imports, with detail below that reads import data and view the status of imports in progress. Below is a row with columns labeled export to Excel and import data.
The Import Data option
The Import Data option will open a window where you can browse the CSV file for processing.

A dialog box titled upload a data file has a box below with a command button choose file and a text box with label students dot c s v, boxed. On the bottom right corner are the command buttons next and cancel.
Choosing the .CSV file to import

A segment from a window has a text box labeled System Data Maps with details below that reads default, automatic mapping.
Default mapping option
Step 3: Map an Entity and its Fields

A window has a segment labeled Map Record Types. From the top, it has a box labeled the data files have been successfully mapped to the target Microsoft Dynamics 365 record types. Below are columns labeled source data files with row entry student, with a check sign, and Microsoft Dynamics 365 Record Types with row entry student.
Mapping table

A window titled Map Fields, from the top has a box labeled all the record types with fields have been successfully mapped. Below, on the left, is a box with column header Dynamics 365 Record Types with row entry student. It has 2 columns on the right labeled source fields with row entries required fields and optional fields, and dynamics.
Mapping columns
Once the fields have been correctly mapped with the Dynamics 365 entity, click Next to review. Then click Submit to finish the steps.

A window of Dynamics 365, under data management, has a table titled my imports. It has column labels import name, student reason, success, partial failure, errors, total, created on, and created by. On the second column, row entries student dot c s v and submitted are boxed.
Import result

A table has eight columns and a row. The column headers are import name, status reason, successes, partial failures, errors, total, created on, and created by. Each row entries, which are students dot c s v, completed, 2, 2, and 4.26.20221 1 are boxed.
Import success

A table titled Active Students has 5 columns and 3 rows. Name has row entries Clyde Richards, Richi Sharma, and Robin Richards. Created on has row entries 4.26.2022 1.18 PM, 4.26.2022 10.07 AM, and 4.26.2022 1.18 PM. Email has row entries clyde at gmail dot com and robin at gmail dot com. Mobile number has row entries 1111222211 and 8888666677.
Import success records
This shows that you have successfully imported the student records into the Dataverse.
Configure Duplicate Detection Rules
Duplicate detection rules can be configured to determine if a record is a duplicate of another record by configuring matching fields. Duplicate detection checks are enforced while creating new records and updating existing ones. You can also enable duplicate detection rules when importing data.
To enable duplicate detection rules, navigate to the advanced settings and, from the Data Management option, select Duplicate Detection Settings.

A window Dynamics 365 has a row labeled duplicate detection settings, with detail below that reads select default duplicate detection settings for your organization.
The Duplicate Detection option
When a record is created or updated: This option will check for duplicate records when creating new records or updating existing ones.
When MS Dynamics 365 for Outlook goes from offline to online: This option will check for duplicates when you are offline and you created some records and duplicate record has not been checked. Once you are back online, the duplicate checks will run.
During data import: This option will check for duplicates during the Data Import operation.

A window titled duplicate detection settings has four checkboxes under the row label, enable duplicate detection. On the bottom right part are command buttons O K and cancel.
Duplicate Detection settings

A window has a segment named Duplicate Detection Rules, with detail below that reads create, modify, and publish duplicate detection rules.
Duplicate Detection Rules option
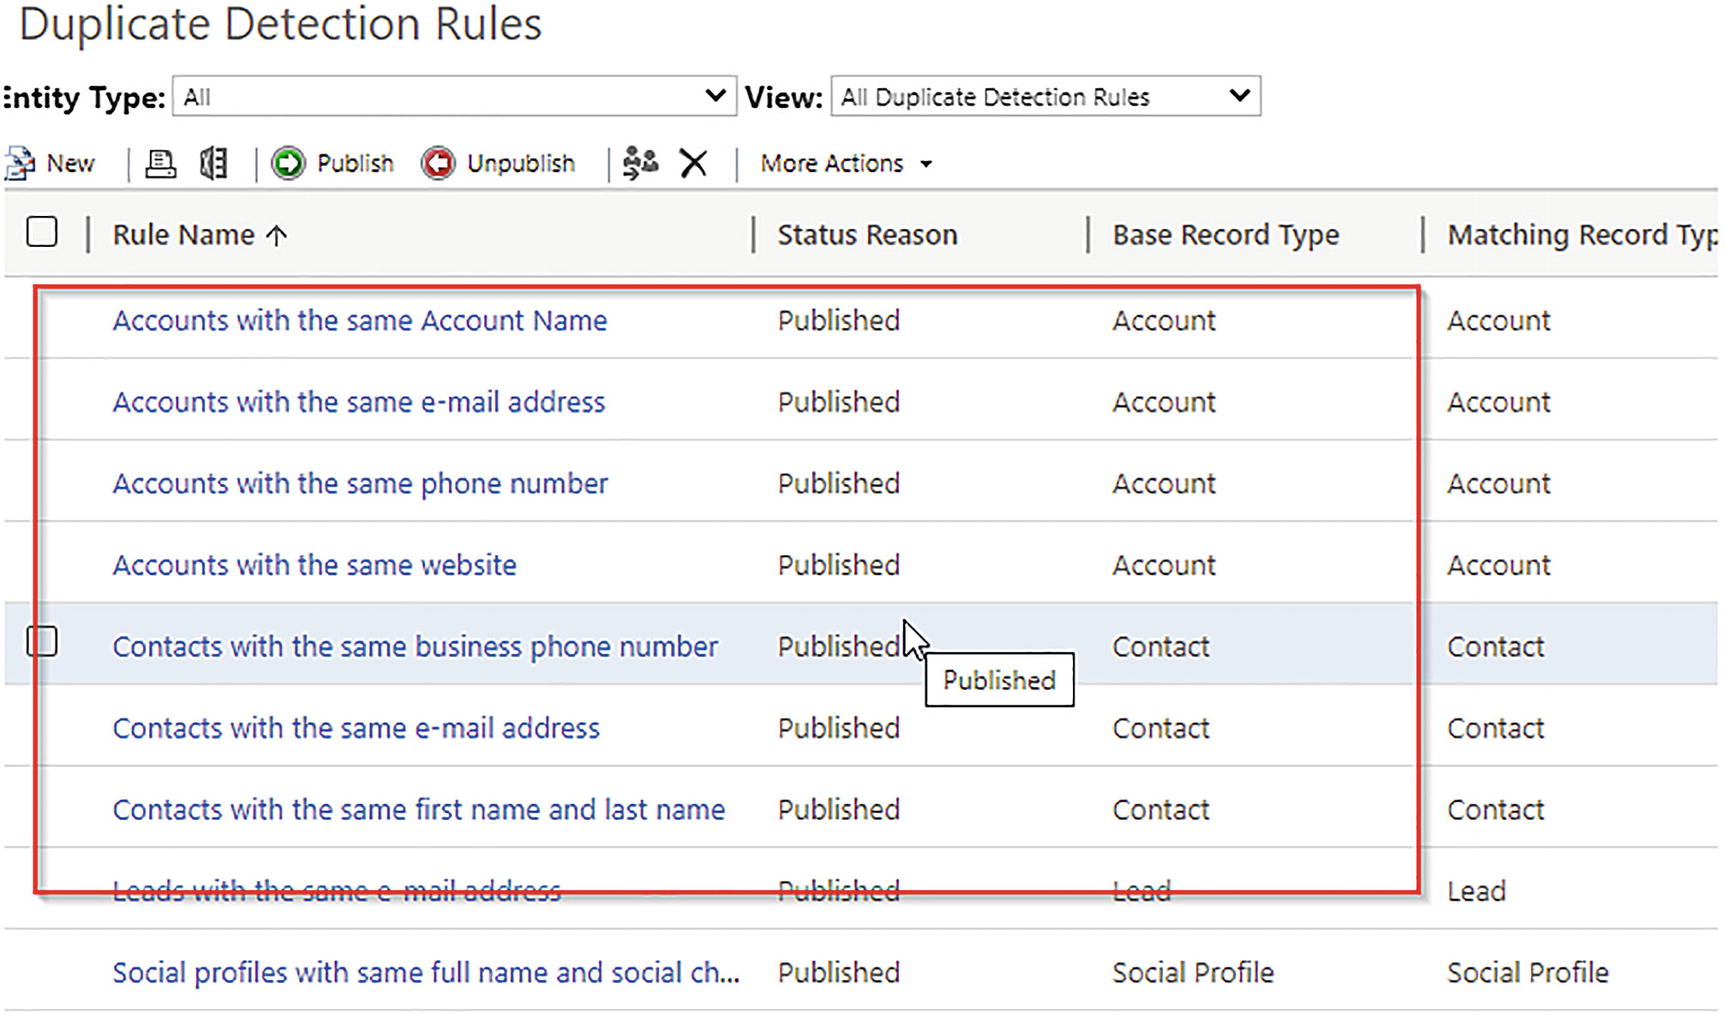
A window named Duplicate Detection Rules has a table that has four columns and nine rows. Column entries from columns 1 to 3, and row entries from rows 1 to 8 are boxed.
List of available Duplicate Detection Rules
In the New Rule screen, specify the name for the rule. Say you want to create a duplicate rule for the Students entity. If two students have the same email ID, those are duplicate records.
In the New Rule screen, set Base Record Type to Student and Matching Record Type to Student.
In the Rule Criteria, select the Email field. For Criteria, choose Exact Match. Save the rule and publish it.

A window titled Duplicare Detection Rule, Students with Same Email Rule, under information. On the left, it has a navigation pane, and on the right, it has text boxes under details name, description, base record type, and matching record type. Below is a table with headers field, criteria, number of characters, and ignore blank values.
Configuration screen for the Student Duplicate Email rule

A dialog box named Duplicate record found has a text box of duplicates found labeled with Student, 1. Below is a table that has three columns and a row. The column headers are name, modified on, and email. On the bottom right corner are command buttons ignore and save, and cancel.
Duplicate record detected
You can either ignore the warning and save this field with duplicate data or you can cancel the save operation.
You can merge new record information with duplicate records and configure multiple duplicate detection rules for a single entity.
Configure the Auditing Feature in Power Apps
The Auditing feature logs changes that are made to customer records and user access so you can review this activity later. The Auditing feature is designed to meet the auditing, compliance, security, and governance policies of many regulated enterprises.

A window of Dynamics 365 under the settings section. It has 3 column headers, which are business with 6 row labels, customization with 5 row labels, system with 2 columns with 6 and 5 row labels. Auditing, under column system is boxed.
The Auditing feature
Follow below sections to enable auditing in Power Apps.
Enable the Global Audit Settings

A window has a segment named Global Audit Settings, with a detail below that reads select audit settings for your organization.
Auditing global settings

A dialog box titled System Settings, under auditing has checklists under row labels audit settings and enable auditing in the following areas boxed. It has two command buttons on the bottom right corner, which are O K and cancel.
Enabling Global Audit
Enable an Audit at the Entity Level

A window has a segment named Entry and Field Audit Settings, with a detail below that reads enable audit tracking on selected entities and fields.
Entity and Field Audit settings
When the screen open, expand the entity node and select the contact entity. In the Contact Entity Settings screen, enable the Audit flag.

A window with a boxed row labeled contact on the navigation pane points to a boxed check box labeled auditing on the bottom part.
Selecting an entity for auditing

A window with row labels in navigation pane, which are contact and fields, and row entry with name of mobile phone are boxed. Row entry mobile phone points to row label auditing with bulleted label enable on a window box atop.
Selecting columns for auditing
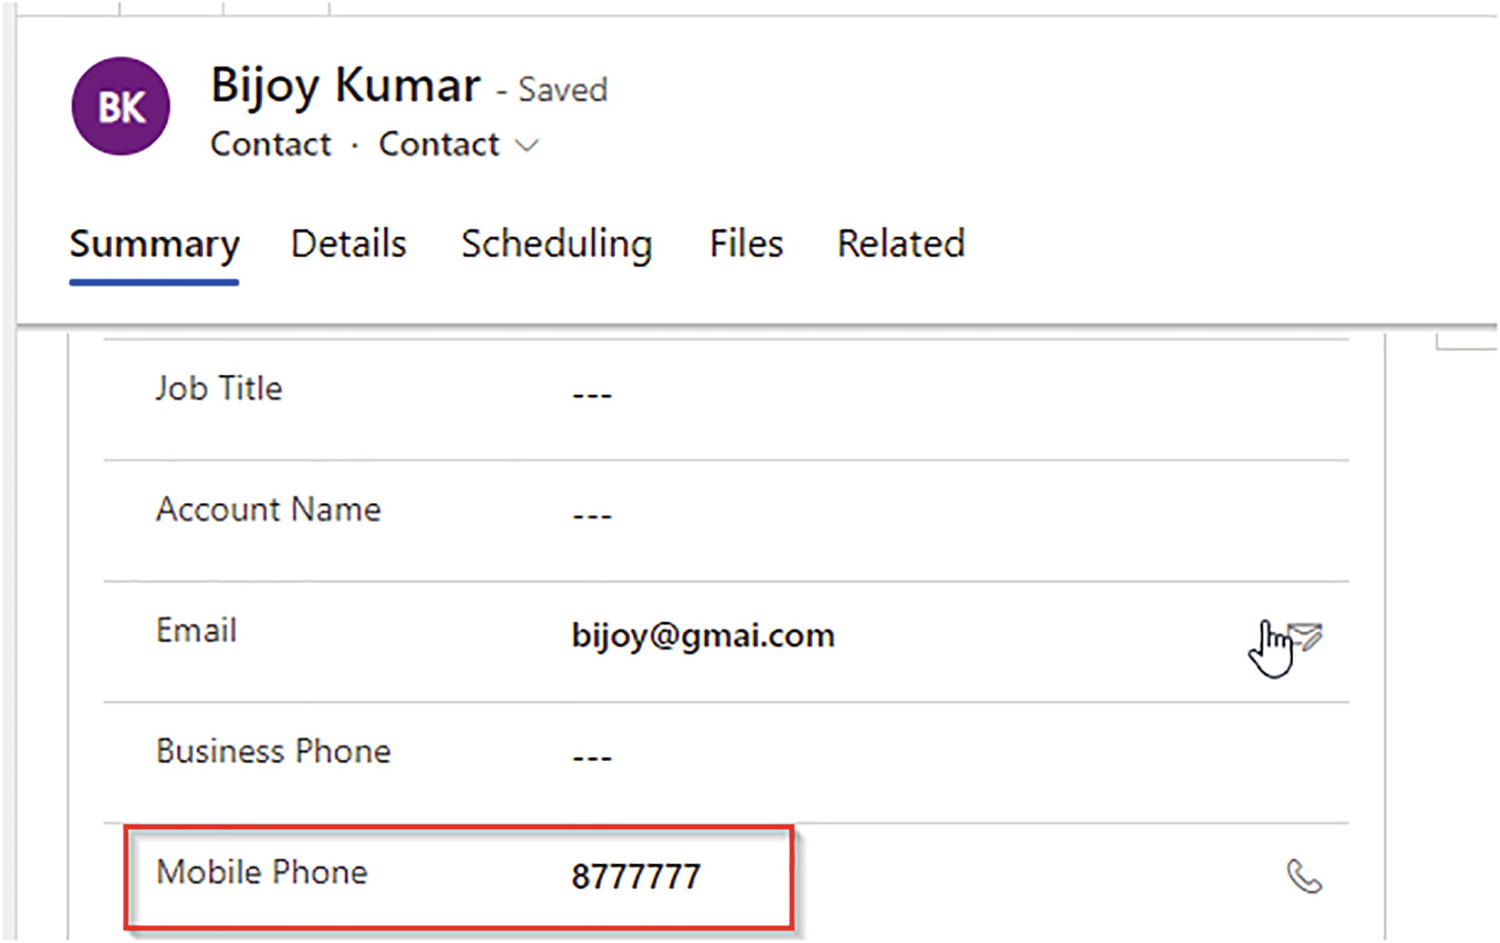
A window of the summary under the account of Bijoy Kumar has a table with a column and five rows. The row headers are job title, account name, email, business phone, and mobile phone. Row entries mobile phone and 8777777 are boxed.
Customer mobile number update screen

A window of audit history under the account of Bijoy Kumar has a table with six columns and three rows. Row entries, which are Sanjay Prakash, update, mobile phone, and 8777777 are boxed.
Verify the audit data using the Audit History option
Add Users to Environments
You can add new users to an environment using Office 365 Admin Center. After you add new users, you can assign a license to them so that they can access correct apps and tables with security roles.
Use the following steps to add new users to your environment.
Step 1: Open the Admin Center and Add a User

A window of a list of apps in two columns in five rows, which are One Drive, Excel, One Note, Power Automate, Power Apps, Word, PowerPoint, Share Point, Admin, and Lists. Admin app is boxed.
Admin option of the Office home page

A window of the Microsoft 365 admin center has a navigation pane on the left where the third row labeled active user is boxed. Under active user, on the menu bar, option add a user is boxed.
Adding a new user to the Dataverse

A dialog box titled set up the basics is on the basics phase. On the right, there are six textboxes with details to fill out, which are first name, last name, display name, username, domains, and password. On the bottom part is command button next.
Basic info about the user

A dialog box titled assign product licenses is on the product licenses phase. On the right, there is a dropdown box, where option United States is selected. Below, under assign user a product license are 6 checkboxes in rows, where dynamics 365 sales premium and office 365 F 3 are ticked. On the bottom part are command buttons back and next.
Assigning a product license to a user

A dialog box titled review and finish is in the final phase. Below, it has row headers, which are assigned settings, display and username, password, product licenses, roles, and profile info. It has two command buttons labeled back and finish adding at the bottom part.
Finish adding a user
Now you have successfully added a user to your Office 365 system. You can now assign a security role to that user. You will learn more about security roles later in this chapter.

A window of the Power Platform admin center has a navigation pane on the left where the second row labeled environment is boxed. On the right, on the menu bar, option settings are boxed. On the table, the first row of the environment column, development, is boxed.
Selecting environment settings

A dialog box with the file path of environments, development, and setting has a search bar followed by row labels product, business, user permissions, and audit and logs. Under users plus permissions, row entry named users is boxed.
Choosing the Users option

A segment of a window has a menu bar where add user option is selected. Below are folder or file labels in order, which are environments, development, settings, and users.
Adding a user to the environment

A window titled Add user has information and a header that reads user access requirements. Below is a text box with the label Rajeeb Kumar.
Searching for a user
This will add the user to the current environment. In the next step, you can select a security role that you want to assign to the user.

A dialog box titled Manage security roles, from the top has a dropdown menu with soft chief dev option selected, followed by a column header role with row entries account manager, activity feeds, A I B Roles, A I B S M L Roles, and Analytics Report Author. Account Manager is selected. On the bottom right corner are command buttons save and cancel.
Adding a security role to the user
Select a security role and click Save. You have successfully created a user and assigned a product license with a security role. The user can log in to Dynamics 365 using their credentials.
If you want to enable some model-driven apps for the security role, you can go to the app and click Manage Roles. Watch this video to learn about giving security access to model-driven apps for users: https://www.youtube.com/watch?v=StsyOdUo6s4.
Security Matrix and Configurations
Securing records from unauthorized users
Securing fields from unauthorized users
The security matrix combines access levels and privileges for entities to define a security role. On the top ladder of this security concept is the business unit.
Business Unit (BU)
A business unit is a logical grouping of related business activities. It is the foundation of the security structure in Microsoft Dynamics 365. Each user has to be part of a business unit. A default business unit is created when Dynamics 365 is installed.

A structural diagram of the T A T A. From the top, it has a column labeled T A T A. It is connected to boxed columns T C S and Tata Motor. The first boxed column, T C S, has two boxed columns below labeled T C S India that has T C S East India and T C S South India, and T C S The United Kingdom.
BU structure of the TATA example
So TCS India, TCS UK, TCS East India, and TCS South India, are child of TCS business unit. One user can be tagged with one Business Unit only. Multiple users can be tagged with the same business unit. One user cannot be tagged with multiple BUs. You can add multiple security roles to a business unit. All security roles of the parent BU are inherited by the children BU. Figure 8-51 shows the BU structure of this TATA example.

A structural diagram of the Global School, from the top, has a column labeled Global School. It is connected to boxed columns G S India and G S The United Kingdom. The first boxed column, G S India, has two boxed columns below labeled G S South India and G S North India.
BU structure of the Global School example
As per a new enhancement, you can add multiple security roles to a user from one BU or multiple BUs.
Privileges
Privileges are actions that users perform on a record. For example, they can create, read, update, and delete records.
Access Levels/Depths
None: No record access.
User: Only access to records owned by the user who’s logged in.
Business Unit: Access to records owned by the user plus access to records created by other users belonging to the same business unit as the initial user.
Parent Child BU: Access to records owned by the user plus access to records created by other users belonging to the same business unit as the initial user belongs, plus access to records created by users from the child business unit of the initial BU.
Organization: Access to records belonging to the organization regardless of the business unit.
Security Role
A security role defines how different users, such as salespeople, access different types of records. To control access to data, you can modify existing security roles, create new security roles, or change which security roles are assigned to each user. Each user can have multiple security roles. You can create a new security role or modify existing ones.
It is always a best practice to open an existing security role and copy it to create a new security role instead of creating a brand new role from scratch.

A window titled Power Platform admin center. On the left, it has a navigation pane, where the row labeled Environments is selected. On the right is the settings page with a dropdown box. Below are rows with headers labeled product, business, and users plus permissions. Below, a row labeled security roles is boxed.
The Security Roles option

A window of security roles under environments. From the top, it has a dropdown box with option soft chief dev selected. Below are columns with headers role and more actions. Roles has row labels account manager, activity feeds, A I B Roles, and A I B, S M L Roles. Each row labels has corresponding three-dotted symbol under more actions column.
Security roles of a parent business unit
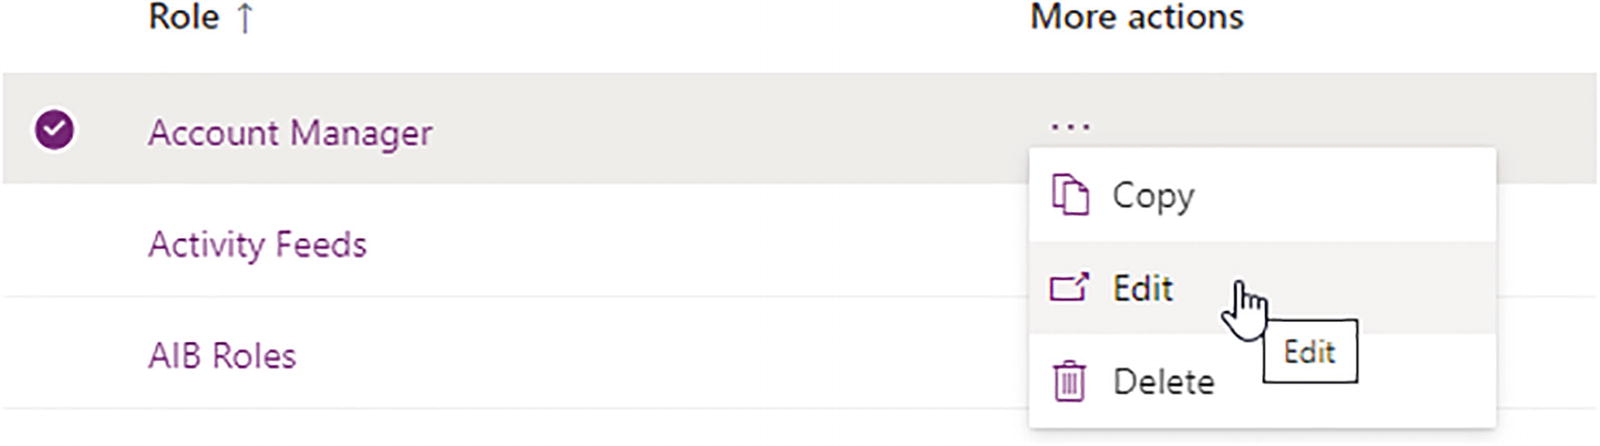
A window has a segment with column headers role and more actions. On role column, it has row labels, which are account manager, activity feeds, and A I B roles. Account Manager is selected, with its context menu on the right with row labels copy, edit, and delete.
The Edit Existing Role option

A window titled Power Apps, under Security Role, Account Manager. On the left, it has a box with 19 rows, labeled as entities, boxed. On the right, columns labeled create, read, write, delete, append, append to, assign, and share labeled as privileges are boxed, followed by circles on the thirteenth row labeled matrix, which is also boxed.
The Access Levels and Privileges with Entity matrix

A window has a segment that has 9 columns and 2 rows. The column headers are table, create, read, write, delete, append, append to, assign, and share. The row labels are shaded circles. On columns of create, delete, and assign, the circles are half-shaded. In columns read, write, append, append to, and share the circles are fully shaded.
Access level
This matrix shows that the Account Manager role has organization read access to the Account entity, which means account managers can read all account records available in the organization, regardless of business unit and owners.
The Account Manager role also has business unit-level delete permission to account records, which means account managers can delete account records that they created or that were created by other users in the same business unit.
The create, read, delete, write, append, append to, assign, and share privileges honor this security matrix. To copy an existing security role to a new security role, you can use the Copy Role option.
Field Security
To restrict access to the high business impact columns, you can configure field security profiles. This way, users of the profile cannot view those field values.

A window of Dynamics 365, under security, has row labels users, security roles, field security profiles, and positions. Field Security profiles with detail below that reads manage user and team permissions to read, create, or write information in secured fields are boxed.
Field Security Profiles
In the next screen, click the New option to create a new field security profile and give it a name. Say you want to hide the actual revenue field from a user named Rajeeb.

A window of Power Apps has boxed labels, which are field security profile, opportunity revenue profile, users, located at the upper part, then users, located in the navigation pane on the left, and row entries Rajeeb Kumar and soft chief dev, located at the center.
Adding a user to the field security profile
You can also add a team. After adding the user or team, you need to define the field permission. Click the Field Permission link. You will see only the columns with the Column Security flag enabled in its field settings. If you don’t see any columns, go to a table and choose the Column setting and then enable Column Security.

A window with row entry labeled actual value, actual revenue is boxed. Atop is a dialog box titled Edit Field Security has three rows with dropdown boxes with no option selected, labeled allow read, allow update, and allow create.
Choosing permissions for the field
Now click OK and save and close. When Rajeeb opens an opportunity record, he will not be able to see the value of the actual revenue.
Configure Workflows and Concepts
Creating new records
Updating existing records
Sending email
Calling custom workflows
Calling custom actions
Using conditions
These workflows are classic CRM workflows that can be used to automate Dynamics 365 CE business needs. You can replace the classic workflows with Power Automate modern flows, which gives you more scope in automating diversified cloud apps, including Dynamics 365 CE. Since many businesses are still using the classic workflow, you should have knowledge about this classic approach.
You can configure real-time or background workflows as needed. Real-time workflows are executed in the same transaction with the core operation. For example, if you want to run a real-time workflow when creating an account, the process of Create Account will not be completed until the real-time workflow execution is complete.
If the workflow runs in the background, the account will be created successfully. After a period of time, when the server is free, the background workflow or asynchronous workflow instance will start execution, without depending on the account creation process.
In real-time workflows, you can choose to run it before or after a value change, but in the background workflow, there is no before option. It will take only the updated value.
You can first define a trigger that will initiate the workflow. The trigger can be event based or on-demand by the user to manually run. Choose the scope as needed. The organization scope will ensure that the workflow will run on all records of the entity type.
Create a Background Workflow
Use the following section to create a background workflow.
Define Basic Info About the Workflow

A window box of Power Apps has options under the context menu, boxed and numbered. From the top, going right, Box number 1 is new, followed by Automation, which is box number 2, then Process, box number 3, and Workflow, which is box number 4.
Adding a classic workflow inside the Power Apps solution

A dialog box titled New workflow has a text box of display name labeled create a task on account create, and has a dropdown box of a table with the account option selected. Below is a ticked checkbox labeled run workflow in the background, then two options, where blank is selected.
Configuring the workflow

A window under information has a menu bar at the top, followed by a navigation pane on the left with categories common and process sessions. On the right side is a checklist in 5 rows, boxed labeled as triggers. On the bottom part, under add step option are boxed row labels, labeled as action steps.
Adding steps and selecting triggers

A window has a segment with a column with options labeled add step, insert, and delete this step. Below is a text box labeled with create task, followed by a dropdown box of create with option task selected. The dropdown box has a command button labeled set properties on the right.
Adding the create new record step and properties

A window under create task has a menu bar at the top, followed by boxed text boxes with labels task discuss with account manager for follow up, task discuss with account manager for follow up, account, and a box on the right names form assistant that has text and dropdown boxes that points to text box labeled 3 days after created on the account.
Set property of the Create New Record of Type Task
The Regarding field is automatically assigned to Account. For Due date, you want to specify three days after the Account Created On date, so use the form assistance to assign the value. Now save and close.
You have successfully created the workflow. Save and activate the workflow to test it.
- 1.
Open the Sales Hub app and create an account record.
- 2.
Navigate to the Activities tab.
- 3.
Click Open Activity Associated View.
- 4.
You will see the task record.

A window with texts and labels boxed and numbered. From the top, going right, Box number 1 is account, followed by Activities, which is box number 2, then Open Activity Associated View, box number 3, and Task Discuss with Account manager for follow-up, which is box number 4. On the bottom right corner, label 5.22.2022, 2.16 P M is boxed.
Testing the workflow

A window of Dynamics of 365 under settings has a table that has six columns and a row. The column headers are system job, system job name, regarding, status reason, owner, and started on. Row entries workflow, create a task on account create, M S F T account, and succeeded are boxed.
Checking the workflow instance in a system job
You can also create real-time workflows using this same process. In later chapters, you learn how to call custom workflow activities from background and real-time workflows.
Configure Custom Actions
You can extend the functionality of Dynamics 365 Customer Engagement by creating custom messages, known as actions. These actions will have associated request/response classes and a Web API action will be generated. Actions are typically used to add new domain-specific functionality to the organization’s web service or to combine multiple organization web service message requests into a single request. For example, in a support call center, you may want to combine the Create, Assign, and Setstate messages into a single new message, called Escalate.
The business logic of a custom action is implemented using a workflow. When you create a custom action, the associated real-time workflow is automatically registered to execute in stage 30 (core operation) of the execution pipeline. In the next chapter, you learn more about the execution pipeline.
You can create custom actions that are specific to an entity or that are global (not specific to any entity). You can call plugins against the custom action in the pre-operation or post-operation stage. You learn more about these stages in later chapters. You can also define input and output parameters inside custom actions.
Create a Custom Action
Let’s consider a business scenario in this section. This example invokes a custom action to request the manager’s approval when a discount for a particular opportunity exceeds 50%.

A window of Power Apps has a navigation pane on the left, followed by three context menus on the right, with row entry action boxed.
Adding an action to the solution

A dialog box titled new action, from the top has a text box of display name labeled with send approval email for opportunity, followed by options table and none, where option table is selected, then a dropdown box of a table with option opportunity selected. Below, are options labeled blank and template, where blank is selected.
Configuring action

A window under information has a navigation pane on the left side, where information is selected. On the right, under the general section are text boxes with details to fill out. On the bottom part, a segment of a window box is boxed, labeled input parameters.
Input arguments in action

A window under send email. Below are text boxes to fill out, which are from, to, C cm B c c, and subject. On the right, a box on the right column labeled form assistant with text and dropdown boxes filled out points to a body of an email on the text box on text box on the bottom left side.
Sending email configuration in action
Click Save and close. Activate the action. Now you can call the custom action from a workflow. Custom actions don’t run independently.

A window has the lower part boxed that has a text box and two dropdown boxes. It points to a table on the web page atop that has row entries special notes, target, slingle line of text, lookup, required, V I P customer, and opportunity. Above is a checklist with command button select, boxed.
Assigning an input argument value
To test this workflow and action, open an opportunity, change the opportunity discount to more than 50, and save it. The workflow will trigger and the action will call, which will send an email.
Configure Reports in Power Apps
Reports are well researched, planned, and organized documents that are written for a purpose. Strategic-level personals need reports to redefine proper business strategy. You can create Dynamics 365 Power Apps reports by selecting the correct data items from one or more entities, as needed.
Use the following steps to configure a report for accounts.
Step 1: Add a Report Component to the Solution
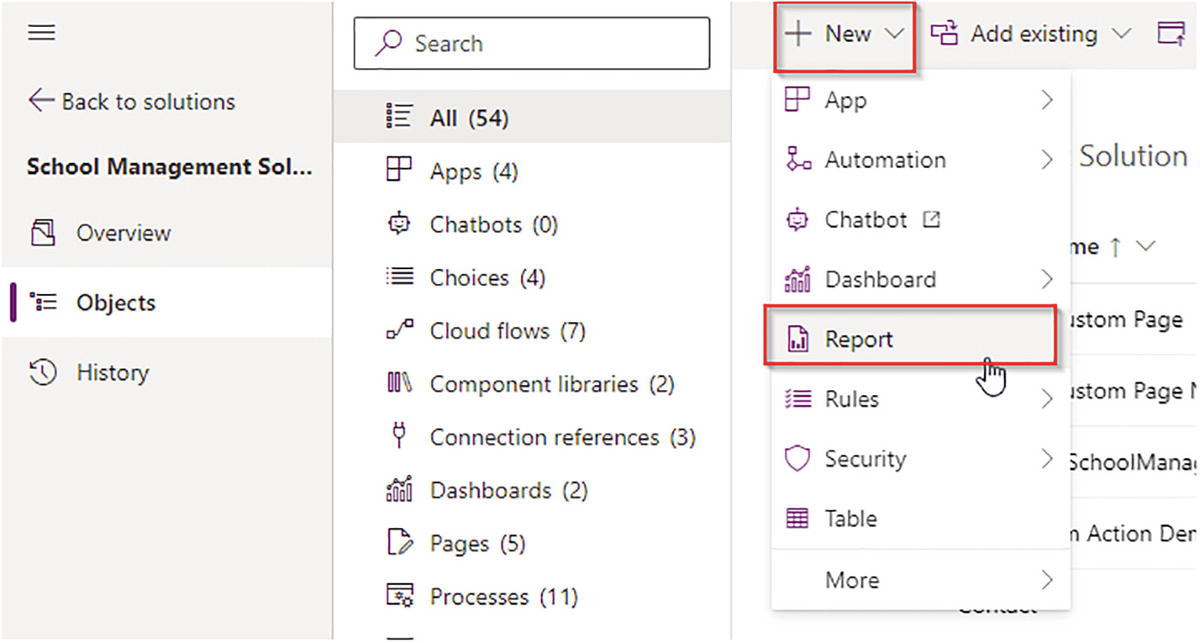
A window has a navigation pane on the left side, where row labeled objects is selected. On the right side, it has a box with 10 row labels, where all is selected, followed by a context menu on the right where a column on the menu bar labeled new is boxed, together with boxed row label report from the context menu.
Adding a report to a solution

A dialog box of report, the new report. Under general section, it has a row label named source that has a text box of report type labeled report wizard report, followed by a command button labeled report wizard below. Below the source row is row label details.
The Report Wizard

A dialog box is titled get started. It has a row label named select the starting point for your report that has two bulleted selections, where start a new report option is selected. On the bottom right part are three command buttons in a row, which are back, next, and cancel.
The Report Wizard option to choose a new or existing report
Step 2: Configure the Report

A dialog box is titled report properties. It has two row labels named specify the name and description of the report, which has two text boxes and specify the record types to include in this report, which has two dropdown boxes. On the bottom right part are three command buttons in a row, which are back, next, and cancel.
Report properties
Step 3: Configure the Criteria

A dialog box is titled select records to include in the report. It has a box named report filtering criteria. The box has text boxes inside labeled all accounts, active, and select. On the bottom right part are three command buttons in a row, which are back, next, and cancel.
Filter condition
Step 4: Configure the Layout Fields and Use Grouping

A dialog box is titled select records to include in the report. It has a box named report filtering criteria. The box has text boxes inside labeled all accounts, active, and select. On the bottom right part are three command buttons in a row, which are back, next, and cancel.
Configure the layout
Step 5: Configure the Report Format

A dialog box is titled format report. It has two selections in rows labeled table only, and chart and table. Table only is selected. On the bottom right part are three command buttons in a row, which are back, next, and cancel.
Choosing the report format

A dialog box is titled report summary. It has row labels report name, which is account report, report description, which is accounts report, and primary record type, which is accounts. On the bottom right part are three command buttons in a row, which are back, next, and cancel.
Report summary
Next click Finish. Your report will be successfully created. Click Run Report to render the report.

A window of Power Apps under Report, Accounts Report. On the menu bar at the top, label run report is boxed. Atop is a window box of a boxed table that has three headers, where the second header, account name has 14 row labels.
Rendered report
Install Multiple Languages in Environments

A window of Dynamics 365 under the settings section. It has 3 column headers, which are business with 3 row labels, customization with 3 row labels, and system with 3 row labels. Administration, under column system is boxed.
The Administration option

A window of Administration has row label Languages boxed. Atop is a dialog box of language settings with a table that has three columns and four rows. The column headers are language, language code, and status. The row entries under language, which are Greek, Hebrew, and Hindi are boxed. On the bottom right part, command button apply is boxed.
The language settings

A dialog box titled Set Personal Options has a text box, filled with English as the base language, and two dropdown boxes, where both Greek are selected. On the bottom part are the two command buttons O K and Cancel.
Language Change options

A window of Dynamics 365. On the left is a navigation pane with texts written in Greek. The third to fifth row labels are boxed. On the right, the first option on the menu bar written in Greek is boxed.
The language change in action
All the sections are not updated yet to Greek, so you’ll need to update the translations.
Working with Translations
When you upload translations, you need to export them from the Power Apps solution. Open the Power Apps solution and add the necessary components that require translation.
Select Solution Overview. Click the Export Translation command to export the translation template. For more details, see https://docs.microsoft.com/en-us/dynamics365/customerengagement/on-premises/customize/export-customized-entity-field-text-translation?view=op-9-1.
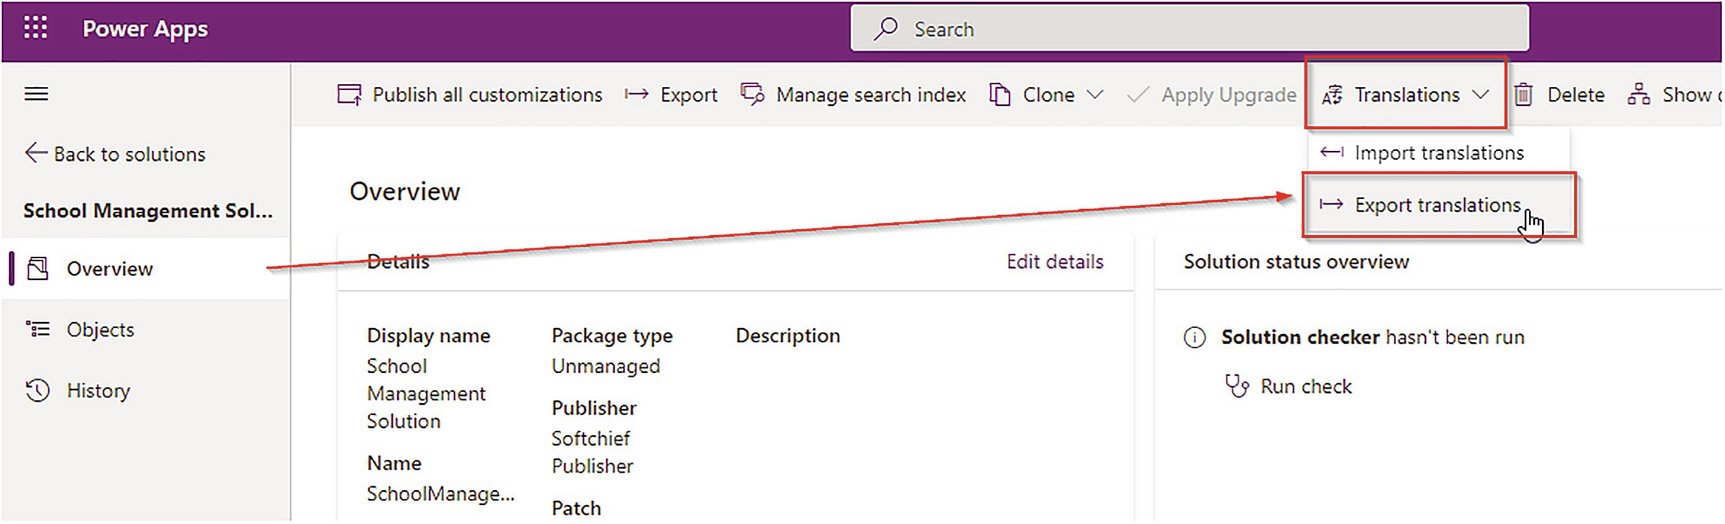
A window of Power Apps. On the left is a navigation pane, where the third-row label, overview, is selected. It has an arrow line that points to translations option on the menu bar, together with export translation, boxed.
The export translation process
Export Translation will prompt you to download the file so that you can open it and define specific translations of English words.

A window has a label on the address bar that reads C r m Translations, underscore, School Management Solution, underscore, 1, underscore, 0, underscore, 0, underscore, 0. It has two text files, which are content types and C r m translations.
Extract Translation package

A table in an Excel worksheet has 4 columns and 37 rows. The column headers are entity name, display string key, 1033, and 1032. On the bottom part, the second sheet titled display strings, boxed. Under columns C and D are rows 1 to 15, boxed.
Updating the corresponding language translations

A table in an Excel worksheet has 5 columns and 37 rows. The column headers are entity name, object I D, object column name, 1033, and 1032. On the bottom part, the third sheet titled localized labels, boxed, has an arrow line that points to a label that reads student, with a greek text at Columns D and E, on row 27.
Update the corresponding language translation in the Localized labels
After all these changes are done, sav the file and ZIP it. Import the translation. Refresh the screen; you will see the new translations.
Working with a Document Template
You can use Word or Excel to generate documents that contain values from records in Dynamics 365. To create a template, follow these steps.
Step 1: Download a Template

A window titled Dynamics 365 has the templates section. Under the section, it has 5 templates, which are article templates, emails templates, and email signatures on Column 1, and contract templates and document templates, which is boxed on Column 2.
Document Templates option

A dialog box is titled Create template from Dynamics. From the top, it has boxes in a column named Excel template and Word template, followed by a dropdown menu where quote is selected. On the bottom right corner are command buttons upload and select entity.
The download template

A window titled select entity has 3 columns of boxes. Box 1, 1.N Relationship has a checklist of entity names in rows, where quote line detail is checked. Box 2, N.1 Relationship has checkboxes in 8 rows. Box 3, N.N Relationship has a checkbox named contact. On the bottom right corner is a command button labeled download template.
Select entities
Step 2: Edit the Template Using Developer Mode

A dialog box titled word option. On the left, a box has a row named customize ribbon selected. On the right, it has a box that has 2 dropdown menus with popular commands and main tabs selected. Under the main tabs is a checklist, with a developer checkbox with row labels, boxed. On the bottom are command buttons O K which is boxed, and cancel.
Enabling the Developer option
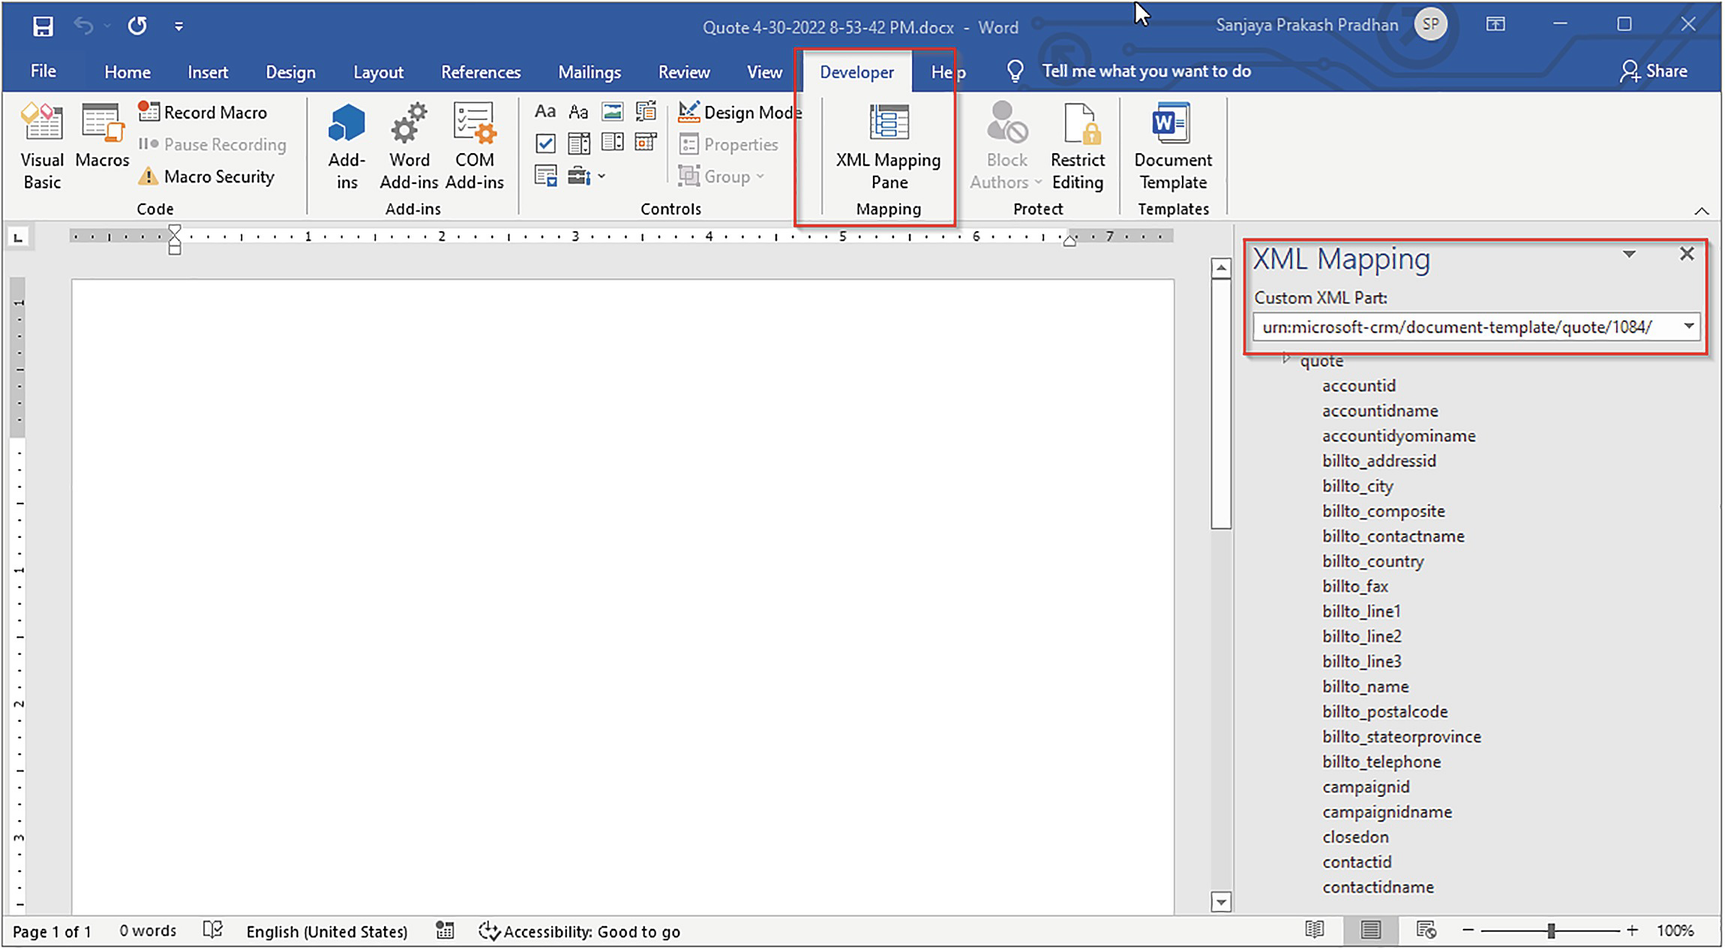
A window of a Word file is on the Developer menu, with the X M L mapping on the ribbon boxed. On the right, the navigation pane named X M L Mapping has a text box that is boxed labeled u r n, colon, microsoft-c r m, slash document-template, slash, quote, slash 1084, slash.
Using the XML mapping option

A window has a page with a header Quote. Below, a text that reads customer I D name is boxed with an arrow line that points to a boxed context menu with insert content control, and plain text selected in the navigation pane on the right. On the right navigation pane, it has a header named quote, boxed.
Adding the fields to a document from mapping
After the dynamic values are prepared, you can upload the final template. Rename the Word template My Custom Quote Template.
Step 3: Upload the Template

A dialog box titled upload template. At the center, it has a box with an icon of a cloud with an arrow that points upward and texts that read drag a file here or browse to upload a file. Below is the file name, which is My Custom Quote Template dot d o c x. On the bottom right corner, there are command buttons upload and cancel.
Uploading a document template
Step 4: Generate the Template

A segment of a window has column labels, check access and export to P D F.
Export to PDF option

A window has export to P D F option from the menu bar boxed. Atop is a new window box titled Export to P D F. On the right, it has a navigation pane where my custom quote template is boxed and selected. It has an arrow line that points to a P D F page on the right named Quote, with details below.
The Export to PDF option renders a PDF
Now you can download or send emails with attachments.
Summary
Admin Centers and their uses
Importing data into Power Apps
Configuring duplicate detection rules
Configuring the auditing feature in Power Apps
Adding users to environments
Using the security matrix and configurations
Configuring workflows and concepts
Configuring custom actions
Configuring reports in Power Apps
Working with email templates and signatures
Installing multiple languages in environments
Working with translation
Working with document templates
Working with client-side JavaScript in Power Apps
Developing plugins for Power Apps
Developing custom workflow activities in Power Apps
Editing command bars in Power Apps
Business scenarios and implementations