
Microsoft Power Automate (previously known as Flow) helps you create automated workflows between your favorite cloud and on-premise apps. It provides services to synchronize files, get notifications, collect data, and more.
Power Automate is an important pillar of Microsoft Power Platform ecosystem that builds robust automation over cloud apps.
These days, most apps are available in the cloud, although some are still available from on-premise environments. Integrating these cloud systems is tricky, and using a no-code, less-code platform to do this is a real benefit. Power Automate solves these integration automation needs, regardless of the datasource’s location. Using connectors, you can connect practically any datasource to automate your business needs.
Power Automate’s Building Blocks
Power Automate has three building blocks. These are triggers, connectors, and actions. Every Flow must have a trigger and one or more connectors and actions.
Triggers, Connectors, and Actions
Building Block | Description |
|---|---|
Triggers | Events that initiate a flow instance. For example, running a flow on-demand from a button click, or running a flow when a file is uploaded to SharePoint. |
Connectors | Adaptors that communicate with other products or services. For example, if you want to create a file in OneDrive, you need a OneDrive Connector. If you want to read data from Dynamics 365, you can create a connector to the Dataverse. Connectors require authentication. You must have a subscription to the service you want to connect from Power Automate. |
Actions | Operations that you define so that the Flow will perform them. For example, creating a file in SharePoint, deleting a record from the Dataverse, sending an email, etc. |
Features of Power Automate
Automate quickly and more securely
With Power Automate, anyone can create automated processes using flows. You can automate repetitive, monotonous operations with ease, using low-code, drag-and-drop tools and hundreds of pre-built connectors.
Boost efficiency
With process adviser, you can record and visualize your end-to-end processes while getting guided advice for developing flows and detailed insights that take the guesswork out of deciding what to automate.
Enhance workflows with AI
With AI Builder, you can make your automation even smarter. Use document automation to quickly process forms, handle approvals, identify photos and text, and generate with pre-built models.
Connectors in Power Automate
A connector is a wrapper or proxy that allows an underlying service to communicate with Microsoft Power Automate, Microsoft Power Apps, and Azure Logic Apps. It allows users to link their accounts and use a library of pre-built actions and triggers to create apps and processes.

A webpage exhibits the rows of 8 connectors under the Popular Connectors, Recently added connectors, and Independent Publisher connectors section. All have Premium tags, except for the Office 365 Outlook, OneDrive for Business, Office 365 Users, SharePoint, Twitter, Notifications, and R S S. A search bar and All connectors with a drop-down option are located at the top.
Connector list
Types of Flows and Uses
Types of Flows
Type | Description |
|---|---|
Automated Cloud Flow | Triggered by designated events. |
Instant Cloud Flow | Triggered manually as needed. |
Scheduled Cloud Flow | You can choose when and how often it runs. |
Desktop Flow | Automated processes on your desktop environment. Leverage Robotic Process Automation (RPA). |
Business Process Flow | Guides users through a multi-step process. |
Configure an Automated Cloud Flow
In this example, you see how to automatically trigger a Power Automate flow when an event occurs in the Dataverse.
Business Scenario
In this example, you see how to send an email to your manager when Lead annual revenue is more than $5,000 for notification purposes.
Solution
This solution requires a Power Automate configuration with an event trigger. The following steps show how to configure the flow.
Step 1: Use the Solution to Create a Flow

A window exhibits four highlighted sequenced steps. After clicking the New option at the top, select the second option, Automation, which reveals a list of four options, namely, Cloud flow, Custom connector, Desktop flow, and Process. Click the first option, and then select Automated above Instant and Scheduled to complete the task.
Adding an automated flow to the solution

A window with Build an automated cloud flow text above an illustrated laptop and additional text. On the right, the Flow name field has Send Email to Manager for Lead more than 5000 U S D revenue and the dataverse entry in the Choose your flow's trigger search bar highlights a Microsoft Dataverse - When a row is added, modified, e t c.
Adding an automated flow to the solution
Step 2: Configure the Trigger

A dialog box is titled When a row is added, modified, or deleted. Change type is set to Modified, Table name is set to Leads, and Scope is set to Organization. To the left is the Show advanced options. New step and Save buttons are located below the dialog box.
The Dataverse trigger
Step 3: Add a Filter Expression to the Trigger
Now you’ll add a filter condition to the trigger to filter and trigger only when the annual revenue is more than $5,000. To do this, click the Show Advanced options of trigger.

A dialog box is titled When a row is added, modified, or deleted. Change type is set to Modified, Table name is set to Leads, and Scope is set to Organization. A highlighted Filter rows option is set to annual revenue g t 5000. Select columns, Delay until, and Run as fields have directions. Hide advanced options button is on the lower left. New step and Save buttons are located below the dialog box.
Adding a filter condition
Step 4: Get the Current User Manager

A window of Office 365 Users. The search bar exhibits two sections of results under Triggers and Actions. Under the latter are Get direct reports V 2, Get manager V 2, and Get my profile V 2, which has a hand cursor.
Get the user profile

A window of Get my profile V 2. Below is the Show advanced options button. Above the window is a downward arrow.
The get user profile step

A window is titled, Choose an operation. The get manager entry in the search bar is highlighted. Under the All tab below the search bar is the highlighted Office 365 Users. From the Actions tab at the bottom is the highlighted Get manager V 2 Office 365 Users above the Premium Get Request Incident Document List Easy Vista Service Manager.
The Get Manager trigger and action
Select the Get Manager action. This will sign in automatically and create a background connector with the Office 365 Users application using the current login user credential.
This Get Manager action requires a user email so that it can get the manager information.

A window of Get manager V 2. User U P N has Mail as its highlighted entry. On the lower right is the Add dynamic content option. Clicking it reveals a separate window with Dynamic content and Expression tabs above a search bar. Under the former tab are entries such as the highlighted Mail.
Assign a user to Get Manager
Step 5: Send an Email

A window of Send email V 2. To is set to Mail. Subject is set to New Lead created more than 5 k Annual Revenue and First Name. Body has Dear, Display Name, and content. Clicking the Add dynamic content option reveals Dynamic content tab entries such as Display Name, Given Name, and I d. Attachment fields are located below.
Send an email and adding dynamic content
Now if you create a lead in the Dataverse and update the annual revenue with more than $5,000, the system will send an email to your manager from your Gmail Account. You can use the Outlook connector to send email as well.
Configure an Instant Cloud Flow
Instant flow creates a mobile button to click on demand and the actions will be performed as per the flow design. Say you want to send an email with an attachment to a person on demand via a button click.
Create an Instant Flow by Navigating to Power Automate

A webpage exhibits the various Office applications under the Apps section. Power Automate is highlighted and is marked by a hand cursor. Other applications are OneDrive, Excel, OneNote, Power Apps, Word, PowerPoint, SharePoint, Admin, and Lists. The option to view All apps is located below.
Power Automate link

A window with the title bar has the text soft chief default with various icons. On the right side is an Environments-labeled panel, followed by a search bar and a checked Development option just above the soft chief default text.
Power Automate environment change

A window of Power Automate. On the left panel is the highlighted Create option. The main window exhibits Three ways to make a flow with five options under the Start from blank section of which Instant cloud flow triggered manually as needed is highlighted. Below is the Start from a template section with four options under the Top picks tab.
Instant flow option

A dialog box with Build an instant cloud flow text above an illustrated laptop with additional text. On the right, the Flow name field has Send Email With File entry and Choose how to trigger this flow highlights the checked Manually trigger a flow, Flow button for mobile out of 7 observable options. Skip, Create, and Cancel buttons are on the lower right.
Choose the button flow

A window is titled as Manually trigger a flow. From left to right and top to bottom, the labels are Subject, Please enter your input, Message, Please enter your input, Email, Please enter an e-mail address, File, and Please select file or image. Add an input option is located below.
Parameters

A title bar with the Manually trigger a flow text connects to a window labeled Gmail through a downward arrow. The latter has a search bar with two sections of results under Triggers and Actions. Under Actions are Reply to email V 2 and Send email V 2. The latter is highlighted and has a hand cursor.
The Gmail connector

A window is labeled as Send email V 2. The Email, Subject, and Message entries in To, Subject, and Body fields above Attachments fields are highlighted and are pointed by arrows from the opened Dynamic content tab next to the Expression tab.
Assigning values from the Dynamic panel

A window exhibits the Attachments fields. Attachments Name 1, Attachments Content, and Attachments Content have highlighted document dot p d f, File, and p d f entries respectively. An arrow from the panel with Dynamic content and Expression tabs points to the File entry. The search bar, under the former, exhibits the File result under Manually trigger a flow.
File assignment
Now save Power Automate. Open your mobile device and install the Power Automate app from Google Play Store or Apple App Store. Once it’s installed, open the app and log in using your credentials. Follow the site at https://us.flow.microsoft.com/en-us/mobile/download/ to download the app and then install it. Select the correct environment. Now if you click the link at the bottom-center of the app, you will see the flow. Clicking the Send Email with File button will prompt you to provide a subject, message, email address, and a file to upload. Once you click Done, the email will be sent to the respective email account.
Configure a Scheduled Cloud Flow
Scheduled cloud flows can be used to run business logic repeatedly in a specific time interval. For example, if you want to run a flow everyday 10AM, you can configure scheduled cloud flow.
Let’s consider a business scenario. You want to send an attendance email every day at 10AM to all the students at your school. Follow these steps to configure Power Automate to do this.
Step 1: Create a Scheduled Flow by Navigating to Power Automate

A webpage of Power Apps. The main page exhibits the contents of the Objects option from the left panel. Option All is selected. The four sequenced steps are as follows. Selecting the New option reveals Automation as the second option. Clicking it reveals Cloud flow and another click exhibits the Scheduled option, the third out of three options.
Adding a scheduled flow

A dialog box with Build a scheduled cloud flow text above an illustrated laptop with additional text and bulleted entries. On the right, four steps are marked. Send Reminder for attendance fill-up in Flow name, Run this flow starting April 4, 2022, at 10 in the morning, and Repeat daily. Skip, Create, Cancel buttons are on the lower right where Create option is selected.
Configuring recurrence
Click Create. This will open the Flow Designer, where you can add actions.
Step 2: Connect to the Dataverse to Get Students
A title bar with the Recurrence text connects to a window labeled List rows through a downward arrow. The latter has Students as its chosen Table name. Show advanced options is located on its lower left.
List Row action of the Dataverse

A window of Apply to each. The Select an output from previous steps has a highlighted value as its entry. On the lower right is an opened panel with Dynamic content and Expression tabs. The search bar, under the latter, has a text value and a result of value under List rows. An arrow connects the similar entries.
Adding a value object to a loop
Inside Apply to Each Action, add a new step. Choose the Gmail connector and select the Send Email action. Specify Email in the To field using the Dynamic content panel. In the Subject field, specify the Reminder – Attendance Filling for the Day static value.

Two superimposed windows are labeled Apply to each and Send email V 2. The former has value as its entry for Select an output from previous steps. The latter has highlighted Email, Reminder Attendance filing for the day, and content for To, Subject, and Body fields respectively.
Assigning email fields

A webpage of Power Apps. The main page exhibits the contents of the Objects option under School Management Solution from the left panel. Cloud flows option is selected. Send Reminder for attendance fill-up is checked and highlighted. The Details option, from the context menu of the former, is also highlighted and has a hand cursor.
Details option for the flow

A window exhibits the contents of Attendance mailer to students daily for filling the attendance from Flows. The left side has Details and highlighted 28-day run history section. The latter has dates under Start, seconds under Duration, and data under Status. On the right are Connection References, Owners, Solutions, and Process insights sections.
Details option for the flow
This is how you create a scheduled flow for your business needs.
Configure a Business Process Flow
Business Process Flows (BPF) guide users to follow a predefined process with multiple stages in order to complete a specific task. For example, for a process called Student On-Boarding, your business might follow specific stages so that all users follow the same steps to complete the process. For more about BPF, visit https://docs.microsoft.com/en-us/power-automate/business-process-flows-overview.
- 1.
Capture personal details
- 2.
Capture communication details
- 3.
Capture enrolled courses
- 4.
Record payment details

A block diagram of business process flow. The Personal Details block connects to Communication Details. The latter then connects to an Enrolled Courses, which in turn connects to a Record Payment block.
Details option for this flow
To configure a Business Process Flow (BPF), use the following steps.
Step 1: Use the Solution to Create a BPF

A webpage of Power Apps. The main page exhibits the contents of the Objects option from the left panel. Option All is selected. The four sequenced steps are as follows. Selecting the New option reveals Automation as the second option. Clicking it reveals Process and another click exhibits the Business process flow option, the second out of 3 options.
Adding a BPF inside a solution
Once you click the option, it will open a side panel where you can specify a display name and table for which you are going to create the BPF. For example, the “student on-boarding” BPF is connected to the Student table.

A webpage exhibits a panel on the right side labeled New business process flow. The Display name field has Student On-boarding entry, Name field in soft underscore has student on boarding entry, and Table has a selected Student option. Create and Cancel buttons are on the lower left side of the panel where Create is selected.
BPF information

The B P F Designer window. The text on the upper left reads Student Onboarding with various options. Three sets of Student New Stage labeled entries are in the center. On the right is an opened Components tab, where the Stage content under the Flow section is being dragged to the center and the cursor highlights the text, This is a valid hit area to add the new tile.
The BPF designer
Data steps
Workflows
Action steps
Flow steps
You can also add conditional branches inside a BPF for complex business processes. Read more about branching in BPF at https://docs.microsoft.com/en-us/dynamics365/customerengagement/on-premises/customize/enhance-business-process-flows-branching?view=op-9-1.
Step 2: Edit the Stages

A zoomed section of the B P F Designer window. Student New Stage is highlighted and has an arrow pointing to the highlighted Stage panel on the right. Display Name is set to Personal Details, Category is set to Qualify, and Entity has an unhighlighted Student text where an arrow cursor is observed. Apply button is highlighted next to the Discard button.
Adding stages to the BPF

The B P F Designer window. The highlighted Student New Stage entry has Details button and Data Step hash 1 New Step under Steps 1 section. An arrow points to the highlighted Data Step panel, where Step Name is set to Name, Data Field is set to Name, Required is checked, and Sequence is set to 1. An arrow then points to the Apply button.
Adding a data step inside a stage

A zoomed section of the B P F Designer window. The panel on the right exhibits an opened Components tab with Flow and Composition sections. Under the latter, Data Step is highlighted and is dragged to the Student Personal Details rectangle entry under Data Step hash 1 Name.
Dragging and dropping data steps

A zoomed section of the B P F Designer window. The Student Personal Details entry exhibits Data Step hash 1 Name, Data Step hash 2 Birth Date, and highlighted Data Step hash 3 Gender under Steps 3 section and above Triggered Process 0.
The final look of the first stage

A zoomed section of the B P F Designer window. The Student Communications Details entry is highlighted. On the right is a highlighted panel labeled Stage. Display Name is set to Communication Details, Category is set to Qualify, and Entity is set to Student. The Apply button next to the Discard button is surrounded by a dashed rectangle.
Adding a new stage

A zoomed section of the B P F Designer window. The Student Communication Details entry exhibits Data Step hash 1 Mobile Number and highlighted Data Step hash 2 Email under Steps 2 section and above Triggered Process 0.
Second stage, final look

A zoomed section of the B P F Designer window. The Student New Stage entry is highlighted and has an arrow cursor with a floating text box. The right panel has highlighted Enrolled Course entry under Display Name, Student Registered Courses, Student entry of Communication Details Student under Relationship, and an Apply button below is selected.
Stage properties

A zoomed section of the B P F Designer window. The Student Registered Courses Enrolled Course entry exhibits Data Step hash 1 Course, Date Step hash 2 Course Start Date, and highlighted Data Step hash 3 Student under Steps 3 section and above Triggered Process 0.
Final look of the third stage

A zoomed section of the B P F Designer window. The Student Payment Record Payment entry exhibits Data Step hash 1 Total Amount, Data Step hash 2 Due Date, Data Step hash 3 Student, and Data Step hash 4 Terms under Steps 4 section and above Triggered Process 0.
Final look of the fourth stage

A zoomed section of the B P F Designer window. Student Personal Details with three steps, Student Communication Details with two steps, Student Registered Courses Enrolled Courses with three steps, and Student Payment Record Payment with four steps are linked. The details of the first entry are opened, exhibiting Name, Birth Date, and Gender.
Final look of the BPF

A webpage of Power Apps. The main page exhibits the contents of the Apps option from the left panel. School Management is selected and is highlighted under the Name column. The Edit button, above Play and Share on the list covers the Modified column entries and is highlighted. The third column is labeled Owner with Sanjay Prakash entries.
Edit the model-driven app option

A zoomed view of the Model App Designer window. The highlighted Business Process Flow Area is above five Dashboards with entries of All. On the right panel is the opened Components tab with a highlighted and checked Student Onboarding entry.
Adding the BPF to the model-driven app
Now save and publish the model-driven app. Click the Play button on the top-right corner.
The Student App will open. Click the Students sub-area and click the +New command to open a new form for the student.
Now you will see that the BPF is available on the top of the form. The BPF will display with all stages you designed. All these stages remain inactive until you visit and take action on every required data step.
To start the BPF, you need to first save the student record by providing the mandatory values; then you can work with the BPF.

A window of the contents of the Student App under the Students section on the left panel. Student On-boarding, Active for less than one minute status is highlighted. Encircled steps are Personal Details, with Name and Gender filled out except for Birth Date, Communication Details, Enrolled Courses, and Record Payment. The General Info tab is opened.
The BPF in stage 1

A zoomed section on the Student App webpage. The Student Onboarding Active for less than one minute status is on the upper left. Two out of four steps are encircled. The Communication Details section, the second step, has its Mobile Number and Email fields filled out. The Next Stage button underneath is highlighted. The General Info tab is opened.
BPF in stage 2

A zoomed section on the Student App webpage. The user is on the Communication Details section just before the Enrolled Course. Mobile Number and Email fields are filled out. The Next Stage button underneath exhibits an empty space labeled Select Student Registered Courses, where Create option on the lower left is highlighted and has a hand cursor.
BPF in stage 2. notification

A zoomed section on the Student App webpage. The user is on the Enrolled Course section after completing Personal Details and Communication Details. The Course is set to Dynamics 365 C E, the Course Start Date is on June 4, 2022, at 8 in the morning, and the Student option is set to Ramnath Kumar. The General tab is opened.
BPF in stage 3

A zoomed section on the Student App webpage. The user is on the Record Payment section after completing Personal Details, Communication Details, and Enrolled Course. The total amount is set to 400 dollars, Due Date is on May 4, 2022. The student is Ramnath Kumar, and the Terms option is set to 1. The General tab along with Student Info is opened.
BPF in stage 4

A zoomed section on the Student App webpage. The user is in the final stage where inputs are needed in the Record Payment section after completing Personal Details, Communication Details, and Enrolled Course. The total amount is set to 400 dollars, Due Date is on May 4, 2022. The student is Ramnath Kumar, and the Terms option is set to 1. The finish button is located below.
The BPF in the final stage

A zoomed section on the Student App webpage. The name Ramnath Kumar is above Student Onboarding status on the upper left. Below are General Info, Communication, and Related tabs. The Roll number is on the upper right. Personal Details, Communication Details, and Enrolled Course linked circles have checkmarks, while Record Payment has a flag icon.
The completed BPF
This way, users can ignore the complexity of tables and fields and simply follow the predefined stages to complete this business process.
You can enable BPF for specific security roles by using the Edit Security Role on the BPF Designer. You can read more about BPF and its security at https://docs.microsoft.com/en-us/dynamics365/customerengagement/on-premises/customize/business-process-flows-overview?view=op-9-1.
Configure a Desktop Flow
Desktop Flows are designed using Power Automate Desktop. Desktop Flows are also called Robotic Process Automation (RPA) flows. You can use them to configure automation for desktop and web application tasks.
For example, if you want to download an Excel sheet from a website, extract data from the Excel sheet, and put it in a file, you can use the Desktop Flow. Or if you want to back up certain folders on a regular basis, you can use the Desktop Flow.
You can use Desktop Flow in lots of real-world scenarios. To create Desktop Flows, download Power Automate Desktop. For more details about Desktop Flow, visit https://docs.microsoft.com/en-us/power-automate/desktop-flows/create-flow.

A webpage with a highlighted Power Automate label. On the upper right are the stacked texts that read Environments, Development next to an icon. The panel on the right is labeled Environments. The Development option is checked and is highlighted below a search bar and above the soft chief default.
Changing the environment

A zoomed section of the Power Automate webpage with Automated cloud flow, Instant cloud flow, Scheduled cloud flow, and Desktop flow. The last option is highlighted. A hand cursor is on the third option out of four.
Select the Desktop Flow option

A dialog box of Build a desktop flow. On the left is an illustrated robotic arm with a file above a box while attached to a laptop. The upper right has a text, Create desktop flows for no additional cost preview title. The download app button is highlighted as step 1, while the Launch app button on its side is highlighted as step 2.
Launch Desktop Flow app option

A window of Power Automate Desktop preview. The name Sanjay Prakash is on the upper right. The options to add New flow, Go Premium, Settings, Help, and Search Flows are located at the top. My flows text is on the upper left. An illustrated laptop with a cursor is on the center of the page, just above the highlighted New flow button.
Desktop Flow home screen

A dialog box of Build a flow. On the left is an illustrated robotic arm with a file above a box while attached to a laptop. On the upper right is the Take back up folder and files entry in the highlighted Flow name field. On the lower right is the highlighted Create button next to Cancel.
Creating a new Desktop Flow
This will open the Desktop Flow designer, where you can drag-and-drop actions to the main screen. The following example shows how to copy a folder with files from one location to another.

A window of Power Automate Desktop preview. Three sequenced steps are as follows. From the left panel titled Actions, type the text folder on the search bar and click the Copy folder under the Folder section. Drag it to the main page to complete the process. On the right are the Variables.
The home screen of the Desktop Flow editor

A dialog box of the Copy folder. Under Select parameters, Folder to copy is set to C colon backslash Users backslash Admin backslash Videos backslash Captures, the Destination folder is set to the same location but with OneDrive and Pictures, and If folder exists is set to Overwrite. Save and Cancel buttons are on the lower right where Save is selected.
The Copy Folder action

Two File Explorer windows placed side by side. The Videos folder under This PC, the test dot t x t file on the main page, and This P C, Videos, and Captures on the address bar are highlighted. An arrow connects the address bar to that of the next window with Pictures and Captures. The file test dot t x t and Pictures folder are also highlighted.
The copy folder result
You can create a Desktop Flow for web and desktop automation using actions and running it as needed.
Dynamic Values and Expressions in Flows
Power Automate allows you to use dynamic values and write expressions for more complex data operations. To any field value, you can assign a static field or use the Dynamic panel to choose dynamic data from the previous steps.

A window of Send email V 2. The Email, Subject, and Message entries in the To, Subject, and Body fields above Attachments fields are highlighted. Three arrows, from the Dynamic content tab panel with User Email and Email entries under the search bar point to the highlighted entries.
Adding dynamic values
Using expressions, you can do string operations, date operations, and so on, in Power Automate. Let’s consider an example here. You want to send renewal due date email to a student using an instant flow.
Create an Instant Flow in Power Automate
Open flow.microsoft.com and log in using your credentials. Choose the correct environment. Choose the +Create option and then choose Instant Cloud Flow. In the Manual Trigger area, add a Text parameter for the email field. In the next step, add a new action to send an email using the Gmail connector.
In the Email To, assign the Email parameter from the Dynamic content panel, which is part of the Manually Trigger a Button step. Specify the email subject as “Reminder – Student Renewal Pending” and, in the Email body, add “Dear Student, your renewal due date is”. After “is,” you’ll want to display the current date plus one year. So, for these types of scenarios, you need expressions.
Click the location where you want to add the expression and then click the Add Dynamic Content link, which will open the Dynamic panel.
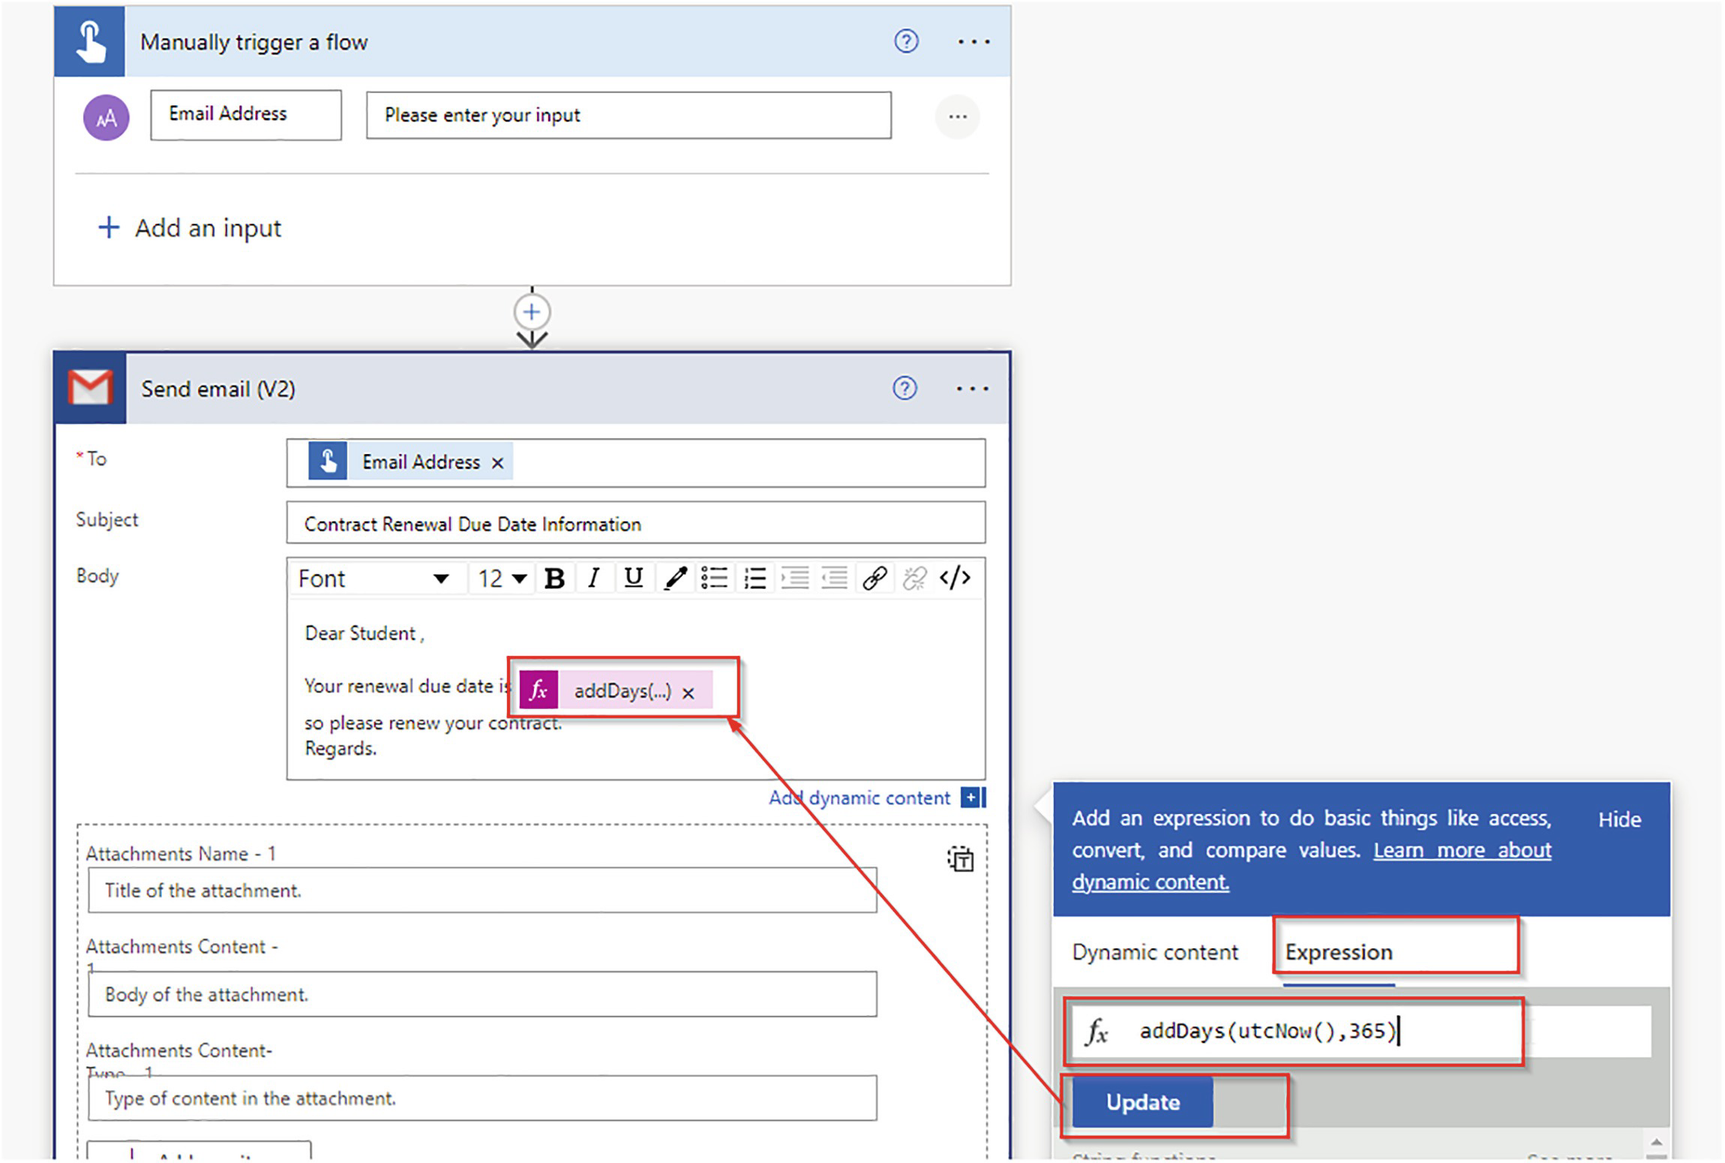
A Manually trigger a flow window connects to a Send email V 2 window through a downward arrow. The add Days ellipsis in parentheses in the Body is highlighted and is where the arrow points from the Update button of the Add dynamic content panel with add Days open parenthesis u t c Now open and close parentheses comma 365 entry under Expression field.
Adding an expression
When you run the flow, the expression is evaluated in real-time and updated in the email body.
There are hundreds of expressions available. You can refer to all such expressions using the Microsoft knowledge base at https://docs.microsoft.com/en-us/azure/logic-apps/workflow-definition-language-functions-reference.
Using Variables, Loops, and Conditions
You can use variables, loops, and conditions inside Power Automate as needed. Variables are a good way to store data temporarily in a placeholder.
Working with Variables and Conditions
Only use variables when required. For example, say you are sending multiple emails to a person in multiple steps and you do not want to specify the email of the same person in every email send action. You can store the email ID once in a variable and use the variable each time.

A window with the highlighted label Variable. Under the Actions tab of the search bar are the entries Append to array variable, Append to string variable, Decrement variable, Increment variable, Initialize variable, and Set variable. A hand cursor is on the highlighted Initialize variable entry.
Choosing a variable

A window of Initialize variable. The Name field has the entry email id. For Type, Boolean is highlighted from six available options namely, Boolean, Integer, Float, String, Object, and Array. The hand cursor is on the String entry.
Choose a variable data type

A window of Initialize variable. The Name field has the entry email id. For Type, the Type is set to String, and the Value field has the entry s p p maestro at sign g mail dot com.
Assigning a value to a variable
You can add new steps to perform your additional actions, such as if Today Day is Monday, send email body “You have to work on consulting”; otherwise, send email body “Work on Training”.

A window is labeled as Condition. Its three fields have highlighted entries of day Of W ellipsis, is equal to, and 1. The Add button is on the lower left. From the Add dynamic content option, a panel opens and exhibits the highlighted day Of Wek open parenthesis u t c Now open parenthesis double close parentheses entry under the Expression tab.
Assigning expressions to conditions

A window of Send email V 2. The empty field for To is highlighted. On its lower right is the highlighted Add dynamic content option, which opens a panel on the right. From there, Dynamic content exhibits highlighted Variables section and its email i d entry, where a hand cursor is placed nearby. If Yes and If No windows are in the background.
Assigning dynamic content to a field

A window labeled Condition highlights day Of W ellipsis, is equal to, and 1 entries. Below, If yes tab has Send email V 2 window with highlighted email id, Its monday Assignment, and You have to work on consulting entries for To, Subject, and Body fields. If no tab has Send email V 2 2 with highlighted email i d, Usual Assignment, and Work on Training entries.
The condition branch
You used the same variable in both steps. If you test this, you will get an email based on the current day of the week.
Working with Loops
You can use loops to read values from a list of items using iteration. For example, you can use loops to read all rows from an Excel sheet, you can use loops to insert data into the Dataverse from an Excel sheet, and so on.
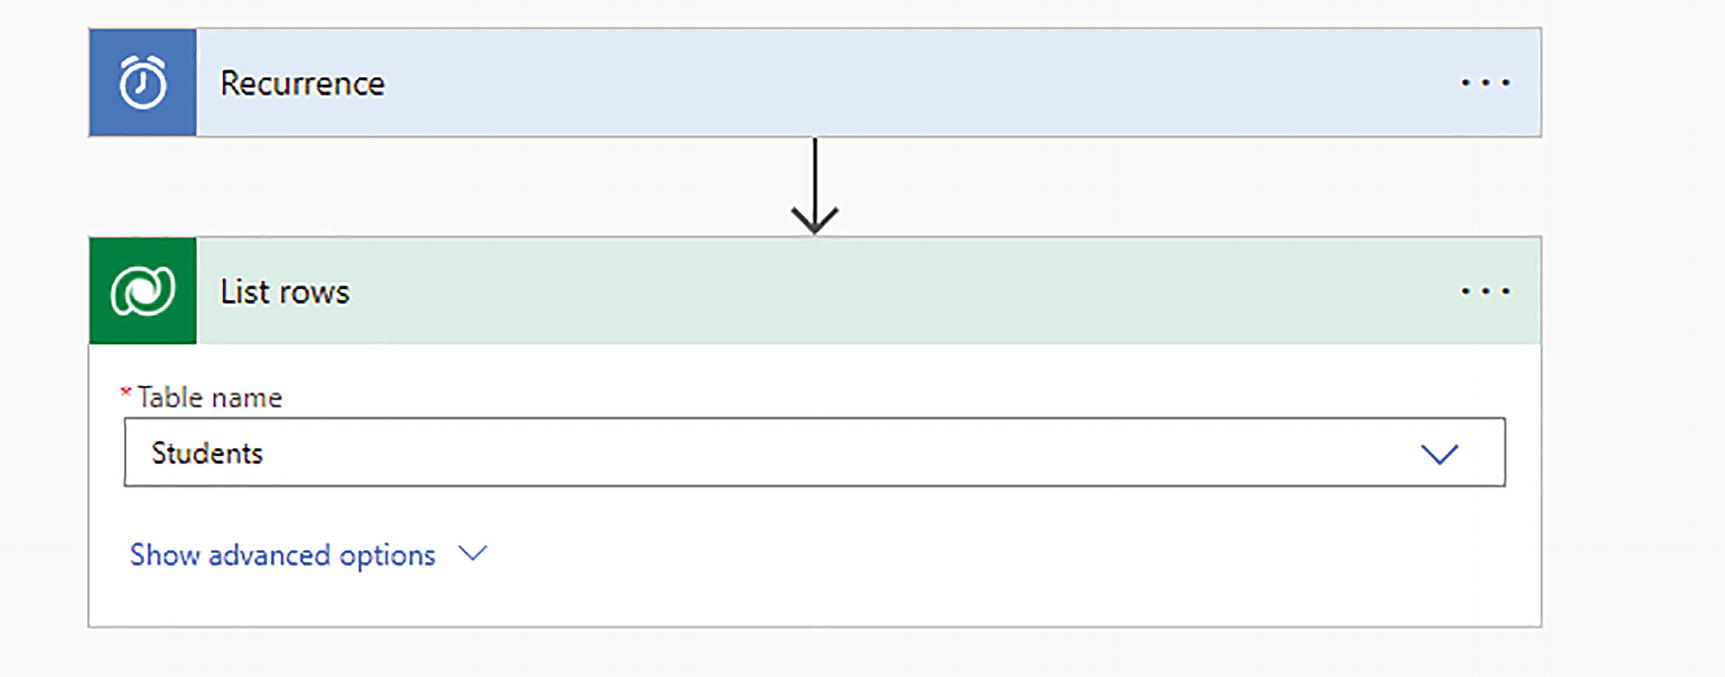
Say you want to send an email to all the students of your schools stored in the Dataverse. For this scenario, you have to use a loop that will run every student record and send the emails.

A window of List rows. The Table name is set to Students. The Show advanced options button is on the lower left.
List Row action for the Dataverse

A window of Apply to each. Select an output from previous steps is highlighted along with its value entry. The Add dynamic content on the lower right opens a panel with the value entry under the List rows of Dynamic content tab which is highlighted and has a hand cursor. A connection with Send email V 2 window through a downward arrow is observed.
Assigning a value list to a loop
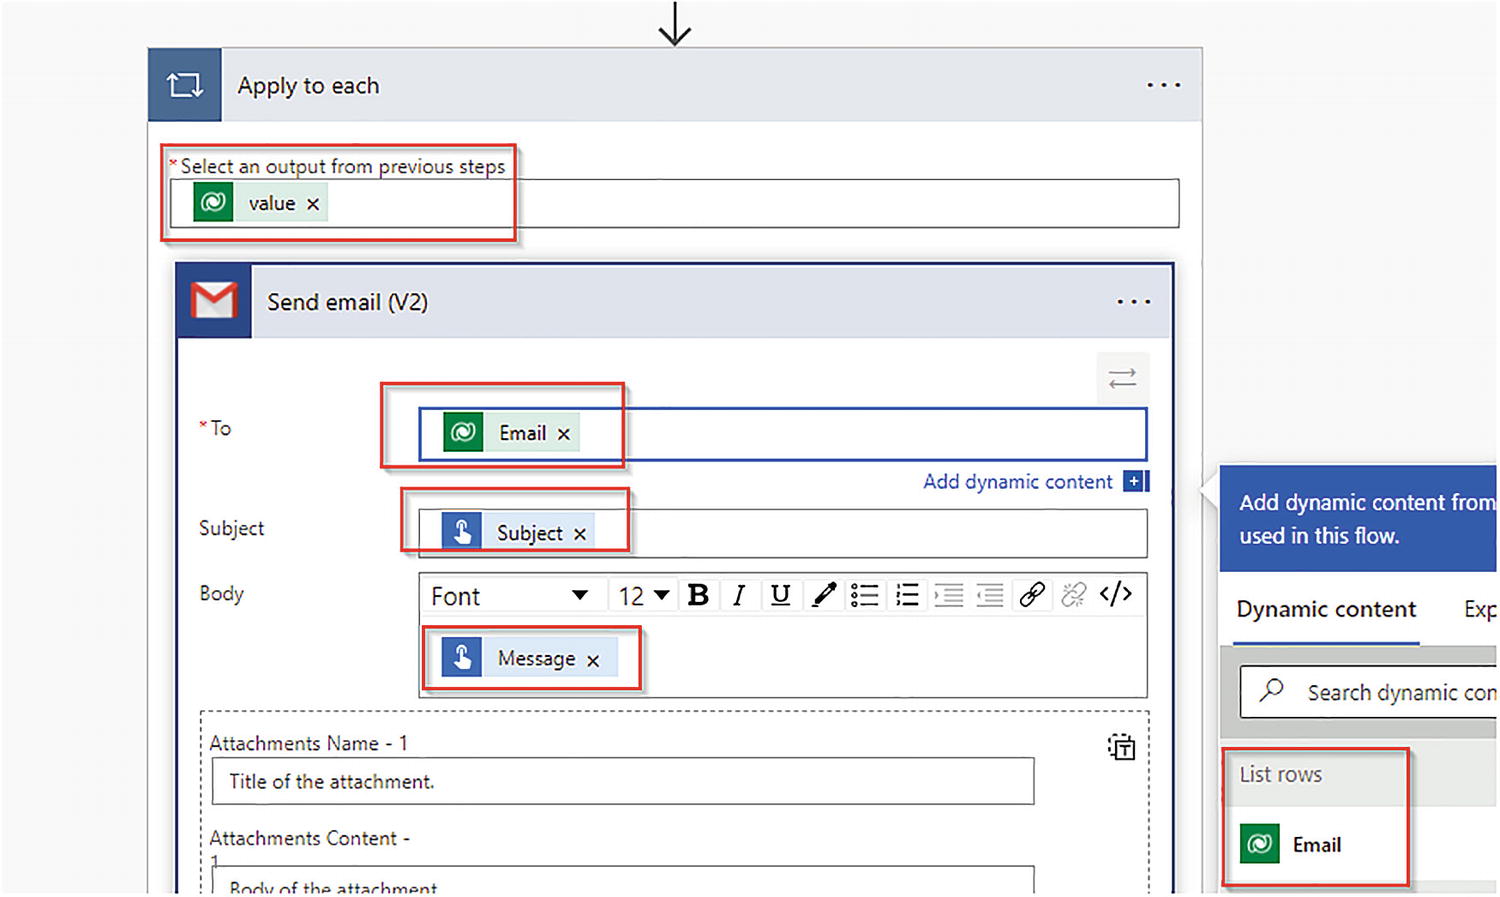
A window of Apply to each. Select an output from previous steps is highlighted along with its value entry in its field. The Send email V 2 window is superimposed and has highlighted Email, Subject, and Message entries for To, Subject, and Body. The Add dynamic content panel highlights the Email entry under the List of rows of Dynamic content tab.
Assigning an email field value using dynamic content
This is how you use loops in Power Automate.
Working with Approvals in Power Automate
Approvals are important scenarios in every business. Say you want to send an approval to one or more people to approve an amount of student joining fees when the amount is less than $200.
To achieve this business scenario, previously you had to write lots of code. Now you can achieve this with no-code. Use the following steps to do this.
Make sure you have an Office 365 Outlook license for your employees to use approvals.
Step 1: Add an Automated Cloud Flow

A window labeled, When a row is added, modified, or deleted is on a page with the label Send Approval for Student Payment less than 200 U S D on the upper left. The window has Added as its Change type, Student Payments as its Table name, and Organization as its Scope. The Show advanced options button is on the lower left.
The Dataverse trigger when a new row has been added
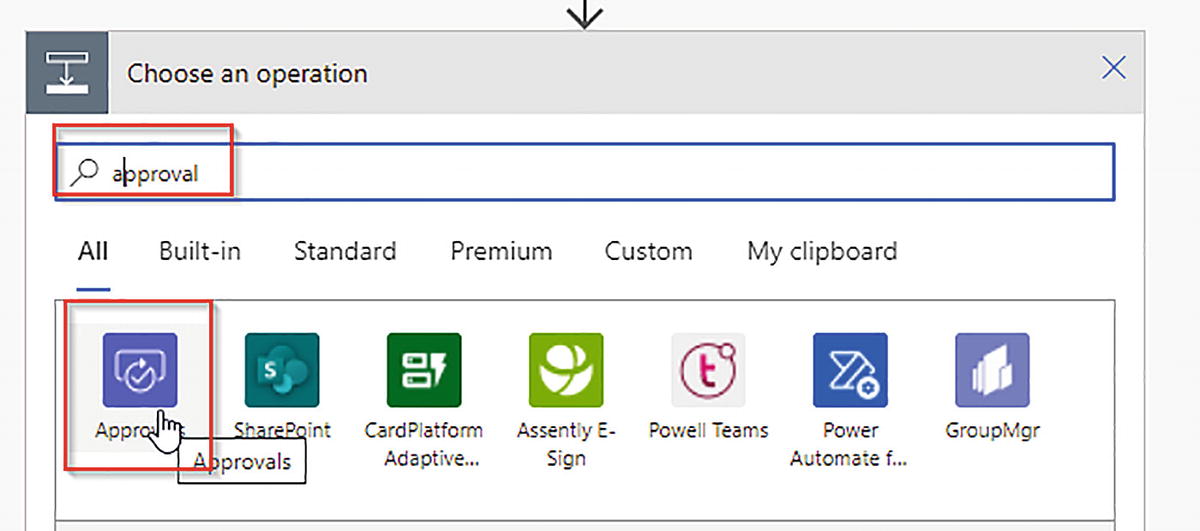
A window of Choose an option. The search bar has a highlighted approval entry. Below is the opened All tab with a highlighted Approvals entry. A hand cursor is placed below its icon.
The Approval connector

A window of Approvals. Under the Actions tab of the search bar are the entries Create an approval, Start and wait for an approval, and Wait for an approval. The Start and wait for an approval is highlighted. The hand cursor is placed nearby.
Approval action type

A window of Start and wait for an approval. The entries under Approval type are Approve or Reject Everyone must approve, Approve or Reject First to respond, Custom Responses Wait for all responses, and Custom Responses Wait for one response. The Enter custom value entry is added below.
Approval types
Approval Types
Approve/Reject – Everyone must approve: Select this when you want all approvers to have to approve this action.
Approve/Reject – First to respond: Select this when you want your approval to be completed by the first approver to take action.
Custom Response – Wait for all responses: Select this when you want your approval to be completed by all approvers with a custom action.
Custom Response – Wait for one response: Select this when you want your approval to be completed by at least one approver with a custom action.

A window of Start and wait for an approval. Approval type is set to Approve or Reject First to Respond, Title is set to Approval Required Student Payment less than 200 U S D, Assigned to Sanjay Prakash, Details is set to Please take action, and Item link is set to Student and Student Value. The Item link description field is empty.
Assigning values during the approval stage
Step 2: Check the Approval Status

A window of Apply to each. The Responses entry of Select an output from previous steps above Condition title bar is highlighted. On the lower right is Add dynamic content option with an opened panel. Here, under the Dynamic content, entries such as Responses Approver response is highlighted and the hand cursor is placed on it.
Read Approval response

A window of Apply to each with a Responses x entry. Condition window in the mid-top part has highlighted Responses, is equal to, and Approve entries. Below, If yes and If no tabs have highlighted To, Subject, and Body field entries under Send email V 2 and Send email V 2 2. The difference lies in the approved and rejected statuses in the Subject field.
The conditional approval branch

A zoomed section of a webpage with the text payment for Rahul on the upper left. Below, the General tab is opened. Name is set to payment for Rahul, Student is set to Rahul Sharma, Terms is set to 1, Due Date is set to November 4, 2022, Total Amount is set to highlighted 188 dollars, and Owner is set to Sanjay Prakash.
The student payment form

A zoomed section of the Flow Details page. The Send Approval for Student Payment less than 200 U S D location on the upper left, following Development and Cloud flows, is highlighted. Below, Details and 28-day run history sections are observed. The Running entry under the Status column of the latter section is highlighted.
The flow status

Three title bars with the labels When a row is added, modified, or deleted, Start and wait for an approval, and Apply to each connected through downward arrows. Apply to each is greyed out. When a row is added, modified, or deleted has a checked 0 second marker on the right, while Start and wait for an approval has a running 2 minute timer.
The flow status in progress

A section of the Outlook webpage. On the left panel, the Microsoft Flow entry under the Focused tab is highlighted. On the main page, the Approval Required Student Payment less than 200 U S D text is highlighted. The same highlighted text appears in the middle of the page. The Approve and Reject buttons at the bottom are highlighted where Approve is selected.
The approval email was received

A zoomed confirmation page. The title reads Respond Approve. Under the Overview section, Approval, Requester, Received, and Link have the necessary information. Under the Details section, the Please take action text appears. Choose your response is set to Approve. Add a comment field has the text ok. Confirm and Cancel buttons are on the lower left.
Taking action
Now the flow will resume and complete. The approval email will be sent.
Business Scenarios, Use Cases, andImplementations
1 | The system must provide a process to streamline the student on-boarding process and capture general information, communication information, and course information. | Configure Business Process Flow using Power Automate. |
2 | As soon as a student is created, the system should send a welcome email to the student and create a task to collect payment from the student after three days. | Use Automated Cloud Flow using Power Automate. |
3 | Automatically send a timesheet fillup email and link the Power Portal to students to fill in the timesheet daily. | Use Scheduled Flow in Power Automate. |
4 | Fetch the latest currency exchange rates from a third-party WEB API currency layer and display them on a Canvas app. | Use Power Apps Trigger Flow. |
5 | Whenever a lead is created in the Dataverse with more than $50,000 annual revenue, send approval for the manager and wait for approval. After approval, update the lead for qualification process. | Approvals in Power Automate |
Summary
Power Automate building blocks
Connectors in Power Automate
Types and uses of flows
Dynamic values and expressions in flows
Using Variables, loops, and conditions
Working with approvals in Power Automate
Business scenarios, use cases, and implementations
Concept of Power Virtual Agent
Building blocks of Power Virtual Agents
Configuring a sample Power Virtual Agent
Deploying a Power Virtual Agent in public websites/portals
Business scenarios, use cases, and implementations