Keeping your system’s data secure
You’ve implemented a system, and you’ve created the best database structure you can architect. Your system is taking off, and you have hundreds or thousands of clients and many gigabytes of customer data on your server. Things couldn’t be better, right? Then you get a notification that something has gone wrong with your database. Somehow, a malicious entity has gained information about all of your customers because you were storing that information in your database in plain text. This nightmare scenario could be you, if you don’t take at least some minimal measures to prevent it.
Data at rest
In today’s world, it is essentially unacceptable to keep any personal customer data at rest in your system in an unencrypted fashion. By having this data in plain text, you are putting yourself and your company at risk for major lawsuits when a breech occurs. Even storing your data off premises at a CSP (cloud service provider) like Microsoft Azure or Amazon AWS is not going to be enough to protect you and your data.
Encryption in the past vs. encryption today
In this chapter, we are going to dive into some of the tenets of encryption using Microsoft SQL Server. Additionally, we’ll see how encryption of data at rest can be accomplished in two different approaches by looking into a Transparent Data Encryption (TDE) solution and an AlwaysEncrpyted solution. Both solutions in our activities will use EFCore.
Likely, when you think of encryption, the first thing you think of is passwords, so let’s start by taking a look at how we can correctly protect user passwords, and then we’ll move into looking at the other fields in our database tables.
Passwords
Password mismanagement is probably the most egregious error a system developer can commit. Today we have a number of options that can help with this issue. The simplest option available is to use a single-sign-on solution via a third-party provider.
SSO via social logins
Today we have many platforms available that provide tools to use their platform as a means to identify users and allow for us to easily build a single-sign-on solution (SSO) . If you don’t like managing users, and you are building a noncorporate business solution, there is very little reason to not just use the SSO capabilities of one or more of these platforms.
Facebook, Google, Microsoft, LinkedIn, and others all provide solutions that are easy to wire up into your applications. When doing this, you are able to let those providers do the heavy work of managing the user’s passwords, and all you need to do is associate the user in your system with the authentication information that comes back from the provider, such as the validated email of a user as returned from the third-party provider.
In general, to set up these third-party solutions, you would just go to the provider of choice and create an application at their developer tools portal, which will give you the app id and token secrets that you need in order to authenticate against the third-party provider. Once the user has authenticated, the appropriate user information (such as email or other identifiers) is handed back to you for your use in your system.
ASP.Net built-in authentication
Another option you have that helps with preventing user password mismanagement comes in the form of the IdentityDbContext, which is part of the AspNetCore.Identity.EntityFramework namespace. ASP.Net with EF6 also had the same sort of structure, with an IdentityDbContext.
When using the IdentityDbContext, we are able to easily create a new solution that handles user authentication for us. At inception, the system creates all the tables necessary for users and roles, as well as identity claims. With all of this in place, we simply needed to perform a few actions to register and/or authenticate users.
When registering users with built-in identity management, the user password is automatically hashed and salted. This makes it impossible for us to get the user password back to plain text. In this scenario, if a user loses their password, they need to go through a validation process to reset the password to a new password.
Salting and hashing
If you must create your own custom database user solution, you should follow a hashing and salting pattern to make sure you hash and salt your user passwords. In case you are not familiar with why this is important, let’s consider a couple of scenarios.
Please don’t even consider using a plain-text password storage solution for anything past a simple demo MVP solution (and even then, using plain text should be avoided if possible).
Now that you agree that storing passwords as plain text is a terrible idea, are you thinking encryption alone is good enough? The answer, of course, is no. Encryption is a two-way process. Anything that is encrypted can be decrypted if the common encryption algorithm and key(s) are known. So, turning on AlwaysEncrypted on your fields only scrambles them from being plain text, but does not make it impossible to reverse the encryption (if it did, we couldn’t store user information like names, social security numbers, and such in an always encrypted column).
With hashing, we use a unique algorithm to set the length of our data to a fixed length. By combining the unique password with the hash and applying the hashing algorithm during encryption, we get a value that is mathematically improbable to reverse engineer. Storing this hash in the database table allows the password to be decrypted by applying that hash to the password as entered by the user and using the same algorithm to decrypt for authentication. Therefore, we are no longer storing the password, but are storing a hash that when combined with user input can be encrypted with the hash and compared to determine that the hashed results match.
What happens, though, when two users have the same password? Without anything else, the hash value would be identical, and this could lead to a security issue. Although it would still be tough to figure it out, a malicious user who has access to your data might be able to run common passwords and determine them from the identical hash values. Additionally, if they know the hashed value of a particular password, and have proper access, they could update the stored hash for all users to the known hash value and then log in and impersonate anyone in the system, including your admin users.

A database with three users that have the same password generated with the same hash

Three users with the same password have unique PasswordHash values when a salt is used
Protecting sensitive user information
There are a couple of ways to implement encryption on data at rest using SQL Server. If your SQL Server version is version 2016 or greater, the easiest way to implement encryption is to use the AlwaysEncrypted functionality of SQL Server. If you are on a previous version of SQL Server, encryption is still straightforward, but involves a more manual interaction with the data.
Encryption basics
In order to encrypt columns in the database, we need to have two keys. The first key is the master key that protects the keys in the system. The second key is the individual key to encrypt columns.
With AlwaysEncrypted , creation of the encryption keys is very easily accomplished using SSMS to encrypt columns. If no master key exists, one is created. When a column is encrypted, a column encryption key can be generated or, if one already exists, can be reused.
When encrypting with the AlwaysEncrypted approach, two types of encryption can be used. The first is Deterministic, and the second is Randomized. The main difference here is that if you are going to be joining to the column or if you are going to use it as a condition in a query, you will want to use the deterministic type. If you are just encrypting the data and it isn’t going to be critical in a join or other queries, you can just use the randomized type.
In SQL Server versions prior to 2016, or in current versions where you don’t want to use AlwaysEncrypted, you can leverage the Transparent Data Encryption method (TDE).
To work with TDE in any SQL Server instance, you need to generate a certificate for the server and then generate one or more keys to use when encrypting columns. To read columns, you’ll need to use the encryption key as part of your transaction. Additionally, you’ll use scripts for encryption of columns.
Since TDE requires more interaction, a general approach that works well is to leverage stored procedures any time data from an encrypted column is queried or transformed.
Which type to use
Each type of encryption has advantages and disadvantages. Let’s consider a couple of things that are important considerations for anyone who is developing a secure system.
TDE is server-side encryption, so data is well encrypted on the server, but the decryption also happens at the server, and then the raw data is sent over the pipe to the UI. There are ways to enforce encryption on the pipe as well, but that requires more configuration. Additionally, the keys for the encryption must be managed at the database level, so they are based on the database and server where they are generated.
The nice thing about TDE is that it can be more performant since the encryption and decryption happen at the server. TDE also works on any version of SQL Server since 2008. One last thing about TDE is that since it is handled on the server, any database admin with execution rights can decrypt the data and see the actual sensitive data as stored in the table, and a compromised database likely means compromised keys.
AlwaysEncrypted is limited to being used from SQL Server 2016 and newer, so older systems or any system with a SQL Server back end that is less than the 2016 version cannot leverage AlwaysEncrypted. AlwaysEncrypted functionality is not database specific, however. The encryption takes place on the client side of the operation, and the encrypted data is passed on the pipe and directly stored in the database table. This means that transmission of the data over the pipe is done with the data already encrypted with no extra configuration needed.
This client-side encryption also means that any SQL Server admin cannot just decrypt the information using server certificates without a client library. Of course, SSMS can be easily configured to be the client library with a few tweaks on the connection, so your data is still not secure from a malicious database administrator who has the right server credentials.
As we’ll see in the upcoming activities, encrypting specific columns with AlwaysEncrypted functionality is as easy as a few clicks, and this goes for tables with or without data. In contrast, encrypting the data using TDE requires us to go through an entire migration process. AlwaysEncrypted leverages client-side decryption, while TDE sends the data plain text to and from the server. TDE makes up for its longer setup time by generally performing better than AlwaysEncrypted would perform.
One final thought, which you can find more information on if you read more into the topic of encryption, is that you are going to need to implement a good key-management strategy. Consider your risk for a compromised key and how you might have a plan in place to migrate to a new key in case such an event does happen. Also consider and test what happens with keys on backup and restore in the various scenarios, as well as moving to a new database server.
Ultimately, it will be up to you to make sure that you mitigate the risk by managing your keys well, and it’s also up to you to implement a risk management strategy to handle scenarios where the keys are compromised, or the server fails.
Chapter 10 Activities: Using Always Encrypted with EFCore and using TDE with EFCore
In the activities for this chapter, we are going to cover two different ways to encrypt our data at rest. We’ll start by implementing AlwaysEncrypted, and we’ll conclude with an activity that implements TDE. We’ll do both solutions in EFCore, but you can be certain that EF6 would be just as able to be used for these activities. In fact, it is probably more likely you would see TDE in an EF6 (or older) implementation, mostly due to the fact that TDE has been around a lot longer.
Activity 1001: Using Always Encrypted in an EFCore solution
In this first activity, we’re going to learn how to set up AlwaysEncrypted in our InventoryManager database solution and then work with it in our codebase.
The great news about always encrypted is that we can use it in a greenfield solution, in a legacy solution when creating new tables, or in tables that already exist, even if the encrypted columns have data.
Step 1: Get set up
- 1.
Create a new .Net Core Console app named appropriately.
- 2.
Get the project folders for the InventoryDatabaseCore, InventoryDataMigrator, InventoryHelpers, and InventoryModels projects. Add references to the InventoryDatabaseCore and Inventoryhelpers project in your new console application project.
- 3.Get the NuGet packages updated by building the solution, and then use the NuGet Package Manager to ensure your new console application project has the following NuGet packages referenced:
- a.
Automapper
- b.
Automapper.Extensions.Microsoft.DependencyInjection
- c.
Microsoft.EntityFrameworkCore
- d.
Microsoft.EntityFramewokCore.SqlServer
- e.
Microsoft.EntityFrameworkCore.Design
- f.
Microsoft.Extentions.Configuration.FileExtensions
- g.
Microsoft.Extensions.Configuration.Json
- a.
- 4.
Get the InventoryMapper.cs file in place in the new console application.
- 5.
Get the appsettings.json in place in the new console application, making sure to set as Content ➤ Copy if newer.
- 6.
Get the code from the activity 0903 Program.cs file, and place in the new Program.cs file in your new console project.
- 7.
Build the solution, and then run update-database in the PMC to make sure everything is in place
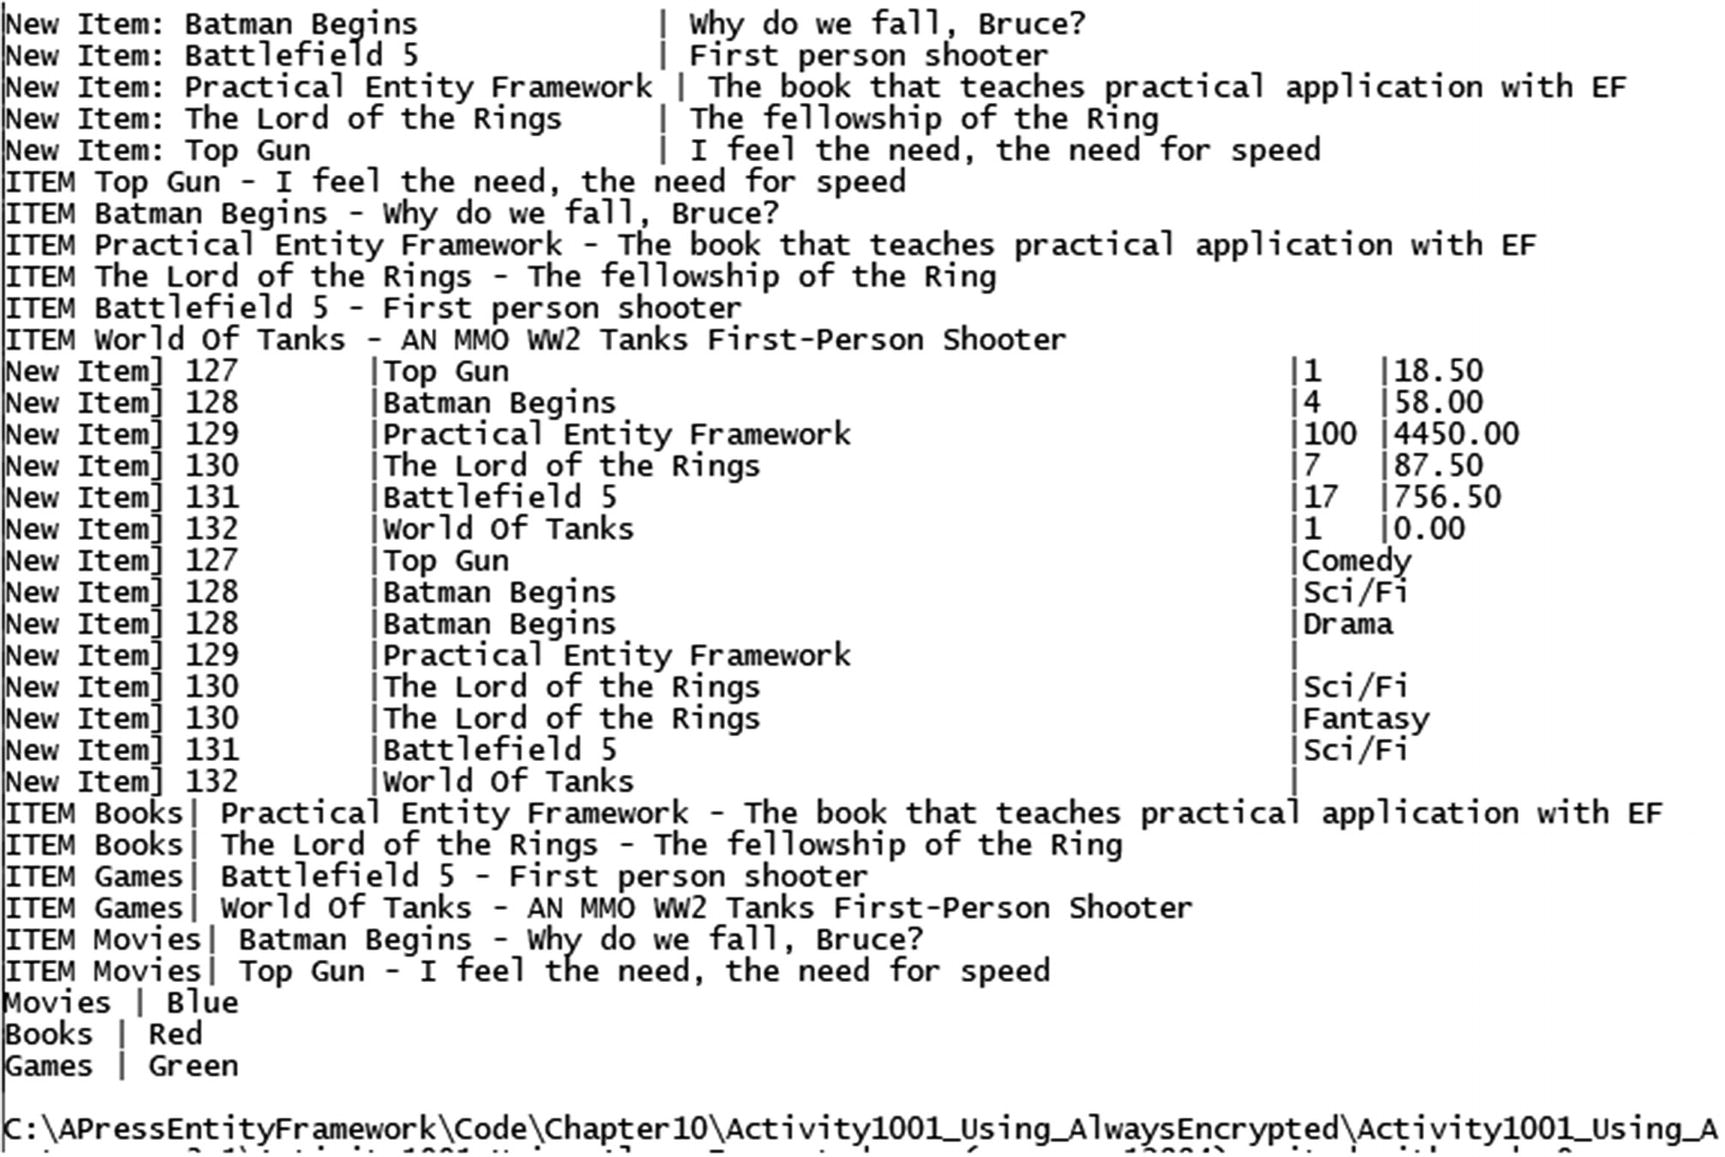
With everything set up, run the program to see the initial results (review Figure 10-3).
If you are running code from the end of Chapter 9, some of your output may vary based on what methods you have enabled and what methods are commented out. The output in Figure 10-3 is calling all methods in the constructor.

The initial results yield items and categories with colors
Now that you’ve ensured the code is working as expected, we can encrypt some columns. As a quick reminder, AlwaysEncrypted will not work if you are using a version of SQL Server prior to SQL Server 2016.
Step 2: Enable Always Encrypted

The Items table without AlwaysEncrypted enabled
In the real-world applications that you are building, you will need to determine which columns you want to encrypt. For this application, let’s encrypt the Name, Description, and Notes fields of the Items table.
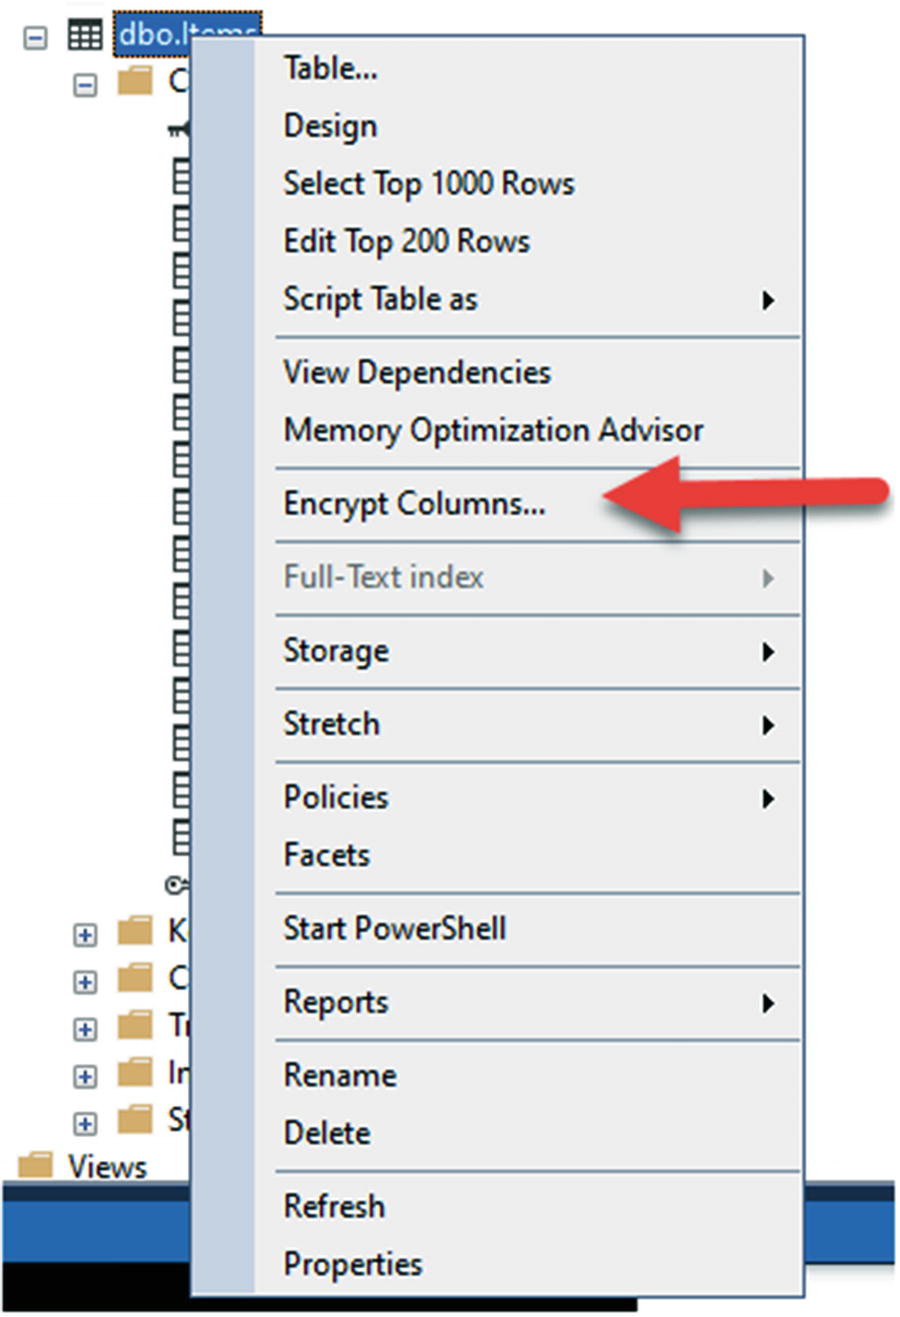
Select the Encrypt Columns option after right-clicking the table in SSMS

The first step of the Always Encrypted wizard

Selecting the columns for encryption
Select Next to continue to the Master Key Configuration step in the Always Encrypted wizard.

Configure the master key settings

Selecting the run settings for key generation and encryption

Review what will be encrypted when the wizard completes
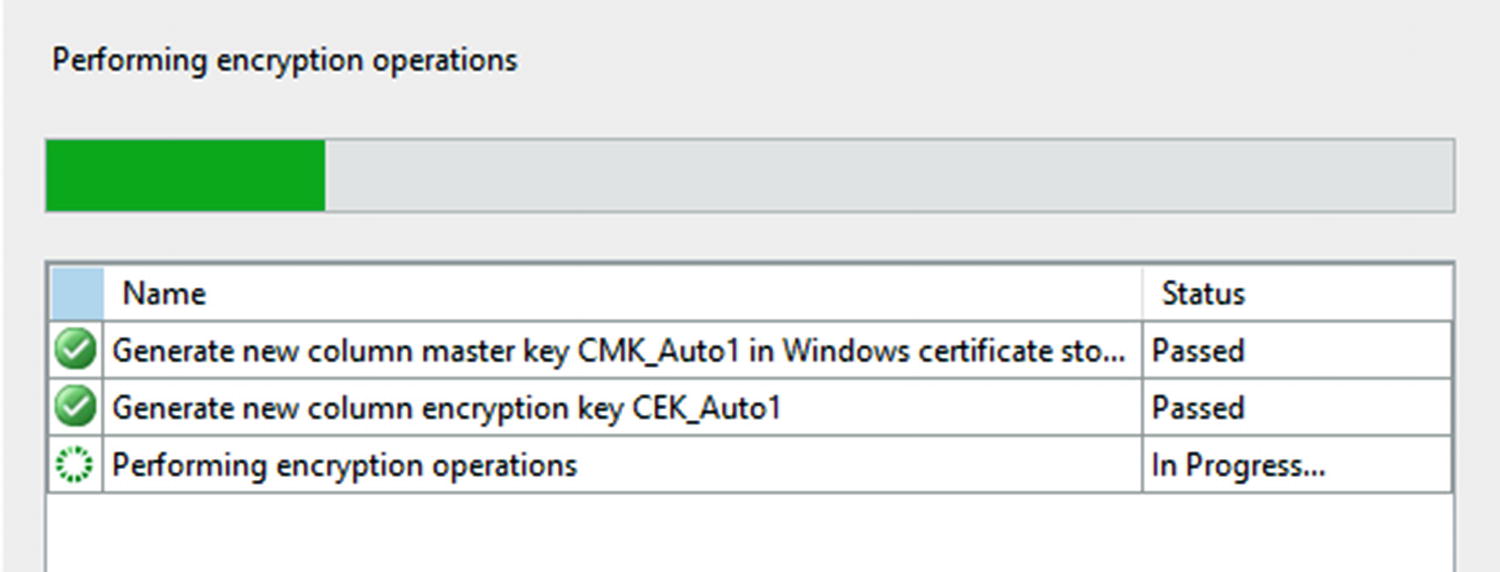
The encryption is in process after hitting the Finish button

The encryption process has completed successfully
Step 3: Review the data

The data is encrypted, even if data was already present
When I ran this query, I didn’t have anything in the Notes column for any of the entries. It is clear, however, that the Name and Description fields that were there are now encrypted as expected. If your data is not showing as encrypted, it may be that the fields are being decrypted by SSMS based on your settings. A quick rerun of the wizard would validate the fields that are encrypted (don’t reapply the wizard if you do take a look).
Step 4: Review the data in SSMS
Just to make sure our data is not corrupted, let’s go ahead and double-check by configuring SSMS to be our client that will encrypt and decrypt the settings. Close your current connection to the database to ensure a new one opens.

Connecting to SSMS with options

Enabling Always Encrypted
If you are on an older version, you will likely need to set the Additional Connection Parameters. If you are on the latest versions of SQL Server and SSMS, you will not need to. If you can’t connect with just the always encrypted setting enabled, add the statement
Column Encryption Setting=enabled

Set the Connection Parameters, but only if on an older version of SSMS
Once you have established a new connection with the correct settings, run the query to select the top 1000 Items. This time you’ll see the data decrypted as expected.
If you added parameters in the Additional Connection Parameters tab, you may see a pop-up the first time you connect. Allow the operation to proceed as expected.
One final note here is that you may need to restart SSMS for the new settings to take effect.
Now that we’ve set up the always encrypted database fields, let’s see what happens when we work with our application.
Step 5: Run the application
Make sure to update all connection strings to use this new setting across all projects.
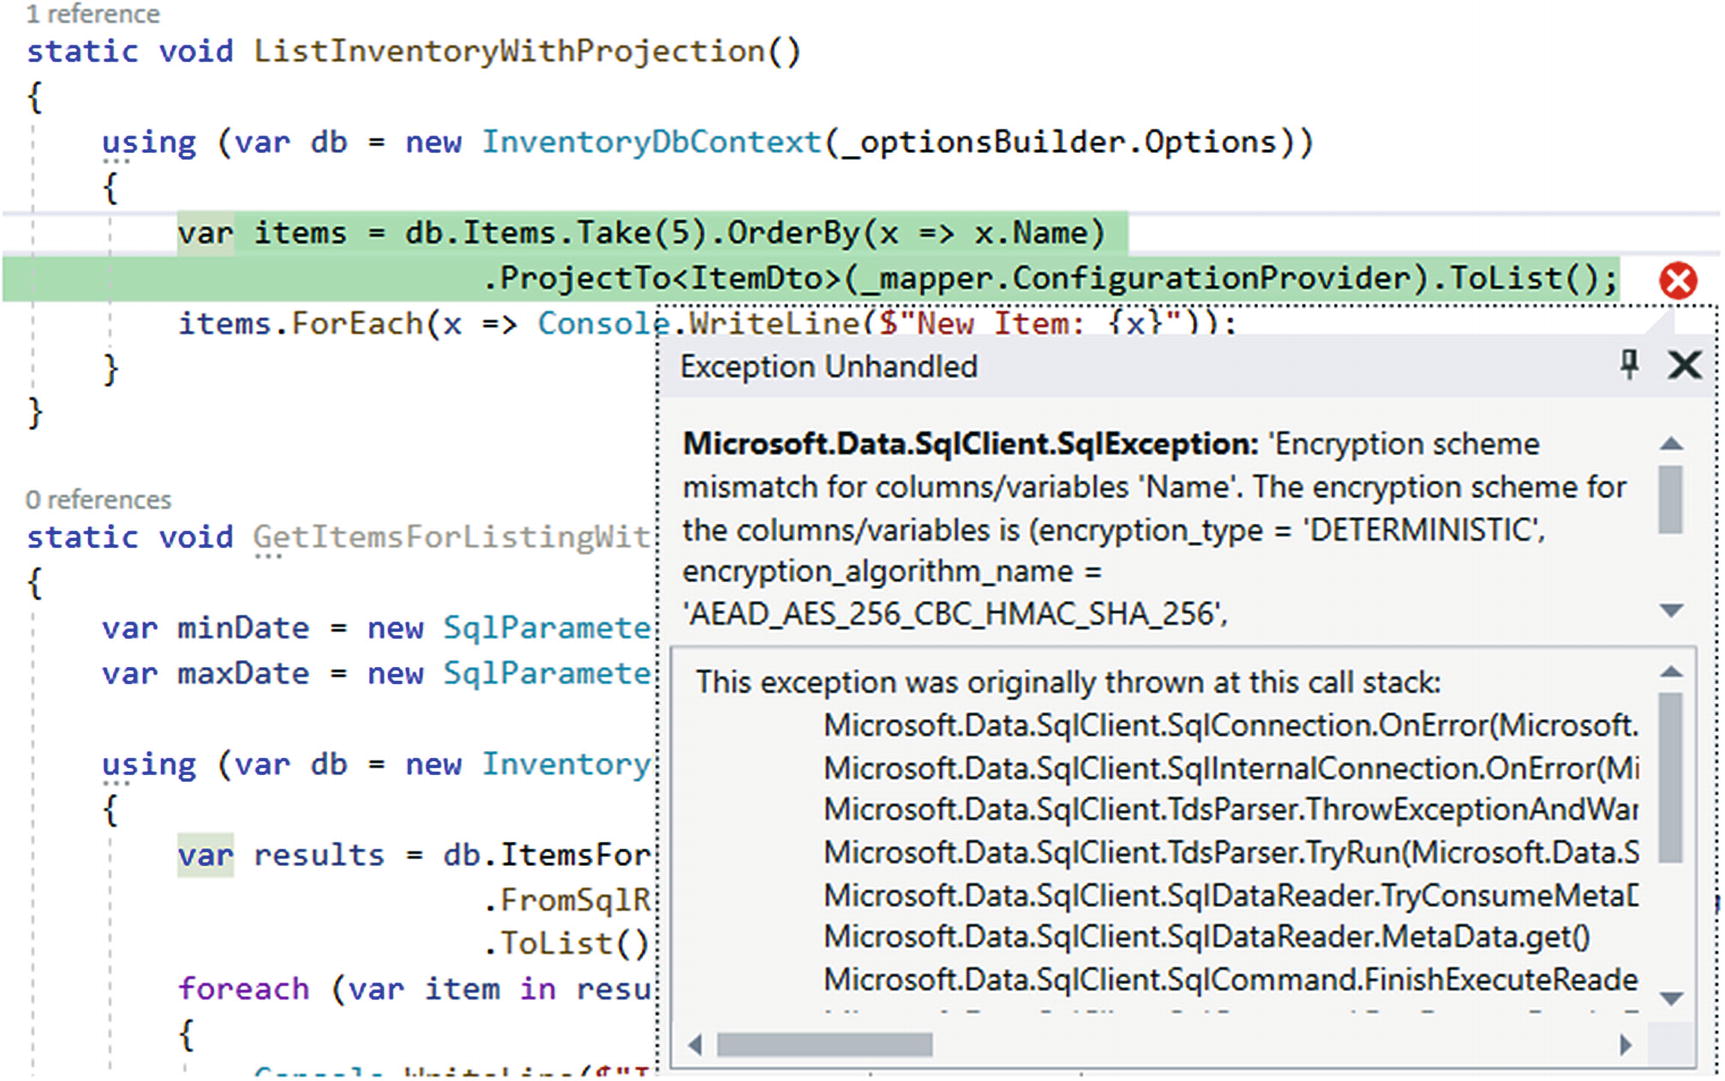
Using Projections on encrypted data does not work
Here, we see an exception is thrown. The reason this happens is because AlwaysEncrypted uses client-side decryption. In this case, we’re trying to work against encrypted Item fields for Name and Description before decrypting them.
If we had set up our AlwaysEncrypted solution to also include enclaves, it might be possible to continue using these projections, since more operations could be handled on the server side.
This is going to be the biggest issue with using LINQ against AlwaysEncrypted database columns when not using enclaves. We won’t be able to leverage these columns without first decrypting the data. This is where using AlwaysEncrypted can take a big performance hit.
In our current solution, we can still create a projection, but we can’t do any ordering, sorting, paging, or filtering until the entire result set is decrypted on the client side.

The output from the projection with ordering before getting to a decrypted list shows that the ordering is happening on encrypted data
This query result is clearly not ordered by Name, and does not get the two records that start with “B” as part of the top five results in order.
Therefore, to this point, the only solution I’ve been able to come up with is to just pull the Items using the standard query. If you think about this, it mostly makes sense, because the data is first decrypted on the client side and then we can work with it after decryption.

The output is correct, but only when we first decrypt everything and then perform the ordering and take operations
Step 6: Fix the Method to Get the Items for Listing using LINQ
Uncomment the GetItemsForListingLinq method , and run the application to reveal that this method will also fail. To make the GetItemsForListingLinq method work, we need to do a couple of things. First, we must get the Items to a list right away before performing the Select. Once that works, we could run the application, but we’ll still see an error. Any thoughts on what it might be?
The projection has Category information in it. In the original projection, we can get the category information only when needed. With AlwaysEncrypted on, we first need to get the information up front, and then we can project.

The updated GetItemsForListingLinq method contains the Include and ToList statements early in the LINQ query
And running the solution gets us the results we are expecting without errors.
Step 7: Turn on other method calls
The final output with data being returned from the database, decrypted, then projected, and ordered
You might have noted that we left a few methods out here. We’ll address other issues as we do some cleanup later in the book. If you’re really wanting to clean them up, the ListInventory and ListInventoryWithProjection methods would just require a call to ToList early in the chain so that ordering and taking a limited number can happen as expected. The stored procedure will not work in our current setup, so the options are to not sort or filter in the stored procedure and handle it client side or just get the data client side and handle sorting and filtering on the client.
Final thoughts on activity 1001
In this activity, we saw how easy it was to set up the AlwaysEncrypted database encryption on our InventoryManager database. Unfortunately, we also saw that once we have set up the always encrypted database columns, we must work with our queries in a manner that first retrieves the results and decrypts them before performing any ordering, filtering, or paging. As we’ve learned in previous chapters, this is not the most efficient way to work with LINQ to generate result sets.
Activity 1002: Using transparent data encryption
While it is more likely that you will encounter the need to use TDE in an older EF6 project, it is entirely possible to implement TDE in .Net Core as well. Therefore, we’ll be using our .Net Core project that connects to the AdventureWorks database to complete this activity. Regardless of the version of EF where we are implementing this solution, the real meat of this activity will happen at the database level, with keys generated, column changes (which could/will be a code-first change), and then the heavy use of stored procedures to work with the data for read and write operations after fields are encrypted.
A quick review of TDE vs. AlwaysEncrypted
As a review of what we’ve already covered, where AlwaysEncrypted worked in the client side with encryption, sending encrypted data over the wire and simply storing the encrypted values in the database, the TDE solution is going to be entirely server side on the database; with keys specific to the database, encryption handled after data is received before insert/update and before sending back to the client. All of the data being decrypted at the database means plain-text values going across the wire without additional configuration.
How TDE can be a better choice for your solutions
Where TDE will really shine is going to be in overall performance, as compared to the AlwaysEncrypted solution. In TDE, with the data encryption/decryption happening at the database in procedures, everything will be in an execution plan, and there won’t be any issues with projecting data on the client side as the data will already be well formed before being sent back to the client – often as the exact shape of the Model or DTO that the client needs.
Step 1: Get set up
To begin, grab a copy of the Activity1002_Using_Transparent_Data_Encryption_Starter.zip files, extract them, double-check your connection string, and make sure that you have the AdventureWorks database set up. Run an update-database command to make sure the migrations are up to date on your machine. Additionally, it will likely be a good idea to run an add-migration to make sure you don’t have any pending model/database changes. If the migration is clear, just delete it. If not, consider just running it to get your database set up. If you don’t have an implementation of AdventureWorks up and running on your system, refer back to the opening chapters of this book for getting set up with AdventureWorks.
As an alternative to using the starter files, it would be possible to continue working with files as of the end of activity 0901. If you desire to build your own starter pack, please use the EF_Activity001 and InventoryHelpers projects so you will be set up to work against the AdventureWorks database with migrations.

The initial output is similar to the output from the end of activity 0901
Step 2: Discuss the TDE migration strategy, including backup
This migration strategy will work for any database that has existing data where you need to implement TDE to protect your data at rest. Our solution is an EFCore implementation, and we have a lot of data. Your solution in the real world is likely similar, even if it’s in an EF6 solution.
First, back up the existing data to another column to hold the data during encryption procedures for each column to be encrypted.
Second, back up all of the data that will eventually be encrypted.
Third, create all of the keys and certificates necessary to encrypt and decrypt data with TDE.
Fourth, drop any constraints on the target columns.
Fifth, change the column type for the columns to be encrypted to varbinary(max). This will destroy the existing data in those columns. Constraints will no longer be possible once the column is encrypted.
Sixth, perform a transformation operation where the backup column is encrypted and inserted into the original column.
Seventh, delete the backup column(s) from the table. Before you do this, make sure to fully document the column type and length. This will be critical during decryption, and if you don’t keep a record of it, you’ll have to review backups or go through the migrations or scripts to see what they were before.
Finally, for every operation around the table with encrypted data, create the Insert, Update, and Read procedures that will be necessary to work with plain-text data inserted to an encrypted column or encrypted data returned to a plain-text result set.
Sounds fairly straightforward, right? It’s actually not too bad. We’ll walk through these steps together. There is one final note to consider, however. If you are working through the chapters of this book out of order, there are other chapters that depend on the AdventureWorks database to be set up and not have encrypted columns. While you could likely just restore the database at any point from the original download, you may wish to make a backup of the database before performing the remaining steps in this activity to avoid conflicts with other chapters.
If you are working on an actual database for your work or personal projects, I would recommend backing everything up before starting, in the off chance that something goes awry.

Backing up the database

Perform a full, copy-only backup to the default file location for backups
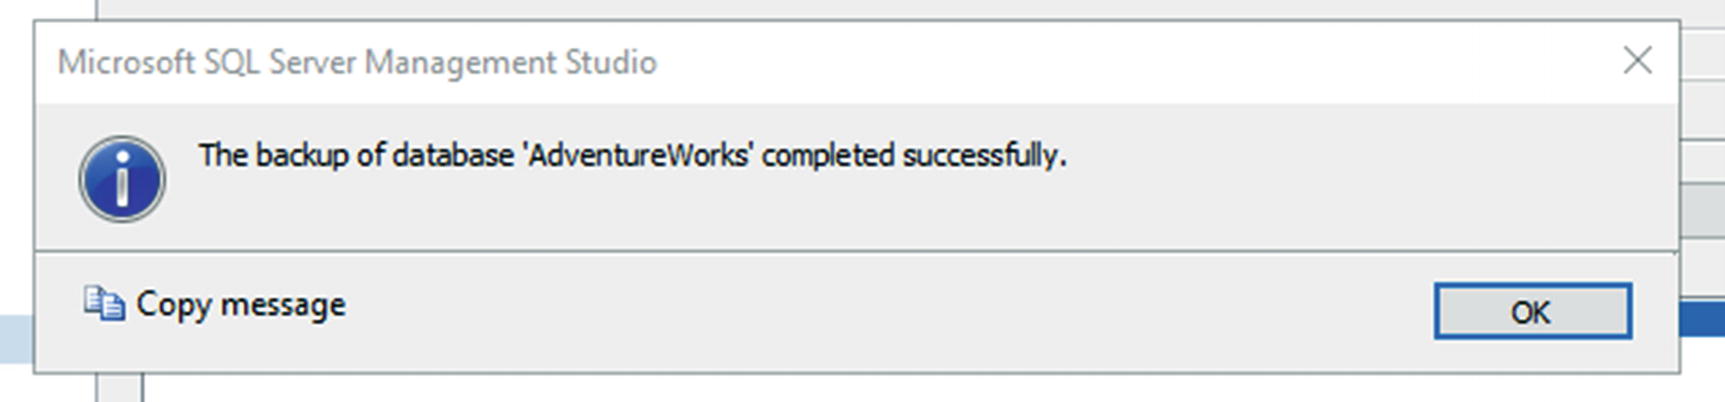
The backup is completed successfully
Step 3: Begin the migration strategy
Referring to the preceding steps, the first thing we want to do is perform a migration to add backup columns for every field we want to encrypt.
While a real-world scenario would likely have many tables and columns to encrypt or decrypt, we’re going to home in on the HumanResources.Employee table in the AdventureWorks database. You should have no problem extrapolating what we learn from this activity to other tables and fields if you want to practice more or when you eventually are implementing your real-world solutions.
NationalIDNumber
JobTitle
BirthDate
MaritalStatus
Gender
HireDate
We could do other fields and other tables, but this will be where we stop for this activity. One bummer about these fields is that there isn’t a decimal field to encrypt/decrypt in this result set, but the decryption strategy will be the same as the others, just if you have a decimal field to encrypt/decrypt, don’t forget to convert to the correct type and size as you decrypt.
For the first part of the strategy, let’s add the backup fields to the model. We could do this by just writing a script and including it in the migration. The choice is yours on how you would like to proceed. If using a script, another thing you could consider is just selecting the whole table into a backup table and then encrypting from a select on that table. There are many solutions available for the migration.
In our example, I’m going to use full database migrations so that there is a small chance I could roll it back without too many issues. Again, you could write manual rollback scripts and just use them to protect your data.
If you have not validated that you have no pending migrations, before continuing, you should try to add a migration and make sure it is blank. If not blank, evaluate and run if there are no issues. If the migration is blank as expected, run the Remove-Migration command.
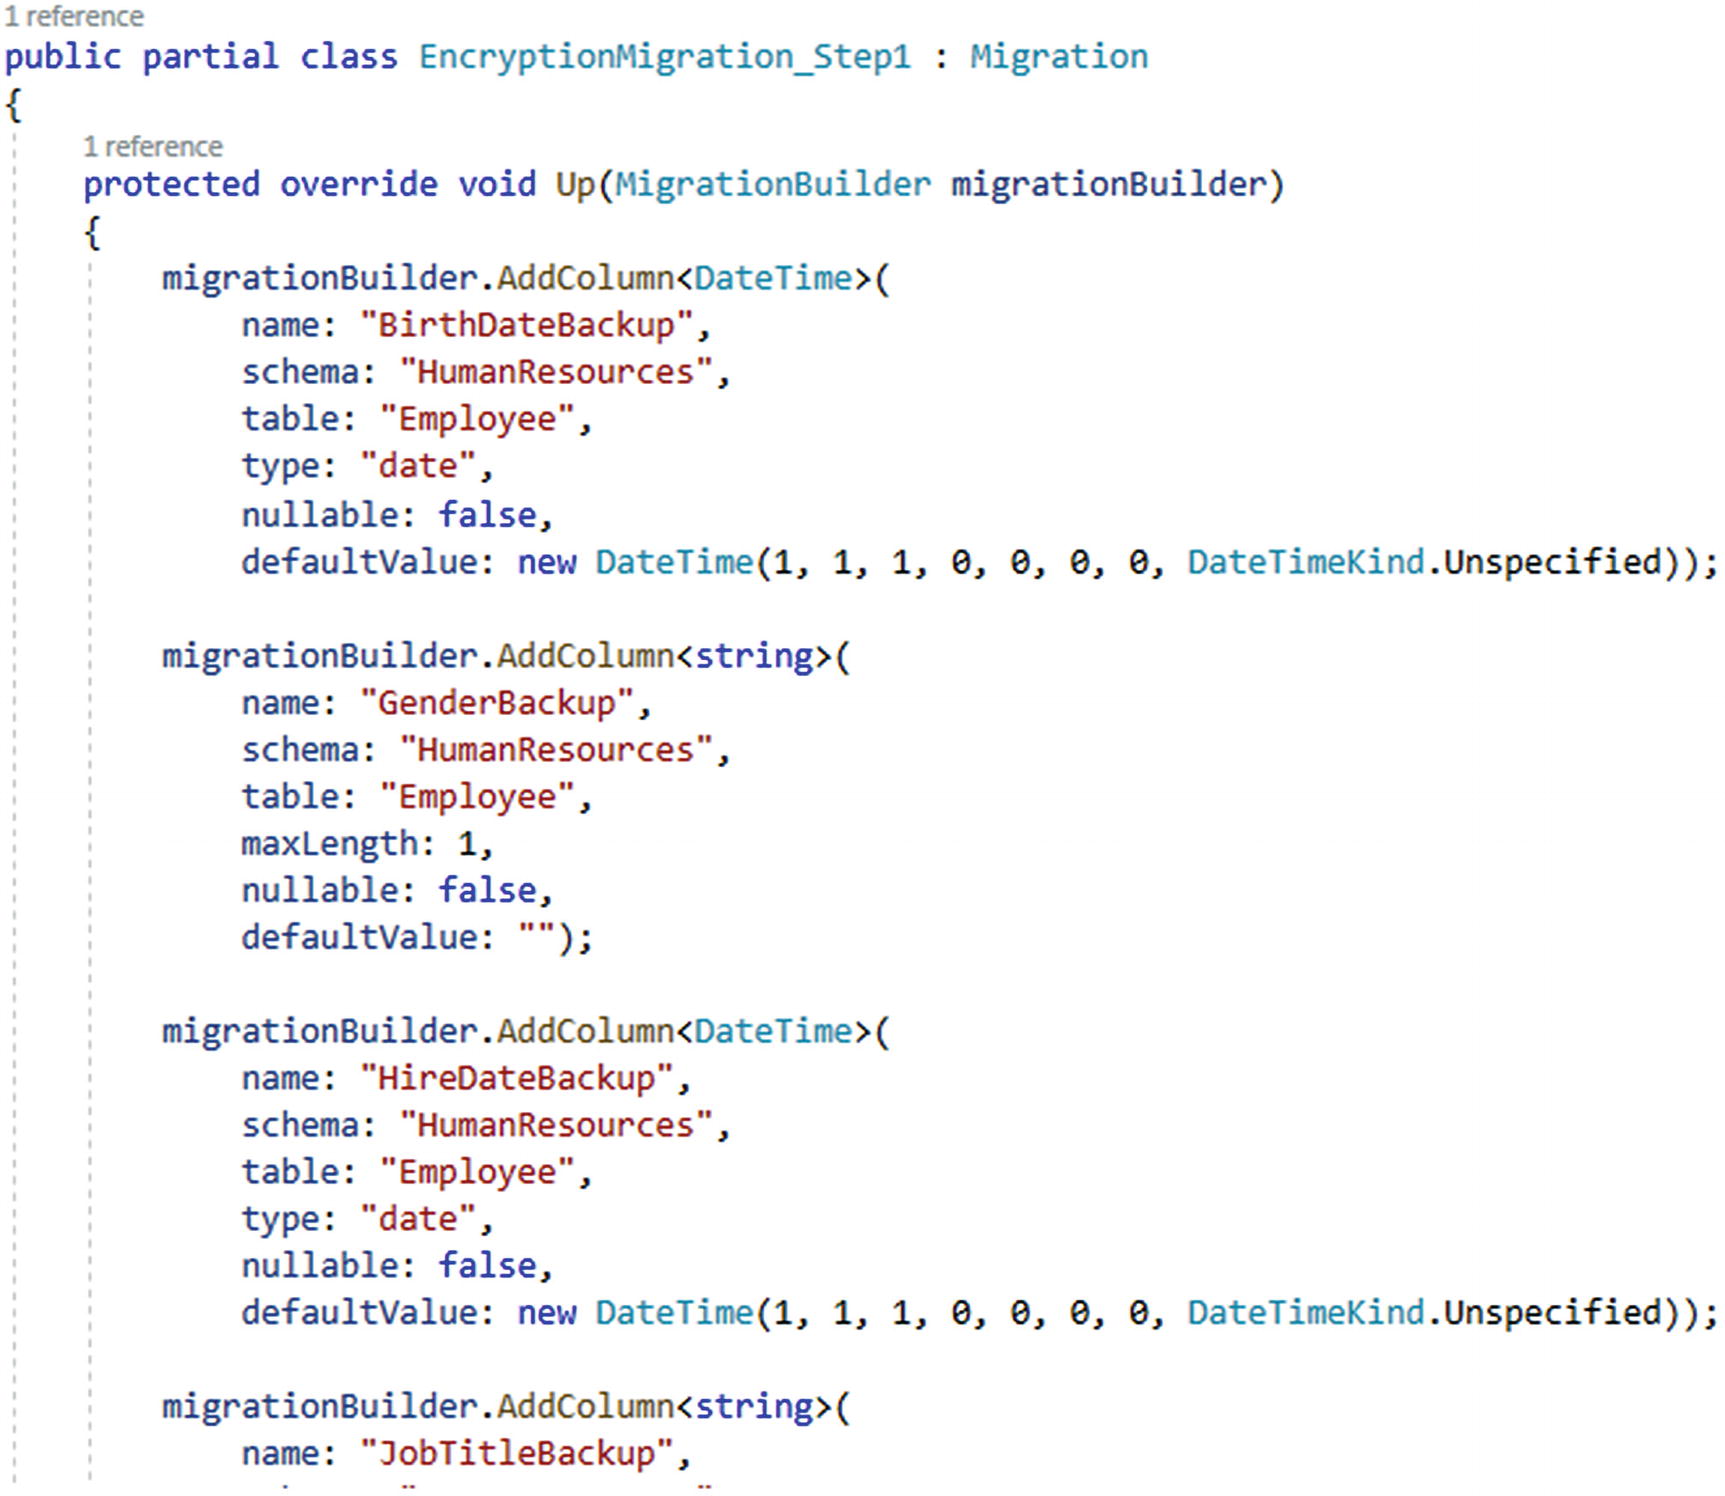
The first migration is adding columns to store the original field data to ensure we don’t lose data during this process
If you were running this process against an EF6 implementation, the migration would look a bit more succinct, but would still accomplish the same goal of adding columns.

The database is updated to have the backup columns
Step 4: Run a script to back up the data for the target columns
Begin by adding a new migration using the command add-migration EncryptionMigration_Step2_BackupData.
Once the migration is created, either add some inline T-SQL to back up the table data or you could also implement a file-management solution like we’ve seen earlier in the text. For this activity, and for purposes of brevity, we’ll just do our scripting within the migration files.
For this migration, there is nothing to do in the down method. If we need to roll back, we’ll have to manually intervene to save our data.

Updating the database runs the script
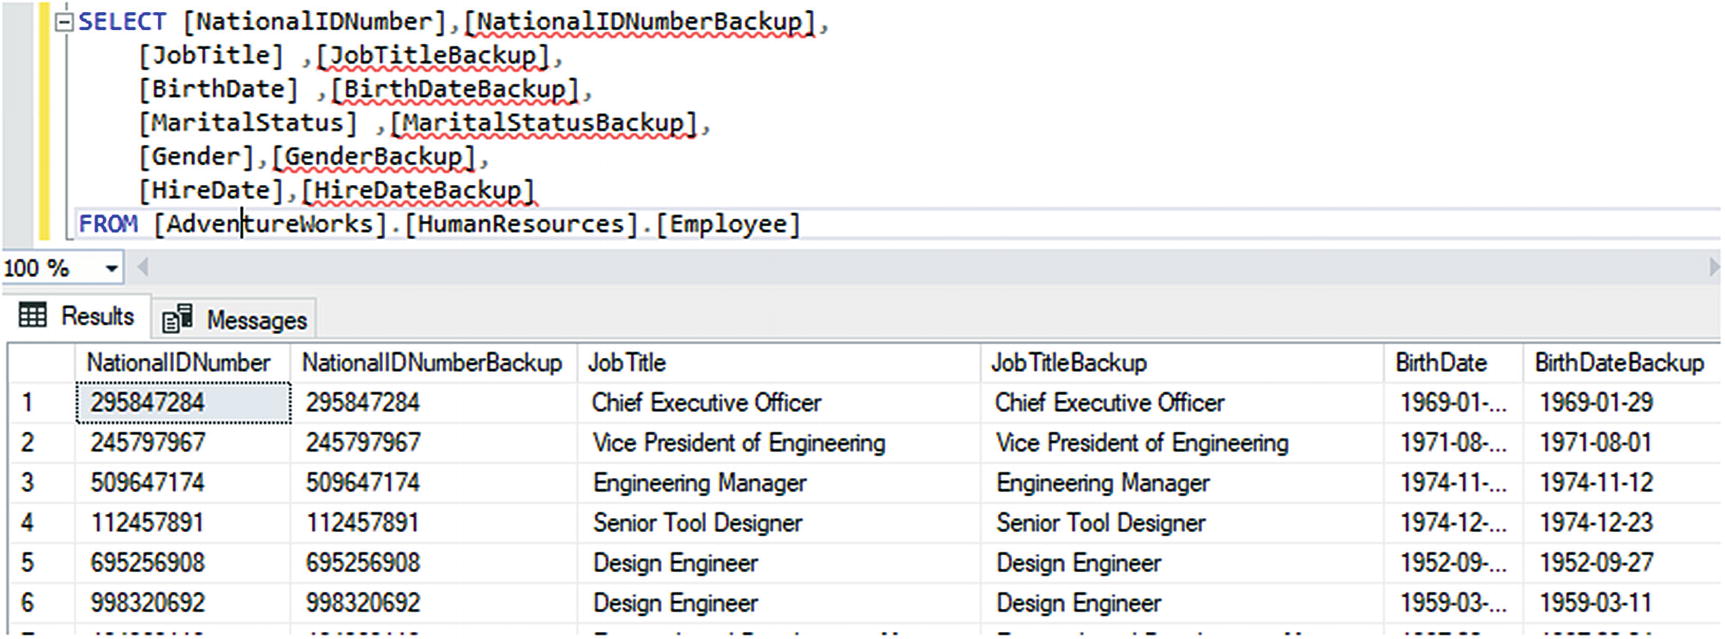
Verifying the data was backed up successfully
Step 5: Create a new script to generate the database keys
In order to make the database keys successfully, you’ll need to have three things. First, you’ll need a certificate. Second, you’ll need to create the symmetric keys. Finally, you’ll need a place to back up your keys. You’ll also need a strong password that can be used for the keys. An important note is that anyone that is executing the migration to create the scripts will need to make sure to have the hard-coded file path in place for storage of local backup certificates and keys. Another consideration would be a personal KeyVault at Azure.
Make sure to validate that the physical drive contains the proper folder for storing backups of the certificates and keys generated by the migration script for creating encryption keys.

The folder to store the database keys after generation
Once the storage location is in place, create a new migration by running the command add-migration EncryptionMigration_Step3_CertsAndKeysGeneration.
Once again, we won’t be doing anything in the Down method for this migration.
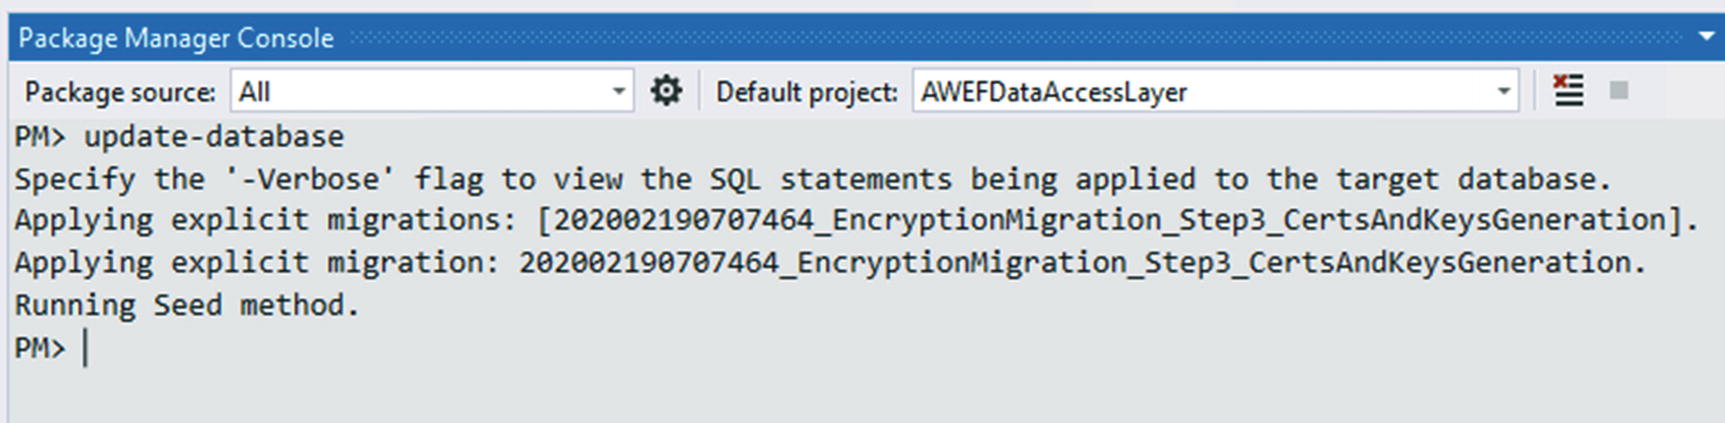
The migration is applied as expected
Now validate that the keys are generated in the database and in the file store.

The keys are generated after the migration is applied
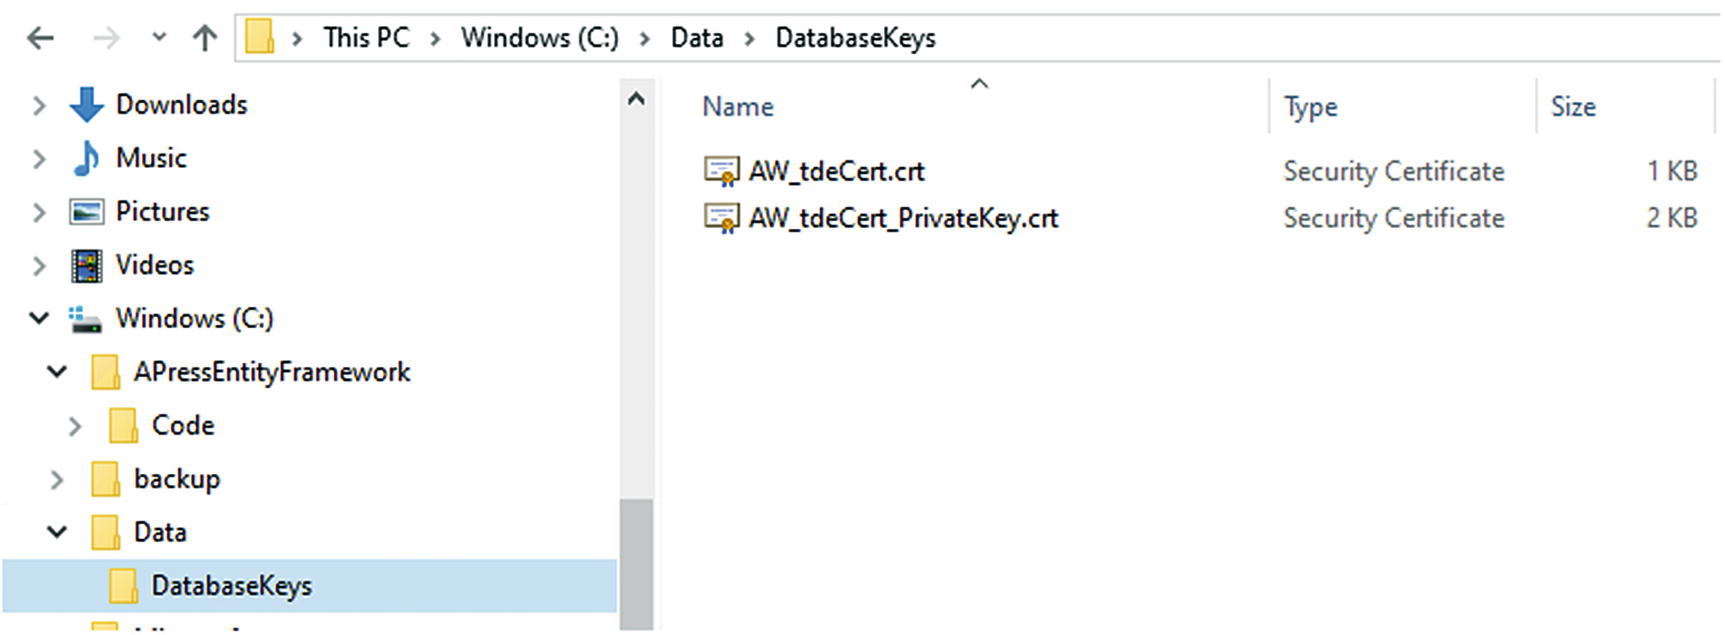
The certificates are backed up on the physical drive as expected
Store your keys somewhere secure.
Step 6: Drop the constraints and indexes on the target columns
Now that we’re ready to encrypt data and we have our target column data backed up, we need to set the columns that we’re using in our database to store the encrypted data.
First, we must drop all the constraints and indexes on the fields that will be changing. We can do that easily with a script.
If you miss one along the way, just update your script file, and then run the drop manually. Otherwise, make sure to change this script to be idempotent.
Add a new migration with the command add-migration EncryptionMigration_Step4_DropConstraints. In this migration, add a SQLResource to script the constraints for dropping. We have a bunch of check constraints to drop on each of these columns. You may want to keep a record of what they do as you may want to enforce these constraints in the procedures that insert and/or update data in the future.

The constraints on the Employee table have some unique identifiers that will be unique to your database implementation
Technically, we should put the scripts in place to recreate these indexes in the Down method. For brevity, we’ll skip it this time. If you want to do this correctly, just right-click each constraint and index we are dropping, script as create to a new query window, and use that generated script in migrationBuilder.Sql(@"code"); statements. Remember to set a new statement anytime a GO command is encountered.

Validating that the constraints are gone
Step 7: Change the data type for target columns to varbinary(max) byte[ ]
For the next change, we’re going to modify the data for the employees table. We need to change all fields to varbinary(max) in the database that will hold encrypted data. When we do this, the data will be lost from these target columns. Since we’re going to be performing destructive changes on the table, it is critical that you have previously run the step where data was backed up to another field. If for some reason you skipped that step, go back now and back up your data.
If you aren’t using migrations in your solution, simply create a script at this step that alters the table to set all the target columns to be type varbinary(max).
If you don’t remove this, but it was already removed from the database, your next migration may not run correctly.
Next, add a new migration with the command add-migration Encryption_Step5_ChangeColumnDataTypes.
Then manually remove the statement to drop the index from your migration.
After the migration is created as expected, run the update-database command to change the data types on the table. This will also rename the NationalIDNumber column to NationalIdNumber since we removed the mapping in the model.
Also remember at this point, if your solution relies on these columns, everything that touches them will need to be modified after this operation to restore your system to working order.

The migration fails to convert
To fix this, we need to do a manual update of our migration. It’s not ideal, but it does work.
Where the first step is to add a temp column, then convert the existing column into the temp column. Then drop the original column, and finally, rename the temp column to the original column. Do the same for Gender, MaritalStatus, and JobTitle.
The DateTime columns will also throw errors, as would other types, so make sure to update them to use the same swap operations as well:
Furthermore, it is likely the Down method won’t work for us at this point, so let’s comment the code out rather than spend time remapping all of the data types.
If you wanted to ensure that works, you could try to reverse the process of going from a byte[] back to the original type. This would require a similar swapping algorithm.

The migration updates as expected

The columns are converted as expected
One last thing at this step is to run another add-migration to make sure that we don’t have any bleed from our last migration since we did alter it overall. Run the add-migration make-sure-no-bleed command. Once that comes up empty, go ahead and run the command remove-migration.
Use SSMS to validate that data columns are showing as encrypted by running the query SELECT * FROM HumanResources.Employee. Some fields should have cryptic values like 0x430068006900650066002000450078006500630075007400690076006500.
The script we just ran shows that we have successfully encrypted the columns, but we did lose the data. Good thing we have everything backed up. Now we just need to encrypt the data into the correct columns.
Step 8: Encrypt the backup data into the new columns
For this step, we’re going to run a migration that will encrypt the varchar data and datetime data that we’ve stored in backup columns and put it into the varbinary columns that are now holding the encrypted data.
Create a new migration using the command add-migration EncryptionMigration_Step6_EncryptBackupDataIntoOriginalColumns.
In the Up method of the migration, we’re going to run some custom SQL to move our backup data into the destination columns. To do this, we’re going to need to encrypt the data.
The important moving pieces of this process will be to first open the symmetric key to allow the encryption process to take place, as well as naming the certificate to use for decryption. In the quick check we did at the end of the last step, we used the same process. We also set the decryption to take place using a built-in function called decryptByKey. In this method, we’ll do the inverse where we’re encrypting, using a function called encryptByKey.
The simple commands to open and close the keys wrap the statements are OPEN SYMMETRIC KEY AW_ColumnKey
DECRYPTION BY CERTIFICATE AW_tdeCert; to open the encryption and CLOSE ALL SYMMETRIC KEYS to end the ability to use the keys for encryption and decryption.
Note that the function encryptByKey(Key_GUID('keyname'), ....) allows us to use the symmetric encryption keys. Also note that the first part of the script opens the key by certificate and the last part just closes all the keys. We will have to use similar commands in SSMS and stored procedures to get data or insert/update data.
Run the migration using the update-database command.
Now let’s verify our data.
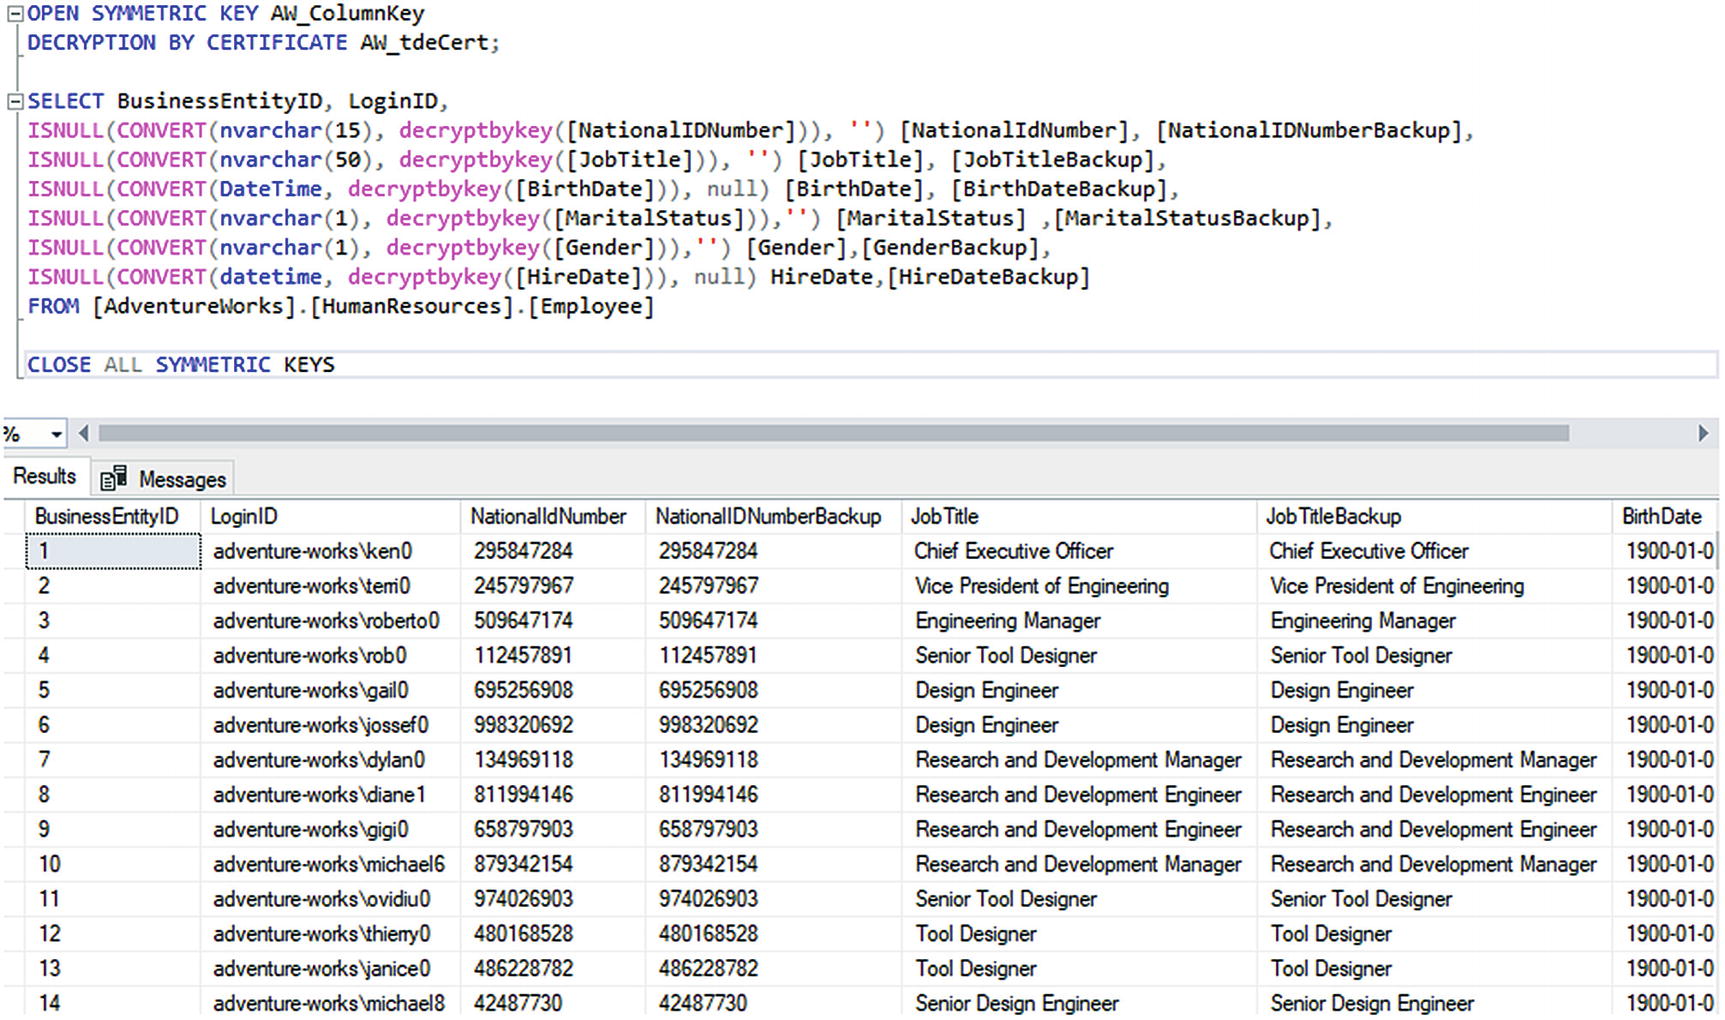
Viewing the decrypted data
Step 9: Delete the backup columns
The final step that remains for the encryption migration is to just go back to the Employee model and delete our backup columns. To keep them in the final solution, I’m just commenting them out. You would do well to just delete them from your code.
After deleting the backup columns from the model, add a final migration using the command add-migration EncryptionMigration_Step7_DeleteBackupColumns.
This migration should scaffold and work as expected to remove the backup columns from the table.
Run the migration with the command to update-database. Then validate that the columns are removed from your table in SSMS.
As an alternative to removing the columns from your model, you could just set them all as NotMapped and potentially rename them to something like FieldNameValue and set the type. This would be one way to allow the decrypted data to be brought through the system in the default model.
Final thoughts on activity 1002
In this activity, we were able to see both what it takes to use TDE encryption in SQL server and how we could perform a migration for columns in the database that we want to encrypt at rest.
If we were to continue working with this system, we would need to write stored procedures for all of the read and write operations against the encrypted columns where we could then inject the use of the symmetric keys as we did in our sample queries in this activity.
Furthermore, we would need some sort of DTO or ViewModel that housed the actual field data to be able to send the data around in our system once it is decrypted.
While it would be interesting to complete this activity with those activities, all of the tools that you would need to do this are available in the samples we’ve already worked through.
Final thoughts for this chapter
Now that we’ve worked through this chapter, we’ve seen how we can work with both AlwaysEncrypted and TDE Encryption in our solutions. We’ve also seen what it takes to modify our systems so that we can work against the encrypted data.
Although the overall encryption is not necessarily using EF – as most is done through the server or through settings on the server and a required client library – the fact remains that once the data is encrypted, we need to be able to work with it.
In each of the activities, we were able to see some of the trickier aspects and issues that could arise in our real-world solutions as we implement or need to migrate and implement encryption at rest on our data.
In our next chapter, we’re going to dive into how we can set up our solutions to test our Entity Framework and database code with unit and integration tests.