In this chapter, we are going to look at what it takes to get up and running with Entity Framework using the code-first approach. As we move through this chapter, we’ll learn about the code-first approach to Entity Framework, and we’ll take note of some of the advantages that working with a code-first approach brings to our development process. We’ll conclude this chapter by working through some activities to create a couple of code-first Entity Framework projects in EFCore and EF6.
Code first doesn’t always mean code first
Even though the name code first implies that the database doesn’t exist until code is written, it is entirely possible to employ a code-first approach with an existing database, as well as in a new greenfield project. As with any development scenario, there are multiple things to consider when attempting to determine if the code-first approach is correct for your project.
When not to use the code-first approach
Sometimes when trying to determine when something is the right answer, the way to start is to determine when it is not the right answer. That being said, in most production applications that you’ll encounter in today’s world, there are very few reasons that code first doesn’t make a lot of sense.
The primary reason to avoid using the code-first approach would relate to having a legacy system that is not capable of supporting the required tools, for example, a project that was written in any .Net Framework prior to .Net 3.5. In those projects, Entity Framework didn’t exist, so using the code-first approach is simply not possible.
Another reason that you may be forced to avoid the code-first approach could be organizational restrictions. Perhaps there are greater security concerns at play, making it against the law or highly dangerous for your company to expose so much power over the data structure to any developer through code. Perhaps your company will not allow anyone but that one mysterious DBA to touch the database for any reason. In both of the previous cases, there may be some training or education that can overcome the issues, or it may truly just be impossible to work with code first in your development efforts.
Yet another reason to avoid using the code-first approach with EF could be due to personal preference. Perhaps you don’t like the normalization structure required to use an ORM. You might also have another solution that you prefer for database interaction, such as F# type providers. Maybe you’ve been using NHibernate and you don’t want to change something that you know already works, although you could also do code first with NHibernate.
A final reason to avoid using code first could simply be that there is a high risk of losing data in a mature database. While it is entirely possible to overcome this issue, there will always be a chance that forgetting to plan for database migrations that affect data can (and perhaps will) happen. Before leaning on this argument as the reason not to choose code first in your solution, please remember that you would have to overcome the same data loss issues in traditional database development and that the solution is usually exactly the same. For example, it is entirely possible to create a migration that runs a script that backs up data from a table and then run a migration to modify the table, truncating or causing data loss, and then another final migration to restore the original data massaged to fit the new table structure, just as you would traditionally have to do with scripts to modify the database structure. As we’ll soon see, the advantages of a code-first approach could even make it a better choice in this situation.
When to use the code-first approach
If you’re wondering when you should use the code-first approach going forward, simply put, the answer is likely going to be every time you can. While there may still be situations as discussed in the previous section that exist where you cannot use the code-first approach, anytime you can use code first, you should use code first.
With EFCore and EFvNext, there is no longer an ability to create a model file like the EDMX file we saw in the previous chapter. While we can always generate a reverse-engineered database, the fact remains that we will likely have a model-based approach to all development going forward. This is a very good thing for several reasons.
Code first in an existing project
Now that you’ve bought in and are ready to build out a code-first approach with Entity Framework, what do you do when you have an existing and mature project, with an existing database? Since the database already exists, we could begin by scaffolding the data models such as we’ve seen in the reverse-engineering approach to get the models auto-generated in our solution, as well as have the DBContext generated and populated for us (as we’ve seen in Chapter 2). To make the project operate in a code-first manner, we would then just need to enable migrations and start working with the migrations against the data structures.
From then on, the project would be able to continue to build out new models and database objects and apply further migrations as needed. A great level of care would still be needed in this approach, however, as the database that is already mature needs to be protected from accidental changes that might truncate data from tables or break critical performance enhancements (such as a change dropping a view or an index might do), especially if other line-of-business applications are relying on these data structures for normal operation.
Code first in a new project against a mature database
Another approach that might be taken when working with Entity Framework in a code-first manner might be to develop a new application, but still need to use an existing database.
In a situation such as this, the development team will need to again use a great deal of caution to avoid breaking legacy functionality that might exist in other applications. Additionally, any changes made in the code-first project would need to be propagated into any legacy applications to avoid potentially causing outages or even more disastrous consequences for other business units in the organization.
Code first in a new project with a new database
This greenfield scenario is an obvious choice for working with a code-first approach. Even when we don’t want to use migrations, at some point we still need data models that define how to work with the various database objects in order to use Entity Framework.
Since the project is new and has a new database to accompany it, using code first will provide the best flexibility and ease of use from our codebase. In this case, it only makes sense to use the code-first approach.
The benefits of a well-executed code-first development effort
In case there is still any doubt about the level of success your team can achieve by using the code-first approach, I’d like to take a moment to highlight some of the greatest benefits of using the code-first approach.
Ability to get up and running quickly
Since the entire database structure is defined in code via migrations, any developer can open the project, validate the connection string works, and run a simple command to get the database in the exact state that it is in any environment where it is deployed. Obviously, there would still be work with some data, as while some data would likely be created by seeding the database, there would be a number of data tables that need human interaction. This is no different than the issues any project using a database would encounter.
A complete record of database changes in source control
As mentioned previously, using the code-first approach allows for every piece of the database to be imperatively defined in code. As the structure and needs of the database were changed, these changes were implemented in code files and a new migration was created and executed to affect the changes on the database.
In the past, you might have tried migrations and found them to be tricky. In fact, migrations before EFCore might have even caused you pain when multiple developers created conflicting migrations. Even if the migrations didn’t conflict, you still were forced to re-scaffold your migration if another developer pushed theirs first since the overall model hash code saved in the database would be different. With EFCore, most of these pain points have been eliminated, and, although migration conflicts can still happen, they are mainly the result of conflicting changes to the same database objects.
Since our code is defined directly within the project in this approach, the files and changes are all tracked in source control. There is no longer any need to create a database project with a bunch of generated and non-generated scripts, or worse, manually put your scripts into source control and hope developers keep them up to date.
Having the changes in source control is a very important advantage and should not be taken lightly. If drives and backups fail, there is always a potential of losing your database entirely. Even if you don’t lose your database, when a database failure happens, you would likely still lose all the transactions that had been run since the previous backup. Although both database and backup failure combined is rare and may never happen, if it did, and you still have your project code, migrations could be run to restore the structure and seed data from the database. Really this feature is more useful for developer machines. As soon as one developer’s changes make it into your developer source branch, other developers can update their own local database with a few quick commands. This is highly advantageous when it comes to avoiding conflicts and bugs.
Agility when needing to revert to a previous state
With the code being in source control, EF migrations also have the added benefit that, when written correctly, can easily roll back a change against the database. Rolling back a change can be a destructive event that loses data, but this is also something that is rarely, if ever, done in production. In fact, there is a camp where some users don’t rely on rollbacks at all. The theory there being that just adding another migration to move the database back in a forward direction is a better approach. Either way, you’re still going to need to plan for how the data is affected.
With the ability to revert, however, it is extremely easy to set a local developer database to match the exact state a database was in at any point of development. For example, it is easy to roll back the database to the state in time when a bug was introduced to your codebase or a patch was released. This allows for effectively coding against the database as it was at that time, making it easier and safer to release a common modification across all official releases of your project or to patch a bug fix.
Another advantage of the migrations is the fact that changes can be reverted at will. For example, if a feature is released and then eventually eliminated, migrations allow the feature to continue to exist at a patch level but to be removed from future development.
Having this history and ability to easily reset the database to the state it needs to be is all managed by the code in the migrations. Therefore, as a developer, you don’t have to spend your time trying to remember which scripts to run and testing to make sure your tables and other object structures are correct for the patch, fix, or feature on which you are working.
Shifting from declarative to imperative database programming
Another important concept with the use of code-first database development is that we are making a conscious transition to imperative database programming and saying goodbye to declarative programming around our database.
Imperative programming is the concept that as a developer, we are directly defining what should happen, thereby locking in the details of the implementation, leaving little to interpretation or fluctuation of implementation.
Declarative programming is just getting to an end result, regardless of how you get there. In this paradigm, often the details of the implementation can be murky or fluent, as long as the result is achieved.
For example, a declarative approach to development around the database might look something like you know there is a table that holds some data that was defined somewhere. You could query that data and perhaps connect to another table or maybe a view to build out a result set, but as long as the data shows up, it is not important how you got it to render. Also, you can sort of count on some fields being in the table for the important information like name, age, date of birth, email, or maybe even a phone number, but it may have changed, so you better double-check before counting on that data. If the data isn’t there, or has changed, maybe I can ask to store that important information somewhere and someone can build out the database scripts so that I can get it eventually.
An imperative approach is more defined, and code first is most definitely imperative by nature. Every database structure is exactly modeled in code. This means you know exactly what tables exist and what fields exist on those tables. In fact, you can easily create an instance of a model that holds exactly the correct data, with exactly the correct limitations that exist in the database, including type and any other constraints like length or range. Furthermore, relationships are directly defined, so you can be certain that a foreign key exists in each related table and you can easily query and populate related data.
For the most part, Entity Framework has always been somewhat imperative, with well-defined structures in place. However, the code-first approach has solidified the imperative approach with the ability to force the database to conform to specific requirements, rather than relying on things to potentially be implemented correctly in the database.
It’s time to see code-first database programming in action
Now that we’ve seen some of the advantages and reasons behind using a code-first approach, it’s time to dive in with a couple of activities. These activities will help us learn more about how the code-first approach works and also see the power that it gives us to work with this approach.
One thing we will not see here is what it would take to put code first into an existing project that is mature. The overall approach would be the same as if using against an existing database. Code would then need to be updated to start working against the EF library for new and maintenance development, and the original connections and code (such as ADO.Net implementation) could remain in place.
In the next three activities, we’ll look at using code-first approach in a new greenfield project in both EFCore and EF6 . We’ll also use EFCore to create a new implementation against a mature database.
I want to take a final moment before diving into some coding activities to make sure a couple of other things are clear. We’re about to learn how to implement the Entity Framework against an existing and a new database in EFCore and also an existing EF6 project (this would be a scenario such as upgrading an older application to use EF6 in the .Net Framework).
Please note that in order to keep the focus on the actual implementation and use of Entity Framework, I’ve chosen to make the startup projects work as console applications. We all know this is not likely to be how your project will work in the real world. However, learning to do things like making web controllers and displaying data on views or rendering information to Xamarin forms, or other similar practical activities, is outside of the scope of this book. It is my belief that if you are a web developer or a Xamarin developer or a UWP or WPF developer, you already have the skills you need in those arenas (or you will likely have resources available to learn them). Therefore, the choice to restrict the GUI portion of these activities to a minimal implementation is a conscious choice.
With that choice comes a small price, however, which I feel is important to address. If you are building out solutions in WPF, UWP, Xamarin, and/or ASP.Net MVC, it is highly likely that those project templates scaffold out an implementation directly to Entity Framework for you, so going through the setup and working in a new manner may not be necessary in many of these cases. Even so, learning how to build out a solution from the ground up will position you to rearchitect your solutions to make a more robust implementation. By the end of these activities, you’ll likely have everything you need to understand how to build out an Entity Framework code-first solution into any existing or new project.
Activity 0301: Creating a new code-first implementation against an existing database project in EFCore
In this first activity, we’re going to go through building out an EFCore code-first implementation against an existing database. This will give us the opportunity to see what it might be like to spin up a new project in a mature business environment, against a mature database that likely has other line-of-business applications working against it.
Use the starter files, or your project from Chapter 2
To begin, we’re going to pick up where we left off at the end of Chapter 2, where we had built out a reverse-engineered database project against the AdventureWorks database, using Entity Framework Core.
If for some reason you do not have these files or you simply want a fresh start, the code resources for this book include a starter zip file package for this activity called Activity0301_EFCore_Starter .
I did modify the implementation a bit to use a singleton configuration builder and of course named my project for this chapter; other than that, everything else is the same as where we landed at the end of Chapter 2. At any point, you can use the starter files or leverage the finished files Activity0301_EFCore_Final as a reference during this activity. At this point, I’m assuming you are well versed in getting started with Visual Studio and getting a project open or up and running, so we’re going to dive right in. Moving the builder code to a singleton is not necessary; I’ve simply done this to get the code out of the way of our learning. If you want to see how to implement, you can review the implementation in the starter files for activity 0301.
Step 1: Setup and getting started

The initial project structure is shown
Once you’ve validated the project setup, run the project to verify that it is working correctly as per the EFCore activity from Chapter 2.

Simple console output at the start of the project
This is essentially where we had left off using the existing database at the end of Chapter 2.
Step 2: Make sure EF is ready to scaffold migrations
Ensure that you have installed the Microsoft.EntityFrameworkCore.Design package on the starter project. To do this, right-click the Solution and select Manage NuGet Packages for Solution. Once the window opens, select the Installed tab and then make sure that Microsoft.EntityFrameworkCore.Design is installed with the latest version of EFCore.

Use the Manage NuGet Packages for Solution dialog to ensure that the Microsoft.EntityFrameworkCore.Design package is installed
Step 3: Create the initial migration
Now let’s create our initial migration in order to begin working with the code-first approach in our application.

Running a command with an incorrect default project selected

The error received when trying to run migrations against an incorrect default project

Failure to create database migration when multiple contexts are present
Change the Default project drop-down to point to the project with the actual AdventureWorks DBContext in it, and then run the command again. Do you think it will work? Figure 3-6 shows the outcome.

Delete the unused database context file
When the warning pops up about permanent deletion, just select OK and allow the file to be destroyed.
It is important to remember that changes to the structure of the project require a rebuild before attempting to add the migration. After deleting the second database context, remember to rebuild the solution before moving on.
If we fail to rebuild and try to apply the migration, we will get the exact same error as before, letting us know that more than one DbContext was found.

The initial migration has been created
Step 4: Review the migration
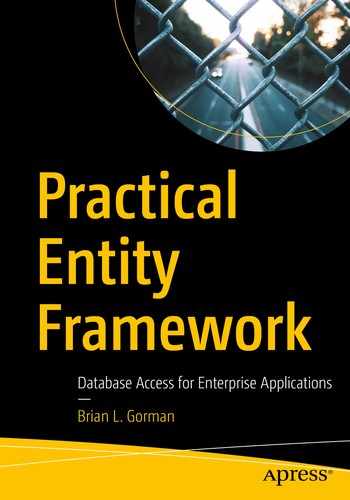
Now that we have a migration ready to go, we might be tempted to jump right in and run the migration. This would be a very big mistake, as the initial migration scaffolded has a lot of tables that it is planning to create which already exist in our database.

The initial migration contains all the table create statements, even though tables already exist in the database
So, what should we do next? There are actually a couple of approaches we can take. One approach would be to comment out everything in the “Up” method and apply the migration with the update-database command.
This approach should work, but it begs the question about what the next developer would do, and the developer after that, if they have a fresh start on an existing database on their machine. A potential solution to that problem could be to run the migration with the code commented out and then propagate the changes and run on other machines or simply modify other developer databases so that the first migration would appear to have already been applied. However, no matter what we do here, care would need to be exercised when running for the first time in production to avoid any potential problems.
Since our database is existing, there should not be a reason that we need to generate the tables as is. Therefore, let’s go ahead and comment out the code in the Up method. You could also remove it if you wanted, assuming everyone would have access to an existing sample of the database. Additionally, we will likely never want to delete these existing tables, so let’s also entirely delete the code in the Down method.
Step 5: Comment out the code in the “Up” method and delete Down method code
The Up method code is commented out and the Down method code is revmoved for the initial migration
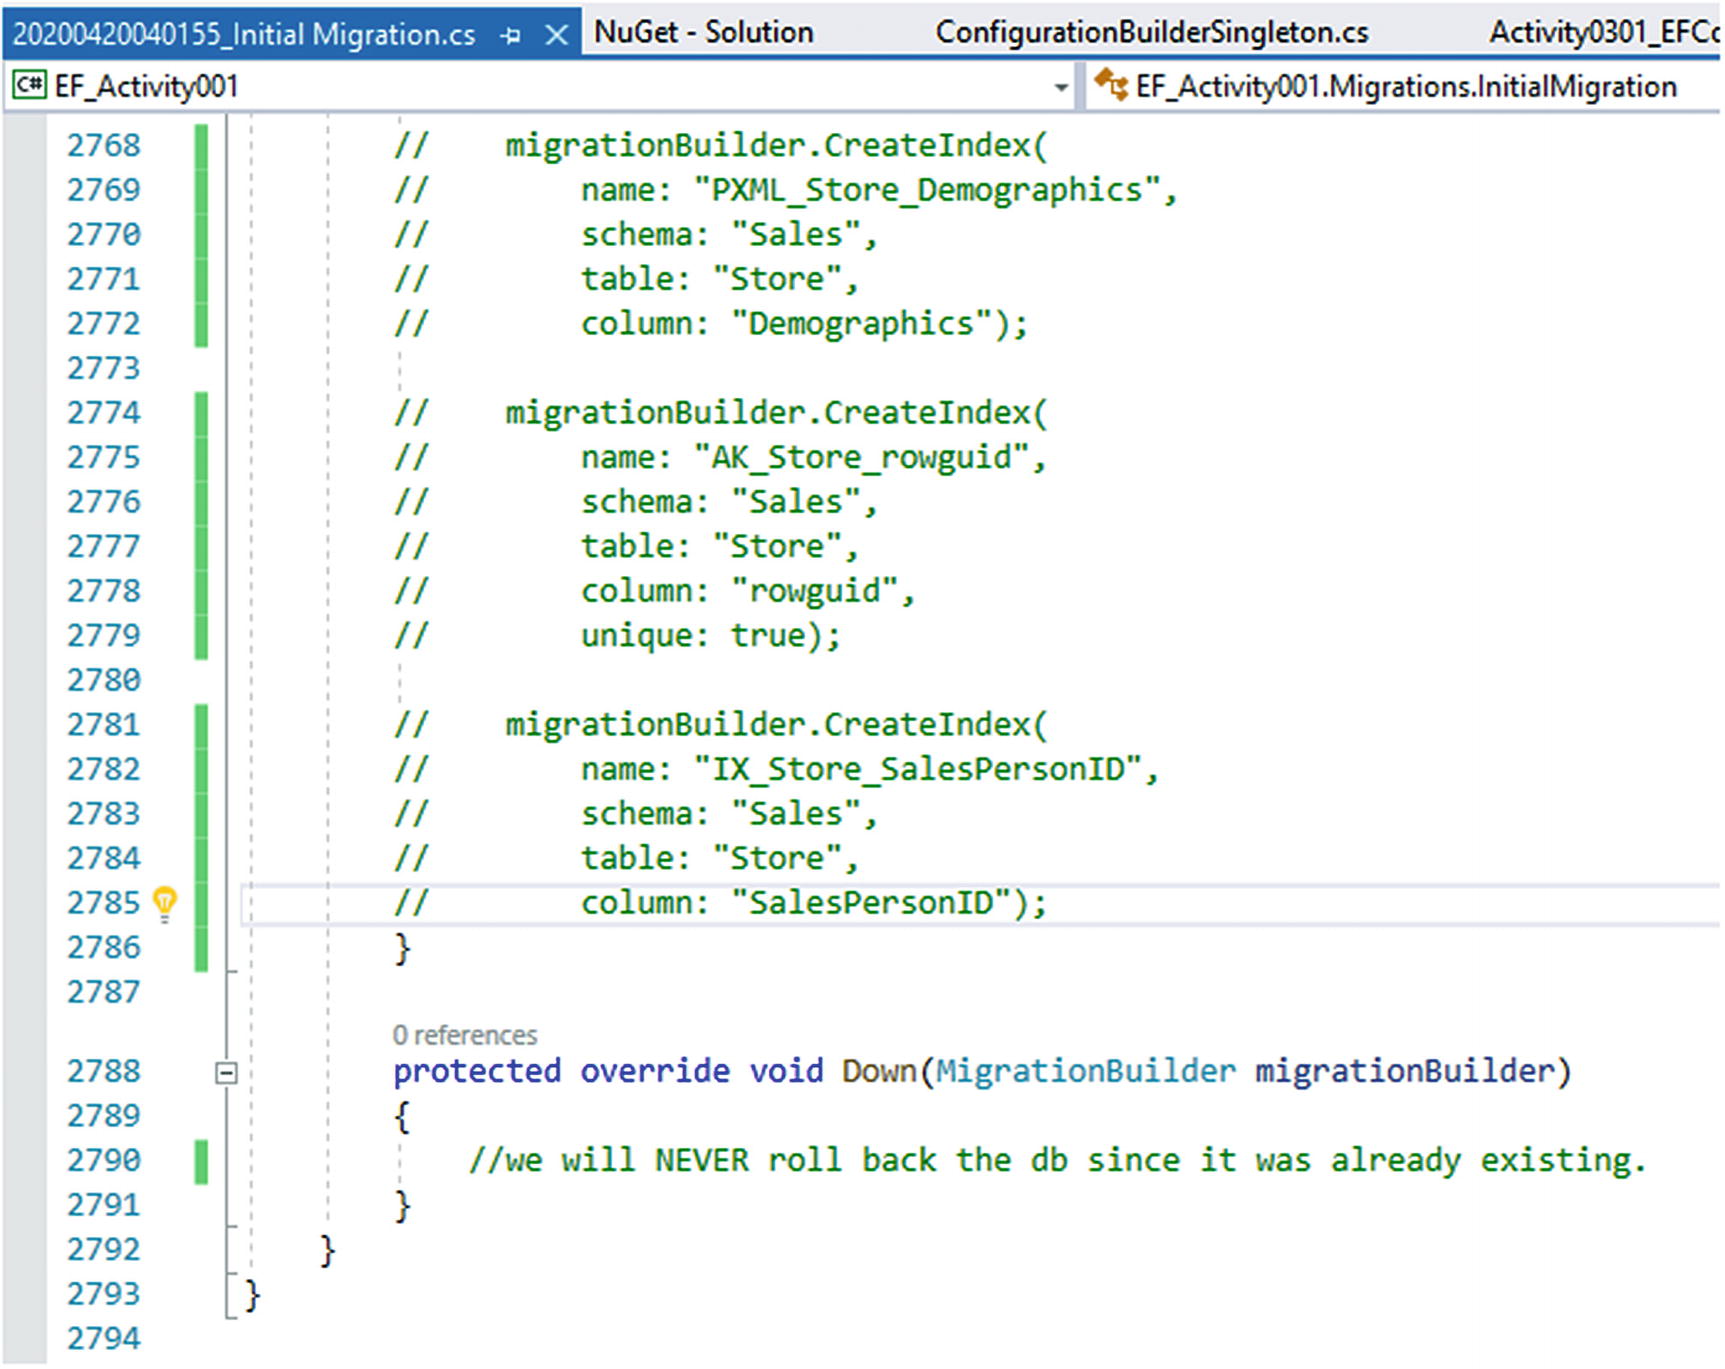
With the migration prepared to run with no effect on our data, let’s feel free to run the update-database command in the PMC and see what happens.
There is no need to fear this command right now. If this operation goes sideways, we can restore from backup. Please do not do this against a production database until you are certain the results you want will be achieved.
Running the update-database command in the PMC
Step 6: Examine the database

The EF Migrations History Table with the initial migration tracked as having been run. Note that the table can be viewed from SSMS or from within Visual Studio using the Server Explorer
Now that we have the data reviewed, we can see how EF knows what migrations to apply in our database. If the migration exists by name in the table (MigrationId column), then the update-database command will not run that migration.
Having the name of a migration in the table prevents execution. For other developers and production databases, we could simply script out and then add the __EFMigrations table to developer or production databases and then insert the first entry by Id so that the initial migration will never be executed on another database.
Here we see the name of the database migration as generated, which is nothing more than a datetime stamp with the name of the migration as named by us. It would be very easy to script the __EFMigrations table, insert it into any database that is going to work with this project, and insert the first record into the table to prevent the migration from ever being run.
Step 7: Add another migration to see what happens

Adding a second migration
As we can see, this migration is blank. Therefore, we do not need to uncomment our code (in fact, we could remove it) from the first initial migration. With that in mind, we should be ok to push to another machine with the existing database or even our production machine without fear of causing any problems in the future. That being said, it’s always wise to make a quick backup before doing something like this, just in case. If you can’t get a backup due to regulations, space, or other mitigating factors, then you could consider scheduling your initial deployment to run immediately following your next automated backup.
Step 8: Remove the blank migration

Removing a migration
In this case, we had not applied the migration. If for some reason you had run the migration that was blank, you would first need to roll back your migration history to the previous migration and then run the remove-migration command. Although we are not covering this in our activity, the command to roll back a migration would be as follows: update-database -migration [name-of-your-migration] command; in this case, it is something like update-database -migration InitialMigration. Please also note the command is different in EF6, where we would specify -target instead of -migration in the command to roll back a migration [update-database -target [name-of-your-migration].
Final thoughts
In this activity, we saw what it takes to get our database set up to work with code-first migrations when the database already exists. We did not cover how to start modifying the database, but we are position to do so.
It is very easy in EFCore to get up and running with code-first against an existing database.
Make sure to avoid using destructive code in your initial migration. The system should be smart enough from that time on to not try to re-create the database.
Use the commands add-migration [migration name] and update-database to create and execute migrations.
Use the command remove-migration to remove a migration that has not been applied to the database. If the migration is applied, use the update-database command with the -migration [migration name] flag to first roll back to the previous migration and then run the remove-migration command.
In the next activity, we’ll start fresh with a new project and a new database, and then we’ll see what it takes to start modifying data in our new database using code-first migrations. Do not fear, the ability to modify data as shown in the next activity would work in exactly the same manner in our existing database project from this point on.
Activity 0302: Creating a new code-first project in EFCore
In this second activity, we’re going to create a new code-first project in EFCore . To begin this activity, we’re going to start a new project, with a new purpose and setup. We’ll set our connection strings as before within the configuration files, and then we’ll start working with the code-first approach with a new database. Although you likely have similar code in place, it may be confusing where I’m starting with this activity. For this reason, I recommend that you simply start with the files from the project Activity0302_EFCoreNewDb_Starter which has been pre-configured with a code library and startup console project. Feel free to update the versions of EFCore as to the latest version at the time you are starting this project.
What are we building?
In this activity, we’re going to build a simple database to manage inventory. Inventory items could be any object you have around your house, such as a bunch of movies or books or board games, and can also include items like computers, cameras, and even clothes. We will be building this from the ground up, and this will be the start of what we’ll be building with for the remainder of the book.
If you are using the starter files, skip to step 2. Step 1 is going to show how to build this project from the ground up.
Step 1: Set up and use a new project
Create a new project

Creating a new .Net Core Console project
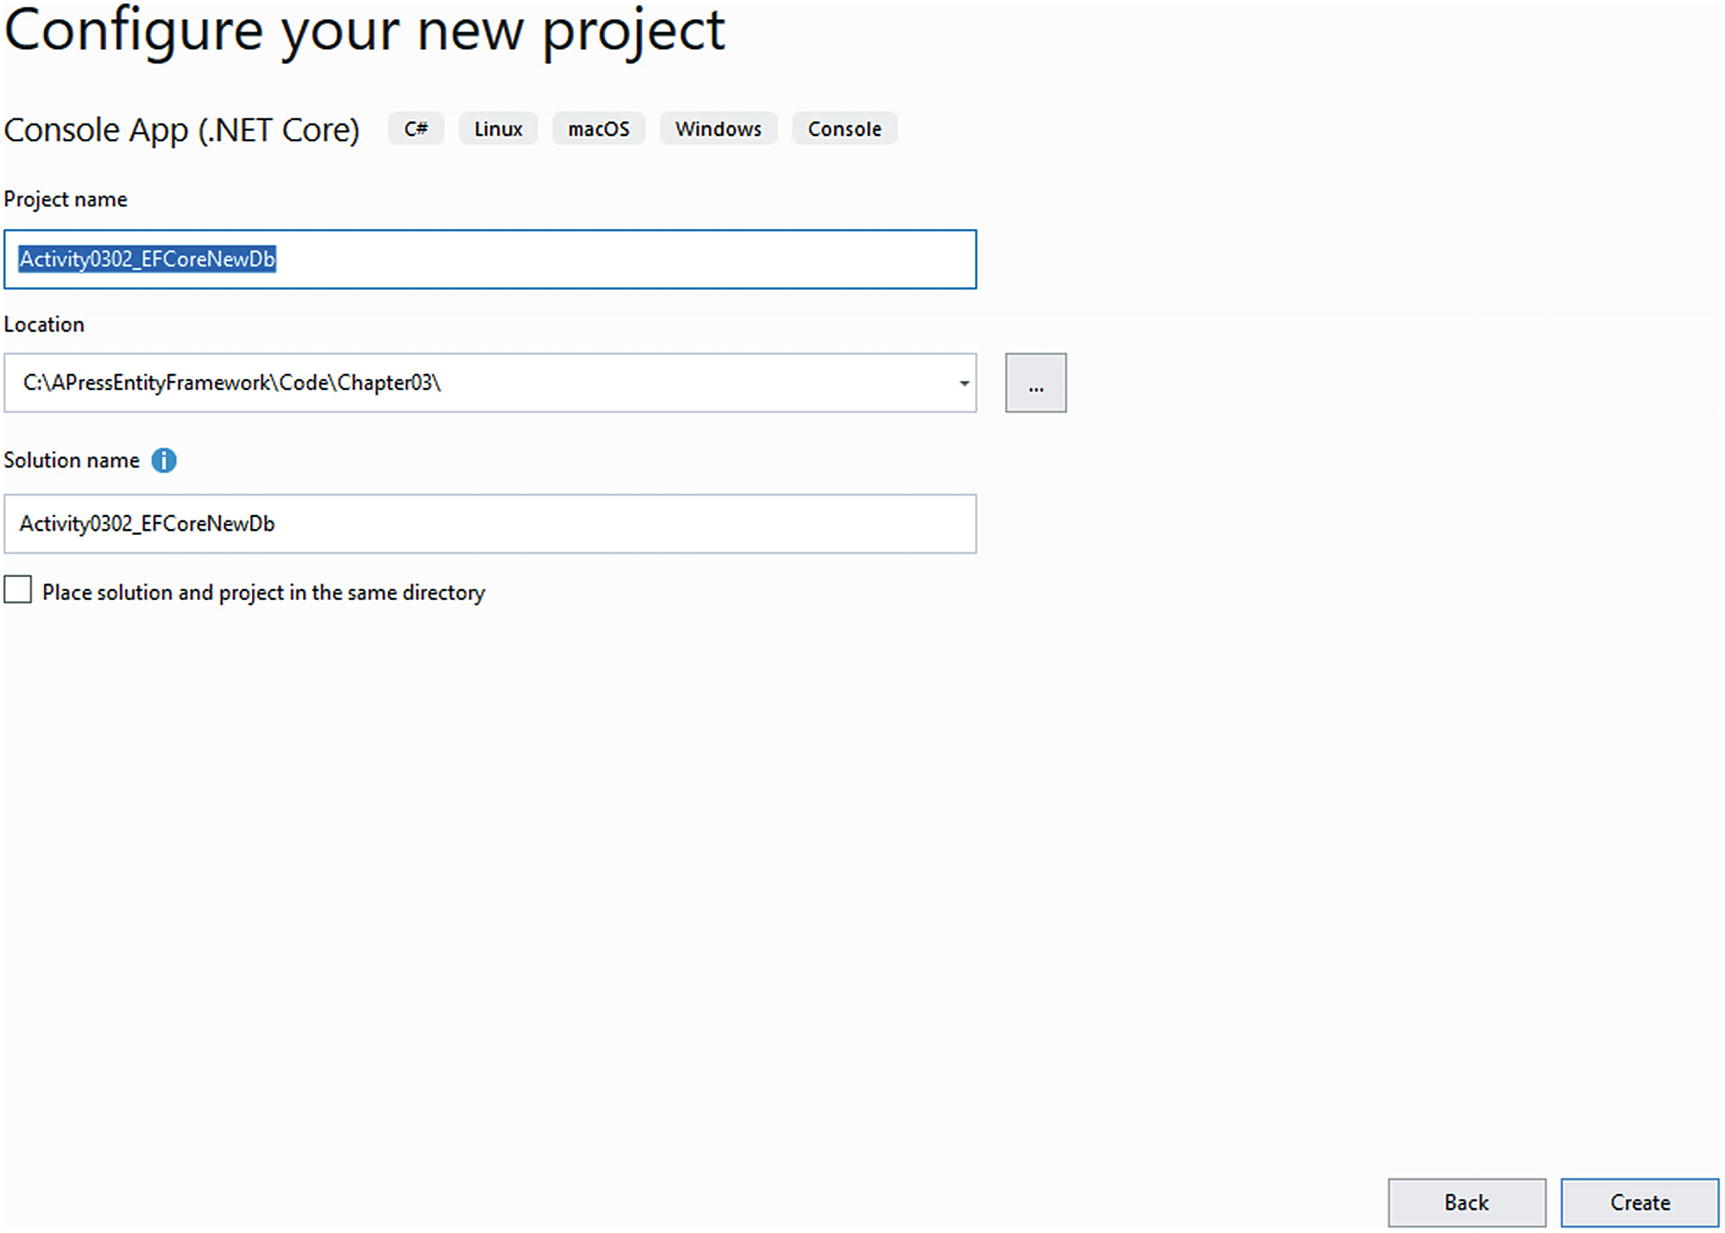
Configuring the new project

The current project as generated during creation

Adding a new project to the solution

Use the .Net Core Class Library template

Configure the DB Project name and folder location

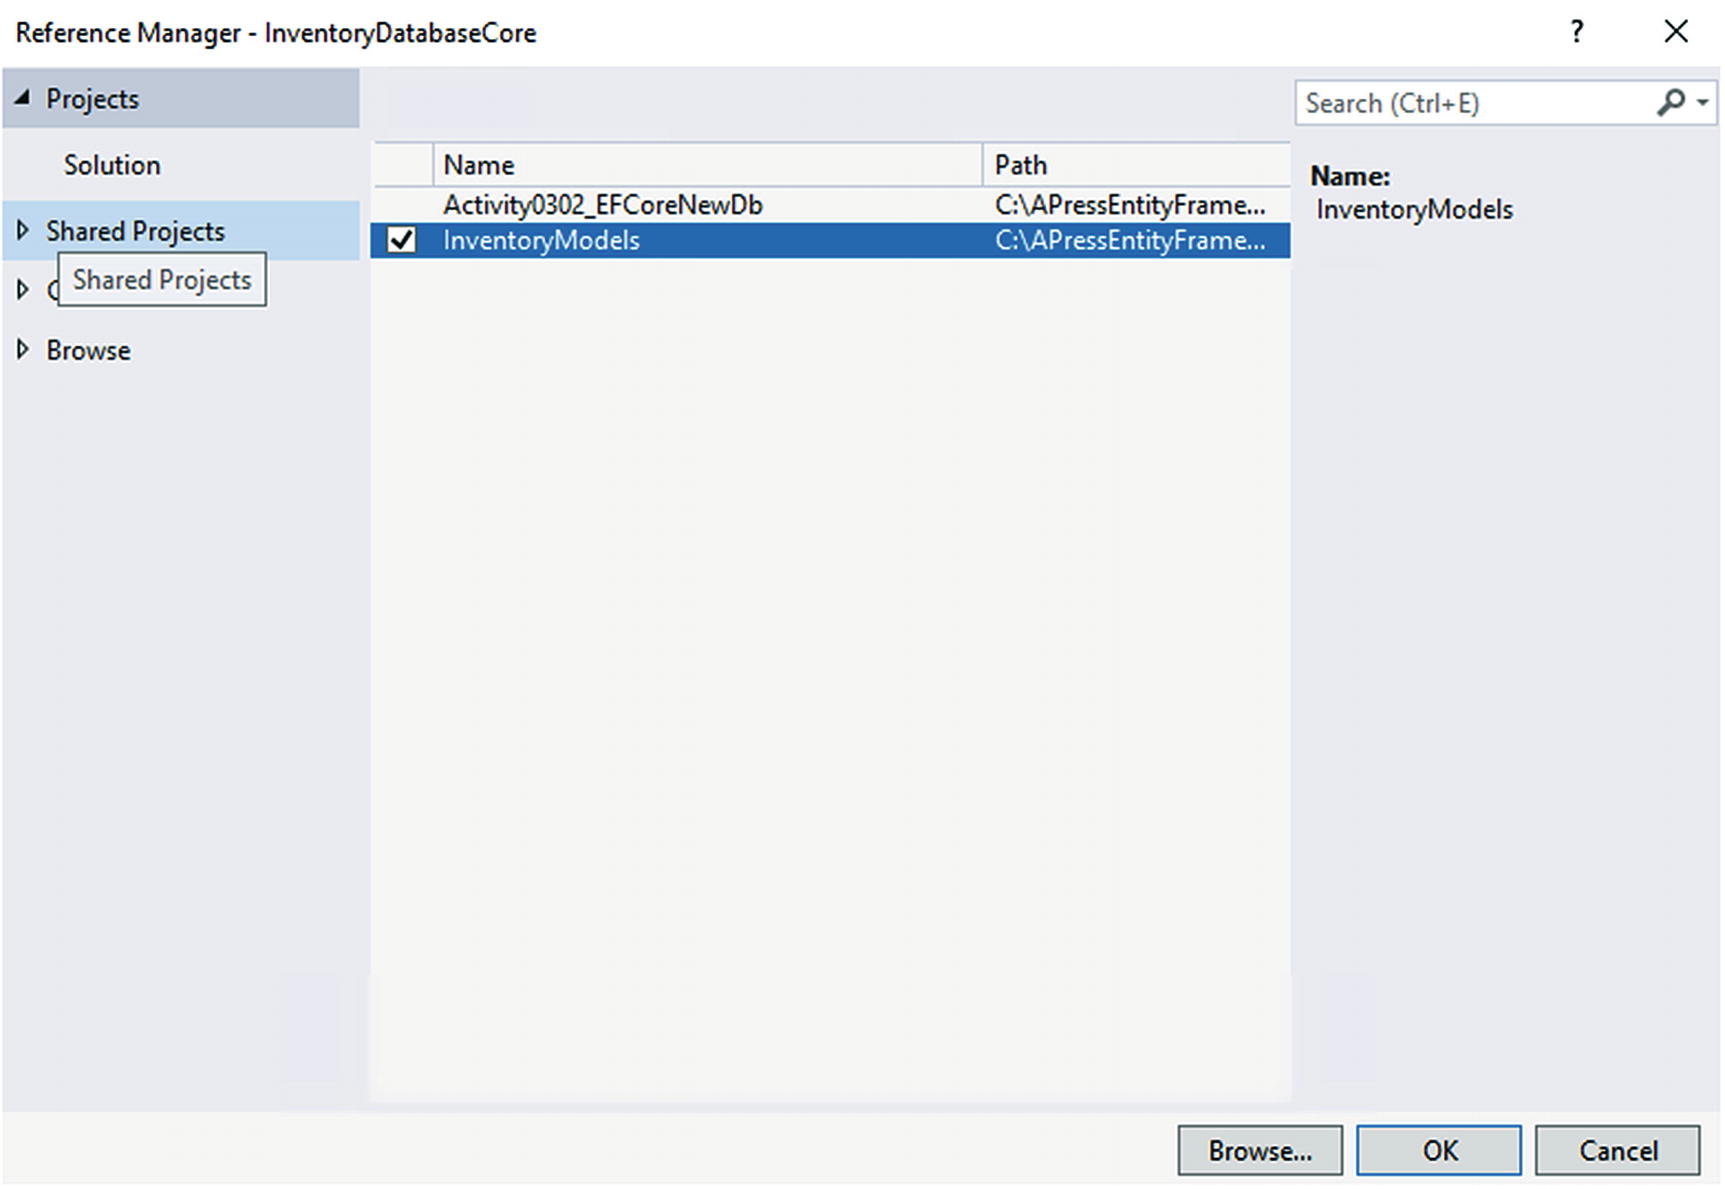
Adding a reference to the new DB project in the starter project

Selectin the DB project as a project reference

Bring up the Manage NuGet Packages for Solution dialog

Installing NuGet packages to the projects

The package and project references are shown in the .csproj file

The DB project package references

Renaming the Class1.cs file to be our new InventoryDbContext

Setting the connection string in appsettings.json

Setting the appsettings.json file as Copy if newer for deploy

The program is set up and working as expected
As a final reminder, when adding a lot of code such as we’ve done in this activity in the last two steps, if something goes wrong and you are getting a lot of errors, don’t forget to compare your code to the final version of the files.
As you are already sure your project is working as expected, skip to step 3.
Step 2: Make sure your project is set up correctly
As mentioned previously, the easiest approach for starting this activity is to get the starter files for the activity. Once you have the files, open the project, then make sure the connection string is set to match your local environment database, and finally run the program to make sure it works as expected.
When the program is working as expected, the output should be similar to what is shown in Figure 3-31 at the end of step 2.
Step 3: Add a reusable library for our database models – the “code” of code first
While it is entirely possible to put your code in the same location as the context, it is much more flexible for future use if we separate the models to their own class. Right-click the Solution, and then select Add ➤ New Project. Use the Class Library (.NET Core) project template. Name the new project InventoryModels and save the project in the same directory as your other projects in the solution.

Creating the class library for the inventory system models
Referencing the InventoryModels library in the InventoryDatabaseCore library
Step 4: Reference the library in an entity DbSet
This next step is one of the most critical steps in the process. If we forget to do this, our migration will scaffold successfully with nothing to update in the database, creating a blank migration. Therefore, if you run the add-migration command after creating a model, and the migration is blank, consider checking your DbContext to make sure you included a reference to the DBSet.
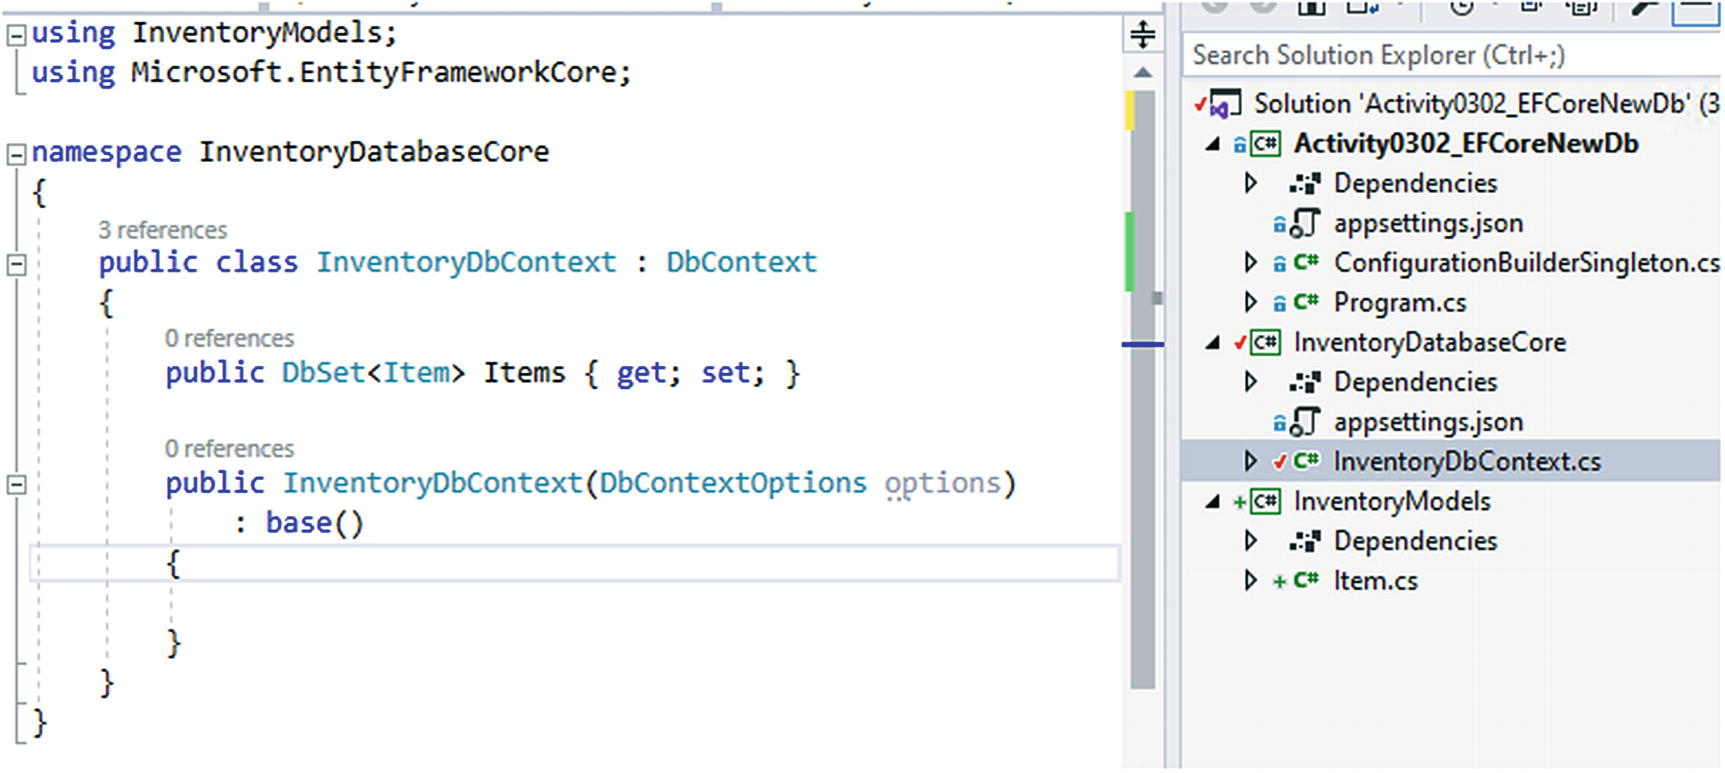
Adding the DbSet<Item> to the Inventory DB Context
Step 5: Add a new migration
We are now ready to begin creating migrations for our new database. To do this, after ensuring that we have set everything up to this point as covered, we can run the command add-migration “Initial Migration” in the PMC.

Adding the initial migration for our new database creates an error
Note that this generated an error. The error is “Unable to create an object of type ‘yourdbcontext’…”. The error is not very helpful as to what went wrong.
This error is happening because we do not have a default constructor in the context file. Let’s add a default constructor and try again.

Fixing the class with a default constructor
Now that this is fixed, try to add the migration again. Do you think it will work this time?
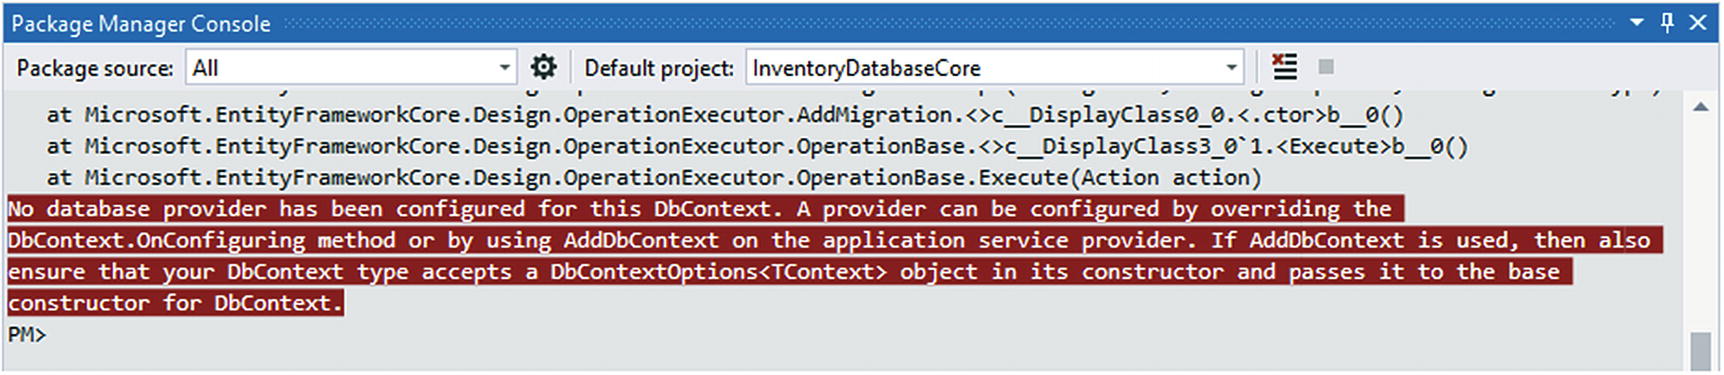
Another error. No database provider has been configured for this DbContext
The text of this error is actually “No database provider has been configured for this DbContext. A provider can be configured by overriding the DbContext.OnConfiguring method or by using AddDbContext on the application service provider. If AddDbContext is used, then also ensure that your DbContext type accepts a DbContextOptions<TContext> object in its constructor and passes it to the base constructor for DbContext.”
So how do we fix this issue?

Activity 0301 had placed an override for OnConfiguring in the DbContext
A couple of important notes. This code from activity 0301 is exactly the same as the options builder that we are using in our startup project. In this case, however, the startup project was not run, so the context did not get an options builder injected (remember, we added a default constructor that takes no parameters in order to run migrations). Therefore, the context itself needs to know how to connect to the database.
Another important note is the fact that the context is literally begging us to change out the code so that we don’t use a hard-coded connection string. While we could get away with that for now, we really should update it to prevent having our connection string information in code (eventually we’ll need to connect to a production database with something other than the trusted windows login).
Next, let’s remove the direct reference to the connection string. The good news is that we already have an appsettings.json file in place. Now we just need to leverage that from our database context.
Just as we did in the startup, we’ll need to build out the connection string from the builder. If we were using an Asp.Net core application, we could leverage the services and just work through that, but from this console project, it’s a bit trickier.
Also, we can’t reference the startup project static builder that we built, because that would create a circular dependency. So, let’s just rehash the builder code directly.
You’ll also need to reference any missing using statements such as using Microsoft.Extensions.Configuration; and using System.IO; at the top of the file.
Additionally, you’ll need to add a class-level variable before the Main method: static IConfigurationRoot _configuration;

Adding the migration succeeds now that we have access to the configuration and have correctly set up the database context to run with a code-first approach
Step 6: Updating the database

Updating the database was successful
There is a chance this will not work for you out of the box. Depending on your local instance and how things are configured, you may need to make sure that you can connect with local windows accounts and/or set to mixed mode if you want to use a SQL Server user id and password.
In some rare instances, you may need to create the database yourself and then run the update-database command . In the end, you should be able to get the update-database command to work as expected.
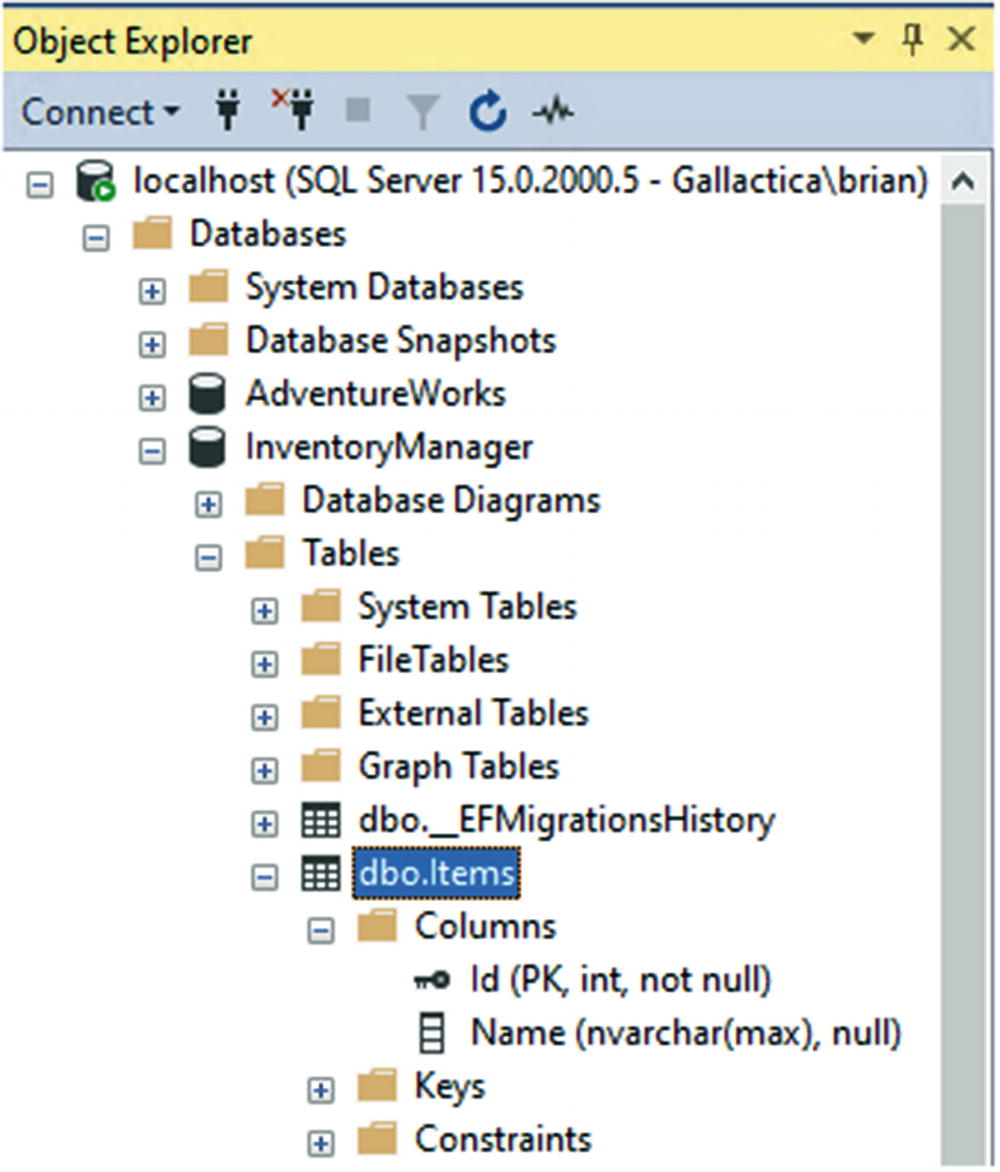
Examining the newly created database
Step 7: Insert and retrieve a set of items
As a final part to this activity, let’s insert and retrieve some items from the Items table in our database. This part of the activity is optional, as we’ll be covering how to work with the database in more detail later in the book. However, I’m a big believer in taking things one step at a time, and this simple insert and retrieve is a good way to get our feet wet.
If you consider yourself to be well versed in EF and LINQ, perhaps step away from the activity and attempt to write the insert and read/write of about five items to and from the Items table.
By doing this, we’ll quickly discover how poor our initial DB design is, as there will be many things we want to enhance about the Items table.
Also note, we are not going to prevent duplicates for now. As stated, we’ll learn more in the future about how to do things correctly against the database.
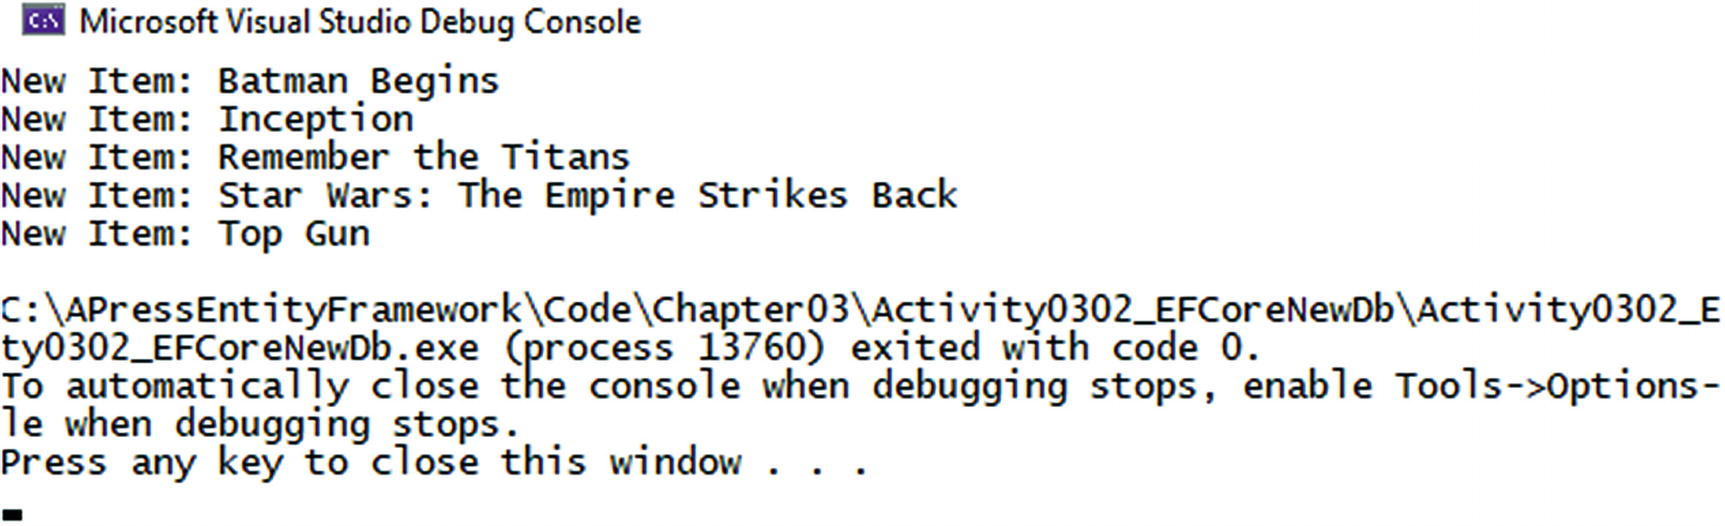
The output of our first code-first application
Final thoughts
The DbContext is the controller for interaction with the database. All the information we need is handled by the context, including DbSets, and configuration to connect.
The Model classes dictate how the table will be structured. Adding public properties will generate columns in the tables.
Add the model to the context as a DbSet in order to make sure the migration includes that model in the scaffolding.
For the migrations to work, we need the Microsoft.EntityFrameworkCore.Tools package and we need to override the OnConfiguring method in the DbContext to make sure the database connection is set as expected. Additionally, the startup project needs the package Microsoft.EntityFrameworkCore.Design.
We create the migration with the command add-migration [migration name] and then run update-database to execute the migration against the database
Migrations are tracked in the database in the table __EFMigrationsHistory
One final note is that we will be leveraging this project for much of the remainder of the book. If you are fluent with source control, now would be a good time to add your project to a repository so that you can easily work with it in the future.
Activity 0303: Creating a code-first project in EF6
In the final activity for this chapter, we’re going to implement an EF6 code-first implementation against an existing project that uses classic ADO.Net as its data access layer. In the real world, your existing project may have another version of Entity Framework already in place (EF2, EF3, EF4, EF5) and may just need a few tweaks to update to use EF6. Additionally, another path with a project that has an existing older EF implementation could just build a data access library for new functionality in EF6. However, it is likely that if you need to do this sort of upgrade, it is to bring some older application up to the last LTS version of the .Net Framework and EF6 to extend its life with the best security and architecture possible, in a manner that is much less expensive than a full rewrite.
Why not a new project?
You could create a new project with a new .Net 4.8 and EF6 architecture implementation. However, if a new project is going to be built, I encourage you to build it in the latest version of Core or in .Net 5 (vNext), depending on when you are reading this book.
Using an existing project to implement an EF6 code-first approach
Before we begin, it’s important to note that there will be a few major differences in how this works from what we’ve learned in the EFCore activities, as working with EF6 and the database context with migrations has a couple of minor differences. Additionally, while the overall idea remains the same, a couple of the commands are different in the PMC for EF6 vs. Core.
Pre-activity setup
To get started with this activity, it will be easiest to just grab a copy of the starter files Activity0303_EF6_UpdateFromExisting_Starter. Extract the files and work along with me as we build out the solution using EF6 code first.
Step 1: Configure the connection if necessary and run the project

Initial output from a pseudo-legacy application against the AdventureWorks database
Step 2: Create a new library and add the Entity Framework libraries

The new data access layer library for our existing project
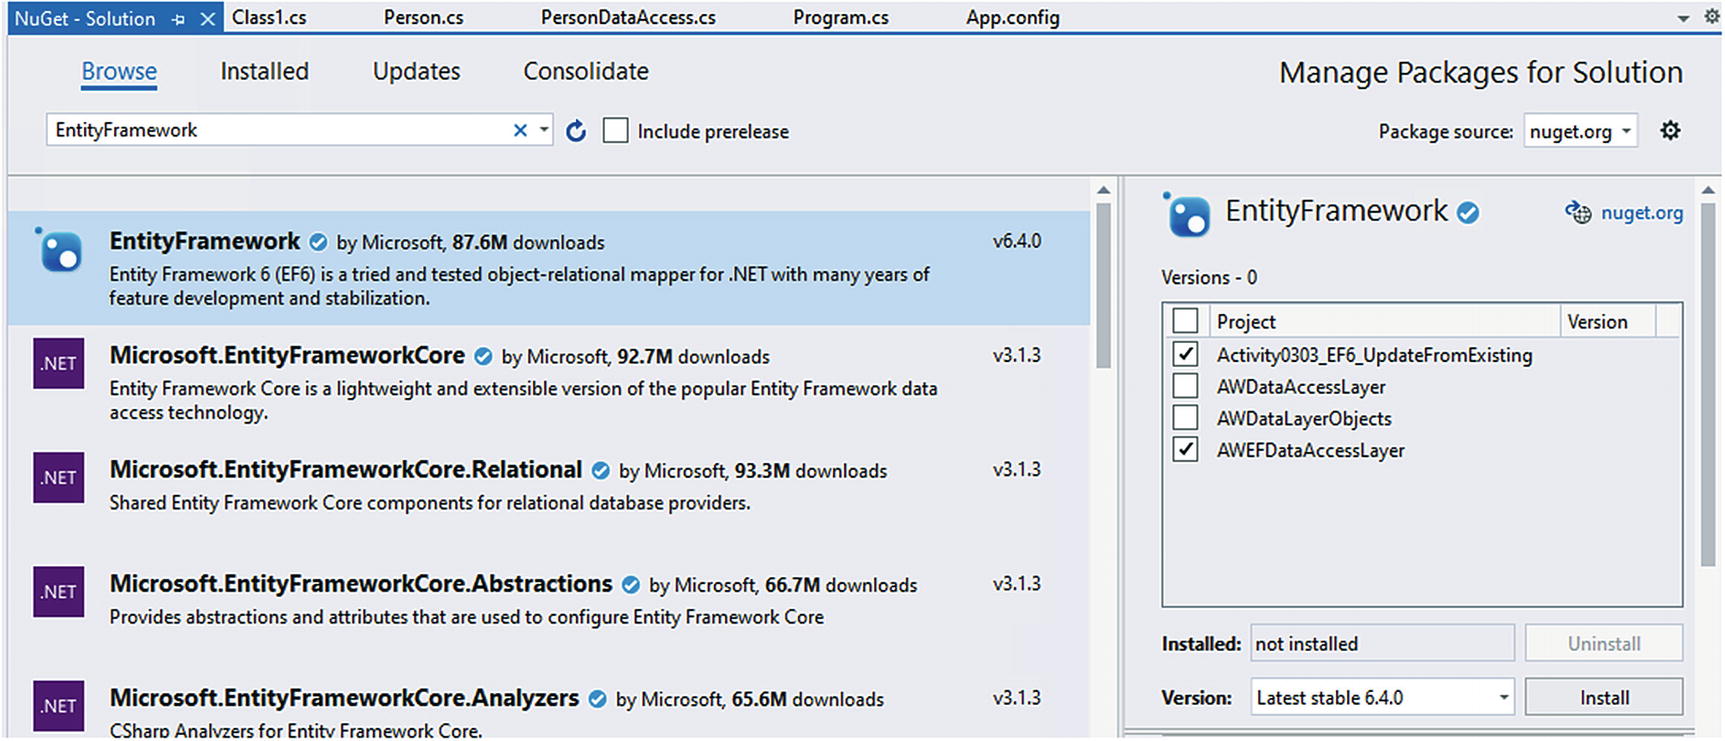
Installing Entity Framework to the library and the startup project
Step 3: Delete the EFMigrations History table from the AdventureWorks database

Deleting the previously created migrations table
Step 4: Create the code-first implementation
Thinking back to our EF6 implementation against the existing database from Chapter 2, we had an auto-generated context that was built out for us. With this project, we will not end up with an EDMX file that will generate code for us. Instead, we’re going to have regular model files and a context which we’ll be able to leverage going forward.

Add a new item to your data access layer library project

Creating the new code-first data model

Selecting the Code First from database option

Setting the connection and connection string properties

Selecting all the database objects for creation
Leave the box to Pluralize or singularize checked, and then select Finish. In the end, you’ll have a DBContext file and a bunch of model files.
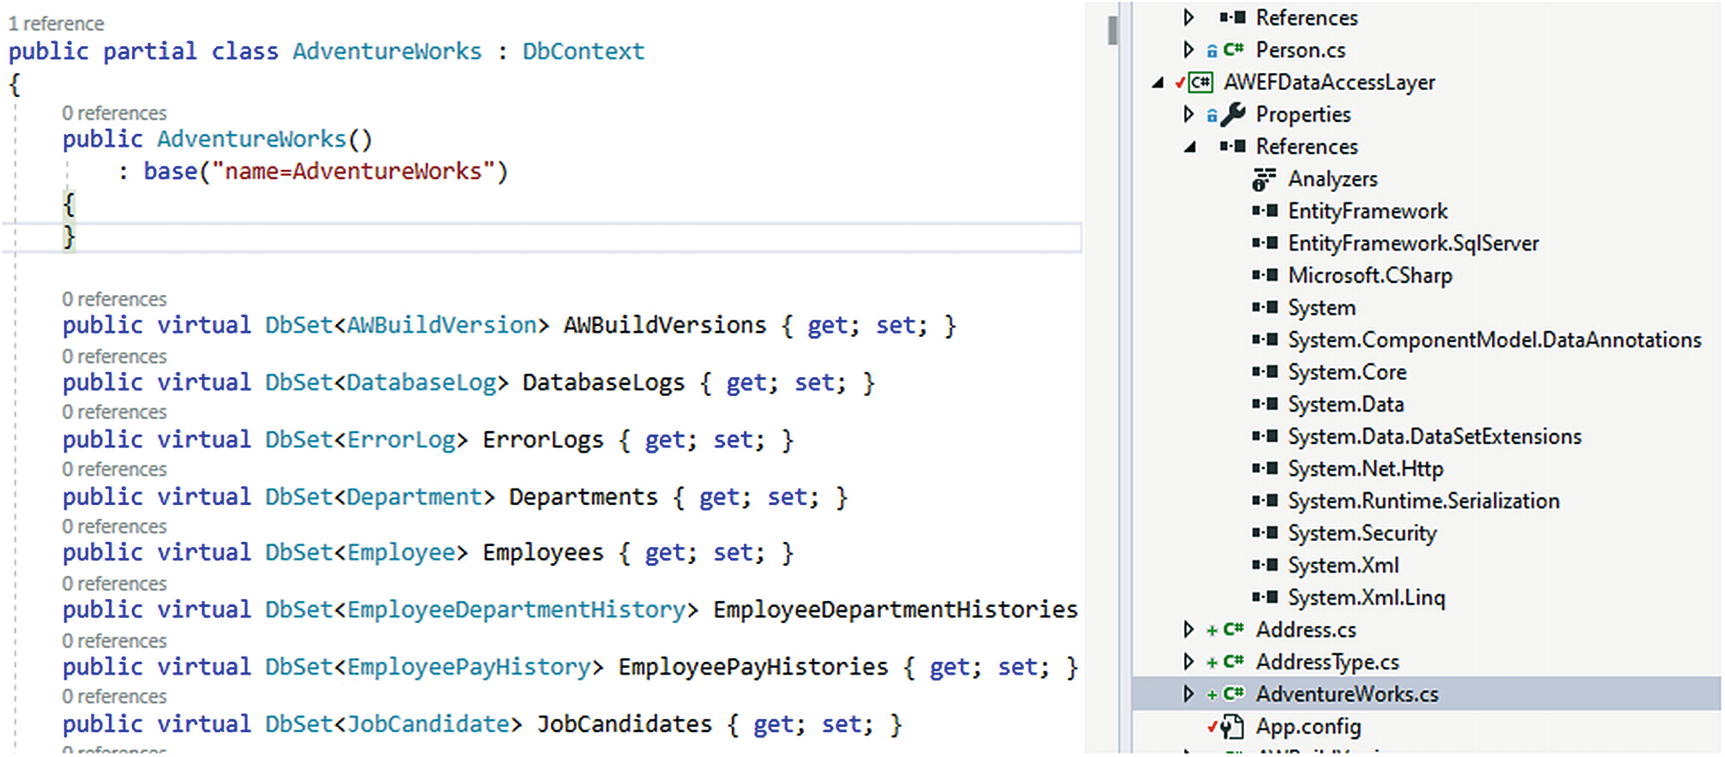
A quick look at the generated DBContext
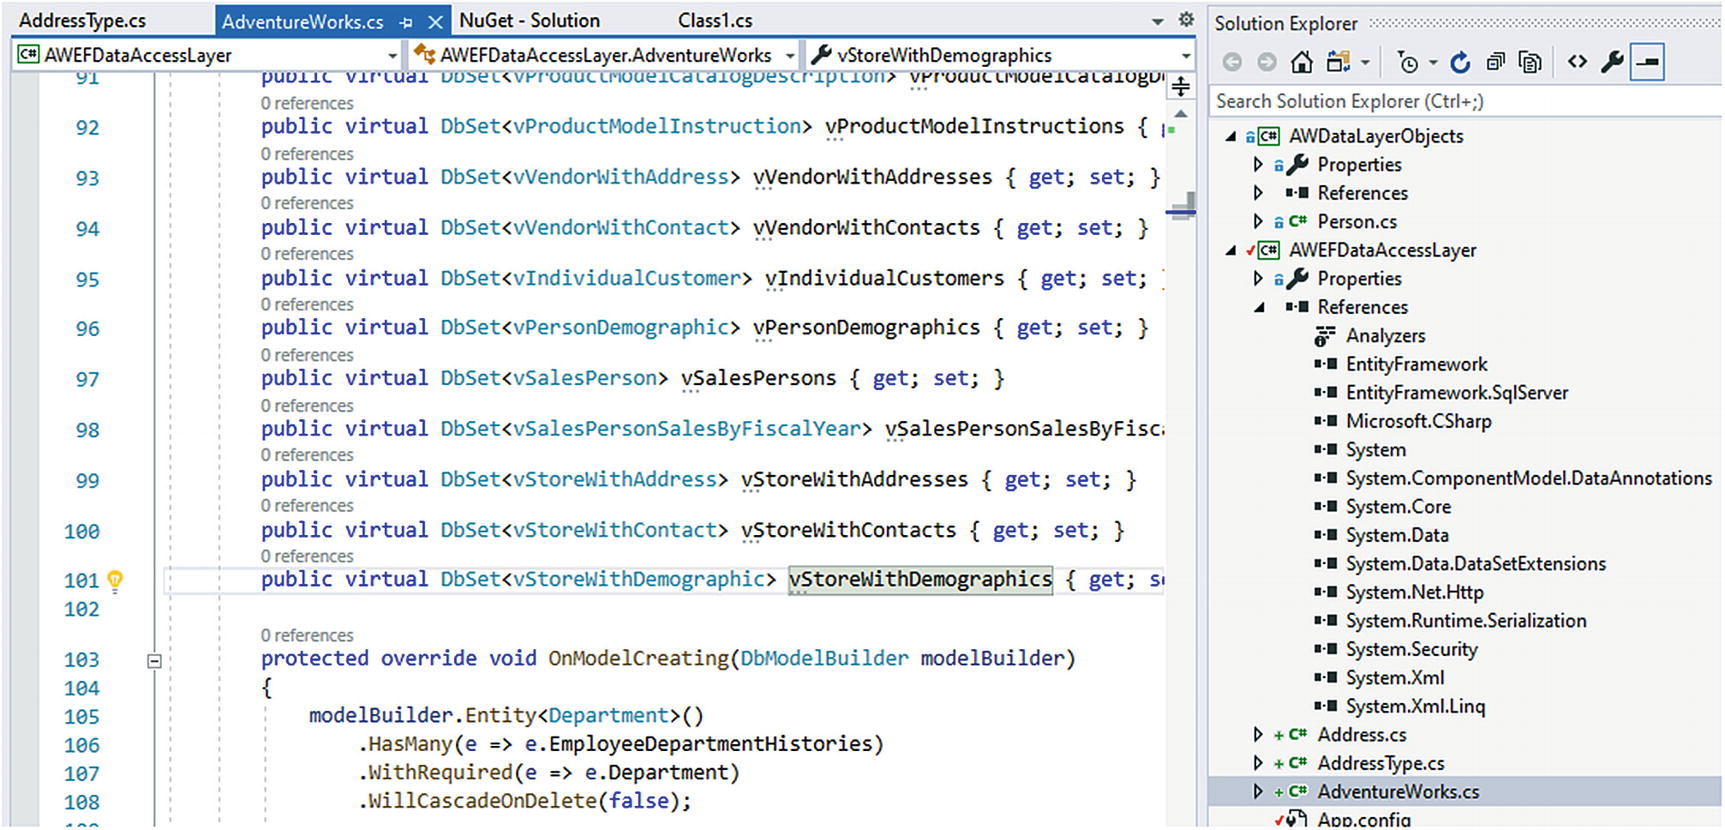
A look at how the views are defined in the generated DBContext
You should also note all of the other models that are defined as expected and the lack of an EDMX file.
Step 5: Enable migrations
Now that we have the database structure defined with models and the DBContext, it’s time to generate the initial migration.
Remember that any time our database models or context have changed, it’s important to rebuild the project and make sure there are no errors. You should have no errors at this point. However, make sure to build now, and then fix any errors if any exist. We cannot generate migrations if the project will not build.

Attempting to add the initial migration in our EF data access layer library
Here, we see there is an error, telling us that no configuration type is found. To fix this, we need to run the command enable-migrations. However, before we do that, we need to consider what we are going to enable. Enabling migrations can be configured to run automatically (on project startup) or can be left as a manual operation (requires intervention). On a new instance, automatic migrations are what we likely want. In this case, however, we need to be extremely careful as automatic migrations may remove or delete objects or data from our existing database. Therefore, we’ll want to make sure automatic migrations are not enabled. We can check and easily change this setting later in the DBContext file.
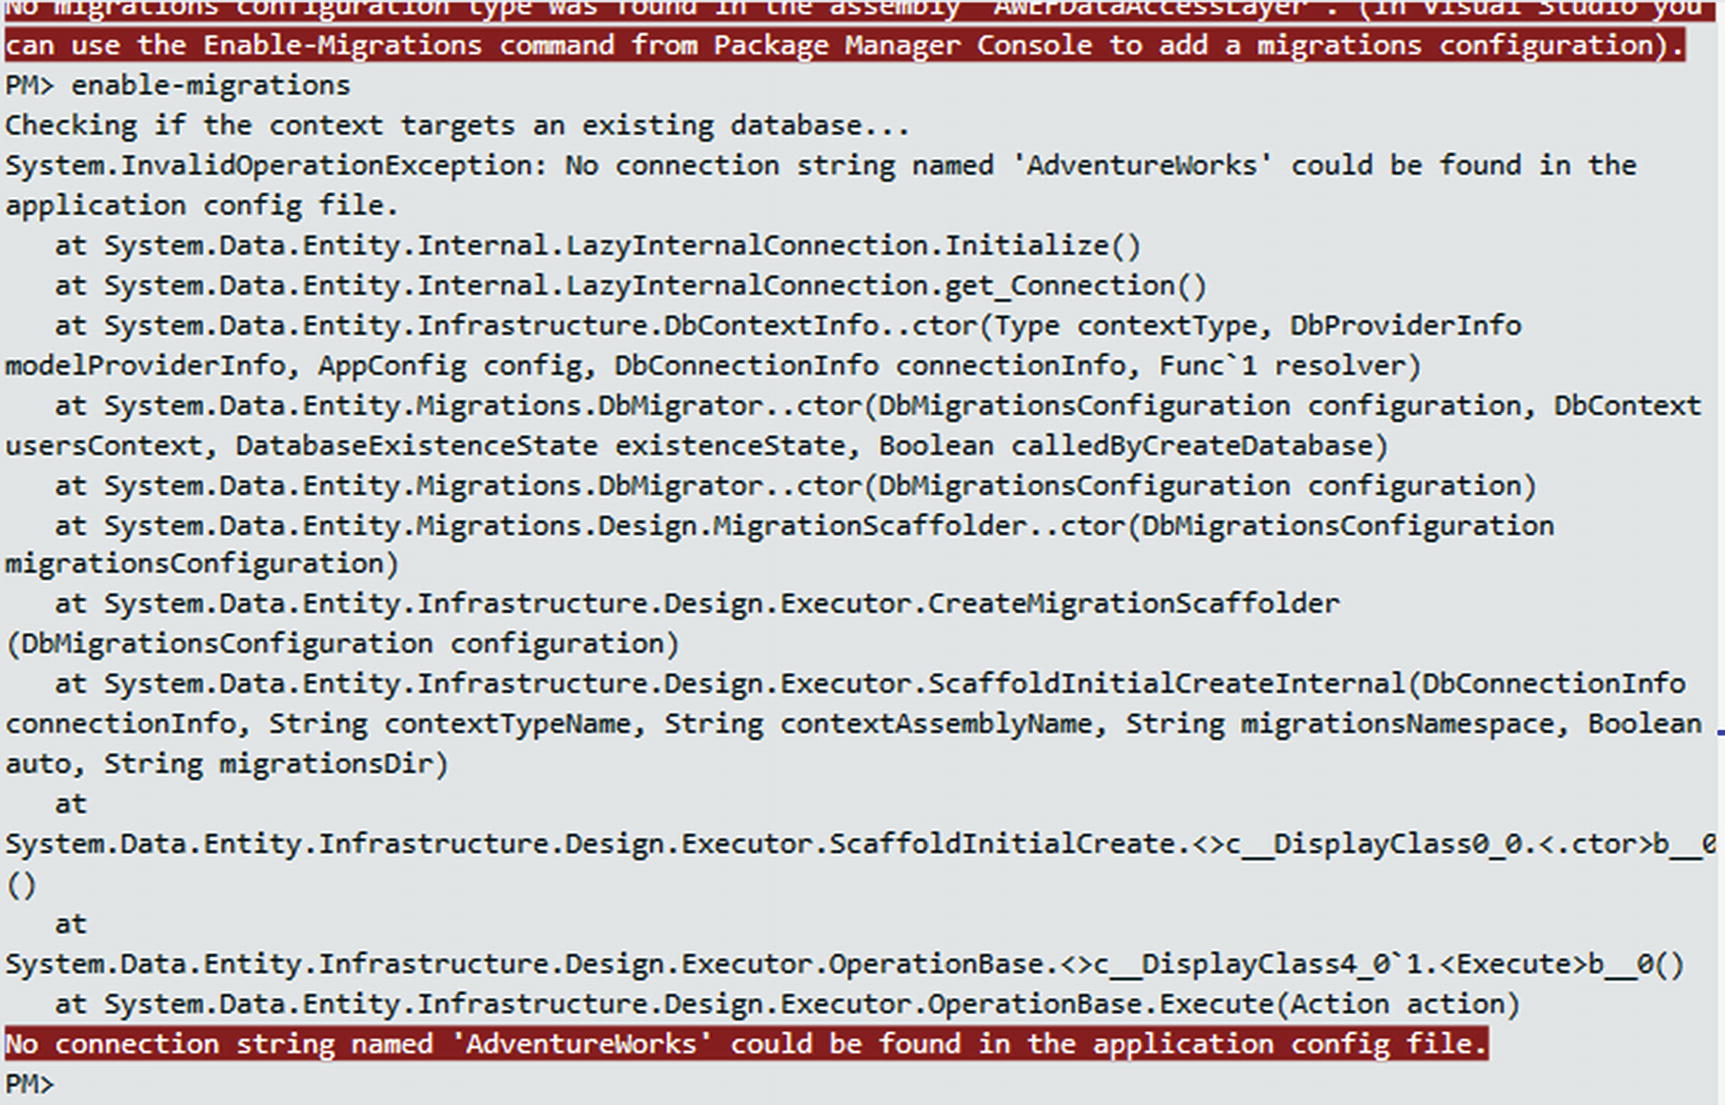
Error for no connection string in the application config file
This error might be particularly confusing. If we look at the app.config file in our library, the connection string is definitely there. However, the config for the console startup project does not have this connection string.

Copying the connection string to the startup project app.config file

Validate the config sections and Entity Framework entries in each project’s config file
If for some reason this section of the config is messed up, try to remove and then reinstall the Entity Framework libraries to the project. That should clear up the config file. Also note that you’ll have two connection strings in the App.config file for the main project as the legacy code connection already existed.

Migrations are now enabled
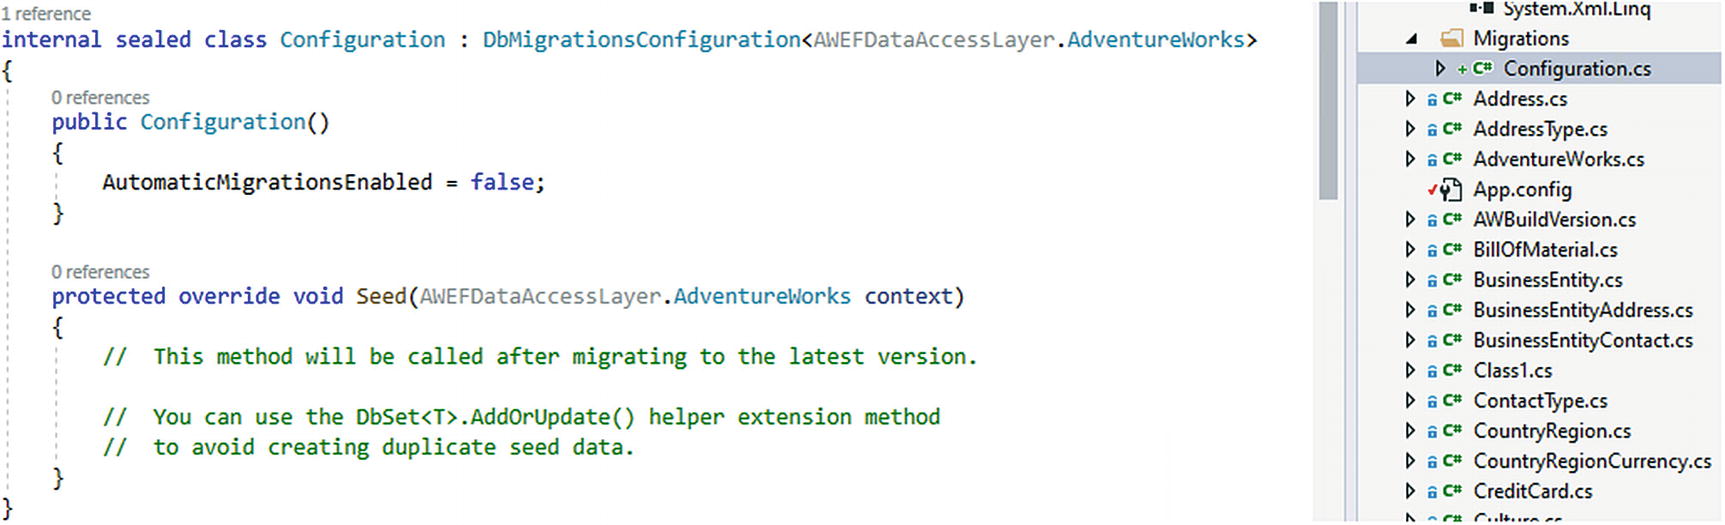
The configuration file for our migrations is now in place
Note the line for AutomaticMigrationsEnabled = false. If we want to turn automatic migrations on, we can set this option to true. We could have also used that as a flag in the enable-migrations command with the command Enable-Migrations -EnableAutomaticMigrations.
Step 6: Create the initial migration
In some cases, the initial migration may already have been created for you. In our case, it is likely we need to generate it.
Continue to make sure your project builds and that you are in the PMC pointing to the default project of your AWEFDataAccessLayer.
The next part of this activity is only going to happen if you are working against all the data in AdventureWorks or in any other database which includes geography data. I opted to keep this spatial data in for this example, even though referencing geography data will create a number of additional problems for us to solve.
Run the command add-migration “Initial Migration” to see what happens.
If you don’t get an error for spatial types, skip to step 8.

Spatial types geography error
This error might happen if you are using an older version of EF6, such as a version less than or equal to version 6.3. This error should not happen on version 6.4+ of EF6.

Installing the Microsoft SqlServer Types library
Make sure to rebuild the solution after adding NuGet packages. Failure to rebuild the solution will not allow the PMC to recognize new NuGet packages. Once the solution is rebuilt, the package(s) will be recognized in the PMC.

Setting the provider in the constructor of the context
Once again, run the command add-migration “Initial Migration” to see what happens. When successful, the new migration should be generated.
Step 8: Comment all “Up” code, delete all “Down” code, update the database
As in the previous activity (activity 0302), we don’t want to re-create all the tables (running would likely error and let us know that the objects already exist). Therefore, we need to clean up our initial migration.

Comment out (or remove) all code in the “Up” method for the initial migration

Remove the “Down” method code for the initial migration
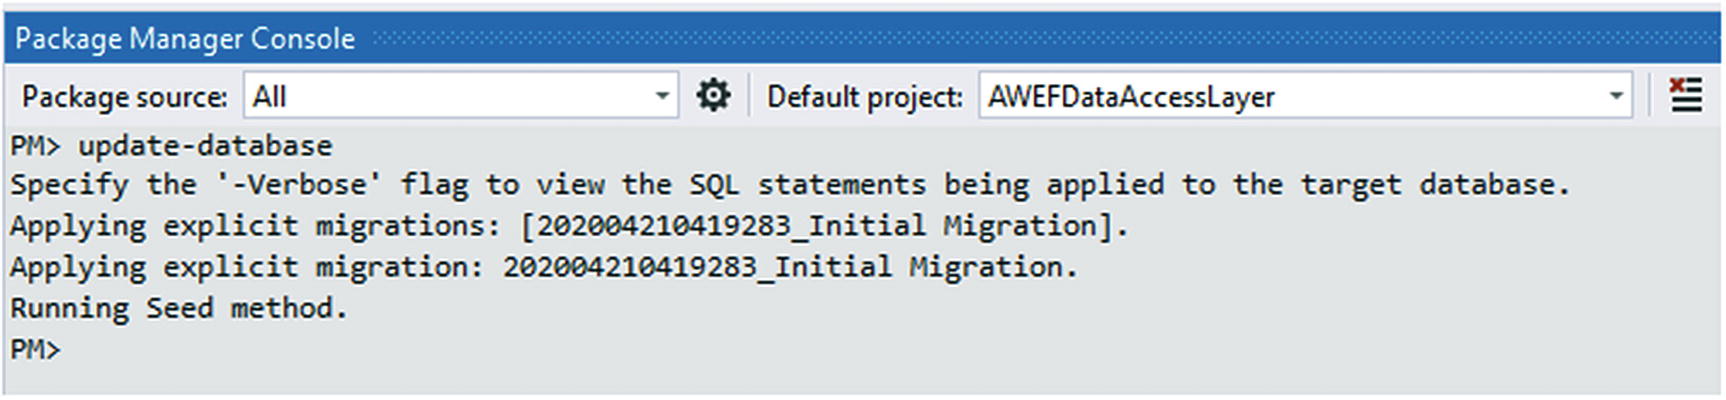
Updating the database

Making sure the next migration scaffolds with no model changes
Since this new migration is blank, we know we are not going to cause any issues, and we can just delete the test migration. Right-click the file and select Delete. If for some reason you had applied this migration, just revert with the command update-database -targetmigration InitialMigration and then delete the test migration.
Step 9: Leverage the new context from the startup app
Now that our context is wired up, we can leverage it from the regular code in our startup application.

Referencing the new EF library in the startup project
Note that we’ll need to set a using statement to map Person now, since there is a conflict between our original DAL and the new EF DAL. Assuming all functional UI will rely on the original mappings, we’ll have to map our EF objects back to DAL objects to ensure we don’t break legacy applications. The using statement for Person is as follows: using Person = AWDataLayerObjects.Person;

The using statement to eliminate ambiguity for the Person object
This code should come right before the completion of the program.
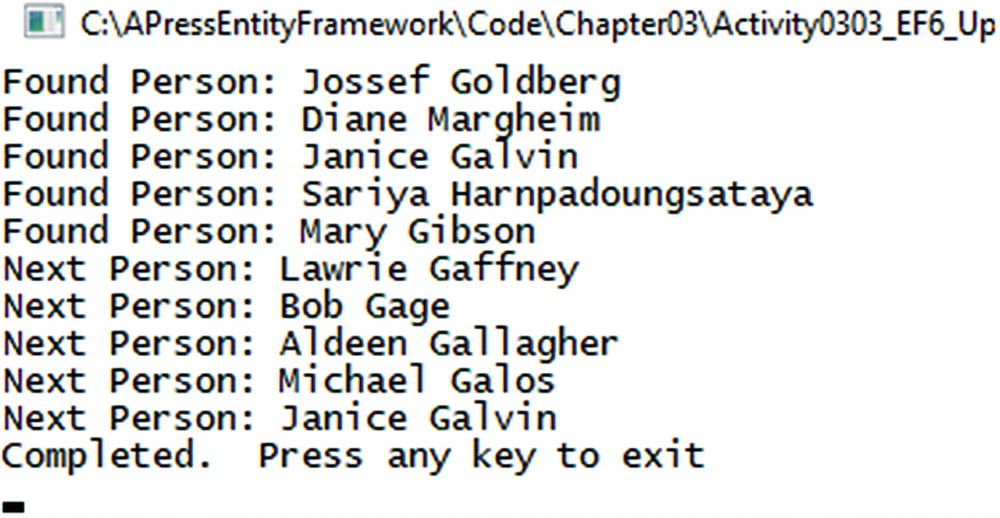
The final output of the program
Final thoughts
In this final activity, we have worked through creating a new code-first EF6 library against an existing database. Creating against a new database would be a similar process, although creating new EF6 projects is likely something you will not be doing very much of in the future. If a new database and project are being built, you should consider moving to EFCore or .Net vNext (.Net 5+).
Code-first migrations require a configuration file.
The configuration file must have migrations enabled.
Migrations can be automatic or manual, based on a flag in the configuration file.
Use the command add-migration [migration name] to scaffold a new migration.
Use the command update-database to apply the next migration.
Use the command update-database -targetmigration [migration name] to roll back the database to a previous migration.
EF6 implementations have a much more verbose config file.
EF6 implementations generally require the connection string to specify that multiple active result sets are allowed.
Final thoughts for this chapter
In this chapter, we have taken an in-depth look at how we can get different projects set up to work with the code-first approach to database development.
We have also gained a basic understanding of what it takes to make changes via migrations when working with the code-first approach.
We also saw that getting things to work manually can sometimes be excessively painful, while somehow beautiful. There is a certain reassurance that happens when you know for sure that your code and your database are completely in sync with each other. We also saw that while there were errors during setup, they were easily overcome, and we are prepared to set up projects of all types in the future.
Code-first migrations can be applied to any project, at any stage of maturity.
Models are the key to generating database objects and working with the data in code.
The DBContext acts as a definition for all database objects available.
A DbSet<T> is essentially a table of the object defined in its generic type T.
Migrations need to be scaffolded.
Migrations can be applied in a forward or backward direction.
Migrations are tracked in the database.
Code-first development allows any developer to quickly build out a copy of the database by structure on any machine.
Code-first development could be considered as an imperative approach to database programming.
Final thoughts on section 1
In these first three chapters, we’ve seen what it takes to work with Entity Framework in both the classic manner (.Net Framework <= 4.8 and EF6) and in the new manner (.Net Core 3.0/EFCore 3.0). This was a necessary thing to cover because as developers we will likely encounter both versions for many years to come in legacy apps and new development.
For the remainder of the book, we’ll be focused on EFCore and vNext Entity Framework concepts and database programming. Even so, almost every concept we learn will still be relevant, even to the EF6 implementations, even if the older versions have a small difference in implementation or syntax.
Now that we have a very good understanding of how to get projects up and running with Entity Framework, in the next section, we’ll start diving deeper into building out the data solution, beginning with a deeper look at models, contexts, and migrations.