In this chapter, we are going to learn about how we can use data annotations to further constrain our database structures from code. In addition, we’ll look at how we can easily build out some relationships in our models that translate directly into relationships in the database.
When we’ve finished with this chapter, we’ll have the ability to correctly create entities that not only specify type but have further constraints like primary and secondary keys and limit the length on strings. Additionally, we’ll learn to enforce required fields and default values and how we can build one-to-many and one-to-one relationships modeled in code and enforced in EF.
As another reminder, our book from this point is focused on the EFCore and EFvNext versions of the Entity Framework; however, everything we do at this level can also be done in the same or a very similar manner in EF6 if you are supporting a legacy EF6 codebase.
Constraining our data to enhance our solutions
To this point in our book, we’ve simply created properties on our only model – the Item. We were able to work with this without any problem; however, as you might expect, working with everything in the default mode is usually not going to be considered the preferred mode. As such, we need to learn more about structuring our models so that we can build solutions in a preferred manner.
Size limitations – for example, minimum and maximum string length
Value constraints – that is, min, max, and range of acceptable values on numeric fields
Default values – such as making sure a bit is always true or false by default
As we approach each of these constraints, we’ll need to evaluate our systems to make sure that what we are applying to the database constraints makes sense. It is also highly likely that as we maintain an existing project, we’ll need to rely on a few of these constraints to keep from having to do further manipulation to protect existing data.
Size limitations
In our activity at the end of the chapter, we’ll look at putting a size limitation on string properties. This is incredibly important, even though we’ve not applied the constraint in our earlier activities.
One thing you might have noted to this point is that in our original database, all our string fields have NVARCHAR(MAX)values. While this is definitely a functional solution, having an unlimited size is both unnecessary and is considered bad practice.
In most cases, your string field will not need to exceed 250, 500, or 1000 characters. In other instances, you might want 4000 or 8000 characters in a field for a longer input like a Notes or a Comments field. However, there are very few, if any, reasons to have a 2GB available allocation on the size of a single column.
Doing the math on this, we know there are one billion bytes in a GB, so this is two billion available bytes. Using NVARCHAR allows for unicode characters, which is useful if you need to store complex characters such as diacritical marks, Cyrillic, Arabic, Mandarin, or other similar characters. As an aside, the data type VARCHAR only stores non-unicode characters. No matter what you are storing, it is highly unlikely you need enough room to store the text of an entire novel in a single field, let alone also requiring multiple fields of unlimited length on the same table.
Going even one step deeper, we know that unicode characters require two bytes per character, and non-unicode characters would require only one byte of storage. Assuming we use NVARCHAR, this means we can store one billion characters in that single field when allocated as NVARCHAR(MAX). Fortunately, most instances of the database will grow to match size needs and not just use the full allocation of 2GB from the initial creation of the column. Even so, do we really want every row to have one or more fields that can expand to use up to 2GB of storage space? The entire size allotment of the SQLExpress database is only 2GB, so it would be really unfortunate to use that on one string column.
Imagine we have the most powerful supercomputer available to mankind, and it comes with unlimited storage, which therefore takes size constraints off the table as a reasonable reason to constrain a text field. Would it really be a problem to use NVARCHAR(MAX) in this case? The answer, of course, is a resounding “yes.”
As database developers, we must consider what happens not just when we store data but also when we fetch or parse the data in queries. Assuming we have just a few of these unlimited length columns, and also assuming many of them have grown to very large lengths (i.e., each one is storing the entire text of a novel for some reason), what happens when we run a query that is looking for a partial match such as “WHERE field like '%contains_text%'”?
We can reasonably assume that queries such as those mentioned earlier will quickly become useless. With potentially unlimited text to search over multiple rows, the execution time would quickly balloon out of a reasonable response time (imagine how long it would take and the number of results you would get when searching for the word “jedi” in a database that stores the entire text of each of the Star Wars books ever written in plain-text fields).
Value constraints
In addition to size constraints, another important type of constraint is a limitation on the expected value of a column. This value could be anything from a limitation on the numeric value to be in a range, such as minimum and maximum values. This could also be as simple as making sure that a field is not able to be set to null as its value.
Required fields are created with a simple attribute [Required] to reference the required data annotation, placed on top of any existing property. This attribute should be used anytime the database field needs to store a value other than null in the table, for example, a primary or foreign key.
The data annotation for setting minimum and maximum constraints on the properties in code is the Range attribute. For example, a range of 0 to max int could be [Range(0, int.MaxValue)]. In any range annotation, the first number is the minimum value and the second number is the max value.
Default values
A final consideration in constraining our data is the default value of an unset column. This is an extremely important aspect in a mature system, because null values on a row or loss of data could cause a lot of problems for your existing codebase and users.
As we add a field to any new or existing table, we can set a constraint on the field to enforce a default value. There are many situations where this approach can save a lot of trouble.
One critical use of this functionality would be adding a new field with a required value to an existing table with data. The field could be an easily managed field such as an IsActive boolean flag, or it could be more complex, such as a number to store the id of a user preference from a pre-defined list of options that references the available options stored in another table. In the first case, we can just set everything to active. The second case will never be as black and white as there are ramifications of every choice. What if we default to some simple value? What if we add an “unset” element to the options? How will this work in our current system?
Other data annotations
In addition to those we’ve already discussed, there are a couple of other data annotations to be aware of. In every case, these annotations exist to apply further constraints on what can be used to store in the database. The main difference with a few of these is that while the constraint still applies, in some cases the constraint is accomplished at the code level, rather than the database level.
In this case, our code will prevent inserting and updating if the input does not conform to a pre-defined email address format. However, the database is still just storing an NVARCHAR or VARCHAR and does not have any other information about the format of the string.
ZipCode – though I’ve had better luck just using a regular expression.
Regular Expression – format must match your expression for the model state to be valid.
Display Name – sets the text to replace the name of the field in the UI. This is useful if you have a field like FirstName and you want to display “First Name.”
Table – it is possible to name the table differently than the name of the model if so desired (affects database structure).
Index – applies an index to the column (affects database structure) (shown in the next section).
NotMapped – allows a field to exist that is not tracked in the database.
Compare – allows making sure one field is the same as another (i.e., password creation for a user taking a second input to validate) (does not affect database structure).
Further annotations can be found by looking at the DataType enumeration: https://docs.microsoft.com/en-us/dotnet/api/system.componentmodel.dataannotations.datatype?view=netcore-3.1.
Using keys in database tables for unique and relational results
We’ve already seen how using an Id field has generated a primary key on our Items table. However, there will be times when we need to do more than just define the primary key.
By default, the field Id is going to implicitly be the primary key. In addition to the implicit generation, we can explicitly define keys. This is accomplished with the [Key] annotation as an attribute.
Suppose, however, that we have a join table and we want to create a composite key on the two ids. In EF6, this could be accomplished a couple of ways using data annotations. The first way was to use the [Key] attribute with a column order [Column(Order=n)] (the order groups the keys). The problem with this is you cannot use the approach if you already have a primary key defined. The second approach was to use an index annotation as an attribute. This is a great way to do it in EF6 but, unfortunately, at the time of this writing, is not possible in EFCore. To accomplish this in our final activity later in this chapter, we’ll have to use the FluentAPI.
Indexes allow us to tell the database what fields are most important on the table, so that the database can precompile some statistics using those fields. This allows, among other things, more efficient queries where those fields are critical in searching for results. Additionally, indexes can be used to make sure column combinations are unique.
Now that we have a good understanding of constraints and keys, we can examine what it takes to set up relationships between tables in the database.
Working with relational data
Most of the systems we build for line-of-business applications require some sort of relational data. Orders need Items and quantity. Addresses require States and/or Regions and Countries. User preferences require selections. SaaS systems often have editions and multi-tenancy. While it is possible to implement without an RDBMS (think NoSQL here), if we’re using Entity Framework, we’re also going to need to work with related data.
First-, second-, and third-normal form
A quick dive into relational database theory would help you to understand normalization and the difference between first-normal form (1NF), second-normal form (2NF), and third-normal form (3NF). There are also other normalization schemas in fourth-normal form (4NF) and Boyce-Codd-normal form (BCNF). In most business applications, the deepest level of normalization that is practical and performant would be 3NF. We will not touch on 4NF and BCNF in this text, but you may want to study them further if normalization is important and/or interesting to you. It is important to note that ORMs violate BCNF and 4NF by default to allow for efficiency gains and practical usage scenarios.
First-normal form (1NF)
1NF is the simplest form of normalization. For a database to be considered 1NF, the table rows must each have a unique key and the rest of the fields in any combination must not be the same as any other row.

The Person.Contact table from AdventureWorks as an example of first-normal form (1NF)
Second-normal form (2NF)

What the Employee table could look like if it violated second-normal form (2NF)
There is another example in AdventureWorks where violation of 2NF is prevented. This is more common in our day-to-day work and very much like what we’ll build in our examples.
The table Person.StateProvince is set up well to be in 2NF. For example, the table has the primary key of StateProvinceID, and then, instead of repeating data like the name of the Country or the name of the Territory, those pieces of information are brought in through foreign-key relationships to the tables Person.CountryRegion and Sales.SalesTerritory, respectively.

The Person.StateProvince table follows 2NF
Third-normal form (3NF)
3NF attempts to further break down 2NF into a unique group of columns (i.e., there are no transitive dependencies in the database) so that there is not any issue with compositional data becoming corrupted or incomputable due to changes in related data. For me, this can be a bit confusing, so it might help if you think in terms of auditing the database.
For example, in AdventureWorks, the Sales.SalesOrderHeader table has a column SubTotal and a column TaxAmt and then Freight and then TotalDue. Knowing that TotalDue is calculated from SubTotal, TaxAmt, and Freight, we have a couple of potential normalization problems, where either this table is in violation of 2NF (TotalDue changes if SubTotal, Tax, and/or Freight change for some reason) or we are in violation of 3NF. Since the TotalDue field is computed, the 2NF issues are mostly eliminated as the value automatically updates.
However, since that TaxAmt field is likely equal to the SubTotal multiplied by the TaxRate of the shipping address of the StateProvince where the customer lives and is likely calculated at the time of the order processing, then the problem becomes an auditing issue without 3NF.

A violation of 3NF happens when a field in one table is dependent on the value of another table, and that other table has a dependency on a third table. When that third table changes and results in changes to the related table, then the resulting dependency is also affected
If the Sales.SalesOrderHeader table was in proper 3NF, the tax rate would have been stored at the time of the placement of the order so that the total due column could be correctly calculated using the subtotal multiplied by the tax rate at the time of the order.
While understanding the differences between 1NF, 2NF, and 3NF goes well beyond our text, it is important to be aware of them when creating our entities. With this awareness, we can now start to create proper, normalized relationships .
Types of relationships
One to one
One to many
Many to many
All three of the relationships have distinct purposes and are easily built out in code-first implementations. The way they are built is directly related to how the code is referenced from one model to another. What’s more, in the many-to-many relationship, we can either define the join table explicitly, or we can rely on the implicit creation of the table. In most cases, we’ll use a one-to-many or a many-to-many relationship, even if we have a one-to-one correlation as the result. However, we should know how a one-to-one relationship would work in case we ever need to set one up.
One-to-one relationships
One-to-one relationships are useful when there are two tables that are directly linked to each other but there is only one row in each table that is joined. The relationship is built with a primary key in one table and the foreign key in the other table and to be truly one-to-one should go in both directions (both tables are modified with a foreign key to relate to the only matching row in the other table).
One-to-one relationships generally provide additional attributes that are created to further define an object, which, when coupled, create a more detailed implementation of the object.
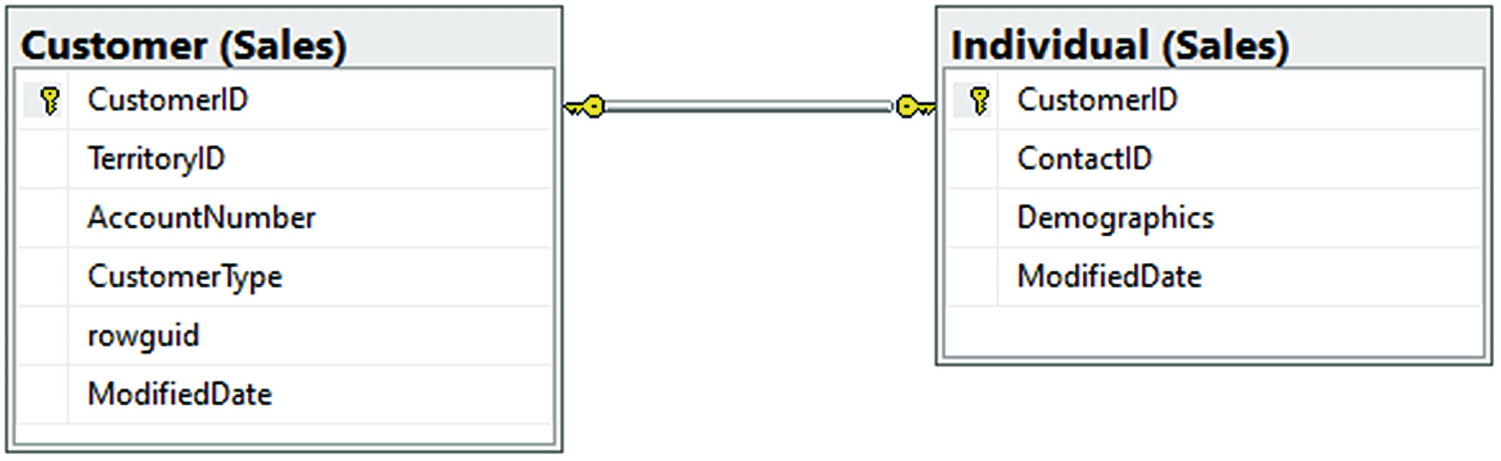
The Sales.Customer and Sales.Individual tables are related in a one-to-one relationship
One-to-many relationships

An example of a one-to-many relationship in the AdventureWorks database
Many-to-many relationships
Many-to-many relationships are a bit more complex than the other two relationship types. In any many-to-many relationship, we are required to use a join table in order to relate entities to each other. This join table allows for a two-way relationship between the two entities. The first table can join and get all elements from the second table that match via the grouping in the join table, and the second table can do the same thing in reverse.
In a straightforward example, we might use many-to-many relationships for things like user preferences. We could look for any users that have set a single preference value, or we can look for all the preferences of a single user. This is very useful for correctly mapping data.

The Contact to CreditCard relationship in AdventureWorks has the join table ContactCreditCard to form a many-to-many relationship
Some final thoughts about relationships and normalization
When working with any RDBMS, forming the correct relationships will be critical in order to effectively work with the data. By knowing the different types of normalization and relationships available to us, we can make sure to build out the best solutions as needed.
With the many different forms of normalization, we need to find the balance between what works and what works with efficiency. As the database developer, it will be our job to understand the trade-offs that will happen if we want to design a database to BCNF or 4NF, vs. the problems that might happen if we only use a 1NF strategy.
Activities for this chapter
The rest of the chapter is devoted to activities. For each of the activities, there will be a starter file set available. The activities will be designed in a way that you could easily work all or part of each of the activities. When opening a new starter pack, don’t forget that you will need to configure the database connection string and run the update-database command to get the database updated to the state it needs to be at the start of the activity.
Alternatively, if you have been working along with the text to this point, you could simply use your files as is, with the only real difference again being the name of the project.
Finally, as with the previous chapter, these activities are focused on the EFCore/EFvNext. Everything we’ll do in these activities could be done with an EF6 implementation, with the potential of a couple of minor syntax differences.
Activity 0501: Add length, range, and other constraints to the Item model
In this activity, we will again dive into the Item class to build out a better database structure. This will give us the chance to see how to apply some of the common data annotations in our models to constrain our database.
By the end of the activity, we’ll be able to set the minimum and maximum length of a string field, understand what it takes to make a field required, be able to set range limits, and apply default values for columns in our tables.
Step 1: Get started
To begin, open your solution, or get the files for Activity0501_ConstrainingTheDatabase_Starter.zip. Once open, make sure your database connection string is correct and update the database to make sure any pending migrations are applied.
Affecting the length of columns
In the next part of this activity, we will limit the length on all the columns currently sized to NVARCHAR(MAX).
Step 2: Add length constraints to the strings on the Item class
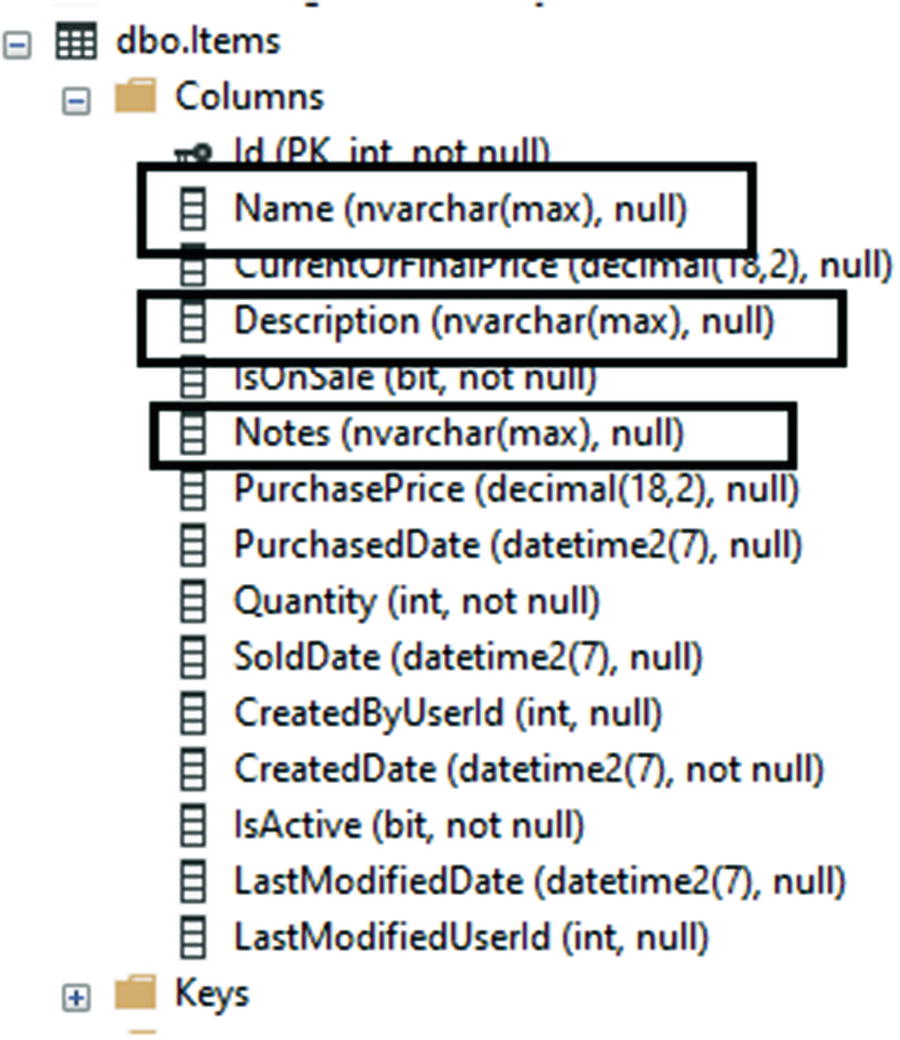
All string fields are currently NVARCHAR(MAX) length
In the real world, if we already have data in the tables, changing the length is likely to be a problem, because this could cause a loss of data if you decrease the length of the field. One way to prevent issues could be to quickly select the data from the table into a backup table using a query; then once the operation is completed, restore by selecting the data back into the table from the backup table. A great way to ensure you don’t have mistakes in such a scenario would be to script this process and ensure it works as expected.
In our case, we are not concerned with lost data, so we will proceed as such.
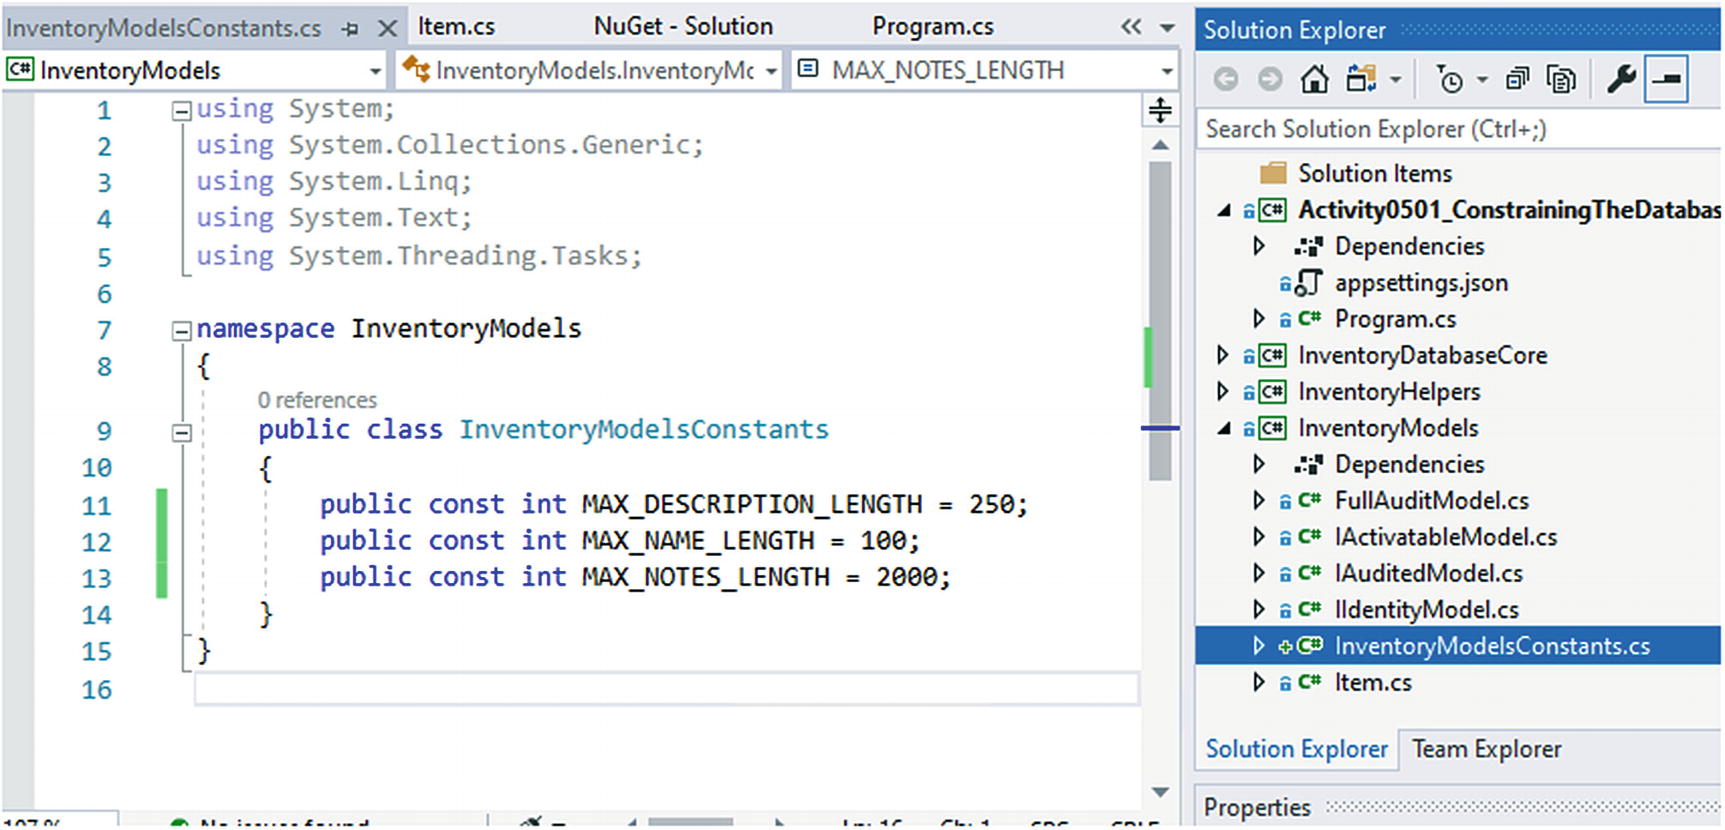
The Length Constants in the Inventory Models Constants file
Adding the StringLength annotation attribute will require adding the using statement using System.ComponentModel.DataAnnotations to the top of the file.
In this example, the minimum length is set to show that it can be done and how it works. In the real world, the minimum length would likely be left blank. Make a note that while the maximum length is enforced at the database level in schema, a minimum length will be enforceable only by the model state. Even after creating this, someone could come along and do a manual insert to the table with a Notes entry having a length less than 10. Because I would ultimately remove this limitation, I did not create a constant to map the minimum length of 10.

Enforcing maximum length on the string properties
Step 3: Create the migration

Adding the migration to enforce maximum string length
As we can see, this operation “may result in the loss of data.” Even so, we can still apply the migration. This warning is to be expected, since we could be truncating strings if the current table has notes longer than 2000 characters, a Name longer than 100 characters, or a Description longer than 250 characters.
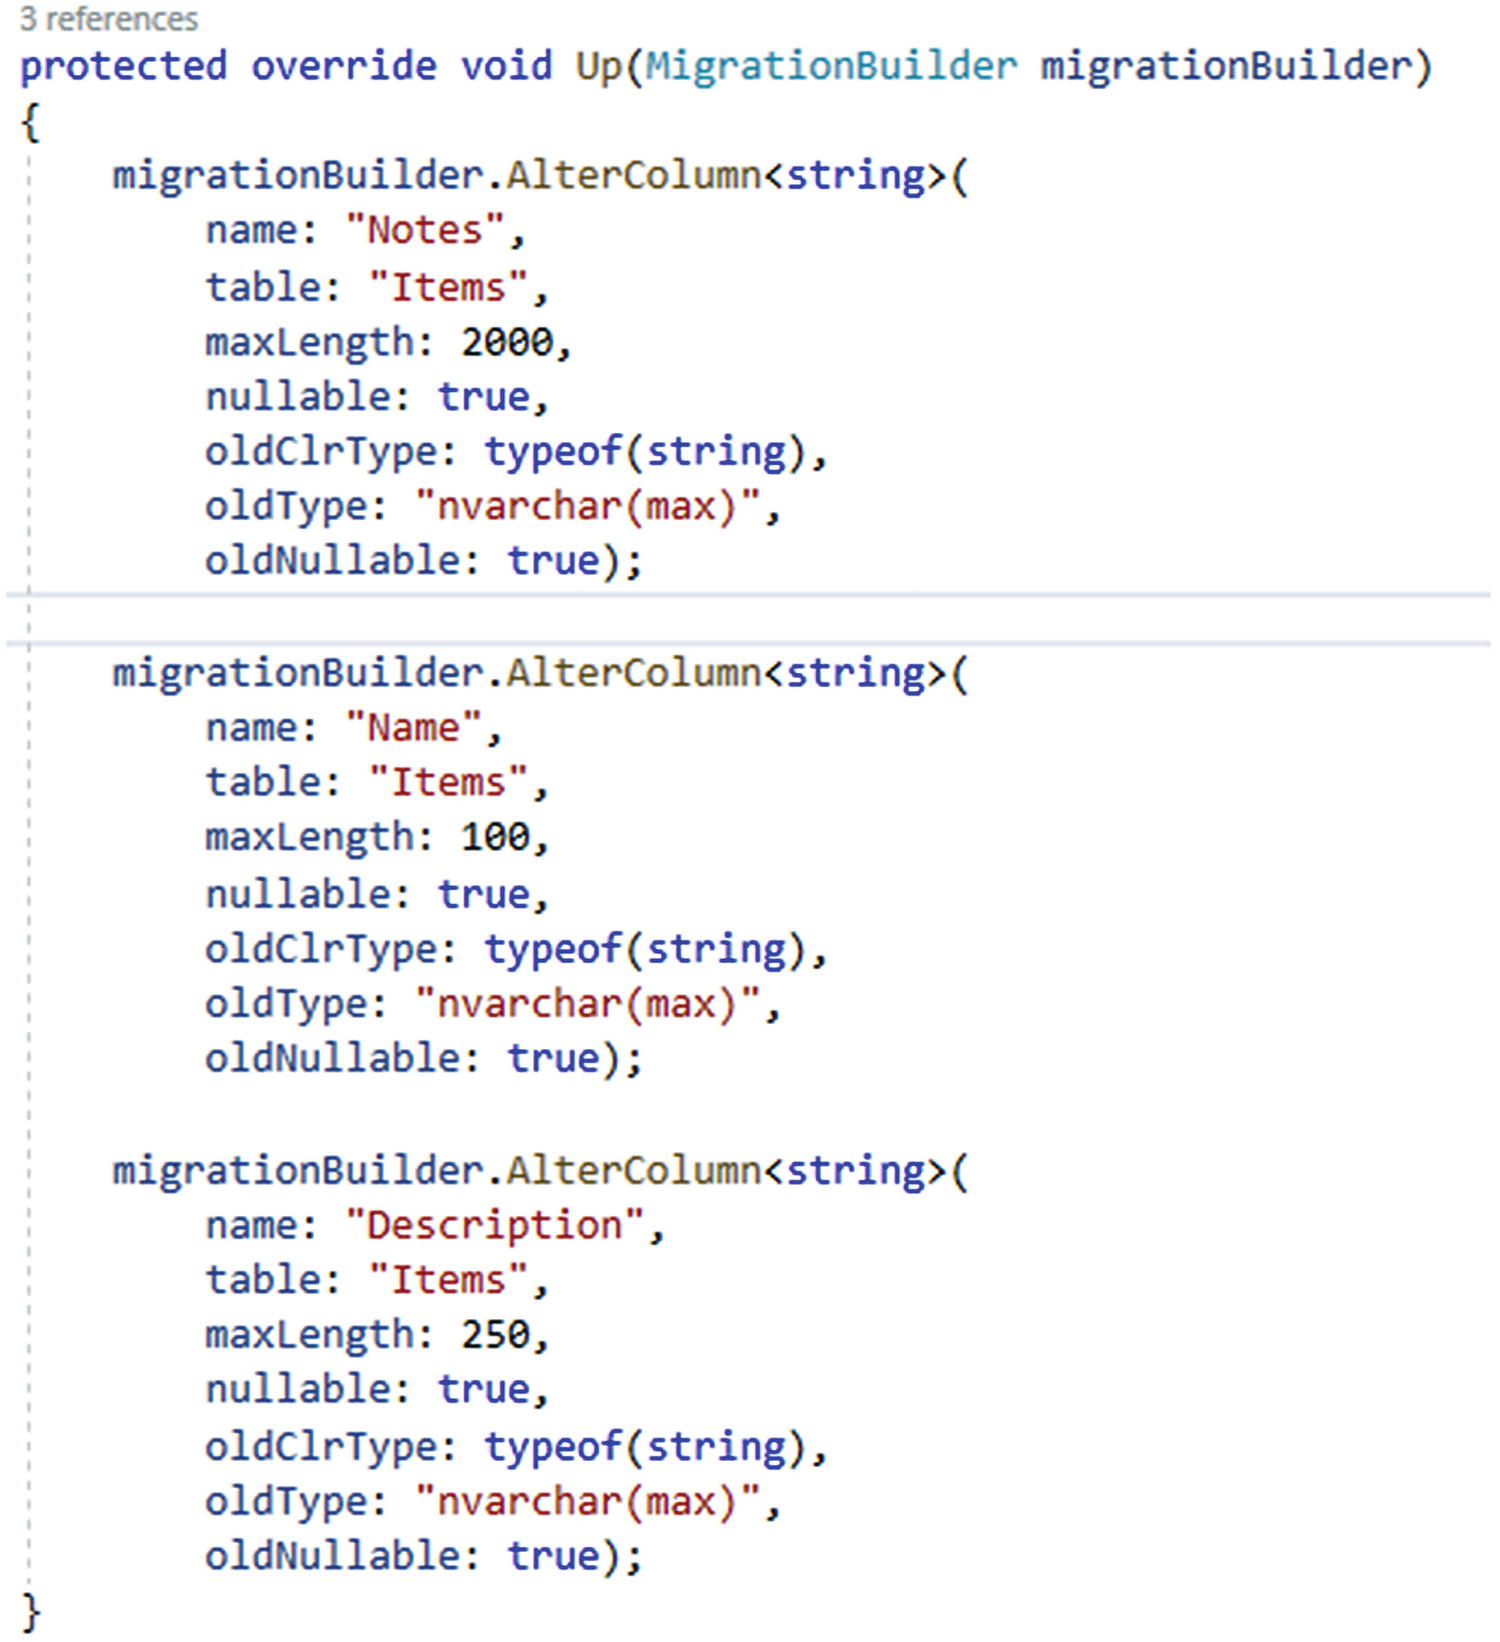
The migration as generated to enforce string maximum lengths
Here we can see the columns will be altered to have a maxLength, but none of them have any limit on something like a minLength, even though we had specified that limitation in our annotation.
Step 4: Update the database

The database table with maximum length in place for the string properties
Creating a range on numeric fields
When working with the database, we’ll often have fields that should be further constrained to limit what values make sense. For example, we should never have a negative quantity, and we likely want to lock down the price on an item so that it is also not negative.
Step 5: Add range values to the quantity and price fields
Next, add the constraints in the Item class.
Once again, we’ll see that these range values are not going to generate constraints on the table, but only constraints that our code would have to respect in the model state.
Step 6: Add the migration
Make sure to save and build, and then add the migration with the command add-migration "updateItem_setMinMaxValuesOnQuantityAndPrice".

Adding a range constraint generates a blank migration
Although it is not shown here, we could repeat these statements for the price columns to add the check constraints on price values.

Multiple or single migration builder statements allow scripts to be executed against the database using a migration
Step 7: Run the migration to add the check constraints to match the range limitations in our data annotations

The check constraints are now in place on the database table schema
Ensuring a field is a Key, making fields required, and setting default values on a column
As we’ve seen, a property called Id on the model acts implicitly as the primary key on the table. It is possible, however, to explicitly name a database field as a key. In fact, it is possible to have multiple fields as keys.
Step 8: Add the [Key] annotation to the Id field

Setting a field as a Key is easily done with the [Key] annotation
Step 9: Making some fields required
In most cases, the ability to make a field required in the database is determined by the data type. If we want the field to be non-nullable, we use a non-nullable type. If we want it to be nullable, we use the question mark to indicate a nullable type.
However, some fields could be ambiguous, like strings. To ensure that a field always has a value when we are working with our data, even if it is a nullable type, we can use the [Required] data annotation. The required annotation will enforce the field to be required in the database as well as invalidate the model state if the field is left null (note: null and empty string are not the same thing!).
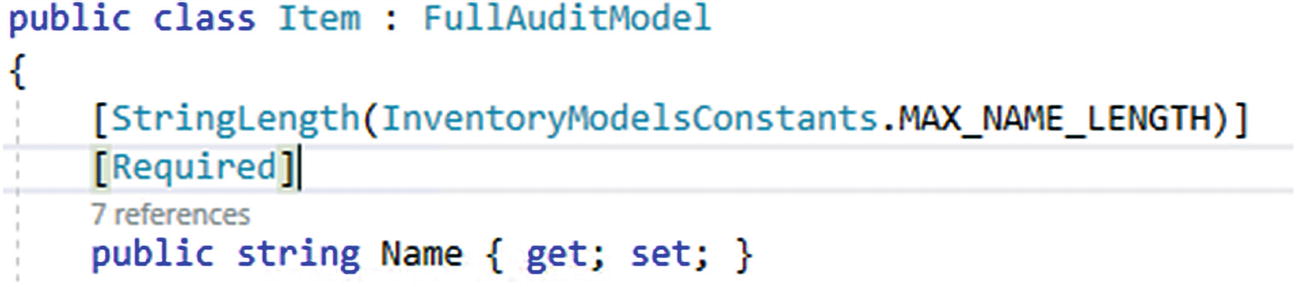
Making the Name field required
Feel free to make other fields required as you see fit.
Step 10: Adding a default value to a field
We’ve mentioned previously that there is a way to do a soft delete by adding an IsDeleted boolean value to the table. Once our table has data in it, however, we can only add fields as nullable, unless we enforce a default value.
We would then want to set the value to false and make the field required to avoid any confusion (is null deleted or not?).
The DefaultValue requires bringing in the using statement: using System.ComponentModel;

The FullAuditModel with the required annotation and default value set to false on the IsDeleted field
Step 11: Create the migration

The migration generated by the additional constraints for required fields and default values
In our generated migration, we note that the migration will in fact make Name non-nullable and will also add the IsDeleted attribute as non-nullable with a default value of false, as we would expect.
Step 12: Update the database and review

The Items table after applying constraints from activity 0501
We can now easily see how our constraints have been applied.
Key takeaways from activity 0501
Can set the key for the table with the [Key] annotation.
Making fields required is possible with the [Required] annotation.
Use [StringLength] to set the maximum length of a string.
Use [DefaultValue(<value>)] to set the default value of a field.
Some of the annotations only apply to the model state. In these cases, we can create a script to run TSQL statements.
Use [Range] to set the minimum and maximum values of a field in the model state.
This concludes activity 0501.
Activity 0502: Setting up relationships
In this activity, we will create a one-to-one relationship and a one-to-many relationship. We’ll build out the relationships and the data structures in code, but we will not yet be implementing them in the UI (we will finish the implementations in the coming chapter on CRUD operations).
By the end of the activity, we’ll be able to define a one-to-one and a one-to-many relationship in code. We’ll also understand the difference between the two types of relationships and when it will be appropriate to use either.
Creating a one-to-many relationship
One of the most common relationships we’ll encounter is the one-to-many relationship. In this system, we’ll create a table to store Categories, and then we’ll create a one-to-many relationship so that we can create a few categories and then have many items in each category.
Step 1: Get set up
To get set up for this activity, grab the Activity0502_CreatingRelationships_Starter.zip file, extract and open the project, or feel free to continue working along in your current project. Once you have the files, make sure to build, set your connection string, and run the update-database command to ensure the table structure of your database is set up correctly. As always, please remember that if you get lost, don’t understand a concept, or need more clarity on what code is being introduced, you can find my solution in the *_final.zip files.
Step 2: Create the Categories table entity
This code should be placed directly below the DbSet<Item> Items { get; set; }.
With the context reference in place and the entity setup, we could create the migration; however, we have yet to create the one-to-many relation, so we should do that before adding the migration.
Step 3: Create the one-to-many relationship
To create a relationship in our code-first implementation, we need to reference the types that are related in the models involved in the relationship.
For this example, each of our Item objects should have one Category. Each of our categories can have many items. By saying this out loud, we can determine which types to place in each entity.
We need to make the CategoryId nullable because the database may already have data at this point. With that data, we won’t be able to set the category id to map until we have some categories to map to. Therefore, we’ll allow null here to prevent the migration from failing. If you must make it required, you’ll need to back up your data, delete from the table, and then re-insert with valid category ids after running the migration. Again, the best way to do backup operations such as this would be to use a script that you write to ensure you don’t lose any data.
Note that it is also imperative that your Id field name matches exactly to the name of the virtual item. If these names are not the same, by convention an extra Id field would automatically be added to line up to your virtual Category field.
If for some reason your Category table has an Id field, but it’s named something like CategoryId instead of Id, you can explicitly set the name of the Id field by using the data annotation [ForeignKey("CategoryId")].
Additionally, we want to use the virtual keyword on any of our relationships so that EF can override and/or extend the properties to support lazy loading of the relational data.
Make sure to set the List to a new list by default to avoid null reference exceptions on the list in the cases where the related items are not loaded into scope.
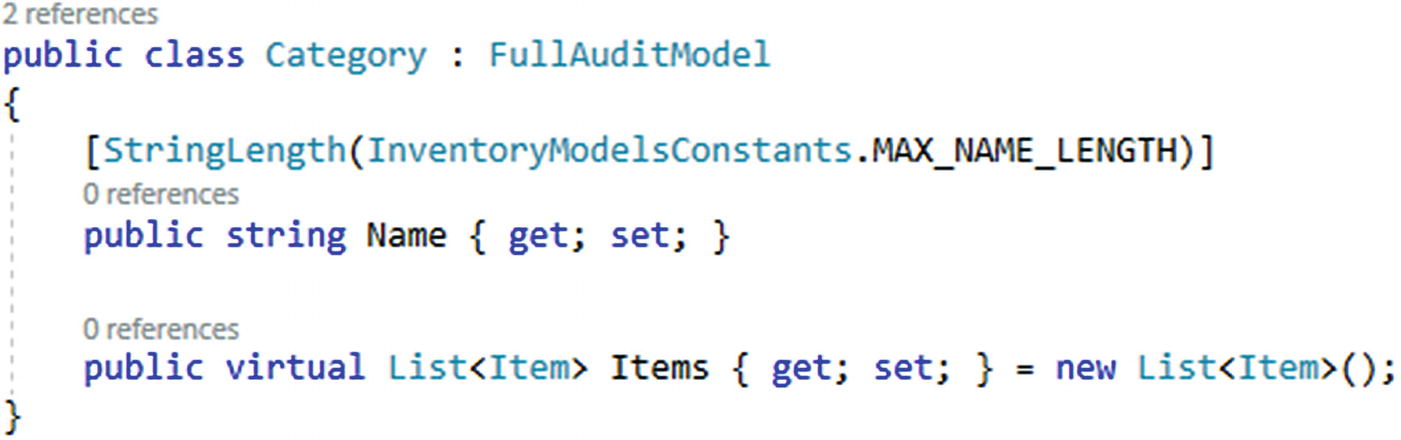
The Category with the list of related items to finish out the one-to-many relationship
Step 4: Create the migration

The generated migration for creating Categories with relation to items
As you can see, there is a lot to unpack in this migration. First of all, we get the column for CategoryId added to the Items table and it is nullable, as we indicated. We can update these later and/or make it required for insert as we build out our solution.
The next part of the migration sets the table for the Categories. Note that there is nothing in this second part to indicate a relationship to the Items table. This is to be expected. Categories are independent of the Items.
The next statement is the index on the CategoryId field in the Items table. This is a common index we’ll want since we’ll likely sort or group by the CategoryId.
The final statement is the meat of the relationship. Note that the foreign key is added to Items related to Categories on Category.Id. Also notice the onDelete: ReferentialAction.Restrict. This action means that if we delete an item, it will not affect the categories table. However, a category will not be able to be deleted if any items exist that reference that category by id.
Step 5: Update the database
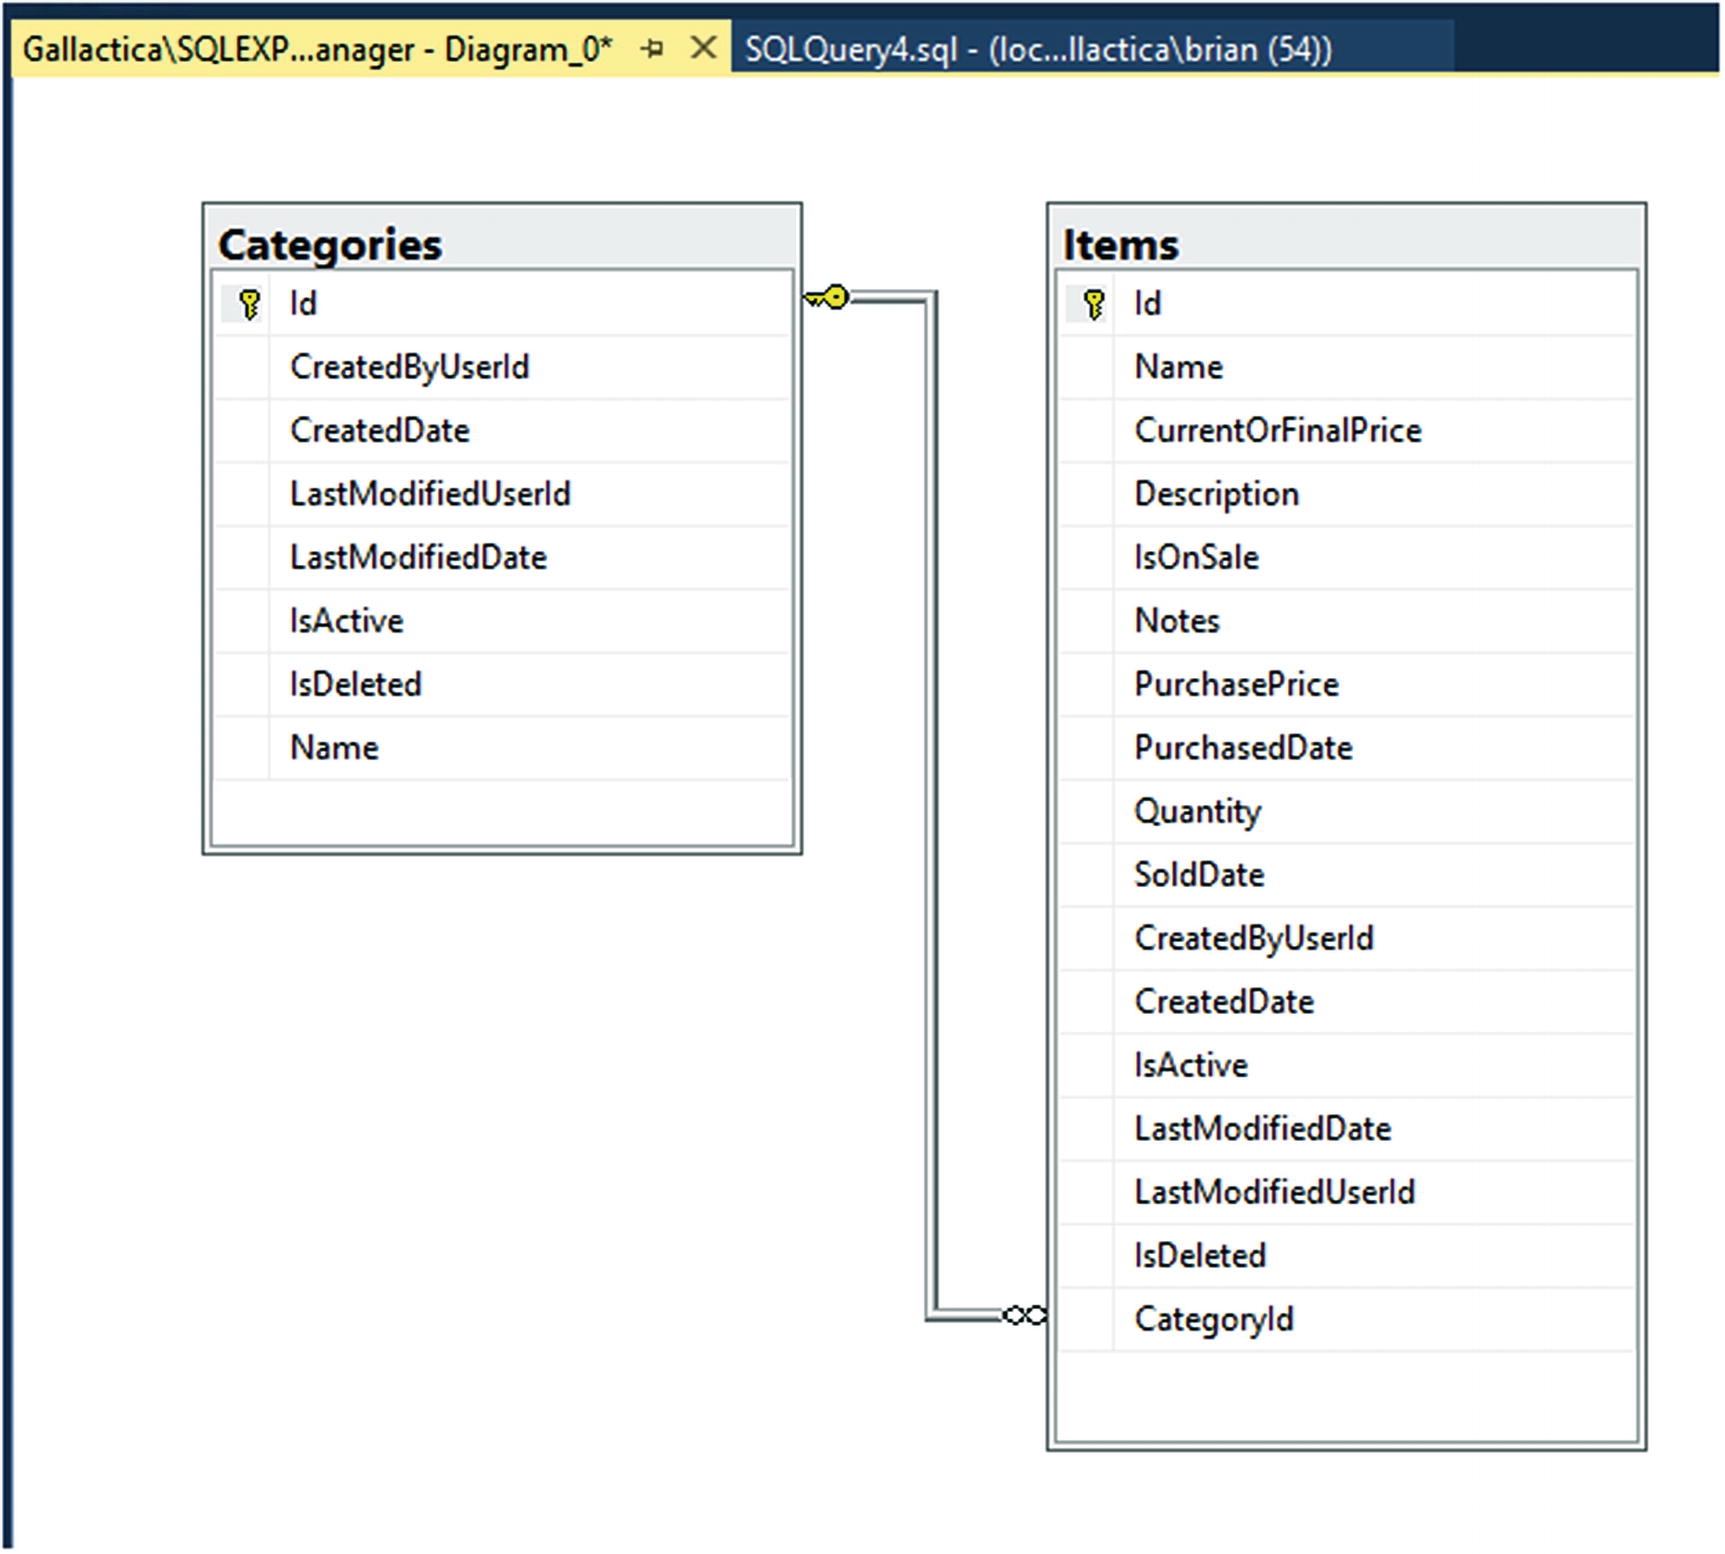
The database now has Categories and the relationship is one-to-many with Items
Creating a one-to-one relationship
In some instances, we will want to have a one-to-one relationship. For now, we’ll just use a contrived example to show how to do this. Assume that we want to assign a hexadecimal web color to each Category and that we want the color to be unique to the category. We’ll create a simple table to store the Color value and relate it directly to the Category in a one-to-one relationship.
Step 6: Create the Color entity
Create another entity in the Inventory Models project entitled CategoryColor by creating a new file called CategoryColor.cs in the project. This is going to be a simple entity with the default int Id and ColorValue as a string. Additionally, add a constant for the StringLength on the ColorValue field to be length 7.
Also, add the maximum color value length to the InventoryModelsContstants file: public const int MAX_COLORVALUE_LENGTH = 7;
To complete the creation of the entity, add the CategoryColor DBSet in the InventoryDBContext file: public DbSet<CategoryColor> CategoryColors { get; set; }, following the DBSet<Category> Categories property. Make sure to add any using statements as needed so the code will compile as expected.
Step 7: Create the one-to-one relationship
As with the one-to-many relationship, we still need to create the relationship in code before creating the migration.Here, we’ll just add the direct one-to-one relationship by giving the color object one category and the category object one color.
In the CategoryColors entity, add the following code: public virtual Category Category { get; set; }

The CategoryColor entity with reference to Category for one-to-one relationship
Do not miss the ForeignKey constraint on the Id field. If you miss adding this, then the one-to-one relationship will not map and work as expected.
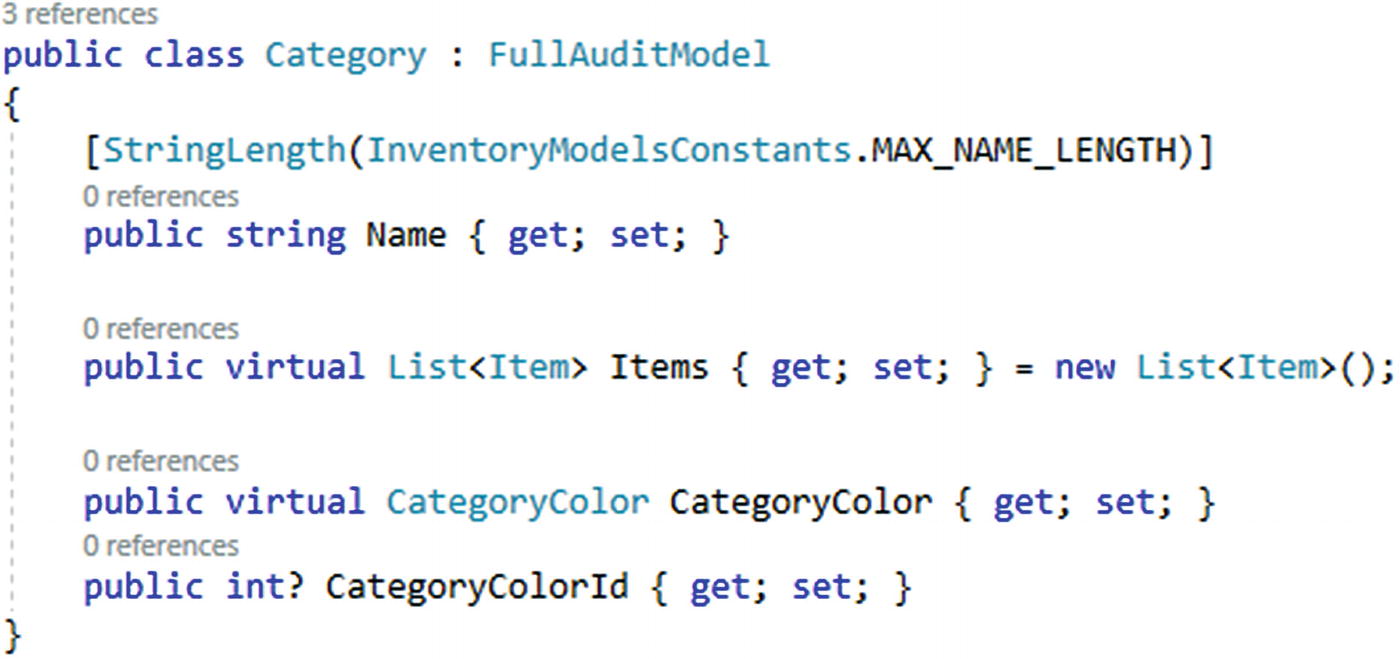
The Category entity with reference to the color for one-to-one relationship
Step 8: Create the migration
Now that the entities are in the context and the relationships are modeled to build a one-to-one relationship, add the migration with the command add-migration "createCategoryColorAndRelateToCategory".
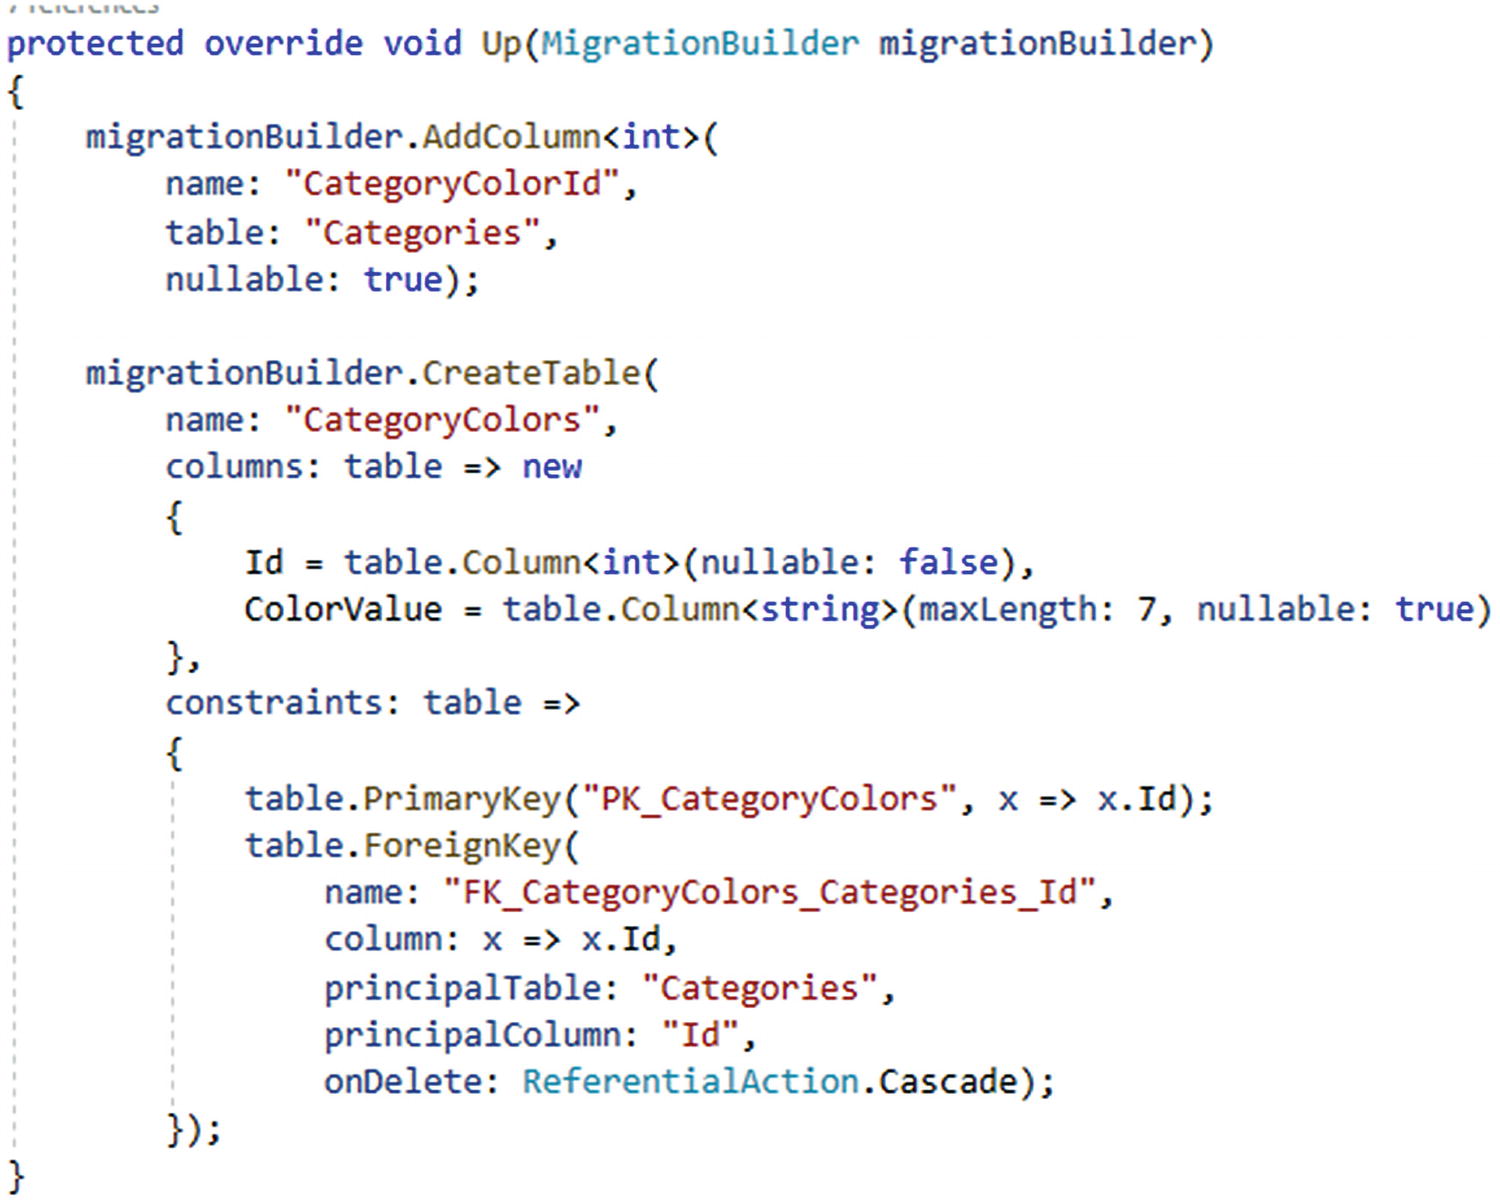
The generated migration for building the Category to CategoryColor one-to-one relationship
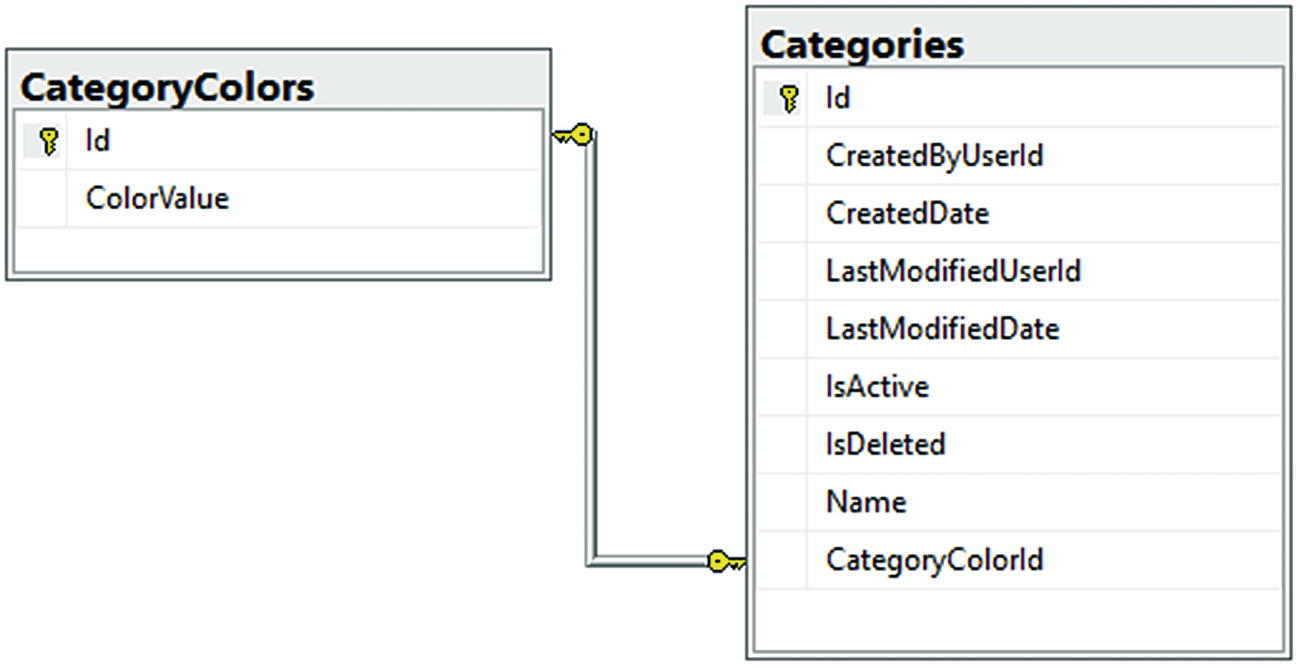
The Categories and CategoryColors one-to-one relationship after database migrations are applied
Note that the table is created and the entities are related as expected. The main difference is the onDelete action is set to ReferentialAction.Cascade. This means that if one is deleted, so is the other. If you think about it, this makes sense as we said every color needs a category and every category needs a color, so deleting one should delete the other.
Step 9: Update the database
With the migration reviewed, save and build, and then run the update-database command to execute the changes. Once the database migration has completed, open the tables in SSMS to review. See Figure 5-28, which shows the one-to-one relationship between Categories and CategoryColors.
Key takeaways from activity 0502
Build out the entities, and then build the relations in the entities using virtual objects.
If using a one-to-many, create a List of the related objects in the “one” table and a direct reference to the “one” object in the “many” object entity.
Set both key and foreign key on the Id of a table in a one-to-one relationship.
Cascading Delete can prevent delete if the entity has a related dependency with data.
Cascading Delete can wipe out an entry if the other part of the relationship is deleted.
Naming is done by convention, so use simple Id fields and then name the related field EntityId to easily map directly to the correct relational fields.
Activity 0503: Using a non-clustered unique index
This final activity for this chapter will be dual purposed in nature. First, we will examine what it takes to build out a many-to-many relationship. After setting up that relationship, we’ll also see what it takes to create a non-clustered index that is unique on the many-to-many relationship. The unique constraint is critical to make sure that we don’t have duplicate records in the database.
Soft delete or hard delete, either way, just make sure it works
A good thing to remember about this setup is that if we are using a soft-delete approach, we’ll need to make sure that any relationships are still intact if we delete and then restore an object. This could be accomplished by soft deleting the join entry or just leaving it alone but making sure the data is handled correctly in both directions.
If we use a hard-delete approach , then deleting one of the sides of the relationship should also delete the entry in the join table via a cascading-delete operation.
By the end of the activity, we’ll be able to define a many-to-many relationship in code, either implicitly or explicitly. We’ll also understand what it means to set up a unique constraint as a non-clustered index on our database using the code-first approach.
Step 1: Set up and getting started
As with other activities, please find the files Activity0503_ManyToManyWithUniqueNonClusteredIndex_Starter.zip or use your solution that you continue to build out as we go. Once you have the solution open, make sure to set any connection strings, build the project, and run the update-database command to make sure your database is up to date with no pending migrations.
Step 2: Add the Genre entity
As we’re tracking items, we likely have some inventory categories like movies and books, games, or other types of media. One common grouping that might exist across categories would be Genre. For example, we can have books and movies that are considered to be “Western” or “Sci-Fi.”
Step 3: Add the migration and update the database
While we can likely create the Genre table, do the relationship mappings, and create the many-to-many relationship in one migration, I’m going to go ahead and create the table in a single migration first. The main reason I want to do this is just to keep my migration simple. The migration with the many-to-many relationship and join table will be a bit more complex, so I’d like to keep that migration separate from this table creation.
Make sure to add the public DbSet<Genre> Genres { get; set; } statement to the InventoryDbContext. The entry should follow the DbSet<CategoryColor> CategoryColors property.

The migration generated to add the Genre table
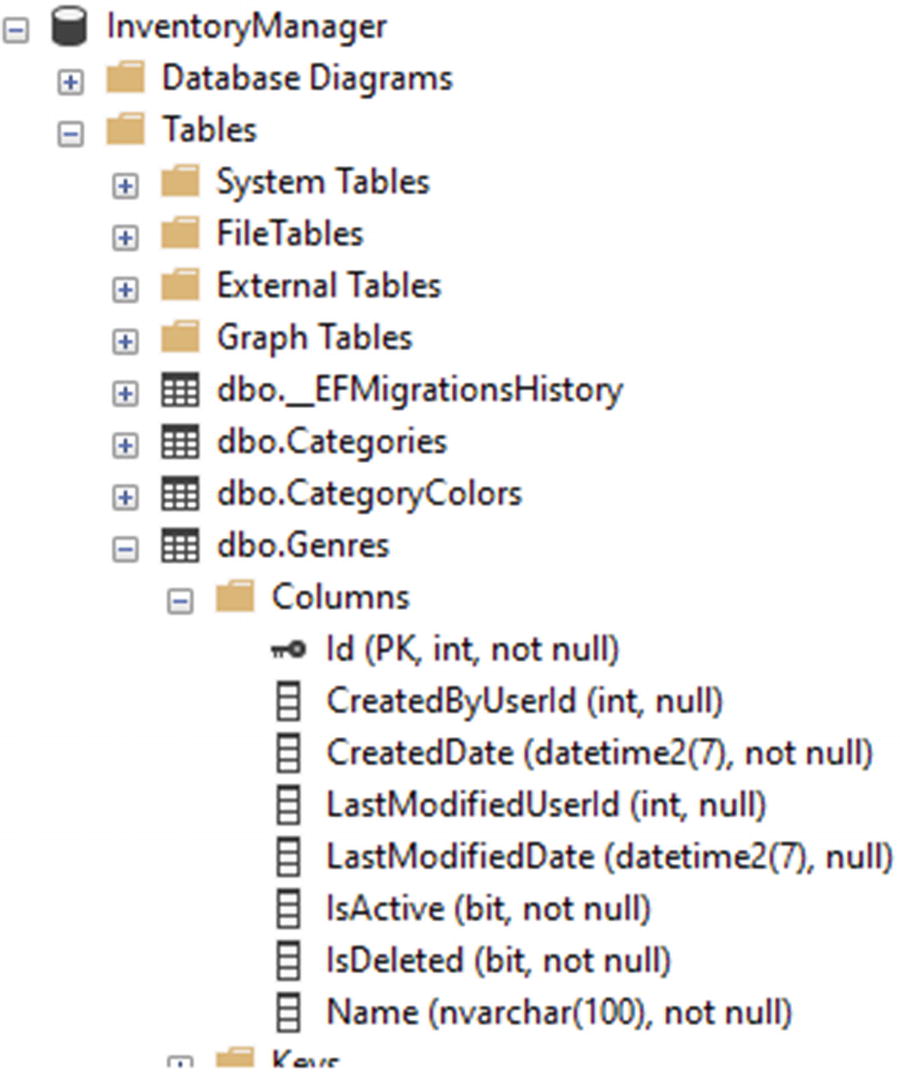
The Genre table after creation
Step 4: Add the ItemGenre entity
To make a many-to-many relationship, we’ll use a join table called ItemGenres . This will track the Item.Id and Genre.Id fields to create a mapping of Items to Genres.
In EF6, if we did not want to explicitly create this table, adding the relationships directly as lists in each of the respective entities would implicitly create the table. In EFCore, it has so far been a requirement to directly define this object.
For the ability to both audit the join table and use the joins in code (rather than fully loading the entities to get join information), along with the fact that the migration likely won’t work as expected in EFCore or EFvNext without the join object, I recommend just building out this entity explicitly. In the end, the table will get created either way, so you may as well take control of it.
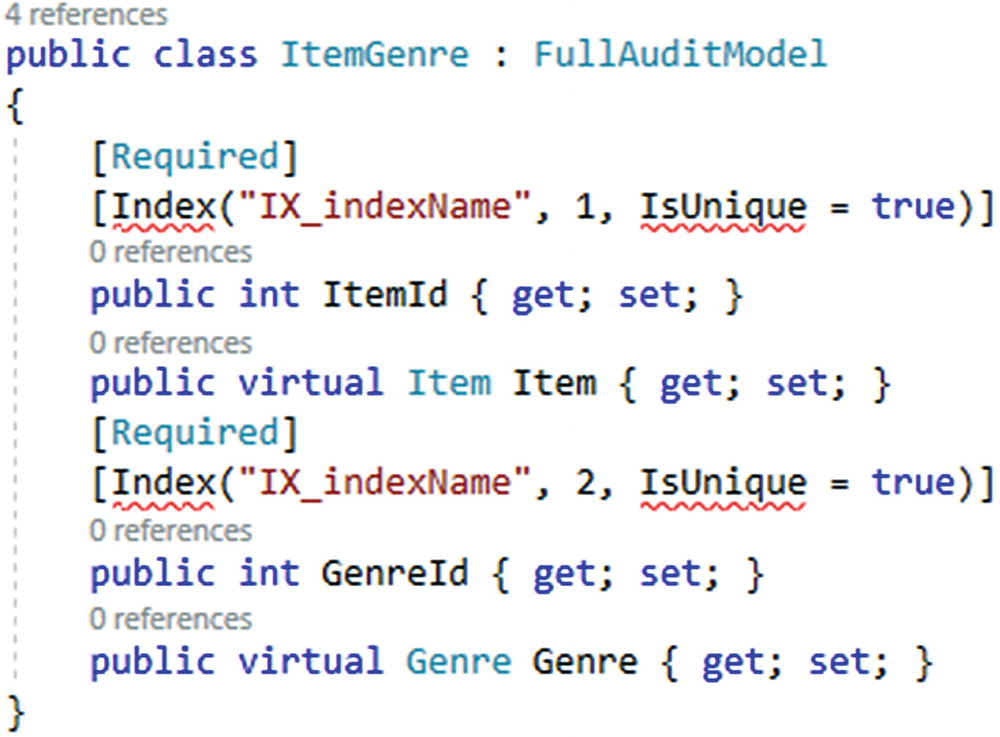
Create the ItemGenre entity in the Inventory Models project as a FullAuditModel. Add two fields for each side of the relationship, an ObjectTypeId and the List<ObjectType> ObjectTypes, to map (just as we have done previously in a one-to-many relationship).
Step 5: Make sure to reference the join table in the Item and Genre entities
If we create the migration right now, we won’t get the join table as expected, because we did not yet set the list of entities to map in each of Item and Genre.
Starting with the Item class, create a public virtual List<ItemGenre> ItemGenres { get; set; } = new List<ItemGenre>(); property. Make sure to add the missing using statement for System.Collections.Generic so the code will compile.
Do the same thing in the Genre class, but name the property as GenreItems. Again, don’t forget to add any missing using statements.

The Genre model with the navigation property for GenreItems
Step 6: Create the migration
Even though we have not added the ItemGenre directly to the DBContext, with the references in place on the left and right side (Item and Genre), the table should be created now as expected. Additionally, in case you missed it previously, make sure that you have added the DbSet<Genre> to the DBContext and have already generated the table for Genre prior to attempting to create this relationship.
After saving and building the solution, run the command add-migration "createdGenreAndItemGenreRelationship", then review the results. In your migration, you should see the table ItemGenre being created with the fields as expected, including an ItemId and GenreId. There should be constraints for the primary key, as well as two foreign keys set with ReferentialAction.Cascade onDelete. Finally, you should see two indexes, one for the ItemId field and one for the GenreId field.

The ItemGenre join table is generated to link the Genres and Items in a many-to-many relationship

The relationship as shown in a database diagram
Adding a unique, non-clustered index to the ItemGenre table to make sure that the joins are unique
To keep from having multiple rows in the database that map the same two Item and Genre entities into a relationship, we’ll create a new index that makes that combination unique. This is important so that we can make sure that when we perform a soft delete or restore from delete, we don’t just create duplicate rows.

In EF6, creating a composite key only works if the created key can be the table’s primary key
Another way to do this in EF6 was to use the [Index] annotation.
Using the Index annotation is only available in EF6, not in EFCore
Using the Fluent API
Up to this point, we’ve not used the FluentAPI, so we don’t know a lot about it. That’s ok. For now, I’ll ask you to trust me and know that we will study the FluentAPI in more detail later in this book.
Step 7: Adding the unique index in the Fluent API

A simple look at the generated model snapshot shows how some relationships can be formed in a Fluent-API like syntax

The OnModelCreating method is used to implement custom FluentAPI declarations for further defining database schema
Step 8: Add the migration
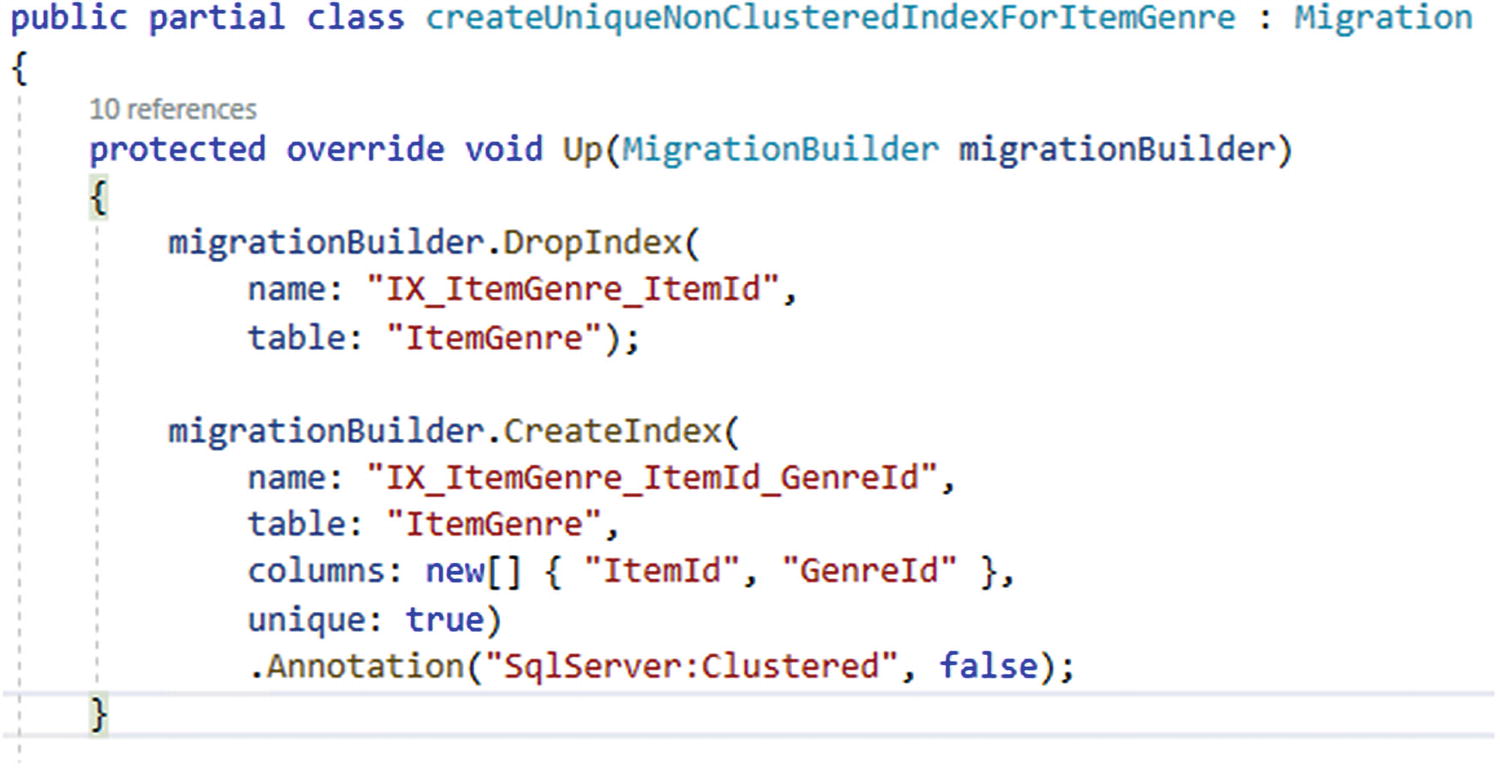
Adding the unique, non-clustered index
Step 9: Update the database and review the table
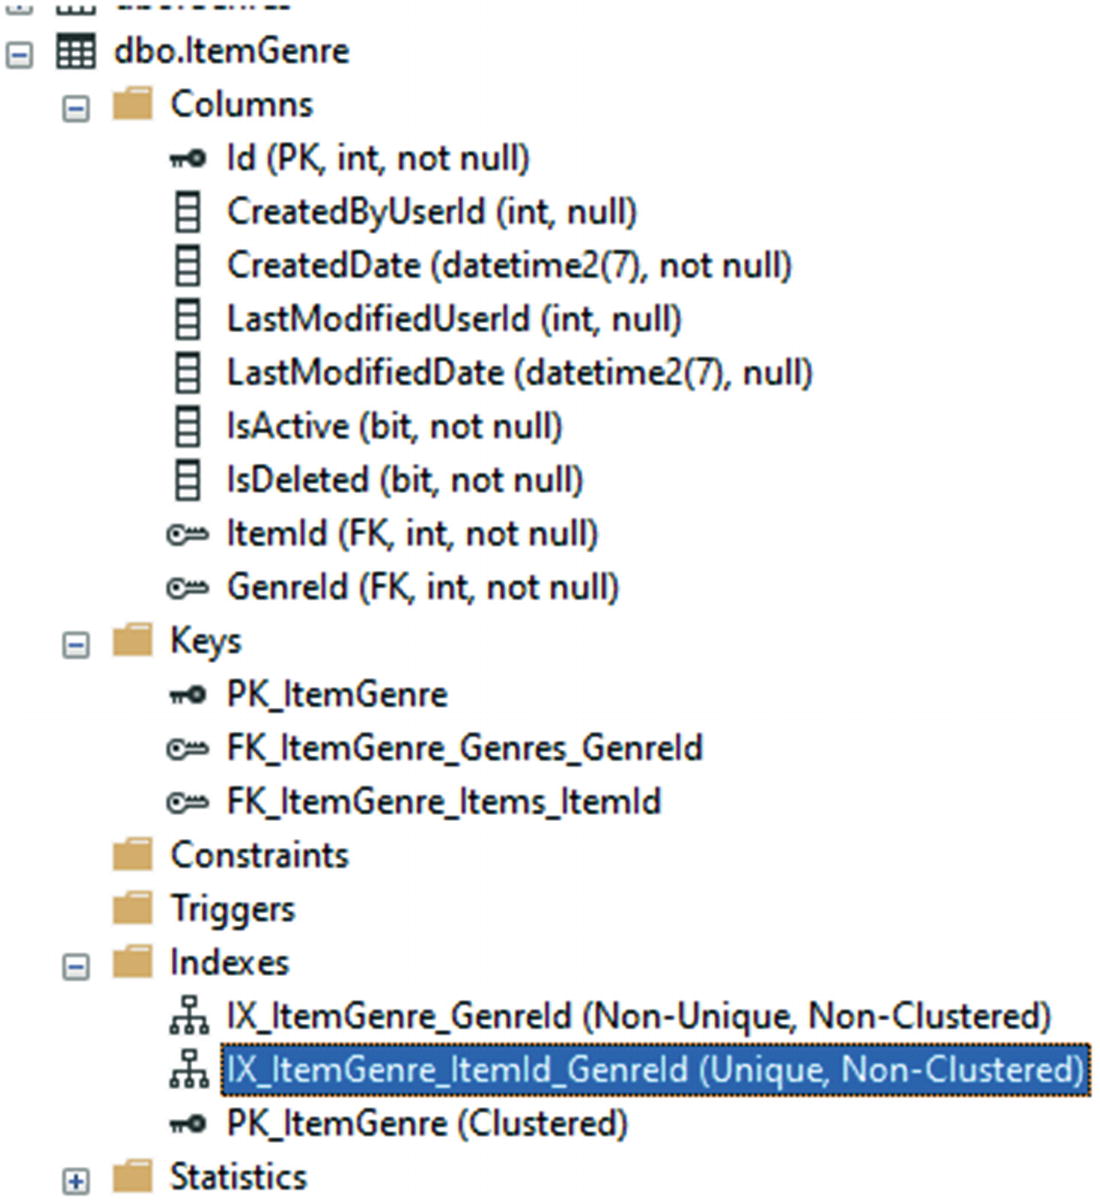
Reviewing the table reveals the created index is in place
Final thoughts on activity 0503
The many-to-many relationship uses a join table that consists of two one-to-many relationships.
We don’t want to add our join tables to the DBContext. Instead, we should force developers to work from one of the main data entities.
EF6 had a nice data annotation for creating an index. EFCore requires using the FluentAPI.
Creating a composite key is possible (two or more fields to create a unique identifier); however, the composite key must be the table’s primary key in order to be created.
Final thoughts for this chapter
Limiting the length of fields
Setting constraints on the values of the fields
Setting default values on fields
Creating one-to-one, one-to-many, and many-to-many relationships
Adding unique indexes using the FluentAPI
At this point, we are in a really good place to start generating some solid database architectures and implementations. As the developer, it will be our job to know about these options that exist and how to work with them correctly to achieve the best overall results with our databases.
In the next chapter, we’ll take a deeper dive into working with real data in this system we’re building, so that we’ll not only have the tools to architect a solid solution but the skills to develop against the data using common Create, Read, Update, and Delete (CRUD) actions.