© Brian L. Gorman 2020
B. L. GormanPractical Entity Frameworkhttps://doi.org/10.1007/978-1-4842-6044-9_14

14. Asynchronous Data Operations and Multiple Database Contexts

Brian L. Gorman1 
(1)
Jesup, IA, USA
 

In this chapter, we’ll cover two final critical concepts, as we discuss asynchronous operations and using multiple database contexts in our solutions.

At the end of this chapter, we’ll have seen how we can implement the database layer while leveraging the power of multiple cores in our computers. We’ll also have taken a look at how it is possible to use more than one database context in our solutions.

Asynchronous operations

The first concept we need to talk about is working with asynchronous operations. To this point, we’ve done everything with all methods being synchronous. However, in most practical applications, we’ll be leveraging the power of asynchronous programming.

Multithreaded programming

As our computer architectures changed from being processor speed oriented as the metric of superiority to processor speed plus core count oriented, multithreaded programming became much more popular and much more important in our day-to-day work.

The main problem with multithreaded programming is that it is difficult. There are many issues to consider before diving into multithreaded programming. Race conditions lead to your asynchronous code executing processes or methods out of order. Thread pools run out of available threads and can still cause pieces of your program to become unresponsive. In a worst-case scenario, threads get locked in an infinite loop and your entire application becomes unresponsive.

Because of the overall difficulty of asynchronous programming, the original rate of adoption was not that high. In fact, the main use prior to the TaskParallelLibrary (TPL) being introduced for most developers was likely just to keep desktop forms from appearing to be locked while processes ran in the background after pressing a button. I even wrote a blog post in 2009 on how to use events, delegates, and threads to avoid running into that specific problem.

Because of the difficulty of multithreaded programming, and the various technical problems associated with it, the .Net Framework was expanded to make our lives a whole lot better.

Async, await, and the TaskParallelLibrary

In the .Net world, async and await keywords first showed up in the .Net 3.0 Framework, but didn’t become widely adopted and useable until the TaskParallelLibrary (TPL) was introduced in .Net 4.

The TPL gave all of us the ability to specify the Task operations with return types that we have come to rely on in our asynchronous code. With the TPL, we can also rely on the fact that issues with concurrency are handled correctly. For example, using the await operator or requesting to get the result of a parallel operation gives us the assurance that our code will not continue to execute until the threaded operation has completed.

Responsive solutions for the end user

To put this more into perspective, think of websites from the early 2000s through about 2010. Perhaps you’ve even heard the term Web 2.0. Prior to Web 2.0 and other initiatives that happened at the end of the 2000s into the 2010s, websites were mostly one user doing one thing for themselves, or essential duties that they would perform, or were just simple, static files. Web 2.0 really grasped the idea that there should be multiple users interacting in the same systems and that each user should see information in real time.

With Web 2.0, it was more common to expect your changes to be immediately reflected to other users of the same system. This led to new approaches to web services and a movement into REST APIs, as well as things like the AjaxControlToolkit and SignalR, to provide an ability to abstract programmers from having to work directly with websockets. In the end, real-time dashboards as part of partial pages were able to immediately display results to the end user. Where a single-threaded approach would need to load all of the page data and then render it, and also get all of the page data from the server to re-render even the smallest changes, Web 2.0 essentially moved us to having multithreaded web pages with various portions responding to different threads and no longer having to reload the whole page to see a simple change on one metric.

All of this brings us to the place where we want to land for our database as well. If you create a dashboard that requires ten different pieces of information from the database, you don’t want the database calls to stop the page from working, and you don’t want the page to wait to respond until all ten different calls have completed.

By placing our database calls into asynchronous operations, our web solutions can also remain asynchronous, and the overall responsiveness of the site appears to be much better, even if there are still calls that bottleneck the process.

Asynchronous database operations

With the TPL and the ability to define a return type that is based on a threaded operation, we can leverage our processor architecture. Using async and await with our operations obfuscates the need to do the heavy lifting of multithreading ourselves, and we can get to a much more responsive solution with less concern about the underlying issues involved with multithreading.

Programming the database operations to also happen in an asynchronous manner thereby gives us the full power to leverage the TPL and the async and await keywords.

In other words, by using asynchronous database operations, we’ll get to keep programming as if we are working with commands in a synchronous manner, while leveraging the power of our multiple-core processors and the underlying multithreading that is available to us. Utilizing asynchronous database operations ultimately helps us to keep our applications responsive while querying the database in the most efficient manner possible.

Basic asynchronous syntax

Without going into a lot of detail here, setting our methods to use asynchronous operations is very straightforward. We will cover all of this in detail in our first activity later in this chapter.

To sum up what it takes to implement asynchronous operations, the main changes will require us to
  • Rework all methods to be async Task operations

  • Change all database calls to happen with the built-in async abilities of EF

  • Refactor any queries that don’t work as written in an asynchronous pattern

  • Use the async/await pattern throughout the application

  • Show how to execute an async operation from a synchronous context

Multiple database contexts

In most applications, a single database context can handle your needs. However, while it is not necessary and should ultimately be used with caution, there will be times when using multiple contexts can be beneficial.

Single sign on (SSO)

The most common reason I can conceive that you would want to have multiple database contexts would be in a company where you have a suite of applications and you want to provide custom sign-on capabilities to users (outside of Azure AD or an on-premises Active Directory).

In this solution, rather than require your users register for all of your applications, you can have an SSO solution where once a user is registered with one of your applications, the same user and password combination can be used for all of them.

It’s certainly true that you could replicate the data in the tables for user management across all of your applications with a background process . However, if all applications connect to and use the same database for identity, you can do much less work and have much less of a chance for error.

Business units

Another solution that might lend itself to multiple contexts would be a situation where you want to separate units within your corporation into their own database solutions while providing a single application to interact with the data.

For example, consider a large banking corporation that has units of work around accounting practices, customer management, financial investment operations, marketing, insurance, lending, and collections.

In this corporation, certain employees would likely need access to pieces of information in all units, such as a customer account with balance and perhaps payment and balance history in combination with mortgage and credit card information. Other business unites might only need access to one or two of the pieces of information. For example, marketing employees might only need access to customer name and address information. Furthermore, some information might be entirely confidential, and, due to regulations, knowing that information could lead to a potential violation of federal law (such as a fairness in lending act), so it may be critical to keep a clear separation of concerns to provide boundaries that cannot be circumvented.

When a case such as this exists, you’ll likely need to expose certain shared data across line-of-business applications, or you may need to have directly created contexts to leverage only the parts of each system that should be accessible. Again, the choice here is which is better for your company – from background jobs to sync your data on some time interval to direct immediate access to the most valid dataset that you can provide, the choices and implementations will be your responsibility as the developer.

Multiple contexts require a bit more work

If our solution is going to use multiple contexts, there are a few things we’ll need to be aware of.

The first thing to be certain to address is the injection of the context and the creation of the context at startup. Most applications will inject their context at startup, but you’ll be required to also include any additional contexts. Using the additional contexts also generally requires a shared library that can leverage the shared contexts.

The second critical piece of information that is important when working with multiple contexts is the knowledge of the commands to run in the package manager console. With a single context, a simple add-migration or update-database command can be run at will. Once you have introduced a second context into the solution, the PMC will need you to explicitly specify which context to use when running these commands.

Finally, using multiple contexts requires that everyone is on the same page as to the standards and approaches used in unit testing and interface segregation. While you could get by without this, it will be nice to know that any library developed around a context is fully unit and integration tested. Additionally, if there are security concerns, the ability to get just a read-only version of the context without much work should be readily available.

Putting it into practice

We’ve now done a good deal of talking about asynchronous operations and the database, as well as using multiple contexts.

For the remainder of the chapter, we’ll work through these scenarios to see what it takes to get set up, as well as learn about how to work with commands and code when making asynchronous calls or trying to add or update the database from the code-first approach to database development.

Activity 1401: Asynchronous database operations

In our first activity, we are going to rework our inventory database library to use asynchronous operations.

Leveraging async and await

The main purpose of this activity is to give us the ability to implement calls that rely on the async/await pattern. By doing this, we should be able to free up our applications to continue processing as well as optimize the performance of our own database operations to leverage the power of multithreading without all the heavy lifting.

As mentioned previously, there will be a few things we have to refactor, and the changes will ripple up all the way to our program. This also means we’ll have to refactor our tests. In the end, this solution will be much more like what we’ll encounter in any real-world application going forward.

Step 1: Steps

To begin, grab a copy of the Activity1401_AsynchronousDatabaseOperations_Starter.zip files, extract them, build the project, double-check your connection string, and make sure that you have the InventoryManager database set up. Run an update-database command to make sure the migrations are up to date on your machine. Additionally, you could run an add-migration command to ensure that you don’t have any pending changes. Assuming there are none, you could then just run the remove-migration command to clean up the empty migration. If you have pending changes, consider just updating the database to match the current solution using the update-database command.

Alternatively, you could just continue using your InventoryManager solution that you’ve been building through the previous chapters in this book, with your code in the same state as it was at the end of Chapter 13.

Step 2: Begin at the database level

To make the changes work, we’re going to have to touch most of the layers in some way or another, including the tests. We’ll start by reworking all of the database calls and move up the layers from there. Along the way, we’ll see how to make calls with async/await, as well as see the ability to run from a synchronous method when we get to the program.

Starting in the InventoryDatabaseLayer, open the IInventoryDatabaseRepo interface . In the interface, change all of the methods to be asynchronous by wrapping each return type with Task<T>. When the method is void, simply change the method to be a Task. Make sure to add the using statement using System.Threading.Tasks;. When the code is updated, it should look as follows:
public interface IInventoryDatabaseRepoReadOnly
{
    Task<List<GetItemsForListingDto>> GetItemsForListingFromProcedure(DateTime dateDateValue, DateTime maxDateValue);
    Task<List<GetItemsForListingWithDateDto>> GetItemsForListingLinq(DateTime minDateValue, DateTime maxDateValue);
    Task<List<GetItemsTotalValueDto>> GetItemsTotalValues(bool isActive);
    Task<List<ItemsWithGenresDto>> GetItemsWithGenres();
    Task<List<CategoryDto>> ListCategoriesAndColors();
    Task<List<Item>> ListInventory();
}
public interface IInventorDatabaseRepoWriteOnly
{
    Task<int> InsertOrUpdateItem(Item item);
    Task InsertOrUpdateItems(List<Item> items);
    Task DeleteItem(int id);
    Task DeleteItems(List<int> itemIds);
}
public interface IInventoryDatabaseRepo : IInventoryDatabaseRepoReadOnly, IInventorDatabaseRepoWriteOnly
{
}
Build the project. There will be a number of errors, as should be expected (review Figure 14-1).
../images/491632_1_En_14_Chapter/491632_1_En_14_Fig1_HTML.jpg
Figure 14-1

Reworking the interface causes a number of expected build errors

We can use the errors to work out the problems going forward as a road map. We already know that we changed the interface that is implemented by two classes. The next step is to rework the two implementations. Do not select “implement interface,” or you’ll get a number of duplicated methods. Instead, let’s fix the methods and the code that goes with them.

In the InventoryDatabaseRepo, begin by fixing the method signatures to match the methods in the interface. This is done by once again wrapping the return types with Task<T> or setting the return type to Task when the method is void. Additionally, each method needs to be declared as an async method. For example, the public List<GetItemsForListingDto> GetItemsForListingFromProcedure(...) method becomes public async Task<List<GetItemsForListingDto>> GetItemsForListingFromProcedure(...).

Make sure to add the using statement for System.Threading.Tasks.

After fixing all the signatures, a number of errors will be created. We’ll now walk through each method and fix the internal code.

Make note that some methods don’t have an error, but only have a green squiggly line under the method name. Hovering on the name of the method reveals the issue (see Figure 14-2).
../images/491632_1_En_14_Chapter/491632_1_En_14_Fig2_HTML.jpg
Figure 14-2

Methods that are asynchronous expect to await within the method

While you can have an async method that does not have an await operation in it and still have valid execution, the warning here is to remind you that you made an asynchronous method without an await operation. We want to await the database call. To do this, we need to make a couple of changes.

Begin by adding the keyword await between return and _context.ItemsForListing.... This change will highlight the operation with a red-squiggly underline. The error created is that the List<GetItemsForListingDto> does not contain a definition for awaiter. To fix this, we need to change .ToList() to .ToListAsync():
public async Task<List<GetItemsForListingDto>> GetItemsForListingFromProcedure(DateTime dateDateValue, DateTime maxDateValue)
{
    var minDateParam = new SqlParameter("minDate", dateDateValue);
    var maxDateParam = new SqlParameter("maxDate", maxDateValue);
    return await _context.ItemsForListing
                        .FromSqlRaw("EXECUTE dbo.GetItemsForListing @minDate, @maxDate", minDateParam, maxDateParam)
                        .ToListAsync();
}

Next, let’s fix the GetItemsForListingLinq method . This fix will be more involved. Because of the way this query is built and because of the database encryption we have implemented, we have to get the list back sooner than would be ideal. Making this method asynchronous will force us to rework the ordering a bit as well.

Begin by creating a new variable called result and set it to await the call to get the items with the included category and select into the GetItemsForListingWithDateDto using the where limitations, but then direct the results ToListAsync() at this point.
var result = await _context.Items.Include(x => x.Category)
                .Select(x => new GetItemsForListingWithDateDto
                        {
                            CreatedDate = x.CreatedDate,
                            CategoryName = x.Category.Name,
                            Description = x.Description,
                            IsActive = x.IsActive,
                            IsDeleted = x.IsDeleted,
                            Name = x.Name,
                            Notes = x.Notes
                        })
                .Where(x => x.CreatedDate >= minDateValue && x.CreatedDate <= maxDateValue)
                .ToListAsync();
Then use the return statement to return that list with ordering as expected:
return result.OrderBy(y => y.CategoryName).ThenBy(z => z.Name).ToList();

This change will allow us to get the list in an asynchronous manner and then we have to do the ordering. The IOrderedEnumerable will not work asynchronously as the code is written, so, while not ideal, at least we got the limited results with the query. If we wanted, we could get the query as an AsyncEnumerable, which would allow for async enumeration of the results, but here we’ll just fetch the results with the await operation and then order the resulting list in memory.

For clarity, the completed GetItemsForListingLinq method is illustrated in Figure 14-3.
../images/491632_1_En_14_Chapter/491632_1_En_14_Fig3_HTML.jpg
Figure 14-3

The reworked GetItemsForListingLinq method is now asynchronous

Now let’s move on to the GetItemsTotalValues method. This method is another simple fix where we just need to make the method async Task<T>, then add the await operator to the database call, and complete by changing the ToList call to ToListAsync. Since we’re here, also fix the parameter declaration to use the passed in parameter instead of the hard-coded value of 1. The reworked method should be as follows:
public async Task<List<GetItemsTotalValueDto>> GetItemsTotalValues(bool isActive)
{
    var isActiveParm = new SqlParameter("IsActive", isActive);
    return await _context.GetItemsTotalValues
                   .FromSqlRaw("SELECT * from [dbo].[GetItemsTotalValue] (@IsActive)", isActiveParm)
                   .ToListAsync();
}Continuing down the code, the ListCategoriesAndColors method is another simple fix - making the method async Task<T> and then adding the await operator and changing ToList to ToListAsync. The method GetItemsWithGenres is similar. The two completed methods should look as follows:
public async Task<List<CategoryDto>> ListCategoriesAndColors()
{
    return await _context.Categories
                    .Include(x => x.CategoryColor)
.ProjectTo<CategoryDto>(_mapper.ConfigurationProvider).ToListAsync();
}
public async Task<List<ItemsWithGenresDto>> GetItemsWithGenres()
{
    return await _context.ItemsWithGenres.ToListAsync();
}
The ListInventory() method is next, and it will require a few changes. For this method, we’ll again start by getting results with await and ToListAsync and then change to include the OrderBy. To see the error we would get without proper refactoring, just add await and change the return of ToList to ToListAsync. We’ll see the error is regarding the fact that the IOrderedEnumerable does not allow a ToListAsync call (review Figure 14-4).
../images/491632_1_En_14_Chapter/491632_1_En_14_Fig4_HTML.jpg
Figure 14-4

The IOrderedEnumerable does not allow a ToListAsync() operation

Refactor the code for the ListInventory method as follows:
public async Task<List<Item>> ListInventory()
{
    var result = await _context.Items.Include(x => x.Category)
                .Where(x => !x.IsDeleted).ToListAsync();
    return result.AsEnumerable().OrderBy(x => x.Name).ToList();
}
In the InsertOrUpdateItem method, add await statements before each call to Update or Create an item:
public async Task<int> InsertOrUpdateItem(Item item)
{
    if (item.Id > 0)
    {
        return await UpdateItem(item);
    }
    return await CreateItem(item);
}
In the InsertOrUpdateItems method , change the method to async Task and then simply add an await statement before the call to InsertOrUpdateItems:
var success = await InsertOrUpdateItem(item) > 0;
For the CreateItem method , we get to see our first save. Here, we’ll add await operations to the first two lines. Additionally, we’ll change the Add method to AddAsync and the SaveChanges method to SaveChangesAsync.
private async Task<int> CreateItem(Item item)
{
    await _context.Items.AddAsync(item);
    await _context.SaveChangesAsync();
    var newItem = _context.Items.ToList()
                    .FirstOrDefault(x => x.Name.ToLower()
                    .Equals(item.Name.ToLower()));
    if (newItem == null) throw new Exception("Could not Create the item as expected");
    return newItem.Id;
}
For the get of the new item, we need to just make the call to get the items, but this time limit to single or default async:
private async Task<int> CreateItem(Item item)
{
    await _context.Items.AddAsync(item);
    await _context.SaveChangesAsync();
    var newItem = await _context.Items.SingleOrDefaultAsync(x => x.Name.ToLower()
                    .Equals(item.Name.ToLower()));
    if (newItem == null) throw new Exception("Could not Create the item as expected");
    return newItem.Id;
}

For the UpdateItem method , we need to make a couple of similar changes. Add await to the call to get Items, and also change the FirstOrDefault call to SingleOrDefaultAsync.

Using FirstOrDefaultAsync would also work here, but we should never get more than one result on a unique Id, so it would be more accurate to use SingleOrDefault/SingleOrDefaultAsync for this call.
var dbItem = await _context.Items.SingleOrDefaultAsync(x => x.Id == item.Id);
Additionally, add the await operator and change SaveChanges to SaveChangesAsync right before returning the item id:
await _context.SaveChangesAsync();
When complete, the UpdateItem should look as follows:
private async Task<int> UpdateItem(Item item)
{
    var dbItem = await _context.Items.SingleOrDefaultAsync(x => x.Id == item.Id);
    dbItem.CategoryId = item.CategoryId;
    dbItem.CurrentOrFinalPrice = item.CurrentOrFinalPrice;
    dbItem.Description = item.Description;
    dbItem.IsActive = item.IsActive;
    dbItem.IsDeleted = item.IsDeleted;
    dbItem.IsOnSale = item.IsOnSale;
    dbItem.Name = item.Name;
    dbItem.Notes = item.Notes;
    dbItem.PurchasedDate = item.PurchasedDate;
    dbItem.PurchasePrice = item.PurchasePrice;
    dbItem.Quantity = item.Quantity;
    dbItem.SoldDate = item.SoldDate;
    await _context.SaveChangesAsync();
    return item.Id;
}
For the DeleteItem method , add the await and change the call to SingleOrDefaultAsync for the query to get the matching item. Also add the await and change the SaveChanges call to SaveChangesAsync.
public async Task DeleteItem(int id)
{
    var item = await _context.Items.SingleOrDefaultAsync(x => x.Id == id);
    if (item == null) return;
    item.IsDeleted = true;
    await _context.SaveChangesAsync();
}
Finally, change the DeleteItems method to await the call to DeleteItem method:
try
{
    foreach (var itemId in itemIds)
    {
        await DeleteItem(itemId);
    }
    scope.Complete();
}

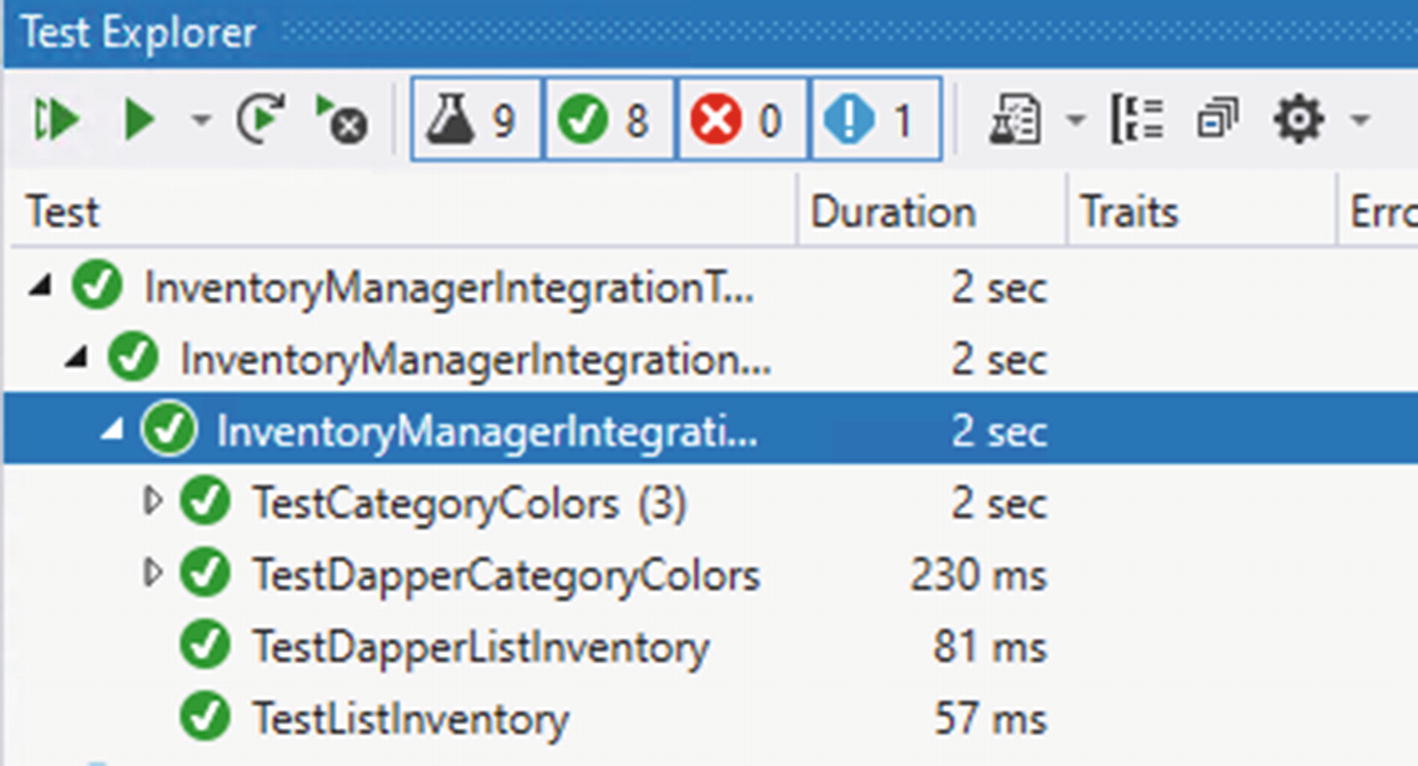
To complete this portion of the activity, we need to also refactor the Dapper implementation.

To do this, once again change all the method signatures on each method to match the asynchronous changes as defined in the interface. Most of these methods are unimplemented, so we can just leave them. They will have a green squiggly line indicating that they do not implement an await operator, but that will not break the compiler or the program execution, even if the method had other synchronous code in it.

For clarity, I’ve collapsed all of the methods and am including a screenshot (see Figure 14-5) so that you can see what the method signatures should look like in the InventoryDatabaseDapperRepo class .
../images/491632_1_En_14_Chapter/491632_1_En_14_Fig5_HTML.jpg
Figure 14-5

The InventoryDatabaseDapperRepo class with methods changed to implement asynchronous operations. For brevity, method bodies are not shown in the image but do exist in the code

To complete the code changes in the InventoryDatabaseDapperRepo, we need to fix the two methods that are implemented. Beginning with ListCategoriesAndColors, change the code for the first var result = _connection.Query... to var result = await _connection.QueryAsync<dynamic>(sql);.

Then change the code in the foreach method call to get the first match with an asynchronous call:
category.CategoryColor = await _connection.QueryFirstAsync<CategoryColor>("SELECT * FROM CategoryColors where ID = "+ category.CategoryColorId);
After completing these changes, the entire method should look like the following code:
public async Task<List<CategoryDto>> ListCategoriesAndColors()
{
    var sql = "SELECT c.Id, c.Name, cc.Id as CategoryColorId, cc.ColorValue " +
                "FROM Categories c " + "INNER JOIN CategoryColors cc " + "ON c.CategoryColorId = cc.Id";
    var result = await _connection.QueryAsync<dynamic>(sql);
    Slapper.AutoMapper.Configuration.AddIdentifiers(typeof(Category), new List<string> { "Id" });
    Slapper.AutoMapper.Configuration.AddIdentifiers(typeof(CategoryColor), new List<string> { "CategoryColorId" });
    /*
     map
    */
    var output = (Slapper.AutoMapper.MapDynamic<Category>(result) as IEnumerable<Category>).ToList();
    foreach (var category in output)
    {
        category.CategoryColor = await _connection
                        .QueryFirstAsync<CategoryColor>("SELECT * FROM CategoryColors where ID = "
                                               + category.CategoryColorId);
    }
    return _mapper.Map<List<CategoryDto>>(output);
}
Complete similar changes to the two _connection.Query calls in the ListInventory method . The code should look as follows when you complete the refactor:
public async Task<List<Item>> ListInventory()
{
    var sql = $"SELECT i.Id, i.Name, i.Description, i.Notes, i.IsDeleted, i.CategoryId " + ", c.Name as CategoryName" +
                " FROM Items i INNER JOIN Categories c on i.CategoryId = c.Id" +
                " WHERE i.IsDeleted = @isDeleted";
    var result = await _connection.QueryAsync<dynamic>(sql, new { isDeleted = 0 });
    Slapper.AutoMapper.Configuration.AddIdentifiers(typeof(Item), new List<string> { "Id" });
    Slapper.AutoMapper.Configuration.AddIdentifiers(typeof(Category), new List<string> { "CategoryId" });
    var output = (Slapper.AutoMapper.MapDynamic<Item>(result) as IEnumerable<Item>).OrderBy(x => x.Name).ToList();
    //have to hydrate the relationship:
    foreach (var item in output)
    {
        item.Category = await _connection
                    .QueryFirstAsync<Category>("SELECT * FROM Categories where ID = "+ item.CategoryId);
    }
    return output;
}
This will complete our refactor operations on the InventoryDatabaseLayer project. Build the project to get the next set of errors (see Figure 14-6).
../images/491632_1_En_14_Chapter/491632_1_En_14_Fig6_HTML.jpg
Figure 14-6

Errors in the BusinessLayer and in the integration tests now exist

Step 3: Update the integration tests to use asynchronous database operations

Now that our database layer is fully updated, we need to begin the next layer of fixes by first fixing the integration tests and making sure they still work as expected.

Open the InventoryManagerIntegrationTests class file in the IntegrationManagerTests project.

Begin by changing the four methods that have Fact or Theory attributes to be asynchronous. This is easily accomplished by simply changing the keyword void to be async Task. Yes, it is really that easy (see Figure 14-7 for reference).
../images/491632_1_En_14_Chapter/491632_1_En_14_Fig7_HTML.jpg
Figure 14-7

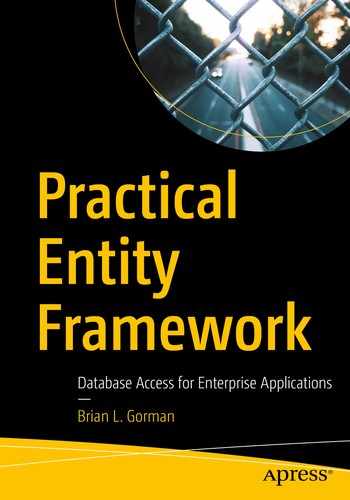
The four test methods are changed to become asynchronous tests

Make sure to add the using statement for System.Threading.Tasks so that the code will compile.

In the each of the four methods identified in Figure 14-7, simply find any calls to the _dbRepo objects and add the await operator to allow for the methods to operate asynchronously. For example, in TestListInventory, change var items = _dbRepo.ListInventory(); to var items = await _dbRepo.ListInventory();

There should be four calls to await added to the test project when this is completed:

In TestListInventory
var items = await _dbRepo.ListInventory();
In TestCategoryColors
var catcolors = await _dbRepo.ListCategoriesAndColors();
In TestDapperListInventory()
var result = await repo.ListInventory();
In TestDapperCategoryColors
var catcolors = await repo.ListCategoriesAndColors();
Rebuild the project. There are still errors for the InventoryBusinessLayer that need to be fixed. However, we can run the integration tests. Run them now to validate that our asynchronous code is working as expected (see Figure 14-8 for sample test output).
../images/491632_1_En_14_Chapter/491632_1_En_14_Fig8_HTML.jpg
Figure 14-8

The integration tests should all be passing at this point

Step 4: Update the business layer

The next step in refactoring our code is to refactor the business layer. This will be a fairly easy and quick operation, now that the deeper database layer is already refactored and validated to be working via the integration tests.

As with the interface for the database layer, refactor all method signatures in the IItemsService file to be configured for asynchronous operations. Don’t forget to also add the using statement for System.Threading.Tasks. When completed, the code for the interfaces in the IItemsService.cs file should be as follows:
public interface IItemsServiceReadOnly
{
    Task<List<GetItemsForListingWithDateDto>> GetItemsForListingLinq(DateTime minDateValue, DateTime maxDateValue);
    Task<List<GetItemsForListingDto>> GetItemsForListingFromProcedure(DateTime minDateValue, DateTime maxDateValue);
    Task<AllItemsPipeDelimitedStringDto> GetItemsPipeDelimitedString(bool isActive);
    Task<List<GetItemsTotalValueDto>> GetItemsTotalValues(bool isActive);
    Task<List<ItemsWithGenresDto>> GetItemsWithGenres();
    Task<List<CategoryDto>> ListCategoriesAndColors();
    Task<List<ItemDto>> ListInventory();
}
public interface IItemsServiceWriteOnly
{
    Task<int> InsertOrUpdateItem(CreateOrUpdateItemDto item);
    Task InsertOrUpdateItems(List<CreateOrUpdateItemDto> item);
    Task DeleteItem(int id);
    Task DeleteItems(List<int> itemIds);
}
public interface IItemsService : IItemsServiceReadOnly, IItemsServiceWriteOnly
{
}
In the ItemsService implementation, make sure to modify all method signatures to be asynchronous, and then simply add the await keyword before any call to the repo object. As always, don’t forget to add the necessary using statements into the file. For example, the GetItemsForListingFromProcedure looks as follows after being refactored:
public async Task<List<GetItemsForListingDto>> GetItemsForListingFromProcedure(DateTime minDateValue, DateTime maxDateValue)
        {
            return await _dbRepo.GetItemsForListingFromProcedure(minDateValue, maxDateValue);
        }
The only other change that needs to be made that will be different from all the other methods is any call to the ListInventory method and a major change in the ListInventory method. In that method, since we’re mapping, first get the result, and then map as follows:
public async Task<List<ItemDto>> ListInventory()
{
    var result = await _dbRepo.ListInventory();
    return _mapper.Map<List<ItemDto>>(result);
}

Make sure to also update any calls in other methods to the ListInventory method to include an await operator, i.e., var items = await ListInventory(); such as in the GetItemsPipeDelimitedString method.

Each of the following code snippets will highlight the changes to the ItemsService class as it should be at completion:
//GetItemsForListingFromProcedure
public async Task<List<GetItemsForListingDto>> GetItemsForListingFromProcedure(DateTime minDateValue, DateTime maxDateValue)
{
    return await _dbRepo.GetItemsForListingFromProcedure(minDateValue, maxDateValue);
}
//GetItemsForListingLinq:
public async Task<List<GetItemsForListingWithDateDto>> GetItemsForListingLinq(DateTime minDateValue, DateTime maxDateValue)
{
    return await _dbRepo.GetItemsForListingLinq(minDateValue, maxDateValue) ;
}
GetItemsPipeDelimitedString:
public async Task<AllItemsPipeDelimitedStringDto> GetItemsPipeDelimitedString(bool isActive)
{
    var items = await ListInventory();
    var sb = new StringBuilder();
    foreach (var item in items)
    {
        if (sb.Length > 0)
        {
            sb.Append("|");
        }
        sb.Append(item.Name);
    }
    var output = new AllItemsPipeDelimitedStringDto();
    output.AllItems = sb.ToString();
    return output;
}
//GetItemsPipeDelimitedString
public async Task<AllItemsPipeDelimitedStringDto> GetItemsPipeDelimitedString(bool isActive)
{
    var items = await ListInventory();
    var sb = new StringBuilder();
    foreach (var item in items)
    {
        if (sb.Length > 0)
        {
            sb.Append("|");
        }
        sb.Append(item.Name);
    }
    var output = new AllItemsPipeDelimitedStringDto();
    output.AllItems = sb.ToString();
    return output;
}
//GetItemsTotalValues:
public async Task<List<GetItemsTotalValueDto>> GetItemsTotalValues(bool isActive)
{
    return await _dbRepo.GetItemsTotalValues(isActive);
}
//GetItemsWithGenres:
public async Task<List<ItemsWithGenresDto>> GetItemsWithGenres()
{
    return await _dbRepo.GetItemsWithGenres();
}
//ListCategoriesAndColors
public async Task<List<CategoryDto>> ListCategoriesAndColors()
{
    return await _dbRepo.ListCategoriesAndColors();
}
//ListInventory
public async Task<List<ItemDto>> ListInventory()
{
    var result = await _dbRepo.ListInventory();
    return _mapper.Map<List<ItemDto>>(result);
}
//InsertOrUpdateItem
public async Task<int> InsertOrUpdateItem(CreateOrUpdateItemDto item)
{
    if (item.CategoryId <= 0)
    {
        throw new ArgumentException("Please set the category id before insert or update");
    }
    return await _dbRepo.InsertOrUpdateItem(_mapper.Map<Item>(item));
}
//InsertOrUpdateItems
public async Task InsertOrUpdateItems(List<CreateOrUpdateItemDto> items)
{
    await _dbRepo.InsertOrUpdateItems(_mapper.Map<List<Item>>(items));
}
//DeleteItem and DeleteItems:
public async Task DeleteItem(int id)
{
    if (id <= 0) throw new ArgumentException("Please set a valid item id before deleting");
    await _dbRepo.DeleteItem(id);
}
public async Task DeleteItems(List<int> itemIds)
{
    try
    {
        await _dbRepo.DeleteItems(itemIds);
    }
    catch (Exception ex)
    {
        Console.WriteLine($"The transaction has failed: {ex.Message}");
    }
}

Now that our ItemsService is updated, we also need to update the ItemsServiceReadOnly to use asynchronous operations.

Once again, update all of the method signatures to be asynchronous in nature and add the using statement for System.Threading.Tasks. As most of these methods are not implemented, we only need to update the ones that are; in this case, ListCategoriesAndColors and ListInventory. As with the previous operations, we’ll need to return the ListInventory into a variable and then map it, but these two implementations are very easy. The code for the two methods that need to be altered is as follows:
public async Task<List<CategoryDto>> ListCategoriesAndColors()
{
    return await _dbRepo.ListCategoriesAndColors();
}
public async Task<List<ItemDto>> ListInventory()
{
    var items = await _dbRepo.ListInventory();
    return _mapper.Map<List<ItemDto>>(items);
}
The remaining methods aren’t implemented, so just make sure they have the correct signatures as shown in Figure 14-9.
../images/491632_1_En_14_Chapter/491632_1_En_14_Fig9_HTML.jpg
Figure 14-9

The remaining methods just need the updated signatures for asynchronous operations

This completes our refactoring of the business layer. Rebuild the project to see the next set of errors, which will be in the InventoryManagerUnitTests and the overall program itself.

Step 5: Update the unit tests

Now that the business layer is in place, we need to update the unit tests. Open the InventoryManagerUnitTests file in the InventoryManagerUnitTests project.

There won’t be a lot to change in this project since we just have the one test. For the setup however, we need to do something a bit different. Since we are going to be mocking an asynchronous return, we need to get the _allItems object as the result of a Task. To do this, we can simply use the call Task.FromResult(_allItems).

In the SetupDbRepoMock, change the _mockInventoryDatabaseRepo.Setup(...) call to be:
_mockInventoryDatabaseRepo.Setup(x => x.ListInventory())
                    .Returns(Task.FromResult(_allItems));
Next, change the TestGetItems method to be async Task, and await the _serviceLayer.ListInventory call:
[TestMethod]
public async Task TestGetItems()
{
    //var result = _mockServiceLayer.Object.ListInventory();
    var result = await _serviceLayer.ListInventory();
    Assert.IsNotNull(result);
    Assert.IsTrue(result.Count > 0);
    result.ShouldNotBeNull();
    result.Count.ShouldBeGreaterThan(0);
    result.Count.ShouldBe(3);
    result.First().Name.ShouldBe(ITEM1_NAME);
    result.First().CategoryId.ShouldBe(1);
}
This completes our refactor for the unit tests. Build the project and see the next set of errors which should all relate to the program itself. Run the unit tests to make sure that it passes as expected. Figure 14-10 shows the output of the unit tests running successfully.
../images/491632_1_En_14_Chapter/491632_1_En_14_Fig10_HTML.jpg
Figure 14-10

The Unit tests are now passing as expected

All that remains is to fix the main program.

Step 6: Update the Program

To complete the system and allow it to work, we need to update the Program. In this part of the activity, we have all the code turned on and just need to get the calls to work with the new asynchronous code.

One thing that will happen is that there are a number of calls to ListInventory. For this reason, the first thing we should do is create a helper method to get the Inventory List. This will also give us a chance to see how to run an asynchronous piece of code from within a synchronous context.

Add the following code to the Program class after the Main method and before the CreateMultipleItems method :
private static List<ItemDto> GetInventoryList(IItemsService svc)
{
    return Task.Run(() => svc.ListInventory()).Result;
}

Make sure to also add the using statement for.

In this code, we see the call to Task.Run(() => ...).Result; That line of code allows us to tell the system to run a command and then use a lambda to inject the asynchronous code to run. Since our method is not asynchronous, we cannot await the result. Therefore, we add the call to .Result at the end of the statement, which tells the system to wait until a result is returned.

Now that we have our common code for getting inventory, let’s fix the rest of the code.

To begin, replace any calls in the code to svc.ListInventory with the new method call to GetInventoryList(svc). There should be six places to replace and the one result that we just created with our new method. For example, the line var inventory = svc.ListInventory(); becomes var inventory = GetInventoryList(svc);.

Using the find and replace tool of ctrl + H, enter the svc.ListInventory() search term and replace all but the new method with GetInventoryList(svc).

After completion, run another find operation to validate you have six method calls to GetInventoryList(svc) as illustrated in Figure 14-11.
../images/491632_1_En_14_Chapter/491632_1_En_14_Fig11_HTML.jpg
Figure 14-11

A simple find can help validate that we have successfully replaced all six calls to get the items

Rebuild the solution to see further errors. Each issue revolves around the fact that the method went from being synchronous to asynchronous. To fix the rest of the calls, look for a call to the business layer and then initiate the call using the Task.Run syntax learned previously.

For example:
var items = svc.GetItemsForListingLinq(minDate, maxDate);
becomes
var items = Task.Run(() => svc.GetItemsForListingLinq(minDate, maxDate)).Result;
Make sure to just leave the Dapper service call to get inventory as is and wrap with a Task.Run operation, as the interface type is not interchangeable as written:
var dapperInventory = Task.Run(() => svc2.ListInventory()).Result;
When this is completed, the code for the Main method with all code uncommented should be as follows (note, for a complete version of the code, see the Activity1401_AsynchronousDatabaseOperations_Final.zip files):
static void Main(string[] args)
{
    BuildOptions();
    BuildMapper();
    var minDate = new DateTime(2020, 1, 1);
    var maxDate = new DateTime(2021, 1, 1);
    using (var db = new InventoryDbContext(_optionsBuilder.Options))
    {
        //decouple the database from the service layer using the
        //dbRepo interface
        var dbRepo = new InventoryDatabaseRepo(db, _mapper);
        var svc = new ItemsService(dbRepo, _mapper);
        Console.WriteLine("List Inventory");
        var inventory = GetInventoryList(svc);
        inventory.ForEach(x => Console.WriteLine($"New Item: {x}"));
        Console.WriteLine("List inventory with Linq");
        var items = Task.Run(() => svc.GetItemsForListingLinq(minDate, maxDate)).Result;
        items.ForEach(x => Console.WriteLine($"ITEM| {x.CategoryName}| {x.Name} - {x.Description}"));
        Console.WriteLine("List Inventory from procedure");
        var procItems = Task.Run(() => svc.GetItemsForListingFromProcedure(minDate, maxDate)).Result;
        procItems.ForEach(x => Console.WriteLine($"ITEM| {x.Name} - {x.Description}"));
        Console.WriteLine("Item Names Pipe Delimited String");
        var pipedItems = Task.Run(() => svc.GetItemsPipeDelimitedString(true)).Result;
        Console.WriteLine(pipedItems.AllItems);
        Console.WriteLine("Get Items Total Values");
        var totalValues = Task.Run(() => svc.GetItemsTotalValues(true)).Result;
        totalValues.ForEach(item => Console.WriteLine($"New Item] {item.Id,-10}" + $"|{item.Name,-50}" + $"|{item.Quantity,-4}" + $"|{item.TotalValue,-5}"));
        Console.WriteLine("Get Items With Genres") ;
        var itemsWithGenres = Task.Run(() => svc.GetItemsWithGenres()).Result;
        itemsWithGenres.ForEach(item => Console.WriteLine($"New Item] {item.Id,-10}" + $"|{item.Name,-50}" + $"|{item.Genre?.ToString().PadLeft(4)}"));
        Console.WriteLine("List Categories And Colors");
        var categoriesAndColors = Task.Run(() => svc.ListCategoriesAndColors()).Result;
        categoriesAndColors.ForEach(c => Console.WriteLine($"{c.Category} | {c.CategoryColor.Color}"));
        _categories = categoriesAndColors;
        Console.WriteLine("Would you like to create items?");
        var createItems = Console.ReadLine().StartsWith("y", StringComparison.OrdinalIgnoreCase);
        if (createItems)
        {
            Console.WriteLine("Adding new Item(s)");
            CreateMultipleItems(svc);
            Console.WriteLine("Items added");
            inventory = GetInventoryList(svc);
            inventory.ForEach(x => Console.WriteLine($"Item: {x}"));
        }
        Console.WriteLine("Would you like to update items?");
        var updateItems = Console.ReadLine().StartsWith("y", StringComparison.OrdinalIgnoreCase);
        if (updateItems)
        {
            Console.WriteLine("Updating Item(s)");
            UpdateMultipleItems(svc);
            Console.WriteLine("Items updated");
            inventory = GetInventoryList(svc);
            inventory.ForEach(x => Console.WriteLine($"Item: {x}"));
        }
        Console.WriteLine("Would you like to delete items?");
        var deleteItems = Console.ReadLine().StartsWith("y", StringComparison.OrdinalIgnoreCase);
        if (deleteItems)
        {
            Console.WriteLine("Deleting Item(s)");
            DeleteMultipleItems(svc);
            Console.WriteLine("Items Deleted");
            inventory = GetInventoryList(svc);
            inventory.ForEach(x => Console.WriteLine($"Item: {x}"));
        }
        //Read only dapper
        var dbDapperRepo = new InventoryDatabaseDapperRepo(db.Database.GetDbConnection(), _mapper);
        var svc2 = new ItemsServiceReadOnly(dbDapperRepo, _mapper);
        Console.WriteLine("List Inventory from Dapper");
        var dapperInventory = Task.Run(() => svc2.ListInventory()).Result;
        dapperInventory.ForEach(x => Console.WriteLine($"New Item: {x}"));
        Console.WriteLine("List Categories And Colors From Dapper");
        var dapperCategoriesAndColors = Task.Run(() => svc2.ListCategoriesAndColors()).Result;
        dapperCategoriesAndColors.ForEach(c => Console.WriteLine($"{c.Category} | {c.CategoryColor.Color}"));
    }
    Console.WriteLine("Program Complete");
}
We also need to update the create and update methods. In each method, look for any calls to the service layer (svc.), and replace them with a Task.Run operation. After rework, the CreateMultipleItems method looks like what follows:
private static void CreateMultipleItems(IItemsService svc)
{
    Console.WriteLine("Would you like to create items as a batch?");
    bool batchCreate = Console.ReadLine().StartsWith("y", StringComparison.OrdinalIgnoreCase);
    var allItems = new List<CreateOrUpdateItemDto>();
    bool createAnother = true;
    while (createAnother == true)
    {
        var newItem = new CreateOrUpdateItemDto();
        Console.WriteLine("Creating a new item.");
        Console.WriteLine("Please enter the name");
        newItem.Name = Console.ReadLine();
        Console.WriteLine("Please enter the description");
        newItem.Description = Console.ReadLine();
        Console.WriteLine("Please enter the notes");
        newItem.Notes = Console.ReadLine();
        Console.WriteLine("Please enter the Category [B]ooks, [M]ovies, [G]ames");
        newItem.CategoryId = GetCategoryId(Console.ReadLine().Substring(0, 1).ToUpper());
        if (!batchCreate)
        {
            Task.Run(() => svc.InsertOrUpdateItem(newItem));
        }
        else
        {
            allItems.Add(newItem);
        }
        Console.WriteLine("Would you like to create another item?");
        createAnother = Console.ReadLine().StartsWith("y", StringComparison.OrdinalIgnoreCase);
        if (batchCreate && !createAnother)
        {
            Task.Run(() => svc.InsertOrUpdateItems(allItems));
        }
    }
}

In the update multiple items method, set the svc call for two lines of code to use the Task.Run(...) operation. First, find and set svc.InsertOrUpdateItem(updItem) to Task.Run(() => svc.InsertOrUpdateItem(updItem));. Then find and set the svc.InsertOrUpdateItems(allItems) method to Task.Run(() => svc.InsertOrUpdateItems(allItems));.

Note that a void method does not need to await the result. For clarity and brevity, review Figure 14-12 to see these two lines of code that need to be altered in the UpdateMultipleItems method.
../images/491632_1_En_14_Chapter/491632_1_En_14_Fig12_HTML.jpg
Figure 14-12

The Update Multiple Items method is reworked

Finally, fix up the DeleteMultipleItems by also fixing the two calls to the service layer in the code:
svc.DeleteItem(itemMatch.Id);
This becomes
Task.Run(() => svc.DeleteItem(itemMatch.Id));
Also
svc.DeleteItems(allItems);
becomes
Task.Run(() => svc.DeleteItems(allItems));
Use a find and replace operation to implement the code changes from the previous discussion. When completed, your code should look similar to what is shown in Figure 14-13.
../images/491632_1_En_14_Chapter/491632_1_En_14_Fig13_HTML.jpg
Figure 14-13

The Delete Multiple Items method is refactored

Build and run the program. Everything should work as expected now that we have fixed up the code. Figure 14-14 shows the program in action with asynchronous operations.

Remember, if you are having problems getting the program to run, don’t hesitate to just leverage the code in the final version of the files to see the completed version of these reworked method calls.

../images/491632_1_En_14_Chapter/491632_1_En_14_Fig14_HTML.jpg
Figure 14-14

The Program in action, now completely reworked for asynchronous database operations

This concludes the activity on asynchronous database operations.

Final thoughts on activity 1401

In this first activity for our chapter, we were able to work through getting the database operations into an asynchronous pattern. We started by changing out the lower-level database layer calls to leverage the context with async and await calls.

After working through each layer, we saw how easy it was to refactor the solution for asynchronous operations. In the end, our program remained as a synchronous method, and therefore we used the Task.Run(() => somecode).Result call to get the results of an asynchronous operation from a synchronous context.

In the next activity, we’ll see what it takes to work with multiple contexts and how having the power to work with asynchronous commands can really help a solution be more responsive.

Activity 1402: Multiple database contexts

In our second activity, we are going to leverage a shared database context for single-sign-on solutions to manage user identities. To simplify this operation, we’ll create a new web solution and integrate the inventory context into the solution.

The identity context

To handle the authentication and authorization in a .Net web application, the system allows for the solution to quickly generate all necessary role and user information in the IdentityContext.

If we were going to create a suite of applications, the ideal approach would be to generate out this identity context and place it in its own library which could then be easily leveraged in the console application and other solutions.

For purposes of brevity, I will leave that to you if you desire to do so.

Step 1: Get the files we created in Chapter 6

We created a new web application all the way back in Chapter 6. To complete this activity, we’ll be starting where we left off in that activity. In the event you didn’t complete those activities, you can just get the Activity1402_Multiple_Database_Contexts_Starter.zip files and extract them to use on your local development machine.

You may need to update the connection string in the appSettings.json file , as the default connection for the web app is just going to leverage the localdb. This simulates a situation where you have an application that connects to two different databases on two different servers.

Once up and running, make sure you can register users and log in to validate the fact that we have a prebuilt identity schema in place for managing user authentication and authorization.

Additionally, you’ll need to put a few categories into the category table. This will not be the same as our inventory system, so feel free to enter anything you want.

Since I’m creating the starter pack and activity 0601 was not a long activity, I’m just running with new files. You could do the same if you so desired.

Finally, in the event you wanted to just set a few categories and ensure your users, please use the following script on your localdb or other connections after you have the website up and running and you have registered a user:
--validate your username
SELECT * from AspNetUsers
--if you can't login, run this with your username
UPDATE AspNetUsers
SET EmailConfirmed = 1
WHERE Id = (
    SELECT [Id]
    FROM [dbo].[AspNetUsers]
    WHERE UserName = '[email protected]' --put your username here
)
--if you want to quickly add categories:
/*WARNING: running more than once will create duplicates */
INSERT INTO Categories ([Name])
VALUES ('Books')
INSERT INTO Categories ([Name])
VALUES ('Movies')
INSERT INTO Categories ([Name])
VALUES ('Games')
select * from categories

A copy of this script is also available in the Resources folder in the starter pack files.

Step 2: Bring the inventory libraries into the project

Once you’ve validated that the project works as expected, bring the libraries for the InventoryDbContext into the solution (copy the project folders from your activity 1401; the starter pack has them in the folder, they are just not referenced). For this minimal implementation, we don’t need the InventoryHelpers or the InventoryDatabaseMigrator project. They are available in the starter pack if you do want to add them at a later point. Add the projects by right-clicking the solution and selecting “Add Existing Project” and then selecting the project file for each of the projects listed here (at minimum):
InventoryBusinessLayer
InventoryDatabaseCore
InventoryDatabaseLayer
InventoryManagerIntegrationTests
InventoryManagerUnitTests
InventoryModels
For clarity, review Figure 14-15 to see the projects in the solution.
../images/491632_1_En_14_Chapter/491632_1_En_14_Fig15_HTML.jpg
Figure 14-15

Importing existing projects

Once the projects are in place, add a reference to the InventoryBusinessLayer in the main project. All other references will be added via the dependency chain in the projects (see Figure 14-16 for clarity).
../images/491632_1_En_14_Chapter/491632_1_En_14_Fig16_HTML.jpg
Figure 14-16

Adding references to the InventoryBusinessLayer project

Grab the connection string for the InventoryManagerDb out of the InventoryDatabaseCore appsettings.json file, and put the connection string into the web project’s appsettings.json file , which should be something like this:
{
  "ConnectionStrings": {
    "DefaultConnection": "Server=(localdb)\mssqllocaldb;Database=aspnet-Activity1402_MultipleDatabaseContexts-B0C284AA-03F8-4103-86A4-D55D9116B10F;Trusted_Connection=True;MultipleActiveResultSets=true",
    "InventoryManager": "Data Source=localhost;Initial Catalog=InventoryManager;Trusted_Connection=True;Column Encryption Setting=Enabled;",
  },
  "Logging": {
    ...
  },
  ...
}

The important thing to note is to not forget that you may need to update that connection string to point to the correct local database instance, whether it’s in SQLExpress or SQLDeveloper edition.

Build the solution and run it. There shouldn’t be any issues. If for some reason you get an issue, you may just need to make sure all of your NuGet packages are updated to the latest versions.

Step 3: Add the context to the injection for the web application

With the InventoryManager libraries ready to go, it’s time to inject the context into the project so that we can use it in our web solution.

Locate the Startup.cs file in the web application. Notice the ConfigureServices method. This is where the context injection will be added. Note that there is already a statement to add the DBContext for the ApplicationDbContext – the default context that contains identity.

We need to add another AddDbContext statement, and we need to leverage the connection string that we copied in the previous step.

Copy the lines for services.AddDbContext<....."DefaultConnection")));

Paste them immediately after the first three original lines, and change the context to the InventoryDbContext and the connection string to match whatever you named your connection string in the appsettings.json file for the web project (i.e., InventoryManager). The new version of the method should be as follows:
public void ConfigureServices(IServiceCollection services)
{
    services.AddDbContext<ApplicationDbContext>(options =>
        options.UseSqlServer(
            Configuration.GetConnectionString("DefaultConnection")));
    services.AddDbContext<InventoryDbContext>(options =>
        options.UseSqlServer(
            Configuration.GetConnectionString("InventoryManager")));
    services.AddDefaultIdentity<IdentityUser>(options => options.SignIn.RequireConfirmedAccount = true)
        .AddEntityFrameworkStores<ApplicationDbContext>();
    services.AddControllersWithViews();
    services.AddRazorPages();
}
For clarity, the code from the ConfigureServices method is shown in Figure 14-17.
../images/491632_1_En_14_Chapter/491632_1_En_14_Fig17_HTML.jpg
Figure 14-17

Injecting the InventoryDBContext into the solution

Note that there is no reason we must use a different database.  As long as the two contexts do not conflict with one another, you can put them both into the same database.

Run the solution to make sure there are no issues. Everything should still work as before.

Step 4: Generate Inventory controllers and views for Items

Now that we’ve brought our InventoryDBContext into the solution, let’s generate some CRUD operations around the Inventory items in the web solution.

Right-click the Controllers folder and select Add ➤ Controller (see Figure 14-18).
../images/491632_1_En_14_Chapter/491632_1_En_14_Fig18_HTML.jpg
Figure 14-18

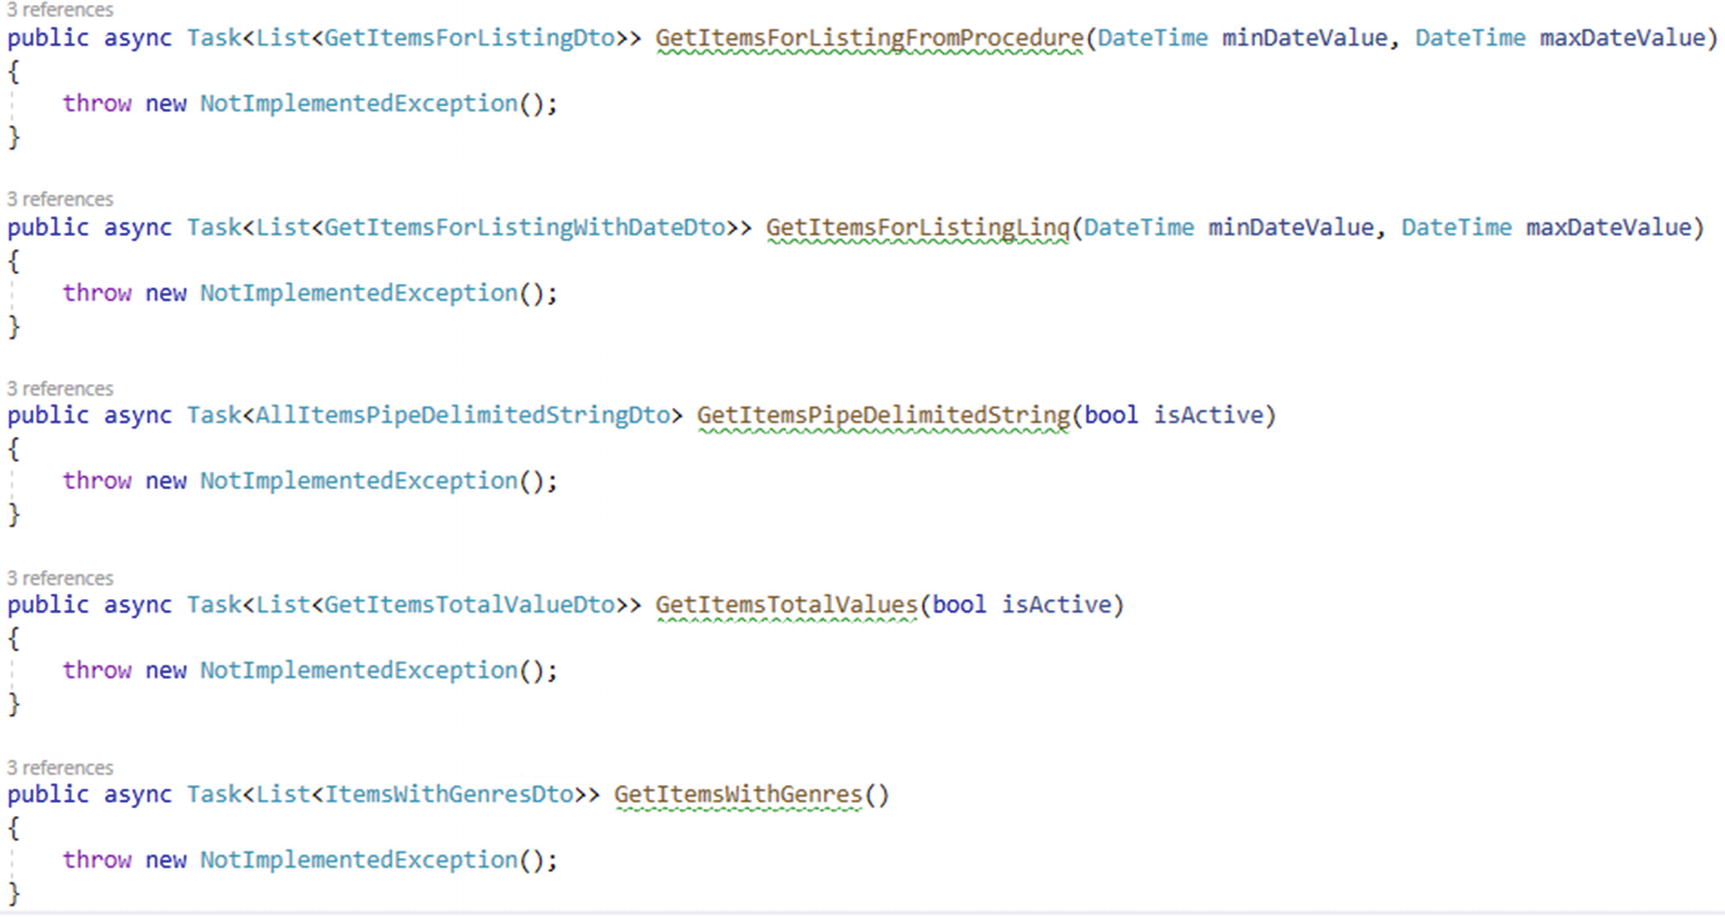
Adding a new controller

Select MVC Controller with views, using Entity Framework, and then hit Add (review Figure 14-19).
../images/491632_1_En_14_Chapter/491632_1_En_14_Fig19_HTML.jpg
Figure 14-19

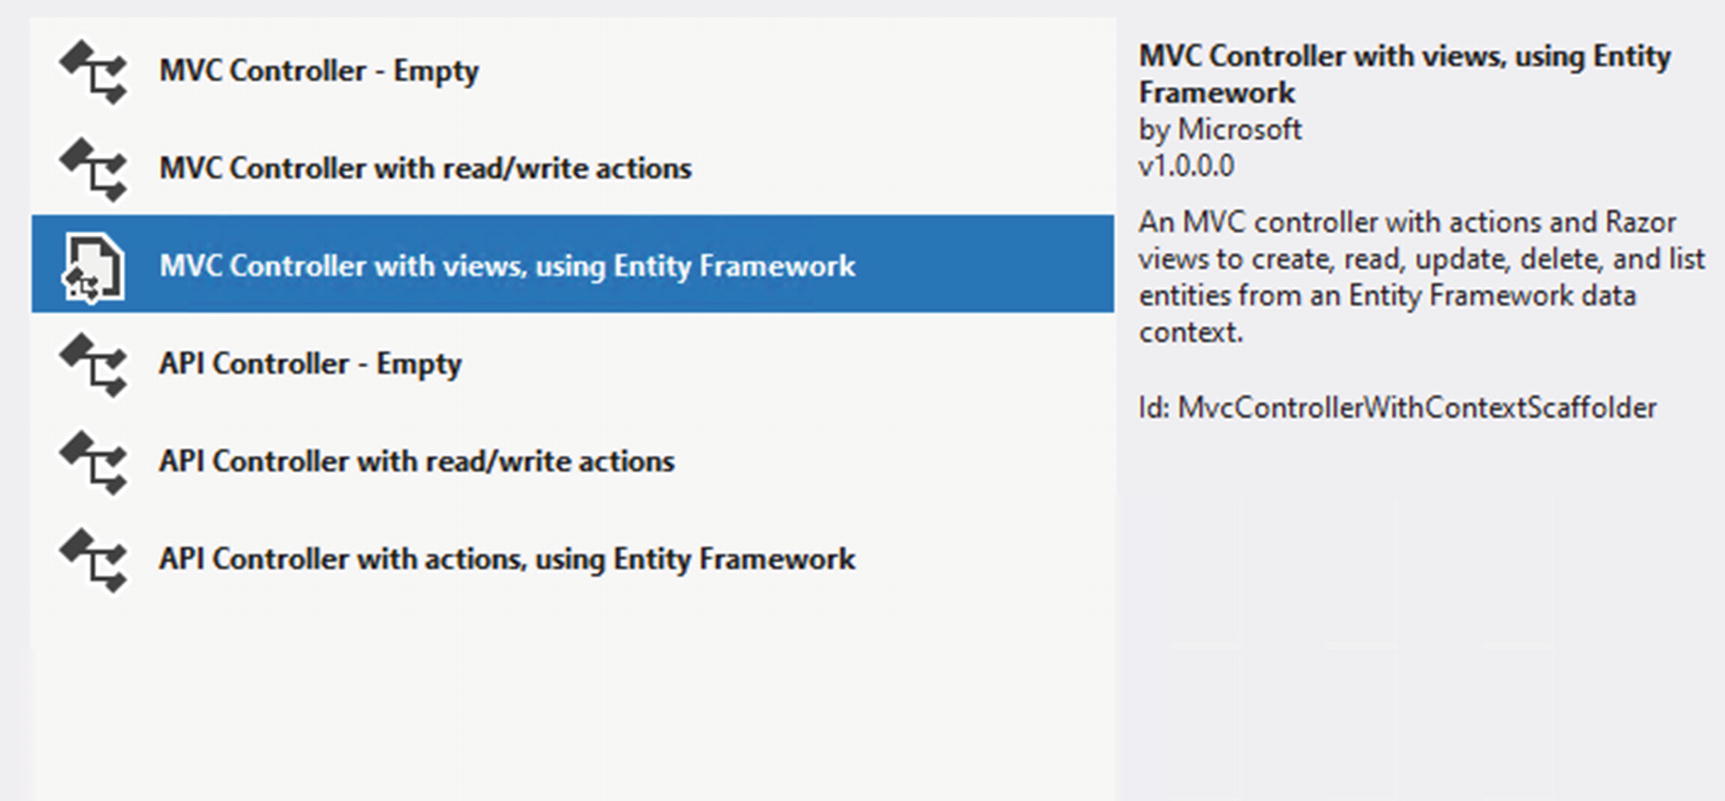
Use the views and Entity Framework

Next, change the context to the InventoryDbContext and select the Item model from InventoryModels. Note that the controller will be Items1Controller. Change that default name to InventoryItemsController. Figure 14-20 shows what the form should look like before hitting “Add” to scaffold the views.
../images/491632_1_En_14_Chapter/491632_1_En_14_Fig20_HTML.jpg
Figure 14-20

Setting up the scaffolding operation for Inventory Items

Add the controller and let the scaffolded views be created by default.

Our inventory context is leveraged, but not our service and database layer that we’ve tested. By default, the solution is putting direction operations against the DBContext into the controller.

Let’s run it to validate that things are working the way we would expect. Run the project and navigate to https://localhost:<yourport>/InventoryItems.

You should see whatever was in your inventory listed in the table (output should be similar to Figure 14-21).
../images/491632_1_En_14_Chapter/491632_1_En_14_Fig21_HTML.jpg
Figure 14-21

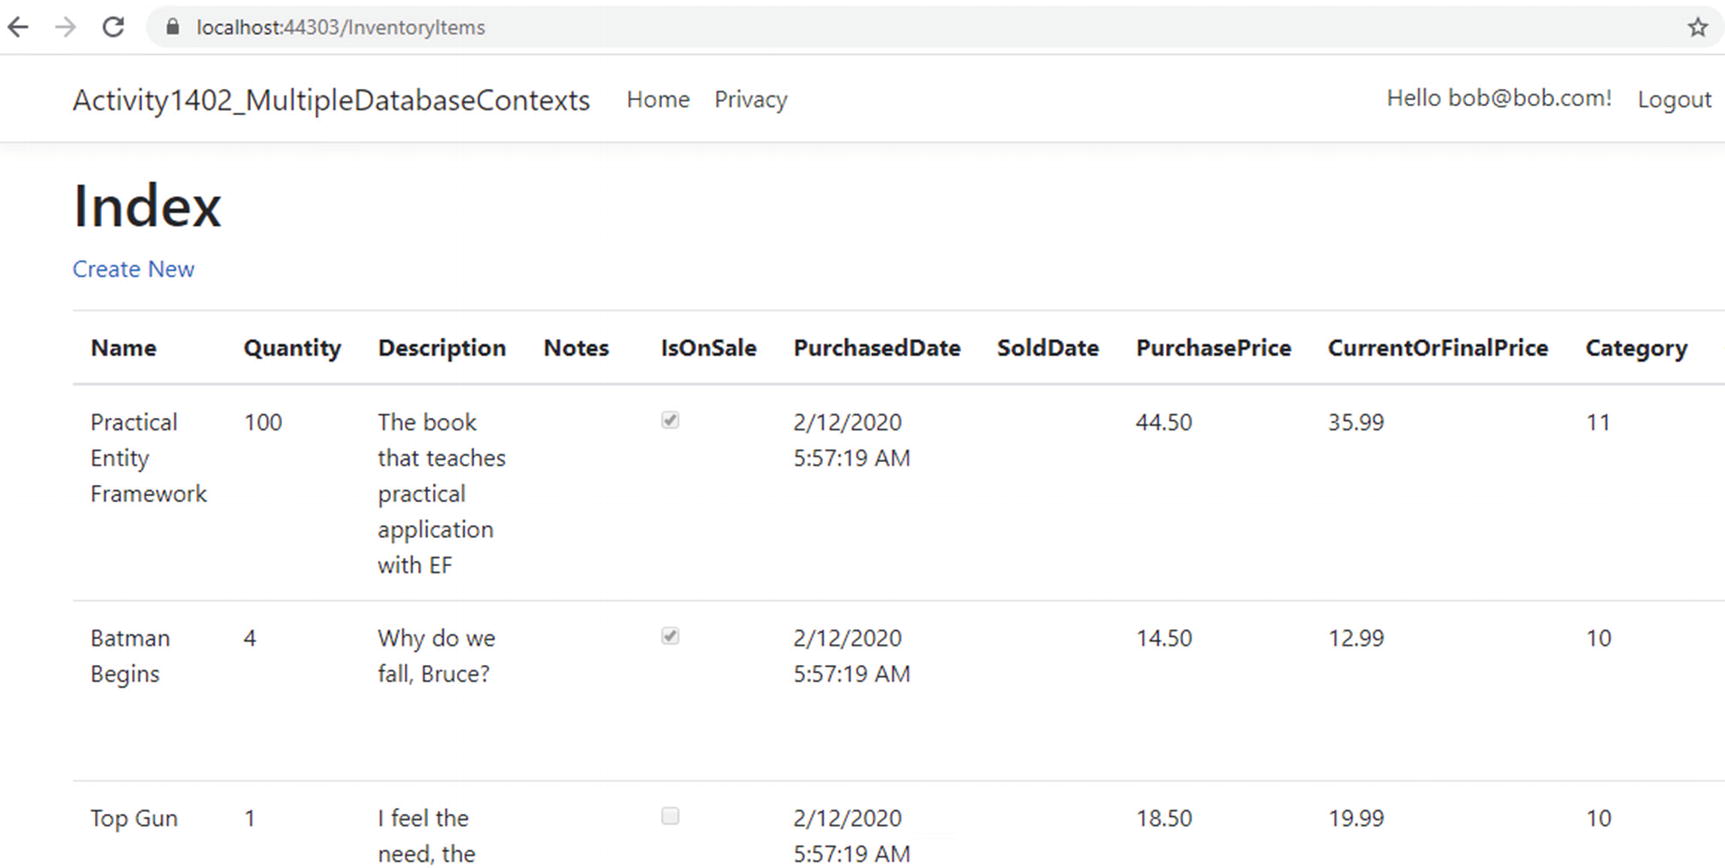
The inventory Items context is wired up as expected

Make sure you can also view, create, edit, and delete items.

This is not a book on web development.  Therefore, we aren’t going to spend any time making the web page nicer at this point.  Clearly, this page is not production-ready.

A couple of final thoughts. We directly leveraged the context and injected it. To make this solution work more like a production system, it would be a good idea to set up AutoMapper and instantiate it at the services level (like we did for the context, similar to how we set everything up in the console app). Then, in the InventoryItems Controller, instantiate an ItemsService object, and only use that object to get data.

After refactoring to set the ItemsService in the controller, also refactor the views to use the DTO objects instead of the full-blown models.

Finally, you’d want to make sure that your drop-down list shows the CategoryName, not the Id so that the user could know which category they are selecting.

The amount of work it would take to do this is outside of the scope of this activity, but is a worthy endeavor to continue your learning.

Step 5: Add a new model to the web application context, add the migration, and update the database

With everything in place, let’s see what it takes to add a new model and migration to our solution. To make sure that we just do this easily, let’s add a new model to the web application’s ApplicationDbContext. As this is a contrived example, let’s just add a class file to create a Model for States in the activity 1402 ➤ Models folder. In the State class, have an Id, a Name, and an Abbreviation.
public class State
{
    public int Id { get; set; }
    public string Name { get; set; }
    public string Abbreviation { get; set; }
}

With the new State model added to the solution, add the State model to the ApplicationDBContext so it can be leveraged in code. Add the line public DbSet<State> States { get; set; } to the ApplicationDbContext. You can add the code anywhere in the class, but I generally stack my properties and then do the constructors and then other methods. For this instance, I put the States DbSet property after the Categories property and before the Constructor.

Now try to add the migration using our expected add-migration command in the PMC (make sure that the drop-down for the default project is pointing to the main activity project that contains the ApplicationDbContext file):
add-migration CreatedStatesTable
Even though the contexts are in different projects, EF still needs us to explicitly name the context to run the migration against. The error we get in this situation is shown in Figure 14-22.
../images/491632_1_En_14_Chapter/491632_1_En_14_Fig22_HTML.jpg
Figure 14-22

Can’t add a migration when there are multiple contexts

Trying to run the migration in this situation generates an error due to having multiple contexts in the solution. To remedy that, the suggestion is to use the -Context flag . In EF6, we leveraged the -ConfigurationTypeName flag.

One other important note here.  When using multiple database contexts, you should make sure they are in different namespaces, and then when you reference them, use the fully qualified name, including the namespace.  This will ensure the correct migrations are associated with the correct contexts.

Add the -Context flag with the namespace and context name to the add-migration command :
add-migration CreatedStatesTable -Context Activity1402_MultipleDatabaseContexts.Data.ApplicationDbContext

When the command add-migration <name> -Context <NameSpace>.<ClassName> is used, the migration generates as expected.

Now we just need to run update-database, right? You probably guessed by now that just running update-database will have the same problem as add-migration. Instead, run the command update-database -Context Activity1402_MultipleDatabaseContexts.Data.ApplicationDbContext.

If we wanted, we could generate the controller and views for the State model to see that it works as expected in the database. Additionally, we could go on to add more entities to the InventoryManager system . In that case, the database for the InventoryManager would reflect the migrations.

When running the update-database command, it is not as important to fully qualify with the namespace, because the program is not generating anything but is executing.  In the preceding command, we could have simply run the command update-database -context ApplicationDbContext.

In the rare instance that you are using multiple contexts against the same database, just remember that you can’t have conflicts in naming between the two contexts. Once one of them has a model that is leveraged, named States, for example, the other one would not be able to add it since they both exist in the same database. However, when multiple databases are used in conjunction with contexts, then the model names do not need to be unique and can be reused, such as Item was reused in both of our contexts for this activity.

Final thoughts on activity 1402

In this second activity for our chapter, we were able to see what it would take to leverage multiple database contexts in the same solution.

The main takeaway is that it is possible, and this opens the door for sharing data across solutions, such as sharing the user identity management portion of a suite of solutions within one database context that can be shared.

Additionally, using multiple contexts opens the door to both sharing the same database and having separate implementations, perhaps even across vendors. There is nothing stopping us from having one context connecting to SQL Server and another to Oracle.

The real difference in the way we have to work when using multiple contexts is that we have to remember to explicitly name the context in the PMC as we run commands. The command in .Net Core is simple: -Context. The command in EF6 was a bit less intuitive and was named -ConfigurationTypeName .

In general, working with multiple contexts should be discouraged, but it is not impossible. There is added complexity that comes into play with multiple contexts. However, there are definite benefits in clear boundaries between things like users and application data, as well as potential segregation of business units.

Final thoughts for this chapter

In this chapter, we’ve covered a couple of very critical aspects of working with Entity Framework in our applications.

Perhaps we should have talked about asynchronous operations earlier in the book, perhaps not. Even so, using asynchronous operations will likely be the normal solution that you encounter in your day-to-day work. The benefits of leveraging multithreading without having to wire up and manage the underlying code are extremely useful.

Having our database operations working in an async/await pattern allows us to write our solutions in a more responsive manner. By using async and await, we can still write our code in a synchronous manner and not have to worry about concurrency or race conditions.

We also talked about another common issue when we discussed using multiple contexts. In most cases, as mentioned previously, I would recommend staying away from multiple contexts. That being said, it is still entirely possible for us to use this approach and beneficial in certain situations.

In our second activity for the chapter, we were able to leverage multiple contexts to prove that an application can use both an identity context that is shared among solutions and other database contexts as well. By having all of this in place, we can make a suite of applications that can easily share data. We can also segregate certain parts of our exposed surface so that users only get the access they need to specific pieces of data.

In the next and final chapter of our book, we’ll discuss the changes that are coming with .Net 5 and likely are in place by the time you are reading this book. As EF has continued to evolve, our lives have gotten substantially better. The latest version of the .Net Framework/.Net Core architecture is a recombination of each platform into one platform to rule them all - .Net 5.

..................Content has been hidden....................

You can't read the all page of ebook, please click here login for view all page.
Reset
18.117.182.179