
One of the things that makes wearable tech difficult is that it brings together many skill sets. People may come into it from sewing, from electronics, or perhaps from writing computer code. If you come into it from the virtual world (3D modeling or programming), one of the big surprises is that physical things always take up more room than expected. Figuring out where to hide (or how best to display) circuitry, how to avoid shorting out those circuits, and how to deal with all the inconvenient things that happen if someone is wearing the piece take a lot of forethought.
Lyn has more than 30 years of experience in dance and theater as a teacher and a performer, as well as her costuming experience. She will be the primary voice in this chapter, but Joan will bring some of what she will call “system engineering” along to the story, and Rich will chime in on some of the technical problems that can be avoided.
We start the chapter with a case study (well, a cautionary tale, really) of our first large collective project. As we discovered, it was far too ambitious. Then we deconstruct our experience there, and create a laundry list of things that you should think about in the planning stages of your projects. We give an assortment of tips that we have come across, and finally end with some philosophy about making your design easy to test and maintain.
In Chapter 11, we move on to walking through a few examples and case studies of wearable tech projects. In this chapter (after our tale of ambition), for the most part we focus on dealing with component-level decisions that affect the entire project.
If you are a teacher using this book as a text for a class, this chapter is intended primarily for teachers defining projects. These are big-picture design issues that you may not want to go over in detail with students. We want to give you ideas about what to try and avoid in your guidelines for student projects—this is in part a chapter about what not to do. We start off with Lyn’s point of view as a costume class teacher incorporating wearable tech ideas for the first time.
The Too-Ambitious First Project
My first foray into wearable tech was exciting—and terrifying. I had almost none of the knowledge required to solder wires, write code for microcontrollers, or work with the many components available to create these pieces. But I had been making and altering costumes for many years, so I was pretty confident I could figure some stuff out. I was fortunate enough to have two wonderful and supportive mentors in Joan and Rich.
It surprised me how simple some things were and how incredibly challenging others were. It changed my way of thinking by expanding the areas I felt competent in—or at least felt able to learn and develop new skills. As I was working through some of the Arduino tutorials, I began to understand what some of the code was saying and why. It was shocking and enlightening for me.
Making mistakes, large and small, is a good way to learn what works and what doesn’t. It can even spark a new creative idea and/or solution. I have made some silly mistakes and some horrible ones (like the wiring in Figure 10-1), but hey, live and learn.
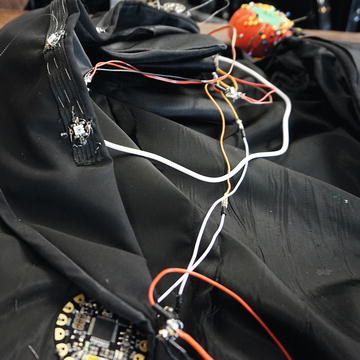
Figure 10-1. Unplanned wiring gets out of hand
The first project I am going to describe here came out of a costuming class brainstorming session. The students were supposed to incorporate wearable tech into a steampunk-style piece of some kind. (Steampunk is a science-fiction genre in which the general premise is that the world somehow comes back to Victorian England and has a mix of eras of technology, but has steam-powered mechanisms and only lighter-than-air flight). The first project the class converged on was a steampunk “haunted dress” that would have a mind of its own.
In the end, it wound up spilling over way beyond the end of the school year and became my personal summer project and self-tutorial on wearable tech. We knew we were going to present it at an educational maker technology conference at the end of that summer, which gave us a deadline to aim for. It helped me prepare for my first full-year costuming and wearable tech class, but it was certainly a baptism by fire that consumed a lot of my summer. Tackling a complex project does force you to learn all the aspects at once and quickly.
The Haunted Dress—the Original Idea
The “Haunted Dress” was intended to be a dress that would be a little performance piece. I wanted to evoke a dress coming to life around a surprised wearer. The sequence would start when the wearer made a gesture to start up the dress. Then, lights would flash down the front of the dress (to evoke lightning). Next, fans would kick in under the skirt to blow it around. Then as the wearer looked down at the skirt, the sleeves would begin to pull up on their own.
The dress was designed as a steampunk/Victorian long chiffon skirt with a bustle overskirt of taffeta and a taffeta short jacket with chiffon sleeves. Figure 10-2 shows the dress in early development. (Our first mistake was that we assembled most of it before putting on the electronics.) Figure 10-3 shows the completed dress, and Figure 10-4 is a closeup of the top as the servos on the shoulders were being added.
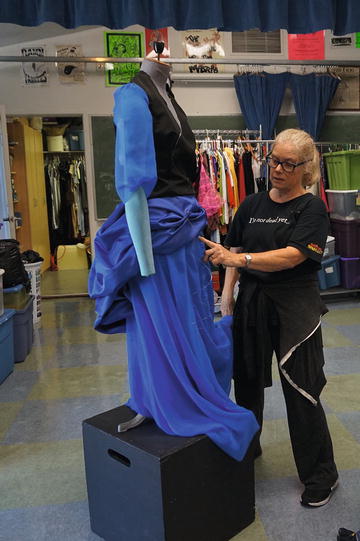
Figure 10-2. (left) The dress in early construction

Figure 10-3. (right) The finished dress

Figure 10-4. The dress jacket showing NeoPixels, Flora, and some of the servo/fishing line attachments
The sketch in Figure 10-5 lays out the key parts of the jacket, which supported most of the electronics. I decided to use a Flora(see Chapter 5 for more on the Flora hardware and Chapter 6 for software) as the dress microcontroller and NeoPixel multi-color LEDs for the lightning effect. Small fans were mounted under the skirt to blow it around, and a mechanism with servos (see Chapter 8) and string pulled up the sleeves. (I decided that pulling them up was not too hard, but dropping them back down again would be too difficult.) The bustle would be a good place to hide batteries and anything else large, and shoulder pads would hide the mechanisms for the sleeves. I was all set—or so I thought.
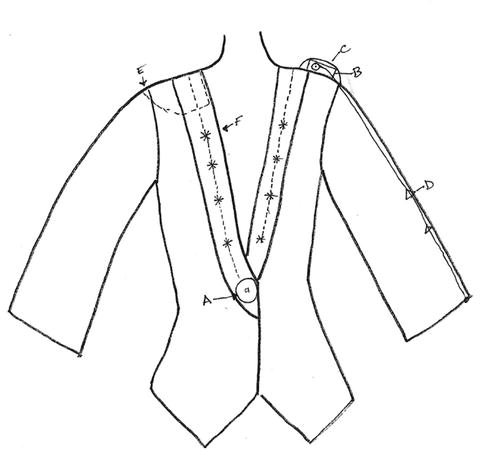
Figure 10-5. Sketch of the jacket of the Haunted Dress, showing the Flora (A), servo (B), and elastic strap that holds the servo on top of the shoulder (C). Inside the jacket is shoulder pad (E, shown on other shoulder for clarity). Fishing line to pull up the sleeves is spooled on a bobbin glued to the servo and pulled through triangular guides (D).
There are shoulder pads in the jacket, which hold lipstick batteries to power the servos. A sewing bobbin is glued to the top of the servo and is wound with enough nylon fishing line to reach the end of the sleeve, plus a bit more. Two small triangle-shaped loops are sewn onto approximately three inches of bias tape. The bias tape is sewn to the inside of the chiffon sleeve, and the triangles create a channel for the nylon line, which is knotted and hand-sewn to the edge of the sleeve.
The Flora board is hand-sewn to the front of the jacket, where a button would go, with hook and loop tape on the inside to fasten the jacket. The NeoPixels are hand-sewn onto the lapel, and conductive thread is used to connect them to the Flora. Conductive thread is also used to attach the wires from the servos and lipstick batteries to the Flora. The wires run from the shoulder pads inside of the jacket.
Mistakes
My biggest mistake on the Haunted Dress was making the skirts and jacket before I fully understood all the other aspects of the project. As an advanced seamstress, I am used to diving in and adapting projects a bit as I go along, but these projects take a lot of up-front planning.
For example, I did not allow for a clean wire run from the servos to the Flora. Consequently, the finished product was quite sloppy, and I even dripped hot solder onto the chiffon skirt. Not a very pretty look!
I also had to take the taffeta bustle apart in several places to create the pocket for the LiPo battery and have it in the best place to allow for movement. In hindsight, I would have created channels for the wiring inside the jacket out of lightweight cotton or lining fabric for a more finished look and a more comfortable feel while wearing it.
Tip
I wish I had made a muslin version of the overskirt to figure out where the other elements should live before using the expensive (and fragile) taffeta. Lightweight, inexpensive cotton muslin is a great fabric to use for creating a prototype of a garment, figuring out the best route for wires, and discovering the best locations for the other components. It allows for mistakes on an inexpensive fabric before cutting and sewing the final version, which may be a more expensive fabric. It is often used by designers to create the first mockup of a piece, which is why a mockup is often called a “muslin.” Those from the electronics world might think of it as the equivalent of putting together a breadboard or alligator-clip version of a circuit before you create a permanent, soldered one.
Flora and NeoPixel Placement
I used conductive thread to sew four NeoPixels on each side of the lapel. The thread ran from the board to the first NeoPixel and then to each of the others in turn. It ran up the right side, around the back of the neck, and down the left side of the lapel, as shown in Figure 10-5.
It was a long run, so I had to make sure the thread was tight enough to make a connection, but not tight enough to pull the lapel out of shape. It took some experimentation to get it right.
In a first iteration, the jacket had NeoPixels sewn onto conductive ribbon, which was sewn around the lapel. The conductive ribbon was attached to the points on the Flora with conductive thread. I did not connect the ribbon to the NeoPixels and Flora correctly, so only some of them worked. I then took the ribbon off the lapel, sewed the NeoPixels on individually, and connected them to the Flora and each other with conductive thread. This worked better.
Caution
Using conductive ribbon (Chapter 5) can be a time saver, but make sure to connect the proper wires in the ribbon with conductive thread to your components. My first attempt at attaching NeoPixels to conductive ribbon was pretty clumsy and time-consuming. I was making a long run around the lapel of the jacket for the Haunted Dress. The NeoPixels ran up the right side of the lapel. After a gap around the back of the collar, they then ran down the left side of the lapel. NeoPixels (Chapter 5) are directional, so for signal to come out of one and into the next, you need to make sure to cut the middle two sections of the ribbon so that the signal in and out paths are maintained from NeoPixel to NeoPixel. I attached them to each other along the ribbon, following the arrows and using conductive thread to attach them to the Flora board. When I tried to light them up, only the right side worked. Arrrgh! That was because I had sewn the last NeoPixel on the left side in the in the wrong direction! It was easy to solve, but quite frustrating for a while until we figured out my mistake.
The Magical Sleeve
I used fishing line, spooled up on a sewing-machine bobbin, to automatically draw up the jacket sleeves. I ran the line down the sleeve through small triangle-shaped rings and attached it at the edge of the sleeve. I used continuous rotation servo motors, with a sewing-machine bobbin glued to the top to reel in the fishing line. The servos were a bit heavy to balance there, so I attached a sturdy piece of black elastic on the outside of the jacket shoulders to hold the servos in place. This also allowed for movement of the bobbin, and for easy removal if needed (Figure 10-6).
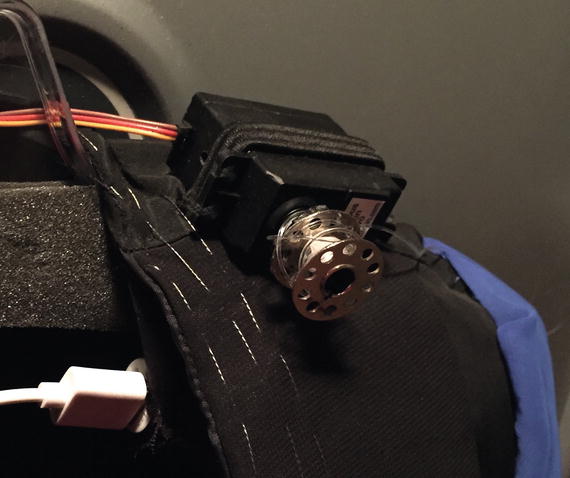
Figure 10-6. Servo attached to the jacket
I used two small triangle-shaped loops sewn to a 3” piece of bias tape and attached along the sleeve as a channel for the fishing line. By knotting the end of the line and using clear nail polish on the knot, I was able to hand sew the line to the edge of the sleeve. I also attached a decorative piece of an old necklace at the end of each sleeve to add weight to the sleeve and help bring the sleeve back into place after the servo had drawn it up (Figure 10-7).

Figure 10-7. The sleeve mechanism and servo
The lipstick batteries to drive the servos were hidden in pockets in the shoulder pads (you can see the white USB cable going into the battery in Figure 10-6) and the USB plugs were soldered to wire from the servos. The servos were also wired to the Flora board.
Integrating Heavy Components in a Chiffon Sleeve
USB cables have an A side (the side that normally plugs into a computer) and a B side (the connector that in our case would normally be plugged into the Flora, Gemma, or other board). The batteries needed a USB connector, so Rich jumped in and stripped the B side of the cables and then soldered it to wires running to the servos. Normally you would not do this; see Chapter 8 for the more typical case. Rich and I used this approach here because we needed to deliver a lot of power to the servos and wanted to give them their own power source to ensure that they would not cause the microcontroller to brown-out. We ran wire down the inside of the jacket from the battery to the servo. We used conductive thread to stitch the wires in place and connect the servos and the Flora to signal and ground connections, as you can see in Figures 10-6 and 10-7.
For the Haunted Dress, I wanted to hide the lipstick batteries in the shoulder pads. Shoulder pads are usually made from cotton batting or foam and covered with a lightweight fabric. I made a cover for the pads from black taffeta to match the bodice of the jacket. Leaving a small opening in the taffeta, I was able to hand stitch the pouches that had come with the batteries inside the shoulder pad covers (Figure 10-8).
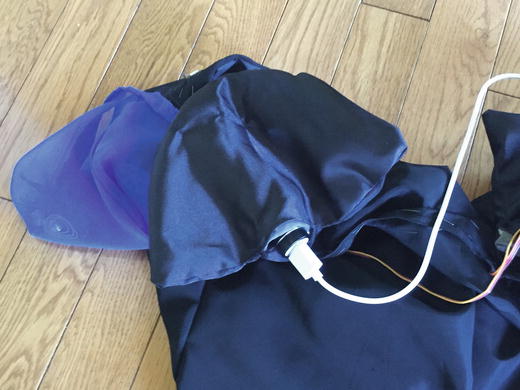
Figure 10-8. The shoulder pads used to contain the lipstick battery
I attached the shoulder pads inside the shoulders of the jacket by tacking them down in two places on the shoulder seam. Tacking means to take a few stitches in the same spot to hold things in place.
The Billowing Skirt
The three of us wanted the chiffon skirt to billow as if a draft of wind were blowing by. We chose to use two small radial blower fans, and they needed a place to live that would allow them to move the chiffon from inside the skirt while staying away from the person wearing it. I made a small pocket for each one and attached them to the underside of the chiffon (Figures 10-9 and 10-10).
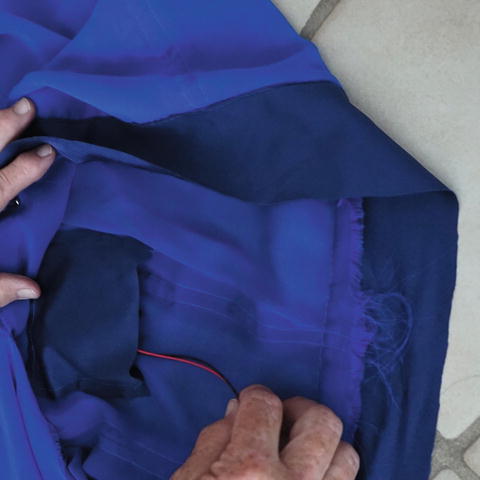
Figure 10-9. The pocket for the fans

Figure 10-10. The fan being slipped out of its pocket
I used two layers of chiffon, one navy blue and one a brighter blue, to make the skirt a bit more opaque (see the pictures of the dress in Figures 10-2 and 10-3). This was also intended to minimize blockage of the fans’ intakes. The wires from the fans were soldered to connectors and attached to a battery. The other wires were soldered to the Flora board. The wires ran between the skirt and the overskirt. I made another pocket inside the front of the overskirt for the battery, which also powered the Flora.
Software
By browsing many tutorials from Arduino.cc and Adafruit.com, I learned a teeny bit about coding (Chapter 6) and was able to program the Flora to control the NeoPixels. The servos (Chapter 8) and fans were more sophisticated, and Rich and Joan stepped in to coach and debug. I have learned more about coding since that first attempt, but still have a lot more to learn.
How It Turned Out
As with many grand ideas, the project did not entirely work out as planned. The original design used an accelerometer to detect a grand gesture that would start and reset all of the components, but unfortunately we ran out of time to implement this. We lowered our expectations to having the wearer push the reset button on the Flora. In the end we wound up just showing the dress as a demonstration on a dress form (as you can see in Figures 10-2 and 10-3), so this was less of an issue than it would have been in the original theatrical concept.
The fans did not provide enough wind to billow the skirt from inside their pockets, so we removed them before the final presentation. In hindsight, we should have run a few tests with more fabric, rather than a brief test with one layer of the cloth.
The servo on the left shoulder only wanted to work about half of the time because of some electrical issue that popped up at the last minute, and we did not have time to debug it. But the right-side servo and the NeoPixels were terrific.
Note
We have not provided the Flora sketch for the dress in this book because the project was never quite completed or debugged. We have referenced (simpler!) NeoPixel and servo examples in Chapters 6 and 8, respectively. We provided this example to show the pluses and minuses of trying something “too hard” the first time out, and as a bit of a cautionary tale.
In the rest of this chapter we will revisit the decisions we made in this project, plus talk about a lot of other “system design” issues that did not come up in this project but that you will encounter.
What We Learned
The first thing we took away from this experience is that it is essential to make a sort of map of your garment before beginning—at a minimum, create a butcher paper pattern and sketch out what goes where. (We say garment in this chapter, though you may be making anything from a stuffed toy penguin to a hat to an evening gown.) This pattern will allow you to figure out where to hide components, determine the path to run the wires, and make the most effective and efficient connections. It is a way to eliminate some of the mistakes before you put the piece together.
Tip
To lay out a simple sewable circuit, you can use the Fritzing software package (Chapter 5) to create a full-scale drawing of the circuit layout. You can then either hold the drawing next to what you are sewing or use it as a guide to draw with tailor’s chalk on the garment.
Creating some sort of minimalist model will allow you to make mistakes, correct them, and discover the best places to hide batteries and the most efficient and comfortable paths for running wires before you create the final project. I did not do this for the dress project, and consequently had to redo many of my first attempts.
Tip
When you sew together your circuit, you might want to sew some of the conductive thread runs or lay wire inside the garment, which means you may be using the pattern in the mirror image of the way you drew it. It is very easy to sew parts of the circuit backward that way, so be sure you are projecting the pattern onto the fabric maintaining things the right way round, where that matters (like signal and power into a NeoPixel - Chapter 5).
Materials Considerations
Next, we realized that the type of fabric and notions will help make your project successful (or not). For the Haunted Dress, I used chiffon and taffeta—in retrospect, not the best fabric choices. Chiffon can be difficult to sew because it is a fine fabric and frays easily, and taffeta is a stiff fabric that shows every stitch you have to take out as a visible hole. It also frays easily. I had to alter the circuit several times, which caused fraying on the chiffon and visible holes from removed seams on the taffeta. I learned a lot, but would have had a better end product if I had created a muslin prototype first, as noted earlier.
Good fabrics to use include lightweight cotton (particularly for beginners) or t-shirt fabric (a bit harder, since it is stretchy). It depends a bit on what you are making, of course. Nylon or any kind of poly-cotton-rayon mix is good. Avoid very stretchy materials because they can be challenging for a beginner to sew.
Hook and loop fastener tape (that is, Velcro) is sewable and will not cause shorts in your circuits. Snaps are easy to use, but make sure they don’t interfere with any conductive thread, fabric, or soldered bits. Creating channels for wire runs out of lining fabric or lightweight cotton is a good idea, but they should open up easily to allow for access if there is a problem or short circuit. If you line the garment, you can attach the channel to the lining so it is not visible from the outside, or hand stitch the channel fabric in strategic places like seams or hems. A hot glue gun is handy for insulating any soldered joints. Just a drop will help protect the connection.
Tip
A pin or magnetic closure hand sewn onto fabric or glued onto the back of a 3D-printed object makes a great fashion accessory. You can add servos for movement or NeoPixels to make it light up. Voila!
Hiding and Supporting Batteries and Mechanisms
Belts, shoulder pads, epaulettes, bustles, pockets, and facings are handy ways to hide batteries, connectors, switches, controllers, and other parts you do not want visible. You can also incorporate these into your design with appliques or embroidery, or let them appear just as they are if they are interesting and/or you like the look.
Caution
It is important to remember to create a secure and protected place for the batteries and controllers that also allows for easy access for recharging and/or replacing. See the discussions of battery issues in Chapter 5.
The sidebar about the chiffon sleeves described how we supported batteries in shoulder pads. These batteries are a bit heavy, so putting them in the shoulders helped to give them some support.
Tip
If something has to actually move, it will probably take a fair amount of power, which may mean hiding a lot of mechanisms and batteries. You may be able to avoid having a costume part move with clever attachments to another body part (like something attached to a shoe that moves as the person walks). In some cases, this might be simpler than trying to be high tech.
Conductive Thread, Wires, and Cables
Conductive thread is a little harder to work with than regular sewing thread because it is stiffer and thicker. It is made from wire, after all. It likes to kink up and twist itself around, so use a fairly short length when you sew. Use just enough to complete each run separately and then rethread your needle. It requires patience and attention to each stitch, but you will get the hang of it fairly quickly.
The stitches need to be tight enough to create a secure connection without distorting the fabric and/or garment. The stitches you make with conductive thread can be longer than you might make with regular sewing thread, but they should not be too long or they will become too loose for an adequate connection.
As you are sewing a run of conductive thread, keep checking the previous stitches, making them taut without pulling the fabric out of shape. After you have finished the project and it is working, move the areas with conductive thread a bit to make sure the connection is strong enough to allow for the movement. If it works intermittently with the movement, you may need to pull some of the stitches a bit tighter.
The bigger issues come into play because you are wiring up a circuit, which has more exacting rules to follow than normal sewing of a garment does. This section suggests some good practices to follow.
Avoiding Short Circuits
To avoid short circuits (having conductive thread create paths for electricity to flow where you did not intend it to), you need to plan where you will sew each run of conductive thread. The thread is not insulated like coated wires are, so if it touches another run of conductive thread as the garment moves, it will short out the circuit.
Creating a map for the layout of your wire and conductive thread runs will help eliminate some frustrating issues with your project. Fritzing (Chapter 5) is good for this because it is easy and creates a clear picture or map to the right scale. You may also draw a circuit plan freehand, but it is easy to forget things or to sketch vaguely and then realize you have problems. Either way, it is best to do it before you put the pieces together, whether you are soldering or sewing.
Caution
Pay particularly careful attention to any directional connections (like those for LEDs in general or NeoPixels in particular), which only work in one direction in a circuit. At best the circuit will not work, and at worst you might fry a component. It is frustrating and time-consuming when you have to take out stitches and replace parts that are glued or sewn on. Fritzing diagrams can be time savers and mood stabilizers.
Routing Physical Control Cables
If you are using a control cable to pull on something (like the fishing line used in the Haunted Dress sleeves) you have to manage routing that as well. Obviously movement of something made of fabric can loosen connections, so it is important to keep the controllers, servos, and other components stable relative to their electrical connections when you push or pull part of the garment.
Mapping out the route your wiring will take gives you a chance to really think about what parts move the most and where your components and wiring runs will best serve the project and be most comfortable for the wearer. Using lining, or similar lightweight fabrics, you can create sleeves or channels for your wire runs and pockets or straps for the components.
Wire vs. Conductive Thread
If you were creating an Arduino circuit on a breadboard, you would probably use insulated wire. Sewable circuits, though, might most simply be attached to a garment by sewing them on with conductive thread (typically steel). Wire is not as flexible as conductive thread, so for most garments, the thread is a better choice. Some connections really need to be soldered and insulated. For instance, it is best to use insulated wire for circuits carrying too much current for the conductive thread, or if the circuits are connected directly to a battery that will allow too much current to flow if they short out. Keep in mind where the connections will be, how much movement the area will have, and whether shorts will be a problem if the circuit is moving around on the garment.
Tip
A hot glue gun is very handy to reinforce and insulate key connections. Clear nail polish is great for securing knots in the conductive thread and adding some protection on top of some connections. It is also easier to use in tight areas than a glue gun.
Attaching Servos
Integrating servos (Chapter 8) into a wearable project poses some particular issues. If the servo is pushing on or pulling something, it must be securely attached to something stable. For example, as described earlier in the chapter, the servos in the Haunted Dress project were attached to the shoulder seams on the outside of the jacket of the Haunted Dress to give it a bit of a steampunk feel. More complex or heavier mechanisms might need the wearer to have some sort of harness or more significant support for the mechanisms.
Placing Switches and Sensors
Placing switches and sensors is very project-dependent (and sensor-dependent). Chapter 8 covers the details of including sensors or switches from a circuitry point of view. From a project-construction perspective, the main thing to consider is whether where you attached your sensor or switch might be prone to false readings.
If a sensor is measuring a person’s movement, you might not want to attach it to a swishy skirt. Our basic advice here is to think through what the sensor’s environment will be (motion, light, whatever else might be relevant) and then be sure that its data will not be corrupted somehow.
There are many different ways to trigger a function on your controller, as Chapter 8 discusses. In a pinch, the reset button on your processor can do the job. However, that button is small, and fumbling with it might ruin the effect you are seeking.
Resistance-Varying Components
There may be times when you may want to control something with more options than just on and off, or when you may want to take action based on an analog input. A rather sophisticated (in terms of fabrication difficulty) way to implement that is to use a metal zipper as a voltage divider (see the discussion of voltage dividers in Chapter 5). For example, you might want to create a purse that has a light that goes on when you open it; we mention it here as another option for a switch. As you open the zipper, you can arrange to have the resistance in part of your control circuit change. We say it is sophisticated, though, because it can be pretty fiddly to get to work and to control.
Fiber Optics
Chapter 5 covers LEDs and NeoPixels in particular, as well as EL wire, at the component level. But you may want to move light around passively—with fiber optics.
Because the middle school was doing a performance of The Little Mermaid, we were looking for sea-creature projects that could be incorporated into the production. We found the project Fiber Optic Jellyfish Skirt by Linawassong ( www.instructables.com/id/Jellyfish-Skirt/ ) and decided to use it as a starting point to create a jellyfish costume. The student playing the jellyfish wore the skirt and a black leotard and walked across a dark stage. Because this was meant to be worn only in the dark (by a middle-schooler) we made it a bit sturdier than the delicate concept in the Instructable. The skirt was created with fiber optics, (a lot of) hot glue, a NeoPixel strip, a leather belt to support the weight of all the components, a Gemma board, a lipstick battery, and a chiffon overskirt cut into strips.
It had a lot of components that could be worked on separately and then brought together to assemble. Therefore it was a good project to occupy several students and it created a lot of excitement when we brought them all together for the finished product.
Gluing together the fiber optic strands took a very long time and a great deal of hot glue. We had considered a purely mechanical attachment from the skirt to make it pulse as the wearer walked, but this turned out to be too complex to finish by showtime and was not really needed, since all the loose ends floated around anyway.
Wearing Tech
Student theater groups are natural partners for wearable tech classes in an academic environment. In our first year we were fortunate that the middle school musical (The Little Mermaid) lent itself to light-up costuming. As we thought about projects, there were things we avoided doing just because we were concerned that there might be issues. Thus, these are things we consciously did not do and thus did not encounter. With some thought, you might find ways around these—we list them here in no particular order as things you should consider (and avoid to keep things simpler) if you are building a costume.
People sweat and they use hairspray and makeup, and water might get tossed around during a performance. All of that needs planning for before and during the performance. Do a dress rehearsal with the costume on to be sure you do not interfere with wireless microphones or other stage electronics. For costumes that will be worn for multiple performances, consider attaching the circuitry to an overgarment that will not need frequent washing.
Costumes for dance numbers have particular issues. The dancers might connect to each other with considerable force, and any controls, batteries, and so on have to be someplace that will not be in the dancer’s (or her partner’s) way. Heavy hardware might rip off in a jump or a fouetté turn. A stately jellyfish pulsing slowly back and forth in a straight line across the stage is more achievable.
Finally, like putting together furniture in a room and discovering you cannot get it back out the door, it is easy to forget that people have to get in and out of costumes. This can require some thought and strategic snaps and nonconductive closures.
All that said, some people have done some stunning projects, notably Lisia Trubat’s E-traces project. She put Lilypad processors (similar to Floras) and accelerometers on a ballet dancer’s pointe shoes and then captured the dancer’s motion in an art piece ( http://cargocollective.com/lesiatrubat/E-TRACES-memories-of-dance ).
Designing a Testable Project
One of the things that can be overwhelming in a wearable tech project is how many things have to go right for it to work. You need to do physical assembly of the garment/piece, plan paths for control circuits, create a circuit, write code, and so on. How can you avoid drowning in all that detail when things do not work? Some of it is just experience, but here we talk about some good design practices that may help.
First, see if you can find ways to have your overall project be a collection of smaller parts, particularly smaller parts that you can test incrementally. Sometimes that is not possible, but consider whether, for instance, if you have a servo and lights, you can build just one or the other, test that much, and then add the other. For the code part, save incremental versions and create a clear naming convention.
For example, you might name something JoanProjectLightsWork.ino, save that much, and then rename the next version JoanProjectLightsServo.ino to continue from there. That way you can always backtrack to something that did work. Keeping tidy computer file folders helps a lot, as does creating Fritzing diagrams ahead of time and using them. It is very easy to sew things on backwards or to create shorts if you do not plan your conductive thread runs carefully.
Never assume that any particular component, USB cable, or computer port is working. If something should work based on all your understanding, try swapping out components that are easy to swap out. We have had a lot of time wasted by low-quality USB cables that appear fine but are not. The earlier chapters in this book have advice on debugging individual aspects, and you should refer there for particular components. Generally, though, never assume that anything must be working. Consider whether your batteries or other power source is putting out the right voltage and can supply enough current (Chapter 5).
Similarly, if you get in trouble and things are not working, be systematic. Change just one thing at a time, rather than five things, and save intermediary versions of any code with clear filenames (and/or good code comments.) If something was working and stops working, think very carefully about what changed. The weather? Vibration? Those things may not be the cause, but they may be correlated with it.
And most of all, if you just cannot see what is wrong, step away from the project, even for a few minutes. When you get back, talk it through with someone, even if they know nothing at all about electronics or coding. Sometimes just the process of talking it through to someone else will show you the problem. Even if you don’t have anyone to discuss it with, you can engage in rubber duck debugging, which is where you figure out why your project isn’t working as expected by explaining what it’s doing, in detail, to a rubber duck.
Summary
In this chapter we covered a case study of an overly ambitious first wearable tech project of ours. Then we extracted some ways to make projects like this easier. In particular we focused on creating the non-electronics part of a garment in a way that makes laying out the electronics as easy as possible. We talked about ways to integrate components that might be relatively heavy into garments using strategic pockets or shoulder pads, and how to avoid short circuits. We have some pointers back to details in the earlier component-level chapters, as well as some forward to the next chapter on example projects you can attempt on your own.