
One of the challenges of writing a book like this is knowing when to stop. If you go to a large public library to look at their section of sewing, fashion, and similar craft books, you most likely will find shelf after shelf of books on those topics. This book focuses on the overlap of sewing and electronics, with a bit of an introduction to 3D printing thrown in.
This chapter gives a brief introduction to a few more tools and techniques that are becoming common, particularly in the cosplay community. Some of these involve tools that are not really available for home use yet, but that are probably available in a makerspace or community college if you have access to resources like those.
Cutting Tools
In this first section we talk about ways of cutting things. Chapter 9 introduces 3D printing, which creates objects by building them up a layer at a time. Laser cutters and CNC (computer numerically controlled) tools both work more traditionally, by removing material from an initial piece of raw material. Neither machine is particularly suitable for home use, although smaller CNC machines are now on the market.
Laser Cutting
A laser cutter uses a laser to burn through (or melt) a piece to cut it into desired shapes. Laser cutting can be used to make very intricate things, as a search online for “laser cut art” will quickly reveal. The minus is that laser cutters are not really home machines, for safety, cost, and logistical (for example, size, noise, and air quality) reasons.
When a laser cuts something it creates both smoke and some fumes from whatever is burning away, so laser cutters need to be vented, either to the outside or to an air scrubber. Laser cutters can produce very toxic fumes if you cut the wrong thing, which can damage both the laser cutter and the person running it. The cutter has to be monitored closely to make sure that the object being cut does not catch fire, and regular maintenance is needed. Given all that, most facilities will either do the job for you or make you take some training, so we will not get into details here beyond covering some concepts about what is possible and how to create a file for laser cutting.
Cutting Fabric
Laser cutters can cut many kinds of cloth. Some fabrics will melt around the edges, which can either mean you have a nice sealed edge or your fabric melted away, depending on the skill of the operator that sets it up. Cotton cuts cleanly but can discolor a little from the cutting (burning) process. Figure 12-1 shows a laser cutter set up to cut fabric, and Figure 12-2 displays some examples of laser cut test pieces. If you can, try a very small test first in case it does not work out well. That way you can still fall back on using scissors without ruining your fabric.
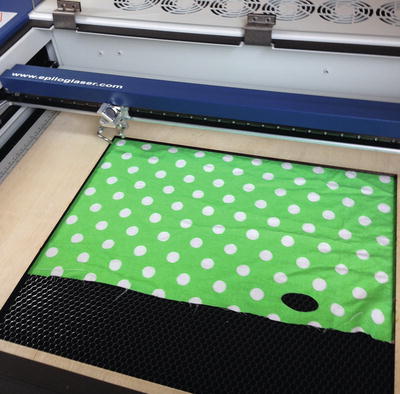
Figure 12-1. Laser cutter setup after cutting small oval of fabric
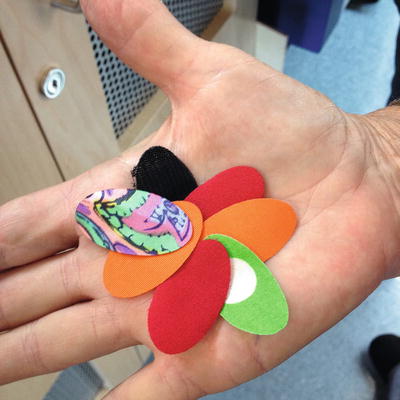
Figure 12-2. Test pieces of various fabrics after laser cutting (the green one was cut in the setup of Figure 12-1)
Designing for a Laser Cutter
Like a 3D printer (see Chapter 9), a laser cutter only works from a computer file—you cannot “draw” with it. Unlike a 3D printer, a laser cutter works from a two-dimensional drawing. Usually this is a file in Scalable Vector Graphics (SVG) format that you create in a drawing program such as Adobe Illustrator or even Tinkercad (see Chapter 9). You can specify whether you want to have a cut go all the way through or just engrave a piece. Engraving light fabric probably will not succeed, because cutting through it takes so little energy, but you can engrave leather, denim, acrylics, and similar heftier materials.
Vector graphics are different from photographs and other raster images. A raster image (sometimes called bitmap) is made up of a series of pixels that are all the same size and laid out in a grid pattern. In other words, raster images are like most digital images you see. The only information the image contains about each pixel is its color. If you scale these images up, those pixels just get bigger, and the image looks blocky because there's no information about what's between the pixels.
Vector images, on the other hand, have lines, arcs, and curves that follow mathematical rules so that a computer can always tell what the features should look like when you look closer. The complex shading of a photo would be nearly impossible to represent this way without simplifying it to create a stylized effect (Figure 12-3 shows an example), but things like letters, geometric shapes, and line drawings can be represented with nearly infinite precision in a vector image.

Figure 12-3. A self-portrait of Rich done in a vector format. Notice the stylized appearance created by the vector shapes
Cutting with a laser cutter requires a file with vector lines for the laser to follow. You can make these lines in a program like Adobe Illustrator, either by drawing them directly or by tracing lines in a raster image (Illustrator comes with automated tools that can help with this).
As mentioned, you can also use a laser cutter to etch or engrave the surface of a material, and you can do this with vector or raster images. In these cases, the laser will darken (or, depending on the material, possibly lighten) the surface where the laser hits it, allowing you to make a monochrome image. Etching may also remove the top layer of a surface (such as a layer of paint) to reveal a different color below it.
You’re not stuck with Illustrator. You can also create a vector file for cutting with a CAD program. TinkerCAD has an option to download an SVG for laser cutting (found in the Download for 3D Printing menu) that will create lines wherever your design is intersecting the workplane. Other CAD programs commonly let you create 2D drawings that you can export in DXF or DWG format. You will need to find out what formats the laser cutter’s software accepts, but all programs that run a laser cutter should work with SVG. Inkscape ( https://inkscape.org/en/ ) is a free and open source alternative to Adobe Illustrator, and although it is not as full-featured, you may at least find it useful for converting one vector format to another.
Tip
Laser cutting is a great way to make multiple copies of a cutout pattern. Lyn had students laser cut cloth fish for a production, making the fish all consistent while allowing for a lot of variation of color and details.
CNC Milling
A CNC mill is a computer-controlled cutting machine. It moves a cutting tool around in three dimensions to remove material, similar to the way a 3D printer adds material. CNC mills can work with more materials than laser cutters or 3D printers, with possibilities ranging from EVA foam to some metals, but it is a much messier process that involves throwing tiny pieces of cut material out of the way. Even so, these machines may be more amenable to a home workshop than a laser cutter because rather than release smoke and fumes, they create the kind of mess than can be cleaned up with a broom or a wet-dry shop vacuum cleaner.
CNC milling may need to be very slow when working with hard materials like metal, but with softer materials like foam or machining wax, it may be faster than 3D printing for large pieces. CNC mill prices also generally start lower than a laser cutter of comparable size, but can range pretty high upward for industrial machines designed to cut intricate shapes out of metal. Othermill, Inventables, and Carbide 3D are popular brands for hobbyist-level machines.
Construction Techniques
You can use a variety of materials to build up prop pieces or costume armor—complex shapes that might be far too large to 3D print. In this section we introduce you to some common construction techniques practiced in the cosplay community. Obviously there are many craft materials available, from wood to aluminum foil and duct tape. We just touch on some of the more “techie” ones here.
Foam Armor
Cosplayers often want to create make-believe armor or weaponry. A common way to do that is to cut and bend sheets of ethylene vinyl acetate (EVA) foam, commonly used for floor mats. One of the best-known practitioners of the art is Bill Doran, who founded Punished Props ( www.punishedprops.com ) in 2012 with his wife, Brittany. They have extensive resources including a YouTube channel ( www.youtube.com/user/punishedprops ) and the Foamsmith series of books available on their site.
Punished Props started out doing commission work, and now Doran mostly trains people to use these techniques. His personal favorite cosplay outfit that he and his wife made for themselves was from the video game Skyrim. They were Drauger Deathlords, with old rusty armor, skeleton faces, and glowing eyes. He enthuses that they looked “inhuman.”
Doran says that the key to a good cosplay costume is to “pick a character that [you] really love, and make sure it is something you are obsessed with.” He also says that it can take months to make a full set of foam armor, so you really do need to want to wear these costumes!
The process involves starting with EVA foam (either in the form of floor mats or bought in large rolls) and cutting it out to desired shapes (see Figure 12-4) using patterns similar to those used for sewing. You then use a variety of tools to bend and finish it. EVA foam cuts easily with a razor knife (though Bill warns that it dulls the blade quickly), a band saw, or even a laser cutter. You can do the detail work with a rotary tool, such as those made by Dremel.

Figure 12-4. EVA foam costume piece, early in the process (photo courtesy of Bill Doran/Punished Props)
Bill says a lot of the techniques involve ways of strapping the pieces to the wearer’s body, knowing what to wear under it, and figuring out how to glue pieces together. The finished and painted prop pieces can be quite spectacular (see Figures 12-5 and 12-6).
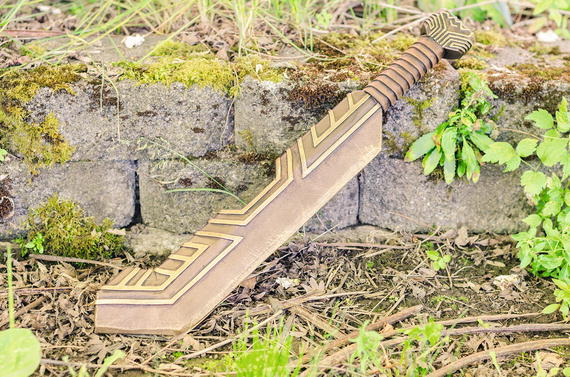
Figure 12-5. A finished, painted EVA sword (photo courtesy of Bill Doran/Punished Props)
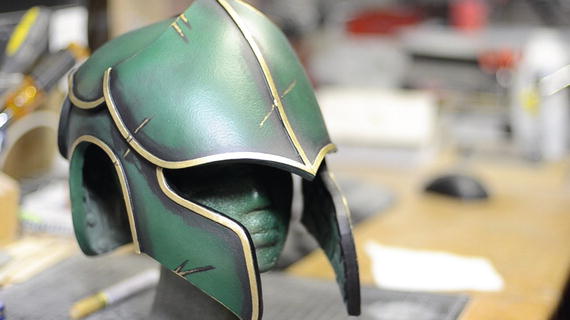
Figure 12-6. A finished, painted EVA helmet (photo courtesy of Bill Doran/Punished Props)
Vacuum Forming
Thermoforming is the process of heating thin sheets of plastic so that they can be stretched and formed to the shape of a mold. A common form of thermoforming is vacuum forming, in which the heated plastic is first stretched over a mold or form and then sealed down to a vacuum table with a frame so that the air can be sucked out, forcing the plastic against the surface before it re-hardens. This a common way to make things like masks, and is how almost all Star Wars stormtrooper cosplay armor is made.
Clear face or eye covers can be made as part of a larger costume by vacuum forming a clear plastic. Many hobbyists build their own vacuum forming tables by making a box with holes in the top and connecting a wet-dry vacuum to the side to suck the air out. More professional vacuum formers include a heating element for the plastic, but others may require you to heat the framed plastic in an oven before transferring it to the vacuum former.
Worbla
There are also plastics that are designed to be formed without a mold. Products like Worbla, Sintra, Wonderflex, and Terraflex can be made soft with a heat gun and then formed by hand into complex shapes. These can be used to make props and armor, or just to make detail pieces to be attached to a larger piece. There are several books (including The Book of Cosplay Armor Making with Worbla and Wonderflex by Svetlana Quindt) listed at www.worbla.com/?cat=33 , and the author has a YouTube channel at www.youtube.com/user/Mogrymillian .
Caution
As always, be sure to follow the manufacturer’s directions on ventilation and other protective gear when you are working with the materials in this chapter.
Other Ideas
There are numberless craft materials and tools out there for experimentation. Here are a couple of other techniques and tools that might be valuable for you to know about:
Pepakura is a technique for creating solid objects by making a cutout paper pattern that can be folded to create a surface. (This is a little different from origami, which creates more delicate creations starting from a square of paper.) Various software packages can do this, such as Autodesk 123D Make ( www.123dapp.com/make ). Items made this way are not very strong, but can be interesting shapes. A laser cutter is a good way to cut out a pepakura pattern.
A vinyl cutter is what it sounds like: a computer-controlled knife that cuts out shapes from a thin vinyl roll. It is useful if you want to have a thin-surface, colored, cut-out design on something, like fancy lettering.
Painting
Once you have made something out of plastic or foam, it will probably still look like it’s made of plastic or foam. Assuming that is not what you’re going for, it is now time to paint. Making your creation look scratched and dirty (known as weathering) can make it look even more real.
Paints for these applications are usually sprayed on, either with an aerosol paint can (known as a rattle can) or with an airbrush, to create an even look without brush strokes. You will usually want to use a primer first and then apply the color of your base layer. Depending on the effect you want, you may lay down many layers of paint, and you can mask off different areas while spraying to get sharp boundaries between sprayed and un-sprayed areas.
Weathering can involve techniques like brushing on paint and then removing it, intentionally spilling coffee on your shiny new thing, and painting the edges with metallic paints so that it looks like paint has chipped off of those areas.
Once it is all done and dry, you’ll probably want to put a clear coat over everything so that your fake damage does not fall prey to real damage. For more on painting and weathering, we recommend Painting and Weathering for Props & Replicas by Harrison Krix of Volpin Props, which you can find at www.volpinprops.com/product/painting-and-weathering-for-props-and-replicas-ebook/ .
Tip
To paint 3D-printed pieces (other than weathering them), acrylic paint works on PLA or ABS. Nylon can be dyed with appropriate (nylon) fabric dye.
Summary
This chapter covered other tools and techniques that are not talked about in depth in other chapters. First we reviewed cutting tools like laser cutters and CNC machines. Next, we explored structural techniques like making armor from foam, vacuum forming, forming with Worbla, and vacuum forming. Finally, we introduced pepakura and vinyl cutting, and wound things up with some thoughts abo ut painting your creations.