
In the previous chapter, we built the server side of FlutterChat, providing a WebSocket/socket.io-based API for the client-side of the app to use.
Now, it’s time to build that client-side. Get ready, here comes FlutterChat: Flutter edition!
Model.dart
BuildContext rootBuildContext – The BuildContext of the root widget of the app. You’ll see why this is needed shortly, but note that while it’s not state per se, it is required in multiple places, so it makes some sense to be here. But, since there’s never a case where we’d need to set it and call notifyListeners(), there’s no explicit setter for it; the default is sufficient.
Directory docsDir – The app’s documents directory. See the comment about rootBuildContext and why it’s in the model but with no explicit setter because it applies to this property as well.
String greeting = "" – The greeting text that will be shown on the home screen (the first one the user sees, and where they wind up after various operations within the app like leaving a room).
String userName = "" – The username, obviously!
static final String DEFAULT_ROOM_NAME = "Not currently in a room" – The text that will be shown on the AppDrawer when the user isn’t in a room.
String currentRoomName = DEFAULT_ROOM_NAME – The name of the room the user is currently in, otherwise the default string to indicate they aren’t in a room at all.
List currentRoomUserList = [] – The list of users in the room the user is currently in.
bool currentRoomEnabled = false – Whether the Current Room item on the AppDrawer is enabled (would only be if the user is in a room).
List currentRoomMessages = [] – The list of messages in the room the user is currently in since they entered.
List roomList = [] – The current list of rooms on the server.
List userList = [] – The current list of users on the server.
bool creatorFunctionsEnabled = false – Whether the creator functions (Close Room and Kick User) are enabled or not.
Map roomInvites = {} – The list of invites this user has received.
Note For brevity, I’ve skipped printing all the imports in this and all source files going forward. If there are any new and exciting imports, I’ll mention them, but otherwise, you can assume they’re only modules you’re already familiar with.
At the end, notifyListeners() is called so that any code interested in this change can react to it.
Just to save a little space, we’ll skip looking at setUserName(), setCurrentRoom(), setCreatorFunctionsEnabled(), and setCurrentRoomEnabled() as they are the same as setGreeting(), just referencing a different property obviously.
Here, instead of a simple property set, we need to use the add() method of the currentRoomMessages property since it’s a List.
We again are updating a List, so we use the add() method again, but this time the inRoomList the function is sent is a Map. So, we need to iterate the keys in that Map, and then, for each, pull out the room descriptor and add it to the rooms List.
After that is a setUserList() method and a setCurrentRoomUserList() method, and those are the same as setRoomList(), except for dealing with users instead of rooms, of course, so we can skip those as well.
That’ll be the one and only instance of it used throughout the app, and with that, this source file is complete, and we have a scoped model ready for use!
Connector.dart
These are, obviously, the two imports needed to use socket.io. There are only two classes we’re interested in: SocketIO from the flutter_socket_io.dart library and SocketIOManager from the socket_io_manager.dart library. But I’m getting ahead of myself a bit!
When you run the app, you’ll need to change this to the IP address where your server is running. As a test of your abilities to this point, I offer you a suggestion: try to add a field for IP address to the login dialog that we’ll be looking at the code for soon. That way, this hardcoding of server address can become dynamic and the app more useful as a result.
The showDialog() function that you’ve seen before is called, and here we can see where that rootBuildContext model property comes into play. The issue is that this mask must mask the entire screen, the entire widget tree, not just some subset of it. So, we’ll always want to set the context to that of the root widget. However, normally, that’s not accessible from everywhere in the code. So, as you’ll see when we look at the main.dart file next, we’ll capture a reference to that widget during startup and set it on the model so it’s available here and anywhere else it might be needed.
Placing the CircularProgressIndicator inside a SizedBox with a specific width and height gives us some control over the size of the indicator. It may seem odd to set the value property to null and never update it, but doing this causes the indicator to show an animation for an “indeterminant” ongoing operation. In simpler terms: it shows a spinning animation! If you had a finite operation, then you could update this value property little by little to give a real indication of the overall progress, but that’s not the situation here. Note that I also set the strokeWidth to make the indicator fatter than usual, which I just felt looked better.
This is the usual way to hide a dialog, so nothing new, other than it must again make use of the rootBuildContext to get a reference to the dialog as it was shown.
Here is where that SocketIO object I mentioned earlier is created via the SocketIOManager.createSocketIO() call and passing it the serverURL. This method also takes a path and a query, neither of which are needed for this app, so default values “/” and an empty string are passed for those (the first can be used if you set your server up to listen at something like myserver.com/my/socket/io , and the query property can be used to send arbitrary query parameters along with each request, perhaps for an authentication mechanism on top of socket.io).
The socketStatusCallback property takes a function to call when the underlying WebSocket’s status changes. Several statuses can come back, but only one is essential to us here: the connect status. This indicates a WebSocket connection has been established with the server. When that happens, only then can we define the handlers for various messages that the server can emit to clients. These are termed “subscriptions” to those messages, so the subscribe() method is called, passing it the message and the handler function for it.
Finally, the init() and connect() methods must be called to actually initiate the connection with the server and, if all goes well, get the callback defined earlier to execute. Once that’s done, our client is now able to emit a message to the server and handle messages emitted by the server.
Server-Bound Message Functions
The function takes in the user’s name, their password, and a reference to a function to call when the server responds. To start, the showPleaseWait() function that we looked at earlier is called to mask the screen. Then, the sendMessage() method on the _io object is called, sending the server the validate message and a string of JSON that includes the user name and password. The callback function uses the Flutter/Dart-provided jsonDecode() function to generate a Dart Map that contains the data that was returned. Then, hidePleaseWait() is called to unmask the screen, and then the callback is called, passing it the status property from the Map.
create() – Called to create a room from the lobby screen. This is passed the name of the room, it’s descriptor, the max number of people, whether it’s private or not, the name of the creating user (the creator), and a callback (which is passed the status and rooms properties from the response, the latter of which is a complete and updated list of rooms on the server including the new one).
join() – Called when the user clicks on a room from the room list on the lobby screen to join (or enter) it. This is passed the user’s name, the room’s name, and the callback (which is passed the status property from the response and the room descriptor).
leave() – Called when the user leaves the room they’re currently in. This is passed the user’s name, the room’s name, and the callback (which is passed nothing).
listUsers() – Called to get an updated list of users on the server when the user selects the user list from the AppDrawer. This is passed just the callback, which is passed the entire response: a map of users.
invite() – Called when the user invites another user to the room. This is passed the name of the user being invited, the name of the room they’re being invited to, the name of the user inviting them, and the callback (which is passed nothing).
post() – Called to post a message to the current room. This is passed the user’s name, the room’s name, the message being posted, and the callback (which is passed the status property from the response).
close() – Called by the creator to close a room. This is passed the room’s name and the callback (which is passed nothing).
kick() – Called by the creator to kick a user from a room. This is passed the user’s name, the room’s name, and the callback (which is passed nothing).
Client-Bound Message Handlers
This is called when a new user is created. The server sends a complete list of users, and this function just sets that in the model.
Here, we have a bit more work to do! First, the updated list of rooms is set in the model. Next, if the room that was closed is the one the user is currently in, then we have some cleanup to do. If there’s an invite for this room, it must be removed (to avoid this user incorrectly having an invite for a room created with the same name later), and the list of users for the current room is cleared. The default text for what room the user is in is set, which will be reflected in the AppDrawer’s header (which you’ll see later when we look at that code). The Current Room link on the AppDrawer is disabled, and the greeting, which will show up on the home screen, reflects that the room was closed, so the user knows what happened. Finally, we need to navigate to that home screen, and that’s accomplished with the help of the pushNamedAndRemoveUntil() method of the Navigator of the rootBuildContext. This ensures we’re navigating with the correct Navigator (because you can nest Navigators, so there could be multiple). This function, one of several that can be used for navigation, ensures that we always go all the way back to the home screen and not just one screen. That way, our Navigator is always in a known, consistent state after this move.
We only care about this message when the user is currently in this room, and if they are, then the list of users sent by the server is set in the model. There is also a left() message handler for when a user leaves a room, and that does the same thing essentially, so we’ll skip it.
Here, we must pull out some information from the response, namely, the name of the room and the name of the user who invited them. Then, an invite is added for that room so that when (if) they click that private room in the lobby, we’ll know to let them in. Then, we must show them a SnackBar to let them know about the invite. We’ll leave it up for a full minute, so they (hopefully) don’t miss it because otherwise there’s no indication that they have an invite (hey, there’s another suggested exercise for you: add some sort of indicator the room list in the lobby for that!). We’ll also give them an Ok button to dismiss the SnackBar if they wish though, just to be thoughtful.
Once again, we have a message that will be emitted to all users, so we have to ignore any message that isn’t for the room this user is currently in. If they are in the room though, then a call to model.addMessage() adds the message to the list of messages for the room and triggers a notification to listeners, which will, of course, result in the message appearing on the screen for this user.
And with that, we now have a complete API for communication with the server against which we can write our client application code. And, the first piece of that puzzle is found in the usual spot: the main.dart file.
main.dart
The contents of the file are a simple string in the form xxx============yyy where xxx is the username and yyy is the password. Why the unusual 12 equals as a delimiter, you ask? Simple: the username and password are both constrained to ten characters, so by having a delimiter two larger than that, it means that even if a user enters ten equal signs for a username (which would be weird, but okay, to each their own!), then we’d still be able to tokenize this string, which is where that split() method comes in. It produces an array of string parts formed by breaking up the string on that 12-character equals delimiter. Yes, I could have used a single character, comma perhaps, and just disallowed commas in the username, but I wanted to give users full reign, even to enter something kind of silly!
As you can see, if the credentials file doesn’t exist, then the login dialog is launched. We’ll look at that in the next section, so for now, let’s keep going. As mentioned, startMeUp() is called after this, and that’s where execution really ostensibly begins.
Note
There is an edge case where if a user registers, but then the server restarts, and if a different user registers with the original user’s userName, and then the original user tries to validate again, it will fail because the password (presumably) won’t match. In that case, the code in validateWithStoredCredentials() will delete the credentials file and alert the user to this situation. Upon app restart, they’ll be prompted for new credentials.
Since we’re going to use Flutter’s built-in navigation capabilities in this app, rather than the “build it ourselves” approach taken in FlutterBook, the first task is to define the routes (read: screens) of the app. There’s four of them: /Lobby (room list), /Room (inside a room), /UserList (the list of users on the server), and /CreateRoom (for creating a room of course). These are called named routes because, well, they have names! Without these, you can still navigate between screens, but then you have to push manually and pop specific widgets off the navigator stack, which tends to result in a lot of duplicate code all over the place. By using named routes, that code becomes much cleaner, as you saw in the Connector.dart code and that you’ll see much more of as we progress.
As you can probably guess, the route names can be as complex as you like and can represent a hierarchy too. So, if you have page A, which has two “child” pages 1a and 2a, then you might name them /pageA, /pageA/1a and /pageA/2a. Here, they’re all effectively at the same logical level, so I kept it simple (you could argue that since the room and create room screens launch from the lobby that they should be named /Lobby/Room and /Lobby/CreateRoom, and that’s a fair argument to make – but either way works, that’s kind of the main point here).
The initialRoute tells the Navigator what screen to show by default, and it corresponds to what the home property points to. Note that it’s an error to have the home property and then also to specify a route named “/” in the routes map. But, if you drop the home property, then you can have “/” in the map, but then you’d need code to navigate to whatever your initial screen is, so it’s usually easier to do it this way and let Flutter and the Navigator do it for you.
LoginDialog.dart

The login (validate) dialog
There shouldn’t be any surprises here by this point. There’s a constraint on how many characters can be entered for a username (important, given the tokenization you saw in main.dart) and likewise a validation on password to ensure they entered something (ditto username). Otherwise, they’re just boring ‘ole TextFormField widgets!
Here, we need to store the credentials in the credentials file, so we create a File object instance, using the join() function to construct the path to the app’s documents directory that was retrieved at startup of the app, and then await the writeAsString() method to write out the value, which again is the username and password separated by that oddly long delimiter! After that, we do the same setup as was done in the ok case, but with a slightly different greeting so it’s distinct from an existing user logging in.
Existing User Login
As before, connector.connectToServer() is first called, and then connector.validate() is also called, passing it the username and password sent in, which will have been read from the credentials file. In this case, the logic is a little simpler because, from the perspective of the user, they are an existing user, but it’s possible that the server was restarted, in which case, from the server’s perspective, this is a new user, as long as the username isn’t now taken by someone else. But of course, the server is a machine, so who cares about its feelings, right?! (unless we’re in an episode of Star Trek: The Next Generation, where Data’s personhood is being debated… but that’s a much larger conversation!) We do, however, care about the user’s feelings! So, whether we get back an ok or a created message, we’ll show the message to indicate the user is a returning user, to make them feel like the server didn’t forget them even though it kinda did!
Since we now know that this username can’t be used, we need to delete the credentials file to avoid a loop at the next app startup. Finally, the exit() function is called, which is a function Flutter provides to terminate the app (the value passed to it doesn’t matter in this case, though it can be used to return a value to the OS if needed). At the next app startup, the user will be prompted for a username and password, altering the flow as we need in this situation.
Now let’s see where those greeting messages are used: the home screen.
Home.dart

The home screen
Yep, that’s really it! It is, in the final analysis, just a Text widget inside a Center widget. The Text widget will be updated from the model.greeting property to reflect things to the user. It is otherwise unremarkable, so I’ll stop remarking on it now!
AppDrawer.dart

The app drawer
At the top, we have a header with a pretty background, above which is shown the user’s name and what room they are currently in, if any. Here, you can see that default room name that you saw in the Model.dart code . See, I told you then that you’d eventually come to know why that value is what it is!
It’s ultimately a Drawer widget that is being built, and inside of it is a Column layout. The first item in that layout is a Container that is decorated with a DecorationImage. As the name implies, this is a widget that decorates a box with an image. That image is an AssetImage built from the drawback01.jpg file in the assets directory. Using the BoxFit.cover value for the fit property tells the Flutter to size the image as small as possible but still ensure that it covers the box, which is a good choice for a background image like this.
First, a little padding is used to ensure nice spacing around these values. Then, a ListTile is used because I want the username to be bigger and the current room to be smaller, which logically makes them a title and subtitle, respectively. I also throw some padding on the title so that I can control the spacing between these two and avoid them bunching up too much. Of course, the color needs to be something other than the default black; otherwise the text won’t show up well on the background, and I also adjust the fontSize to get them looking just how I want. The text displayed comes from the corresponding model fields so that they will get updated as appropriate automagically.
It is, again, a ListTile, with some padding thrown in, so I can space these items out nicely. Each of these three items will get an icon in the leading that makes sense for its functionality. When the onTap handler fires, a couple of tasks are necessary. First, we get a reference to the Navigator for inContext and call the pushNamedAndRemoveUntil() method , specifying the name of the route to navigate to. Then, a connector method is called to retrieve an updated list of rooms. In theory, this isn’t necessary, since the server will emit a message when a room is added or closed, and the list would be updated then, but there’s no harm in doing it here, just to be sure we have an updated list. Finally, the list of rooms is set on the model, and the lobby’s list of screens will reflect the new list. Remember that the please wait mask will have been shown after the navigation, which is why the navigation occurred first: I wanted the lobby to be visible while awaiting the list of rooms since that’s more like how you’d would, as a user, expect such a thing to work.
The next two items, Current Room and User List, are identical to the code you just looked at, save for one difference: there is no call needed to the server when navigating to the current room, and no model data to set, so that item just does the navigation and that’s it. Oh, and of course, the User List item calls connector.listUsers() and model.setUserList() instead of the room methods, but I think you could have guessed that! So, we’ll skip looking at the code for those here and instead get to the code for the lobby screen.
Lobby.dart

The lobby (room list) screen
There’s a possibility that there are no rooms, so rather than just have a blank screen, I decided to show a message right in the center of the screen. If there are rooms though, that’s when we build the ListView. Each room descriptor is pulled out of the model.roomList map, and then a Column layout is started. I do this because I want to show the room in a ListTile and then also have a Divider after it, so I need a widget with a children property.
First, the lock icon, which is in the leading of the tile. The private element in the room map tells us whether the room is private or not, and it just so happens to be a boolean, so a simple ternary conditional is used to insert the appropriate Image widget. After that, the title and subtitle are shown, as per usual with a ListTile.
First, we see if the room is private. If it is, we check to see if the user has an invite. Also, we check to see if this is the user that created the room. If the room is private and the user doesn’t have an invite, and they aren’t the creator, then a SnackBar is shown indicating they can’t enter the room without an invite.
Entering a room entails some setup work. First, the server is notified of the user entering the room thanks to the connector.join() method emitting the join message. If the response comes back joined, then the user is entering the room. In that case, the current room name is recorded, along with the list of users in the room that the server will have returned. The current room AppDrawer item has to be enabled as well, and we have to make sure there’s no list of messages floating around in case this isn’t the first time the user has been in this room (the room will appear devoid of messages any time the user enters it whether the first time or not). If this user is the creator, then we enable the creator functions as well. Finally, the /Room route is pushed to show the room screen, which will be examined in the final section of this chapter.
As with not having an invite to a private room, a SnackBar is shown to let them know the room is full. And with that, the lobby is complete! Now, let’s go back to what happens if you tap that FAB button, which finds us in the CreateRoom.dart file.
CreateRoom.dart

The create room screen
It’s a simple enough screen, which makes sense given that creating a room isn’t a complex thing. Just one piece of information is required, and that’s the name of the room. A description is optional, and the maximum number of people in the room as a default value, though it can be adjusted using a Slider. A room can also be made private by actuating the Switch widget for that. Then, hit Save and you’ve got yourself a room!
First, the Form is validated, and then its state saved, the typical first steps you’re familiar with. After that, the value of _maxPeople needs to be truncated. That’s because we want an integer value, but the Slider gives us a floating point. Once that’s done, we can call the connector.create() method , which emits the create message to the server. Two possible outcomes must be handled: either the room was created, or it wasn’t, and the latter can only happen if the name is already in use. So, we branch on the inStatus that is provided to the callback. If it’s created, then that means the server sent back an updated list of rooms, so we set it in the model. Then, the keyboard is hidden, and the screen is popped off the Navigator stack, which takes the user back to the Lobby screen. However, if the room wasn’t created, then a SnackBar is shown to let the user know that the name was already taken, giving them a chance to choose a new one.
Building the Form
Each field in the form is contained within a ListTile, beginning with the Name field. The validator ensures both that something is entered and that its length is 14 characters or less (I chose that length so that it displays well in all cases without wrapping or being cut off or anything else that a longer name could allow).
It’s a simple enough widget, just requiring a min and max value to define its endpoints, and in this case the value property ties to a state property, _maxPeople. There’s no validation for this field, but any time the value changes, we need to set it in the widget’s state. Finally, one problem that arose is that as the user is sliding the Slider, there is by default no way for them to know what the value currently is – it’s not displayed anywhere, and there aren’t even tick marks or something on the Slider to help. To alleviate this, I threw a Text widget in the trailing of the ListTile and took the value of _maxPeople to display. Of course, Text requires, well, text, to display, but _maxPeople is a number. Fortunately, a double in Dart has available several methods to convert it to a string, one of which is toStringAsFixed() (there is also toStringAsExponential() and toStringAsPrecision()). It does exactly what we need: convert the double to a string while also allowing us to set the precision shown after the decimal point. Of course, here, I want no numbers after the decimal point, which is exactly what passing zero to this method does.
For the first time, you see the Switch widget used. It seemed like a good choice here since it’s a binary choice: the room is either public, or it’s private. A Checkbox would have done the trick too, but since you haven’t seen Switch in action yet, I figured I’d show you something new!
UserList.dart
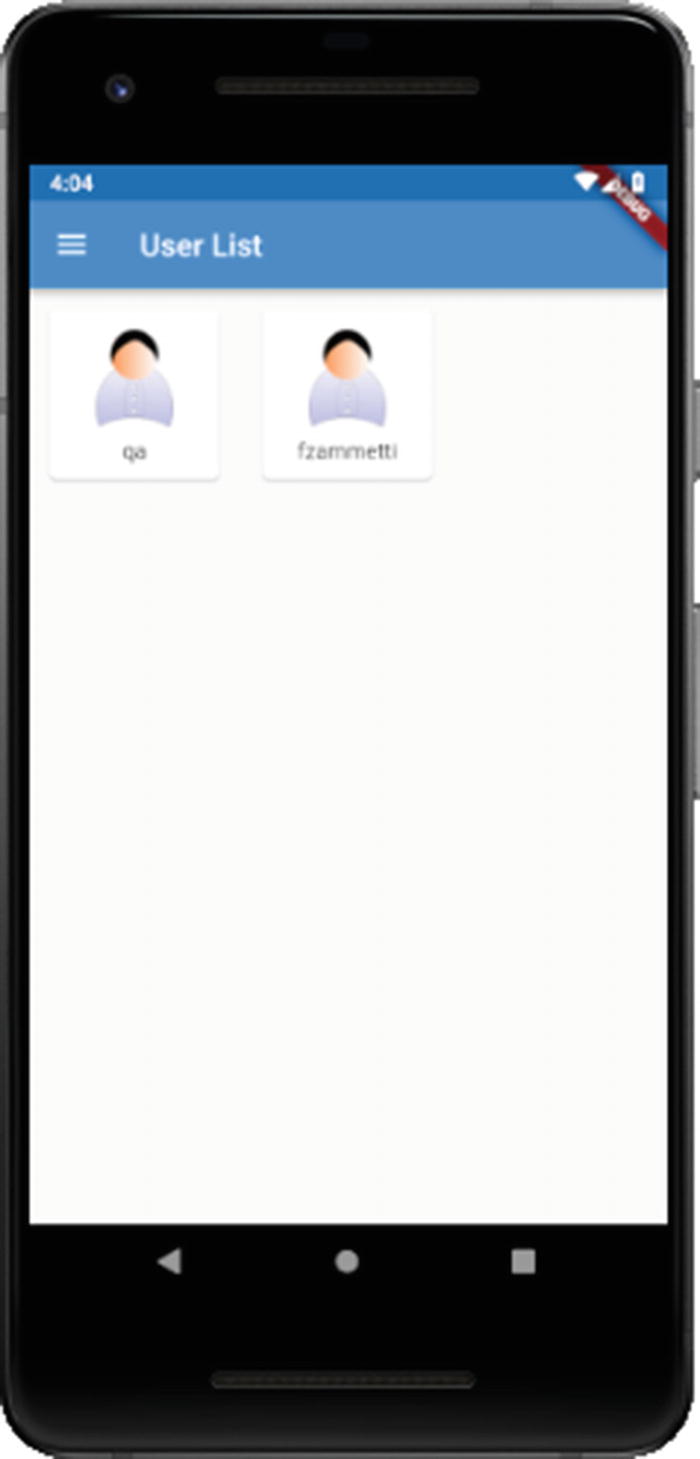
The user list screen
The screen itself is very simple: it’s just a GridView with an item for each user registered with the server. Each user grid item is housed in Card widget and has a generic icon, just for appearances’ sake (one could imagine letting users choose an avatar icon like for the contacts in FlutterBook, but that’s not done – but hey, that sounds like one of those suggested exercises I’m always on about, doesn’t it?!)
It opens like almost every other class you’ve seen has. We need data from the model obviously, so everything is housed in the usual ScopedModel/ScopedModelDescendant/builder() hierarchy. We’re building a screen, so the root widget returned is a Scaffold, and the AppDrawer is referenced on it so that we don’t lose that on this screen. Then, the body begins. As I said, it’s a GridView, so we use the builder() constructor of that class and feed it the length of the model.userList collection as the itemCount property value. Next, a gridDelegate is provided of type SliverGridDelegateWithFixedCrossAxisCount (Flutter isn’t known for brevity of class name!). Here, we specify that we want three items per row with the crossAxisCount property.
For each item, we get the user descriptor from the userList map in the model. Then, a Card wrapped in a Padding with space defined all around it (so the items in the GridView don’t bunch up unpleasantly) is built. The child of the Card is our friendly neighborhood GridTile, the usual child of a GridView (it doesn’t have to be a direct child though, as you can see). The child of that is an Image widget that displays the user.png asset, wrapped in Padding to control the spacing around it (in this case, just to put some space on the bottom of it to separate it from the user’s name) and that wrapped in a Center to center it on the Card. Finally, the footer of the Card is where the user’s name goes, with textAlign set to TextAlign.center to center it, like the image above it.
And that’s all there is to the user list! It’s easy when there are no actions the user can take, but that’s very obviously not the case for the room screen, which is what’s up next to review (and is the last bit of code for this app in fact).
Room.dart
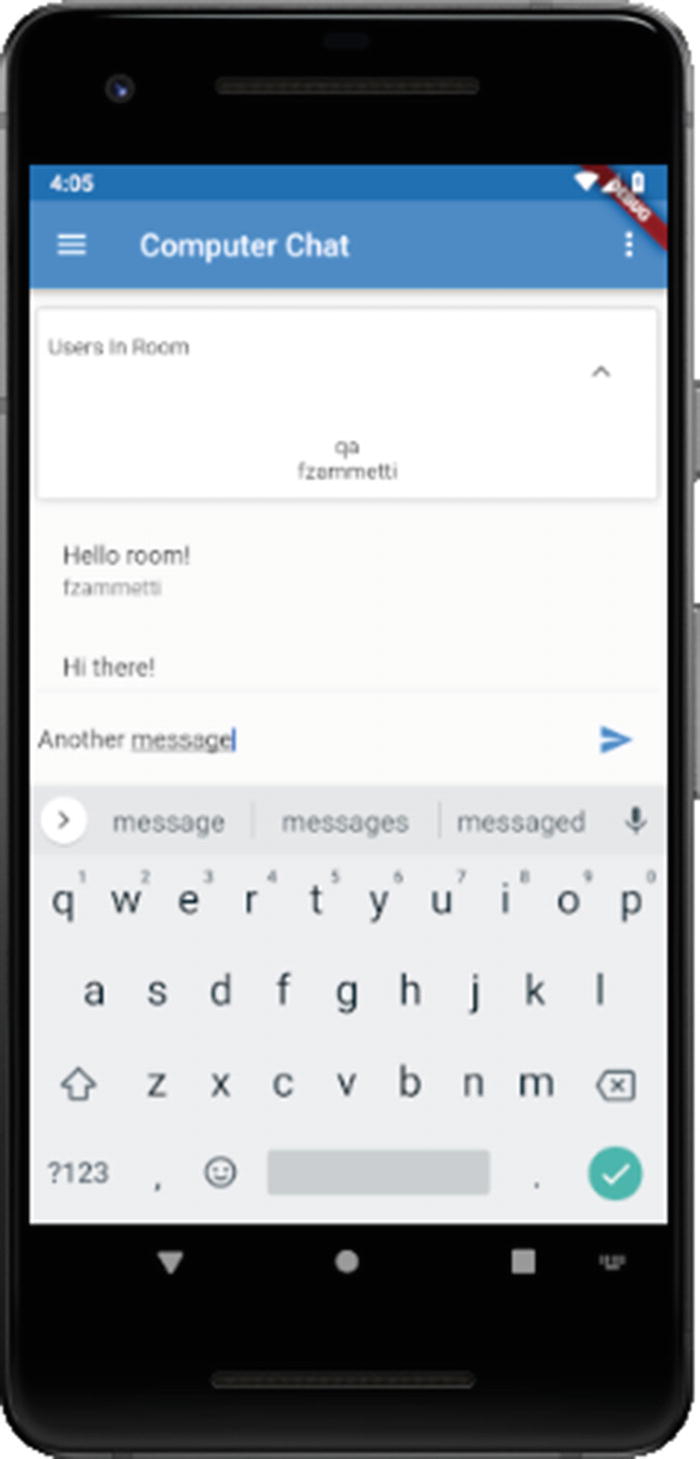
The room screen
At the top, you see an ExpansionPanelList widget . This is a widget that provides for having a list of child items which can be expanded and collapsed at the user’s behest. In this case, we’ll use it to show a list of users in the room. It should be expandable and collapsible because below that is the list of messages in the room, which of course is the primary purpose of this screen. At the bottom is an area for the user to enter a message and post it to the room, with an IconButton for doing this, which is a type of button that is just an icon. In the upper right is a three-dot menu, or overflow menu as it’s sometimes called, where you find some functions: leaving the room, inviting a user to the room, kicking a user, and closing the room, the last two only being enabled if you’re the user that created the room. The invite function will lead to a dialog to select a user from, but we’ll get to all of that in just a bit.
This is a stateful widget; we’re going to need some state local to this widget for expanding and collapsing the ExpansionPanelList. Of course, I could have put this in the scoped_model too. But, generally, for things that are truly local to a single widget, it probably makes more sense to make it a stateful widget and have that scope in the widget itself. But, as I’ve said before, Flutter is flexible, and there are no absolute rules about things like this.
There’s a couple of class-level variables, namely, the one that determines whether the user list is expanded (when _expanded is true) or collapsed (when it’s false). We also have a variable, _postMessage, that will contain the message the user posts. Also, we have a ScrollController referenced by the variable _controller. This is an object you typically don’t need to deal with directly as most scrolling components have one automatically. However, in this app, there’s a specific need for it that I’ll get to a bit later when we look at the code behind the message list. After that, finally, is a TextEditingController, which you know is used when dealing with TextField widgets, which is exactly what’s used for the user to enter a message in.
The Room Functions Menu
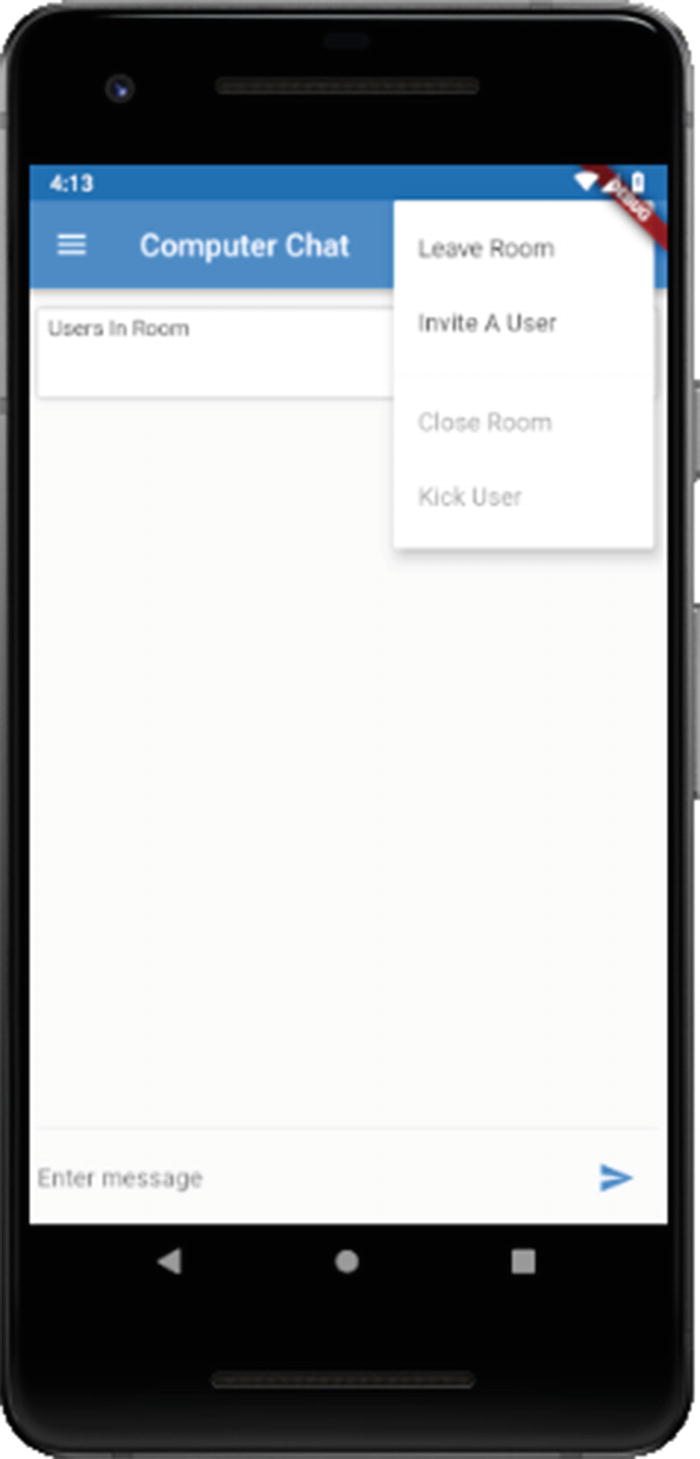
The room functions menu
Although we haven’t constructed the menu items yet – that code is coming soon – we’ve already started in with the code that will execute when you select an item on the menu, contained within the onSelected handler function . This function receives the string value associated with a menu item that was tapped, so we start an if statement to take the correct course of action. In the case of the invite string, we’re calling an _inviteOrKick() method, and we’ll look at that later (that function handles both inviting a user and kicking a user out of the room).
Leaving a room requires us to do some model cleanup tasks, beginning with removing any invites for the room that might have been present. One could argue you should still be able to enter a room you were invited to if you leave, which is reasonable, but I guess I’m a little more “hey, you left, good riddance to you!” in my thinking. The list of users in the room must be cleared as well and the default room name string set again so that the AppDrawer again reflects the user not being in a room. Also related to the AppDrawer, the Current Room item must be disabled, and finally we navigate the user back to the home screen.
There’s no work to do here other than informing the server that the room is closed and then navigating to the home screen.
We must return an array of PopupMenuEntry widgets , and each PopupMenuEntry in that array has a value property (who’s values you should recognize!) and a child Text widget for the actual text to be displayed. For the Close Room and Kick User options, the enabled property references the creatorFunctionsEnabled model property (just to show that you indeed can mix and match local state and global state, no problem) to determine whether those items are enabled or not.
The Main Screen Content
Ok, so, after the drawer, there’s some new stuff here. First, a Padding is at the top so that I can control spacing around all the elements on the screen. I push everything down 14 pixels to clear the shadow under the status bar, and a few pixels on the left, right, and bottom, just because I think it looks better if things don’t run right up against the screen edges.
After that comes a Column layout and its first child, the ExpansionPanelList where our list of users is displayed. The first thing we need to do is hook up an event handler to fire whenever the user expands or collapses the panel. Interestingly, by default, nothing will happen if you don’t do this other than the little arrow on the right changing. Once that’s done, it provides the flag we need in the first child of the ExpansionPanelList, which is the ExpansionPanel that houses our user list. The flag becomes the value of the isExpanded property, which is the isExpanded argument to the headerBuilder function. This function is where we build the header of the ExpansionPanel. That’s just a simple Text widget, but not the two spaces at the start. This is another way to do padding, essentially. In this case, the Text by default will bump up right against the left edge of the panel, but as you know by now, I tend to not like this! But rather than wrap is in a Padding, which certainly would have worked, I instead just add those two spaces, and we’re good to go.
In addition to a header, an ExpansionPanel typically always has a body, and this one is no different. For this, I use a Padding to ensure some space below the user list, for similar reasons as in the header: without it, the last user in the list would be right up against that bottom edge, which just doesn’t look right.
Now, the child of this Padding is something interesting. You’ve seen various builder functions plenty before, but I never showed that you could, in nearly all cases, have a generic Builder function any time you like. This is sometimes necessary because using it creates a closure, so if you need access to some data that you otherwise wouldn’t (without resorting to putting everything in some common state object of course). In this case, there really wasn’t that need, but I thought this would be an excellent place to demonstrate this anyway because obviously you can do it even if you don’t need a closure. Again, Flutter gives you plenty of choices for how to solve problems.
Inside the Builder’s builder() function is a simple iteration over the list of users in the room from state where each is a Text inside a Column, with the Column being what ultimately gets returned and displayed.
The Container is yet another way to introduce padding into a layout. By defining it with no content but a defined height, I’ve added some separation between the user list and the message list without an explicit Padding widget. After that is a ListView for the messages, which hopefully is something that makes sense to you, both conceptually and in terms of the code, since you’ve seen ListView widgets a few times now. For each item in the list, a ListTile is created with the title being the message text and the subtitle being the name of the user that posted the message.
First things first: the entry area is a TextField and an IconButton right next to each other, so a Row layout makes sense. But I want to avoid having to set explicit widths for either since I don’t know the dimensions of the screen. As it happens, Flutter provides a handy widget for such situations: Flexible. This allows you to control how components inside a Flex, Row, or Column widget flex and fill the available space. Here, the goal is simple: allow the TextField to fill as much space as is available once the IconButton is factored in. So, I place the TextField inside the Flexible, and then the Flexible inside the Row as the first child. The second child of the Row is a Container that contains the IconButton. It’s an IconButton inside a Padding rather than just the IconButton by itself again for spacing purposes so that I can have a few pixels to the left and right of the IconButton. Then, the IconButton is constructed. Flutter gives us a nice icon for sending a message, which I think works well for this situation.
When the button is pressed, the connector.post() method is called, passing it the user’s name, room name, and of course the message they entered. Assuming we get the ok response back, then the message is added to the list of messages for the room, and then, finally, that ScrollController I mentioned at the top is used. The goal here is that since the message will appear at the bottom of the ListView, it may not be visible if the number of messages overflows the screen (or if the user has scrolled back up to read messages). So, with the _controller, we can use its jumpTo() method, passing it _controller.position.maxScrollExtent, which is shorthand for “jump to the bottom of the ListView,” which is how you typically expect a chat room to work.
Inviting or Kicking a User
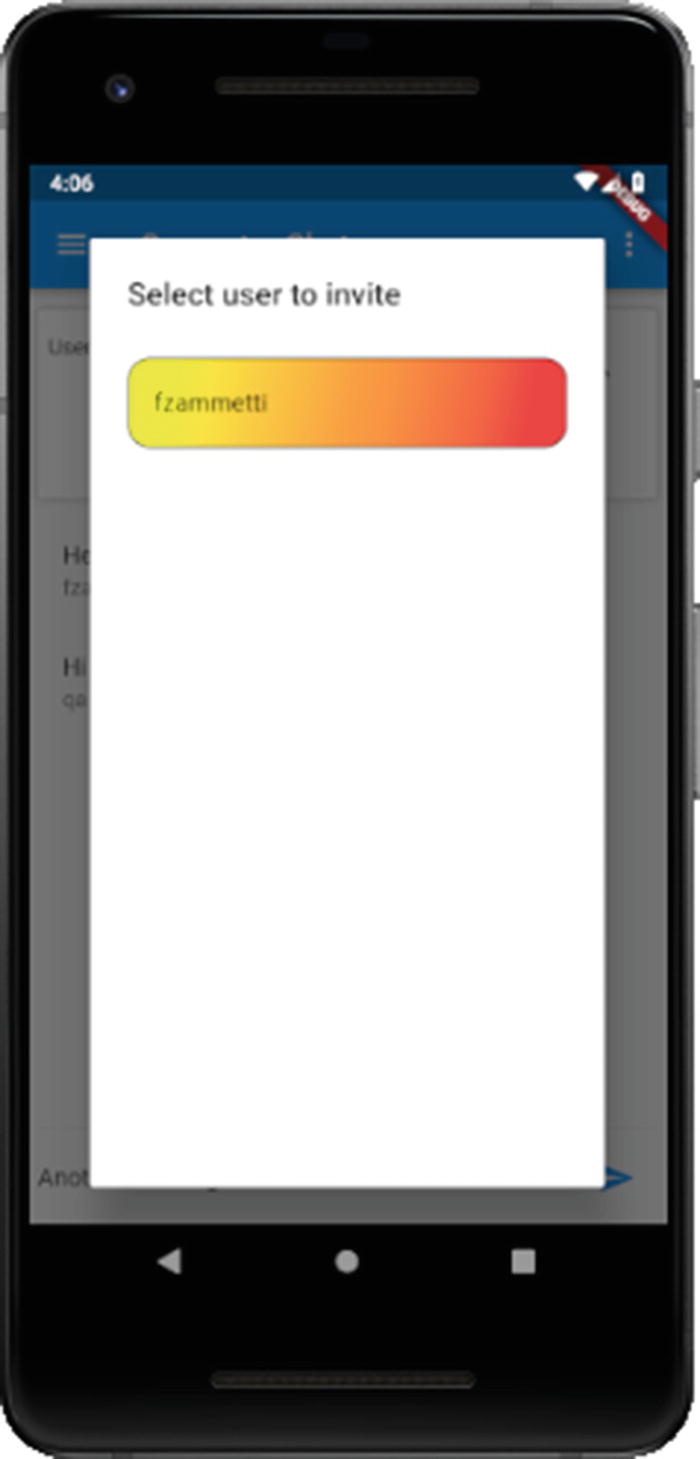
The invite user dialog
The first thing we want to do is get an updated list of users on the server. As in a few other places, this should be superfluous, but better safe than sorry. Note that if we’re kicking a user, this really is superfluous since the code already has the list of users in the room, but at this point, the code hasn’t branched on the inInviteOrKick argument, so the server is consulted either way. It’s a bit of inefficiency, but assuming our server is working well, it really shouldn’t matter much.
It all starts ordinarily enough, and in the AlertDialog constructor , you can see the first time something is different based on what function we’re doing: the display of the title text.
Here, I want the dialog to fill the screen mostly, so I use a little trick by setting the width to the maxFinite constant of the double class and the height to half that value. This effectively forces Flutter to size the window to a maximum size that it determines will fill most of the screen.
Next, a ListView is built, since, of course, this is a list of users. Which list we get the data from, whether model.userList for an invite or model.currentRoomUserList for a kick, is determined both to get its length into the itemCount property as well as where we get the actual users from. When we hit the current user, it needs to be skipped, so an empty Container is returned. Flutter will collapse this into nothing, but we can’t just return null from the itemBuilder function lest we get an exception, hence this empty Container.
First, I apply a BoxDecoration so that I can round the corners via the borderRadius property. You can round any or all corners this way – it’s all of them here. Of course, without a border, this winds up looking a little funky to my eyes, so I apply a Border via the border property. The defaults work well enough for this, hence a simple BorderSide instance for all sides (again, you can apply borders arbitrarily to any or all sides as you see fit).
There are a handful of ∗Gradient classes, LinearGradient being one that produces a gradient that goes straight up or down (RadialGradient and SweepGradient are the others). For this, you need to tell it where to begin and where to end, and in this case, I wanted it to start on the left and go to the right (technically it’s the top-left and bottom-right, but it winds up being the same as left-to-right). You then need to define the stops along the gradient, which means what fraction of the total gradient will be each defined color. The values go from zero to one, and you can split them up however you want. Here, I want each color to take up equal space, so the stops are each a tenth of the way. The colors themselves are defined next. There are several ways you can define colors with Flutter, and you’ve seen the use of the Colors collection before, but here I wanted to be more explicit, so I use RGB values (red, green, blue). Technically, it’s RGBO, where O is opacity, and in fact, the opacity is set to .75 for each, which makes them 75% translucent. It just blends in a little bit with the background that way, which dulls the colors a bit since the background color behind it is white. Finally, I apply some margin to the top so that there’s space between the first user listed and the title text, and then, of course, a ListTile is built for each user.
This is easy: if we’re inviting a user, then we call connector.invite() and pass it the selected user’s name, the current room name, and the name of the user inviting the other so that it can be displayed to the invited user. Or, if we’re kicking a user, then it’s a call to connector.kick() instead, passing it the name of the userName of the selected user and what room they’re being kicked from. And, in both cases, the dialog is dismissed.
Summary
In this chapter, we wrapped up the FlutterChat app, building the Flutter-based client-side of the app. In it, you saw some new things (or some not new things that we haven’t used in a real app before) like stateful widgets, the PopupMenuButton widget, the ExpansionPanel widget, real use of the GridView widget, the Slider and Switch components, and of course socket.io and WebSocket communications. As a bonus, you got to play around with Node a bit and write a server!
In the next chapter, we’ll start building the last of our three apps, and this one will take you in a totally new direction and give you a somewhat different view of Flutter: we’re building a game!