
In the last chapter, we began looking at the code of FlutterBook, the notes entity specifically. In this chapter, we’ll close it out by looking at the tasks, appointments, and contacts.
That may seem like a lot of ground to cover, but here’s the secret of why it’s not: if you compare the code for the four entities, you’ll see that they are probably 90% the same. The same structure is at play for all of them: a main code file (like notes.dart) and then a list screen and an entry screen, each in their own source files. The code in each will mostly be the same (or extremely similar) to that of the notes entity. The four list screens are all somewhat different though, so we’ll be looking at those in some detail, but the entry screens are, for the most part, very similar, save for a few bits and pieces.
So, what I’m going to do is only show you the areas where things diverge from the code you saw in the last chapter. As such, we’ll be looking at pieces of source files for the most part, not full source files. The bottom line is if I don’t discuss it here then you can assume that it’s not really any different than the notes code from the previous chapter (aside from small things like variable names and field names and such, the obvious things that don’t have much impact to your learning).
Get ‘Er Done: Tasks
The first entity we’ll look at in this chapter is tasks. Tasks are straightforward things: they only require a line of text to describe them and optionally a due date. As you saw in the screenshot from the previous chapter, the list view allows the user to check off the tasks they have completed. As such, the code is quite simple, arguably even simpler than the notes code.
TasksModel.dart
As usual, an instance of this class will be stored in the database, and so we need a unique id field. Beyond that, we have the description of the task, a dueDate (which will be optional) and a completed flag to tell if the task is done or not. You may think that completed should be a bool, and I would generally agree! But, since it’s getting stored in a SQLite table, and SQLite doesn’t offer us a boolean type natively, it’ll have to be stored as a string. While converting from and to string when necessary so we’re dealing with a bool in the Dart code would be doable, I don’t see much point to it in this case, so a string it is!
Wait, did I make a mistake pasting the code in this chapter? Nope! The TasksModel really is empty! You see, there are no fields on the entry screen like there were with notes (dealing with the selected color) that we need to track on the screen. Therefore there doesn’t have to be anything in the model. Recall that BaseModel provides the common code that all four of the models need to have, but tasks don’t need anything beyond that; hence its just an empty object (empty aside from what BaseModel provides that is!).
TasksDBWorker.dart
Hopefully, that’s exactly what you expected!
Tasks.dart
The starting point for the task entity’s screen is, like TasksDBWorker.dart, nearly identical to Notes.dart that you saw in the last chapter, the same screen structure with the IndexedStack and all that is present here, so let’s move on to some code that actually has some differences to see, shall we?
TasksList.dart
The due date, if there is one, gets split() into three individual parts (remember from the previous chapter that it’s stored as “year,month,day”) and those parts passed to the DateTime constructor to get a DateTime object for the specified due date. Then, we use one of the formatting functions that the DateFormat class offers. This class is a utility class from the intl package that provides numerous functions for formatting dates and times and dealing with other internationalization concerns. The intricacies of working with these functions is a little beyond our scope here. But, the bottom line is that calling the yMMMMD() function and then feeding the return value to the format() function and passing it the result of a toLocal() call on the dueDate DateTime object gives us back a nicely formatted version of the date suitable for display. And that’s the whole point of this exercise!
This time though, the leading is where we find the Checkbox the user can check when the task is completed. The value is taken from the task reference, which as you can see is the next task in the list of tasks. Since completed is a string and not a boolean, it can’t be the value of the value property directly, so a simple ternary expression gets the boolean that is needed. After that, we have to attach an onChanged event handler for when the Checkbox is checked (or unchecked). The work here is easy: take the boolean value passed into the onChanged function and set it as the value of task.completed by calling toString() on it. Then, ask TasksDBWorker to update the task, and finally tell the TasksModel to rebuild the list via a call to the loadData() method that you know is supplied by BaseModel. That’s it, easy!
That should all look pretty familiar to you given your exposure to the code for notes, but one thing to understand is that we don’t allow the user to edit a task that is already completed, hence the check of task.completed in the onTap() event handler.
As with notes, there is a deleteTask() method here too that you can see called via the secondaryActions of the Slidable, but given that it’s the same as for notes, we can skip looking at it and move on to the entry screen.
TasksEntry.dart

The entry screen for tasks
Here, we finally see the usage of that utils.selectDate() function that we looked at briefly in the last chapter. This function returns a string in the form “year,month,day” after the user selects a date, which you know is the form it’s saved into the database. Of course, if null is returned, then no date was selected, so we only set the dueDate field of the task if null wasn’t returned.
And that’s it for tasks!
Make a Date: Appointments
Next up is the appointments entity, and here we have a few new things to look at, including a nice plugin for our main display on the list screen. But, before that, let’s take a look at the model.
AppointmentsModel.dart
The id you know about and title and description are obvious. Like task, an appointment has a date, called apptDate this time, but unlike tasks, appointments also have a time, stored as apptTime. Both are strings again because that’s how they ultimately get stored in the database, so naturally, we’re going to have some conversion code somewhere, as you’ll see soon.
As with tasks (and contacts, as you’ll see later), the BaseModel chosenDate field and setChosenDate() method will be used for the appointment’s date on the entry screen (because that’s needed on multiple entry screens, putting it in BaseModel avoids some duplicate code). Since only appointments have a time though, we only need the apptTime and setApptTime() method in this model, but the code for the setApptTime() method is just like that of setChosenDate(): store the passed in value in the model and notify listeners, so the screen is rebuilt with the new value.
AppointmentsDBWorker.dart
There are no other surprises here; you’ve essentially seen this already by virtue of seeing the database worker for notes, so let’s go forward.
Appointments.dart
Again, like with tasks, the core screen definition for appointments is the same as that of notes, so we can jump into the list screen straight away, which does have some new stuff to see.
AppointementsList.dart
The Calendar Carousel is a plugin (see here: https://pub.dartlang.org/packages/flutter_calendar_carousel ) that provides to our app a calendar widget that can be swiped horizontally to move between months. It has many other options available to it such as showing indicators on dates that have events on them, a variety of display modes, and tap handlers to perform actions when a date is tapped.
All of which sounds like precisely the kind of thing we need for displaying appointments in something other than a simple list! Flutter doesn’t offer such a thing out of the box, hence the need for a plugin, and Calendar Carousel fits the bill exactly.
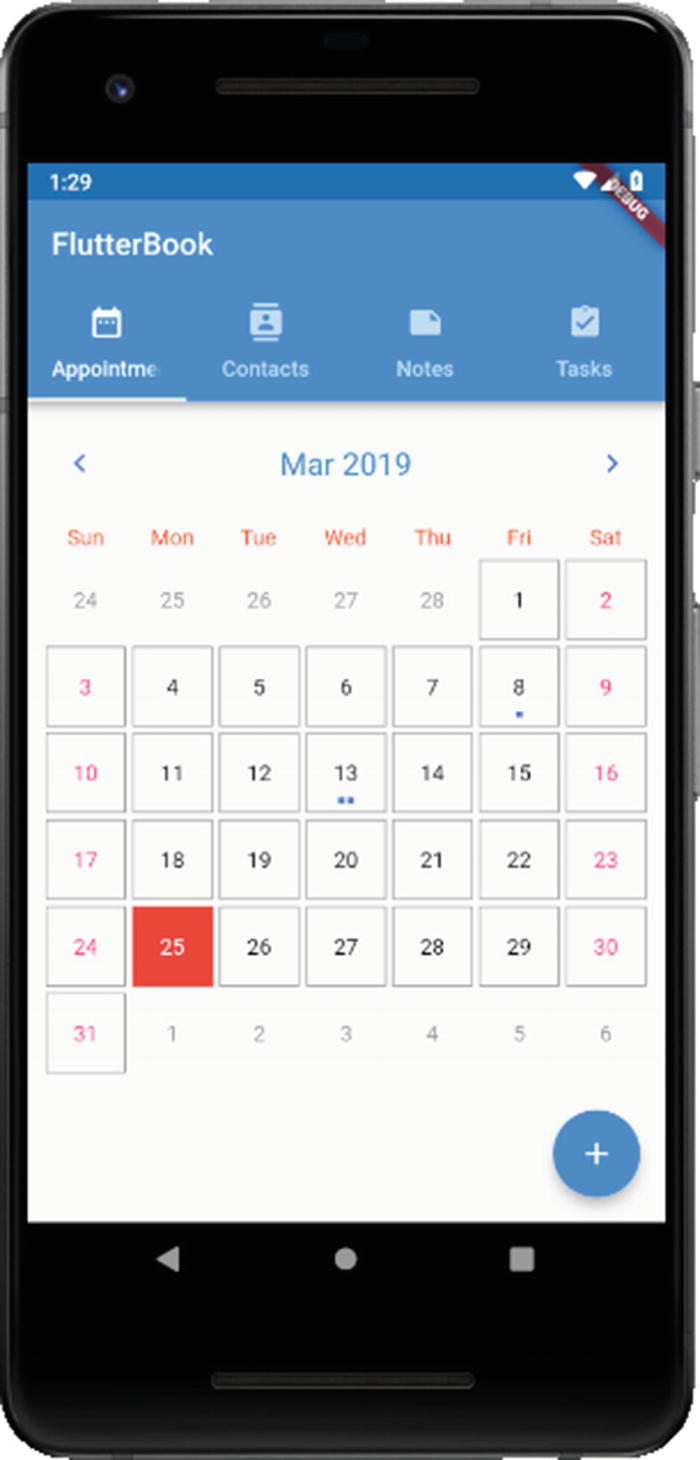
The appointments list screen with date indicators
The 8th and 13th have appointments, hence the dots. Notice on the 13th that if there are multiple events, you’ll get multiple dots. Perfect!
The goal here is to get the Calendar Carousel to expand to fill the screen. For that, an Expanded widget makes sense since that’s expressly its purpose: it expands its child to fill the available space inside a Row, Column, or Flex. The important point is that the parent widget must have a flex capability, which limits it to those three shown. Which of those is used here wouldn’t matter much given that this is the only widget on the screen (well, in the body more precisely), so I just went with the tried and true Column. Rather than put the CalendarCarousel widget directly as the child of the Expanded though, I put it inside a Container so that I could set some margin around it. I just felt it looked better not stretching all the way to the very edge of the screen, not to mention avoiding running into the TabBar at the top or the FAB at the bottom.
This method starts by accepting the DateTime that was tapped, and the BuildContext associated with the widget that called it. Note that while the function defined for onDayPressed accepts a list of events, for the display to show what I want, I needed to get that data from the entityList in the model. That’s because the Event objects passed in wouldn’t have all the data I needed, so that argument is simply ignored here in favor of the code that follows. That’s why the widget returned by the builder function of the showModalBottomSheet() call begins with a ScopedModel and references our AppointmentsModel.
So far, nothing you haven’t seen before, right? I again felt like some padding was in order here, so a Container starts off the body so that I could apply it.
The first child is just a simple Text element, centered on the BottomSheet via the textAlign property, and the value of which is the selected date, formatted nicely. Notice here the way the color of the text is retrieved: the Theme.of() function is always available and gets you a reference to the theme currently active for the app. Once you have that reference, you can access its members, one of which is accentColor, which for the default theme will be a nice shade of blue. The fontSize is also specified to make this text stand out from the rest. I also added a Divider widget after that to separate the date from the list of appointments.
For any appointment that’s not for the selected date, we return a Container with a zero height. This is necessary because returning null from the itemBuilder function will result in an exception; Flutter expects something to be returned in all cases, so here it’s something that won’t display anything, so only appointments for this date will be visible in the end, just like we want.
The time of the appointment, if there is one, has to be split just like the date is, because it’s stored as a string in “hh,mm” form in the database. Once that’s done, we can pass those two pieces of information to the TimeOfDay constructor , which is just like DateTime but, obviously, for times! The format() method of TimeOfDay gives us back a nicely formatted time in the applicable local form.
It too is nearly identical to its notes and tasks edit method counterparts like the delete code is, but here we must deal with the time. Since the date and time are optional for appointments, we have to check if they are null or not and only process them if they aren’t. If they aren’t, we have to parse out the date components and build a DateTime to pass to setChosenDate() in the model, and similarly, we have to parse out the time components to construct a TimeOfDay to pass to setApptTime().
AppointmentsEntry.dart

The entry screen for appointments
It’s a simple enough screen, just a single required field in the title, a multi-line description field, and two fields for selecting a date and time. Technically, Date is required as well because an appointment without a date wouldn’t make much sense (though time is not required because an appointment doesn’t necessarily have to have a time associated with it logically). But, instead of dealing with validation, the date gets set to the current date by default, and there’s no way to clear it. Therefore, an appointment is automatically going to always have a date, and it’s up to the user to change it if the current date isn’t appropriate.
Like I said, very similar to the code for getting a date that you saw earlier for tasks. If the user is editing an existing appointment, then we have to set the initialTime of the TimePicker that we’ll show via the call to showTimePicker(). Therefore, we have to parse it out of the model, the entityBeingEdited specifically, since the list screen will have set that before navigating to the entry screen. Then, once the user selects a time, or cancels the TimePicker, the apptTime is updated in entityBeingEdited and then also in the model via the call to setApptTime() so that it gets reflected on the screen (remember, that method will call notifyListeners(), which will trigger Flutter updating the display based on the new model value).
Reaching Out: Contacts
The final entity to look at is contacts, and I left it for last because in some ways it’s the most complex of the bunch, and for sure it offers you the opportunity to see some new things.
ContactsModel.dart
A contact can, of course, have a great deal of information stored about it – if you open your phone’s contact app right now, you’ll see a whole host of attributes you can set – but I’ve chosen probably the key ones only, plus one more just for fun! The name, phone, and email fields are obviously key to a contact in this day and age, and I added birthday just to have another example of working with dates and the DatePicker.
Tip
I recommend extending the three apps in this book as learning exercises. All of them have things that can be done to make them better, by design for the most part, and adding more fields for contacts would be one relatively easy thing you could do to practice your skills.
The birthday will be covered by the chosenDate field (and its associated setter method) from BaseModel, so this one triggerRebuild() method really is all that’s specific to contacts. Since notifyListeners() must be called from within the model class, that’s why we need this method, but in this case, that’s the only task it has to accomplish. As you’ll see, this method will be used when editing a contact, and an avatar image is selected so that the image gets displayed on the screen. Let’s not get ahead of ourselves though; we’ll get to that soon.
ContactsDBWorker.dart
By now, that shouldn’t hold any surprises for you.
Contacts.dart
Similarly, the base layout of the contacts screen has nothing new to offer compared to the code for the other three entities, so let’s get to where there is some new stuff.
ContactsList.dart
It all starts off ordinarily enough: the usual ScopedModel at the top, with the model referencing contactsModel, and then a child that is a ScopedModelDescendant. The builder function then is present, and it returns a Scaffold, which we need so we can have a FAB for creating a new contact.
Now, the onPressed event handler of the FAB is where we start to see some new and exciting stuff. What you’re going to see is that when a contact is created, you can add an avatar image to it. The image will be stored in the app’s documents directory, not in the database (that’s on purpose because it provides an opportunity for you to see some file handling code). But, when editing a contact, whether new or existing, a temporary image file can be present if the user had previously been editing a contact. So, to start when creating a new contact, we have to make sure that the temporary file isn’t there. The File class is a Dart class from the io package, and its constructor takes as an argument a path to a file. You saw the utils.docsDir retrieved in the previous chapter, and its path property is the path to the documents directory. So, passing that to the join() method , which is a function provided by the path library that knows how to concatenate file path parts to wind up with a proper platform-dependent path, along with the filename avatar, gets us a reference to that file, if it exists, wrapped in a File instance. The File class provides some methods, one of which is existsSync(). This returns true if the file exists, false if not, and it does so synchronously, which we need here. Otherwise, we’d have to await it (or otherwise wait for a Future to be resolved). There is also an exists() version that is asynchronous. If it exists then the deleteSync() method is called to get rid of it (and there is an asynchronous delete() method available as well). After that, a new Contact is created, and the user is navigated to the entry screen as usual.
Each child of the ListView is a Column layout and will have two items in it: a Slidable that contains a contact itself and a Divider, hence the Column being necessary. The Slidable is like all the others you’ve seen except for the leading. Here, it’s a CircleAvatar , which is a widget that shows an image and condenses it down into a circular shape. It’s typically used to display avatar images of people in a list, so it’s a very fitting widget to use here. The only trick here is that the backgroundImage, which is how the image is specified, must be either a valid FileImage reference or null. That’s where that avatarFileExists flag comes in. When it’s true, the avatarFile, which remember is a File instance, is wrapped in a FileImage widget, which is a widget to display an image based on a reference to a file on the file system. When it’s false, then backgroundImage will be null.
We also need that flag because when a contact has no avatar image, we want to show the first letter of their name, which is a typical pattern in contact apps. So, the child of the CircleAvatar will either be null when there is an image, or it will be a Text widget when it doesn’t. In the latter case, the substring() method of the String class, of which contact.name is, of course, an instance, is used to get that first letter, and the toUpperCase() method is used to ensure its upper-case.
This handler too is not too different from the others you’ve seen, but here again, we have to deal with the temporary avatar image that could be there, so that’s deleted if it exists. The date has to be parsed apart too and set in the model for display on the edit screen, and then the usual screen navigation is done via the call to setStackIndex().
You can also see the Divider there, and that completes the return in the itemBuilder() function .
Most of this is what by now can rightly be called the typical code of an entity delete function, but once more, we have the avatar files to deal with. Deleting a contact from the database isn’t sufficient; we have to delete its avatar file too if it has one, so once more we get a reference to it and, if it exists, call deleteSync() to get rid of it. After that, it’s just the usual database deletion and showing a SnackBar code to confirm, and we’re all done!
ContactsEntry.dart

The entry screen for contacts
This is a typical entry form start, but in the Cancel button’s onPressed handler we have some work to do around the possible temporary avatar file. Even though it’s deleted before this screen is shown, it’s still better to delete it now, if it exists (if the user had selected an avatar but then cancelled), so that’s exactly what we do. Once that’s done, the soft keyboard is hidden as previously discussed, and the user navigated back to the list screen. The Save button just calls _save() like always, and we’ll see that later.
Now, you can see where that avatarFile reference comes into play: the title of the ListTile will be either an Image or it will be a Text widget saying that no avatar image has been selected. When it’s an Image, the avatarFile is passed to the Image.file() constructor and the avatar image is shown. Note that I did nothing fancy with scaling or constraints here. It will simply display the image in whatever size it is (you may want to change that as a suggested exercise – hint hint!). The trailing property of the ListTile provides an IconButton for the user to click to select an avatar image, and the code for this is something we’ll look at soon because it’s got some interesting new stuff to see!
That’s all stuff you’ve seen before, aside perhaps from the keyboardType property , which allows us to specify a keyboard tailored to the type of data being input. As you can see, there are several properties available on it like phone and emailAddress, and their meanings I would think are self-explanatory!
The job here is to show a dialog where the user selects the source of the avatar image, which can either be from their gallery or the camera. So, we call showDialog()and then return an AlertDialog from its builder function. Inside the AlertDialog we start with a SingleChildScrollView, which is a widget that contains a single widget that can be scrolled. Why use that here? Honestly, there’s no particular reason other than to show you an alternate way to do things. In this case, scrolling doesn’t come into play, but what if you had a few more sources of images you wanted to provide? Rather than ensuring the dialog is big enough to fit them all, you can just allow it to scroll like this.
Anyway, inside the SingleChildScrollView goes a ListBody, which is a widget that arranges its children sequentially along a given axis and forces them to the dimensions of the parent in the other axis. Finally, because we need items that can be clicked, I decided to go with GestureDetector widgets here rather than buttons or something else, though not for any special reason. By doing so, we have an onTap event now that can be applied to this item, which is a Text widget that when clicked will launch the camera. The ImagePicker class is provided by the image_picker plugin which offers functions to access sources of images, the location you want to get the image from being specified by the source property passed to the ImagePicker.pickImage() function. Upon return from that call, if cameraImage isn’t null (it would be null if no picture was taken), then we use the copySync() method, which is available because a File instance is what gets returned to us, to copy it to avatar, which you know now is our temporary avatar image file.
Then, we have to tell the model that it changed, even though in reality it hasn’t! We have to do that because we need Flutter to call our build() method so that the image is shown (remember that code from earlier?). So, the contactsModel.triggerRebuild() method is called, which you’ll remember just calls notifyListeners(), and that causes the image to be shown as a result of the screen being redrawn. Then, we just pop() the dialog away by getting a reference to the BuildContext for the dialog, and we’re good to go.
The only thing unique to contacts is, of course, the avatar image, and here we have to account for that. If the temporary avatar file is present, then we use the renameSync() function to give it a name matching the id of the contact. The id is captured from the call to the create() method of ContactsDBWorker, which is the only database worker class that does this, and is the ID that was assigned to the contact when it was stored to the database. Of course, when updating an existing contact, we already know that id, so we’re good to go in either case.
And with that, we’ve completed our tour of the first app, FlutterBook!
Summary
In this chapter, we completed our look at the FlutterBook app. You saw how the appointments, contacts, and tasks entities were coded, including things like getting images from the gallery or camera and picking times and dates. With that, we have a complete PIM application that you could use for real if you wanted to, in keeping with the “practical” title of this book!
In the next chapter, we’ll start building the second of our three apps and, in the process, you’ll see some new capabilities of Flutter and even get a taste of some server-side programming and interfacing a Flutter app with it.
Sounds like good, educational fun, no? That’s my goal!