
This chapter investigates mobile forensic investigation for the KeyLogger application installed on iOS or Android; it introduces and helps the investigator to discover traces of a spy application case, determine which tools were used to investigate and search for various spy programs, and shows how to report results obtained from the iPhone spy program, which was installed and used for espionage and access to sensitive data.
Introduction to Mobile KeyLogger
Methodology and Case Study Setup
Mobile Malware and Spyware
Evidence Recovered during the Examination
Evidence Recovered Using Magnet ACQUIRE
Examination and Analysis KeyLogger Result
Summary
Introduction to Mobile KeyLogger
Currently , applications of technology and communication, including smartphones, are incredibly developed. We chose implementation for a mobile forensic investigation on Android smartphones and iOS smartphones because of their widespread use and user base. Android is the market leader over iOS.

Mobile malware detection classification
Seizure Phase
For the practical case study in this chapter, we will assume the following details for the reporting agency. The governorate oversees the implementation of laws, regulations, instructions, and orders issued by the President of the National Authority or the Council of Ministers. It is responsible for public security, order and morals, public health, and the protection of public freedoms and the rights of citizens. The governor has the powers of the Minister for the administrative staff of the department. The functions and powers of the director of the governor’s office are very sensitive, as the director is responsible for all the activities of the governor and has all the working papers of the governor’s office. Therefore, there are many attempts to break into the governor’s office cell phone to use sensitive information related to the work of the governor and the governor’s office.
The director of the governor’s office was on a mission outside the governorate, and was interrupted by Israeli occupation soldiers in a checkpoint and had everything confiscated, including the work cell phone. The director was released after an hour and got everything back. Based on this incident, the director reported the incident to the governor. In that report, the director stated a suspicion of spyware on the cell phone because data usage was unusually high; the phone showed signs of activity in standby mode and performed unexpected reboots, and battery life was deteriorating.
Based on the country’s cybercrime law, such as No. 10 from the year 2018 and Article No. 32, the governor issued an administrative decree based on the powers under the applicable laws and presidential decrees, especially Decree No. 22 for the year 2003 on the powers of the governor, and Decrees No. 77 and No. 2021 dated April 20 2021 giving powers to the IT Department, cell phone data was extracted from MI Note 8 Pro Android mobile by the director of the governor’s office and analyzed for suspected spying applications. Figure 12-2 shows the details of the device seized for examination including serial number, make, and model.
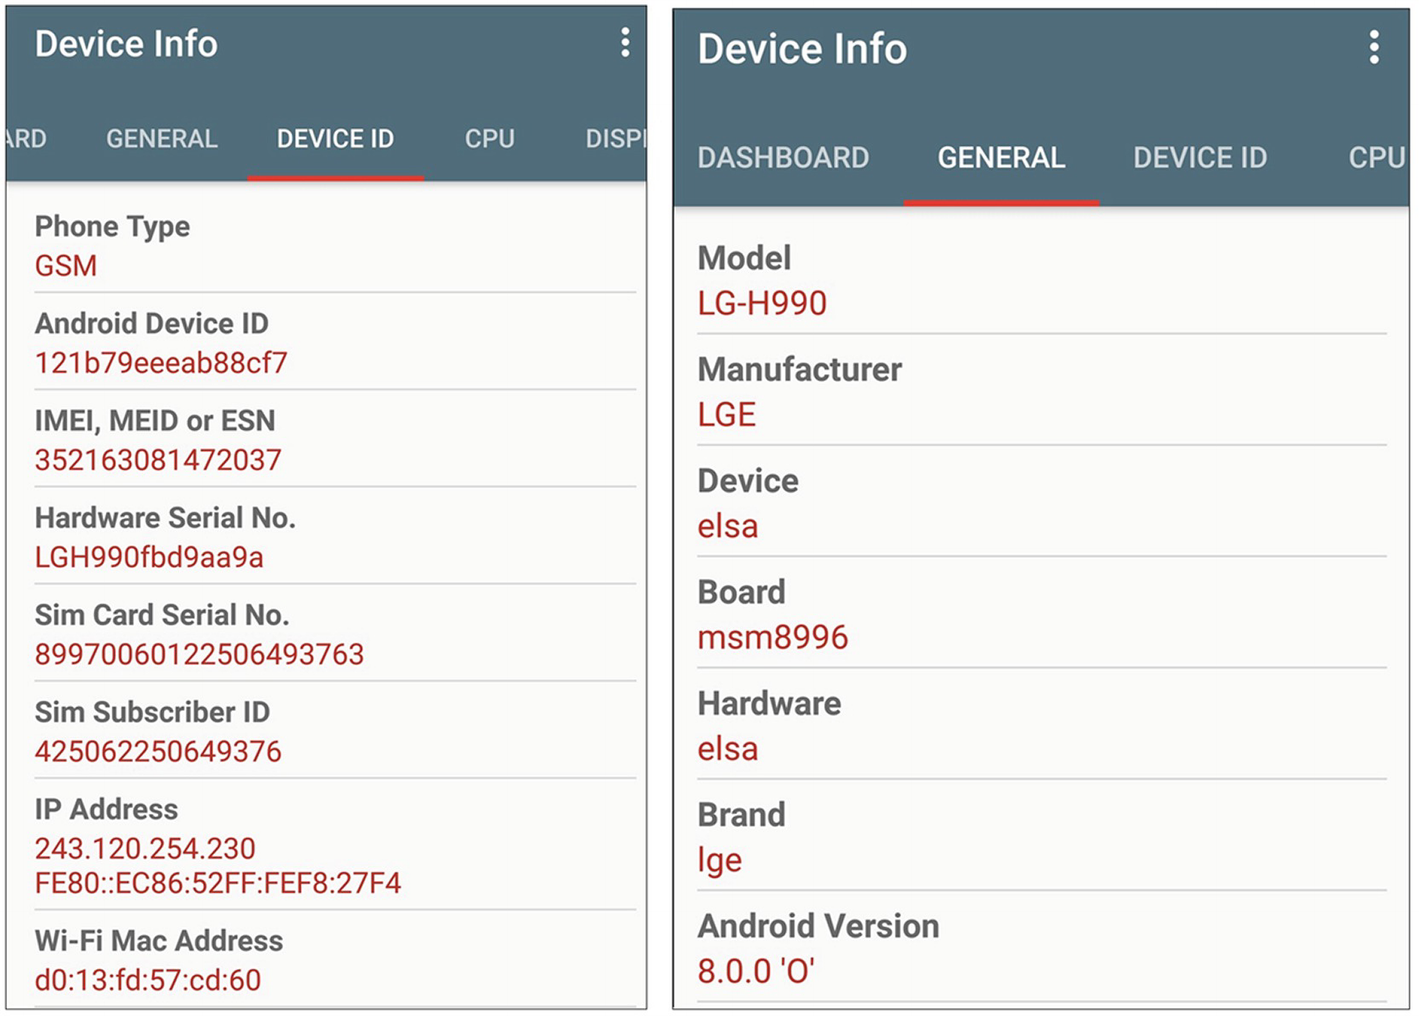
Device information
Android Acquisition Phase
Android Debug Bridge: adb command-line tool introduced in the previous chapter. We use it in this case for connecting the Android device with the workstation using the command line.
APK Analyzer: After the development process is complete, Android Studio features an APK Analyzer that offers quick insight into the composition of your APK. The APK Analyzer may help you save time troubleshooting issues with DEX files and resources in your app, as well as minimize the size of your APK. It may also be run from the command line using APK Analyzer [3].
jadx GUI decompiles an APK: The Apache 2.0 License governs the use of this program, which is open to the public to decompile an APK. To use jadx with a graphical user interface, run the jadx-gui.bat file (included in the jadx-folder/bin folder) as an administrator. First, you’ll get a box where you may select the APK file to decompile [8] See Figure 12-3.
FINALMobile: Used in previous cases, it’s a strong software and mobile solution for legal inspectors that gives the most advanced data mining and information extraction capabilities to the legal community. This software can convert raw data into executable and ready files with just a few clicks thanks to its comprehensive knowledge of system files and information patterns. Information on mobile devices is stored in specific formats, and in many circumstances, this information is not totally wiped. For our case, this software may quickly recover deleted (hidden) files, and also it is easy to recover information for future mobile devices because most mobile devices follow the same pattern. The software can evaluate the data by scanning each sector if the file system experiences an error during retrieval. With this software, you can also categorize your data in a variety of ways and export it as Excel or PDF reports [6].

Decompile an APK or DEX file using jadx in Windows
Magnet AXIOM: AXIOM gets to the most relevant information quickly because it is built on the idea that artifacts-first forensics is the most efficient way to search and analyze data. Browser history, email, conversations, photographs, location data, videos, documents, and social networks are just a few of the artifacts that are instantly accessible for immediate study. Use Dynamic App Finder to locate relevant artifact data from apps that aren’t currently supported, such as chats [10].
Manual Backup via Android Debug Bridge
- (a).
Navigate to the Settings section menu.
- (b).
Tap System at the bottom of the page.
- (c).
Choose “About phone”.
- (d).
Enables Developer options.
- (e).
Select Developer settings from the System menu by pressing the back button.
- (f).
Toggle Developer options on. Toggle on USB debugging by scrolling down, as shown in Figure 12-4.

USB debug setting
The use of ADB is as described previously in many cases. The following are the main steps:
- (a).
Download the Android SDK Platform Tools ZIP file.
- (b).
The contents of this ZIP file should be extracted to a convenient location such as C:platform-tools.
- (c).
Go to the location where the contents of this ZIP file were extracted using Windows Explorer.
- (d).
Start a command prompt from the same directory as the ADB binary. Right-click within the folder while holding Shift, then select “Open command window here” from the menu. (Some Windows 10 users may see “PowerShell” rather than “command window.”)
- (e).
Use a USB cord to connect your phone to your computer. Set the USB mode to “file transfer (MTP)”. Some OEMs may or may not need it, but for general compatibility, it’s better to just keep it in this state.
- (f).
To start the ADB daemon, use the following command in the Command Prompt window: adb devices.
- (g).
A popup screen will appear on the phone’s screen to accept or refuse USB Debugging access. Naturally, when requested, you should grant USB Debugging access (and tap the always allow check box if you never want to see that prompt again).
- (h).
Re-enter the command from step (f) at the end. If everything went well, we should now be able to view the serial number of your device at the command prompt (or the PowerShell window).
- (i).ADB pull data extraction: Logical data extraction operates on a wide range of devices and is simple to use. On a nonrooted device, certain data can be extracted, but root access will unlock the device and give you access to all of the files on it. Using one or more of the previous data, the Android application saves data on the device in one of the following locations:
Shared preferences: This uses a lightweight XML format to store data in key/value pairs. The shared-pref folder in the application’s /data directory is where shared preference files are kept.
Internal storage: This is where private data is stored in the device’s internal memory. Other apps cannot access files stored to the internal storage since they are private.
External storage: This puts public data on the device’s external memory, which often lacks security measures. This information may be found in the /sdcard directory.
SQLite database: This information may be found in the database /data/data/PackageName/. The.db file extension is most commonly used.
- (j).For ADB backup extraction, the command used for full backup is the following: adb backup -shared –all
When the command is run, authorizing permission on the device must be acceptable. Then to start a backup, the device’s screen must be unlocked. By default, an Android backup file is saved as .ab file in the Android SDK’s platform-tools subdirectory.
The .ab file is converted to a .tar file, which can then be converted by using Android Backup Extractor [12]. Because this is a Java-based utility, Java must be installed on the workstation before using it, to convert the backup file to .tar file, using the command line java -jar abe.jar unpack backup.ab backup.tar, as shown in Figure 12-5.

Convert the backup file to .tar file
Then you can use any archive programs such as WinRAR or 7Zip can read .tar files. By default, the backup file includes two main directories in the archive file, and the apps folder includes all of the information for the apps included in the backup that is found under /data/data and shared folder, which includes all data stored on the SD card.
Reverse Engineering for Extracting an APK File
- 1.
We need to access the device’s APK files (for nonrooted devices) by identifying the package name of the app command adb.exe shell pm list packages as shown in Figure 12-6.

The steps for extracting an APK file
- 2.
By giving the following command, you can determine the complete pathname of the APK file for the requested package (Figure 12-7).

Determine the complete pathname of the APK file
- 3.
Using the APK file from the Android device, transfer it to the forensic workstation (Figure 12-8).

Pull the APK file
- 4.After obtaining the APK file, start the reverse engineering for the Android apps.
- (a).
Rename the APK extension (base.apk) to ZIP (base.zip).
- (b).Extract base.zip file (Figure 12-9).
 Figure 12-9
Rename the APK extension and extract APK
- (c).
Using the dex2jar tool to convert classes.dex into a Java class file using command line d2jdex2jar.bat classes.dex dex2jar classes.dex -> classesdex2jar.jar, a new class, dex2jar.jar, is created in the same directory.
- (d).
Open the JAR file using jadx-GUI to examine the code, and examine how the app saves data, permissions, and malware (Figure 12-10).

Open JAR file using jadx-GUI to examine the code
Steps Were Taken to Root LG V20 H990DS
- (a).
The device is turned on.
- (b).
The battery level must be at least 50%.
- (c).
Use of the Internet is required (Wi-Fi network suggested).
- (d).
Allow applications to be installed from unknown sources.
Unknown Sources (Settings ➤ Security ➤ Unknown Sources)
Steps for Rooting Android using the KingoRoot APK
Step 1: Get KingoRoot APK for free.
Step 2: Download the KingoRoot APK and install it on your smartphone.
Step 3: To begin, open “Kingo ROOT” and select “One Click Root”.
Step 4: Wait a few moments for the result screen to display. When using KingoRoot, make sure the network is steady because Kingo’s server stores the rooting scripts. KingoRoot apk will not be able to root smartphones if this is not complete.
Step 5: Result: succeeded or failed.

Evidence recovered using Magnet forensic software
Acquisition and Analysis Using FINALMobile Forensics Software
Step 1: Connect the Android smartphone (LG V20) PC using a USB cable to start the acquisition phase using FINALMobile Forensics software.
Step 2: Open FINALMobile Forensics software to acquire the Android smartphone (LG V20).
Step 3:Start acquisition phase using FINALMobile software.
Step 4: Start the analysis phase using FINALMobile software.

KeyLogger artifact result using FINALMobile Forensics software
Acquisition and Analysis Using Magnet AXIOM Forensics Software
Step 1: Connect the Android smartphone (LG V20) PC using a USB cable to start the acquisition phase using software forensic (FINALMobile).
Step 2: Open Magnet ACQUIRE (AXIOM Process) Forensics software to acquire the smartphone (LG V20) device and create a new case.
Step 3: Select an evidence source.
Step 4: Acquire evidence.

Details of findings or issues identified using FINALMobile Forensics software
Results and Conclusions
At this point, after the digital forensic investigation, results were obtained from the analysis using various types of digital forensic analysis software; based on the results, it was determined that there was a spy program installed on the Android smartphone (LG V20). Based on these findings, it was recommended that the mobile phone should not be given to anyone to keep private and sensitive data from being lost or exploited by anyone.

Artifacts for keylogger
References
- [1].
CSO. Malware Explained. 2019. URL: https://www.csoonline.com/ article/3295877/what-is-malware-viruses-worms-trojans-andbeyond.html.
- [2].
Kevin Curran et al. “Mobile Phone Forensic Analysis”. International Journal of Digital Crime and Forensics 2.3 (2010), pp. 15–27. ISSN: 19416229. DOI: https://doi.org/10.4018/jdcf.2010070102.
- [3].
Developer.android.com. Android Debug Bridge (adb). 2021. URL: https://develo per. android.com/studio/command-line/adb?gclid=CjwKCAjw_o- HBhAsEiwANqYhp_1p_NOVXmZolalK200r5uXe3KmzLkqUgDLn5myBt7otjkU ISi ROxoC4nMQAvD_BwE&gclsrc=aw.ds (visited on 2021).
- [4].
Dotnettricks. Understanding Xamarin Android - Build Native Android App. 2021. URL: https://www.dotnettricks.com/learn/xamarin/understandingxamarin-android-build-native-android-app.
- [5].
Sarah Edwards et al. “The Most Relevant Evidence per Gigabyte”. In: Walidumar.my.id. 2022. [online] Available at: https://walidumar.my.id/buku.elektronik/Forensic/BukuElektronik/DFIR%20Smartphone%20Forensic.pdf [Accessed 26 March 2022].
- [6].
Finaldata. FINALMobile Forensics. 2021. URL: https://finaldata.com/mobile/.
- [7].
Github.com. dex2jar. 2021. URL: https://github.com/pxb1988/dex2jar.
- [8].
Github.com. jadx to Decompile an APK GUI. 2021. URL: https://github.com/skylot/jadx/releases.
- [9].
D. Hamdi et al. “Multimedia File Signature Analysis for Smartphone Forensics”. In: Proceedings - 2016 9th International Conference on Developments in eSystems Engineering, DeSE 2016 (2017), pp. 130–137. DOI: https://doi.org/10.1109/DeSE.2016.22.
- [10].
Magnetforensics.com. Magnet AXIOM. 2021. URL: https://www.magnetforensics.com/products/magnet-axiom/.
- [11].
Priyanka Sahu and Preeti Tuli. “System Monitoring and Security Using Keylogger”. In: IJCSMC 2.3 (2013), pp. 106–111. URL: http://d.researchbib.com/f/8nq3q3YzydL3AgLl5wo20iMT9wpl9jLKOypaZiGJSlL2tlZQRmY1LlFGZlZQRmZwVhpTEz.pdf.
- [12].
Sourceforge.net. Android Backup Extractor. 2021. URL: https://sourceforge.net/projects/adbextractor/.
- [13].
Statcounter. Mobile Operating System Market Share Worldwide. 2021. URL: https://gs.statcounter.com/os-market-share/mobile/worldwide.