
This chapter will cover everything you need to know about practical forensics on Android devices. We will start by learning about the Android platform and its file system and then cover the topics of setup, acquisition, extraction, and recovery. We will also learn how to connect devices using ADB tools and back them up and how to use SQLite files for the acquisition process.
Recently, smartphones have developed tremendously; in each period of development, a new company has appeared to enter the global market competition to impose itself, and this is directly proportional to the emergence of new applications every day for various devices. In addition, the field of cyber security has several aspects, including smartphones; especially with the exploitation of the huge number of users, many immoral hackers have been greedy to exploit these applications for their interests, either theft, destruction, plagiarism, or many others. This chapter shows how these applications are exploited, especially in Android devices; how to explore the backups; how the company Evina found some apps that used phishing attacks to steal users’ accounts using a quantitative methodology; and data analysis and results from the Android presentation.
Understanding Android
Application Framework
Android Runtime
HarmonyOS
Linux Kernel
Android Forensic Setup and Pre-Data Extraction Techniques
Android Data Extraction Techniques
Android Data Analysis and Recovery
Android App Rooting Process and Techniques
Introduction
Increasingly, many devices do much more than receive a telephone call occasionally. These devices are becoming more and more capable, and the number of people using them has increased accordingly. With the increasing availability of these powerful devices, criminals can also use this technology. Criminals might use smartphones for several activities, such as email fraud, textual harassment, trafficking in child pornography, communication for narcotics trafficking, and so on. Analysts can be extremely helpful in the investigation by storing data on smartphones. Mobile equipment already shows a large amount of data connected to a person with a basic telephone history, contact information, and text information; even more useful information such as email, browser history, and chat logs is provided by smartphones. Mobile devices probably display more proof of byte connectivity than most computers – and it may be harder to collect forensically. Part of the problem is that there is plenty of available hardware, software, and/or interfaces. These differences vary between media, in which data is stored in the operating system and the file system, and the efficiency of specific instruments. Even different cellular models manufactured by the same manufacturer may need cables and software for access to telephone information [8].
In recent days, the popularity of Android OS has grown. It has almost the same features on desktop/laptop computers. Users can create documents, access the Internet, read and forward email, call, text and MMS, and maintain confidential information in many different ways. You can access the information via the Internet. These Android devices and apps make it easy for friends, family members, and groups to communicate on the web and socially. For many cybercrime investigations, a forensic smartphone exam is necessary to determine a range of suspected activities. Advanced cells contain a lot of information, which is extremely useful to investigators in the exploration cycle. Cell phones give significantly more valuable data, for example, talk logs, messages, individual data, and program history. These incorporate the major history of your phones, texts, and contacts. In this chapter, strategies for and instruments of scientific seizure of the specified instrument and the investigation of crimes is analyze [9].
When reading cutting-edge Android forensic approaches, particular writing or techniques about rooting were used to achieve root user privileges because of the device. The largest user privilege is to show the partition and wreath over the gadget with the aid of “dd” (ADB). The images received are analyzed using common forensic commercial enterprise tools [10]. The creator talked otherwise concerning the fast imaging and analysis information partition area based on Yaffs2 Android. Even without a precise tool and system, a wealth of pertinent information has been recovered forensically [11].
Android File System
Most Android users just use their Android phones for telephone, text messaging, browsing, and basic apps, but for development prospects, we should know the Android internal structure. To organize files and folders on your device (for example booting, systems, recovery, data, etc.), Android uses multiple parts just like Windows OS. This is a feature for each partition, but the meaning and content of each partition are unknown to most of us [13].
/boot: has the files and information needed for the phone to boot after power on. It contains the kernel and RAM, which have forensic value and should be captured in some cases.
/system: contains the ROM OS files other than those in /boot. ROM files include the Android user interface files and preinstalled apps.
/recovery: tools in this partition help the user to back up and restore other partitions. Additionally, this partition contains the files needed to enable the device to boot in recovery mode.
/data: applications data are stored in this partition. This includes the data of all user-installed apps and preinstalled apps like contacts, call history, SMS, and others. This partition is accessible on the user level through a data connection to a computer. Factory reset deletes this partition removing all user data.
/cache: contains the frequently accessed data and applications parts for increasing the performance of referencing these data. Contents of this folder can be deleted; it will be rebuilt during normal use of the phone.
/misc: contains system and hardware settings information. These mostly describe the on or off state of the devices.
/sdcard: a user-accessed partition. It contains the information on the SD card. It can hold pictures and user files of different formats.
Android file systems handle the data storage techniques, organization, and retrieval from the disk volume. Android has several file systems. The volume can have several partitions where each partition can be managed separately by a different file system. The file system can be attached as an additional file system to a partition when it is mounted. File system type may affect the analysis process for the targeted partition, so it is forensically important to know the file system used on the partitions of interest. Android file systems are organized into three main categories [15]: flash memory file systems, media-based file systems, and pseudo file systems.
Flash Memory File Systems
- [1].
Extended File Allocation Table (exFAT): invented by Microsoft for flash drives. exFAT is not part of the Linux kernel. Some manufacturers still support Android with the exFAT file system.
- [2].
Flash-Friendly File System (F2FS): an open source Linux file system utilizing log-structured methods. F2FS for Android was introduced by Samsung in 2013.
- [3].
Yet Another Flash File System (YAFFS2): a relatively old file system. New kernels do not support it anymore with a few exceptions. It is a single-threaded file system based on log-structured methods.
- [4].
Robust File System (RFS): like the File Allocation Table (FAT 16, FAT 32) file systems with journaling. It may slow down some Android features.
Media-Based File Systems
- 1.
Extended File System (EXT): introduced as one of the first Linux-supported file systems in 1992. Now, it has subsequent versions, namely, EXT2, EXT3, and EXT4. EXT4 gets the advantage of supporting multiple processors.
- 2.
Virtual File Allocation Table (VFAT): an extension for FAT 16 and FAT32. Most operating systems support FAT32. Additionally, most SD cards are formatted with FAT32. VFAT makes it easy to support file operations on FAT32 partitions in Android.
Pseudo File Systems
- 1.
rootfs: the root mount point in which the boot process starts. It is the base file system in which other file systems can be mounted. It is mounted at the root /.
- 2.
sysfs: contains information about device configurations. It is mounted on /sys partition.
- 3.
devpts: mounted on /dev/pts. It creates a node for each shell connection made to the device.
- 4.
cgroup: control groups are used to track the tasks of the Android device.
- 5.
proc: mounted on /proc. This file system contains information about the kernel processes and other system information. The list of supported file systems can be retrieved from /proc/filesystems.
- 6.
tmpfs: temporary storage file system to store files in RAM. Data in RAM will be lost upon device reboot or power off.
Android System Architecture
Android OS is based on Linux OS, and it is an open source platform from Google for mobile devices. Since Android is open source, it is easy to view code and update it as needed. The native code of Android is set up the way it is because other operating systems must talk with hardware as a sequence of layers, as shown in Figure 3-1.
There are various components for all Android apps in Android’s architecture. There are many C/C++ libraries exposed by the application framework services within an open source kernel of the Android software of Linux [14].
Applications
Application Framework
Android Runtime
Platform Libraries
Linux Kernel

Android architecture
The starting point is the Linux kernel layer , which acts between hardware and Linux. The hardware abstraction layer (HAL) consists of several libraries and interfaces for a specific type of hardware, allowing hardware companies to develop functionality without altering system components. Libraries include all programming packages interacting between HAL and Java API layers. The Java API framework layer is responsible for the main functional module in mobile. The system apps layer is basically where the user can work with either preinstalled applications or new ones such as social media, email client, and others (Rohit T., Oleg S., Heather M., Satish B., 2020).
Security
Memory Management
Process Management
Network Stack
Driver Model
The second layer is HAL, which presents the hardware capabilities of the device through standard interfaces to the higher-level API framework. HAL consists of library modules. These libraries implement interfaces for hardware components. When taking a picture from an application, the API needs to access the hardware camera. Accordingly, the OS loads the related library modules for the camera. The next layer is the Android Runtime (ART), which is one of Android’s most important components. The main components of this layer are Just in Time (JIT) and Ahead of Time (AOT) compilers. JIT executes the frequently used codes of identified operations and compiles them to machine code. This improves the performance of the most used operations. AOT compiles the entire application into machine code. This is done once the application is installed. This will result in reducing power consumption and increasing performance. Accordingly, FBM DEX files will be compiled and converted to executable code. Dalvik includes essential libraries and a virtual chin, among other things (DVM). It primarily serves as the foundation for the app frame and makes use of key libraries to make our application more user-friendly. Dalvik virtual machine (DVM), like Java virtual machine (JVM), is an Android-based virtual machine that runs on a registry that has been carefully developed and optimized for performance. The threading kernel and low-memory management will be crucial to the Linux layer. For Android apps, we employ the mainstream Java and Kotlin programming languages in our core libraries.
Platform Libraries: The collection comprises some Native C and C++ libraries (such as media, graphics, Surface Manager, OpenGL, etc.) from the next layer in Android architecture. Some of these libraries can be accessed using Java framework APIs provided by the Android platform. Some of the Android components are built using Native C and C++. This is like the ART mentioned in the previous layer. Additionally, any application developed using native C and C++, in case they need to reference the related code libraries, will be provided by this layer. Above the libraries and ART layers, there is the Java API framework layer. It is responsible for providing Java APIs to handle the basic phone services and OS features. Developers can use these APIs as building blocks for their apps to use the core components and services of Android.
The last layer, the system apps layer, supports the direct user interaction with the device. This layer has a set of core apps such as a calendar, browser, email app, and others. Only this layer will be installed in preinstalled apps like home, contacts, camera, gallery, and so on, as well as third-party apps downloaded from the Play Store. It operates within Android times with the help of classes and services provided by the app framework. Developers can utilize these apps. This layer manages the default app to be used, which can be a native app or a user-installed app. User interaction with some installed apps, such as writing and sending messages, involves the direct use of the system apps layer.
Android System Permission Model
Android applications need to be granted explicit permission by users to be able to access sensitive functionality and certain services of the MD, such as the Internet, call lists, contact details, and so on (Almomani & Khayer, 2020). This provides the opportunity for users to know beforehand what the functionality is and which running services are on a device accessed by the application. Thus, it requires a user’s explicit permission to be able to perform any type of malicious activity like stealing identity, stealing data, or compromising the system. In devices running Android 6.0 and prior versions, the users needed to explicitly grant the permissions while the app was installed.
Users have the choice of either accepting the entire permissions or not installing the entire application at all. Starting from devices running Android 6.0 and later versions, users can grant permissions to the applications at the running status. This new permission model also increases user control over the application’s functionality and running services by allowing the user to be able to grant any appropriate and selective permissions (Talegaon & Krishnan, 2020). Thus, users can deny particular application access to their location, but are able, meanwhile, to provide access to the Internet services. From a mobile forensic point of view, this means that the type and amounts of information capable of being extracted from MD not only depends on the device and the installed applications but also depends on the permissions granted and configured by the user.
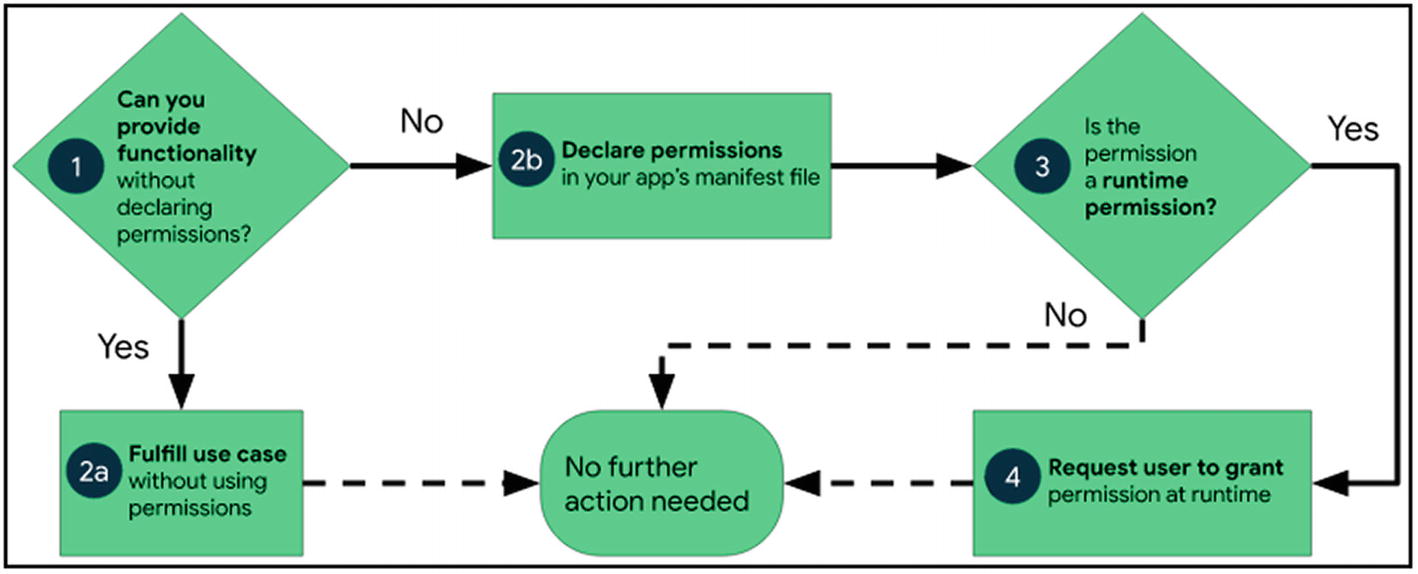
The workflow for using software permissions on Android
Standard permissions require access to data or resources beyond the sandbox of the app, but there is very little risk to the privacy of the user or the operation of other applications. Permission to set the alarm, for instance, is an example. Dangerous permissions are needed if the app wants information or services that include the private information of the user or that could potentially impact the stored information of the user or the activity of other apps. For instance, dangerous permission is the ability to read user contacts.
To limit the usage of components in an application that can perform critical tasks, applications can also specify their permissions. The third level of authorization is signature permission, which developers use to move resources and data between their applications while protecting them from other developer applications. Finally, there is high-level signature or system authorization, which involves modifying security settings, downloading an application, and so on. OS developers and manufacturers retain these permissions. The system grants these applications either found in the system image or signed by the same certificate as the system image (Bhandari et al., 2017).
Harmony Operating System
HarmonyOS is one of the first open source operating systems developed by the Chinese, as Huawei Technologies Company developed it. HarmonyOS was developed due to political and economic conflicts between China and the United States (Ng & Weng, 2020). HarmonyOS is based on the microkernel, an operating system oriented to the 5G era. HarmonyOS can be deployed on different devices such as mobile devices, TVs, cars, and other smart devices. HarmonyOS is compatible with all Android and web applications.
HarmonyOS Architecture

HarmonyOS architecture (“About HarmonyOS,” 2021)
Kernel Layer
Kernel subsystem: HarmonyOS uses a multikernel design so that appropriate OS kernels can be selected for devices with different resource limitations. The kernel abstraction layer (KAL ) shields differences in kernel implementations and provides the upper layer with basic kernel capabilities, including process and thread management, memory management, file system, network management, and peripheral management (“About HarmonyOS,” 2021).
Driver subsystem: Hardware Driver Foundation (HDF) lays the foundation for an open HarmonyOS hardware ecosystem. It allows unified access from peripheral devices and provides the foundation for driver development and management (Ng & Weng, 2020).
System Service Layer
Basic system capability subsystem set: Implements distributed application running, scheduling, and migration across HarmonyOS devices. This subsystem provides the following basic capabilities: DSoftBus, distributed data management, distributed scheduler, Ark multilanguage runtime, utils, multimodal input, graphics, security, and AI. Among them, the Ark runtime leverages the C, C++, and JS runtimes and provides basic system class libraries. It also provides the runtime required for Java programs statically compiled by the Ark compiler (Ng & Weng, 2020).
Basic software service subsystem set: Provides HarmonyOS with common and universal software services, including common event and notification, telephony, multimedia, Design For X (DFX), as well as Mobile Sensing Development Platform (MSDP) & Device Virtualization (DV) (Ng & Weng, 2020).
Enhanced software service subsystem set: Provides HarmonyOS with differentiated and enhanced software services, including those dedicated to smart TVs, wearables, IoT devices, and more (Ng & Weng, 2020).
Hardware service subsystem set: Provides HarmonyOS with hardware services, including location and biometric recognition, as well as those dedicated to wearables and IoT devices (Ng & Weng, 2020).
The basic software service, enhanced software service, and hardware service subsystem sets can be tailored by subsystems, and each subsystem can be tailored by functions, depending on the deployment scenario for a particular device form (Ng & Weng, 2020).
Framework Layer
This layer provides what you need to develop HarmonyOS applications: application framework and ability framework, specific to multiple languages (like Java, C, C++, and JS), Java and JS UI frameworks, as well as multilanguage APIs for hardware and software services. The APIs available for different HarmonyOS devices vary according to component-based tailoring (“About HarmonyOS,” 2021).
Application Layer
This layer consists of system applications and third-party applications. Each HarmonyOS application is powered by one or more Feature Abilities (FAs) or Particle Abilities (PAs). An FA provides a UI for user interaction. A PA has no UI and provides background task processing as well as data access. During user interaction, FAs may need to retrieve background data from PAs. Applications developed based on FAs and PAs implement specific business characteristics and achieve cross-device scheduling and distribution, delighting users with a consistent and efficient experience (“About HarmonyOS,” 2021).
Data Extraction Techniques on Android
Acquisition’s Levels, Advantages, and Disadvantages [3]
No | Data acquisition method | Advantages | Disadvantages |
|---|---|---|---|
1 | Manual extraction Standard interfaces such as touch controls, screen controllers, and keyboards are used to access the information stored on the device and to record input directly from the screen. | There are no special tools necessary, and the technical difficulty is modest. | Large amounts of data will be exhausted over time; there is a risk of data adjustments being made by mistake; it does not restore data that has been erased. It will certainly be impractical if the hardware is destroyed. |
2 | Logical extraction A standard interface between the workstation and the device must be built utilizing USB, Wi-Fi, or Bluetooth to send device data to the workstation. | Technical complexity is minimal, while data abstraction is high. | Unintentional data changes may occur, and data access is restricted. |
3 | Physical extraction or Hex dumping The device should be in diagnostic mode and downloading its flash memory. | It’s possible to do with conventional interfaces; it works with devices that have little damage; data access is still possible. | Data analysis and decoding might be difficult. It is not assured that you will have access to all partitions. Invasive device access (JTAG) necessitates extensive training. |
4 | Chip-off After removing the device’s physical flash memory, extract a binary image. | Provides a complete binary image suitable for more traditional analysis. | Possibility of causing physical harm; much training is necessary. |
5 | Micro read Using an electron microscope to examine logic gates on a physical level and then turning these observations into readable, comprehensible data requires a high level of technical skill. | Last option that is applicable. | Resource-intensive and technically challenging. |
Manuel Data Extraction
Manual acquisitions take place with the investigator facing the phone’s user interface. This is an excellent way for investigators to scroll via a phone that usually works and allows them to document what they see. Data can be detected by researchers only when clicking a call log, text messages, a photo scan, or a browser history, and data are sorted for other applications like Facebook. The photos/screenshots of the valuable data on the telephone are evidence. Manual removal is a simple and quick way to scan Android contents but involves many challenges. This enables us to check data available only at the moment. Researchers or investigators are at risk of accidental deletion or compromising the integrity of the device or its contents.
The first method in mobile forensics is manually checking the phone, and the first stage is to bypass the lock screen. In this case study, the Samsung Galaxy Note 9 doesn’t have any lock screen or any protections; someone sent a child pornographic image using WhatsApp and the criminal opened the photo. Once they saw it, they deleted it. What the criminal didn’t know was that there is a bin and when an image is deleted it is moved to the bin folder instead of being permanently deleted. We successfully found the porno image in the bin folder (trash); however, it will last for only 30 days in the trash. After that, it will be deleted permanently.
Logical Data Forensics
The logical acquisition enables the analysis of data on the Android device to be made more thorough and is the first way to use data ‘extraction’ for a separate review. This means connecting the device to the forensic workstations by wired or wireless. It also means accessing your phone file system and obtaining a copy of the backup information, for example, ADB pull data extraction. In our practical case for this chapter, the logical forensic analysis will be done to Samsung Galaxy Note 9 without rooting.
Method 1: Using ADB Pull Command:
The first step is to enable developer options.

USB debugging mode
The third step is to go where ADB is located: “C:UsersfullpathLocalAndroidSdkplatform-tools”.

ADB pull
Method 2: Using Mobiledit Forensics
Now the criminal has deleted the porno image from the gallery and also from the trash cycle; in this section, we present another method of mobile forensics to obtain the deleted images (child pornography). Mobiledit is a good example to mention, as it doesn’t require rooting and it can collect data from the normal privileges.
Step 1: Connect the phone to the PC using a USB cable and enable debugging mode, as Figure 3-5 shows.

Main screen for deceive select on mobiledit

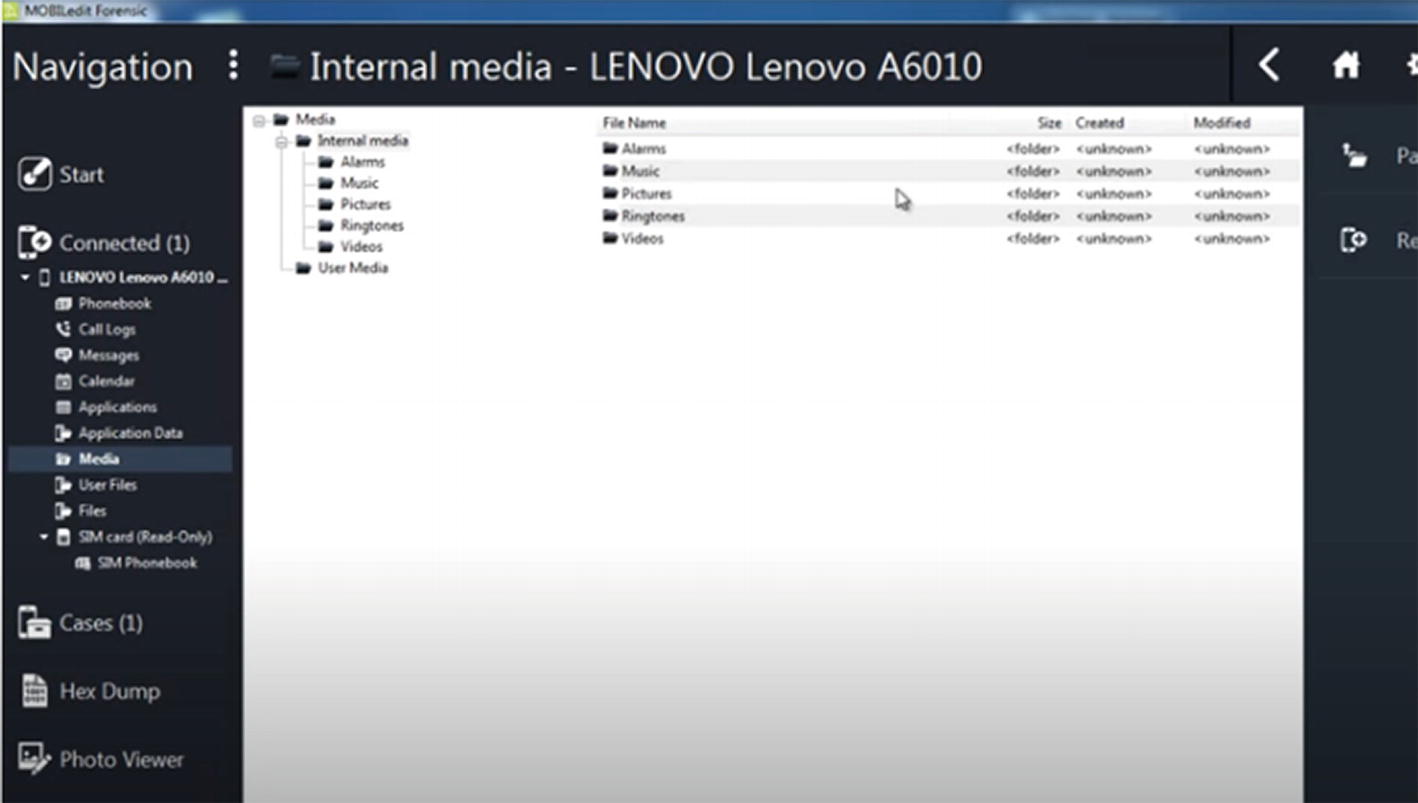
Media
After examining and analyzing the data that was extracted by mobiledit , we can see that the program has the advantages that the phone doesn’t require root, and it’s good for analysis of nondeleting media, but it doesn’t get any deleted data, which means that the data extracting is not bit by bit; it’s only for existing data.
Screen Lock Bypassing Techniques
Based on the lock technology used, the key file will be named. The naming of the key file depends on the manufacturer too. In this experiment the key files were located under /data/system partition. Names of the key files are gatekeeper.password.key for password or passcode lock and gatekeeper, pattern key for the pattern lock. To bypass the lock, delete the mentioned key files using the rm command with superuser privilege and then reboot the device. This method works on a rooted device only.
✓ Pattern lock: The user sets the pattern or design of your phone and you have to unlock the device using the same pattern. Android was the first smartphone to start a design lock.
✓ PIN code: This is the most popular mobile phone locking option. To unlock the device, you have to enter the PIN code is a four-digit number.
✓ Passcode: An alphanumeric passcode. The alphanumeric passcode contains both characters and numbers, contrary to the four-digit PIN.
ADB: When you connect to ADB via a USB connection on an Android device, it’s best to take advantage of USB debugging.
The gesture is deleted. Key File: The gesture is taken away. The device pattern lock is deleted from the key file.
Lock screen removal: Dr.Fone from Wondershare.
The update settings.db file technique requires accessing a rooted device from the shell. This can be done from the ADB shell. The settings file is located under /data/data/com.android.providers.settings/databases; using sqlite3 you can update by setting the lock screen values to 0.
Rooting the Devices
Rooting any device usually involves exploiting a security bug in the device’s firmware, then copying the su (superuser) binary to a location in the current process’s path (/system/xbin/su), and granting it executable permissions with the chmod command. Rooting Android phones has become a common phenomenon, and you can expect to encounter rooted phones during forensic examinations, and you may also need to root the device in order to acquire data for forensic examination. The root user has the power to start/stop any system service, edit/delete any file, and change the privileges of other users. Rooting an Android phone is all about gaining access to the device to perform actions that are not normally allowed on the device; most rooting of Android devices is done to allow superuser capabilities and provide open access to the Android device.
- 1.
Connect the phone by USB cable.
- 2.
Download the firmware from sammobile.com or halabtech.com.
- 3.Check the model number if it’s supported and download the firmware as shown in Figure 3-9.
 Figure 3-9
Firmware
- 4.Turn off the phone and hold the volume-down button and the Bixby button, then fill the (BL, CP, CSC, and AP) as Figure 3-10 shows , and then click start, and the phone will be rooted.
 Figure 3-10
Odin3
Rooting allows modification of the software on the device to the deepest level—for example, you can overclock or underclock the device’s CPU.
It allows restrictions imposed on the device by carriers, manufacturers, and so on to be bypassed.
For extreme customization, new customized ROMs can be downloaded and installed.
Rooting a device must be done with extreme care as errors may result in irreparable damage to the software on the phone, turning the device into a useless brick.
Rooting might void the warranty of a device.
Rooting results in increased exposure to malware and other attacks.
Physical Forensics
Physical means getting the current bit-by-bit image of a device. It should be understood that a device copy and paste doesn’t have one image per bit. Only files that have been copied and pasted on a device, such as visible files, hidden files, and system-related files. It’s a logical photograph. The deleted files and archives are not copied with this method. Now after we rooted the Samsung Galaxy Note 9, we finally can obtain a bit-by-bit image. This will help us to detect any deleted photos; in our case the criminal viewed the porno image and deleted it from the gallery and also from the trash, so it was hard or even impossible to detect it using manual and logical forensics. Therefore, we now present the physical forensics, which is getting a bit-by-bit image.
Back to logical extraction: now we will use ADB tools to create bit-by-bit images.
Step 1: Go to where adb is located: “C:UsersdellAppDataLocalAndroidSdkplatform-tools”
Step 2: You can use the dd command for creating a raw image of the device. This command helps us create an Android image bit-by-bit by copying low-level data.

.dd image
Step 4: Open autopsy and analyze the file.

Autopsy
In some cases, we can flash the recovery partition that was used to replace the recovery partition on the Android device with previously stored images from a computer (backup image). This works if the bootloader is not locked on the device. The flashing is made through the fastboot diagnostic protocol, which comes with the Android SDK. To apply this method, reboot the device in the boot loader mode. Use a set of commands from the shell to flash or write over the recovery partition. After the process finishes, reboot the device in recovery mode. From the recovery mode shell, mount /data and /system partitions. Investigators can use the ADB bypass method on the mounted partitions. This technique makes unrecoverable changes to the evidence. The alternative approach supported by fastboot is to boot a temporary recovery image without changing the original recovery partition.
Other advanced physical data extraction techniques are JTAG and chip-off. Note that these techniques will not work on devices with full desk encryption enabled.
Joint Test Action Group Data Extraction
JTAG is the Joint Test Action Group data acquisition method. It involves electronic works to connect specific ports on the device and ordering the processor to send the data in the RAM to the connections. This is a physical data extraction method, as it moves all bits in the RAM to an image. This is a very advanced technique and should be referenced by experts for very rare cases in which applying other data extraction techniques is not possible. Even though this method is very hard to implement, it has some advantages in special cases. It is useful on a damaged device that is not able to boot normally, as JTAG works on powered-off devices. Additionally, it is useful in extracting data from locked devices without the need for root or USB debugging mode enabled. It should be noted that this technique may result in damages to the device and losing all data.
Chip-Off Data Extraction
This technique involves detaching the NAND flash electronic chips from the device and attaching them to a specific device to extract the data. Chip-off has the advantages of JTAG in accessing unlocked, damaged, or unrooted devices. On the other hand, it has an extremely high risk of damaging the device. This is due to the very delicate chip-detaching process. Additionally, it is much more difficult to reattach the removed chips back to their place. Accordingly, the device after this process should be considered unrecoverable.
Mobile Forensics Investigation Challenges on Android Devices
With the rapid evolution of smartphones, mobile forensics is more difficult than ever. Every new Android version introduces new features and security enhancements, which might obstruct the forensic procedure. Based on what was discussed during this section and the previous section, the problems and difficulties that exist in Apple devices are the same as the difficulties found in Android devices. Add to this that Android devices are witnessing a great development in the field of security and encryption. Moreover, phones that run on the Android system are multiple, and we witness many versions from companies and multiple versions that are very difficult to follow:
- 1.
Apart from software, a forensics analyst may come across many sorts of hardware due to a large number of competitors in the market. Device requirements have gotten increasingly complicated, and they differ from one company to the next. This adds to a forensic examiner’s preparation work since they require the right tools to access the hardware.
- 2.
Manufacturers have begun to enhance their security modules, which the consumer appreciates. Such a high degree of protection has become a major roadblock for forensic examiners since it is extremely difficult to get beyond the device’s security. While older Android devices may still be accessed in various ways, newer smartphones sometimes lack support from even commercial software.
- 3.
For smartphone users, cloud storage has become a popular and preferred alternative. Manufacturers provide enticing packages to entice customers to store their data on the cloud, and customers find it to be quite handy.
- 4.
Advanced forensics techniques like JTAG, chip-off, and micro-read, in addition to the logical and physical acquisition, are very intrusive and need thorough understanding and specialized training. These methods are also highly expensive, and only a few firms provide these services, so they are not available to everyone.
- 5.
There are many things that are important to mention that are available in Xiaomi phones and some other Android devices, as these things are considered among the distinctive characteristics of users in terms of safety. (Reddy, 2019)
- 6.At the same time, these matters are considered among the great challenges facing the digital investigator, and these characteristics include:
Two spaces in the same device. Figure 3-13 shows how the second space can be created in Xiaomi devices.
 Figure 3-13
Two spaces in Xiaomi devices

Enable developer mode for a locked device
- 7.
Install via USB and USB debugging. There are many Android devices that require this option to be activated in order to install and extract data from third-party applications such as WhatsApp. Unfortunately, activating this option requires an Internet connection, and doing this step on the digital directory will expose the digital directory to the risk of losing data or damage to the phone.
- 8.
Since many phones can be formatted remotely through the Internet, it is also possible to lose open accounts if the account holder locks them or changes the open sessions by changing passwords (Xiaomi, 2019).
Summary
The iPhone 6s was backed up by the iTunes program, and we were able through this backup to get the porno picture using Magnet Axiom. However, the Belkasoft program could not get the porn picture; we note that the iPhone has not been jailbroken, so we were able to get the image after deleting it, unlike the Samsung Note 9. I browsed the device manually and found the image in the trash file, but when we deleted the image from the trash file, we made a logical image without rooting the device, but we were unable to get the deleted image. So we did a physical image and rooted the device, and after that, we were able to get the deleted image. In the end, the forensic investigation of the iPhone was easier than the forensic process for the Samsung phone.
Practical Lab 3.1


References
- [1].
In: Qanon.ps. http://www.qanon.ps/news.php?action=view&id=22980. Accessed 10 Aug 2021
- [2].
Iqbal F, Marrington A, Hung P et al. (2017) A Study of Detecting Child Pornography on Smart Phone. Advances in Network-Based Information Systems 373-384. doi: 10.1007/978-3-319-65521-5_32
- [3].
Polastro M, da Silva Eleuterio P (2010) NuDetective: A Forensic Tool to Help Combat Child Pornography through Automatic Nudity Detection. 2010 Workshops on Database and Expert Systems Applications. doi: 10.1109/dexa.2010.74
- [4].
Garcia N (2018) Digital Steganography and Its Existence in Cybercrime. Scientific and Practical Cyber Security Journal 2(2): 18-24.
- [5].
In: Ro.ecu.edu.au. https://ro.ecu.edu.au/cgi/viewcontent.cgi?article=7480&context=ecuworks. Accessed 10 Aug 2021
- [6].
Al Mutawa N, Baggili I, Marrington A (2012) Forensic Analysis of Social Networking Applications on Mobile Devices. Digital Investigation 9:S24-S33. doi: 10.1016/j.diin.2012.05.007
- [7].
D’Orazio C, Ariffin A, Choo K (2013) IOS Anti-Forensics: How Can We Securely Conceal, Delete and Insert Data? SSRN Electronic Journal. doi: 10.2139/ssrn.2339819
- [8].
Lessard J, Kessler G (2010) Android Forensics: Simplifying Cell Phone Examinations.
- [9].
Rao V, Chakravarthy A (2016) Forensic Analysis of Android Mobile Devices. 2016 International Conference on Recent Advances and Innovations in Engineering (ICRAIE). doi: 10.1109/icraie.2016.793954s
- [10].
Lessard J, Kessler G (2010) Android Forensics: Simplifying Cell Phone Examinations.
- [11].
Lamine A, Kechadi T (2012) Android Forensics: A Physical Approach.
- [12].
L. Simao A, CausSicoli F, Melo L (2011) Acquisition of Digital Evidence in Android Smartphone.
- [13].
Anglano C (2014) Forensic Analysis of WhatsApp Messenger on Android Smartphones.
- [14].
Wiley J (2012) Beginning Android™ 4 Application Development.
- [15].
Farooq U (2018) Android Operating System Architecture.
- [16].
Tamma R, Skulkin O, Mahalik H, Bommisetty S. Practical Mobile Forensics - Fourth Edition.