
Seat an engineer behind a mixing console and ask him or her to do a mix. It sounds great. Then seat another engineer behind the same console and again ask for a mix. It sounds terrible. What happened?
The difference lies mainly in their ears—their critical listening ability. Some engineers have a clear idea of what they want to hear and how to get it. Others haven’t acquired the essential ability to recognize good sound. By knowing what to listen for, you can improve your artistic judgments during recording and mixdown. You are able to hear errors in microphone placement, equalization, and so on, and correct them.
To train your hearing, try to analyze recorded sound into its components—such as frequency response, noise, reverberation—and concentrate on each one in turn. It’s easier to hear sonic flaws if you focus on a single aspect of sound reproduction at a time. This chapter is a guide to help you do this.
CLASSICAL VERSUS POPULAR RECORDING
Classical and popular music have different standards of “good sound.” One goal in recording classical music (and often folk music or jazz) is to accurately reproduce the live performance. This is a worthy aim because the sound of an orchestra in a good hall can be quite beautiful. The music was composed and the instruments were designed to sound best when heard live in a concert hall. The recording engineer, out of respect for the music, should always try to translate that sound to disc with as little technical intrusion as possible.
By contrast, the accurate translation of sound to disc is not always the goal in recording popular music. Although the aim may be to reproduce the original sound, the producer or engineer may also want to play with that sound to create a new sonic experience, or to do some of both.
In fact, the artistic manipulation of sounds through studio techniques has become an end in itself. Creating an interesting new sound is as valid a goal as re-creating the original sound. There are two games to play, each with its own measures of success.
If the aim of a recording is realism or accurate reproduction, the recording is successful when it matches the live performance heard in the best seat in the concert hall. The sound of musical instruments is the standard by which such recordings are judged.
When the goal is to enhance the sound or produce special effects (as in most popmusic recordings), the desired sonic effect is less defined. The live sound of a pop group could be a reference, but pop-music recordings generally sound better than live performances—recorded vocals are clearer and less harsh, the bass is cleaner and tighter, and so on. The sound of pop music reproduced over speakers has developed its own standards of quality apart from accurate reproduction.
GOOD SOUND IN A POP-MUSIC RECORDING
Currently, a good-sounding pop recording might be described as follows (there are always exceptions):
• Well mixed
• Wide range
• Tonally balanced
• Clean
• Clear
• Smooth
• Spacious
It also has:
• Presence
• Sharp transients
• Tight bass and drums
• Wide and detailed stereo imaging
• Wide but controlled dynamic range
• Interesting sounds
• Suitable production
The next sections explore each one of these qualities in detail so that you know what to listen for. Assume that the monitor system is accurate, so that any colorations heard are in the recording and not in the monitors.
A Good Mix
In a good mix, the loudness of instruments and vocals is in a pleasing balance. Everything can be clearly heard, yet nothing is obtrusive. The most important instruments or voices are loudest; less important parts are in the background.
A successful mix goes unnoticed. When all the tracks are balanced correctly, nothing sticks out and nothing is hidden. Of course, there’s wide latitude for musical interpretation and personal taste in making a mix. Dance mixes, for example, can be very severe sonically.
Sometimes you don’t want everything to be clearly heard. On rare occasions you may want to mix in certain tracks very subtly for a subconscious effect.
The mix must be appropriate for the style of music. For example, a mix that’s right for loud rock music usually won’t work for a pop ballad. A rock mix typically has the drums way up front and the vocals only slightly louder than the accompaniment. In contrast, a pop ballad has the vocals loudest, with the drums used just as “seasoning” in the background.
Level changes during the mix should be subtle, or should make sense. Otherwise, instruments jump out for a solo and fall back in afterwards. Move faders slowly, set them to preset positions during pauses in the music, or use automation. Nothing sounds more amateurish than a solo that starts too quietly and then comes up as it plays—you can hear the engineer working the fader.
Wide Range
Wide range means extended low- and high-frequency response. Cymbals should sound crisp and distinct, but not sizzly or harsh; kick drum and bass should sound deep, but not overwhelming or muddy. Wide-range sound results from using high-quality microphones, DIs, virtual instruments, and adequate EQ.
You might want to combine “hi-fi” and “lo-fi” sounds in a single mix. The lo-fi sounds generally cover a narrow frequency range and might be distorted.
Good Tonal Balance
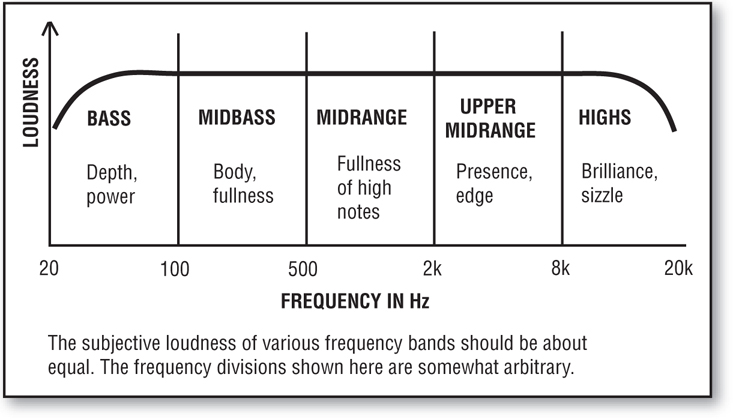
The overall tonal balance of a recording should be neither bassy nor trebly. That is, the perceived spectrum should not emphasize low or high frequencies. Low bass, mid-bass, midrange, upper midrange, and highs should be heard in equal proportions (Figure 12.1). Emphasis of any one frequency band over the other eventually causes listening fatigue. Dance club mixes, however, are heavy on the bass end to get the crowd moving.
FIGURE 12.1 Loudness versus frequency of a pop recording with good sound
Recorded tonal balance is inversely related to the frequency response of the studio’s monitor system. If the monitors have a high-frequency rolloff, the engineer will compensate by boosting highs in the recording to make the monitors sound correct. The result is a bright recording.
Before doing a mix, play over the monitors some commercial recordings whose sound you admire, to become accustomed to a commercial spectral balance. After your mix is recorded, play it back and alternately switch between your mix and a commercial recording. This comparison indicates how well you matched a commercial spectral balance. An effective tool for this purpose is Harmonic Balancer (www.har-bal.com). Of course, you may not care to duplicate what others are doing.
In pop-music recordings, the tonal balance or timbre of instruments does not necessarily have to be natural. Still, many listeners want to hear a realistic timbre from acoustic instruments, such as the guitar, flute, sax, or piano. The reproduced timbre depends on microphone frequency response, microphone placement, the musical instruments themselves, and equalization.
Clean Sound
Clean means free of noise and distortion. Hiss, hum, and distortion are inaudible in a good recording. Distortion in this case means distortion added by the recording process, not distortion already present in the sound of electric-guitar amps or Leslie speakers. There are exceptions to this guideline; some popular recordings have noise or distortion added intentionally.
Clean also means “not muddy” or free of low-frequency ringing and leakage. A clean mix is one that is uncluttered or free of excess instrumentation. This is achieved by arranging the music so that similar parts don’t overlap, and not too many instruments play at once in the same frequency range. Usually, the fewer the instruments, the cleaner the sound. Too many overdubs can muddy the mix.
Clarity
In a clear-sounding recording, instruments do not crowd or mask each other. They are separate and distinct. As with a clean sound, clarity arises when instrumentation is sparse, or when instruments occupy different areas of the frequency spectrum. For example, the bass provides low frequencies, keyboards might emphasize mid-bass, lead guitar provides upper midrange, and cymbals fill in the highs.
In addition, a clear recording has adequate reproduction of each instrument’s harmonics. That is, the high-frequency response is not rolled off.
Smoothness
Smooth means easy on the ears, not harsh, uncolored. Sibilant sounds are clear but not piercing. A smooth, effortless sound allows relaxation; a strained or irritating sound causes muscle tension in the ears or body. Smoothness is a lack of sharp peaks or dips in the frequency response, as well as a lack of excessive boost in the midrange or upper midrange. It is also low distortion, such as provided by a 24-bit recording.
Presence
Presence is the apparent sense of closeness of the instruments—a feeling that they are present in the listening room. Synonyms are clarity, detail, and punch.
Presence is achieved by close miking, overdubbing, and using microphones with a presence peak or emphasis around 5 kHz. Using less reverb and effects can help. Upper-midrange boost helps, too. Most instruments have a frequency range that, if boosted, makes the instrument stand out more clearly or become better defined. Presence sometimes conflicts with smoothness because presence often involves an upper-midrange boost, while a smooth sound is free of such emphasis. You have to find a tasteful compromise between the two.
Spaciousness
When the sound is spacious or airy, there is a sense of air around the instruments. Without air or ambience, instruments sound as if they are isolated in stuffed closets. (Sometimes, though, this is the desired effect.) You achieve spaciousness by adding reverb, recording instruments in stereo, using room mics, or miking farther away.
Sharp Transients
The attack of cymbals and drums generally should be sharp and clear. A bass guitar and piano may or may not require sharp attacks, depending on the song.
Tight Bass and Drums
The kick drum and bass guitar should “lock” together so that they sound like a single instrument—a bass with a percussive attack. The drummer and bassist should work out their parts together so they hit accents simultaneously, if this is desired.
To further tighten the sound, damp the kick drum and record the bass direct. Rap music, however, has its own sound—the kick drum usually is undamped and boomy, sometimes with short reverb added. Equalize the kick and bass in complementary ways so that they don’t mask each other; for example:
• Kick: Boost 60 to 80 Hz, cut 600 Hz, boost 3 kHz.
• Bass: Cut 60 to 80 Hz, boost 600 Hz, cut above 3 kHz.
Wide and Detailed Stereo Imaging
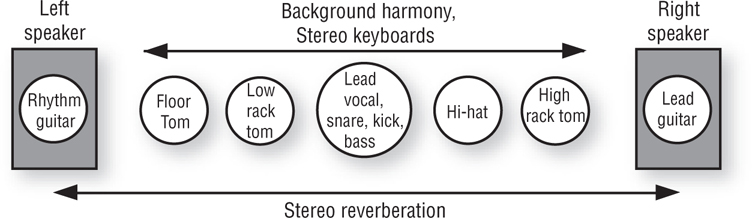
Stereo means more than just left and right. Usually, tracks should be panned to many points across the stereo stage between the monitor speakers. Some instruments should be hard-left or hard-right, some should be in the center, and others should be half-left or half-right (panned to 9 o’clock and 3 o’clock). Try to achieve a stereo stage that is well balanced between left and right (Figure 12.2). Instruments that occupy the same frequency range can be made more distinct by panning them to opposite sides of center.
FIGURE 12.2 An example of image placement between speakers.
You may want some tracks to be unlocalized. Backup choruses and strings should be spread out rather than appearing as point sources. Stereo keyboard sounds can wander between speakers. A lead-guitar solo can have a fat, spacious sound.
There should also be some front-to-back depth. Some instruments should sound close or up front; others should sound farther away. Use different miking distances or different amounts of reverb on various tracks.
If you want the stereo imaging to be realistic (for a jazz combo, for example), the reproduced ensemble should simulate the spatial layout of the live ensemble. If you’re sitting in an audience listening to a jazz quartet, you might hear drums on the left, piano on the right, bass in the middle, and sax slightly right. The drums and piano are not point sources, but are somewhat spread out. If spatial realism is the goal, you should hear the same ensemble layout between your speakers. On some commercial CDs, the piano and drums are spread all the way between speakers—an interesting effect, but unrealistic.
Pan-potted mono tracks often sound artificial in that each instrument sounds isolated in its own little space. It helps to add some stereo reverberation around the instruments to “glue” them together.
Often, TV mixes are heard in mono. Hard-panned signals sound weak in mono relative to center-panned signals. So pan sound sources to 3 and 9 o’clock, not hard-right and hard-left.
Wide but Controlled Dynamic Range
Dynamic range is the range of volume levels from softest to loudest. A recording with a wide dynamic range becomes noticeably louder and softer, adding excitement to the music. To achieve this, don’t add too much compression (automatic volume control). An overly compressed recording sounds squashed—crescendos and quiet interludes lose their impact, and the sound becomes fatiguing.
Vocals often need some compression or gain-riding because they have more dynamic range than the instrumental backup. A vocalist may sing too loudly and blast the listener, or sing too softly and become buried in the mix. A compressor can even out these extreme level variations, keeping the vocals at a constant loudness. Bass guitar also can benefit from compression.
Interesting Sounds
The recorded sound may be too flat or neutral, lacking character or color. In contrast, a recording with creative production has unique musical instrument sounds, and typically uses effects. Some of these are equalization, echo, reverberation, doubling, chorus, flanging, compression, distortion, and stereo effects.
Making sounds interesting or colorful can conflict with accuracy or fidelity. That’s okay, but you should know the trade-off.
Suitable Production
The way a recording sounds should imply the same message as the musical style or lyrics. In other words, the sound should be appropriate for the particular tune being recorded.
For example, some rock music is rough and raw. The sound should be, too. A clean, polished production doesn’t always work for high-energy rock ‘n’ roll. There might even be a lot of leakage or ambience to suggest a garage studio or nightclub environment. The role of the drums is important, so they should be loud in the mix. The toms should ring, if that is desired.
New Age, disco, rhythm and blues, contemporary Christian, and pop music are typically slickly produced. The sound is usually tight, smooth, and spacious. Folk music and acoustic jazz typically sound natural and have little or no reverb. Music in the digital hardcore genre has lots of distortion.
Actually, each style of music is not locked into a particular style of production. You tailor the sound to complement the music of each individual tune. Doing this may break some of the guidelines of good sound, but that’s usually okay as long as the song is enhanced by its sonic presentation.
GOOD SOUND IN A CLASSICAL-MUSIC RECORDING
As with pop music, classical music should sound clean, wide range, and tonally balanced. But because classical recordings are meant to sound realistic—like a live performance—they also require good acoustics, a natural balance, tonal accuracy, suitable perspective, and accurate stereo imaging (see Chapter 18).
Good Acoustics
The acoustics of the concert hall or recital hall should be appropriate for the style of music to be performed. Specifically, the reverberation time should be neither too short (dry) nor too long (cavernous). Too short a reverberation time results in a recording without spaciousness or grandeur. Too long a reverberation time blurs notes together, giving a muddy, washed-out effect. Ideal reverberation times are around 1.2 seconds for chamber music or soloists, 1.5 seconds for symphonic works, and 2 seconds for organ recitals. To get a rough idea of the reverb time of a room, clap your hands once, loudly, and count the seconds it takes for the reverb to fade to silence.
A Natural Balance
When a recording is well balanced, the relative loudness of instruments is similar to that heard in an ideal seat in the audience area. For example, violins are not too loud or soft compared to the rest of the orchestra; harmonizing or contrapuntal melody lines are in proportion.
Generally, the conductor, composer, and musicians balance the music acoustically, and you capture that balance with your stereo mic pair. But sometimes you need to mike certain instruments or sections to enhance definition or balance. Then you mix all the mics. In either case, consult the conductor for proper balances.
Tonal Accuracy
The reproduced timbre or tone quality should match that of live instruments. Fundamentals and harmonics should be reproduced in their original proportion.
Suitable Perspective
Perspective is the sense of distance of the performers from the listener—how far away the stage sounds. Do the performers sound like they’re eight rows in front of you, in your lap, or in another room?
The style of music suggests a suitable perspective. Incisive, rhythmically motivated works (such as Stravinsky’s “Rite of Spring”) sound best with closer miking; lush, romantic pieces (a Bruckner symphony) are best served by more distant miking. The chosen perspective depends on the taste of the producer.
Closely related to perspective is the amount of recorded ambience or reverberation. A good miking distance yields a pleasing balance of direct sound from the orchestra and ambience from the concert hall.
Accurate Imaging
Reproduced instruments should appear in the same relative locations as they were in the live performance. Instruments in the center of the ensemble should be heard in the center between the speakers; instruments at the left or right side of the ensemble should be heard from the left or right speaker. Instruments halfway to one side should be heard halfway off-center, and so on. A large ensemble should spread from speaker to speaker, while a quartet or soloist can have a narrower spread.
It’s important to sit equidistant from the speakers when judging stereo imaging, otherwise the images shift toward the side on which you’re sitting. Sit as far from the speakers as they are spaced apart. Then the speakers appear to be 60 degrees apart, which is about the same angle an orchestra fills when viewed from the typical ideal seat in the audience (tenth row center, for example).
The reproduced size of an instrument or instrumental section should match its size in real life. A guitar should be a point source; a piano or string section should have some stereo spread. Each instrument’s location should be as clearly defined as it was heard from the ideal seat in the concert hall.
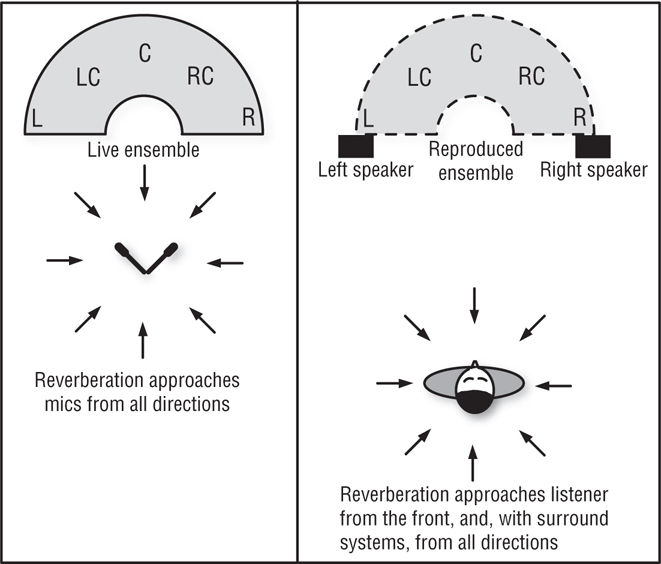
Reproduced reverberation (concert-hall ambience) should surround the listener, or at least it should spread evenly between the speakers. Surround-sound technology is needed to make the recorded ambience surround the listener, although spaced-microphone recordings have some of this effect. Accurate imaging is illustrated in Figure 12.3.
FIGURE 12.3 With accurate imaging, the sound-source location and size, and the reverberant field, are reproduced during playback.
There should be a sense of stage depth: front-row instruments sound closer than backrow instruments.
TRAINING YOUR HEARING
The critical process is easier if you focus on one aspect of sound reproduction at a time. You might concentrate first on the tonal balance—try to pinpoint what frequency ranges are being emphasized or slighted. Next listen to the mix, the clarity, and so on. Soon you have a lengthy description of the sound quality of your recording.
Developing an analytical ear is a continuing learning process. Train your hearing by listening carefully to recordings—both good and bad. Make a checklist of all the qualities mentioned in this chapter. Compare your own recordings to live instruments and to commercial recordings. Check out the Golden Ears ear-training CDs at www.moultonlabs.com/full/product01. Audiofile Engineering makes a Mac & iOS app that includes feedback via quizzes: Quiztones (http://audiofile-engineering.com/quiztones).
A pop-music record that excels in all the attributes of good sound is The Sheffield Track Record (Sheffield Labs, Lab 20), engineered and produced by Bill Schnee. In effect, it’s a course in state-of-the-art sound—required listening for any recording engineer or producer.
Another record with brilliant production is The Nightfly by Donald Fagen (Warner Brothers 23696-2), engineered by Roger Nichols, Daniel Lazerus, and Elliot Scheiner, produced by Gary Katz, and mastered by Bob Ludwig. This recording, and Steely Dan recordings by Roger Nichols, sound razor sharp, very tight and clear, elegant, and tasteful; and the music just pops out of the speakers.
The following listings are more examples of outstanding rock production, and set high standards:
Songs:
• “I Need Somebody,” by Bryan Adams; producer, Bob Clearmountain
• “The Power of Love,” by Huey Lewis & The News; producer, Huey Lewis & The News
Albums:
• 90125, by Yes; producer, Trevor Horn
• Synchronicity, by The Police; producer, Hugh Padgham and The Police
• Dark Side of the Moon, by Pink Floyd; producer, Alan Parsons
• Thriller, by Michael Jackson; engineer, Bruce Swedien; producer, Quincy Jones
• Avalon, by Roxy Music; engineer, Bob Clearmountain; producer, Roxy Music
• Nevermind, by Nirvana; producer, Butch Vig
• Come Away with Me, by Norah Jones; engineer, Jay Newland
• Genius Loves Company, by Ray Charles; several engineers
• Give, by The Bad Plus; engineer, Tchad Blake
• Live in Paris and The Look of Love, by Diana Krall; engineer, Al Schmitt
• Smile, by Brian Wilson; engineer, Mark Linett.
Some other recordings of note are those by Supertramp, Pat Metheny Group, Alison Krauss, The Wailin’ Jennys, Heart, and Radiohead; and by producers George Martin and Andy Wallace.
Then there are the incredibly clean recordings of Tom Jung (with DMP records) and George Massenberg. Some classical-music recordings with outstanding sound are on the Telarc, Delos, and Chesky labels. You can learn a lot by emulating these superb recordings and many others.
Once you’re making recordings that are competent technically—clean, natural, and well mixed—the next stage is to produce imaginative sounds. You’re in command; you can tailor the mix to sound any way that pleases you or the band you’re recording. The supreme achievement is to produce a recording that is a sonic knockout, beautiful or thrilling.
TROUBLESHOOTING BAD SOUND
Now you know how to recognize good sound, but can you recognize bad sound? Suppose you’re monitoring a recording in progress, or listening to a recording you’ve already made. Something doesn’t sound right. How can you pinpoint what’s wrong, and how can you fix it?
The rest of this chapter includes step-by-step procedures to solve audio-related problems. Read down the list of “bad sound” descriptions until you find one matching what you hear. Then try the solutions until your problem disappears. Only the most common symptoms and cures are mentioned; console maintenance is not covered.
This troubleshooting guide is divided into four main sections:
1. Bad sound on all recordings (including those from other studios)
2. Bad sound on playback only (the mixer output sounds all right)
3. Bad sound in a pop-music recording
4. Bad sound in a classical-music recording
Before you start, check for faulty cables and connectors. Also check all control positions, rotate knobs and flip switches to clean the contacts, and clean connectors with DeoxIT from Caig Labs.
Bad Sound on All Recordings
If you have bad sound on all your recordings, including those from other studios, follow this checklist to find the problem:
• Upgrade your monitor system.
• Adjust tweeter and woofer controls on speakers.
• Adjust the relative gains of tweeter and woofer amplifiers in a bi-amped system.
• Relocate speakers.
• Improve room acoustics.
• Equalize the monitor system.
• Try different speakers.
• Upgrade the power amp and speaker cables.
• Monitor at a moderate listening volume, such as 85 dBSPL. We hear less bass and treble in a program if it is monitored at a low volume, and vice versa. If we hear too little bass due to monitoring at a low level, we might mix in too much bass.
Bad Sound on Playback Only
If a hard-drive recording has glitches or drop-outs on playback, try this:
• Increase the latency setting in your recording software.
• Follow the tips in Appendix B, “Optimizing Your Computer for Multitrack Recording.“
If a digital recording sounds distorted, these suggestions might help:
• Keep the recording level as high as possible, but try not to exceed −6 dBFS (decibels full scale) in peak meter mode, not RMS mode.
• Avoid clipping in effects plug-ins.
• Record at a higher sampling rate or higher bit depth.
• Avoid sampling-rate conversion.
• Apply dither when going from a high bit depth to a lower bit depth.
• Try a higher-quality audio interface.
Bad Sound in a Pop-Music Recording Session
Sometimes you have bad sound in a pop-music recording session.
MUDDINESS (LEAKAGE)
If the sound is muddy from excessive leakage, try the following:
• Place the microphones closer to their sound sources.
• Spread the instruments farther apart to reduce the level of the leakage.
• Place the instruments closer together to reduce the delay of the leakage.
• Use directional microphones (such as cardioids).
• Overdub the instruments.
• Record the electric instruments direct.
• Use baffles (goboes) between instruments.
• Deaden the room acoustics (add absorptive material or flexible panels).
• Filter out frequencies above and below the spectral range of each instrument. Be careful or you’ll change the sound of the instrument.
• Turn down the bass amp in the studio, or monitor the bass with headphones instead.
MUDDINESS (EXCESSIVE REVERBERATION)
If the sound is muddy due to excessive reverberation, try these steps:
• Reduce the effects-send levels or effects-return levels. Or don’t use effects until you figure out what the real problem is.
• Place the microphones closer to their sound sources.
• Use directional microphones (such as cardioids).
• Deaden the room acoustics.
• Filter out frequencies below the fundamental frequency of each instrument.
MUDDINESS (LACKS HIGHS)
If your sound is muddy and lacks highs, or has a dull or muffled sound, try the following:
• Use microphones with better high-frequency response, or use condenser mics instead of dynamics.
• Change the mic placement. Put the mic in a spot where there are sufficient high frequencies. Keep the high-frequency sources (such as cymbals) on-axis to the microphones.
• Use small-diameter microphones, which generally have a flatter response off-axis.
• Boost the high-frequency equalization or cut slightly around 300 Hz.
• Change musical instruments; replace guitar strings; replace drum heads. (Ask the musicians first!)
• Use an enhancer signal processor, but watch out for noise.
• Use a direct box on the electric bass. Have the bassist play percussively or use a pick if the music requires it. When compressing the bass, use a long attack time to allow the note’s attack to come through. (Some songs don’t require sharp bass attacks—do whatever’s right for the song.)
• Damp the kick drum with a pillow, folded towel, or blanket, and mike it next to the center of the head near the beater. Use a wooden or plastic beater if the song and the drummer allow it.
• Don’t plug an electric guitar directly into a mic input. Use a direct box or a highimpedance input.
• Apply high-frequency boost after compression, not before.
MUDDINESS (LACKS CLARITY)
If your sound is muddy because it lacks clarity, try these steps:
• Consider using fewer instruments in the musical arrangement. Maybe turn down synth pads in the mix.
• Equalize instruments differently so that their spectra don’t overlap.
• Try less reverberation.
• Using equalizers, boost the presence range of instruments that lack clarity. Or cut 1 to 2 dB around 300–500 Hz.
• In a reverb unit, add about 45 to 100 msec of predelay.
• Pan similar-sounding instruments to opposite sides.
DISTORTION
If you hear distortion when monitoring the mics in a pop-music recording, try the following:
• Increase input attenuation (reduce input gain), or plug in a pad between the microphone and mic input.
• Readjust gain-staging: set faders and pots to their design centers (shaded areas).
• If you still hear distortion, switch in the pad built into the microphone (if any).
• Check connectors for stray wires and bad solder joints.
• Unplug and plug-in connectors. Clean them with Caig Labs DeoxIT or Pro Gold.
TONAL IMBALANCE
If you have bad tonal balance—the sound is boomy, dull, or shrill, for example—follow these steps:
• Change musical instruments, change guitar strings, change reeds, etc.
• Change mic placement. If the sound is too bassy with a directional microphone, you may be getting proximity effect. Mike farther away or roll off the excess bass.
• Use the three-to-one rule of mic placement to avoid phase cancellations. When you mix two or more mics to the same channel, the distance between mics should be at least three times the mic-to-source distance.
• Try another microphone. If the proximity effect of a cardioid mic is causing a bass boost, try an omnidirectional mic instead.
• If you must place a microphone near a hard, reflective surface, try a boundary microphone on the surface to prevent phase cancellations.
• If you’re recording a singer/guitarist, delay the vocal mic signal by about 1 msec.
• Change the equalization. Avoid excessive boost. Maybe cut slightly around 300 Hz if the sound is muddy, or cut around 3 kHz if the sound is harsh.
• Use equalizers with a broad bandwidth, rather than a narrow, peaked response.
• During mastering, try a spectrum analyzer/equalizer such as Harmonic Balancer (www.har-bal.com).
LIFELESSNESS
If your pop-music recording has a lifeless sound and is unexciting, these steps might help you solve it:
• Work on the live sound of the instruments in the studio to come up with unique effects.
• Add effects: reverberation, echo, exciter, doubling, equalization, etc.
• Use and combine recording equipment in unusual ways.
• Try overdubbing little vocal licks or synthesized sound effects.
If your sound seems lifeless due to dry or dead acoustics, try these:
• If leakage is not a problem, put microphones far enough from instruments to pick up wall reflections. If you don’t like the sound this produces, try the next suggestion.
• Add reverb or echo to dry tracks. (Not all tracks require reverberation. Also, some songs may need very little reverberation so that they sound intimate.)
• Use omnidirectional microphones.
• Add hard, reflective surfaces in the studio, or record in a hard-walled room.
• Allow a little leakage between microphones. Put mics far enough from instruments to pick up off-mic sounds from other instruments. Don’t overdo it, though, or the sound becomes muddy and track separation becomes poor.
NOISE (HISS)
Sometimes your pop-music recording has extra noise on it. If your sound has hiss, try these:
• Check for noisy guitar amps or keyboards.
• Switch out the pad built into the microphone (if any).
• Reduce mixer input attenuation (increase input gain).
• Use a more sensitive microphone.
• Use an impedance-matching adapter (a low- to high-Z step-up transformer) between microphones and phone-jack mic inputs.
• Use a quieter microphone (one with low self-noise).
• Increase the sound pressure level at the microphone by miking closer. If you’re using PZMs, mount them on a large surface or in a corner.
• Apply any high-frequency boost during recording, rather than during mixdown.
• If possible, feed recorder tracks from mixer direct outs or insert sends instead of group or bus outputs.
• Use a lowpass filter (high-cut filter).
• As a last resort, use a noise gate.
NOISE (RUMBLE)
If the noise is a low-frequency rumble, follow these steps:
• Reduce air-conditioning noise or shut off the air conditioning temporarily.
• Use a highpass filter (low-cut filter) that is set around 40 to 100 Hz.
• Use microphones with limited low-frequency response.
• See the next section, “Noise (Thumps).“
NOISE (THUMPS)
• Change the microphone position.
• Change the musical instrument.
• Use a highpass filter set around 40 to 100 Hz.
• If the cause is mechanical vibration traveling up the mic stand, put the mic in a shock-mount stand adapter, or place the mic stand on some carpet padding. Try to use a microphone that is less susceptible to mechanical vibration, such as an omnidirectional mic or a unidirectional mic with a good internal shock mount.
• Use a microphone with a limited low-frequency response.
• If the cause is piano pedal thumps, also try working on the pedal mechanism.
HUM
Hum is a subject in itself. See the tips on hum prevention near the end of Chapter 4.
POP
Pops are explosive breath sounds in a vocalist’s microphone. If your pop-music recording has pops, try these solutions:
• Place the microphone above or to the side of the mouth.
• Place a foam windscreen (pop filter) on the microphone.
• Stretch a nylon stocking over a crochet hoop, and mount it on a mic stand a few inches from the microphone (or use an equivalent commercial product).
• Place the microphone farther from the vocalist.
• Use a microphone with a built-in pop filter (ball grille).
• Use an omnidirectional microphone, because it is likely to pop less than a directional (cardioid) microphone.
• Switch in a highpass filter (low-cut filter) set around 80 to 100 Hz.
SIBILANCE
Sibilance is an overemphasis of “s” and “sh” sounds. If you are getting sibilance on your pop-music recording, try these steps:
• Use a de-esser signal processor or plug-in. Or use a multiband compressor, and compress only the range from 5 to 10 kHz.
• Place the microphone farther from the vocalist.
• Place the microphone toward one side of the vocalist, or at nose height, rather than directly in front.
• Cut equalization in the range from 5 to 10 kHz.
• Change to a duller sounding microphone such as a ribbon.
BAD MIX
Some instruments or voices are too loud or too quiet. To improve a bad mix, try the following:
• Change the mix. (Maybe change the mix engineer!)
• Compress vocals or instruments that occasionally get buried.
• Change the equalization on certain instruments to help them stand out.
• During mixdown, continuously change the mix to highlight certain instruments according to the demands of the music.
• Change the musical arrangement so that different musical parts don’t play at the same time. That is, consider having a call-and-response arrangement (fill-in-the-holes) instead of everything playing at once, all the time.
UNNATURAL DYNAMICS
When your pop-music recording has unnatural dynamics, loud sounds don’t get loud enough. If this happens, try these steps:
• Use less compression or limiting.
• Avoid overall compression.
• Use multiband compression on the stereo mix instead of wideband (full-range) compression.
ISOLATED SOUND
If some of the instruments on your recording sound too isolated, as if they are not in the same room as the others, follow these steps:
• In general, allow a little crosstalk between the left and right channels. If tracks are totally isolated, it’s hard to achieve the illusion that all the instruments are playing in the same room at the same time. You need some crosstalk or correlation between channels. Some right-channel information should leak into the left channel, and vice versa.
• Place microphones farther from their sound sources to increase leakage.
• Use omnidirectional mics to increase leakage.
• Use stereo reverberation or echo.
• Pan effects returns to the channel opposite the channel of the dry sound source.
• Pan extreme left-and-right tracks slightly toward center.
• Make the effects-send levels more similar for various tracks.
• To give a lead-guitar solo a fat, spacious sound, use a stereo chorus. Or send its signal through a delay unit, pan the direct sound hard left, and pan the delayed sound hard right.
LACK OF DEPTH
If the mix lacks depth, try these steps:
• Achieve depth by miking instruments at different distances.
• Use varied amounts of reverberation on each instrument. The higher the ratio of reverberant sound to direct sound, the more distant the track sounds.
• To make instruments sound closer, use a longer predelay setting in your reverb (maybe 40–100 msec). Use a shorter predelay (under 30 msec) to make instruments sound farther away.
Bad Sound in a Classical-Music Recording
Check the following procedures if you have problems recording classical music:
TOO DEAD
If the sound in your classical recording is too dead—there is not enough ambience or reverberation—try these measures to solve the problem:
• Place the microphones farther from the performers.
• Use omnidirectional microphones.
• Record in a concert hall with better acoustics (longer reverberation time).
• Turn up the hall mics (if used).
• Add artificial reverberation.
TOO CLOSE
If the sound is too detailed, too close, or too edgy, follow these steps:
• Place the microphones farther from the performers.
• Place the microphones lower or on the floor (as with a boundary microphone).
• Roll off the high frequencies.
• Use mellow-sounding microphones (many ribbon mics have this quality).
• Turn up the hall mics (if used).
• Increase the reverb-send level.
TOO DISTANT
If the sound is distant and there is too much reverberation, these steps might help:
• Place the microphones closer to the performers.
• Use directional microphones (such as cardioids).
• Record with a spaced pair of directional mics aiming straight ahead.
• Record in a concert hall that is less live (reverberant).
• Turn down the hall mics (if used).
• Decrease the reverb-send level.
STEREO SPREAD TOO NARROW OR TOO WIDE
If your classical-music recording has a narrow stereo spread, try these steps:
• Angle or space the main microphone pair farther apart.
• If you’re doing mid-side stereo recording, turn up the side output of the stereo microphone.
• Place the main microphone pair closer to the ensemble.
If the sound has excessive stereo spread (or “hole-in-the-middle”), try the following:
• Angle or space the main microphone pair closer together.
• If you’re doing mid-side stereo recording, turn down the side output of the stereo microphone.
• In spaced-pair recording, add a microphone midway between the outer pair, and pan its signal to the center.
• Place the microphones farther from the performers.
LACK OF DEPTH
Try the following to bring more depth into your classical-music recording:
• Use only a single pair of microphones out front. Avoid multimiking.
• If you must use spot mics, keep their level low in the mix.
• Add more artificial reverberation to the distant instruments than to the close instruments.
BAD BALANCE
If your classical-music recording has bad balance, try the following:
• Place the microphones higher or farther from the performer.
• Ask the conductor or performers to change the instruments’ written dynamics. Be tactful!
• Add spot microphones close to instruments or sections needing reinforcement. Mix them in subtly with the main microphones’ signals.
MUDDY BASS
If your recording has a muddy bass sound, follow these steps:
• Aim the bass-drum head at the microphones.
• Put the microphone stands and bass-drum stand on resilient isolation mounts (such as a carpet pad), or place the microphones in shock-mount stand adapters.
• Roll off the low frequencies or use a highpass filter set around 40 to 80 Hz.
• Use artificial reverb with a shorter decay time at low frequencies.
• Record in a concert hall with less low-frequency reverberation.
RUMBLE
Sometimes your classical-music recording picks up rumble from air conditioning, trucks, and other sources. Try the following to clear this up:
• Check the hall for background rumble problems.
• Temporarily shut off the air conditioning.
• Record in a quieter location.
• Use a highpass filter set around 40 to 80 Hz.
• Use microphones with limited low-frequency response.
• Mike closer and add artificial reverb.
DISTORTION
If your classical-music recording has distortion, try the following:
• Switch in the pads built into the microphones (if any).
• Increase the mixer input attenuation (turn down the input trim).
• Check connectors for stray wires or bad solder joints.
• Avoid sample-rate conversion.
• Apply dithering when going from 24 to 16 bits.
BAD TONAL BALANCE
Bad tonal balance expresses itself in a sound that is too dull, too bright, or colored. If your recording has this problem, follow these steps:
• Change the microphones. Generally, use flat-response microphones with minimal off-axis coloration.
• Follow the three-to-one rule mentioned in Chapter 7.
• If a microphone must be placed near a hard, reflective surface, use a boundary microphone on the surface to prevent phase cancellations between direct and reflected sounds.
• Adjust equalization. Try a spectrum analyzer/equalizer such as Harmonic Balancer (www.har-bal.com).
• Place the mics at a reasonable distance from the ensemble (too-close miking sounds shrill).
• Avoid mic positions that pick up standing waves or room modes. Experiment with small changes in mic position.
This chapter described a set of standards for good sound quality in both popular- and classical-music recordings. These standards are somewhat arbitrary, but the engineer and producer need guidelines to judge the effectiveness of the recording. The next time you hear something you don’t like in a recording, the lists in this chapter will help you define the problem and find a solution.