
You want to set up a recording system that’s affordable, easy to use, and sonically excellent. With today’s wide array of user-friendly sound tools, you can do just that. This chapter is a guide to equipment for a recording studio: what it does, what it costs, and how to set it up.
In this chapter we’ll examine:
• Equipment
• Cables and connectors
• How to hook up your studio gear
• Preventing hum and radio frequency interference
What is the bare-bones equipment you need to crank out a decent demo CD? How much does it cost? Thanks to the new breed of affordable equipment, you can put together a complete home recording studio for as little as $1200. That includes powered speakers, two mics and mic stands, recording software, an audio interface, headphones, and cables.
EQUIPMENT
Let’s examine each piece of equipment in a recording studio. You’ll need some sort of recording device, headphones, cables, mics, direct box, monitor speakers, audio interface, and effects.
Recording Device
Six types of recording devices to choose from are a 2-track recorder, an iOS recording system, a recorder-mixer, a separate multitrack recorder and mixer, a computer, and a keyboard workstation. We’ll look at each one.
PORTABLE 2-TRACK RECORDER
This device records in stereo on two tracks, either with two external mics or two builtin mics. Prices are $200 to $1800. Three types of 2-track recorder are:
• Handheld flash-memory recorder (Figure 4.1)
• Apple iOS device with recording software
• Laptop computer with recording software
FIGURE 4.1 Roland R-09HR, an example of a portable 2-track recorder.
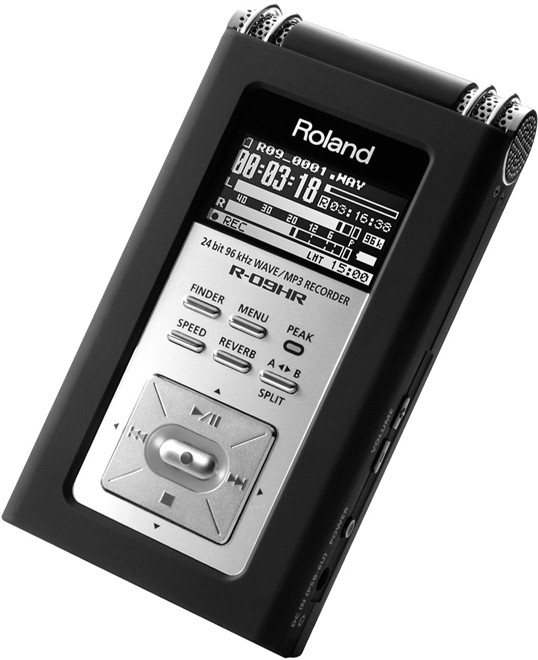
A 2-track recorder works well for on-location stereo recording of classical music: an orchestra, symphonic band, string quartet, pipe organ, or soloist. Connect two highquality mics and record in stereo as described in Chapter 7.
You can also use a 2-track recorder to capture practice sessions or gigs of pop, folk, or jazz groups. Recordings made this way sound sort of distant, as if you are listening from out in the audience. They might have background noise and not the best balance. But the recording process is very simple: just place the recorder, set a level, and hit Record.
Some handheld recorders are the Sony PCM-D50 and PCM-M10; Alesis PalmTrack; Zoom H4n; H2N, and H1; Tascam DR-07mkII, DR-05, DR-100, and DR-08; Yamaha
PocketTrak; Korg MR-2 and SOS; Roland R05 and R26; Marantz PMD620 and PMD661; Edirol (Roland) R-09HR (Figure 4.1); M-Audio MicroTrack II 24/96; and Olympus LS-7 and LS-100.
IOS RECORDING SYSTEM
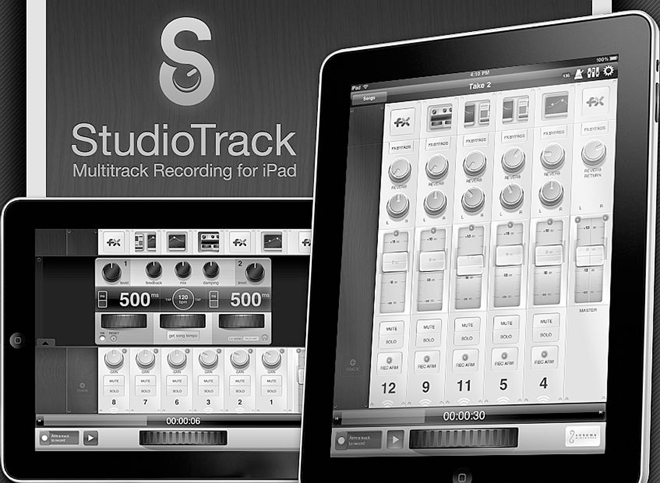
Apple’s iOS devices including the iPad have loads of recording app options. On the iPad, simply tap the App Store Icon and search for recording apps. Check out GarageBand, MultiTrack DAW by Harmonic Dog, Sonoma Wire Works’ StudioTrack (Figure 4.2), StudioMini XL, Wizdom Music Morphwiz, and n-Track Studio (http://ntrack.com). On the iPhone and iPod touch, be sure to check out Audiofile Engineering’s FiRe.
FIGURE 4.2 Sonoma Wire Works StudioTrack app for the Apple iPad.
Also available are audio and audio/MIDI interfaces that plug into iOS devices. An example is the Tascam iU2. The Alesis iO Dock acts as an interface for an iPad, providing multiple I/O options.
Some stereo microphones are designed to plug into an iPad or other iOS devices. Three examples are the IK Multimedia iRig Mic, Blue Mikey Digital, and Tascam iM2.
More details on 2-track recorders are in Chapter 13 on digital recording.
MINI STUDIO
Also called a portable studio, notebook studio, personal studio, or pocket studio, this piece of gear combines a 4-track or 8-track recorder with a mixer—all in one portable chassis (Figure 4.3). A similar option is an Apple iPad with recording software, mentioned earlier.
FIGURE 4.3 Fostex R16, an example of a mini studio.
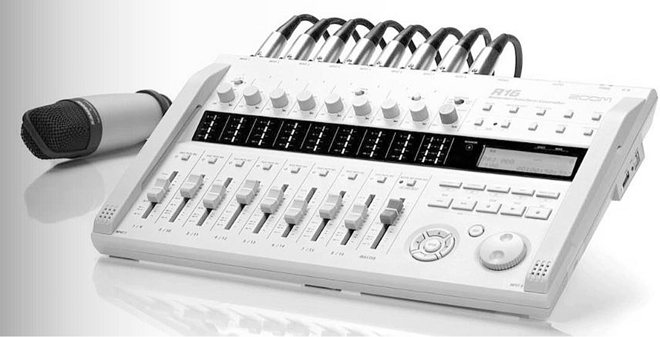
A mini studio records in MP3 or WAV format to a flash memory card. It lets you record several instruments and vocals, then mix them to stereo. That is, you “bounce” the tracks to a stereo file in the memory card. You can copy the stereo mix file to your computer via USB (Universal Serial Bus, an industry standard that defines certain cables and communications protocols for high-speed data transfer). Pocket studios sound good enough to make demos, or to use as a musical scratchpad for ideas, but not to release commercial albums. Some examples are the Boss BR-800 and Micro BR, TASCAM DP-004, and Zoom R16. Costing about $200 to $599, a mini studio can be a good choice for beginning recordists.
Some features include
• An internal MIDI sound module (synthesizer) that plays back MIDI sequences and includes MIDI files or rhythm patterns to jam with.
• Built-in effects.
• Built-in mic (in some models).
• Autopunch (automatically “punch” into and out of record mode to correct mistakes).
• Battery or AC-adapter powered.
• Virtual tracks let you record multiple takes of a single performance, then select your favorite take during mixdown.
• Guitar-amp modeling simulates various guitar amps; mic modeling simulates mic models.
• 2 mic inputs; records up to 2 tracks at a time.
• Plays back 4 or 8 tracks at once.
DIGITAL MULTITRACKER (RECORDER-MIXER)
Other names for this device are standalone digital audio workstation (DAW), portable digital studio, or personal digital studio.
Like the mini studio, the digital multitracker combines a multitrack recorder with a mixer in a single chassis (Figure 4.4). It’s convenient and portable. Offering better sound than a mini studio, the digital multitracker provides CD sound quality because it can record wave files. It records 8 to 32 tracks onto a built-in hard drive or flash memory card. The mixer includes faders (volume controls) for mixing, EQ or tone controls, and aux sends for effects (such as reverb). An LCD screen displays recording levels, waveforms for editing, and other functions.
FIGURE 4.4 Korg D3200, an example of a digital multitracker (recorder-mixer).
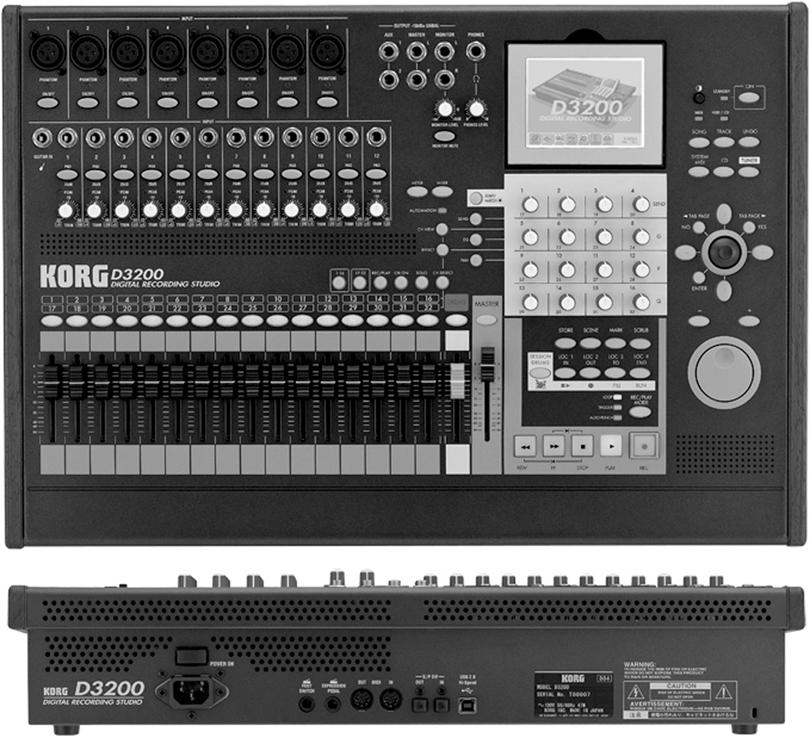
The price for this device ranges from $700 to $3600. Some manufacturers of mini studios or digital multitrackers are TASCAM, Boss, Fostex, Korg, Roland, Yamaha, and Zoom (Samson).
Chapter 13 (under the heading “Recorder-Mixer”) lists some features to look for in a recorder-mixer.
SEPARATE MULTITRACK RECORDER AND MIXER
Ideal for on-location recording, a multitrack hard-disk recorder (HD recorder) records up to 48 tracks reliably on a built-in hard drive (Figure 4.5), just like the hard drive in your computer. The recorder does not have mic preamps, so it must be used with a mixer or mic preamps. Multiple recorders can be linked to get more tracks. Some examples are the Alesis ADAT HD24XR, TASCAM X-48MKII, iZ Technology RADAR V, and Fostex D2424L Mk2. Prices range from $1,500 to $20,000.
FIGURE 4.5 Alesis HD24XR, an example of a multitrack hard-disk recorder.
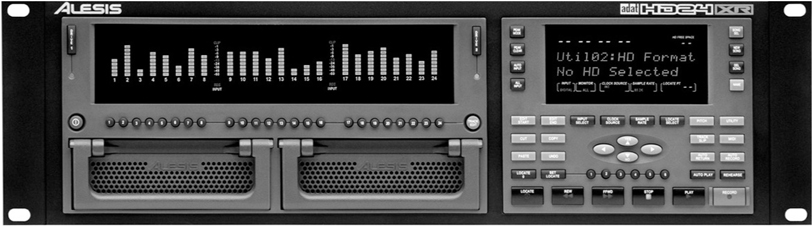
Current units record with 24-bit resolution and up to 96 kHz sampling rate. Some record 24 tracks of 24-bit programs at sample rates of 44.1 and 48 kHz. They record 12 tracks of 24-bit recording at 88.2 and 96 kHz (these terms are explained in Chapter 13 on digital recording). Some HD recorders allow track editing, either on a built-in LCD screen or on a plug-in computer monitor. A few models have built-in removable hard drives for backing up projects, while others include network or high-speed data connections for data transfer.
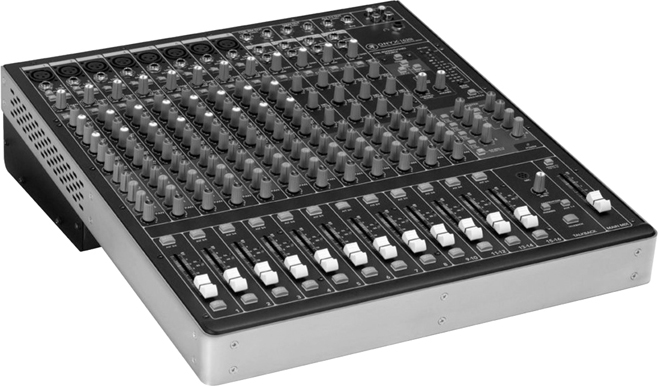
A mixer (Figure 4.6) is an electronic device with several mic preamplifiers, volume and tone controls for each mic, monitor volume controls, and outputs for effects devices. To use it, plug mics and electric instruments into the mixer, which amplifies their signals. Connect the output signal of each mic preamp to a multitrack recorder. While recording, you use the mixer to send those signals to the desired recorder tracks, and to set recording levels. During mixdown, the mixer combines (mixes) the tracks to stereo. It also lets you adjust each track’s volume, tone quality, effects, and stereo position. A large, complex mixer is called a mixing console (board or desk) and costs upwards of $3000. explains mixing consoles in detail.
FIGURE 4.6 Mackie Onyx 1620i, an example of a mixer. It has a FireWire port for connecting to a computer.
The normal price range for mixers is about $180 to $1500. Mixers are made by such companies as TASCAM, Alesis, Yamaha, Mackie, Allen & Heath, Soundcraft, M-Audio, Tapco, Peavey, Samson, and many others.
COMPUTER DIGITAL AUDIO WORKSTATION (DAW)
This low-cost recording setup has three parts: a personal computer, an audio interface, and recording software (Figure 4.7). Some software records MIDI data (explained later) as well as audio. The audio interface converts audio from your mics, mic preamps, or mixer into a signal that is recorded on the computer’s hard drive as a magnetic pattern. Dozens of tracks can be recorded with professional quality. You mix the tracks with a mouse by adjusting the “virtual” controls that appear on your computer screen. Then you record the mix on your computer’s hard drive. Details are in Chapter 14 on computer recording.
FIGURE 4.7 Computer with recording software and a choice of audio interface.
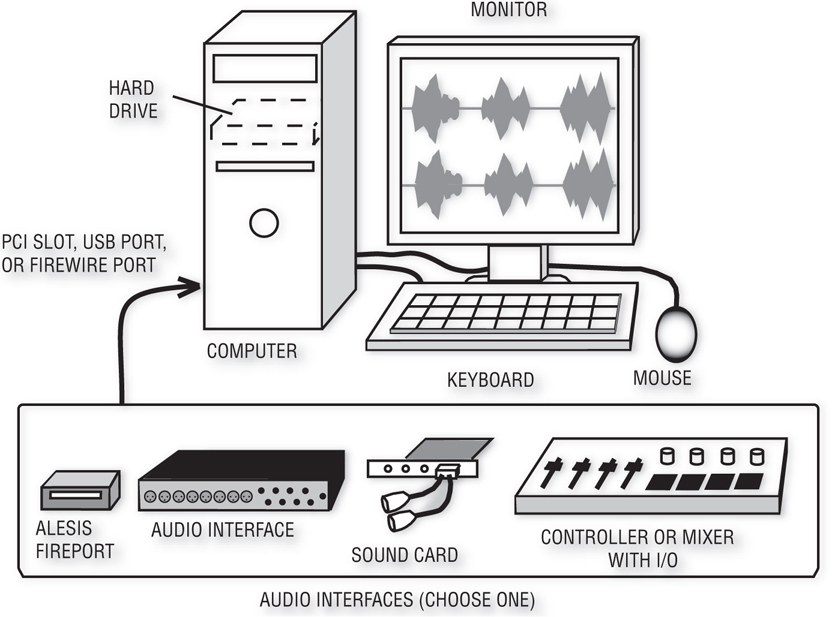
A computer studio costs about the same as a mini studio and is more powerful. It’s a bargain. But since software requires computer skills, it’s a little harder to learn and use than a hardware multitracker. Software recordings are at least CD quality—better than the MP3 recordings you get with a mini studio.
Recording software costs anywhere from $0 (freeware) to $1800, with $150-$500 being typical prices. Software examples include Cakewalk Home Studio, Sonar Studio, and X1 Producer; Avid Pro Tools 10 and HD Native; Apple Logic Studio and Logic Pro; Reaper; Steinberg Cubase and Nuendo; PreSonus Studio One and Studio One Pro; FL Studio Producer; Propellerhead Record; Sony Vegas and Sound Forge; BIAS Deck; Pro Tracks Plus; Magix Samplitude and Sequoia; SADiE; Pyramix; Mackie Tracktion 3; N Track Studio; RML Labs SAW Studio; Adobe Audition; and MOTU Digital Performer.
Free multitrack recording programs are available for download. Although they lack extensive features, they offer a chance to practice your skills at no cost. Examples are Audacity (from http://audacity.sourceforge.net) and GarageBand (supplied free with any new Apple computer or $79 with an iLife software upgrade).
Related to recording software is music creation software, which comes with samples of musical instruments. You set up loops (repeating drum riffs and musical patterns), play along with them using a MIDI keyboard, and record that MIDI sequence. Examples include Ableton Live, Propellerhead Reason, Sony ACID Pro, and Spectrasonics Stylus RMX.
A sound card (PCIe audio interface) costs $100 to $400. Some makers of sound cards include Echo, Event, Frontier Design, M-Audio, RME, Lynx, and E-MU.
An audio interface is a chassis with 2 to 16 mic preamps, A/D convertors, and a USB, FireWire, or Thunderbolt port that sends digital audio on a single cable to your computer. Some units have MIDI ins and out, and a high-impedance instrument input for an electric guitar, electric bass, acoustic guitar pickup, or synth. More details are in Chapter 14 on Computer Recording under the heading “FireWire, USB, or Thunderbolt Audio Interface.”
Audio interface prices: 2-channel costs $150 to $500, 4-channel costs about $150 to $450 (Figure 4.8), and 8-channel starts at $400. If you link (connect together) two 8-channel interfaces, you can record up to 16 mic signals at once.
FIGURE 4.8 M-Audio Fast Track Ultra, an example of a 4-channel USB 2.0 audio interface. It offers low-latency direct monitoring with reverb, and can create two headphone mixes.
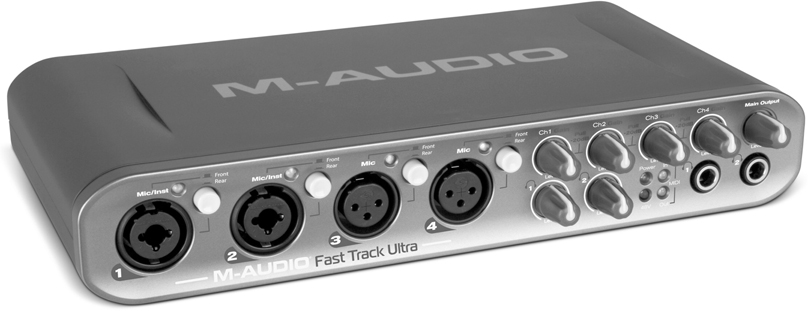
Manufacturers of audio interfaces include Akai, Avid, Metric Halo, MOTU, PreSonus, Apogee, Focusrite, M-Audio, TC Electronic, ART, Prism, Mackie, E-MU, Alesis, Edirol, TASCAM, and many others.
An audio interface usually has built-in mic preamps. Advanced users might prefer to use separate mic preamps connected to an A/D converter (analog-to-digital converter). Some converter manufacturers are Lynx, Mitek, Crane Song, Millenia Media, RME, Universal Audio, and Apogee.
Another type of audio interface is a mixer that connects to a computer via a FireWire or USB connection. It sends the output signal of each mic preamp to a separate track in your recording software, and returns the stereo mix back to the mixer for monitoring. This can be a good system for recording a band because it offers easy setup of monitor mixes with effects. Some examples are the Mackie Onyx 1640i (Figure 4.6) with 16 recording channels, PreSonus StudioLive (16 recording channels and 16 mic inputs), Alesis Multimix 16 USB 2.0 (18 recording channels and 8 mic inputs), and Behringer Xenyx X2442USB (2 recording channels). Generally these mixers are not controllers for recording software—you still need to use a mouse.
A USB microphone has a USB interface built in, so you just plug the mic directly into your computer’s USB port. No audio interface is needed. Examples are the Audio Technica AT2020 USB and AT2005 USB; Samson C01U; Blue Snowball, Yeti Pro, and Spark Digital; Rode Podcaster USB microphone; Apogee ONE and MicC; and MXL USB.009, 990 USB, and 990 USB Stereo mics.
An alternative to a USB microphone is a standard microphone plugged into an XLRto-USB mic adapter. The MXL MicMate, Shure X2U, and the Blue Icicle connect to any mic and convert its output to USB. Phantom power and headphone monitoring are included. Its digital-audio format is 16-bit, 44.1 or 48 kHz. The Centrance MicPort Pro is similar but records up to 24-bit/96 kHz audio.
Using a mouse can be fatiguing and can lead to repetitive stress syndrome. An alternative to the mouse is a control surface or controller. It looks like a mixer with faders, but it adjusts the virtual controls you see on the computer screen. That way you can use your computer for recording, and control the software with knobs and faders instead of a mouse. Two controllers with one fader are the Frontier Design AlphaTrack ($200, Figure 4.9) and PreSonus FaderPort ($150). Multifader controllers are made by such companies as Mackie, TASCAM, M-Audio, Avid, and Alesis ($350 to $1300).
FIGURE 4.9 Frontier Design AlphaTrack, an example of a controller for recording software.

You might want to get a wireless QWERTY keyboard so you can control your DAW from a mic location in the studio. Or add a USB extender cable to the keyboard.
KEYBOARD WORKSTATION
Here’s another device to record music. This is a synthesizer/sampler with a pianostyle keyboard, a built-in multitrack sequencer (MIDI recorder) and effects. Examples include the Korg Kronos and M50; Kurzweil PC3K8 and PC3LE; Yamaha Motif XF8; and Roland Fantom-G8 and Juno-Gi. The workstation lets you create a tune with several instrument sounds. Then you record the audio from the keyboard into a computer. If you want to add a vocal, use MIDI/audio recording software. An arranger keyboard workstation automatically creates backing tracks (drums, bass, and chords) by following your left hand’s notes and right hand’s melodies. Examples include the Yamaha Tyros4 and PSR-S910.
A similar device is a beat box or groove box, which is a sample player with pads that you tap to generate sounds and grooves. It lets you assemble a stereo music track from drum and synth samples. Copy the music from the beat box into your computer and add vocals. Examples include the Dave Smith Tempest; Korg Monotribe and Electribe; Akai MPC series and XR20; Native Instruments Maschine 1.6; Arturia Spark; Boss DR-880; Roland TD-20X; and Zoom RT-223. Beat boxes are available as software, too, such as MOTU BPM and Korg iElectribe for the Apple iPad.
LEGACY RECORDING DEVICES
Some recording equipment has become almost obsolete, but you may need to work with it if a client brings older gear into your studio to transfer audio tracks. Some of these formats are listed below.
Analog tape recorder: This records 2 to 24 tracks of analog audio on reels of magnetic tape from 1/4 inch to 2 inches wide. Compared to digital recorders, analog recorders have more noise, distortion, frequency-response errors, and unstable pitch. Their electronics and tape heads need frequent alignment. Still, many people love the sound of them. Some have mic inputs; all have analog line inputs and line outputs.
DAT (Digital Audio Tape) recorder: This records 2 tracks of audio digitally on a small DAT tape, a cassette about half the size of a standard analog cassette. The DAT also writes absolute time (hours, minutes, and seconds) on tape as it records. Inputs are analog mic/line level and digital; outputs are analog line level and digital.
Modular Digital Multitrack (MDM): This records 8 digital tracks on a videocassette, using a rotating drum like a DAT recorder. Two popular models are the Alesis ADAT, which records on S-VHS tape, and the TASCAM DA-88, DA-78, or DA-38, which record on Hi-8 mm tape. ADAT records up to 40 minutes on a single tape; DA-88 records up to 1 hour 48 minutes. With both types, you can sync several 8-track units with a cable to add more tracks. Both have analog line inputs and outputs. ADAT has Lightpipe-format digital outputs; TASCAM models have TDIF-format digital outputs.
Microphone
So far we covered recording devices. Let’s move on to other studio equipment.
A microphone converts the sound of a voice or instrument into an electrical signal that can be recorded. Microphone sound quality varies widely, so be sure to get one or more good mics costing at least $100 each. Your ears should tell you if a mic’s fidelity is adequate for your purpose. Some people are happy to get any sound recorded; others settle for nothing less than professional sound quality.
Probably the most useful mic types for home recording are the cardioid condenser mic and cardioid dynamic mic. The cardioid pickup pattern helps reject room acoustics for a tighter sound. The condenser type is commonly used on cymbals, acoustic instruments, and studio vocals; dynamics are used typically on drums and guitar amps. You’ll also need at least one mic cable, mic stand, and boom costing about $25 each. For more information on microphones, see Chapter 6.
Do you want to record solo instruments or classical musical ensembles in stereo with two mics at a distance? You’ll need either a stereo mic or a matched pair of highquality condenser or ribbon mics of the same model number, plus a stereo mic-stand adapter. See Chapter 18 for details.
Phantom Power Supply
A phantom power supply powers the circuits in condenser mics. It uses the same cable that carries the mic’s audio signal. You don’t need the supply if your condenser mic has a battery, or if your mixer or audio interface supplies phantom power at its mic connectors (most do). Some makers of phantom supplies are Behringer, ART, AudioTechnica, Rolls, and Whirlwind. The price ranges from $20 to $139.
Mic Preamp
This device amplifies a mic signal up to a higher voltage called “line level,” which is required by mixers and recorders. A standalone mic preamp provides a slightly cleaner, smoother, or more colorful sound than a mic preamp built into a mixer or audio interface, but costs much more. A 2-channel preamp costs $120 to $2000, while 8-channel preamps range from $600 to $6000. Studios on a budget can do without a standalone preamp.
Some manufacturers are Manley, True Systems, Focusrite, Universal Audio, GLM, Chandler, A Designs, Millennia Media, Avalon, Great River, John Hardy, Benchmark, AEA, Apogee, Vintech, Grace, Groove Tubes, PreSonus, Mackie, Summit Audio, Studio Projects, Samson, dbx, Aphex, and M-Audio.
Direct Box (DI)
A direct box (Figure 4.10) is used to connect an electric instrument (guitar, bass, synth) to an XLR-type mic input of a mixer, recorder-mixer, or audio interface. It lets you record electric instruments directly into your mixer without a microphone. A direct box picks up a very clean sound, which may be undesirable for electric guitar. If you want to pick up the distortion of the guitar amp, use a microphone instead. Or use a guitaramp modeling device or modeling plug-in.
FIGURE 4.10 A direct box.
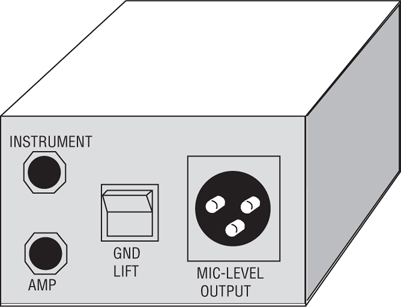
Some recorder-mixers and audio interfaces have “high-impedance” or “instrument” inputs meant for electric guitars and synthesizers. In this case, simply use a short guitar cord between the instrument and the mixer high-impedance input. If the cable run is over 15 feet, you’ll get higher quality with a direct box plugged into an XLR mic input.
Direct boxes sell for $50 to $700. Some manufacturers are Behringer, Radial, Countryman, Whirlwind, Manley, Groove Tubes, Pro Co, BSS, Tapco, Aphex, and ART.
Monitor System
Another important part of your studio is the monitor system, a pair of quality headphones or loudspeakers. The monitor system lets you hear what you’re recording and mixing—what you’re doing to the recorded sound. The sound you hear over the monitors is approximately what the final listener will hear.
Very good headphones are available for $100 and up from Sony, AKG, Sennheiser, Beyerdynamic, Audio Technica, Ultrasone, Shure, and others. A headphone amp can power several headphones at once, and some units let the musician adjust the headphone mix.
If you’re recording only yourself, one set of headphones is enough. But if you’re recording another musician, you both need headphones. Many recorder-mixers have two headphone jacks for this purpose.
If you want to record or overdub several people at once, you need headphones for all of them. For example, if you’re overdubbing three harmony vocalists, each one needs headphones to hear previously recorded tracks to sing with. To connect all these headphones, you could build a headphone junction box, an aluminum or plastic box that contains several headphone jacks. These are wired to a cable coming from your mixer’s headphone jack. Or you could use a splitter cable, which makes two jacks out of one. Another option is to purchase an affordable Rolls or Behringer headphone amplifier. Feed the amp from aux sends or the stereo mix.
Powered speakers with built-in amplifiers provide accurate, high-fidelity monitoring. Described in Chapter 5, these Nearfield studio monitors are small, bookshelf-type speakers that are placed about 3 feet apart and 3 feet from you as you sit at your mixer. Some monitor companies include Genelec, Dynaudio, JBL, Event, Quested, Focal, Lipinski, KRK, Blue Sky, Yamaha, Adam, Mackie, Alesis, Tannoy, M-Audio, Behringer, Edirol, and Samson. Prices range from $200 to $3860 a pair.
Effects
A recording without effects sounds rather dead and plain. Effects such as reverberation, echo, and chorus can add sonic excitement to a recording. They are produced by devices called signal processors (see Figure 4.11) or by plug-ins, which are software effects used in a computer recording program. See Chapter 9 for more information on effects.
FIGURE 4.11 An effects unit.

Although effects are built into most recording programs and recorder-mixers, most analog mixers require external effects units. On the mixer is a set of connectors (labeled “send” and “return”) for hooking up an external effects unit, such as a reverb or delay device. A unit with one effects send lets you add one type of effect; a unit with two effects sends lets you add two different effects to create more sonic interest.
Miscellaneous Equipment
Other equipment for your home studio includes audio cables, USB or FireWire cables, power outlet strips, lighting, tables or studio furniture, mic pop filters, masking tape and a pen to label inputs and cables, contact cleaning fluid, MIDI equipment stands, music stands, session forms, connector adapters, pen and paper, a flashlight, and so on.
MIDI Studio Equipment
MIDI is covered in detail in Chapter 16. It describes the components in a typical MIDI studio, such as shown in Figure 4.12. Also see Chapter 2 under the heading “MIDI Sequencing.”
FIGURE 4.12 One type of MIDI studio.

We’ve looked at several types of recording setups. All can help you create quality demos. As you go higher in price you get more features and better sound. For example, if you want to record an entire band playing all at once, with each instrument having its own mic, you’ll need a system with more microphones, more tracks, and more headphones.
As we’ve seen, putting together a home studio or project studio needn’t cost much. As technology develops, better equipment is available at lower prices. That dream of owning your own studio is within reach.
SETTING UP YOUR STUDIO
Once you have your equipment, you need to connect it together with cables, and possibly install equipment racks and acoustic treatment. Let’s consider each step.
Cables
Cables carry electric signals from one audio component to another. They are usually made of one or two insulated conductors (wires) surrounded by a fine-wire mesh shield that reduces hum. Outside the shield is a plastic or rubber insulating jacket. On both ends of the cable are connectors. See www.bartlettmics.com/newsletter/newsletter%204-11.pdf.
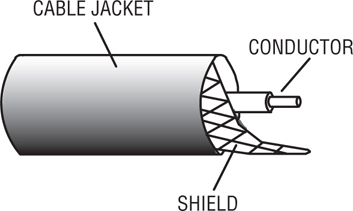
Cables are either balanced or unbalanced. A balanced line is a cable that uses two wires (conductors) to carry the signal, surrounded by a shield (see Figure 4.13). Each wire has equal impedance to ground. An unbalanced line has a single conductor surrounded by a shield (see Figure 4.14). The conductor and shield carry the signal. A balanced line rejects hum better than an unbalanced line, but an unbalanced line less than 10 feet long usually provides adequate hum rejection and costs less.
FIGURE 4.13 A 2-conductor shielded, balanced line.
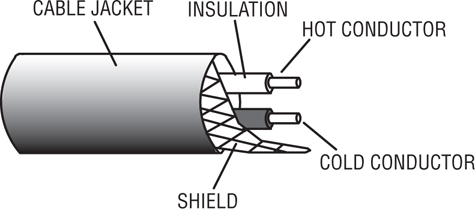
FIGURE 4.14 A 1-conductor shielded, unbalanced line.
A cable carries one of these five signal levels or voltages:
• Mic level: about 2 mV (0.002 volt) to about 1 V depending on how loud the sound source is, and how sensitive the mic is
• Instrument level: typically 0.1 V to 1 V for passive pickups; up to 1.75 V for active pickups
• Semipro or consumer line level: −10 dBV (0.316 volt)
• Pro line level: +4 dBu (1.23 volts)
• Speaker level: about 20 volts.
Note that “instrument level” can overlap mic level and line level.
Some manufacturers use dBu instead of volts (for an explanation, see Appendix A on the decibel):
• Mic level: about −52 dBu to +2.2 dBu
• Instrument level: −17.7 dBu to +7 dBu
• Semipro or consumer line level: −7.8 dBu
• Pro line level: +4 dBu
Equipment Connectors
Recording equipment also has balanced or unbalanced connectors built into the chassis. Be sure your cable connectors match your equipment connectors.
Balanced equipment connectors:
• 3-pin (XLR-type) connector—Figure 4.15
• 1/4-inch TRS (tip-ring-sleeve) phone jack—Figure 4.16
FIGURE 4.15 A 3-pin XLR-type connector used in balanced equipment. Left: male output connector. Right: female input connector.
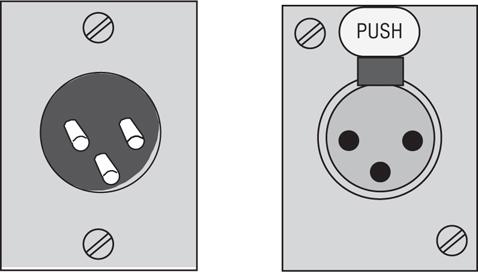
FIGURE 4.16 A 1/4-inch phone jack used in balanced and unbalanced equipment.

Unbalanced equipment connectors:
• 1/4-inch TS (tip-sleeve) phone jack—Figure 4.16
• Phono jack (RCA connector)—Figure 4.17
FIGURE 4.17 A phono (RCA) jack used in unbalanced equipment.
A jack is a receptacle; a plug inserts into a jack.
Connectors are confusing because a single connector can have several functions (usually not at the same time). Here are some examples:
• XLR: balanced line input at +4 dBu, balanced mic input at 2 mV to 1 V, or balanced line output at +4 dBu
• TRS (stereo 1/4-inch phone jack): balanced mic input, insert send/return connectors (line level), instrument input, or stereo headphones
• TS (mono 1/4-inch phone jack): unbalanced mic input, unbalanced line-level input or output (+4 dBu or −10 dBV), instrument input, or low-cost speaker connector
• Combi connector: An XLR mic input plus a TRS input (instrument level or line level)
• RCA (phono): home stereo line-level input or output at −10 dBV, composite video input/output, or SPDIF digital-audio input/output
• 1/8-inch (3.5 mm) mini phone jack: headphone jack, low-cost stereo mic input, line output in a portable recorder at −10 dBV; or a computer sound card’s line in, line out, or speaker out
Equipment connectors are labeled according to their function. If you see an XLR connector with the label “MIC,” you know it’s a balanced mic input. If it’s a 1/8-inch connector on a sound card, look at the icon near the connector. It’s either a mic input, line input, line output, or speaker output. You could download the manual for the sound card, which should describe the function of each connector.
Cable Connectors
Several types of cable connectors are used in audio. Figure 4.18 shows a 1/4-inch mono phone plug (or TS phone plug), used with cables for unbalanced microphones, synthesizers, and electric instruments. The tip terminal is soldered to the cable’s center conductor; the sleeve terminal is soldered to the cable shield.
FIGURE 4.18 A mono (TS) 1/4-inch phone plug.
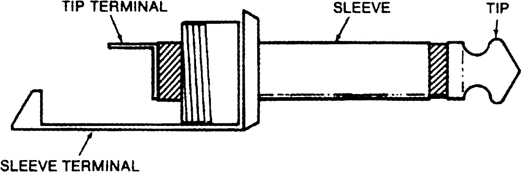
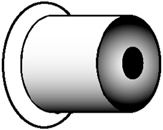
Figure 4.19 shows an RCA or phono plug, used to connect unbalanced line-level signals. The center pin is soldered to the cable’s center conductor; the cup terminal is soldered to the cable shield.
FIGURE 4.19 An RCA (phono) plug.
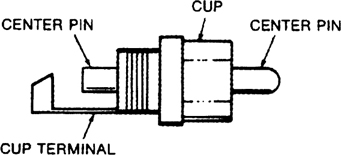
Figure 4.20 shows a 3-pin pro audio connector (XLR-type). It is used with cables for balanced mics and balanced recording equipment. The female connector (with holes; Figure 4.20A) plugs into equipment outputs. The male connector (with pins; Figure 4.20B) plugs into equipment inputs. Pin 1 is soldered to the cable shield, pin 2 is soldered to the “hot” red or white lead, and pin 3 is soldered to the remaining lead. This wiring applies to both female and male connectors.
FIGURE 4.20 A 3-pin pro audio connector (XLR-type). (A) female. (B) male.
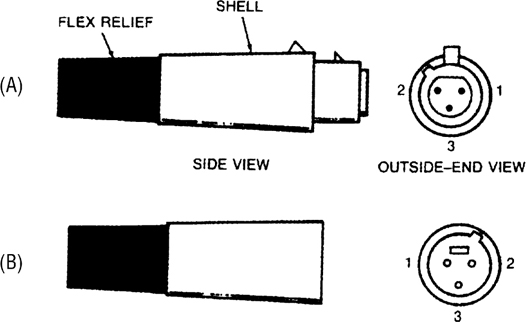
Figure 4.21 shows a stereo (TRS) phone plug, used with stereo headphones and with some balanced line-level cables. For headphones, the tip terminal is soldered to the left-channel lead, the ring terminal is soldered to the right-channel lead, and the sleeve terminal is soldered to the common lead. For balanced line-level cables, the sleeve terminal is soldered to the shield, the tip terminal is soldered to the hot red or white lead, and the ring terminal is soldered to the remaining lead.
FIGURE 4.21 A stereo (TRS) phone plug.
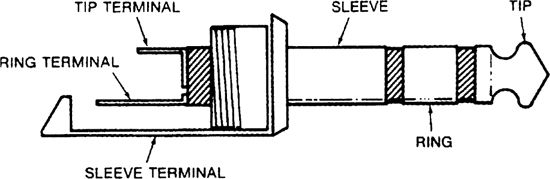
Some mixers have insert jacks that are stereo phone jacks; each jack accepts a stereo phone plug. The tip is the send signal to an audio device input, the ring is the return signal from the device output, and the sleeve is the ground.
Cable Types
Cables are also classified according to their function. In a studio, you’ll use several types of cables: power, mic, MIDI, speaker, USB, FireWire, S/PDIF, TASCAM TDIF, Alesis Lightpipe, guitar cords, and patch cords.
A power cable, such as an AC extension cord or a power cord on a device, is made of three heavy-gauge wires surrounded by an insulating jacket. The wires are thick to handle high current without overheating.
A mic cable is usually 2-conductor shielded. It has two wires to carry the signal, surrounded by a fine-wire cylinder or shield that reduces hum pickup. On one end of the cable is a connector that plugs into the microphone, usually a female XLR-type. On the other end is either a 1/4-inch phone plug or a male XLR-type connector that plugs into your mixer or audio interface.
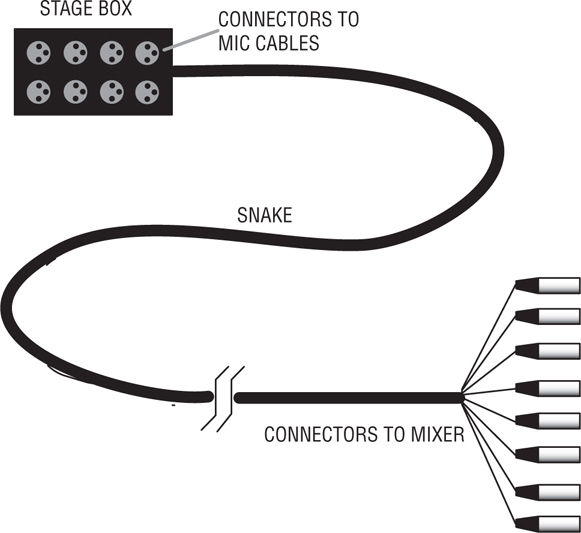
Rather than running several mic cables to your mixer or interface, you might consider using a snake, which is a box with multiple mic connectors, all wired to a thick multi-conductor cable (Figure 4.22). A snake is especially convenient if you’re running long cables to recording equipment from another room. It’s essential for most on-location recording.
FIGURE 4.22 A stage box and snake.
Professional balanced equipment is interconnected with mic cable: 2-conductor shielded cable having a female XLR on one end and a male XLR on the other. Professional patch bays (described later) use balanced cables with tip-ring-sleeve phone plugs.
A MIDI cable uses a 5-pin DIN connector on each end of a 2-conductor shielded cable. The cable connects MIDI OUT to MIDI IN, or MIDI THRU to MIDI IN.
A speaker cable connects a power amp to each loudspeaker. To avoid wasting power, speaker cables should be as short as possible and should be heavy gauge (between 12 and 16 gauge). They can even be made from lamp cord (zip cord). Number 12 gauge is thicker than 14; 14 is thicker than 16.
A USB cable or a FireWire cable connects a peripheral device (like an audio interface) to a computer. USB and FireWire are covered in detail in Chapter 14.
An S/PDIF cable transfers a digital signal from one device’s S/PDIF output to another device’s S/PDIF input. It uses a shielded unbalanced cable (ideally a 75-ohm RG59 video cable) with an RCA plug on each end.
A TASCAM TDIF cable is a multiconductor cable with a 25-pin D-sub connector on both ends. It’s used to connect multiple digital-audio signals from TASCAM multitrack recorders to digital mixers or computer TDIF interfaces.
An Alesis Lightpipe cable is a fiber optic cable with a TOSLINK connector on both ends. This cable is used to connect 8 channels of digital-audio signals from an Alesis multitrack recorder to a digital mixer or computer Lightpipe interface.
A guitar cord is constructed of a 1-conductor shielded cable with a 1/4-inch phone plug on each end. It connects a guitar amp to an electric instrument (electric guitar, electric bass, synthesizer, or an acoustic guitar with a pickup). Also, it connects an electric instrument to a direct box or to an instrument input.
Patch cords connect your recorder-mixer to external devices: an effects unit, a 2-track recorder, and a power amplifier. They also connect an analog mixer to the analog inputs and outputs of a multitrack recorder, usually as a snake that combines several cables. An unbalanced patch cord is made of 1-conductor shielded cable with either a 1/4-inch phone plug or a phono (RCA) connector on each end. A stereo patch cord is two patch cords joined side-by-side.
Rack/Patch Bay
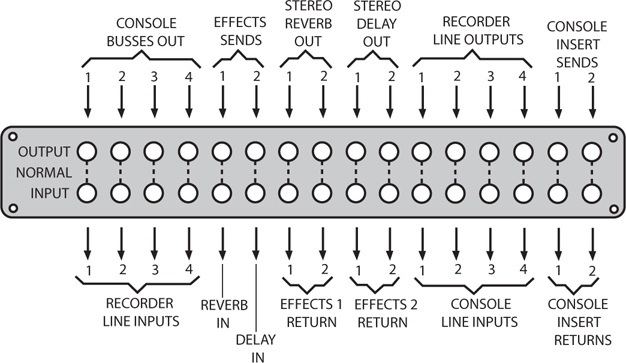
You might want to mount your signal processors in a rack, an enclosure made of wood or metal with rails of screw holes for mounting equipment (Figure 4.23). You also might want to install a patch panel or patch bay, a group of connectors that are wired to equipment inputs and outputs. Using a patch bay and patch cords, you can change equipment connections easily. You also can bypass or patch around defective equipment. Note that a patch bay increases the chance of hum pickup slightly because of the additional cables and connectors. Racks and patch bays are not essential, but they are convenient. Figure 4.24 shows some typical patch-bay assignments.
FIGURE 4.23 A rack and patch panel.
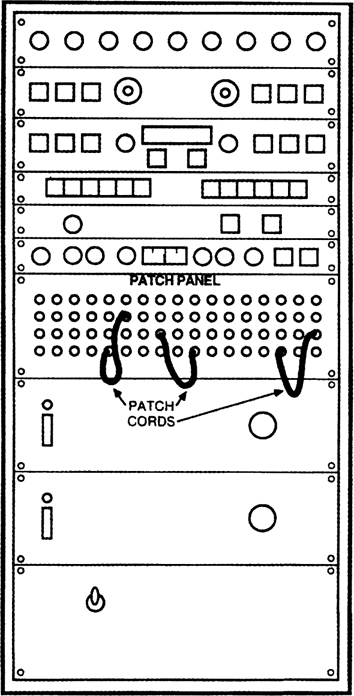
FIGURE 4.24 Some typical patch-bay assignments.
Equipment Connections
The instruction manuals of your equipment tell you how to connect each component to the others. In general, use cables that are as short as possible to reduce hum, but that are long enough to let you make changes.
Be sure to label all your cables on both ends according to what they plug into—for example, MIXER CH1 MONITOR OUT or ALESIS 3630 IN. If you change connections temporarily, or the cable becomes unplugged, you’ll know where to plug it back in. A piece of masking tape folded over the end of the cable makes a stay-put label.
Let’s say you have a hardware mixer in your recording setup. Here’s a typical way to hook up the gear (see Figure 4.25):
1. Plug the AC power cords of audio equipment and electric musical instruments into AC outlet strips fed from the same circuit breaker. Make sure that the sum of the equipment current ratings does not exceed the breaker’s amp rating for that outlet. Plug the power amplifier or powered speakers into their own outlet on the same breaker so that they receive plenty of current. Consider using an AC power conditioner such as made by Furman (www.furmansound.com). It provides clean, steady AC power to sensitive electronic equipment. Surge protection and noise filtering are included.
2. Connect mic cables to mics. Use mic cables with a male XLR connector on one end and a female XLR connector on the other end.
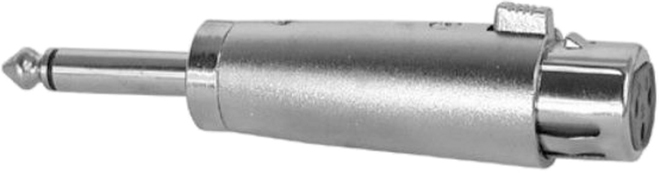
3. Connect mic cables to the female XLR connectors in either the snake junction box, or directly into mic inputs on a mixer or mic preamps. Plug the snake connectors into the mic inputs. If your mixer has phone-jack mic inputs, you may need to use an impedance-matching adapter (female XLR to phone) between the mic cable and the mic input jack (Figure 4.26).
4. Set the output volume of synthesizers and sound modules about three-quarters up. Using a guitar cord, connect their audio outputs to instrument or line inputs on your mixer. If this causes hum, use a direct box. Using a MIDI cable, connect the MIDI OUT of a MIDI controller to the MIDI IN of your audio interface or MIDI interface.
5. If you are recording a guitar direct, connect its cord either to (1) an instrument input on your mixer or audio interface (1/4-inch phone jack), or (2) a direct box. Connect the XLR output of the direct box to a mic input on your mixer or audio interface.
6. If the mixer is a standalone unit (not part of a recorder-mixer), connect the mixer’s stereo line outputs to the inputs of an audio interface. Use a stereo RCA-to-RCA cable or two phone-to-phone cables. If the mixer has a USB or FireWire connector, connect that to the mating connector in your computer—you don’t need an audio interface.
7. Connect the audio interface line outputs to the mixer’s 2-track or tape inputs, or directly to powered speakers. Use a stereo RCA-to-RCA cable or two phone-to-phone cables. Again, if the mixer has a USB or FireWire connector, connect that to the mating computer connector and omit the audio interface.
8. Connect the mixer’s monitor outputs to the power-amp inputs. Connect the power-amp outputs to loudspeakers. Or if you are using powered (active) monitors, connect the mixer monitor outputs to the monitor-speaker inputs.
9. If the mixer does not have internal effects, connect the mixer aux-send connectors to effects inputs (not shown). Connect the effects outputs to the mixer auxreturn or bus-in connectors. Use phone-to-phone cables.
10. If you’re using a separate mixer and multitrack recorder, connect mixer bus 1 to recorder track 1 IN; connect bus 2 to track 2, and so on. Also connect the recorder’s track 1 OUT to the mixer’s line input 1; connect the track 2 OUT to the mixer’s line input 2, and so on. Use cables with RCA or phone connectors. As an alternative, connect insert jacks to multitrack inputs and outputs. At each insert plug, connect the tip (send) terminal to a track input and connect the ring (return) terminal to the same track’s output. Use a TRS-to-2-TS cable (stereo phone plug to two mono phone plugs).
11. If you have several headphones for musicians, connect the mixer’s headphone jack to a small amplifier to drive their headphones. Use a cable with a stereo phone plug on one end and two mono phone plugs on the other end (TRS-to-2-TS cable). Or if the mixer’s headphone signal is powerful enough, connect it to a box with several headphone jacks wired in parallel.
FIGURE 4.25 Typical connections for a mixer-based studio.
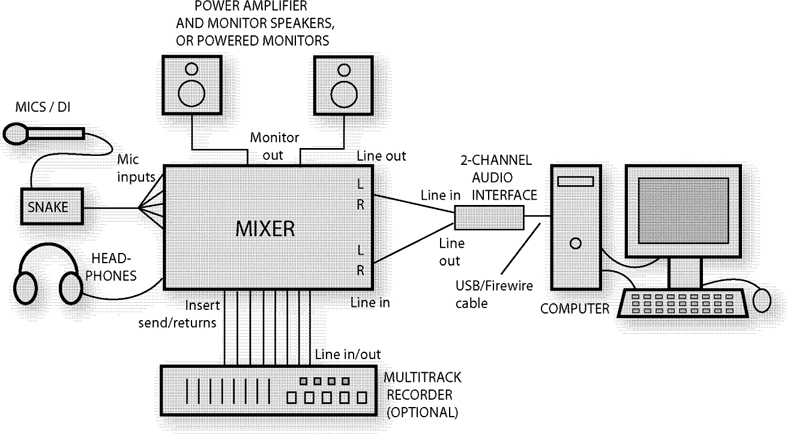
FIGURE 4.26 A female XLR to phone plug adapter, such as Radio Shack #274-016.
Semipro studio equipment with unbalanced connectors (usually phone or RCA) operates at a level called −10 or −10 dBV. Pro studio equipment with balanced connectors (XLR or TRS) works at +4 or +4 dBu. Check your equipment manuals to determine their input and output levels. When you connect devices that run at different levels, set the +4/−10 switch on each unit to match the levels. If there is no such switch on either device, connect between them a +4/−10 converter box such as the Whirlwind LM2U line level converter (www.whirlwindusa.com). Or try the cables shown in Appendix A, “dB or not dB,” Figures A-3 and A-4.
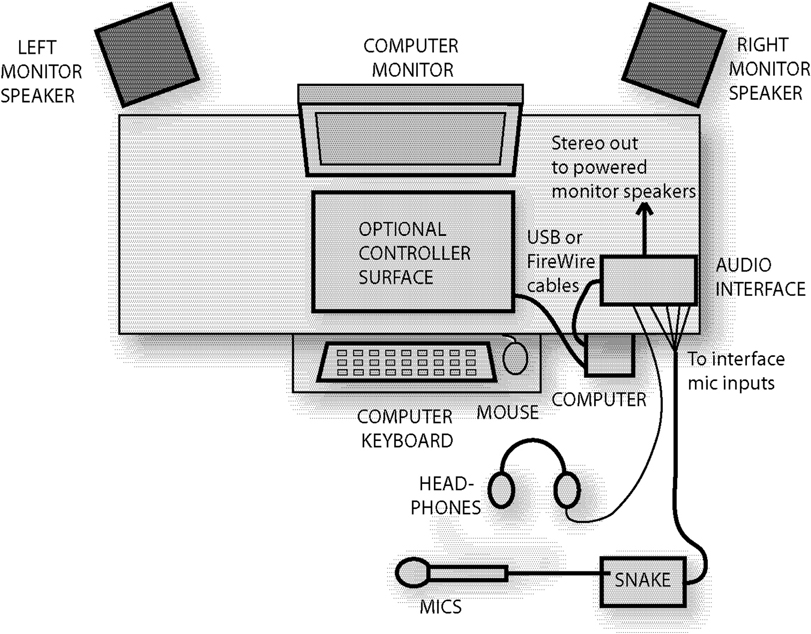
Figure 4.27 shows typical connections in a DAW recording studio with a multichannel audio interface. Figure 4.28 shows a typical layout for a DAW recording studio.
FIGURE 4.27 Typical connections in a DAW recording studio.
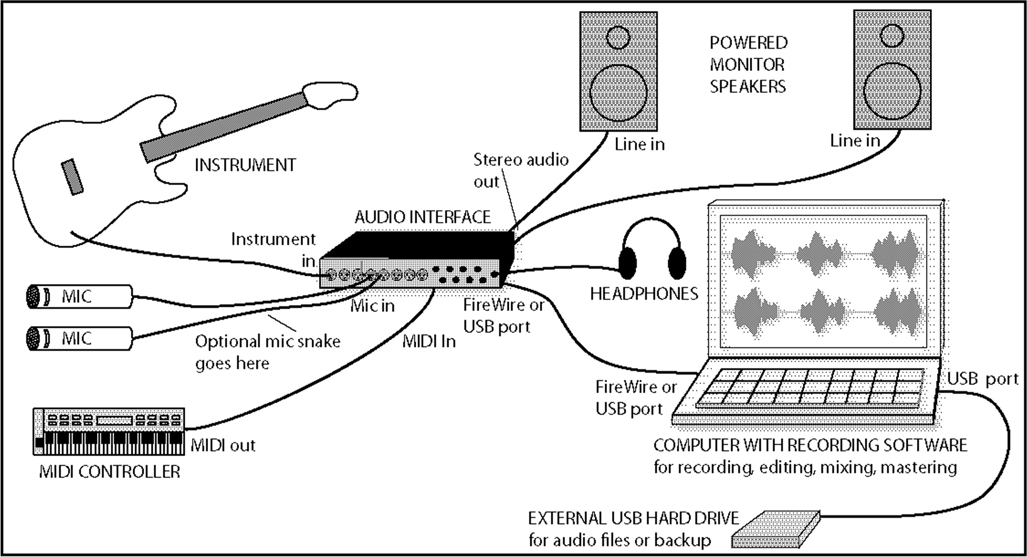
FIGURE 4.28 Typical layout of a DAW recording studio.
As shown in Figure 4.27, you might connect the equipment like this:
1. Using a guitar cord, connect electric instruments to instrument inputs on the audio interface. If an instrument is more than about 15 feet from the interface, connect its output to a direct box (using guitar cords), and connect the direct box XLR output to a snake or to an audio interface mic input.
2. Using an XLR mic cable, connect each mic to a mic input on the audio interface. If the mics are more than about 15 feet from the interface, connect each mic to a snake box, and connect the snake XLR connectors to the interface mic inputs. If you prefer to use a separate mic preamp and A/D converter, plug the mic into the preamp, and connect the preamp’s line output to the A/D converter’s line input using an XLR or phone-to-phone cable.
3. Using a MIDI cable, connect the MIDI OUT of a MIDI controller to the MIDI IN of the audio interface.
4. Using two phone-to-phone cables (stereo or mono), connect the stereo output of the interface to two powered monitors. If your monitor speakers are passive, connect the interface stereo outputs to the line inputs of a stereo power amp. Use speaker cable to connect the power-amp outputs to the speakers.
5. Plug headphones (or a headphone amplifier or junction box) into the headphone jack of the interface.
6. Using a USB or FireWire cable, connect the USB/FireWire port in the interface to the mating port in the computer.
7. Using a USB cable, connect the USB port of an external hard drive to a mating port in the computer. That hard drive can be used for audio files or for backup.
Hooking up a recorder-mixer studio can be quite simple. Plug mics into mic inputs, plug headphones into headphone jacks, and plug powered speakers into the mixer monitor outputs.
HUM PREVENTION
You patch in a piece of audio equipment, and there it is—HUM! It’s a low-pitched tone or buzz. This annoying sound is a tone at 60 Hz (50 Hz in Europe) and multiples of that frequency.
Hum is caused mainly by
• Cables picking up magnetic and electrostatic hum fields radiated by power wiring—especially if the cable shield connection is broken.
• Ground loops. A ground loop is a conductive loop or circuit made of a cable shield and a power-ground wire. A ground loop occurs when two or more separated pieces of audio equipment are each connected to power ground through a 3-prong power cord, and are also connected to each other through a cable shield. The ground voltage may be slightly different at each piece of equipment, so a 50-or 60-Hz hum signal flows between the components along the cable shield.
These are the most important points to remember about hum prevention:
• To prevent ground loops, plug all equipment into outlet strips powered by the same AC outlet or AC circuit.
• Do not use an AC (electrical) 3-to-2 adapter to disconnect the power ground—it causes a safety hazard.
• Some power amps create hum if they don’t get enough AC current. So connect the power amp (or powered speakers) AC plug to its own wall outlet socket—the same outlet that feeds the outlet strips for the recording equipment. · If possible, use balanced cables going into balanced equipment. Balanced cables have XLR or TRS connectors and two conductors surrounded by a shield. At both ends of the cable, connect the shield to a screw in the chassis, not to XLR pin 1. Or use audio gear whose XLR connectors are wired with pin 1 to chassis ground, not to signal ground.
• Transformer-isolate unbalanced connections. If that is not an option, use the cable assemblies shown in Figures A-3 and A-4 in Appendix A.
• Don’t use conventional SCR dimmers to change the studio lighting levels. Use Luxtrol® variable-transformer dimmers or multiway incandescent bulbs instead.
Even if your system is wired properly, a hum or buzz may appear when you make a connection. Follow these tips to stop the hum:
• If the hum is coming from a direct box, flip its ground-lift switch.
• Check cables and connectors for broken leads and shields.
• Unplug all equipment from each other. Start by listening just to the powered monitor speakers. Connect a component to the system one at a time, and see when the hum starts.
• Remove audio cables from your devices and monitor each device by itself. It may be defective.
• Lower the volume on your power amp (or powered speakers), and feed them a higher-level signal.
• Use a direct box instead of a guitar cord between instrument and mixer.
• To stop a ground loop when connecting two devices, connect between them a 1:1 isolation transformer, direct box, or hum eliminator (such as the Jensen CI-2RR, Behringer HD400, Rolls HE18, or Ebtech He2PKG). See Figures A-3 and A-4 in Appendix A.
• Make sure that the snake box is not touching metal.
• To prevent accidental ground loops, do not connect XLR pin 1 to the connector shell except for permanent connections to equipment inputs and outputs.
• Try another mic.
• If you hear a hum or buzz from an electric guitar, have the player move to a different location or aim in a different direction. You might also attach a wire between the player’s body and the guitar strings near the tailpiece to ground the player’s body.
• Turn down the high-frequency EQ on a buzzing bass guitar track.
• To reduce buzzing between notes on an electric-guitar track, apply a noise gate.
• Route mic cables and patch cords away from power cords; separate them vertically where they cross. Also keep recording equipment and cables away from computer monitors, power amplifiers, and power transformers.
• See Rane’s excellent article on sound system interconnections at www.rane.com.
By following all these tips, you should be able to connect audio equipment without introducing any hum. Good luck!
REDUCING RADIO FREQUENCY INTERFERENCE (RFI)
RFI is heard as buzzing, clicks, radio programs, or “hash” in the audio signal. It’s caused by CB transmitters, computers, lightning, radar, radio and TV transmitters, industrial machines, auto ignitions, stage lighting, and other sources. Many of the following techniques are the same used to reduce hum from other sources. To reduce RFI:
• If you think that a speaker cable, mic cable, or patch cord is picking up RFI, wrap the cable several times around an RFI choke (available at Radio Shack). Put the choke near the device that is receiving audio.
• Install high-quality RFI filters in the AC power outlets. The cheap types available from local electronics shops are generally ineffective.
• If the shield is disconnected in a balanced cable connector, solder it to pin 1.
• If a mic is picking up RFI, solder a 0.047 microfarad capacitor between pin 1 and 2, and between pin 1 and 3, in the female XLR connector of the mic cable. Caution: this might cause high-frequency distortion with some mics.
• At equipment XLR mic inputs, use a cable connector with a tab that is connected to the metal shell. Use a wide strip of metal braid to connect this tab to pin 1. Make sure the connector makes metal-to-metal contact with the chassis.
• Periodically clean connector contacts with Caig Labs DeoxIT, or at least unplug and plug them in several times.
This chapter briefly covered the equipment and connectors for a recording studio. Therest of this book explains each piece of equipment in detail and explains how to use it for best results.