
“We’re rolling. Take One.” These words begin the recording session. It can be an exhilarating or an exasperating experience, depending on how smoothly you run it.
The musicians need an engineer who works quickly yet carefully. Otherwise, they may lose their creative inspiration while waiting for the engineer to get it together. And the client, paying by the hour, wastes money unless the engineer has prepared for the session in advance.
This chapter describes how to conduct a multitrack recording session. These procedures should help you keep track of things and run the session efficiently.
There are some spontaneous sessions, especially in home studios, that just “grow organically” without advance planning. The instrumentation is not known until the song is done! You just try out different musical ideas and instruments until you find a pleasing combination.
In this way, a band that has its own recording gear can afford to take the time to find out what works musically before going into a professional studio. In addition, if the band is recording itself where it practices, the microphone setup and some of the console settings can be more or less permanent. This chapter, however, describes procedures usually followed at professional studios, where time is money.
PREPRODUCTION
Long before the session starts, you’re involved in preproduction—planning what you’re going to do at the session, in terms of overdubbing, track assignments, instrument layout, and mic selection.
Instrumentation
The first step is to find out from the producer or the band what the instrumentation will be and how many tracks will be needed. Make a list of the instruments and vocals that will be used in each song. Include such details as the number of tom toms, whether acoustic or electric guitars will be used, and so on.
Recording Order
Next, decide which of these instruments will be recorded at the same time and which will be overdubbed one at a time. It’s common to record the instruments in the following order, but there are always exceptions:
1. Loud rhythm instruments—bass, drums, electric guitar, electric keyboards
2. Quiet rhythm instruments—acoustic guitar, piano
3. Lead vocal and doubled lead vocal (if desired)
4. Backup vocals (in stereo)
5. Overdubs—solos, percussion, synthesizer, sound effects
6. Sweetening—horns, strings
The lead vocalist usually sings a guide vocal or scratch vocal along with the rhythm section so that the musicians can get a feel for the tune and keep track of where they are in the song. You record the vocalist’s performance but you will probably rerecord it later. That eliminates leakage and lets you focus on the lead vocal.
In a MIDI studio, a typical order might be:
1. Drum machine or soft synth drum set (playing programmed patterns)
2. Synthesizer bass sound
3. Synthesizer chords
4. Synth melody
5. Synth solos, extra parts
6. Vocals and miked solos
Track Assignments
Now you can plan your track assignments. Decide what instruments will go on which tracks of the multitrack recorder. The producer may have a fixed plan already.
What if you have more instruments than tracks? Decide what groups of instruments to put on each track. In a 4-track recording, for example, you might put guitars on track 1, bass and drums on track 2, vocals on track 3, and keyboards on track 4.
Remember that when several instruments are assigned to the same track, you can’t separate their images in the stereo stage. That is, you can’t pan them to different positions—all the instruments on one track sound as if they’re occupying the same point in space. For this reason, you may want to do a stereo mix of the rhythm section on tracks 1 and 2, for instance, and then overdub vocals and solos on tracks 3 and 4.
It’s possible to overdub more than four parts on a 4-track recorder. To do this, bounce (mix) several tracks onto one, then record new parts over the original tracks. Your recorder manual describes this procedure.
If you have many tracks available, leave several tracks open for experimentation. For example, you can record several takes of a vocal part using a separate track for each take, so that no take is lost. Then combine the best parts of each take into a single final performance on one track. Most recorder-mixers let you do these extra takes on virtual tracks.
It’s also a good idea to record the monitor mix on one or two unused tracks. The recorded monitor mix can be used as a cue mix for overdubs, or to make a recording for the client to take home and evaluate.
Session Sheet
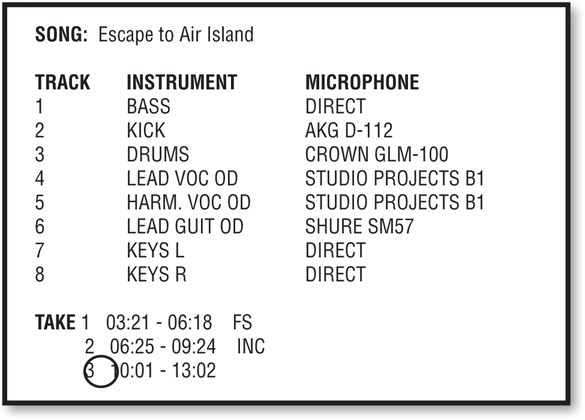
Once you know what you’re going to record and when, you can fill out a session sheet (Figure 15.1). This simple document is adequate for home studios. “OD” indicates an overdub. Note the recorder-counter time for each take, and circle the best take.
FIGURE 15.1 A session sheet for a home studio.
Production Schedule
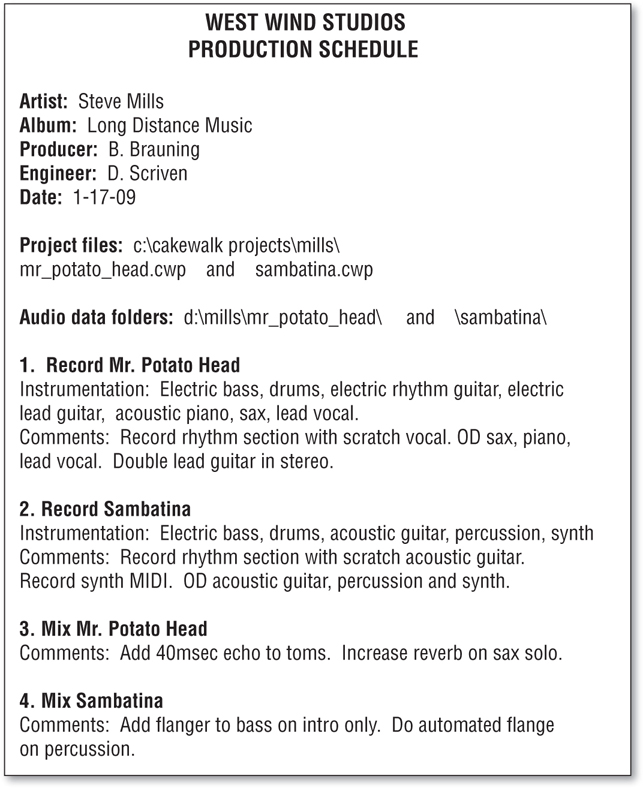
In a professional recording studio, the planned sequence of recording basic tracks and overdubs is listed on a production schedule (Figure 15.2).
FIGURE 15.2 A production schedule.
Track Sheet
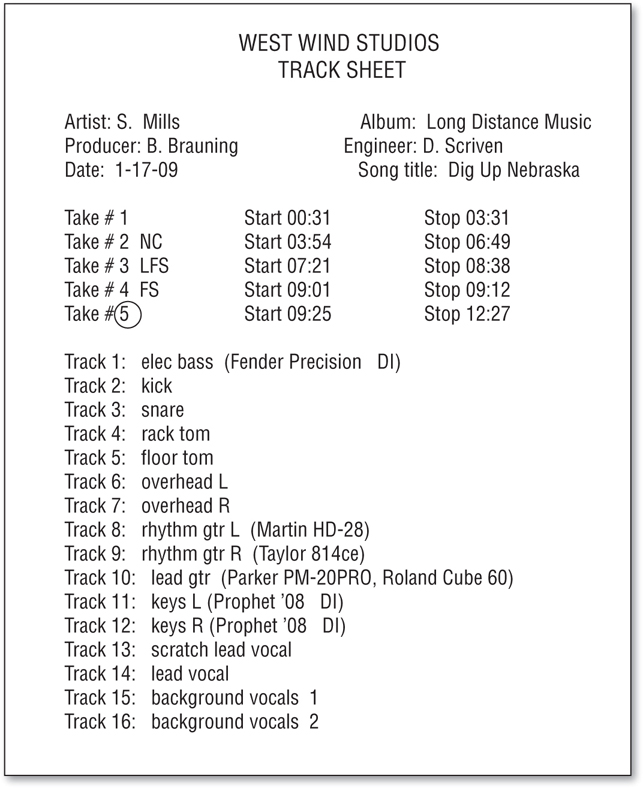
Another document used in a pro studio is the track sheet or multitrack log (Figure 15.3). Write down which instrument or vocal goes on which track. The track sheet also has blanks for other information such as take numbers. If you are using a DAW, you can enter this information by typing it in.
FIGURE 15.3 A track sheet (multitrack log).
Microphone Input List
Make up a microphone input list similar to that seen in Table 15.1. Later you will place this list by the mic snake box and by the mixing console.
Table 15.1 A Microphone Input List

Be flexible in your microphone choices—you may need to experiment with various mics during the session to find one giving the best sound with the least console equalization. During lead-guitar overdubs, for example, you can set up a direct box, three close-up microphones, and one distant microphone—then find a combination that sounds best.
Find out what sound the producer wants—a “tight” sound; a “loose, live” sound; an accurate, realistic sound, etc. Ask to hear recordings having the kind of sound the producer desires. Try to figure out what techniques were used to create those sounds, and plan your mic techniques and effects accordingly. Tips on choosing a microphone are given in Chapter 6.
Instrument Layout Chart
Work out an instrument layout chart, indicating where each instrument will be located in the studio, and where baffles and isolation booths will be used (if any). In planning the layout, make sure that all the musicians can see each other and are close enough together to play as an ensemble. Often a circular arrangement works well.
Keep all these documents in a single folder or notebook that is labeled with the band’s name and recording date. Also include contact information, time sheets, invoices, and all the correspondence about the project.
SETTING UP THE STUDIO
About an hour before the session starts, clean up the studio to promote a professional atmosphere. Lay down rugs and place AC power boxes according to your layout chart.
Now position the baffles (if any). Put out chairs, stools, and music stands according to the layout. Run a headphone extension cable from each artist’s location to the headphone junction box in the studio.
Place mic stands approximately where they will be used. Wrap one end of a microphone cable around each microphone-stand boom, leaving a few extra coils of cable near the mic-stand base to allow slack for moving. Run the rest of the cable back to the mic input panel or snake box. Plug each cable into the appropriate wall-panel or snake-box input according to your mic input list.
Some engineers prefer to run cables in reverse order, connecting to the input panel first and running the cable out to the microphone stand. That procedure leaves less of a confusing tangle at the input panel where connections might be changed.
Now set up the microphones. Check each mic to make sure its switches are in the desired positions. Put the mics in their stand adapters, connect the cables, and balance the weight of each boom against the microphone.
Finally, connect the musicians’ headphones for cueing. Set up a spare cue line and microphone for last-minute changes.
SETTING UP THE CONTROL ROOM
Having prepared the studio, run through the “Session Preparation” section of Chapter 11 to make sure the control room is ready for the session. Then turn up the monitor system. Carefully bring up each fader one at a time and listen to each microphone. You should hear normal studio noise. If you hear any problems such as dead or noisy microphones, hum, bad cables, or faulty power supplies, correct them before the session.
Verify the mic input list. Have an assistant scratch each mic grille with a fingernail and identify the instrument the microphone is intended to pick up. If you have no assistant, listen on headphones as you scratch the grilles.
Check all the cue headphones by playing a tone or music through them and listening while wiggling each cable. Make sure they play at a reasonable level, not too loud.
SESSION OVERVIEW
This is the typical sequence of events:
1. For efficiency, record the basic rhythm tracks for several songs on the first session.
2. Do the overdubs for all the songs in a dubbing session.
3. Mix all the tunes in a mixdown session.
4. Edit the tunes and master the album.
Some musicians prefer instead to record all the parts for one song at a time.
After the musicians arrive, allow them 1/2 hour to 1 hour free setup time for seating, tuning, and mic placement. Show them where to sit, and work out new seating arrangements if necessary to make them more comfortable.
Once the instruments are set up, listen to their live sound in the studio and do what you can to improve it. A dull-sounding guitar may need new strings, a noisy guitar amp may need new tubes, the drums may need tuning, and so on. Adjust the studio lighting for the desired mood.
RECORDING
Before you start recording, you might want to make connections to record the monitor mix. This recording is for the producer to take home to evaluate the performance.
Many DAW programs have session templates: a group of tracks with EQ, compression, and effects plug-ins already in place. You simply load in the template and you’re ready to go. You can create your own session templates, such as “16 tracks with aux 1 and 2” or “drum set.”
Some DAWs let you create a track template, which is a format for a single track. You might have a vocal track template with the input channel, reverb, EQ, and compression already set up. Each time you’re about to record another vocal, import the vocal track template.
Follow the mixer recording procedures described in Chapter 11. Set recording levels, then set cue mixes for the musicians’ headphones. The monitor mix affects only what is heard, not what is recorded. To clarify the beat of the cue mix, you might create a mix of only a few instruments such as drums, bass, chords, and vocal.
When you’re ready to record the tune, briefly play a metronome to the group at the desired tempo, or play a click track (an electronic metronome) through the cue system. Or just let the drummer set the tempo with stick clicks. A click track is helpful if you are starting with an acoustic guitar and are adding drums and bass later.
Start recording. Note the recorder counter time. Hit the slate button (if any) and announce the name of the tune and the take number. Then the group leader or the drummer counts off the beat, and the group starts playing.
The producer listens to the musical performance while the engineer watches levels and listens for audio problems. As the song progresses, you may need to make small level adjustments.
The assistant engineer (if any) runs the multitrack recorder and keeps track of the takes on the track sheet, noting the name of the tune, the take number, and whether the take was complete (Figure 15.3). Use a code to indicate whether the take was a false start, long false start, nearly completed, a “keeper,” and so on.
While the song is in progress, don’t use the solo function, because the abrupt monitoring change may disturb the producer. The producer should stop the performance if a major flub (mistake) occurs but should let the minor ones pass.
At the end of the song, the musicians should be silent for several seconds after the last note. Or, if the song ends in a fade-out, the musicians should continue playing for about 30 seconds so there is enough material for a fade-out during mixdown.
After the tune is done, you can either play it back or go on to a second take. If you connected your multitrack recorder to the insert jacks, use the faders to set a rough mix with EQ and effects. The musicians will catch their flubbed notes during playback; you just listen for audio quality.
Now record other takes or tunes. Pick the best takes. Punch in to correct errors on each best take, or fix errors with editing.
To protect your hearing and to prevent fatigue, try to limit tracking sessions to four hours or less. Take breaks to give your ears and body a rest.
Relating to the Musicians
During a session, the engineer needs not only technical skills, but also people skills. It’s important to respect artistic personalities and to keep the creative energy flowing.
First, learn the names of the band members and refer to them by name during the session.
Musicians are often nervous at the beginning of a session. Having a sense of humor and exuding confidence helps to put the artists at ease. Talk about the band’s music, origin, or instruments. Be sure that the artists are comfortable—adjust the layout and lighting, offer beverages and snacks. Tell new clients that mistakes are normal and are easy to fix. Ask band members, “Is the mix okay in your headphones? Is the volume all right? Does your recorded instrument sound okay?”
Don’t badmouth other musicians, and respect the privacy of your clients. Each musician you record should feel confident that you’re not telling others about their mistakes.
When you want to try something that could enhance a song, don’t just do it. Ask first. Say, “What would you think about doubling the guitar in stereo?” or “I want your input on this.”
During a playback, try not to point out the errors. The musicians will hear them and will try to do better on the next take. Don’t say, “That sucked.” Say “It’s almost there—do you want to punch in a few spots?” Or say “That was good, but how about another take?” The goal is to make the best record you can, not to make clients feel bad about themselves. Give a musician time to practice during overdubs, too.
If the band members are getting tired or are having trouble getting through a particular song, you might say “Let’s take a break” or “Let’s try another song and come back to this one later.”
Finally, if a piece of gear breaks or your software develops a glitch, try to work around it quietly without making it obvious. Musicians need an engineer who handles technical problems in a professional way.
OVERDUBBING
After recording the basic or rhythm tracks for all the tunes, add overdubs. A musician listens to recorded tracks over headphones and records a new part on an open track. See the Chapter 11 sections “Overdubbing” and “Composite Tracks.”
You might have the musician play in the control room while overdubbing. You can patch a synth or electric guitar into the console through a direct box, and feed the direct signal to a guitar amp in the studio via a cue line. Pick up the amp with a microphone, and record and monitor the mic signal.
Do any drum overdubs right after the rhythm session because the microphones are already set up, and the overdubbed sound will match the sound of the original drum track.
BREAKING DOWN
When the session is over, tear down the microphones, mic stands, and cables. Put the microphones back in their protective boxes and bags. Wind the mic cables onto a power-cable spool, connecting one cable to the next. Wipe off the cables with a damp rag if necessary. Some engineers hang each cable in big loops on each mic stand. Others wrap the cable “lasso style” with every other loop reversed. You learn this on the job.
Put the labeled recording and session documents in a labeled box or file folder. Normally the studio keeps the multitrack recording for possible future work unless the group wants to buy or rent it. Backup the multitrack recordings (audio files) and session files (track setups for each song) to another medium, such as an external hard drive, CD-R, or DVD-R. Glyph makes pro-quality external hard drives for audio and video storage.
If you’re using a hardware mixing console, log the console and effects settings by writing them in the track sheet or reading them slowly into a portable recorder. At a future session you can play back the recording and reset the console the way it was for the original session. Automated consoles can store and recall the console’s control adjustments. DAWs remember both the mixer settings and the plug-in settings.
MIXDOWN
After all the parts are recorded, you’re ready for mixdown. Follow the mixdown procedures in Chapter 11 and repeat for all the song mixes. Again, be sure to backup your session files (the mix and edit settings) and audio files (multitrack audio recordings and stereo mixes).
MASTERING
After recording the mixes, you can burn a CD of the mixes as they are, or you can master an album or demo of those mixes. Mastering is the last creative step before burning the final CD used for duplication or replication. In mastering you edit out noises or false starts before the beginning of each song, put the songs in the desired order, insert a few seconds of silence between songs, and make each song the same loudness and the same tonal balance. The goal is a consistent sound from track to track, so that everything flows better and the album sounds unified. You also might try to make the CD as loud or “hot” as possible (without destroying its sound quality).
At this point, you have three choices:
1. If the CD will be just a reference, not a demo or album, you can burn a CD of the unedited mixes and stop there.
2. If the CD will be a demo or album, burn a CD of the unedited mixes, then send it to a mastering engineer for mastering.
3. Or you can edit and master the mixes yourself, then burn a CD. It will be the CD premaster for duplication or replication. “Duplication” is making copies with a CD-R burner, while “replication” is stamping CDs from a glass master (the professional standard).
Let’s look at each option above.
Burning a Reference CD
You can use the CD-burning software that came with your computer CD burner, or use other software. Some examples of CD-burning programs are Express Burn Disc from NCH Software, Roxio’s Creator 2012 and Toast 11 Titanium, Sony CD Architect, and Nero Burning ROM. Some DAW software (such as WaveLab) includes a CD-burning application.
Before you start, note that most CD-burning software puts 2 seconds of silence between songs. If you want to have extra seconds of silence at the end of a song, record the silence as part of the song’s WAV file. You might want to normalize each song’s WAV file. This raises the level of the song so that the highest peak in the song reaches maximum level: 0 dBFS (decibels full scale) or whatever level you specify. Normalizing does not make the tracks the same loudness, because loudness depends on the average signal level, not the peak level.
Here’s a CD-burning procedure:
1. Launch the CD-R burning software.
2. Select which WAV files you want to put on the CD-R, drag them to the playlist, and arrange them in the desired order. The total playing time must be less than the CD-R length (74 or 80 minutes).
3. Choose “On the Fly” or “Disk Image.” When recording on the fly, the computer grabs the sound files from random locations on hard disk and puts them in order as the CD-R does a burn. When recording a disk image, the computer rewrites the sound files to a single, contiguous space on your hard disk and puts them in order. Then you copy the disk image from hard disk to CD-R. Disk Image is less likely to produce CD errors than On the Fly.
4. Set the burn speed. Some CD recorders and blank CDs can record up to 52 times normal speed. Normal speed is 172 kBps (Bytes is capital B), double speed is 344 kBps, etc. A 52× recorder can burn a 74-minute CD in less than 2 minutes. Some CD burners automatically select the optimum speed based on what the blank CD-R can handle. High speeds do not degrade sound quality seriously, but they tend to increase errors—which the CD player may or may not correct accurately. The recommended speed to prevent errors is 2× to 4× when making a final master CD to be sent out for replication. But some CD recorders and blank CD-Rs have fewer errors at higher speeds.
5. Set the software to Disc-at-Once Mode. Start recording the CD-R. The WAV files will transfer in order to the CD-R disc. To prevent glitches, do not multitask while the CD is recording.CD-R discs cannot be erased and used over again, so try to make everything right before you burn a disc. You could do a practice burn on a CD-RW.
6. As soon as the recording is done, the display will indicate that the table of contents is being written. Eventually, the system will beep and eject the disc. To prevent error-causing fingerprints, be sure to handle the disc only by the edges. Pop the disc in an audio CD player, press Play, and check that all the tracks play correctly.
Sending Out Your CD for Mastering
You might prefer to send your CD of mixes to a good mastering engineer. This person can listen to your program with fresh ears, then suggest processing for your album that will make it sound more commercial. He or she is likely to have a better monitor system and better equipment than yours. They have heard hundreds of recording projects done by others, and know how to make your CD sonically competitive.
If you plan to have your program mastered outside, do not apply any signal processing to your finished mixes such as editing, level changes, compression, normalization, fades, or EQ. Let the mastering house do it with their better equipment and software. Also, leave some headroom by recording the finished mixes at about −3 dBFS maximum in peak meter mode.
Deliver your mixes in the highest possible resolution that the mastering engineer can accept, such as 96 to 192 kHz and 24 to 32 bits on a data CD (ISO 9660 format). However, a 24 bit/44.1 kHz format is usually adequate. Copy the mixes’ WAV files to CD, rather than creating CD audio tracks (.cda files). The resulting data CD can be read by a CD-ROM but cannot be played on a CD player. If your CD-burning program does not support data CDs, either get one that does, or create an audio or music CD at 16 bits/44.1 kHz.
Also send the mastering engineer the sequence of songs and any suggestions on how you would like certain songs to be improved or edited. The mastering engineer might suggest that you need to redo some mixes.
Mastering Your Own Album
You can master an album with your multitrack recording software, or with a mastering program such as Steinberg Nuendo, Sony Sound Forge, BIAS Peak Pro, IK Multimedia T-RackS, or Magix Samplitude. A suite of plug-ins is Sonalksis Mastering Suite.
First, discuss the order of the songs on the recording. The first track on the album should be a strong, accessible, up-tempo piece. Change keys from song to song. The last track should be as good as or better than the first to leave a good final impression.
Mastering engineer Bob Katz offers this advice for song sequencing: Create the album in sets of one to three songs of the same tempo. Make sure the songs flow from one to the next. Here’s a suggested song order:
1. An up-tempo, exciting song that hooks the listener.
2. After a short space, an up-tempo or mid-tempo song.
3. After three or four songs, slow down the tempo.
4. Reach a climax near the end of the album.
5. The last song should sound relaxed and intimate, perhaps using fewer members of the band.
You can drag the WAV files of your song mixes into iTunes and experiment with various sequences.
To get your mastered songs onto a CD, you need CD-burning software, either consumer or pro. With a consumer CD-burning program—such as Roxio’s Creator 2012, Roxio’s Record Now Music Lab, or Nero—you drag the WAV files of each of your song mixes into a playlist, then burn the CD.
With a professional program, you create one long WAV file of all the song mixes. You can adjust the timing between each pair of songs. You specify when each song starts, and the software creates a table of contents on the CD made of song-start IDs. This feature is called PQ subcode editing. Some programs that do this are Sony CD Architect and Goldenhawk Technology CDRWIN (www.cdrwin.de/cdrwin-en.html). Some mastering software includes a CD-burning application that lets you set start IDs. Examples are Steinberg WaveLab, Sony Sound Forge, Magix Samplitude and Sequoia, Sadie, and Amadeus Pro (for Mac).
Here’s a suggested procedure to master an album:
1. If you already recorded your mixes directly onto hard disk as stereo WAV files, skip to step 4.
2. If your song mixes are WAV files on a CD-R, put the CD-R in your CD-ROM drive and copy each song to your hard drive. Then go to step 4. If your song mixes are audio tracks (.cda files) on a CD-R, convert each track to a WAV file on your hard drive using ripper software. Skip to step 4.
3. If your mixes are on a standalone 2-track recorder without a USB or FireWire port, plug the recorder’s digital output into the digital input of your audio interface. If your interface lacks a digital input, use analog out to analog in. Launch the recording software. Set levels if necessary, start recording on your hard drive, and play the 2-track recording containing your mixes. All the mixes will copy in real time to your hard drive to create a single long WAV file.
If your 2-track recorder has a USB or FireWire port, plug it into your computer’s matching port. The recorder will appear as a hard drive to your computer. Copy the WAV file(s) of the mixes to your computer hard drive.
4. Now that all the song mixes are on your hard drive, launch your DAW software. Import the first song’s WAV file to a track at time zero. The waveform of the song appears as a clip or segment of audio. Slip-edit or trim the beginning and end of the song clip to remove extra space and noises. Repeat for the other songs.
Click on the trimmed Song 1 and slide it 10 frames to the right in your mastering software. That way the CD player won’t miss the beginning of Song 1.
It’s convenient to put each song clip on a different track, one after another (Figure 15.4). That way you can easily adjust the spacing between songs, and apply different fader settings and processing to each song as needed. Assign all the tracks to the same stereo bus so you can apply bus processing to them later.
5. Now that all the songs are in place and trimmed, add a fade-out at the end of certain songs if desired. If your CD-burning program can write PQ subcodes (start IDs), you can crossfade between two songs: overlap their clips near the transition point, and use the crossfade function in your DAW. Or fade out the end of one song and fade in the beginning of the next (as shown in Figure 14.17).
6. If your CD-burning program can write PQ subcodes (start IDs), you can adjust the spacing or gap between songs. Two to three seconds of silence between songs is typical, but go by ear. Use a longer space if you want to change moods between songs. Use a shorter space to make similar songs flow together. A short space also works well after a long fade-out because the fade-out acts like a long pause between songs.
7. Click on and play part of each song’s waveform to check for loudness. Make all the songs equally loud by adjusting the track’s fader for each song. If you put all the songs on the same stereo track, set up an automation volume envelope.
Here’s one method to match song levels. If most songs are equally loud, set the fader to zero before each of those songs in order to avoid processing. Then turn down any louder songs and turn up quieter songs to match the rest of the songs. Do this by ear. You might use post-fader RMS metering on the stereo mix bus as a rough indicator of average levels.
CAUTION: If you increase a song’s level, make sure the peaks in the song don’t clip.
Another way to match song levels is to find the song with the highest peaks, and leave its level alone Adjust the levels of other songs so they match the loudness of the song with the highest peaks. Again, do this by ear. You may need to turn up the intro of a song so it works in context with the previous song. Consider using Harmonic Balancer (www.har-bal.com), a tool to match song levels and tonal balances.
8. Apply EQ to songs that need it. Put songs with different EQs on different tracks. If necessary, touch up levels after adding EQ.
9. If desired, apply multiband compression, limiting, and normalization to the mix bus in order to get a “hot” or loud CD. Don’t overdo it, or your project will be distorted and fatiguing to listen to. Squashed dynamics can suck the life out of music. If you apply only peak limiting and normalization, you’ll get a hot CD without altering the musical dynamics. Play audio clip 40 at www.taylorandfrancis.com/cw/bartlett-9780240821535/.
FIGURE 15.4 Placing song clips on successive tracks makes mastering easier.

The idea is to knock down the peaks in the waveform because they do not contribute to perceived loudness—the average level does. Once you limit the peaks about 6 dB, you can normalize (raise the overall level) and thus create a louder program. Normalizing to 100% of full scale can create errors with some D/A converters, so you might normalize to 96% or −0.3 dB.
The Loudness Wars
Musicians and record labels, more than recording engineers or mastering engineers, are requesting hotter levels on CDs. One reason is that a low-level CD played with others in a CD changer or MP3 player tends to sound less exciting. Musicians also want their songs to stand out on the radio.
Loudness depends mostly on average (RMS) level rather than peak level. So in an attempt to raise average levels, engineers limit or clip the peaks. Overall compression of the mix is common too. Unfortunately, the song loses its dynamic range and its musical excitement.
When I master a pop-music CD, I often compromise by limiting peaks by no more than 7 dB, then normalizing to −0.3 dB without overall compression or clipping. That retains the dynamic range of the music, has no clipping, and sounds pretty competitive in loudness. But it sacrifices some of the clarity and impact of percussive transients.
If playback equipment had switchable automatic volume control (compression), then we wouldn’t need to maximize levels in the recording. The iTunes Sound Check feature is a step in the right direction: it adds gain and limits peaks of quiet recordings to match the loudness of overly compressed ones. But that reduces the sound quality of the quieter recordings. It would be better to turn down the overly compressed recordings to match the average level of more dynamic recordings. That way, all songs would sound equally loud, and mixes with a wide dynamic range would keep their clarity and impact.
According to mastering engineer Bob Katz, hot CDs and quiet CDs end up at the same level when processed with radio-station compressor/limiters. Overcompressed CDs do not sound louder on the air; they just sound more distorted. So ignore the “loudness wars” and avoid excessive compression. Bob recommends that pop music be mastered at an average or RMS level of −14 dBFS while listening at 83 dBSPL C-weighted, slow meter reading. He suggests an average level of −20 dBFS for classical music.
10. After your musical program is edited, you have two options:
1. If you have professional CD burning software that can write PQ subcodes, export (save) the mastered song mixes to a single 16 bit/44.1 kHz stereo wave file. If your recording was 24 bit, first turn on dithering. That retains much of the 24-bit sound quality when converting to 16-bit format.
2. If you have consumer software that burns a CD from a list of song WAV files, click on one song’s clip in your DAW to highlight it, then export the mix to a single 16 bit/44.1 kHz stereo wave file. If your recording was 24 bit, first turn on dithering. Repeat for all the song clips.
TRANSFERRING THE MASTERED PROGRAM TO CD-R
At this point your hard drive contains either one long WAV file of all the mastered songs, or several WAV files, each one a mastered song. If the latter, launch your CD-burning application and drag the WAV files in order to the playlist. To prevent errors on the CD, burn it at 4x speed and don’t multitask. Check the finished CD in a CD player.
Suppose you have pro CD-burning software. It creates CD tracks from a single WAV file by following a cue sheet (a text file that lists the start time of each song). When the CD is recorded, the software creates a start ID for each song based on the cue sheet. With this method you can create CD song-start IDs that occur even during a continuous program, such as a live concert recording.
CDRWIN at www.goldenhawk.com is such a program. I’ll describe how to use it as an example.
1. Note the start time of each song in the DAW editing software’s edit decision list or playlist. Or check the start time of each song clip by right-clicking on it or by looking at its beginning on the project time line. The start time of each song is specified in your DAW in minutes:seconds:frames, and there are 30 frames per second. Write down the start time of each song.
2. In the cue sheet, make each song’s start time about one-third of a second (10 frames) before the actual start time of each song. That way the CD player’s laser will have time to find the track before playing audio. For example, if a song actually starts at 12:47:28, make its start time in your cue sheet 12:47:18. List Song 1’s start time as 00:00:00. The cue sheet should also include the name and file path of the mastered program’s WAV file.
3. Place a blank CD-R in your CD burner. Do not put a paper label on the CD before recording because the label can cause jitter.
4. Open your CD-burning program and load in the cue sheet text file. Set the recording speed to 2× to 4× speed to reduce errors. Some CD recorders and blank CD-Rs have fewer errors at higher speeds.
5. Start recording the CD. The CD-burning program writes the cue sheet’s start times in the CD-R’s table of contents, and copies the mastered program’s WAV file to the CD-R. Each CD track starts at the time you specified in your cue sheet. To prevent glitches, do not multitask while the CD is burning.
6. When the CD is finished, handle it by its edges to prevent error-causing fingerprints. Play the CD from start to finish to check for glitches. Press the track-advance button to make sure each song starts at the right time. If you look at the CD’s contents in your computer, you’ll see a separate.cda (CD audio) file for each song.
You can identify the CD either by writing on the label side with a felt-tip marker or by sticking on a paper label. To avoid damaging the CD plastic layer, use water-based Sharpie or Memorex CD marking pens, available in the CD-R section of many stores. Use a label applicator device and label design software such as Stomp’s CD Stomper, Neato’s MediaFACE, or Roxio’s Record Now Music Lab. Some software can even print liner notes, including the track numbers, titles, and timing. If you are duplicating CDs yourself, you might want to use a CD printer rather than labels. Caution: Adhesive CD labels can damage the data on disc over several years.
Another way to create master CDs is to use the Tascam DV-RA1000HD.
CD-Text and ISRC Codes
You can add nonaudio data to your CD when you create the cue sheet. If you want the listener to see on-screen each song’s title and performer as the CD plays, create a CD-Text file using the CD-Text editor that comes with most CD-burning software. Include the file path of the CD-Text file in the cue sheet. Not all CD players support CD-Text.
Some players get CD-Text information from an online database rather than from the CD. You upload the CD-Text information to the database so that the player can display it. For example, iTunes needs to access an online CD database called Gracenote (formerly CDDB) to get the artist and song titles. Gracenote is at www.gracenote.com.
Every database has a different procedure for uploading CD-Text. When using the iTunes database, follow this procedure:
1. Insert your CD and open iTunes.
2. Select all tracks in the iTunes window.
3. Select Get Info and enter the album name, artist, year, genre, copyright info, and so on.
4. Select each track individually, select Get Info, and enter the track’s correct name.
5. Go to Advanced > Submit CD Track Names. Your information will uploaded to the Gracenote database. When someone puts your CD into iTunes, your info will show up.
When using the Windows Media Player database, send a copy of your CD to AMG (All Media Guide) at www.rovio.com.
Many players access the freedb database at www.freedb.org. Go there to see a list of supported players you can use to submit CD information. Popular applications are Exact Audio Copy and Nero. Another database is Muse at www.rovio.com.
iTunes prior to version 7 did not display CD-Text. The current version of iTunes can display CD-Text information, but only if it has been uploaded to the Gracenote database.
The International Standard Recording Code (ISRC) is a 12-character code that identifies each track. It’s a tool for royalty collection and anti-piracy. Information on applying for ISRC codes is at www.recordlabelresource.com/isrc-registration.html and www.riaa.com. If the CD tracks have ISRC codes, include them in the cue sheet as well. Some online music providers, such as CDBaby, can create the ISRC codes for you.
MASTER LOG
Type or print a log describing the CD-R master (such as shown in Table 15.2) and include it with your master.
Table 15.2 A CD Master Log

Album title: Don’t Press That Button (demo)
Also include the CD liner notes such as song lyrics, instrumentation, composers, credits, arrangers, publishers, copyright dates, and artwork. Include contact information for the artist, engineer, and mastering engineer. Stay in contact with the duplication or replication house, especially about artwork.
Before you send out the master, be sure to make another copy that you keep in your studio. This copy can be used if the master is lost or damaged.
Note that the CD-R premaster doesn’t leave the studio until all studio time is paid for! When this is done, send the CD-R to the duplication house.
The document “Recommendations for Delivery of Recorded Music Projects” provides examples of session sheets, tracks sheets, and so on. It also recommends media for delivering and backing up master recordings. It can be found at www.aes.org/technical/ documents. Search for AESTD1002.1.03-10_1.pdf. Also see the NARAS guidelines at http://www.grammy.org/recording-academy/producers-and-engineers/guidelines.
It’s amazing how the long hours of work with lots of complex equipment have been concentrated into that little CD-R—but it’s been fun. You crafted a product you can be proud of. When played, it recreates a musical experience in the ears and mind of the listener—no small achievement.
COPYRIGHTS AND ROYALTIES
It’s important to copyright original songs so that others cannot claim them as their own. Go to www.copyright.gov/forms to download form SR (for Sound Recordings) and form CON (continuation of form SR to add more songs). The filing fee is $45 for submission by regular mail or $35 by electronic submission. That fee lets you copyright several songs by the same composer(s) as a single work on one CD. Just be sure to list all the song titles. Send the forms, CD, and fee in a box to the U.S. Copyright Office, address at that website.
If you record and sell cover tunes (songs that have been recorded by other artists), or if you sample other artists’ music in your own recording, you must obtain a “mechanical license” and pay a royalty fee to BMI or ASCAP. The Harry Fox Agency (HFA) is the premier musical industry resource for licensing. They offer a service called Songfile, a simple, fast way to obtain licenses for 25 to 2,500 copies of a recording as a CD, cassette, LP, or digital download. If the cover song is under 5 minutes long, the royalty fee is about $45 per song for every 500 CDs that you distribute. For details check out www.harryfox.com, www.bmi.com, and www.ascap.com.