
![]()
Configuring SharePoint for Your Collaboration Content
A typewriter is a means of transcribing thought, not expressing it.
—Marshall McLuhan
How can you stay ahead of the mass of content, channeling it and organizing it, before it becomes a daunting behemoth? Content all begins somewhere, and in most cases, yours will begin with users collaborating to create new pieces of content, working together or independently, generating reports and documentation, producing artifacts of information as they carry out their job functions. Your task is to design this collaboration process. In this chapter, I provide guidance on how to plan for and manage collaboration sites and how to organize content containers to capture collaboration outputs. I also discuss how to analyze and implement document management capabilities within your collaboration sites.
After reading this chapter, you will know how to
- Describe collaboration and determine your guiding principles for collaboration.
- Design and implement your site creation process.
- Plan and design your content containers.
- Identify and implement your document management needs.
- Review audit and usage reports on collaborative site content.
Understanding Collaboration
Collaboration is one of those almost mythic-like terms people use to fit a variety of situations. Its popularity in business has not died down much in recent years, especially as people discuss SharePoint and the underlying business needs that they want to address with SharePoint. “We need to enable collaboration,” or “Collaboration is how information workers work today,” or something similar. I just made those quotes up, but I bet they are not far off from some of the collaboration-related platitudes you have heard. I do not doubt the statements’ validity, but I do find it more interesting and more useful to dig deeper. I prefer to look at what purpose collaboration serves, and even what collaboration means.
Let’s start there—what is collaboration? The Oxford English Dictionary defines it as “the action of working with someone to produce or create something.” Notably absent from this definition, oddly enough, is any mention of SharePoint—or any mention of any software package or technology solution for that matter. SharePoint is not synonymous with collaboration, and collaboration is not synonymous with SharePoint. Collaboration is much more basic than that.
Collaboration is working with another person or a group of people, each individual adding their part, all culminating into some desired outcome. In the workplace, people collaborate in meetings, over the phone, on physical documents passed back-and-forth, and on and on. SharePoint provides one way to capture the products and output of collaboration and it facilitates one way of collaborating with others. Without SharePoint, users will and do use something else to collaborate with each other, but with SharePoint, they can adopt a standard way to collaborate while also having a consistent place to capture and coordinate their collaboration efforts.
Back in Chapter 2, I listed collaboration as one of the core capabilities for SharePoint, and indeed, it is. The product exposes functionality to support multiple users working together in a variety of ways and in almost every aspect of the product’s capabilities. It has a bunch of features that support users to collaborate with each other, from basic things such as a discussion board for teams to discuss and work through a topic together, to advanced things such as sharing OneNote notebooks in a SharePoint site where multiple users can edit and add notes concurrently with each other. It offers features for asynchronous collaboration, such as checking out a document for an individual’s exclusive editing, and synchronous collaboration, such as with a team of users adding and editing pages in a wiki library.
Collaboration can take many forms, and depending on the purpose behind a collaborative initiative, you can decide which aspect of SharePoint will best support and facilitate your efforts. You might also use other products to collaborate in ways beyond what SharePoint supports, either to augment what SharePoint offers or to use in place of SharePoint. For example, you might collaborate with peers over e-mail by sending messages as you share ideas and discuss an issue. Alternatively, you might conduct an instant messaging or a web conference session using a program such as Lync, which enables advanced collaborative scenarios with video conferencing or desktop sharing.
For my purposes in this book, I am focusing on the phenomenon of collaboration as it relates to using SharePoint to collaborate on and capture content. However, I wanted to stress that SharePoint is simply a tool in the larger collaboration picture; it is not the picture itself. You can use SharePoint to facilitate and support collaboration among your users, which can help enhance their productivity. SharePoint also provides rich features to capture additional metadata about a piece of content in addition to other aspects that complement a rich and managed information life cycle.
If the value of collaboration is found in the coming together of people to each contribute toward some effort, some new piece of content, some new knowledge, then I find the best way to maximize that value is to reduce any barriers the users face in collaborating together. This includes establishing collaboration tools that support how users work together. But even before that, I find the best results come out of empowering users to create their own collaboration spaces and decide how they want to collaborate together, all with minimal IT involvement (or obstructions) in the process. I refer to this as liberating collaboration.
Liberating Collaboration
When I suggest the idea of opening SharePoint to empower users with things such as enabling on-demand site provisioning, there seems to be a general worry with clients in the SharePoint market that their SharePoint environment will degenerate into a free-for-all, users doing what they want, leaving you hopeless and in a chaotic state. Sometimes I even hear archaic terms such as SharePoint sprawl to refer to this. Do not let these silly notions distract and scare you into constraining and limiting your SharePoint deployment. You can manage and guide organic growth so that it grows in a sustainable fashion, and you do not have to micromanage or control every little detail to achieve this.
I say micromanage or control because that is effectively what some SharePoint administrators attempt with their deployment. Let me tell you, unless you have a big team or your user base is small, this idea is just not practical. You just cannot reasonably scale to manage every piece of content your users generate in their sites. There are products out there that may help you audit or implement policies to manage the bigger picture, but this does not change the reality that there is simply too much content to manage at an individual level and still maintain an effective collaboration environment. You will find more success if you look at how you can empower your users and how you can liberate collaboration for them.
Think about those giant network file shares and the amount of content in them. I doubt that anyone manages the masses of files at an individual level for all groups; instead, I imagine that different departments or workgroups have a directory that IT delegates to them, where some users organize an elaborate hierarchy of folders to structure their content, and others simply dump content in whatever folders that IT made available to them. IT generally did not try to control and manage content for users on network file shares; they just provided a platform to store the content. An IT team should attempt to do the same with SharePoint, providing it as a platform and a service to enable users.
For some, their experiences with network shares motivate them to swing the pendulum back the other way, to where they want their SharePoint deployment without an overwhelming repository of content, or content growing out of control without any sense of order. Perhaps your users have a hard time finding anything in the network shares and this is what you want to improve as you transition to SharePoint. I suggest that the problem is not with a lack of controlling this content, but instead the problem stems from letting the content live in perpetuity, all without any classification systems to identify units of information within the content corpus, and all without any way to distinguish between authoritative and obsolete content. The problem is not in users creating chaos and generating SharePoint sprawl, and the solution is not in locking the collaboration process down.
Now, I accept that you might not be able to empower your users and to fully liberate collaboration for them, for whatever reason, and there are many valid reasons for this. I agree there are places for controlling content and its related processes, but I prefer to focus on controlling and locking down content in the records management stage of the content life cycle while liberating the collaborative stages. When I manage this relationship well, between collaborative or transitory content and official records, it becomes a nonissue, liberating me from having to worry about some of those immaterial details.
![]() Note Please see the chapters in Part IV, where I discuss records management in more depth.
Note Please see the chapters in Part IV, where I discuss records management in more depth.
The trouble or challenge with trying to control content and how users collaborate on it is not only with the amount of content, but also with the variety of different ways that users prefer to collaborate together. Some users are like me, minimalists with the amount of content they preserve and hyperorganized with any content they do retain. Other users are more like my antithesis, hoarders of any and every piece of content that they muddle together without any order or structure. However, most users will be somewhere on the continuum between the ends. This is where those rigid attempts at locking down or controlling the collaborative environment fail, because people collaborate in such diverse ways.
One of my favorite things about SharePoint is its ability to adapt and fit whatever situation you want, to accommodate different ways that users want to work with the system, making it a flexible platform that you can use to meet different business drivers and needs. Its default settings lean more toward a liberating collaborative experience for users, particularly at the site level with designated users as the site collection administrators, delegating full control to them for the site. As I mentioned back in Chapter 2, a site collection is the main container and unit of segregation for SharePoint content—it isolates groups of users and processes while establishing security boundaries. Within the site collection, users can adapt sites, lists, and libraries to fit their needs.
My process for liberating collaboration revolves around the site collection. I use its boundary to manage how users organize content from a global perspective and at the content database level, but I avoid getting caught up in the implementation details of lists and libraries in individual sites. This provides me with the best balance between capturing content for the organization to leverage, and enabling users to work with content and collaborate in ways that they prefer. I then use site quotas to manage the growth and resource usage within sites by establishing thresholds to alert me to revisit a site when site owners request a larger quota, allowing me (or, more likely, the service desk) to assess whether the users are using the site appropriately.
Where this site collection can run into trouble is when users create a deep hierarchy of sites and libraries with a monstrosity of content, resulting in a content repository closely resembling the chaotic file dumping in a network file share that you might have tried to move away from. There are many valid reasons for a deep hierarchy within a site collection, which can work just fine since SharePoint supports them, but I find the undesirable aspects usually stem from not having a fluid enough way for users to create new sites. If you design your site creation process well, you can alleviate many of the issues relating to having content grow out of control.
Designing a Site Creation Process
You have a few options when it comes to your site creation process, and they range from empowering your users to provision their own sites in a self-service fashion, to having the service desk manually provision a site when a user submits a request. There is no right or wrong way to approach your site creation process, but the first step is to determine how open or controlled you want the process to be.
If you want a completely open process where users can provision sites on-demand, then you can simplify your site creation process to focus on decisions such as the default site quota to apply, what information you want to collect from users in a self-service form, and what managed paths you want to provision sites under. Otherwise, you will probably set the process as open and simple. On the other hand, if you want to configure all these settings yourself, you will leave the process closed, though still simple, while addressing similar settings as the more open process.
In between these two extremes is where the site creation process can get interesting. This is where you might automate the process, yet rather than automatically grant every user request for a new site, you can require an approval. The approver might be the user’s supervisor, who then becomes the site sponsor. Figure 5-1 illustrates a sample site creation workflow process with an approval step if the requestor is not a manager.
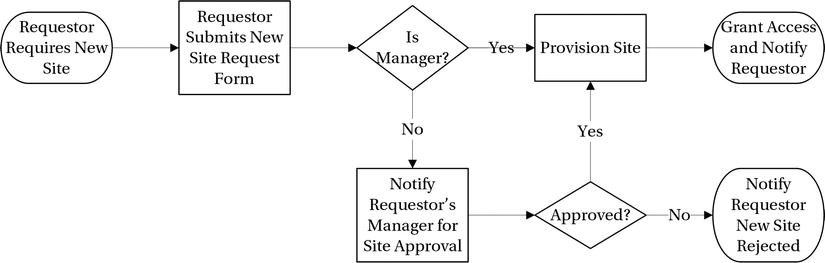
Figure 5-1. A site creation process with an approval step
![]() Note For more on how to create an approval workflow, please see Chapter 7.
Note For more on how to create an approval workflow, please see Chapter 7.
I generally design the site creation process in a self-service fashion, and I encourage you to do the same unless you have valid business drivers requiring you to customize or formalize a site request and site creation process. If you do create a custom process, you can implement it in SharePoint by providing your own custom site request page and specifying the URL to that page in the self-service site creation settings. Then, whenever a user attempts to create a new site, SharePoint will direct them to your custom page.
Configuring Self-Service Site Creation
You can configure self-service site creation on a per web application scope. Open SharePoint Central Administration and click the Manage Web Applications link in the Application Management section to navigate to the Manage Web Applications page.
- Select the desired web application and click the Self-Service Site Creation button in the Security area of the ribbon.
- Select to allow users to create site collections and select a default quota to apply to new sites.
- Select how the self-service Start A Site page should work with managed paths, or optionally specify a custom form URL.
- Click OK.
Figure 5-2 provides an example of the Self-Service Site Creation Management modal window.
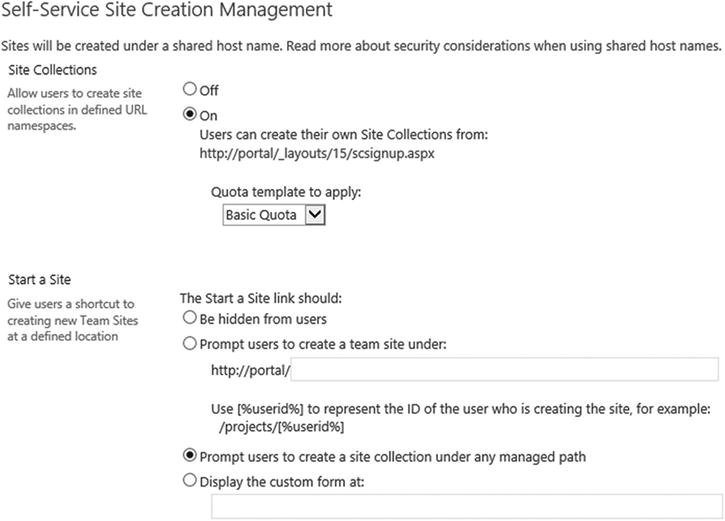
Figure 5-2. The Self-Service Site Creation Management modal window
Designing Your Content Containers
As you might suspect by now, I generally default to a single site in a site collection, and I steer users toward the single site, but I also allow them to extend their sites with child sites to create whatever site structure they need. Nonetheless, I design content containers around a single site for collaborative workspaces, and within those sites is where the containers get interesting.
You can use a SharePoint list or a library to store content. These are the two basic types of content containers that you will use to store the actual content. From there, you can choose a specialized list or library to store and manage specific pieces of content. Ultimately, the type of list or library you choose depends on the type of content you are capturing and the type of collaboration that you want to facilitate. For example, if you want your team to produce documentation, then you might select your content containers from a wiki library, document library, or OneNote notebook within a library. Choosing the type of library you select will depend on the type of user experience you want and on how you want to leverage the content in the future.
![]() Note Please see Chapter 4 for more information on designing your site structure and information architecture.
Note Please see Chapter 4 for more information on designing your site structure and information architecture.
Within your content containers, you store the individual pieces of content. You can have many different settings to organize and manage your content within a container, and I will return to different aspects of these settings and build upon them in relevant sections throughout this book. For now, I want to focus on managing the size of your content containers, and specifically on how to optimize performance based on the number of items you store in a list of a library.
You may have heard folklore about the number of items a list can hold. In older versions of SharePoint, people talked about limiting a list or a library to 2,000 items; in modern versions, people talk about a threshold of 5,000 items. This is not a list limitation, or more precisely, this is not a storage limitation. You can store many millions of items in a list without issue. The items captured and stored in a list do not have a 5,000-item storage threshold, and because they sit in a list, they do not have much of a performance impact, no matter how many items that list stores. The actual issue relates to querying those list items—it is a retrieval issue, not a storage issue.
These thresholds are important only when you are querying a list to retrieve a set of list items, and they have to do with the algorithm and the processing that SharePoint uses to query and return a set of list items. Remember, SharePoint is an abstraction layer on top of a database; it is not a database, nor does its queries perform like database queries. Because it abstracts away the database implementation details to provide flexible and dynamic columns of metadata and content, it has to translate a flat data structure into its tabular data view with columns and rows in a list or library. SharePoint joins everything together to present a user-friendly tabular view of the data, completely abstracting away the underlying SQL Server storage details. However, the product team optimized SharePoint to perform these data transformations, this abstraction, up to certain thresholds, namely 5,000 items.
SharePoint does not suddenly collapse once you hit 5,001 items. Picture it instead as a performance curve, where around 5,000 items performance begins to degrade at a steeper rate on the curve. This is not terrible or something that should scare you into making absolute decisions along the lines of “every list must contain less than 5,000 items.” Large lists generally are not as bad as people often make them out to be. If this were a terrible thing, one that you should always avoid, then the product team would have made it a hard limit built into the product. SharePoint lets you add a huge number of items because sometimes you require this.
As I mentioned, storing a large number of items is not the issue, and when you need to meet these requirements, you can. In those cases, you need to design an effective way to query those items in a large list if you want to avoid or minimize any performance degradation when users query items in the list. Notice that I suggested avoiding any performance degradation might be optional, and this is because every system faces tradeoffs where not everything has to perform lightning fast all the time. You might not need to bother tuning and optimizing performance for lists with queries that perform good enough for your users or with lists your users query infrequently. But with other lists, you will need to optimize the query performance, and those are where you should focus your efforts.
One common solution is to partition the list items in folders, limiting the number of items in each folder to 5,000 or fewer. This is effective, and I suspect this design led to the confusion for some people assuming lists should not store more than 5,000 items. Using folders makes the queries perform better because with the narrower scope of items in a folder, a query affects fewer items, but the issue does necessarily not relate to how you need to store the items, only with how you query the items.
Segregating your list items in folders is good for automatically managing query performance, but a deep hierarchy gets back to a single-dimensional view of the data, an archaic limitation of the network file share directories. This is not bad, because you can still apply metadata to items and you can use metadata to filter and navigate a document library. Folders present one option, and they work well, but they are just one option. Not every list or library will offer folders, so they are certainly not a golden rule for designing content structures in SharePoint. With some repositories, you may prefer to have them flat rather than in a deep folder hierarchy, or you may find the performance degradation might be so insignificant that you simply accept it and keep your implementation simple. Folders are an option available to you, but they are not mandatory to manage list item limits.
Another misconception with item limits is the assumption that these thresholds only apply to the number of items returned in your query. This is not the case; the thresholds apply to the number of items affected by a query. For example, if you have a list with 70,000 items and you apply a filter to your query to limit the results to the first 1,000 items, your query may or may not hit the performance threshold, depending on the query. If you simply select the first 1,000 items without any filters or sorting, then your query will only affect those 1,000 items and you will not hit the performance threshold. If you select the first 1,000 items where say a city column equals “Casablanca” or you want to select the first 1,000 items sorted alphabetically, then your query will need to evaluate each item in the list, affecting 70,000 items, hitting that performance threshold even though your query is only returning 1,000 items.
In this case, you need to optimize your query as best as you can and evaluate whether it causes performance degradations that warrant your efforts to optimize the query or list settings. You can evaluate query performance by manually timing the response time for a list query or by using the SharePoint Developer Dashboard to calculate precise execution times of queries. Here is the PowerShell script to enable the Developer Dashboard on a web application:
$content = [Microsoft.SharePoint.Administration.SPWebService]::ContentService
$content.DeveloperDashboardSettings.DisplayLevel = [Microsoft.SharePoint.Administration.
SPDeveloperDashboardLevel]::On
$content.DeveloperDashboardSettings.Update()
After executing the PowerShell script, SharePoint will display a button in the top-right area of your site. Clicking it will open the Developer Dashboard window, as shown in Figure 5-3. On the Scopes and SQL tabs, you can review the execution duration information for the different aspects involved with loading and rendering the page. This information can help you identify the poor-performing areas of your site, including those poor-performing list queries.
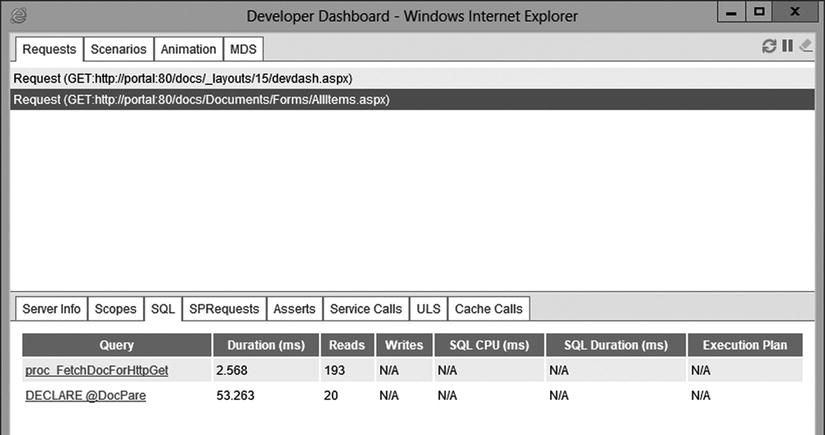
Figure 5-3. The SharePoint Developer Dashboard
![]() Note You can throttle the list queries to manage performance for a web application. To set list query throttling, navigate to the Manage Web Applications page in SharePoint Central Administration, select a web application, and select Resource Throttling on the context menu of the General Settings button on the ribbon.
Note You can throttle the list queries to manage performance for a web application. To set list query throttling, navigate to the Manage Web Applications page in SharePoint Central Administration, select a web application, and select Resource Throttling on the context menu of the General Settings button on the ribbon.
Once you identify lists with queries that perform poorly, you can investigate the list views to analyze the queries and determine what is causing the performance degradation. In most cases, you will identify columns included in the query that cause the query to affect every item in the list, resulting in a query that exceeds the performance thresholds. You identify these columns by looking at queries on large lists that filter or sort on specific columns.
After you identify the columns in the query, you can evaluate whether you want to apply an index to those columns. Indexed columns in SharePoint are conceptually similar to indexed columns in a database: they save SharePoint from having to evaluate every item in a list by utilizing an index instead. Every column involved in the query’s sort and filters will require an index to avoid affecting every list item. This, of course, leads to design tradeoffs, because in practicality, you cannot index every column. As you increase the number of indexed columns, you will experience diminishing returns for performance improvements.
Indexed columns have a marginal performance hit when you add an item to a list, because SharePoint will also have to update the index with the new item’s data. This means that indices are not a definitive solution, because they require making tradeoffs and design decisions to determine when an indexed column will help. To add an index to a column, navigate to the list or library settings page and follow these steps:
- Click the Indexed columns link in the Columns section.
- Click the Create A New Index link.
- Select the primary column for the index.
- Optionally, select a secondary column to create a compound index.
- Click Create.
![]() Note You can create a maximum of 20 indices on a list.
Note You can create a maximum of 20 indices on a list.
Another option is to use the SharePoint search engine to query list items and the refiners in the search results to refine the results by filtering on a particular facet. The performance threshold does not apply to search because it uses its own index to query list items. This is a particularly useful solution when you want to filter and sort on a volatile selection of columns, and it is also useful when you want to aggregate items from multiple lists for your query. Search handles these scenarios well. The product team designed search to execute queries across a large corpus of content, so you will find this is an especially elegant solution for large lists. And if you use continuous crawling for your search indexing schedule, then the query results will include items that users create in near real time.
![]() Note Please see Chapter 9 for more information on planning and implementing SharePoint search.
Note Please see Chapter 9 for more information on planning and implementing SharePoint search.
Of course, in the end, you might be better off just accepting the performance degradation as a tradeoff from any added complexity that a folder structure, indexed columns, or search query will entail. These are design decisions that depend on your requirements. More likely, however, these are design decisions that you will leave to your end-users until you identify a list that performs so poorly that it warrants your involvement to tune its queries or columns.
Your content container design first matches the type of content to a specialized list or library for the content, and then you optimize the container for how users query and retrieve content. This design offers valuable settings to capture and manage your content. Lists and libraries have other settings for managing content, and in the next section, I discuss some of those that relate to document management.
COLLABORATING IN DOCUMENT CENTER SITES
SharePoint offers a variety of site templates for different collaboration purposes. There is the team site, a generic site from which you can activate features and build up any other type of site you need. I use the team site most often, but there are other sites I use when they serve a better purpose, such as the wiki site for enterprise wikis or the records center for a records repository. I consider the document center a hybrid between the wiki and the records center. You can use it as a knowledgebase where users continuously add and collaborate on articles and documentation, and you can use it as a document repository.
I use it in a variety of scenarios to support producing and collecting documents, either documents from across the enterprise, such as in a general reference or a knowledgebase, or documents from among a team, such as documentation and reports. A document center is a specialized team site already configured with a document library, document identifiers, document sets, and other document management features.
Identifying Your Document Management Needs
The first thing you need to do to analyze your document management needs is to decide whether content in a library has any special management needs—does the content have any special requirements to manage it, or will a regular library with default settings suffice? Do you want to be bothered with the extra settings and management processes, or do you simply want to provide a container to capture documents?
In most cases, your site collection administrators and site designers will be making these decisions in their own collaboration sites, but you can add a custom SharePoint feature or app to configure a library with standardized settings if you want, and these standard settings will likely utilize a standard set of content types, metadata, and other information management policy settings. In later chapters, I return to these topics and I look at how to centralize or standardize them. For now, I want to focus on document management settings within a single library, because this narrower focus simplifies the introduction to document management settings.
![]() Note Please see Chapter 6, where I discuss content types and configuring a content type hub in more detail.
Note Please see Chapter 6, where I discuss content types and configuring a content type hub in more detail.
You can manage your document management settings at the library through the library’s settings page. Click the Library Settings button on the Library tab of the ribbon to navigate to the library settings page, as shown in Figure 5-4.
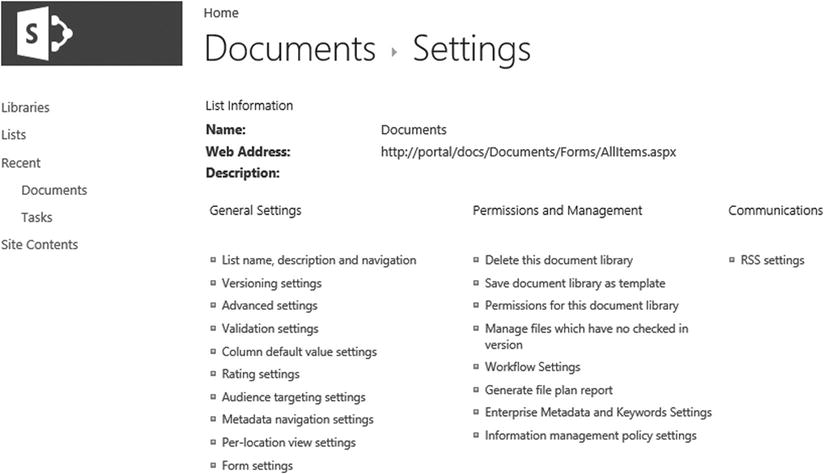
Figure 5-4. The library settings page
On this page, you can configure many content management aspects for a library, including the metadata columns you want to associate with content items, document versioning, advanced settings, document alerts, workflow associations, and the document information panel.
Within a document library, you can configure columns to capture additional metadata for each piece of content. This metadata can help you manage the content itself, such as by enabling you to filter and sort based on metadata, as I described previously. It can also help facilitate collaboration among team members by providing an extra field where they can contribute and collaborate on information. One useful field to add is the Contributor field, which lists the people who contributed to producing the content.
To add a Contributor column, navigate to the library settings page and follow these steps:
- Click the Add From Existing Site Columns link in the Columns section.
- In the Select Site Columns From option, select the Core Document Columns filter.
- In the Available Site Columns list, select the Contributor column.
- Click the Add button.
- Click OK.
![]() Note Please see Chapter 6, where I discuss assigning columns to enterprise content types.
Note Please see Chapter 6, where I discuss assigning columns to enterprise content types.
Figure 5-5 shows the Add Columns page with the Contributor column selected.
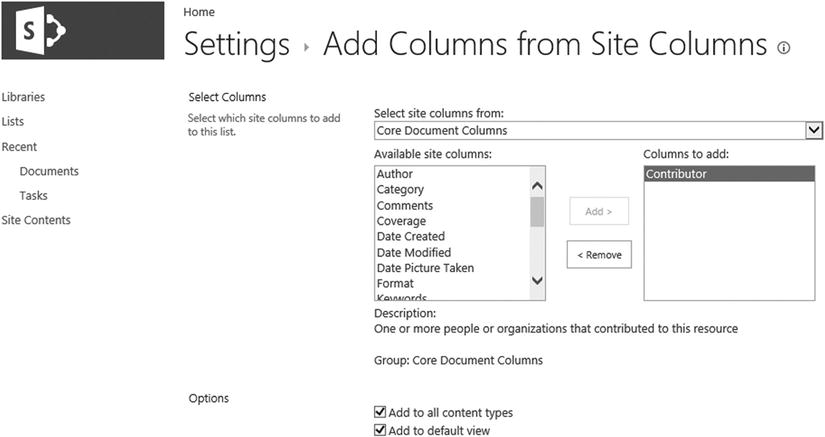
Figure 5-5. Adding the Contributor column
Maintaining a history of document changes through previous versions will allow you to review or rollback to previous versions if you do not like a change. Versioning also contributes to other aspects of document management, such as providing the ability to identify who made which change based on the version where a user introduces the change in question. It also enables a publishing process you can perform in-place within a library, where editors can see drafts and contribute changes, while other read-only visitors can only see the latest published version.
To enable document versioning, navigate to the library settings page and follow these steps:
- Click the Versioning Settings link.
- In the document Version History, select the type of versioning you desire, consisting of either major versions or major and minor versions.
- Optionally, select whether to limit the number of previous major or minor versions that SharePoint retains.
- Click OK.
Document versions can help you keep track of changes that users make, but you can formalize the editing process for users to prevent multiple users from attempting to make the same edits by requiring that a user first check out a document before they can make a change.
Requiring a Check Out for Document Edits
Checking out a document locks the document for exclusive editing by a user; other users can still read the most recent version, but they cannot make changes until the user who checked out the document checks it back in. This prevents users from accidently overwriting each other’s changes. For example, if one user downloads a document to make changes, and meanwhile another user edits the document and uploads their changes back to the document library, then when the first user uploads their changes, they will unknowingly overwrite the second user’s changes.
You might want to configure this setting to require a user to check out a document before he or she can edit it if you experience these types of edit overwrites or your users complain that their changes were lost. To require that users check out documents before they can edit them, navigate to the library settings page and follow these steps:
- Click the Versioning Settings link.
- Scroll down to the Require Check Out section and select to require users check out documents before they can edit them.
- Click OK.
Even when you require users to check out a document before allowing edits, a user could still download a copy to edit, and then check out the document later when ready to upload the changes. This is not an ideal habit, and ideally you can encourage users to check out a document as they open or download it, but having to check out a document still draws their attention to information such as when it was last modified rather than having them blindly uploading and overwriting the document, so it should still help.
When users check in a new document or any changes, you might want to know so that you can stay up-to-date with the latest information. Rather than have users notify you when they make changes, you can have SharePoint automatically notify you by subscribing to an alert.
Alerts can help you and your users keep up with changes in the document library without having to physically check. When a change occurs that meets a set of criteria you are interested in, SharePoint can notify you by sending an e-mail to those subscribed to the alert. This allows you to delegate the task of monitoring changes on a list or library to SharePoint, and the alert will bring any relevant changes to your attention.
Users will generally self-subscribe to alerts for content of interest, but sometimes you may want to subscribe users to alerts when you set up an important document library that you want users to pay attention to. In addition, you might want to manage alerts for a user who previously subscribed to receive alerts, but who now complains that the alerts are bombarding him or her with notifications, yet he or she does not know how to unsubscribe.
To add alerts for users in a document library, navigate to the document library and then click the Alert Me button on the Library tab of the ribbon to open the New Alert modal window, as shown in Figure 5-6.
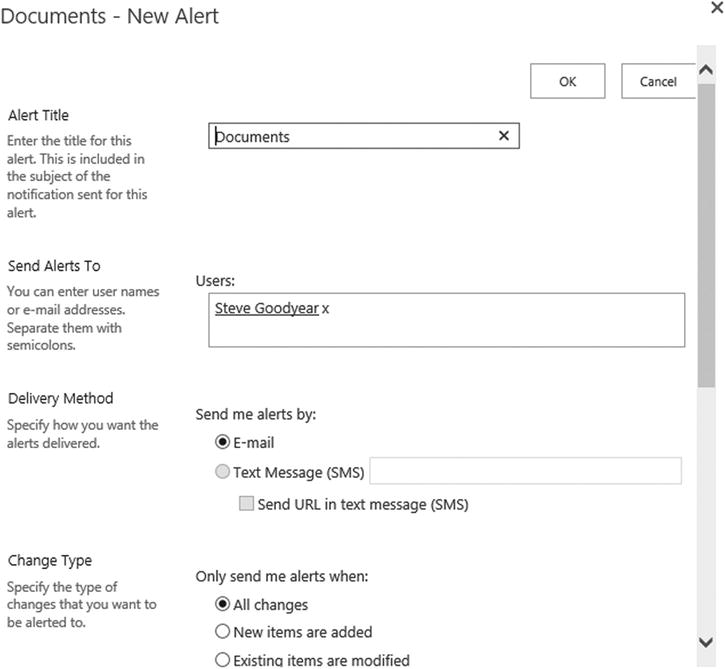
Figure 5-6. The New Alert modal window
You can delete alerts for users by navigating to the Site Settings page and clicking the User Alerts link in the Site Administration section. On the User Alerts page, select the user and then delete any alerts you want to unsubscribe for that user.
Similar to having SharePoint automatically send notifications to users who subscribe to alerts, you can have SharePoint automatically initiate a workflow when users add or change content in a library.
Associating Document Workflows
When you want SharePoint to process logic after a user adds a new item or changes an existing item, you associate a workflow to the library. In the workflow’s definition, you can add the logic as steps, either using one of the built-in SharePoint workflow definitions, developing your own custom workflow, or by configuring a workflow definition using SharePoint Designer or Visio. Once SharePoint detects a new or changed item, it instantiates an instance of the workflow for the item.
To associate a document workflow to a document library, navigate to the document library settings page and follow these steps:
- Click the Workflow Settings link to navigate to the document library’s Workflow Settings page.
- Click the Add A Workflow link.
- Select to run the workflow on every item in the list or for a specific content type.
- Select the workflow template.
- Enter a unique name for the workflow.
- Select the start options to identify who can start the workflow or whether the workflow starts automatically.
- Click OK.
Setting a Document Template and the Information Panel
By default, clicking to create a new document in a document library creates a blank Word document to start. You can supply your own document template if you want to start users off with a custom template rather than a blank document. For example, if your organization has a standard document format with headers and section structures, then you can specify this as the template that SharePoint will use when users click to create a new document.
To specify a custom document template, navigate to the document library settings page and click the Advanced Settings link to navigate to the Advanced Settings page, as shown in Figure 5-7. In the Document Template section, enter a template URL or click the Edit Template link.
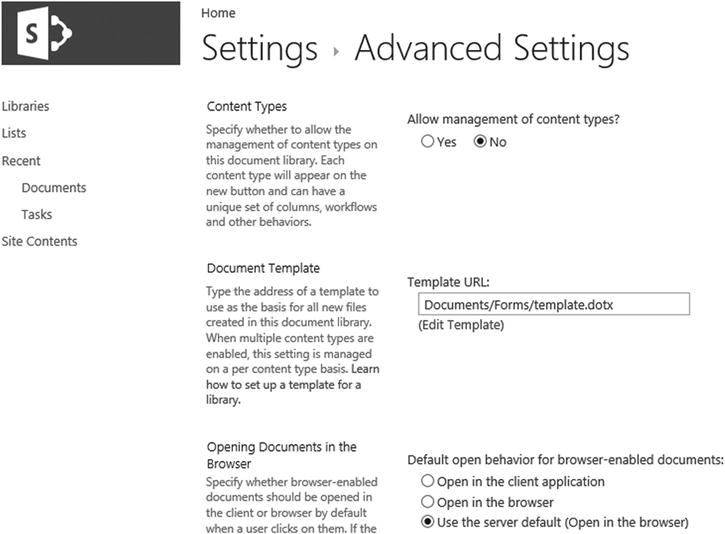
Figure 5-7. The document library Advanced Settings page
To customize the document template for a content type, navigate to the Site Settings page and click the site content types under the Web Designer Galleries section to navigate to the Site Content Types page. Click the Advanced Settings link and select whether to enter a URL for an existing document template or upload a new document template.
Using custom document templates can standardize the layout and format of specific types of documents, such as a standard functional specification document format for the engineering department or a standard status report document format for status reporting. But hidden within the benefits of a document’s standard format and layout, custom document templates also standardize the font face and other typographic styles in the document, enabling you to facilitate brand consistency across documents within your organization, and ultimately moving your users beyond the default fonts and styles in Word to instead produce consistent-looking documents that align with your organization’s brand.
Word includes a document information panel to capture metadata properties for the document. You can also provide your own custom document information panel. You can display this panel with the document properties across the top of a Word document. You customize the document information panel by modifying its form using InfoPath. This allows you to capture additional properties and even to link them to SharePoint columns, making the user experience for tagging metadata much more fluid and natural as a user creates and edits a document, rather than troubling him or her for metadata after the fact.
Because document information panels are InfoPath forms packaged with the other assets that make up an Office file, you can standardize on the document information panel to make it consistent across your organization. You can also add custom logic to simplify or automate a business process for an information worker, and you can even pull and integrate data from external systems.
![]() Note For more information on designing a document information panel using InfoPath, please see the Office support article at http://office.microsoft.com/HA010201967.
Note For more information on designing a document information panel using InfoPath, please see the Office support article at http://office.microsoft.com/HA010201967.
To customize the document information panel, navigate to the Site Settings page and click the site content types under the Web Designer Galleries section to navigate to the Site Content Types page. Click the desired content type and then click the Document Information Panel Settings link to navigate to the Document Information Panel Settings page, as shown in Figure 5-8.
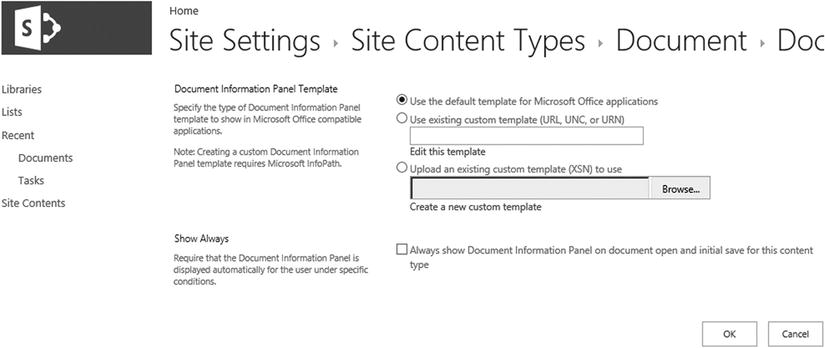
Figure 5-8. The Document Information Panel Settings page
If you have an existing document information panel on the site, you can select the option to enter the URL. You can click the Create A New Custom Template link to open InfoPath and edit the document information panel. After you finish editing the panel, save it locally, and then return to SharePoint to upload the custom template. You can also optionally select to always show the document information panel for the content type’s document template.
![]() Note Please see Chapter 8 for more on InfoPath forms.
Note Please see Chapter 8 for more on InfoPath forms.
Managing Document Information Management Policies
One of the more crucial document management settings in a document library is setting the information management policies. This allows you to configure retention and audit settings most notably, as well as policies for labels and any custom information policies that you develop and define. The following describe each of the standard information management policy settings:
- Retention: You can configure retention policies to process a piece of content after a given duration, either from the content’s creation date, last modified date, or its record declaration date. You can choose to have SharePoint dispose of the content, declare the content as a record, transfer to another location, delete previous drafts, or initiate custom workflows with more sophisticated logic.
![]() Note I discuss content retention and disposition in more depth in Chapter 15.
Note I discuss content retention and disposition in more depth in Chapter 15.
- Auditing: You specify the following audit events to capture the following: open or view, edit, check out or check in, move or copy, and delete or restore content items.
- Barcodes: You can have SharePoint assign a barcode to each document or item, or optionally, you can prompt users to insert a barcode before saving or printing.
- Labels: You can add a label to a document to print selected metadata information with the document.
To configure an information management policy on a document library, navigate to the document library settings page and click the Information Management Policy Settings link to navigate to the Information Management Policy Settings page, as shown in Figure 5-9.
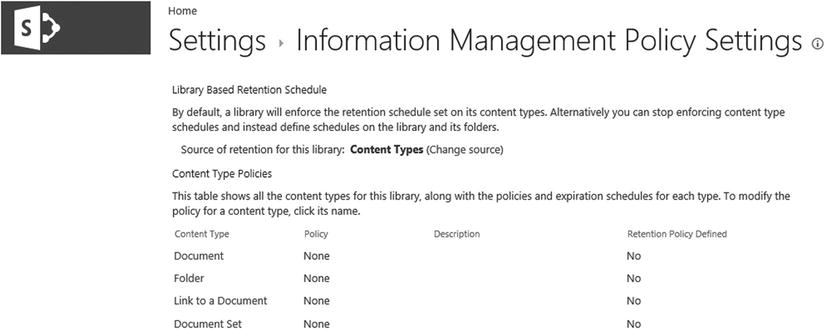
Figure 5-9. The Information Management Policy Settings page
Reviewing Audit and Usage Reports for Site Content
If you set an information policy to audit content in a document library, you can review the audit reports to view and analyze audit information about the content. Audit reports can help you track and report on compliance information for specific types of content, such as if you need to audit any changes or access to financial reports in a document library.
You can also review usage reports to analyze the popularity of content and the usage patterns users follow with accessing content. This can help you identify how users search for information and how they are consuming information. You can analyze usage reports to determine your content retention durations or your metadata strategy as you adjust and adapt your content management settings based on how users actually consume the content.
To view site usage reports for all libraries in a site collection, navigate to the site collection settings page and click the Popularity And Search Reports link under the Site Collection Administration section. On the View Usage Reports page, as shown in Figure 5-10, select one of the reports listed in the Usage Reports or Search Reports group.

Figure 5-10. The site collection View Usage Reports page
To view the audit log, navigate to the site collection settings page and click the Audit Log Reports link under the Site Collection Administration section. On the View Audit Reports page, as shown in Figure 5-11, select one of the reports listed in the Content Activity Reports group or the Information Management Policy Reports group.
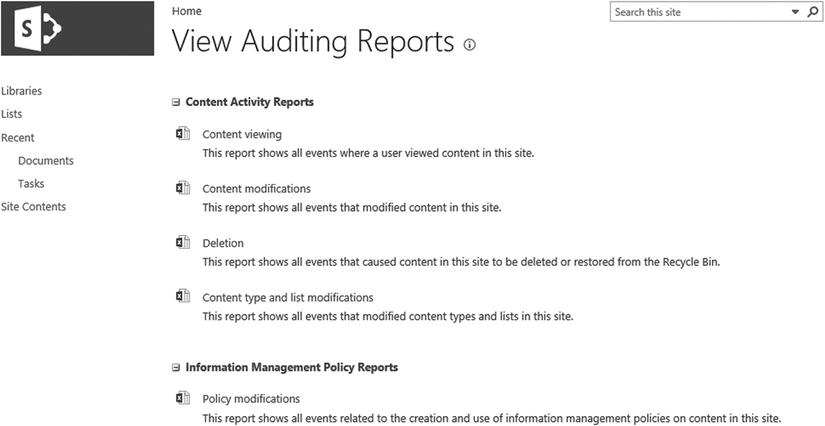
Figure 5-11. The View Audit Reports page
Inside Story: Notes from the Field
I once had a client who wanted their IT team to manage every aspect of provisioning and administrating the site collections for their end-users. This, of course, translates to a significant burden on an IT service delivery team that has to respond to every user request, rather than simply delegate those tasks to the end-users to perform themselves. Even though I generally encourage my clients to design their processes around self-service and automation, and I spent some time in this chapter advocating such a position, I know this is not a golden rule that everyone needs to adopt in every situation. In fact, in many situations, just the opposite strategy may be the best one.
Regular users are not IT administrators; they are not experienced with system and security administration. Your users probably have other job functions and their domain expertise focuses on those functions rather than on IT solution design and administration. And so, if your IT operations and service delivery team is resourced well enough and you have a customer service-oriented culture internally, then you may find, as my client found, that performing these functions to service your internal customers can ease their technology burden and enable you to steer the direction for how your users adopt the software.
My client wanted to manage all aspects of the service for their users so that the users would only need to think about the job for which they needed to collaborate with each other. Users consumed the service strictly as contributors to the collaboration process; no one managed their own sites or security. The SharePoint service delivery team created Active Directory groups for every site, they provisioned and configured each site, and they managed every other aspect of the SharePoint service, always masking the administration and management aspects from the users.
I like this level of service because it adds a human element, connecting knowledge workers to real people who can help them and who can answer questions or provide advice. The technology experts, those working in IT, can simplify the process for valuable knowledge workers to focus on carrying out their job functions, supporting the knowledge workers with experts who can best guide the workers on how to optimally leverage the technology. The process can even relieve the stress of a nontechnical person trying to make technology decisions and figure out how best to utilize technology. The trouble is that its budget is expensive and it requires more than adequate resourcing, both of which are often in short supply for many organizations with whom I engage.
Ultimately, this approach does not scale well, because it depends on a central team to provide and manage the service, and the team has to scale with the service’s adoption and usage. If you can manage to resource a team well enough to provide this level of service and keep up with scaling it as needed, then this service delivery approach may appeal to you. However, in my experience, these service delivery teams are few and far between the majority who have to compromise by automating many tasks in a self-service fashion, and this is the reason I generally encourage clients to maximize the self-service capabilities that they have available to their users.
My point is that you can tightly control everything for your users, and this might be preferable if you have the budget and resourcing to offer the required level of service. But you realistically cannot have the best of both worlds if you want a functional and sustainable service: either you want to empower your users by enabling self-service functionality, or you want to be like my client and staff a service delivery team to manage the processes on behalf of your users.
Wrapping Up
You can stay ahead of the content masses by planning and designing how you enable your collaboration process to channel and organize content as users create it. You enable your collaboration content by first understanding the nature of collaboration: working with another person or groups of other people to produce or create new content. Collaboration flourishes when you liberate it, empowering users to come together whenever and however they need to as they generate new information in their job functions. In this chapter, I noted how you could liberate collaboration effectively by designing an appropriate site creation process, one that steers users toward sustainable and supportable growth and adoption. From there, I shared different considerations for designing your content containers, particularly as they relate to the number of items you store. Finally, I discussed how you can identify and implement your document management needs, including configuring the library settings to add custom metadata columns, enable document versioning, and setting information management policies.
Enabling collaboration equips users with a productive workspace where they can produce and collaborate on content together. This can generate a lot of content and it is the best opportunity to start classifying and organizing the content, capturing the content with relevant and self-describing information to make future searches and content discovery productive. In the next chapter, I discuss how to move beyond the document library and instead standardize your content management to classify and organize your content at a global level. The primary tool I discuss to achieve this organization-wide standard is the content type, which works closely with the lists and libraries, as well as the content management settings that I have described so far.