
![]()
Implementing Your Records Repository
The future depends on what you do today.
—Mahatma Gandhi
How do you archive and manage records you need to retain? The first of the key criteria requires a destination, typically a records repository, to archive and manage records within. In this chapter, I provide guidance on how to plan and create a Records Center in SharePoint 2013. I also discuss how to design workflows to process your records, how to audit and report on records, and how to manage in-place records. Finally, I share techniques to optimize your disk storage design for archival content.
After reading this chapter, you will know how to
- Plan and create a records repository.
- Manage in-place records.
- Configure document Send To connections.
- Configure document routing.
- Design workflows to manage and process records.
- Audit and report on records.
Overview of Records Repositories
In the past, managing records was a laborious process of collecting, conditioning, inspecting, indexing, and filing pieces of content for archiving. For example, indexing involved manually using index cards with a written pointer reference to the physical file’s actual location. Records managers created and filed index cards in helpful orders, depending on how they expected users to search for and request information.
Electronic records repositories share many of the concepts of the former paper-based system. Indexes still maintain pointers to records, with organization based on the different ways to query the content. Rather than requiring a records manager to create index cards, the system crawls the content to build the index. Instead, the records manager focuses on managing and optimizing the record’s life cycle, including these tasks:
- Applying retention and auditing policies to content
- Organizing the file plan and designing content routing
- Configuring eDiscovery cases and applying holds
- Managing the records repository and monitoring compliance
![]() Note Records repositories may have changed, and in the process this changed the records manager’s role; yet a records manager is still a vital role on your team.
Note Records repositories may have changed, and in the process this changed the records manager’s role; yet a records manager is still a vital role on your team.
Like their paper-based equivalent of paper records filed in cardboard records boxes (such as the Bankers Box), your records repository stores digital records in folders and online libraries at each node of your file plan. When you store records in a records box, such as the example shown in Figure 14-1, you can add additional metadata to the container by writing additional details on the box’s face with a marker.
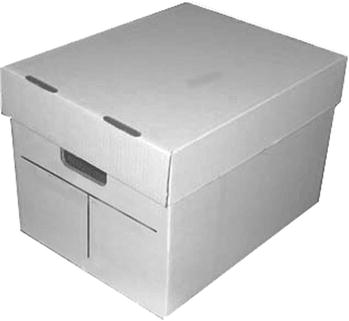
Figure 14-1. A records box for paper records
Records boxes served as the containers for records, and a records manager organized the boxes using the file plan. The SharePoint folders and libraries that you provision for different nodes in your file plan act as a container in a similar way to the records box. Rather than writing on the box with a marker, you can capture metadata by specifying property attributes for the container. Otherwise, it contains documents and other pieces of content related to a particular topic area in the file plan.
![]() Note Please see Chapter 13, where I discuss file plans in more detail.
Note Please see Chapter 13, where I discuss file plans in more detail.
There are several needs you may find requiring your organization to capture and preserve records. Some may be driven internally for content that you expect will provide some future value. Others can come from an external organization or regulatory body mandating the records retention. The following are some of the external record areas that may apply to your organization:
- Government compliance
- Tax-related
- Securities and security commissions
- Environmental
- Health and safety
- Product and consumer protection
- Legal compliance
Ultimately, your organization has an obligation to protect and preserve certain data to avoid litigation and protect the company. Without the ability to produce required evidence to prove the organization is in compliance for a regulatory requirement, the organization, and possibly even its officers, could face fines or stricter penalties.
Records serve as the memory of an organization, preserving evidence about a decision or a transaction in the organization’s operations. They provide historical reference information to support future organizational use or to meet regulatory compliance requirements. They are important, but not every record holds the same degree of importance, as some are more important than others are.
To identify the relative importance of a record to your organization, I recommend you create categories to group different importance levels. You can create as many categories as you need to meet your requirements, but typically most organizations will only need a few. The following are common categories that records managers use to specify importance levels, along with examples of the types of records each include.
- Nonessential Records: Information with no ongoing value; typically not worth retaining, or retained for temporary storage of 60 days to one year. These types of records include:
- E-mail messages with no ongoing value
- Working documents no longer in use
- Useful Records: Helpful references to support ongoing operations; typically retained for short-term storage of up to three years. These types of records include:
- Reports
- Executive communications
- Important Records: Contain pertinent information that needs to be re-created or replaced if lost; typically retained for long-term storage of seven to ten years. These types of records include:
- Financial data
- Credit histories
- Sales data
- Vital Records: Necessary for defining an organization’s legal and financial status, and essential for business continuity; typically retained permanently. These types of records include:
- Shareholder statements and ownership records
- Contracts and agreements
You can apply these categories to each node in your file plan, as well as to each type of content. This information can help you design appropriate operations and maintenance tasks, such as the backup strategy and the retention policy. Just knowing the relative importance of a record can define how long you need to retain it and the process for disposition.
![]() Note Please see Chapter 15, where I discuss content retention and disposition in more detail.
Note Please see Chapter 15, where I discuss content retention and disposition in more detail.
Digital records repositories often share common characteristics, such as associating metadata and a retention policy with a record. And as I mentioned, they also share characteristics with a paper-based records repository. Planning a SharePoint records repository is consistent with planning any archival document repository; even still, I look next at some SharePoint features and implementation details you can consider in your planning.
Planning Your SharePoint Records Repository
Much of your planning should happen during the design phase, when you would focus primarily on designing a blueprint for your records repository in the form of a file plan. A file plan defines the structure and hierarchy of a records repository, and you can use this to guide your repository implementation, but there are still SharePoint-specific configuration decisions you need to make.
![]() Note Please see Chapter 13, where I discuss designing a file plan in more depth.
Note Please see Chapter 13, where I discuss designing a file plan in more depth.
You implement your records repository in SharePoint 2013 using the Records Center site template. This creates a SharePoint site that is, in essence, like any other site, but it also has activated features for records management. This template includes the feature to route and organize content, which provides some of the key functionality for an efficient Records Center, as I describe later in this chapter.
Before you get too far along with planning your records repository, you have to decide whether you want a centralized or decentralized repository. In SharePoint terms, this is a question of whether or not you want to capture and preserve in-place records. The following lists some benefits for centralized and decentralized records management.
- Centralization: Standardizes in a well-known single archival repository and manages records in a consistent manner; responsibility for records management is held with a records manager who possesses specialized archival and information management skills.
- Decentralization: Keeps record in context at its content creation origin; responsibility for records management is delegated to knowledge workers who can adapt a process to fit their information needs.
My preference is usually to design for a centralized records repository managed by a records manager, unless there are compelling requirements for a decentralized design. I like a centralized design because I like the consistency in managing the records; I also like that the physical storage of record content would be separate from the transitory content where the record originates.
SharePoint provides an option to move the record to a Records Center while retaining a link in the original location. For me, this provides a good experience for accessing the record from its original context, while still managing the record centrally.
Centralizing your records places together similar records from across the enterprise. This allows you to view records in context with other similar records. I also find a centralized design easier to apply and manage security permissions for users who require access to a particular record type but who may not be members of the collaboration site where the record originated. In a centralized repository, you can grant permissions to those users for the different libraries they require.
For example, in Figure 14-2, you could grant permissions on the Records Center to an auditor who needs to access the records. You can avoid granting item-level permissions for the individual origin sites, thus avoiding complexity in permission management, and you can avoid granting access to the origin site collections, which could grant more content access than the auditors require.

Figure 14-2. Copies of records captured in a centralized records repository
Vital records are another, very notable reason I prefer to design centralized records repository centers around the ability to group and store similar content together. As I noted earlier, a vital record contains valuable content and is typically crucial to business continuity. If you preserve your vital records in-place, distributing them across potentially multiple content databases, you have to restore all those databases to restore the vital records. Conversely, if you preserve your vital records in a centralized records repository, you can group them together in a content database, allowing you to target your disaster recovery response.
For example, if you span your Records Center across multiple site collections, you can allocate different site collections in different content databases, as shown in Figure 14-3. With this design, you can designate a site collection to preserve all of your vital records, grouping them together in a common content database.

Figure 14-3. Allocating disks for content databases with vital records
The choice between designing a records repository in a single site collection and spreading it across multiple site collections depends on the total content size. If you are archiving up to 100 GB or 200 GB of content, a single site collection will likely work well for your purposes. If, on the other hand, you are archiving several terabytes of content, then you will be better served with a multisite collection and a multicontent database design.
In both cases, you start by creating a Records Center. This provides the main entry point into the records repository, both where users submit new records and where users browse existing records. Next, I discuss some considerations for creating and configuring your Records Center in SharePoint.
Creating and Configuring Your Records Center
A Records Center is a specialized portal for a records repository in SharePoint. It includes several features related to records management, particularly with the routing and organizing of new records submitted to the repository.
To create a Records Center site, navigate to the Create Site Collection page in SharePoint Central Administration and enter the appropriate information in the Name, Description, and Site Owner fields. For the Template Selection option, select the Records Center site template located on the Enterprise tab. After you create a new Records Center site, you can navigate to the site’s welcome page, similar to the one in Figure 14-4.
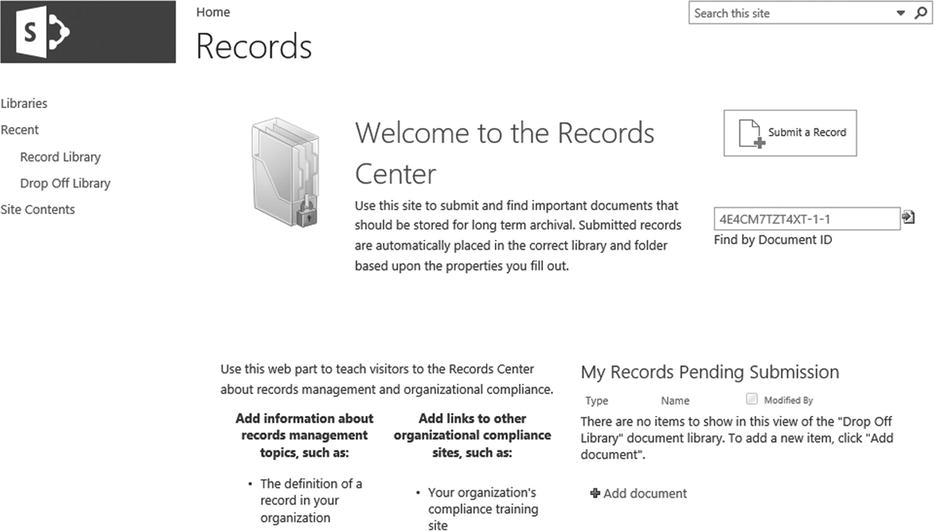
Figure 14-4. The SharePoint 2013 Records Center
SharePoint Record Centers rely on content types to process and manage content properly. The routing engine uses content types as the first means to identify content and route it to its proper location. If you have set up an enterprise content type hub to manage and synchronize content types across all site collections, then your Records Center will already have the necessary content types configured; otherwise, you will need to create any content types you require.
![]() Note Please see Chapter 6, where I discuss the enterprise content type hub in more detail.
Note Please see Chapter 6, where I discuss the enterprise content type hub in more detail.
Next, you need to create a hierarchy of the different records libraries and folders you wish to implement based on your file plan and your records repository design plan. This is the place where you decide to either implement the file plan hierarchy within a single site or structure it across multiple sites. I prefer to structure across multiple sites, even if they all share the same content database initially, because this provides room to grow and scale the records repository easily in the future.
Create and configure each site you identify as needed for the repository structure, and then create the necessary records libraries within each site. Finally, create any folders, if needed, in each library. This establishes the shell structure of your records repository, where you will physically store the individual records.
![]() Tip If you need to partition content across multiple databases, you will need multiple Records Center site collections to implement your records repository across. Each site collection can share a content database with another site collection or you can dedicate its own content database, as required.
Tip If you need to partition content across multiple databases, you will need multiple Records Center site collections to implement your records repository across. Each site collection can share a content database with another site collection or you can dedicate its own content database, as required.
The Records Center uses the content types to identify a submitted piece of content and route it to the appropriate records library you provisioned in your file plan implementation. Because the content types and records libraries are things you created and configured, SharePoint has no way of knowing how to route content until you tell it, which you do by configuring document routing rules.
At the heart of an effective Records Center is content routing. This feature processes new records submitted to the Records Center and routes each to its predefined container within the repository hierarchy, automatically organizing pieces of content based on routing rules.
If your records repository spans multiple sites and site collections, you need to enable an option in the Document Routing Settings. You need to enable the Content Organizer feature on any other site collection you wish to route content to and include it in your records repository.
To enable routing content to another site, navigate to the Site Settings page and click the Content Organizer Settings link in the Site Administration section. On the Content Organizer Settings page, check to allow rules to specify another site in the Sending To Another Site section, as showing in Figure 14-5.
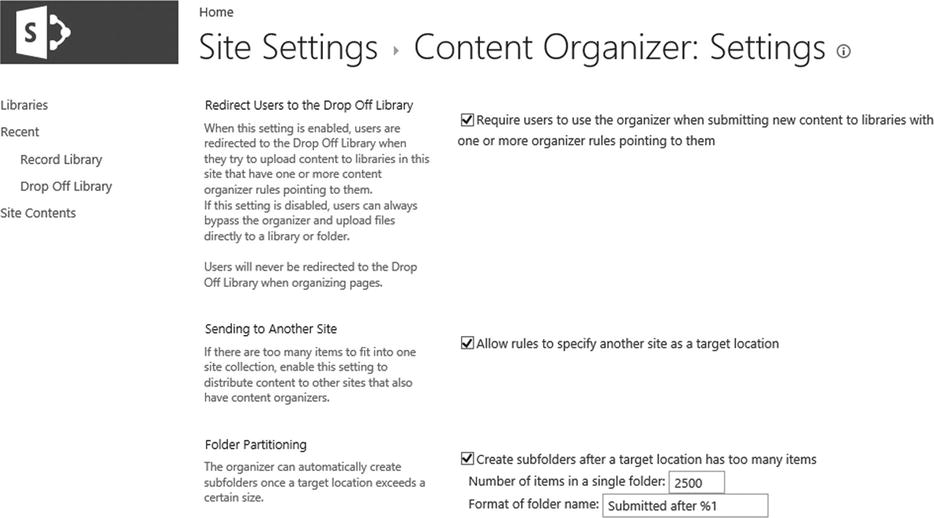
Figure 14-5. The Content Organizer Settings page
To create a content organizer rule to route content to records libraries, navigate to the Site Settings page for the Records Center and click the Content Organizer Rules link in the Site Administration section. On the Content Organizer Rules page, click the New Item button to create a new content organizer rule, as shown in Figure 14-6.
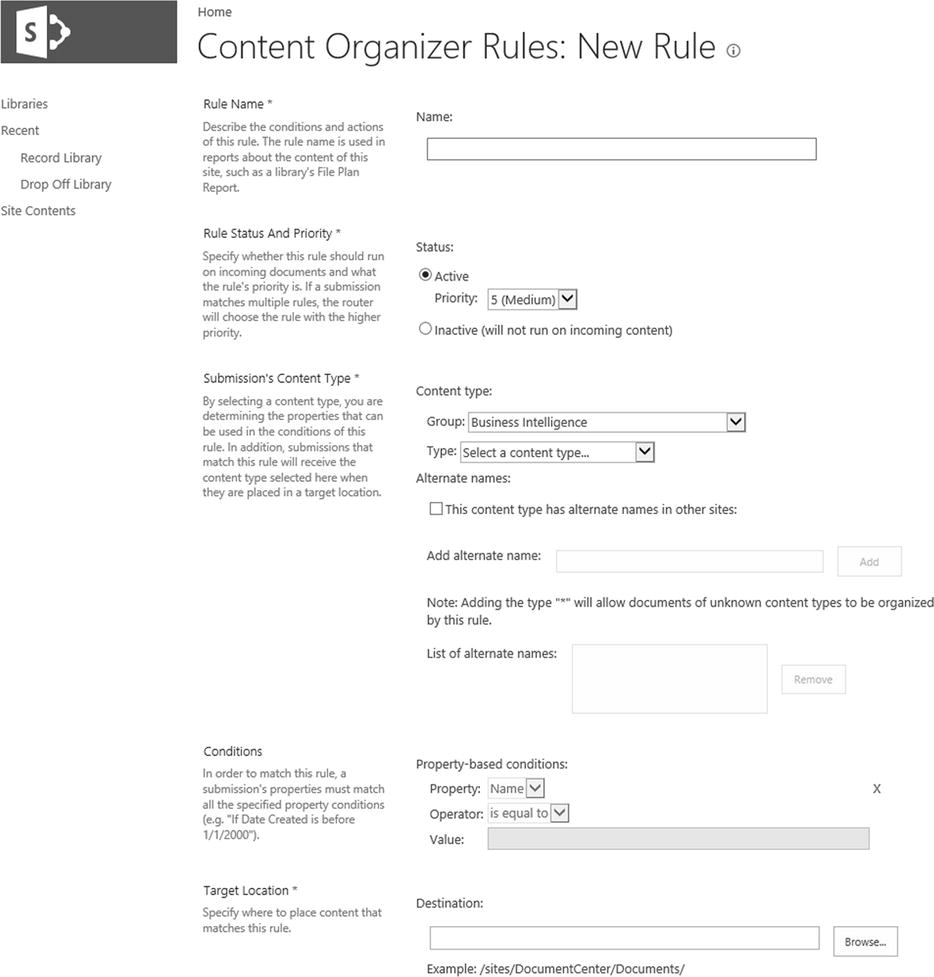
Figure 14-6. The New Content Organizer Rule page
On the New Content Organizer Rule page, enter the following information to create a new content routing rule:
- Provide a Rule Name. SharePoint uses this name in reports about the records repository’s content.
- Specify the Rule Status And Priority. If a submission matches multiple rules, the content router will choose the rule with the highest priority.
- Specify the Submission’s Content Type by selecting the content type’s Group and the Type from the drop-down lists. If other sites use a different name for the content type, select the Alternate Names option and add the alternate names.
- Optionally, specify any further Conditions you wish to use to route content, such as a content type’s property value, in addition to routing based on the content type itself.
- Specify a Destination records library in the Target Location section.
- Click the OK button (not visible in Figure 14-6).
When the Records Center receives a new piece of content in the Drop Off Library, the content organizer will evaluate it and select a matching rule with the highest priority to route the content to a records library. Content that does not match a rule will remain in the Drop Off Library until a records manager manually routes the content or creates a new rule to match and route the piece of content.
A Records Center with routing rules set up is ready to receive content. Your Records Center can receive a piece of content from users manually submitting it or from a workflow processing the content. Both of these methods for submitting content use a Sent To Connection to identify the drop-off library for the Records Center.
Configuring Send To Connections
In the top-right area of the Records Center welcome page there is a Submit A Record button. Users can click this button to submit a record to archive in the records repository. Although this is a useful button to receive records into the repository, your users will probably prefer to declare and submit in the context of the sites they are working in.
To enable the Send To capability, you first need to configure a Send To Connection for the web application by following these steps:
- Navigate to SharePoint Central Administration and click the General Application Settings link in the left navigation menu. On the General Application Settings page, click the Configure Send To Connections link.
- In the Send To Connections section, select New Connection.
- In the Connections Settings section, enter the Display Name and the Send To URL, specify an Explanation to display to users and record in the audit log, and select a Send To Action. The following describes the different Send To Actions:
• Copy: Creates a copy of the document and sends the copy to the repository.
• Move: Deletes the document from its current location and moves it to the repository.
• Move and Leave A Link: Moves the document to the repository and creates a link at the current location to direct users to the repository.
- The Configure Send To Connections page should look similar to the one shown in Figure 14-7, depending on the options you selected and the URL to your Records Center.

Figure 14-7. The Configure Sent To Connections page
- Note that the Send To URL must point to a valid routing destination. To test, you can click the Click Here To Test link next to the Send To URL. You should receive an alert similar to the one shown in Figure 14-8, verifying the URL is a valid routing destination.

Figure 14-8. Routing destination URL verification message
- Click the Add Connection button to add the new Send To connection. You can select a connection in the Send To Connections section to update a connection’s property; otherwise, you can click OK at the bottom of the page.
Once you have the Send To Connection set up properly for a web application, users can manually send their documents to the Records Center. They can perform this function by selecting an item in a site library and clicking the Send To button on the Item tab of the ribbon, as shown in Figure 14-9.

Figure 14-9. The Send To drop-down menu in a document library
You can also use a workflow or retention policy to submit a record to a record repository. To configure a policy on a document library, navigate to the library Settings page and follow these steps:
- Click the Information Management Policy Settings link.
- Check the Enable Retention option.
- Click the Add A Retention Stage For Records link.
- Specify the relevant options in the Retention Stage Properties dialog, as shown in Figure 14-10. Click OK.

Figure 14-10. Retention stage properties
![]() Note Please see Chapter 15, where I discuss content retention policies in more depth.
Note Please see Chapter 15, where I discuss content retention policies in more depth.
Designing Workflows to Process Records
Records Centers that automate the processing of records tend to be the most successful. Manually processing and routing individual records was necessary in a physical records repository, but in a digital one, you can take advantage of the compute processing power to automate the common tasks. This level of automation enables a Records Center to scale without requiring a significant increase in records manager resources.
The routing and content organizer feature in a Records Center absorbs much of the management burden for records, as I noted earlier in the chapter. This feature organizes the content within the repository. You can use workflows to automate several of the remaining routine records management tasks. This can range from a workflow declaring a piece of content as a record during its publishing process and submitting it to a records repository.
Figure 14-11 illustrates the conceptual steps involved in a document approval workflow that ultimately submits an approved version to the Records Center. I like records management workflows that integrate in user processes for document creation and publishing, because this seamlessly ensures compliance without even having users think about records management—they simply go about their regular work and the system fits their process without having to burden them.

Figure 14-11. A sample records workflow process
I discussed options for workflows at several places throughout this book. You can create useful approval workflows on a document library though the browser; you can create more sophisticated workflows using Microsoft Visio 2013 or SharePoint Designer 2013. The functionality in these power-user tools can achieve a surprising range of workflow needs.
There are situations where these tools reach their limit with configuring workflow actions, instead requiring a developer develop custom actions. Requirements such as this often come up for system integration or any type of specialized processing logic. A developer can develop custom actions for SharePoint 2013 workflows using Microsoft Visual Studio 2012 with the SharePoint 2013 project templates installed.
![]() Note You need to install the Microsoft Office Developer Tools for Visual Studio 2012 to create projects using SharePoint 2013 project templates. Download and install the required components from the Microsoft download site at http://aka.ms/OfficeDevToolsForVS2012.
Note You need to install the Microsoft Office Developer Tools for Visual Studio 2012 to create projects using SharePoint 2013 project templates. Download and install the required components from the Microsoft download site at http://aka.ms/OfficeDevToolsForVS2012.
To create a SharePoint 2013 workflow in Visual Studio 2012, open Visual Studio and follow these steps:
- Create a SharePoint 2013 Empty Project.
- Open Solution Explorer in Visual Studio. Right-click on the new project, hover over Add, and click New Item on the submenu.
- In the Add New Item window, select Workflow, as shown in Figure 14-12. Click Add.

Figure 14-12. The Visual Studio Add New Item window
Visual Studio completes the range of workflows you can create for a SharePoint application. Its limits are practically your imagination and budget to write code. It is a productive development environment for all sorts of development, and this is especially true for SharePoint development, including SharePoint workflows. If you find yourself reaching the limits creating workflows within the SharePoint Designer 2013 tool, I encourage you to experiment with developing custom workflow actions within Visual Studio 2012.
![]() Note For more information on SharePoint development using Visual Studio 2012, including code samples and technical references, please see the MSDN site at http://msdn.microsoft.com/aa905690.
Note For more information on SharePoint development using Visual Studio 2012, including code samples and technical references, please see the MSDN site at http://msdn.microsoft.com/aa905690.
Auditing and Reporting on Your Records
Capturing, preserving, and managing records cover the majority of a records manager’s tasks, but also important is the ability to audit and report on the records within a repository. You might want to audit and report on a variety of things, such as compliance, content inventory, configuration setting review, and general usage. SharePoint supports these requirements through the site usage and audit reports, in addition to the Records Center file plan report.
You can view the reports in a Records Center from the Records Center Management page. On the Settings menu, click the Manage Records Center menu item to navigate to the Records Center Management page, as shown in Figure 14-13.

Figure 14-13. The Records Center Management page
In the lower-right area of the Records Center Management page under the Common Records Management Tasks section, the page presents the following two reporting options:
- Generate A File Plan Report: Generates a spreadsheet about the records libraries with details about the hierarchical structure and retention schedules.
- Generate An Audit Report: Navigates to the site collection auditing reports, including content viewing, policy modifications, expiration and disposition, and auditing settings reports.
Wrapping Up
You archive and manage your organization’s official records in a records repository, referred to as a Records Center in SharePoint 2013. A Records Center includes the functionality to route and organize content by evaluating routing rules against the content that users submit to the repository. In this chapter, I walked you through how to create and manage a Records Center site, how to configure routing rules, and how to configure a Send To destination that users can use to submit content to the repository. Finally, I provided an overview of creating workflow using Visual Studio 2012 and generating auditing reports on the Records Center.
Capturing and preserving content protects the company’s knowledge and evidence of transactions and decisions. However, at some point, the content may not provide your organization any further value and so it may no longer be necessary to retain the content. You can automate the retention and disposition of records using retention policies. In the next chapter, I walk you through how to create a retention policy with a disposition workflow and apply it to records in a records repository.