
![]()
Planning Social Computing
Everybody gets so much information all day long that they lose their common sense.
—Gertrude Stein
Knowledge in an organization centers around people, the organization’s people who possess the expertise or who can reference the information somewhere on the network. But if one is not the expert, how can he or she discover and access this knowledge? In this chapter, I provide an overview of the social computing capabilities in SharePoint, including how to deploy a people search and how to manage the My Site features. I also discuss social tagging and how tagging can help users to discover relevant content. Finally, I walk you through how to configure blogging settings and manage ad hoc blog content.
After reading this chapter, you will know how to
- Describe the social computing capabilities in SharePoint.
- Analyze your social computing requirements.
- Deploy a people search portal.
- Manage My Sites features and configure profile synchronization.
- Configure audiences and audience targeting.
- Create a personal blog.
Understanding Social Computing
Somewhere along the way, social became a scary word for folks. Not that they are antisocial or anything like that, they just hold a misguided notion that the idea of social is somehow bad. I believe this discomfort with social comes out of equating social computing with social networking—the two terms are not synonyms. But if one does think about social networking when presented with the prospects of social computing, then he or she might begin to picture things such as Facebook, possibly along with the aspects of newsfeed streams filled with irrelevant posts—at least irrelevant to the organization and its function.
Let me clear some of this up and tell you unequivocally, SharePoint is not Facebook for the enterprise. If the term social scares you or some of your stakeholders because of a mental block that cannot move past such an idea, then choose a new term—interpersonal computing, perhaps. These are important and valuable concepts, ones you can use to make knowledge more discoverable and accessible in your organization. Social computing exposes knowledge through people, either directly through your immediate network of colleagues, or, and even more valuably, through your extended network, tapping into your colleagues’ network, or your colleagues’ colleagues’ network.
I can usually articulate the value and business case of a social computing initiative by asking a single rhetorical question: How do you find people in your organization when you do not know their names? The value of social computing is tangled with the answer—the people and metadata about them and the things they do, their interests, their expertise, and anything else that can connect two people together who otherwise might not even know to look for each other.
Similarly, you can link that metadata with metadata associated with pieces of content, again helping people discover relevant information they might not even know to look for. Connecting people to relevant knowledge based on their individual profiles, this is the essence of social computing.
![]() Note To learn more about research into the relationship between information technology and society, please see the Intel Science and Technology Center for Social Computing at http://socialcomputing.uci.edu.
Note To learn more about research into the relationship between information technology and society, please see the Intel Science and Technology Center for Social Computing at http://socialcomputing.uci.edu.
As you can see (I hope), there is nothing to be scared of with social computing. If you face a lot of resistance, try to debunk the myths by defining the goals and business value of a social computing initiative. If all else fails, simply adopt new terms, or focus on the individual applications in your social strategy, which should include the following:
- People Search: A rich experience moving beyond simple lookups by name, focusing as well on finding people using other criteria and attributes, such as responsibilities, skills, or expertise.
- People Profiles: The source data powering a rich people search—some data fields imported from a human resources system, other data fields stored locally and editable by the user him or herself.
- Communication Options: Features to engage users with each other to share knowledge and ideas, such as comment fields, blog posts, wiki pages, forums, and microblogs—all content sources that help feed a rich people search.
- Tagging and Content Classification: Pointers to content based on labels and organization indexes using language that users are familiar with, without applying strict classification processes and formalized taxonomies.
Social computing is not bad and it does not mean your network will be flooded with useless posts. It provides a means to connect knowledge and expertise in your organization. You do, however, have to expose aspects of that expertise to provide a hook for the link. This hook can be a person’s profile information or it might be how he or she tags content or his or her site membership. There are several ways to expose one’s knowledge for others to discover. Similarly, there are several ways to capture their expertise in an archival format for other users to discover.
CAPTURING EXPERTISE
Connecting existing employees to senior employees helps to facilitate knowledge sharing and discovery of expertise among the current team, but as I mentioned earlier, many organizations have a worry about the day when these experienced employees retire and leave a knowledge gap, an expertise void in the organization.
When the knowledge is in someone’s head, then the person’s retirement means that knowledge also retires and leaves the organization. The solution is to capture that knowledge before people retire. One option is to have them document everything they know and archive that on a network share or team site; that option is usually not overly practical and may feel like a chore for the retirees.
My preference is to have them make a series of videos and place these in an asset library for future generations of workers to reference. These can include a range of types of videos, everything from a podcast discussing a topic to an interviewer asking leading questions. You can even use video to shadow them on their jobs as they walk through and explain the different things they do and why (this is especially valuable content for tradespeople performing certain tasks and discussing the safety aspects of their steps).
Overview of Social Computing Capabilities
Practically every feature in SharePoint is loosely collaborative in nature and related in some way to social computing concepts. Nevertheless, I selected a handful of key social features to study closer in this section. Any features I omit are not necessarily less social in nature; I just wanted to highlight a few key features.
My Sites provide the hub for different social aspects in SharePoint. Most notably, users can manage their profile information and store personal content. These are two key sources of data for the search engine to crawl and return in search results for other users to discover people and their knowledge in the organization.
Within the My Site host, users can view and post to a microblog and activity feed known in SharePoint 2013 as a newsfeed. This allows for interactions with other users, alerting a crowd to things such as projects a user is working on, documents a user found interesting, and even notices alerting a user’s title change, among others. This can help a community of users to stay connected and informed of each other’s activity.
![]() Note Microsoft acquired Yammer, which provides a private social network for enterprise microblogging with some similarities to the newsfeed. You can find out more about this service at https://about.yammer.com.
Note Microsoft acquired Yammer, which provides a private social network for enterprise microblogging with some similarities to the newsfeed. You can find out more about this service at https://about.yammer.com.
People can populate their newsfeeds by following the activities of other people, sites, documents, or tags. When someone posts a note to his or her newsfeed or takes an action on one of the related items, an activity will appear in the newsfeed aggregation.
Those aspects that feed into the newsfeed are also social—the activities on sites or documents, for example, that a user follows. Activities can notify when an item changes, making it easy and convenient for a user to stay updated on any changes or developments of items he or she is interested in following.
Activity updates in a newsfeed are an unobtrusive way to notify users of changes without overloading their inbox; however, at times a piece of content may be of particular interest and of such importance that a user needs a more prominent notification so that he or she does not have to risk missing a change if his or her newsfeed becomes busy with other activities streaming in. In these cases, the user can subscribe to a SharePoint alert to notify him or her of any changes meeting specific criteria.
SharePoint sends alerts by e-mail to the user, and the user can choose whether to receive an immediate alert after each change, or he or she can opt for a daily or weekly summary on a specified schedule. Alerts and activities are such a simple, yet powerful, tool to help users stay informed of changes to content they are interested in.
Other types of activities posted to the newsfeed are particularly social in nature: social tagging and rating content. Social tagging involves a user tagging a piece of content with a term—a word or string of words describing the content in plain English (or whatever language and locale is in use). Users will see these activities in their newsfeeds when they follow either the content being tagged, the user doing the tagging, or the tag itself. Similar to social tagging, users apply ratings to a piece of content as a social means contributing to the content’s relevance for other users. Ratings can take a numerical value or a binary selection indicating that the content was liked or it was not.
Users take explicit social actions on a piece of content through tagging and rating it. They also take implicit social actions by opening and interacting with the most valuable content to them. When users click links to content, SharePoint tracks their activities and calculates the most popular locations. You can expose these trending popular locations through one of the relevant built-in web parts designed to report on the trending popularity.
SharePoint enables users to be social directly with other users in a variety of ways. One is (again) via the newsfeed where they can mention and reply to each other’s posts and activities. Another option is through discussion boards or forums. SharePoint 2013 includes a site template for Community Sites, which is essentially a forum with threaded discussions where users can ask and answer questions, or simply discuss ideas with each other. Any site can also add a Discussion Board app to include similar functionality for a specific team or project.
![]() Note On my blog post at http://stevegoodyear.wordpress.com/2012/08/02, I discuss the Community Site template and provide an example of how you could use this as part of an employee onboarding community.
Note On my blog post at http://stevegoodyear.wordpress.com/2012/08/02, I discuss the Community Site template and provide an example of how you could use this as part of an employee onboarding community.
Other social site templates include the wiki and blog sites. A wiki provides a flexible way for multiple users to collaborate and post web pages with content to the wiki. A blog provides functionality for users to post articles of content to an audience. The key difference between the two is how they are organized: blogs are typically organized in a sequence from newest to oldest, whereas wikis typically adopt some other organizing method, such as grouping content by topic.
SharePoint also includes the ability to personalize and target content on a page. You can plan for and design tailored experiences for different types of users, depending on what holds the most relevancy for them. You can use these features to design additional social experiences, such as allowing users to opt in and out of communities based on their profile settings.
Social computing can help bring users together to discover information through each other, ultimately facilitating knowledge transfer and expertise sharing. However, simply enabling features will not provide you with an adequate social solution; instead, you need to analyze your requirements and plan for the social experience you wish to provide to your users.
![]() Note For more information on the features in SharePoint 2013, including the social computing features, please see the TechNet article at http://technet.microsoft.com/fp142374.
Note For more information on the features in SharePoint 2013, including the social computing features, please see the TechNet article at http://technet.microsoft.com/fp142374.
Analyzing Your Social Computing Requirements
I have often heard about concerns for the number of workers an organization anticipates will retire in the coming years—an exodus of an older, more experienced generation. This concern has come up with my consulting clients in a range of industries, from trades such as line workers in utility corporations to government workers in the public sector, and even to senior employees in corporations.
People retire and have been retiring all along. This is not anything new, but there appears to be a greater proportion of people set to retire (at least in my region)—people with experience and expertise contained in their heads who will take that knowledge with them when they leave. My mission is often to offer advice on a way to capture as much of that knowledge before they retire and leave, making it available to newer workers and, ideally, preserving it for future workers.
Capturing the expertise of your knowledge workers may be the driver for your social computing initiative and this could make up your primary requirements. Closely associated to capturing expertise, your other requirements may relate to connecting people to knowledge by discovering relevant expertise in the organization. These are often the main reasons my clients become interested in a social computing initiative, at least initially. However, these are still high-level and vague requirements, but they can give you a place to start and they can identify the overarching goal for a social computing solution.
For me, the requirements tend to revolve around the desired user experience I want to provide and the primary objectives I want the overall solution to achieve. I like to write use cases to capture the details of a scenario and its sequencing. This helps me visualize how users interact with the system and the processes they take to produce or discover knowledge.
![]() Note For more information on use cases, I recommend Alistair Cockburn’s book, Writing Effective Use Cases (Addison-Wesley, 2001). You can find a preview of this book at http://alistair.cockburn.us/get/2465.
Note For more information on use cases, I recommend Alistair Cockburn’s book, Writing Effective Use Cases (Addison-Wesley, 2001). You can find a preview of this book at http://alistair.cockburn.us/get/2465.
When I work on identifying the primary objectives, I ask myself questions about the goals of a social computing solution, such as the following list. These can help to clarify the underlying driver and objectives the solution ought to achieve.
- Do I want to capture expertise?
- Do I want to identify relevant and popular content?
- Do I want to enable people to discover one another?
- Do I want to facilitate interactions and collaboration among people?
One of the first places you can start is facilitating ways people can discover and connect with each other. The primary tool you can build around is an effective people search, a search engine where people can search based on another’s experience and expertise. A tuned and functional people search connects people with knowledge in an organization, establishing a fundamental centerpiece, one I usually start with to build any social computing solution around.
Deploying a People Search
You might already have some form of a people search, likely a directory to lookup someone by name. What if you spell the name wrong or use the wrong form—is it Steve or Steven or Stephen? (Or Zach or Zack or Zachary, as my technical reviewer pointed out.) This is a model I equate to corporate white pages, and it works as long as you know who you are looking for and how his or her name is spelled in the directory.
The kind of rich people search experience I want to focus on here moves beyond a white-pages style, lending itself more as a corporate yellow pages using phonetic search results. Figure 10-1 shows a typical people search for steve, which happens to match the name I used for my profile.

Figure 10-1. People search
In the results, you can see a preview pop up on the right because I hovered the mouse over this item. This shows recent documents I authored, as well as a link to my profile. Within the search results, notice how SharePoint is aware that I have searched for myself, and as a result it has included some statistics along with my search result to show the number of times that searches have led to my profile in the last month and in the last week. (Although in this example, my profile is not yet a popular destination for people searching on my demo server because both show zero searches that led to my profile.)
The nuances with the different spellings of a name highlights a practical example of the richness in a SharePoint people search. Figure 10-2 shows the same search result, even though in this example I searched for stephen—an alternate spelling of steve.
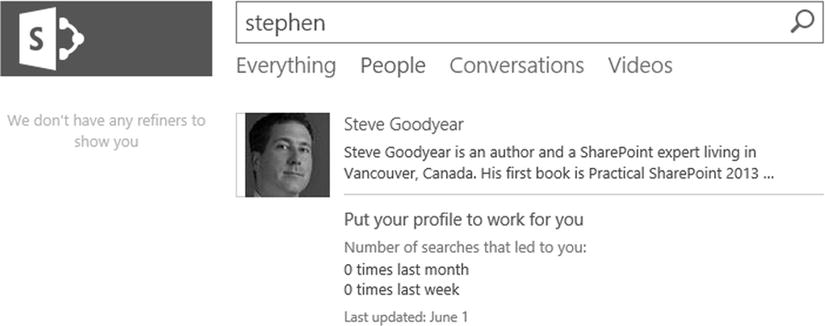
Figure 10-2. People search with an alternate spelling
I could have searched using any other profile property, which is handy when you need to find someone and you do not know his or her name. When users discover someone in the search results, they can click through to the person’s profile page to learn more details, such as profile pictures, interests, skills, and other organizational information. Figure 10-3 provides an example of a profile page.

Figure 10-3. Example of a profile page
Employee onboarding is one example I use to describe the potential value of a rich people search such as this. You might remember that when you joined your current organization or when you took a new class, there were several people to meet—and that meant several names to learn. One way you can ease the stress and challenge with learning everyone’s name is to point your new hires toward the people search and show them how they can search for different colleagues to learn names. For example, you can show a new hire to search by his or her new department or team, and he or she can use the search results to learn everyone’s name.
SharePoint indexes profiles and My Site content using two different protocols. When you configure the search content source for people, use the regular http:// protocol for the My Site content’s start address and the sps3:// protocol for people profiles. If you are using SSL, you can use https:// and sps3s:// for the URL as well. Figure 10-4 provides an example of a content source using these two protocols as start addresses to index people information for the enterprise search.
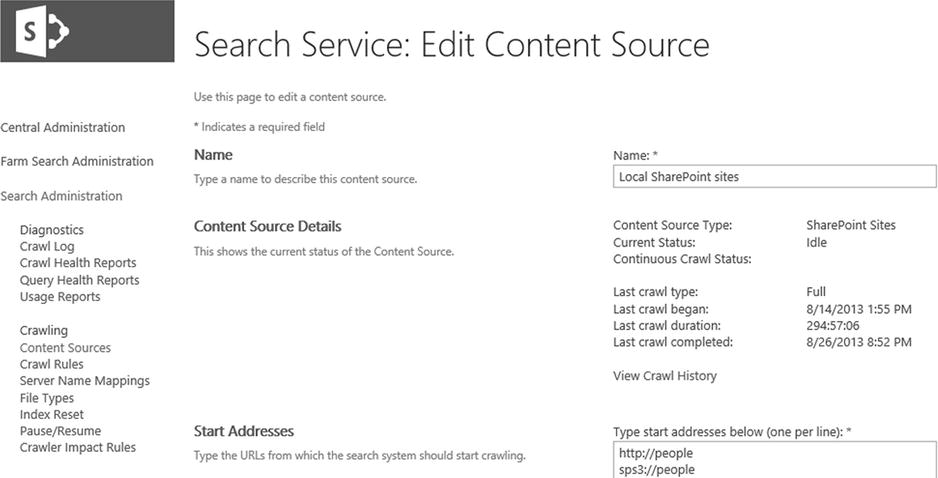
Figure 10-4. Edit content source
![]() Note Please see Chapter 9, where I discussed search and configuring content sources in more detail.
Note Please see Chapter 9, where I discussed search and configuring content sources in more detail.
For a people search to be effective, you need to configure user profiles and other My Site features. If nothing else, managing these features defines the profile fields that users can use for advanced searches.
There are several My Site configuration options available to you to manage a variety of settings. I want to highlight a few key settings that are the most important for you to be aware of, starting with how to set the permissions to grant permissions for users to manage the User Profile Service.
Figure 10-5 shows the permissions you can grant or limit on the User Profile Service. You can set these permissions by navigating to the Manage Service Applications page in SharePoint Central Administration, selecting the User Profile Service, and clicking the Administrators button in the ribbon.

Figure 10-5. User Profile Service permission settings
You manage most settings related to My Sites and the User Profile Service on the Manage Profile Service page, accessed by selecting the User Profile Service and clicking the Manage button in the ribbon on the Manage Service Applications page. Click the Setup My Sites link in the My Site Settings section on the Manage Profile Service page to navigate to the My Site Settings page shown in Figure 10-6.
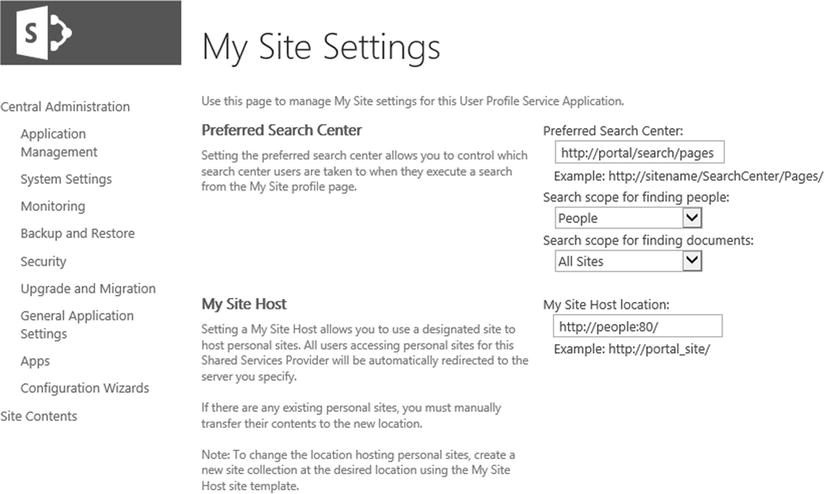
Figure 10-6. The My Site Settings page
On the My Site Settings page, you can configure the following options:
- Preferred Search Center: Allows you to control which search center to direct users to when they submit a search query from the My Site profile pages.
- My Site Host: Specifies the site to host personal sites and the My Site host to redirect users to the selected User Profile Service.
- Personal Site Location: Specifies the managed path location to create personal sites under, which should be an existing wildcard managed path configured for the web application hosting My Sites.
- Site Naming Format: Specifies the format to use to name new personal sites and how to resolve naming conflicts.
- Language Options: Selects whether users are permitted to choose the language of their personal sites when they first access it and queue its provisioning.
- Read Permission Level: Specifies the accounts or groups to grant the Read permission level at the time of site provisioning, granting read access for shared areas of a user’s personal site.
- Security Trimming Options: Selects the security trimming options for links in activity feeds, ratings, social tags, and notes, configuring whether feed items should be hidden from users who lack permissions to see them, which is the default settings.
- Newsfeed: Selects whether you want to enable activities on My Site newsfeeds.
- E-Mail Notifications: Specifies the e-mail address to use for sending certain e-mail notifications, such as replies to conversations in which a user has participated.
- My Site Cleanup: Specifies whether a user’s manager or a secondary My Site Owner should be granted access when a user’s My Site is flagged for deletion after the user’s profile has been deleted.
- Privacy Settings: Selects whether to make all users’ My Sites public by default to allow other users to see a list of a user’s followers and other activities, such as social tagging, content rating, birthdays, job title changes, and new blog posts.
Users might find that their newsfeed contains a lot of activities as they follow more and more things. There may be some activities they would prefer to exclude from their newsfeed to prevent other activity items from being lost in the noise. You can configure some options globally while managing the User Profile Service, but in many cases, it is probably easier to have the users set their own preferences. When a user edits their profile, they can click the Newsfeed Settings option to set their preferences. Figure 10-7 shows the options for the newsfeed settings.

Figure 10-7. The Newsfeed setting options
After you create and configure a User Profile Service with its My Site settings, you are ready to populate it with profiles and properties. You can populate profile data by configuring the profile synchronization connections.
Managing Profile Properties and Synchronization
A user profile includes a place to store profile pictures. If you use Active Directory and have Exchange and Lync deployed for your users, you can configure SharePoint to share this picture across all three applications, effectively making a user’s My Site in SharePoint the form for managing their enterprise picture. To achieve this, you need to configure the Picture profile property to export its value back to Active Directory. In addition, you can map the SIP Address and Work E-mail profile properties to their respective Active Directory fields.
To configure the profile properties and map them with their respective Active Directory field, follow these steps:
- Open SharePoint Central Administration and click the Manage Service Applications link in the Application Management section.
- Select the User Profile Service and click the Manage button in the ribbon to navigate to the Manage Profile Service page.
- Click the Manage Profile Properties in the People section.
- On the Manage Profile Properties page, edit the Mapped Attributes for each of these properties to verify their synchronization mapping settings:
- Picture: The My Site profile picture’s thumbnail image to share with Exchange and Lync. The export direction populates this property in Active Directory.
- Direction: Export
- Attribute: thumbnailPhoto
- SIP Address: The SIP Address property maps the profile value to enable the presence indicator at different locations in SharePoint sites. The import direction pulls the value from the identity source.
- Direction: Import
- Attribute: msRTCSIP-PrimaryUserAddress
- Work E-mail: The work e-mail maps the default e-mail display field in the user profile with the default e-mail field’s imported value from an identity source system such as Active Directory.
- Direction: Import
- Attribute: mail
With the profile fields properly mapped, you are ready to configure the profile synchronization settings and begin importing profile values from the identity management system. The following steps walk you through how to configure the profile synchronization settings.
- Return to the Manage Profile Service administration page.
- Click the Configure Synchronization Connections link under the Synchronization category.
- On the Synchronization Connections page, click the Create New Connection button to navigate to the Add New Synchronization Connection page shown in Figure 10-8.
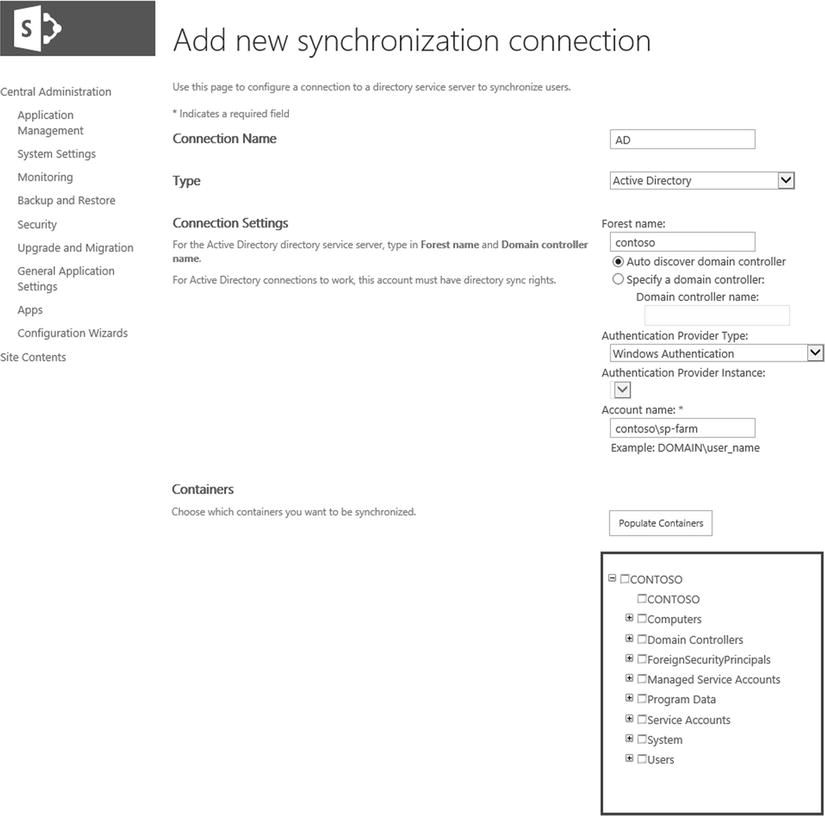
Figure 10-8. The Add New Synchronization Connection page
- Enter a Connection Name and select a Connection Type from the drop-down box. You can select from the following Connection Types:
• Active Directory
• Active Directory Logon Data
• Active Directory Resource
• Business Data Connectivity
- Enter the authentication information and the remaining connection information. Click the OK button at the bottom of the page.
- Return to the Manage Profile Service administration page and click the Start Profile Synchronization link under the Synchronization category.
- On the Start Profile Synchronization page, select between an incremental and a full synchronization.
- Click the OK button to begin importing and synchronizing profiles.
In addition to configuring the synchronization connection, you can also set synchronization options. To set these options, follow these steps:
- Click the Configure Synchronization Settings link in the Synchronization section on the Manage Profile Service page.
- Select whether to include users and groups or just users for the Synchronization Entities.
- Select whether to include BCS connections for synchronization.
- Select the Synchronization Option for the connection from the following options:
- Select Use SharePoint Profile Synchronization for the full-featured SharePoint profile synchronization.
- Select Use SharePoint Active Directory Import for the lightweight import option.
- Select Enable Identity Manager to use an external identity manager for the profile synchronization.
You should schedule regular profile synchronizations to capture changes and keep your profile data fresh. This will help ensure a fresh and relevant people search. The frequency of your synchronization schedule depends on how often data changes in the source system. Typically, I set the synchronization schedule as nightly. You can configure the schedule by clicking the Configure Synchronization Timer Job in the Synchronization section on the Manage Profile Service page.
PREPOPULATING PROFILE PICTURES
Often my clients will use a user’s picture for his or her security access badge, and usually they store these pictures on a network share somewhere. These pictures can be a nice place to start for user profiles, and you can programmatically prepopulate a user’s picture in his or her profile using his or her badge picture. This helps give your social computing launch more of a wow factor since users will see profile pictures right from the start.
You can use PowerShell or you can create a .NET utility to import the pictures. If the pictures are already online and available, you only need to update the Picture URL property value with the URL of the existing picture. The following C# code illustrates how to set the profile picture URL for a specific user.
string accountName = @"contososteve";
UserProfile userProfile = userProfileManager.GetUserProfile(accountName));
userProfile["PictureUrl"].Value = pictureUrl;
userProfile.Commit();
If you want to mimic the SharePoint functionality for situations when a regular user uploads his or her picture, you can also upload three thumbnails to the Profile Pictures folder in the User Photos library on the host My Site. Once you upload the thumbnails, you can set the Picture URL property value to the uploaded thumbnail. The following code illustrates the folder to upload the profile picture thumbnails to.
SPFolder folder = = web.Folders["User Photos"].SubFolders["Profile Pictures"];
Prepopulating default profile pictures, along with any other profile properties you wish, can help to get users started and it helps you provide a rich people search as soon as you launch, rather than waiting for users to upload their profile pictures and edit their profiles.
Promoted sites in SharePoint 2013 provide a way for you to list important sites for users to discover on the Sites page. This offers an alternative to linking everything from a global navigation on an intranet or maintaining a global site directory. Instead, users can discover promoted sites prominently displayed on the Sites page, along with a list of sites they are following and any recommended sites.
To promote a site, follow these steps:
- Navigate to the Manage Profile Service page and click the Manage Promoted Sites link in the My Site Settings section.
- On the Promoted Sites page, click New Link to navigate to the Promote A Site page, as shown in Figure 10-9.
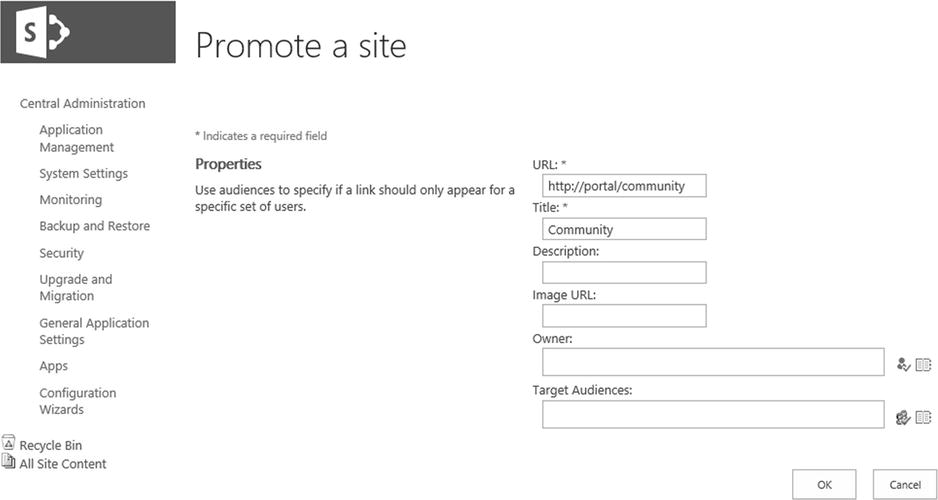
Figure 10-9. The Promote A Site page
- Enter the URL, Title, and, optionally, a description and an image URL for the promoted site tile background. You can also specify an owner and target the promoted site to specific audiences. Click OK.
You can test the promoted site by navigating to the Sites page. Figure 10-10 shows an example of the Community promoted site I created.
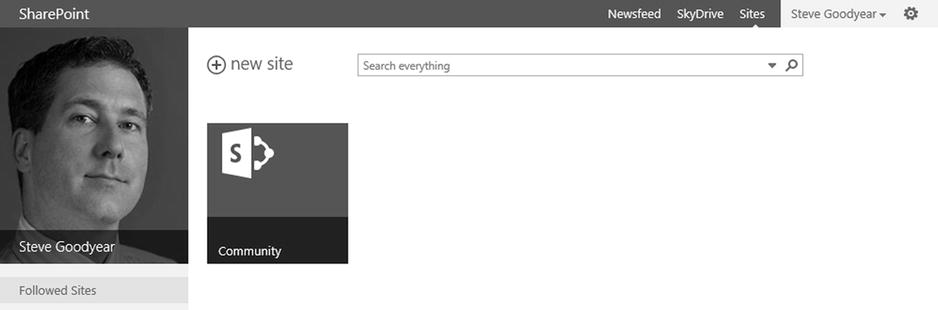
Figure 10-10. Example of a promoted site
One way to organize your promoted sites is to only show them to people who would find the site relevant. In SharePoint, you can target promoted sites, links, web parts, and other user interface elements to specific users through a feature known as audience targeting.
Configuring Audience Targeting
Audiences are groups of related users you can identify through common memberships or property values. You define the membership of an audience by specifying the rule criteria to use for evaluating each user. For performance reasons, SharePoint compiles the membership of an audience on a recurring schedule rather than conducting a real-time dynamic membership evaluation for each request.
To create a new audience, follow these steps:
- Navigate to the Manage Profile Service page and click Manage Audiences.
- On the View Audiences page, click New Audience to navigate to the Create Audience page.
- Specify an audience Name.
- Specify if the audience includes users based on whether they match all or any of the rules you will define for the audience. Click OK.
- On the Add Audience Rule page, you can select between User and Property for the rule Operand.
• If you select User, you can set the rule criteria for users who report to a specified manager or for users who belong to a specified membership group.
• If you select Property, you can set the rule criteria for users who share a specified property value. For example, in Figure 10-11, I selected the Skills property and set the value as SharePoint to create an audience of SharePoint Experts.
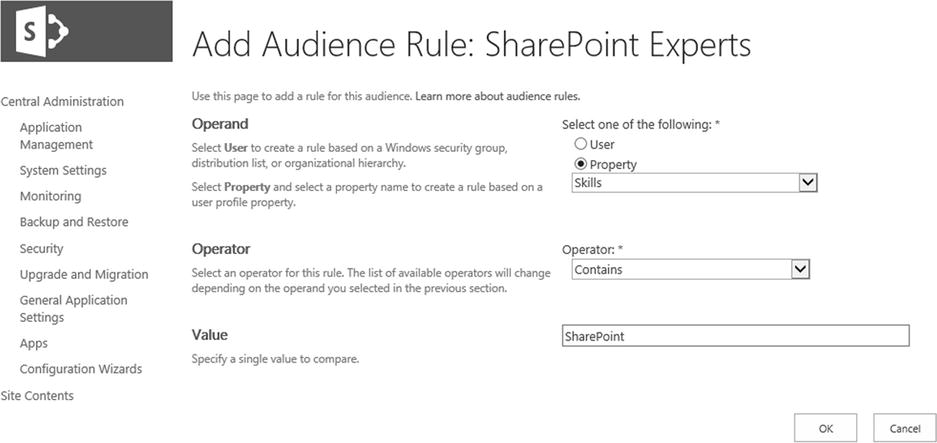
Figure 10-11. The Add Audience Rule page
- Click OK to create the rule, and then navigate to the View Audience Properties page, as shown in Figure 10-12.
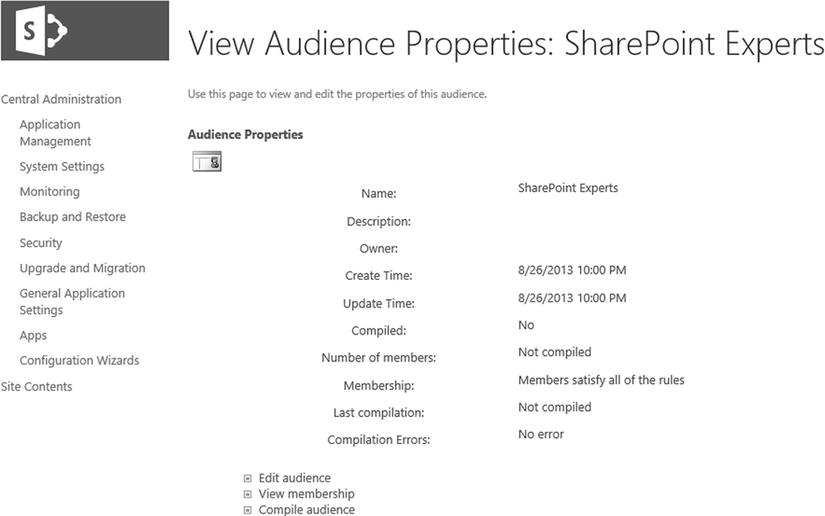
Figure 10-12. The View Audience Properties page
- Click Compile Audience to compile the audience and populate its membership of users who meet the rule criteria you specified.
![]() Note Remember that SharePoint compiles the audience’s membership on a schedule, so if a user changes a profile property value that matches an audience rule, he or she will not actually be included in the audience until the next scheduled audience member compilation.
Note Remember that SharePoint compiles the audience’s membership on a schedule, so if a user changes a profile property value that matches an audience rule, he or she will not actually be included in the audience until the next scheduled audience member compilation.
With your new audience created and compiled, you can use it to target user interface elements anywhere SharePoint provides the option to specify an audience for targeting, such as with web parts and links. This can help you design a page with the highest content relevancy for users by omitting any irrelevant items.
![]() Important Audiences do not provide, nor do they enforce, security; they selectively render an element based on targeting rules, but this is not the same as security trimming because the underlying content is still accessible to the users.
Important Audiences do not provide, nor do they enforce, security; they selectively render an element based on targeting rules, but this is not the same as security trimming because the underlying content is still accessible to the users.
Blogs are a handy way to publish articles and communicate with an audience. You can quickly create your personal blog by navigating to the My Site personal profile and clicking the Blog link. The first time you click this link, SharePoint will provision a new blog site for you, similar to the one shown in Figure 10-13.
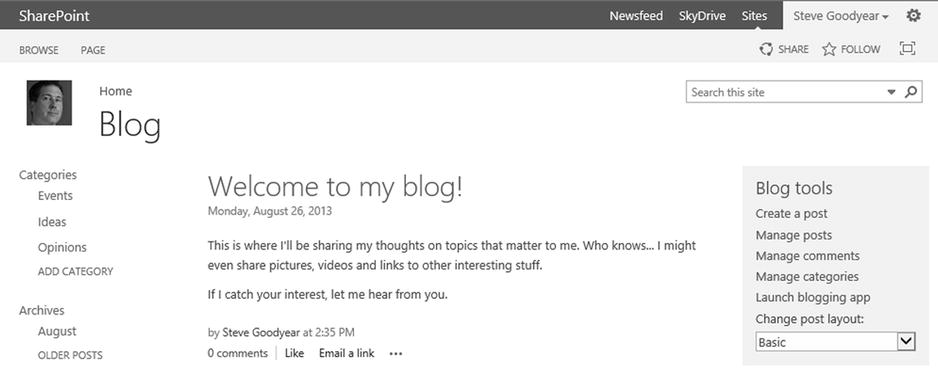
Figure 10-13. The default blog welcome page
Notice on the right, the Blog Tools web part lists several administrative links in a convenient location. The most useful for any blog is the Create A Post link, which navigates to the New Blog Post page shown in Figure 10-14, where you can enter the content and publish a new blog post.
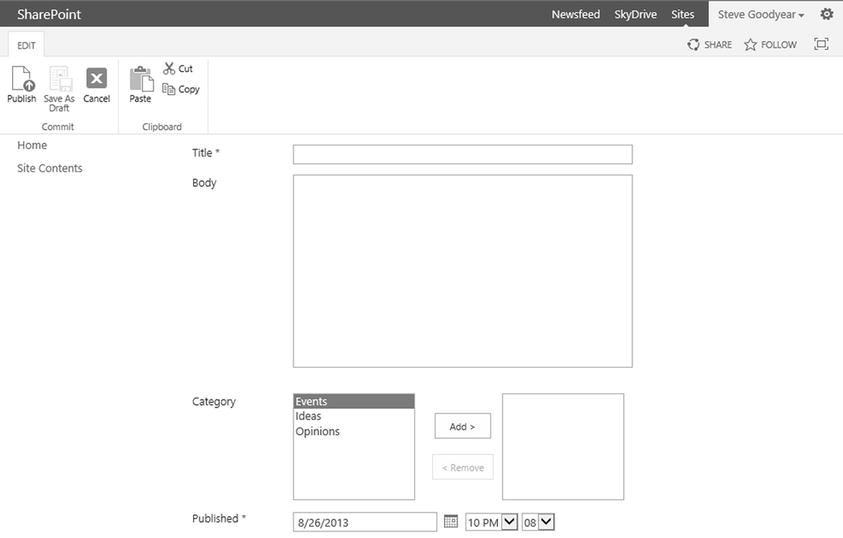
Figure 10-14. The New Blog Post page
Wrapping Up
People can discover knowledge and expertise in an organization through other people: colleagues, peers in other departments, subject-matter experts, and the like. Finding these people and discovering related information might be easier when you already know the people or what you are looking for, but without a social computing strategy, much of what you do not know to look for can be missed. Social computing does not equate to social networking; instead, I noted how it is about people discovering and accessing information through other people. I described some key social features in SharePoint 2013 to aid in this sort of content discovery, including people search, people profiles, social tagging, and blogs.
Social computing helps regular users discover relevant information in the context of their job functions. Between search and the social aspects that SharePoint provides, knowledge workers have the tools they need to find and research information. The organization’s compliance officers can also use these tools to locate content relating to any compliance or legal requirement. They can use either the search tools for ad hoc discovery or the more sophisticated tools to manage eDiscovery—tools that leverage the search index with an emphasis on compliance. In the next chapter, I discuss eDiscovery and discovery case management in more depth, stepping through the product features and providing guidance on how to plan for and manage discovery cases.