Seen from outside, web applications are black boxes that convert requests into responses: URLs go in, and HTML comes out. Routing, controllers, and actions are important parts of ASP.NET MVC's internal machinery, but it would all be for nothing if you didn't produce some HTML. In MVC architecture, views are responsible for constructing that completed output.
You've seen views at work in many examples already, so you know roughly what they do. It's now time to focus and clarify that knowledge. By reading this chapter, you'll learn about
How
.aspxview pages, inline code blocks, and automatic HTML-encoding work behind the scenesThe framework's wide range of built-in HTML helper methods
How to create reusable view segments called partials, and various ways to pass data to them
Most software developers understand that UI code is best kept well away from the rest of an application's logic. Otherwise, presentation logic and business logic tend to become intertwined, and then keeping track of either part becomes impossible. The slightest modification can easily spark an explosion of widely dispersed bugs, and productivity evaporates. MVC architecture attacks this persistent problem by forcing views to be kept separate, and by forcing them to be simple. For MVC web applications, views are only responsible for taking a controller's output and using simple presentation logic to render it as finished HTML.
However, the line between presentation logic and business logic is still subjective. If you want to create a table in which alternate rows have a gray background, that's probably presentation logic. But what if you want to highlight figures above a certain amount and hide rows corresponding to national holidays? You could argue either way—it may be a business rule or it may be merely presentational—but you will have to choose. With experience, you'll decide what level of complexity you find acceptable in view logic and whether or not a certain piece of logic must be in a controller or a separate component so that it can be unit tested.
View logic is less unit testable than controller logic because views output text rather than structured objects (even XHTML isn't fun to parse—there's more to it than tags). For this reason, views aren't usually unit tested at all; logic that needs to be unit tested should normally go into a controller or domain class. But if you're also doing UI automation testing using a tool such as WatiN, as described in Chapter 3 (also called integration testing), then if you wish, you can use these to specify and verify how views display their data and how their JavaScript code should behave.
The MVC Framework comes with a built-in view engine called the Web Forms view engine, implemented as a class called WebFormViewEngine. It's familiar to anyone who's worked with ASP.NET in the past, because it's built on the existing Web Forms stack, which includes server controls, master pages, and the Visual Studio designer. It goes a step further, too, providing some additional ways to generate HTML that fit more cleanly with ASP.NET MVC's philosophy of giving you absolute control over your markup.
In the Web Forms view engine, views—also called view pages—are simple HTML templates. They work primarily with just one particular piece of data that they're given by the controller—the ViewData dictionary (which may also contain a strongly typed Model object)—so they can't do very much more than write out literal HTML mixed with information extracted from ViewData or Model. They certainly don't talk to the application's domain model to fetch or manipulate other data, nor do they cause any other side effects; they're just simple, clean functions for transforming a ViewData structure into an HTML page.
Behind the scenes, the technology underpinning these MVC view pages is actually ASP.NET Web Forms server pages. That's why you can create MVC view pages using the same Visual Studio designer facilities that you'd use in a Web Forms project. But unlike Web Forms server pages, ASP.NET MVC view pages usually have no code-behind class files, because they are concerned only with presentation logic, which is usually best expressed via simple inline code embedded directly in the ASPX markup.
As with every part of the MVC Framework, you're free to use the Web Forms view engine as is, use it with your own customizations, or replace it entirely with a different view engine. You can create your own view engine by implementing the IViewEngine and IView interfaces (you'll see an example of that in Chapter 13). There are also several open source ASP.NET MVC view engines you might choose to use—some examples are discussed in Chapter 13, too.
However, most ASP.NET MVC applications are built with the standard Web Forms view engine, partly because it's the default, and partly because it works pretty well. There's a lot to learn about the Web Forms view engine, so except where specified, this chapter is entirely about that default view engine.
In earlier examples, you saw that you can create a new view by right-clicking inside an action method and choosing Add View. Visual Studio will place the new view wherever that controller's views should go. The convention is that views for ProductsController should be kept in /Views/Product/, or /Areas/areaName/Views/Product/ if the controller is in an area.
As a manual alternative, you can create a new view by right-clicking a folder in Solution Explorer, choosing Add
It's entirely possible to have a view page that consists of nothing but fixed, literal HTML (plus a <%@ Page %> declaration):
<%@ Page Inherits="System.Web.Mvc.ViewPage" %>
This is a <i>very</i> simple view.
You'll learn about the <%@ Page %> declaration shortly. Apart from that, the preceding view is just plain old HTML. And of course you can guess what it will render to the browser. This view doesn't produce a well-formed HTML document—it doesn't have <html> or <body> tags—but the Web Forms view engine doesn't know or care. It's happy to render any string.
You won't get very far by creating views that are nothing but static HTML. You're in the business of writing web applications, so you'll need to put in some code to make your views dynamic. The MVC Framework offers a range of mechanisms for adding dynamic content to views, ranging from the quick and simple to the broad and powerful—it's up to you to choose an appropriate technique each time you want to add dynamic content.
Table 11-1 shows an overview of the techniques at your disposal.
Table 11-1. Techniques for Adding Dynamic Output to Views
Technique | When to Use It |
|---|---|
Inline code | Use this for small, self-contained pieces of view logic, such as |
HTML helpers | Use these to generate single HTML tags, or small collections of HTML tags, based on data taken from |
Server controls | Use these if you need to make use of ASP.NET's built-in Web Forms controls, or share compatible controls from Web Forms projects. |
Partial views | Use these when you want to share segments of view markup across multiple views. These are lightweight, reusable controls; they may contain view logic (i.e., inline code, HTML helpers, and references to other partial views), but no business logic. They're like HTML helpers, except you create them with ASPX pages instead of just C# code. |
Child actions | Use these to create reusable UI controls or widgets that may include application logic as well as presentation logic. When you invoke a child action, it undertakes a separate MVC process of its own, rendering its own view and letting you inject the result into the response stream. |
You'll learn about the first four methods as you progress through this chapter. Child actions are covered in Chapter 13, and there are more details about reusing Web Forms server controls in MVC applications in Chapter 18.
The first and simplest way to render dynamic output from an view page is by using inline code—that is, code blocks introduced using the bracket-percent (<% ... %>) syntax. Just like the equivalent syntaxes in PHP, Rails, JSP, classic ASP, and many other web application platforms, it's a syntax for evaluating results and embedding simple logic into what otherwise looks like an HTML file.
For instance, you might have a view page called ShowPerson.aspx, intended to render objects of some type called Person, defined as follows:
public class Person
{
    public int PersonID { get; set; }
    public string Name { get; set; }
    public int Age { get; set; }
    public ICollection<Person> Children { get; set; }
}
As a matter of convenience, you might choose to make ShowPerson.aspx into a strongly typed view (strongly typed views will be covered in more detail later in the chapter) by setting "View data class" to Person when initially creating the view.
Now, ShowPerson.aspx can render its Person-typed Model property using inline code:
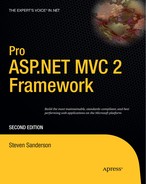
<%@ Page Language="C#" Inherits="System.Web.Mvc.ViewPageYourNamespace.Person>"%> <!DOCTYPE html PUBLIC "-//W3C//DTD XHTML 1.0 Transitional//EN" "http://www.w3.org/TR/xhtml1/DTD/xhtml1-transitional.dtd"> <html xmlns="http://www.w3.org/1999/xhtml" > <head> <title><%: Model.Name %><title> </head> <body> <h1>Information about<%: Model.Name %><h1> <div><%: Model.Name %>is<%: Model.Age %>years old. </div> <h3>Children:</h3> <ul><% foreach(var child in Model.Children) { %><li> <b><%: child.Name %></b>, age<%: child.Age %></li><% } %><</ul> </body> </html>
Note
As a matter of best practice, I've written the preceding view code using ASP.NET 4's <%: value %> syntax, which avoids cross-site scripting (XSS) vulnerabilities by automatically HTML-encoding its output. If you're using .NET 3.5 (e.g., with Visual Studio 2008), you won't be able to use that syntax; you should write <%= Html.Encode(value) %> instead. You'll learn more about these syntaxes—how they work internally and which one is best to use—in a few pages.
For some appropriate Person object, this will render the screen shown in Figure 11-1.
If you've been working with ASP.NET Web Forms for the past few years, you may look at the inline code in this example—and perhaps all the inline code you've seen in the book up until this point—and feel an itchy, uncomfortable sensation. You might be experiencing nausea, panic, or even rage. That's OK—we'll go through the difficult questions, and you'll come out of it with a glorious new sense of freedom.
Inline code is generally frowned upon in ASP.NET Web Forms because Web Forms pages are supposed to represent a hierarchy of server controls, not a page of HTML. Web Forms is all about creating the illusion of Windows Forms-style GUI development, and if you use inline code, you shatter the illusion and spoil the game for everyone.
It's a different story with the MVC Framework. It treats web application development as a specialism in its own right—it doesn't try to simulate the experience of building a desktop application—so it doesn't need to keep up any such pretenses. HTML is text, and it's really easy to generate text with templates. Many web programming platforms have come and gone over the years, but the idea of generating HTML using templates keeps coming back in different forms. It's a natural fit for HTML. It works well.
I realize you might be asking yourself, "But what about separation of concerns? Shouldn't I separate logic from presentation?" Absolutely! ASP.NET Web Forms and ASP.NET MVC both try to help the developer separate application logic from presentation concerns. The difference between the two platforms is their opinion about where the dividing line should go.
ASP.NET Web Forms separates declarative markup from procedural logic. ASPX code-in-front files contain declarative markup, which is manipulated and driven by procedural logic in code-behind classes. And that's fine—it does separate concerns to some degree. The limitation is that in practice, about half of the code-behind class is concerned with fine-grained manipulation of the UI controls, and the other half works with and manipulates the application's domain model. Presentation concerns and application concerns are thus fused in these code-behind classes.
The MVC Framework exists because of lessons learned from traditional Web Forms and because of the compelling benefits that earlier MVC-based web application platforms have demonstrated in real-world use. It recognizes that presentation always involves some logic, so the most useful division is between application logic and presentation logic. Controllers and domain model classes hold application and domain logic, while views hold presentation logic. As long as that presentation logic is kept very simple, it's clearest and most direct to put it right into the ASPX file.
Developers using ASP.NET MVC and other MVC-based web application platforms have found this to be a strikingly effective way to structure their applications. There's nothing wrong with using a few if and foreach constructs in a view—presentation logic has to go somewhere, after all—just keep it simple and you'll end up with a very tidy application.
Now you've become familiar with inline code. Before moving on to look at the other techniques for adding dynamic content, I'd like to pop open the hood and show you how this really works. First, we'll look at the core mechanics of Web Forms ASPX pages, and how they're compiled and executed; and then I'll move on to give you a precise understanding of how ViewData and Model work.
Each time you create a new view page, Visual Studio gives you an ASPX page (e.g., MyView.aspx or MyPartialView.ascx). It's an HTML template, but it can also contain inline code and server controls. When you deploy a Web Forms or MVC application to your server, you'll usually deploy a set of these ASPX and ASCX files that are as yet uncompiled. Nonetheless, when ASP.NET wants to use each such file at runtime, it uses a special built-in page compiler to transform the file into a genuine .NET class.
ASPX files always start with a <%@ Page %> directive. It specifies, at a minimum, what .NET base class your ASPX page should derive from, and almost always specifies the .NET language used for any inline code blocks—for example:
<%@ Page Language="C#" Inherits="System.Web.Mvc.ViewPage" %>
It's instructive to examine the sort of code that the Web Forms compiler generates from your ASPX files. You can see the code by finding the automatically generated .cs files in c:UsersyourLoginNameAppDataLocalTempTemporary ASP.NET Files (that's the default location on Windows 7, but note that the AppData folder is hidden by default). Alternatively, you can deliberately use bad syntax in the view to cause a compilation error, and then in the resulting "yellow screen of death," click Show Complete Compilation Source.
For example, the following view page:
<%@ Page Language="C#" Inherits="System.Web.Mvc.ViewPage<ArticleData>" %>
<html xmlns="http://www.w3.org/1999/xhtml" >
    <head>
        <title>Hello</title>
    </head>
    <body>
        <h1><%= Model.ArticleTitle %></h1>
        <%= Model.ArticleBody %>
        <h2>See also:</h2>
        <ul>
            <% foreach(string url in Model.RelatedUrls) { %>
                <li><%= url %></li>
            <% } %>
        </ul>
        <asp:Image runat="server" ID="ImageServerControl" />
    </body>
</html>
is compiled to
public class views_home_myinlinecodepage_aspx : ViewPage<ArticleData>
{
    protected Image ImageServerControl;

    protected override void FrameworkInitialize()
    {
        __BuildControlTree();
    }

    private void __BuildControlTree()
    {
        ImageServerControl = new Image() { ID = "ImageServerControl" };
        SetRenderMethodDelegate(new RenderMethod(this.__Render));
    }

    private void __Render(HtmlTextWriter output, Control childrenContainer)
    {
        output.Write("
<html xmlns="http://www.w3.org/1999/xhtml" >

    <head>
     <title>Hello</title>
    </head>
    <body>

    <h1>");
        output.Write(Model.ArticleTitle);
        output.Write("</h1>
        ");
        output.Write(Model.ArticleBody);
        output.Write("
        <h2>See also:</h2>
      <ul>
      ");
        foreach (string url in Model.RelatedUrls)
{
output.Write("
<li>");
output.Write(url);
output.Write("</li>
");
}
output.Write("
</ul>
");
childrenContainer.Controls[0].RenderControl(output);
output.Write("
</body>
</html>
");
}
}Note
ASP.NET's native ASPX compiler doesn't understand C#-style generics syntax as part of the Inherits directive. So, you might wonder how it's possible to create strongly typed views using declarations such as Inherits="System.Web.Mvc.ViewPage<MyModel>". If you look at /Views/Web.config, you'll see a reference to a "page parser filter" called System.Web.Mvc.ViewTypeParserFilter. This is how the ASP.NET MVC team managed to inject some extra magic into the ASPX compilation process to support C#-style generics syntax in the Inherits directive. Don't delete /Views/Web.config; otherwise, you'll lose the ability to create strongly typed views and go crazy trying to figure out why.
I've simplified the decompiled listing, but it's still an accurate representation. The key point to notice is that each fragment of literal HTML—line breaks and all—becomes a call to HtmlTextWriter.Write(), and your inline code is simply transferred into the __Render() method unchanged, so it becomes part of the rendering process. Server controls, like the ImageServerControl in the example, are parsed out and become member variables on the compiled type, with a call to their RenderControl() method inserted at the appropriate point.
You will never normally have to concern yourself with the compiled representation of an ASPX file, but now that you've seen one, you'll have no uncertainty about how inline code and server controls are actually invoked at runtime.
You'll find that you're free to edit an ASPX/ASCX file at any time, because the built-in compiler will notice you've done so, and then will automatically recompile an updated version the next time it's accessed. This gives you the flexibility of an interpreted language with the runtime benefits of a compiled language.
Note
When you use Build
If you have any experience with ASP.NET Web Forms, you'll certainly have seen code-behind classes. The idea is that instead of having pages that inherit directly from System.Web.UI.Page, which is the standard base class for traditional Web Forms pages, you can set up an intermediate base class (itself derived from System.Web.UI.Page) and use it to host additional code that will affect the behavior of the page. This code-behind model was designed for ASP.NET Web Forms, and is central to the way Web Forms works: you use a code-behind class to host event handlers for each of the server control objects defined in the ASPX page. Technically, it's also possible to create an MVC view page with a code-behind class by using Visual Studio to create a Web Form at the desired view location, and then changing its code-behind class to inherit from System.Web.Mvc.ViewPage or System.Web.Mvc.ViewPage <YourModelType>.
However, code-behind classes are almost always unnecessary and undesirable in ASP.NET MVC, because under MVC's separation of responsibilities, views should be kept very simple, and therefore rarely need code-behind event handlers. Code-behind classes are only relevant as a last resort if you must reuse an old Web Forms server control that needs some initialization code in a Page_Load() handler. If you find yourself adding many code-behind handlers to inject logic at various points in the page life cycle, you're really missing the benefits of ASP.NET MVC. If that is necessary for some reason, then you might want to consider building a regular Web Forms application or a deliberate hybrid of Web Forms and MVC, as described in Chapter 18.
No matter what web development technology you use, you must be careful not to emit arbitrary text supplied by untrusted users into your HTML pages, because the user-supplied text might contain malicious scripts. Chapter 15 shows how an attacker could take advantage of this to steal other users' accounts or take actions on their behalf—it's called a cross-site script (XSS) attack.
For example, the previous view contained the following line.
<%= Model.ArticleBody %>
This might be OK if trusted site administrators are the only people able to create articles. But what if an untrusted user could create an article, and they put a malicious script into ArticleBody?
The standard defense against XSS is to HTML-encode any user-supplied text that you display. This means replacing each special character in the text (e.g., <) with its HTML entity equivalent (e.g., <). Browsers understand that these entities should be displayed literally, and won't treat them as special characters that might introduce scripts or unwanted HTML elements. The normal way to do this is by using Html.Encode() as follows:
<%= Html.Encode(Model.ArticleBody) %>
Of course, you don't want to HTML-encode the output from HTML helpers such as Html.ActionLink(), because instead of rendering a working link, it would display uselessly as unrendered HTML in your finished page.
Unfortunately, if you're using ASP.NET MVC on .NET 3.5 (e.g., with Visual Studio 2008), then you must continually remember to use <%= Html.Encode(...) %> when rendering user-supplied text, and <%= ... %> when rendering HTML helpers. Don't forget or make the wrong choice, because an attacker only needs to find one XSS vulnerability!
Clearly, this is an awkward situation. To make our lives a little easier, the core ASP.NET 4 platform contains a smarter HTML encoder. First, it introduces an interface called IHtmlString, defined as follows:
public interface IHtmlString
{
    string ToHtmlString();
}
Now, whenever you call HttpUtility.HtmlEncode(value) (which ASP.NET MVC's Html.Encode() calls internally), the platform inspects whatever value you supply to see whether it implements IHtmlString.
If your value does implement
IHtmlString, thenHttpUtility.HtmlEncode()understands that your value is intended to represent HTML and shouldn't actually be encoded. It will call the value'sToHtmlString()method and return the result without HTML-encoding it.If your value doesn't implement
IHtmlString, thenHttpUtility.HtmlEncode()will revert to its default behavior of HTML-encoding the value.
All of ASP.NET MVC's HTML helper methods (such as Html.ActionLink()) return instances of MvcHtmlString—a type that implements IHtmlString.
The whole point of this is that in .NET 4, you no longer have to choose whether to write <%= Html.Encode(...) %> or <%= ... %>—you can follow the much simpler rule of always calling Html.Encode(). You know that the framework will automatically make the right choice about whether to actually HTML encode the value you supply.
Note
If you're running on .NET 3.5, then HTML helpers such as Html.ActionLink() still return instances of MvcHtmlString, but on .NET 3.5, that type doesn't implement IHtmlString because there is no such interface.
Since in .NET 4 it's always correct to call <%= Html.Encode(value) %>, there's a new shorthand syntax for doing so. You've guessed it: it's <%:value%>.
The idea is that you can completely forget about the older, less intelligent, and downright dangerous <%= ... %> syntax. There's almost never any reason to use it. And the great thing is that it only takes a few seconds to use Visual Studio's Find in Files feature (Ctrl+Shift+F) to search your entire solution for any unwanted uses of <%=, and you can quickly replace them with <%:.
Warning
I mentioned earlier that the <%: ... %> syntax and the smarter HttpUtility.HtmlEncode() behavior are new features in the core ASP.NET 4 platform. Obviously this means you can only use them when developing in Visual Studio 2010. Slightly less obviously—people do forget about this—you can only use them if you're going to deploy to a server that runs .NET 4. Virtually everything else in ASP.NET MVC 2 works on .NET 3.5 SP1 servers.
You can think of an MvcHtmlString as being just the same as a regular string instance, except it also has a special badge—the IHtmlString interface—that means "I'm safe to emit into HTML, so please don't HTML-encode me." All MVC Framework HTML helpers return instances of this type, because the helper needs to include HTML tags in its return value and the helper is responsible for HTML-encoding any user-supplied values that it renders into those tags.
You can easily convert between MvcHtmlString and string.
To turn an
MvcHtmlStringinstance into a regularstringinstance, call itsToString()method or itsToHtmlString()method. They both just return the underlyingstringvalue.To turn a regular
stringinto anMvcHtmlString, callMvcHtmlString.Create(yourValue).
We'll need to use the second technique later in the chapter when creating a custom HTML helper method.
In .NET 4, the core ASP.NET platform's built-in default HTML, URL, and HTTP header encoding algorithms work very nicely and are normally satisfactory. However, in case your application has special requirements, it's possible to configure the platform to use your own custom encoding logic whenever anybody calls HttpUtility.HtmlEncode() or HttpUtility.UrlEncode() or sends an HTTP header. In turn, this affects the behavior of Html.Encode(), Url.Encode(), and the <%: ... %> syntax, which internally all call the encoding methods on HttpUtility.
To do this, first create a class that inherits from HttpEncoder, and override whichever of its encoding methods you want to change—for example:[67]
public class MyEncoder : HttpEncoder
{
    protected override void HtmlEncode(string value, TextWriter output)
    {
// Emits each character as an HTML entity literal (if within ASCII range)
foreach (char c in value)
output.Write("&#{0};", (int)c);
}
// Other possible overrides include UrlEncode() and HtmlAttributeEncode()
}Then enable it by adding or updating an <httpRuntime> in your Web.config file as follows:
<configuration>
  <system.web>
    <httpRuntime encoderType="Namespace.MyEncoder"/>
  </system.web>
</configuration>
Note
When writing a custom encoder, you don't need to account for IHtmlString. The platform recognizes that type as a signal to bypass encoding even if you're using custom encoding logic. Your custom encoder will only be called for values that do need to be encoded.
You know that in ASP.NET MVC, controllers supply data to a view by passing an object called ViewData, which is of type ViewDataDictionary. That type gives you two ways to pass data:
Using dictionary semantics: Each
ViewDataDictionaryis a dictionary that you can populate with arbitrary name/value pairs (e.g., settingViewData["date"] = DateTime.Now). Each pair's name is astring, and each value is anobject.Using a special property called
Model: EachViewDataDictionaryalso has a special property calledModelthat holds an arbitraryobject. For example, you can setViewData.Model = myPerson.[68] In your view, you can use the shortcut of referring to this object simply asModelrather thanViewData.Model(either way, it's the same object).
The value of the first strategy is obvious—you can pass an arbitrary collection of data. The value of the second strategy depends on which type your view page inherits from. ASP.NET MVC gives you two options for your view page base class:
If your view inherits from
ViewPage, you've created a loosely typed view. AViewPagehas aViewDataproperty of typeViewDataDictionary. In this case,ViewData.Modelis of the nonspecific typeobject, which is rarely useful, so a loosely typed view page is most appropriate if you intend to useViewDataexclusively as a dictionary and ignoreModelentirely.If your view inherits from
ViewPage<T>for some custom model classT, you've created a strongly typed view. AViewPage<T>has aViewDataproperty of typeViewDataDictionary<T>. In this case,ViewData.Modelis of typeT, so you can easily extract data from it with the benefit of IntelliSense. This is what Visual Studio gives you when you check the "Create a strongly typed view" check box in the Add View pop-up.As a special case of
ViewPage<T>, .NET 4 makes it possible to inherit views fromViewPage<dynamic>. If you do this—as in fact Visual Studio 2010 does by default if you ask it to create a view without specifying a model type—then you're saying, "The controller will supply aModelobject, but I don't need to tell you what type it is because I want to access its properties and methods dynamically at runtime." The drawback of this option is that you won't get IntelliSense while writing the view, and if you use a refactoring tool to rename aModelproperty later, the view won't be updated automatically.
Your controllers don't know or care about the difference between the two. They always supply a ViewDataDictionary regardless. However, strongly typed views wrap the incoming ViewDataDictionary inside a ViewDataDictionary<T>, giving you strongly typed (or dynamically typed) access to ViewData.Model as you write your ASPX view. Of course, this depends on any incoming ViewData.Model object being castable to type T—if it isn't, there will be an exception at runtime.
In practice, if your view page is primarily about rendering some domain model object, you'll use a ViewPage<T>, where T is the type of that domain model object. If you're rendering a collection of Person objects, you might use a ViewPage<IEnumerable<Person>>. It maximizes convenience for you. You can still add arbitrary dictionary entries at the same time if you also need to send other data, such as status messages.
One of the main uses for inline code is to pull out and display data from ViewData, either by treating it as a dictionary (e.g., <%: ViewData["message"] %>) or as a strongly typed object (e.g., <%: Model.LastUpdateDate.Year %>). What you haven't seen yet is ViewDataDictionary's Eval() method, and how you can use it to scan for a value that might be anywhere in ViewData or Model.
Eval() is a way of searching through the whole ViewData object graph—both its dictionary and Model object elements—using a dot-separated token syntax. For example, you might render <%: ViewData.Eval("details.lastlogin.year") %>. Each token in the dot-separated expression is understood either as the name of a dictionary entry, or case-insensitively as the name of a property. Eval() recursively walks both the underlying dictionary and the Model object, in a particular priority order, to find the first non-null value. The previous example is capable of finding any of the following:
ViewData["details.lastlogin.year"]ViewData["details"].lastlogin.yearViewData["details.lastlogin"].yearViewData["details"]["lastlogin"]["year"]ViewData.Model.Details.LastLogin.YearViewData.Model.Details["lastlogin.year"]
These are just a few of the many possible ways it can resolve your expression. It will actually check every possible combination of dictionary entry names and property names, first on ViewData as a dictionary, and second on ViewData.Model, stopping when it finds a non-null value.
If you're concerned about the performance implications of this scan, bear in mind that normally your expression will contain at most a few dots, so there will only be a handful of possible interpretations, and dictionary lookups are very cheap. Eval() also needs to perform some reflection to find properties whose names match tokens in your expression, but this is still negligible compared to the cost of handling the entire request. You almost certainly won't find it to be a problem in practice.
Note
Eval() only searches for dictionary entries and properties. It can't call methods (so don't try ViewData.Eval("someitem.GetSomething()")), nor can it extract values from arrays by numeric index (so don't try ViewData.Eval("mynumbers[5]")).
You're free to call ViewData.Eval() directly, but most ASP.NET MVC developers rarely find a need for that. The reason I've taken the time to explain ViewData.Eval() is that it underpins a whole range of string-based HTML helpers that are more commonly used—for example:
<%: Html.TextBox("person.Address.City") %>Html.TextBox(), like other string-based HTML helpers, internally uses ViewData.Eval() to find a suitable ViewData dictionary entry or property based on the string you supply. This lets it populate itself automatically, simplifying its use in common scenarios.
Even though MVC views give you very tight, low-level control over your HTML, it would be laborious if you had to keep typing out the same fragments of HTML markup over and over. That's why the MVC Framework gives you a wide range of HTML helper methods, which generate commonly used markup fragments using a shorter, tidier syntax assisted by IntelliSense.
For instance, instead of typing
<input name="comment" id="comment" type="text"
       value="<%: ViewData.Eval("comment") %>" />
you can type
<%: Html.TextBox("comment") %>They're called "helper methods" because—guess what—they help you. They aren't controls in the Web Forms sense; they're just shorthand ways of emitting HTML tags.
Views and partial views have a property called Html (of type System.Web.Mvc.HtmlHelper, or for strongly typed views, System.Web.Mvc.HtmlHelper<T>), which is the starting point for accessing these helper methods. A few of the HTML helper methods are natively implemented on the HtmlHelper class, but most of them are actually extension methods living in System.Web.Mvc.Html and extending HtmlHelper. A default ASP.NET MVC Web.config file imports the System.Web.Mvc.Html namespace via a <namespaces> node, so you don't have to do anything special to access the helpers in a view. Just type <%: Html., and you'll see all the options appear.
Tip
The ASP.NET MVC team decided to implement all the HTML helpers as extension methods in a separate namespace so that you could, if you wanted, replace them entirely with an alternative set. If you created your own library of HtmlHelper extension methods, perhaps matching the same API as the built-in set, you could then remove System.Web.Mvc.Html from Web.config and import your own namespace instead. Your views wouldn't need to be changed; they'd just switch to using your custom helpers.
Let's take a quick tour of all of the framework's built-in HTML helper methods. First, be warned: there are a lot of them. Well over 50, in fact, and that's before you even count all their different overloads that correspond to rendering different HTML tag attributes—quite a few have over 10 different overloads. There are so many possible parameter combinations that it would be unhelpful to list them all. Instead, I'll show representative examples for each group of HTML helper methods, and then describe their main variations in use.
The first set of helper methods produce a familiar set of HTML input controls, including text boxes, check boxes, and so on (see Table 11-2).
Table 11-2. String-Based HTML Helpers for Rendering Input Controls
Description | Example |
|---|---|
Check box |
|
Hidden field |
|
Radio button |
|
Password |
|
Text area |
|
Text box |
|
Note
Notice that the check box helper (Html.CheckBox()) renders two input controls. First, it renders a check box control as you'd expect, and then it renders a hidden input control of the same name. This is to work around the fact that when check boxes are deselected, browsers don't submit any value for them. Having the hidden input control means the MVC Framework will receive the hidden field's value (i.e., false) when the check box is unchecked.
If your view page is strongly typed, then in addition to the string-based HTML helpers shown in Table 11-2, there is an equivalent set of strongly typed helpers that work with lambda expressions (Table 11-3). The benefit of the strongly typed helpers is that you get IntelliSense to help you choose from the properties on your Model type, and refactoring tools can automatically keep the views up to date if you later rename any of those model properties.
Table 11-3. Strongly Typed HTML Helpers for Rendering Input Controls
Description | Example |
|---|---|
Check box |
|
Hidden field |
|
Radio button |
|
Password |
|
Text area |
|
Text box |
|
Strongly typed input controls offer an improved syntax, but besides that, they are just the same as the string-based HTML helpers. At runtime, the strongly typed helpers merely take your lambda expression, flatten it into a string (e.g., x => x.Address.Line1 is mapped to "Address.Line1"), and then internally call the same underlying tag-building methods as the string-based helpers. So, string-based and strongly typed HTML helpers have very similar behavior and capabilities.
Each of these controls tries to populate itself by looking for a value in the following places, in this order of priority:
ViewData.ModelState[expression] .Value.RawValue(where expression is thenameparameter you supply if you're using a string-based helper, or it's a string representation of your lambda expression if you're using a strongly typed helper)For string-based helpers, the
valueparameter passed to the HTML helper method, or if you called an overload that doesn't take avalueparameter, thenViewData.Eval(expression)For strongly typed helpers, the corresponding property value on your
Modelobject
ModelState is a temporary storage area that ASP.NET MVC uses to retain incoming attempted values plus binding and validation errors. You'll learn all about it in Chapter 12. For now, just notice that it's at the top of the priority list, so its values override anything you might set explicitly. This convention means that you can pass an explicit value parameter to act as the helper's default or initial value; but when rerendering the view after a validation failure, the helper will retain any user-entered value in preference to that default.[69] You'll see this technique at work in the next chapter.
All of the string-based HTML helpers let you choose whether to supply an explicit value parameter. If you choose not to supply a value, the input control will try to obtain a value from ViewData. For example, you can write
<%: Html.TextBox("UserName") %>This is equivalent to writing
<%: Html.TextBox("UserName", ViewData.Eval("UserName")) %>It means that the helper will take an initial value from ViewData["UserName"], or if there is no such non-null value, then it will try ViewData.Model.UserName.
The strongly typed helpers don't give you this choice; they assume that if you want to set an initial value you will assign it to the corresponding model object property.
All of the HTML helper methods listed in Table 11-2 and Table 11-3 let you render an arbitrary collection of extra tag attributes by supplying a parameter called htmlAttributes—for example:
<%: Html.TextBox("mytext", "val", new { someAttribute = "someval" }) %>This will render
<input id="mytext" name="mytext" someAttribute="someval" type="text" value="val" />As shown in this example, htmlAttributes can be an anonymously typed object (or any arbitrary object)—the framework will treat it as a name/value collection, using reflection to pick out its property names and their values.
Tip
The C# compiler doesn't expect you to use C# reserved words as property names. So, if you try to render a class attribute by passing new { class = "myCssClass" }, you'll get a compiler error (class is a reserved word in C#). To avoid this problem, prefix any C# reserved words with an @ symbol (e.g., write new { @class = "myCssClass" }). That tells the compiler not to treat it as a keyword. The @ symbol disappears during compilation (as it's just a hint to the compiler), so the attribute will be rendered simply as class.
If you prefer, you can pass an object for htmlAttributes that implements IDictionary<string, object>, which avoids the need for the framework to use reflection. However, this requires a more awkward syntax—for example:
<%: Html.TextBox("mytext", "val",
new Dictionary<string, object> { { "class", "myCssClass" } }) %>Finally, it's worth noting that these HTML helper methods automatically HTML-encode the field values that they render. That's very important; otherwise, you'd have no end of XSS vulnerabilities laced throughout your application. Then, as you learned earlier, the helpers all return an instance of MvcHtmlString to advise the platform not to reencode their output.
The next set of HTML helper methods allow you to render HTML links and raw URLs using the routing system's outbound URL-generation facility (see Table 11-4). The output from these methods depends on your routing configuration.
Table 11-4. HTML Helpers for Rendering Links and URLs
Example | |
|---|---|
App-relative URL |
|
Link to named action/controller |
|
Link to absolute URL |
|
Raw URL for action |
|
Raw URL for route data |
|
Link to arbitrary route data |
|
Link to named route |
|
In each case other than Url.Content(), you can supply an arbitrary collection of extra routing parameters in the form of a parameter called routeValues. It can be a RouteValueDictionary, or it can be an arbitrary object (usually anonymously typed) to be inspected for properties and values. The framework's outbound URL-generation facility will either use those values in the URL path itself, or append them as query string values—for example:
Html.ActionLink("Click me", "MyAction", new {controller = "Another", param = "val"})may render the following, depending on your routing configuration:
<a href="/Another/MyAction?param=val">Click me</a>For details on how outbound URLs are generated, refer back to Chapter 8.
The HTML helper methods listed in Table 11-5 give you a quick way of encoding text so that browsers won't interpret it as HTML markup. For more details about how these help to defend against XSS attacks, see Chapter 15.
As you learned earlier in the chapter, if you're using .NET 4, then you should standardize on using the <%: ... %> syntax, which automatically HTML-encodes its output. This eliminates the need to call Html.Encode() or Html.AttributeEncode() manually. If you're using .NET 3.5, you can't use the new autoencoding syntax, so you must manually HTML-encode any user-supplied text when you display it.
Warning
.NET 3.5 developers beware! Neither Html.Encode() nor Html.AttributeEncode() replace the apostrophe character (') with its HTML entity equivalent ('). That means you should never put their output into an HTML tag attribute delimited by apostrophes—even though that's legal in HTML—otherwise, a user-supplied apostrophe will mangle your HTML and open up XSS vulnerabilities. To avoid this problem, if you're rendering user-supplied data into an HTML tag attribute, always be sure to enclose the attribute in double quotes, not apostrophes.
If you're using .NET 4, though, you can breathe a little easier. Microsoft has fixed this loophole in .NET 4, so the HTML encoder does replace the apostrophe character with '.
It doesn't usually matter whether you HTML-encode or HTML attribute-encode. As you can see from Table 11-5, Html.Encode() encodes a larger set of characters (including angle brackets) than Html.AttributeEncode() does, but it turns out that Html.AttributeEncode() is adequate in most cases. Html.AttributeEncode() runs slightly faster, too, though you're unlikely to notice the difference.
Table 11-6 lists some of the built-in HTML helper methods for rendering form controls containing lists of data, including string-based and strongly typed versions.
Table 11-6. HTML Helpers for Rendering Multiple-Choice Input Controls
Example | |
|---|---|
Drop-down list |
<select id="myList" name="myList">
    <option value="">Choose</option>
    <option>A</option>
    <option>B</option>
</select> |
Drop-down list |
<select id="Gender" name="Gender">
    <option>M</option>
    <option>F</option>
</select> |
Multiselect list |
<select id="myList" multiple="multiple" name="myList">
    <option>A</option>
    <option>B</option>
</select> |
Multiselect list |
<select id="Vals" multiple="multiple" name="Vals">
    <option>A</option>
    <option>B</option>
</select> |
As you can see, all of these helpers take values from a SelectList object or its base class, MultiSelectList. These objects can describe a literal array of values, as shown in Table 11-6, or they can be used to extract data from a collection of arbitrary objects. For example, if you have a class called Region defined as follows:
public class Region
{
    public int RegionID { get; set; }
    public string RegionName { get; set; }
}
and if your action method puts a SelectList object into ViewData["region"], as follows:
List<Region> regionsData = new List<Region> {
    new Region { RegionID = 7, RegionName = "Northern" },
    new Region { RegionID = 3, RegionName = "Central" },
    new Region { RegionID = 5, RegionName = "Southern" },
};
ViewData["region"] = new SelectList(regionsData,  // items
"RegionID", // dataValueField
"RegionName", // dataTextField
3); // selectedValuethen <%: Html.DropDownList("region", "Choose") %> will render the following (line breaks and indentation added for clarity):
<select id="region" name="region">
    <option value="">Choose</option>
    <option value="7">Northern</option>
    <option selected="selected" value="3">Central</option>
    <option value="5">Southern</option>
</select>
Tip
Html.ListBox() and Html.ListBoxFor() render multiselect lists. To specify more than one initially selected value, pass a MultiSelectList instance instead of a SelectList instance. MultiSelectList has alternative constructors that let you specify more than one initially selected value.
Bear in mind that you don't have to use these helper methods just because they exist. If you find it easier to iterate over a collection manually, generating <select> and <option> elements as you go, then do that instead.
ASP.NET MVC's Futures assembly, Microsoft.Web.Mvc.dll, contains a number of other HTML helper methods that Microsoft didn't consider important or polished enough to ship as part of the core MVC Framework, but might be useful to you in some situations. You can download this assembly from www.codeplex.com/aspnet. Make sure you download the version corresponding to ASP.NET MVC 2.
Before you can use any of these helpers, you need to add a reference from your project to Microsoft.Web.Mvc.dll, and also alter your Web.config file so that the namespace is imported into all of your view pages, as follows:
<configuration>
    <system.web>
        <pages>
            <namespaces>
                <add namespace="Microsoft.Web.Mvc" />
                <!-- Leave other entries in place -->
            </namespaces>
        </pages>
    </system.web>
</configuration>
Having done this, you'll have access to the additional helpers listed in Table 11-7.[70]
Table 11-7. HTML Helper Methods in the Futures Assembly, Microsoft.Web.Mvc.dll
Description | Example |
|---|---|
CSS reference |
|
Image |
|
JavaScript button |
|
Link as lambda expression |
|
Mail-to link |
|
JavaScript reference |
|
Serialized data |
|
Submit button |
|
Submit image |
|
URL as lambda expression |
|
Warning
The lambda-based URL-generating helpers, Html.Action<T>() and Html.BuildUrlFromExpression<T>(), were discussed in Chapters 8 and 10. I explained that even though these strongly typed helpers seem like a great idea at first, they cannot be expected to work when combined with certain ASP.NET MVC extensibility mechanisms, which is why they aren't included in the core ASP.NET MVC package. It may be wiser to use only the regular string-based link and URL helpers and ignore these lambda-based ones.
In some cases, it's slightly easier to use these helpers than to write out the corresponding raw HTML. The alternative to Html.Image(), for instance, is
<img src="<%: Url.Content("~/folder/img.gif") %>" />which is awkward to type, because Visual Studio's ASPX IntelliSense simply refuses to appear while you're in the middle of an HTML tag attribute.
However, some of these helper methods are actually harder to write out than the corresponding raw HTML, so there's no good reason to use them. For example, why write
<%: Html.SubmitButton("someID", "Submit now") %>when it's unlikely that you'd want to give the submit button an ID, and you can instead just write
<input type="submit" value="Submit now" />
As a matter of completeness, Table 11-8 shows the remaining built-in HTML helpers not yet mentioned. These are all covered in more detail elsewhere in the book.
Table 11-8. Other HTML Helper Methods
Method | Notes |
|---|---|
| A range of Ajax-related helpers, such as |
| Renders opening and closing |
| Assists HTTP method overriding, as described in Chapter 10. |
| Invokes a child action (an independent internal request, returning the output from its view). See the "Using Child Actions to Create Reusable Widgets with Application Logic" section in Chapter 13) |
| In |
Renders a partial view (see the "Using Partial Views" section later in this chapter) | |
| Attempts to block cross-site request forgery (CSRF) attacks (see the "Preventing CSRF Using the Anti-Forgery Helpers" section in Chapter 15). |
| Encodes the supplied string to ensure that it's safe to include in a URL. Rarely used because the link-generating helpers (e.g., |
There are also a range of helpers associated with view templating, such as Html.DisplayFor(), Html.EditorForModel(), Html.Label(), and ones associated with validation, such as Html.Validate() and Html.ValidationMessageFor(). These are all covered in Chapter 12.
The framework also provides helper methods for rendering <form> tags, namely Html.BeginForm() and Html.EndForm(). The advantage of using these (rather than writing a <form> tag by hand) is that they'll generate a suitable action attribute (i.e., a URL to which the form will be posted) based on your routing configuration and your choice of target controller and action method.
These HTML helper methods are slightly different from the ones you've seen previously: they don't return an MvcHtmlString. Instead, they write the <form> and </form> tags' markup directly to your response stream.
There are two ways to use them. You can call Html.EndForm() explicitly, as follows:
<% Html.BeginForm("MyAction", "MyController"); %>
    ... form elements go here ...
<% Html.EndForm(); %>
or you can wrap the output of Html.BeginForm() in a using statement, as follows:
<% using(Html.BeginForm("MyAction", "MyController")) { %>
    ... form elements go here ...
<% } %>
These two code snippets produce exactly the same output, so you can use whichever syntax you prefer. Assuming the default routing configuration, they will output the following:
<form action="/MyController/MyAction" method="post">
    ... form elements go here ...
</form>
In case you're wondering how the second syntax works, Html.BeginForm() returns an IDisposable object. When it's disposed (at the end of the using block), its Dispose() method writes the closing </form> tag to the response stream.
If you want to specify other routing parameters for the form's action URL, you can pass them as a third, anonymously typed parameter—for example:
<% Html.BeginForm("MyAction", "MyController", new { param = "val" }); %>This will render the following:
<form action="/MyController/MyAction?param=val" method="post">Note
If you want to render a form with an action URL based on a named route entry or an arbitrary set of routing data (i.e., without giving special treatment to parameters called controller or action), you can use Html.BeginRouteForm(). This is the form-generating equivalent of Html.RouteLink().
You can omit a controller and action name, and then the helper will generate a form that posts back to the current request's URL—for example:
<% using(Html.BeginForm()) { %>
    ... form elements go here ...
<% } %>
This will render as follows:
<form action="current request URL" method="post" >
    ... form elements go here ...
</form>
ASP.NET MVC developers often like to use this Html.BeginForm() overload when they accept both GET and POST requests to the same URL. Typically, a GET request displays the initial form, and a POST request handles the form submission and either redisplays the form (if there was a validation error) or redirects the user away to a different action (if the submission was accepted and saved)—for example:
public class SomeController : Controller
{
   public ViewResult MyAction() { /* Displays the form */ }

   [HttpPost]
   public ActionResult MyAction(MyModel incomingData) { /* Handles the POST */ }
}
Letting Html.BeginForm() use the current URL means that you don't have to specify any action names or other routing data in the view. It's just one less thing to maintain. You'll learn more about handling data entry and validation in Chapter 12.
The Futures DLL, Microsoft.Web.Mvc.dll, contains a generic Html.BeginForm<T>() overload, which lets you use a strongly typed lambda expression to reference a target action. For example, if you have a ProductsController with a suitable SubmitEditedProduct(string param) action method, then you can call
<% using(Html.BeginForm<ProductsController>(x => x.SubmitEditedProduct("value"))) { %>
    ... form elements go here ...
<% } %>
Note
For this to work, your ASPX page needs a reference to the namespace containing ProductsController. For example, at the top of the ASPX page, add a <%@ Import Namespace=" declaration. (This is in addition to needing a reference to Your.Controllers.Namespace" %>Microsoft.Web.Mvc).
This will render the following (based on the default routing configuration):
<form action="/Products/SubmitEditedProduct?param=value" method="post" >
    ... form elements go here ...
</form>
The strongly typed Html.BeginForm<T>() helper suffers the same limitations as Html.ActionLink<T>(). Also, bear in mind that to form a valid C# lambda expression, you have to specify a value for every method parameter, which then gets rendered into the URL as a query string parameter. But that doesn't always make sense—sometimes you want action method parameters to be bound to form fields rather than query string parameters. The workaround is to pass a dummy value of null for each unwanted parameter, but even that doesn't work if the parameter is a nonnullable type such as an int.
For these reasons, I'd say that you're better off avoiding Html.BeginForm<T>() and sticking with Html.BeginForm() instead.
There's nothing magical or sacred about the framework's built-in helper methods. They're just .NET methods that return MvcHtmlStrings, so you're free to add new ones to your application.
For example, both online movies and HTML 5 are becoming increasingly widespread, so let's create a helper method that renders HTML 5 <video> tags. Make a new static class called VideoTagExtensions (e.g., at /Views/Helpers/VideoTagExtensions.cs):
public static class VideoTagExtensions
{
    public static MvcHtmlString Video(this HtmlHelper html, string src)
    {
        string url = UrlHelper.GenerateContentUrl(src, html.ViewContext.HttpContext);

        TagBuilder tag = new TagBuilder("video");
        tag.InnerHtml = "Your browser doesn't support video tags.";
tag.MergeAttribute("src", url);
tag.MergeAttribute("controls", "controls"); // Show Play/Pause buttons
return MvcHtmlString.Create(tag.ToString());
}
}Note
This code demonstrates the TagBuilder API, which is what ASP.NET MVC's built-in HTML helpers themselves rely upon to construct HTML tags efficiently and without any awkward string manipulation. UrlHelper.GenerateContentUrl() is what Url.Content() uses behind the scenes—it's an easy way to accept URLs that might be absolute (http://...), URL relative (myvideo.mp4), or application relative (~/Content/myvideo.mp4).
Like other HTML helpers, this is an extension method on the HtmlHelper class, which gives you access to ViewContext properties such as HttpContext. Also, it's important for the helper to return an instance of MvcHtmlString (not a plain string) in order to be compatible with .NET 4's autoencoding syntax, <%: ... %>, as well as the older <%= ... %> syntax.
After compiling, you'll be able to use your new helper method from any view by using its fully qualified name:
<%: MyApp.Views.Helpers.VideoTagExtensions.Video(Html, "~/Content/myvideo.mp4") %>This will render the following (line breaks added):
<video controls="controls" src="/Content/myvideo.mp4">
    Your browser doesn't support video tags.
</video>
In case you're wondering, the message "Your browser doesn't support video tags" will appear only on non-HTML 5 browsers. Newer browsers will hide it and show the video instead.
You probably don't want to write out the fully qualified name of the helper method each time. In fact, you probably want to invoke the helper as an extension method on Html, just like all the built-in members of the Html.* club. To enable this, you can import its namespace in one of two ways:
Add an
importdirective to the top of each view page that will use the method (e.g.,<%@ Import Namespace="MyApp.Views.Helpers" %>).Import the namespace to all view pages by adding a new child node below the
system.web/pages/namespacesnode inWeb.config(e.g.,<add namespace=").MyApp.Views.Helpers"/>
Either way, you can then invoke the helper more simply, as follows:
<%: Html.Video("~/Content/myvideo.mp4") %>Technically, you could avoid the need to import a new namespace by putting your static class directly into the System.Web.Mvc.Html namespace, but it would get very confusing to you and other developers when you lose track of what code is your own and what's built into the framework. Don't barge in on other people's namespaces!
You'll often want to reuse the same fragment of view markup in several places. Don't copy and paste it—factor it out into a partial view. Partial views are similar to custom HTML helper methods, except that they're defined using your chosen view engine's syntax (e.g., an ASPX or ASCX file—not just pure C# code), and are therefore more suitable when you need to reuse larger blocks of markup.[71]
In this section, you'll learn how to create and use partial views within the default Web Forms view engine, along with various methods to supply them with ViewData and ways to bind them to lists or arrays of data. First, notice the parallels between partial views and regular views:
Just as a view page is a Web Forms page (i.e., an ASPX file), a partial view is a Web Forms user control (i.e., an ASCX file).
A view page is compiled as a class that inherits from
ViewPage(which in turn inherits fromPage, the base class for all Web Forms pages). A partial view is compiled as a class that inherits fromViewUserControl(which in turn inherits fromUserControl, the base class for all Web Forms user controls). The intermediate base classes both add support for MVC-specific notions, such asViewData, TempData, and HTML helper methods (Html.*, Url.*, etc.).You can make a view page "strongly typed" by having it inherit from
ViewPage<T>. Similarly, you can make a partial view strongly typed by having it inherit fromViewUserControl<T>. In both cases, this replaces theViewData, Html, andAjaxproperties with generically typed equivalents. This causes theModelproperty to be of typeT.
You can create a new partial view (also called a partial) by right-clicking inside a folder under /Views and then choosing Add
For example, create a partial view called MyPartial inside /Views/Shared, and then add some HTML markup to it:
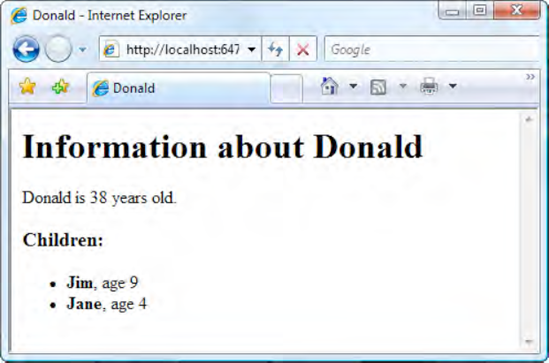
<%@ Control Language="C#" Inherits="System.Web.Mvc.ViewUserControl" %>
<i>Hello from the partial view</i>
Next, to render this partial view, go to any view page in your application and call the Html.Partial() helper, specifying the name of the partial view as follows:
<p>This is the container view</p>
<%: Html.Partial("MyPartial") %>
<p>Here's the container view again</p>
This will render the output shown in Figure 11-2.
If you wish to render a partial view that isn't in /Views/nameOfController or /Views/Shared, then you need to specify its virtual path in full, including file name extension—for example:
<%: Html.Partial("~/Views/Shared/Partials/MyOtherPartial.ascx") %>When Html.Partial() invokes your partial, it creates a StringWriter in memory, tells the partial to emit its output to that StringWriter (thereby collecting the results in memory), and then returns an MvcHtmlString representing the final contents of the StringWriter. That means you can use it just like any other HTML helper.
If you prefer to pipe the partial's output directly to the response stream—bypassing any StringWriter in memory—you can do so by calling Html.RenderPartial() instead.
<% Html.RenderPartial("MyPartial"); %>Notice the change in syntax: this method doesn't return a result, but instead writes directly to the response stream. You're not evaluating an expression (as in <%: ... %>), but in fact executing a line of C# code (hence <% ...; %>) with the trailing semicolon.
The performance benefits of doing this are usually inconsequential, but it might be worth considering if your partial returns an extremely large amount of text or if you're rendering hundreds of partials from a single page.
As you'd expect for a view, partial views have a ViewData property. By default, it's just a direct reference to the container view's ViewData object, which means that the partial view has access to the exact same set of data—both its dictionary contents and its ViewData.Model object.
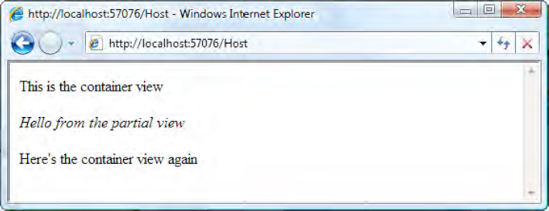
For example, if your action method populates ViewData["message"] as follows
public class HostController : Controller
{
    public ViewResult Index()
    {
        ViewData["message"] = "Greetings";

        // Now render the view page that in turn renders MyPartial.ascx
        return View();
    }
}
then MyPartial.ascx automatically shares access to that value:
<%@ Control Language="C#" Inherits="System.Web.Mvc.ViewUserControl" %>
<i><%: ViewData["message"] %> from the partial view</i>
This will render the output shown in Figure 11-3.
This technique works fine, but it feels a bit messy to let a child partial view have access to the parent's entire ViewData collection. Surely the partial view is only interested in a subset of that data, so it makes more sense to give it access to only the data it needs. Also, if you're rendering multiple instances of a given partial view, where each instance is supposed to render different data, you'll need a way of passing a different data item to each instance.
When you call Html.Partial() or Html.RenderPartial(), you can supply a value for a second parameter, called model, which will become the partial's Model object. Normally, you'd use this overload when rendering a strongly typed partial view.
For example, if your controller puts a Person object into ViewData:
public class Person
{
    public string Name { get; set; }
    public int Age { get; set; }
}

public class HostController : Controller
{
    public ViewResult Index()
    {
        ViewData["someperson"] = new Person { Name = "Maggie", Age = 2 };
        return View();
    }
}
then when you render a partial view, you can pick out and pass it only that specific value. For example, from the preceding Index action's view, render a partial view as follows:
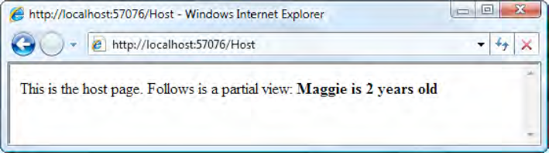
This is the host page. Follows is a partial view:
<b>
    <%: Html.Partial("PersonInfo", ViewData["someperson"]) %>
</b>
Now, assuming you've got a partial view at /Views/Shared/PersonInfo.ascx inheriting from ViewUserControl<Person>, containing the following:
<%@ Control Language="C#"
    Inherits="System.Web.Mvc.ViewUserControl<MyApp.Namespace.Person>" %>
<%: Model.Name %> is <%: Model.Age %> years old
then this will render the output shown in Figure 11-4.
As you can see, the value passed as the model parameter to Html.Partial() becomes the partial view's Model object. Remember that in a view, Model is just a shortcut to ViewData.Model, where ViewData is a data structure containing a set of dictionary entries as well as the special ViewData.Model value.
Tip
When you supply an explicit Model object, the partial view still has access to any dictionary entries in the parent view's ViewData collection. It's only the Model value that gets replaced as far as the partial is concerned. There are also overloads of Html.Partial() and Html.RenderPartial() that let you explicitly pass a different ViewData collection to the partial.
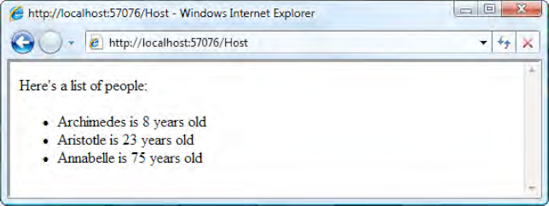
As you saw in Chapter 4, when rendering a series of ProductSummary.ascx partial views, it's quite simple to render a separate partial view for each item in a collection. For example, if your action method prepares an IEnumerable<Person> and renders a strongly typed view inherited from ViewPage<IEnumerable<Person>>:
public ViewResult Index()
{
    IEnumerable<Person> viewModel = new List<Person> {
        new Person { Name = "Archimedes", Age = 8 },
        new Person { Name = "Aristotle", Age = 23 },
        new Person { Name = "Annabelle", Age = 75 },
    };
    return View(viewModel);
}
then your view can iterate over that collection and render a separate partial view for each entry:
Here's a list of people:
<ul>
    <% foreach(var person in Model) { %>
        <li>
            <%: Html.Partial("PersonInfo", person) %>
        </li>
    <% } %>
</ul>
This will render the output shown in Figure 11-5.
Every ASP.NET MVC programmer I know prefers to use a plain old foreach loop rather than the data binding mechanism prevalent in ASP.NET Web Forms. foreach is trivially simple, requires no special OnDataBound() event, and permits the code editor to offer full IntelliSense. However, if you just love funky retro code, you can still perform Web Forms-style data binding, as you'll learn shortly.
As an alternative to using Html.Partial(), you can embed a partial view into a parent view page by registering the control as a server tag. If you've worked with ASP.NET Web Forms, you'll have used this technique before.
To do this, add a <%@ Register %> declaration at the top of your view page, specifying the partial view to be made available, along with a custom tag prefix and tag name. This can go right at the very top of the ASPX file, either above or immediately below the <%@ Page %> declaration. For example, add the following:
<%@ Register TagPrefix="MyApp" TagName="MyPartial"
             Src="~/Views/Shared/MyPartial.ascx" %>
This tells the ASPX compiler that when you use the tag <MyApp:MyPartial runat="server" />, you're referring to /Views/Shared/MyPartial.ascx. Note that adding runat="server" is mandatory. Without it, the ASPX compiler doesn't regard it as a special tag, and will simply emit the tag as plain text to the browser.
Having done this, you can now write <MyApp:MyPartial runat="server" /> anywhere in your view, and then your partial view will be rendered at that location. This technique is not really as useful or as tidy as using Html.Partial(), so I'll cover it only briefly.
Note
You've already seen how such server controls are handled during compilation and at runtime. Earlier in the chapter, when you saw a decompiled ASPX class, you saw that server controls become member variables in the compiled page class. The control's render method is called at the relevant point in the parent page's render method.
When you render a partial view by using a custom server tag, the partial once again inherits the parent page's entire ViewData data structure by default—both its dictionary contents and Model object. In fact, if you have a Web Forms-style hierarchy of server controls, any MVC partial will scan its chain of ancestors to find the first one that can provide a ViewData structure (i.e., the first one that implements the interface IViewDataContainer).
When you render a partial view by using a custom server tag, you can supply a Model object explicitly by specifying a tag attribute called ViewDataKey.
For example, assuming you've registered the strongly typed PersonInfo partial view (from a previous example) using a declaration such as the following:
<%@ Register TagPrefix="MyApp" TagName="PersonInfo"
             Src="~/Views/Shared/PersonInfo.ascx" %>
then you can render it, passing a ViewDataKey parameter, as follows:
<MyApp:PersonInfo runat="server" ViewDataKey="persondata" />
Assuming your controller has already populated ViewData["persondata"] with some suitable object, then that object will become the child partial's Model object (and the child partial will retain access to any dictionary entries in the parent view's ViewData collection).
Tip
Internally, the MVC Framework calls ViewData.Eval("yourViewDataKey") to locate a model object for the partial view. That means you can use Eval()'s dot-separated token notation here, or reference properties on the container view's Model object.
This works OK if you're only rendering a single instance of a control and passing some ViewData dictionary entry that always has a known, fixed key. Pushing this technique further, it's even possible to use ASP.NET Web Forms-style data binding to render a series of partial views, each with different Model objects, using an <asp:Repeater> control. I don't think you'll normally want to do this, but if you do, it will look like this:
<asp:Repeater ID="MyRepeater" runat="server">
    <ItemTemplate>
        <MyApp:PersonInfo runat="server"
                          ViewDataKey='<%# "peopledict." + Eval("Key") %>'/>
    </ItemTemplate>
</asp:Repeater>

<script runat="server">
    // Hack alert! Embedding a Web Forms event handler into an MVC view...
    protected void Page_Load(object sender, EventArgs e)
    {
        MyRepeater.DataSource = ViewData["peopledict"];
        MyRepeater.DataBind();
} </script>
This code assumes that the controller has already put an IDictionary<string, Person> object into ViewData["peopledict"] (and it has to be a dictionary, not just a list or array, because you need to be able to address each entry by name, not by index).
I hope you'll agree that this kind of data binding is bizarre, hacky, and unpleasant. I've only shown it here because lots of ASP.NET MVC newcomers ask how to do it, and spend a lot of time trying to figure it out. Don't do it—it's far simpler just to write the following:
<% foreach(var person in (IEnumerable)ViewData["people"]) { %>
    <%: Html.Partial("PersonInfo", person) %>
<% } %>In this chapter, you've expanded your knowledge of ASP.NET MVC's default view engine, known as the Web Forms view engine. You learned about each of the main ways to insert dynamic content into a view, and have uncovered the truth about how ASPX files get translated into .NET classes on the web server. You also found out why ASP.NET 4's new autoencoding syntax exists and how it knows whether or not to HTML-encode its output.
You should now have a solid knowledge of routing, controllers, actions, and views. The next chapter digs into models—the all-important M in MVC—to show you how model metadata, templated input helpers, and validation all work together to help you build robust data entry screens without duplicating a lot of code. In the rest of the book, you'll explore important related topics such as Ajax, security, deployment, and how to make the best use of other facilities provided by the broader core ASP.NET platform.
[67] This code is only intended to demonstrate the way to insert custom logic; I'm not suggesting you would actually want to render all your strings as HTML entity literals like this.
[68] This is what happens implicitly when an action method invokes a view by returning View(myPerson). Of course, your action method might also have already added some name/value pairs to ViewData.
[69] To be accurate, I should point out that Html.Password() and Html.PasswordFor() behave differently from the other helpers: by design, they don't recover any previous value from ModelState. This is to support typical login screens in which, after a login failure, the password box should be reset to a blank state so that the user will try typing in their password again. Similarly, Html.PasswordFor() always displays an initially empty text box, even if your lambda expression corresponds to a nonempty property. Oddly, this is inconsistent with Html.EditorFor(), which does not blank out the rendered text box even if you use [DataType(DataType.Password)] to tell it that the property represents a password.
[70] Microsoft.Web.Mvc.dll also includes a helper called RadioButtonList(), which you'd probably expect to work like DropDownList(). I'm omitting it because most people find that it doesn't do what they want it to do. The assembly also contains helpers called Id, IdFor, IdForModel, Name, NameFor, and NameForModel, which are related to templated input helpers. You'll learn more about templating in Chapter 12.
[71] ASP.NET MVC's partial views are logically equivalent to what are known as "partial templates" or "partials" in Ruby on Rails and MonoRail.