ASP.NET MVC is supposed to be lightweight and flexible. It provides you with efficient, tidy, unit testable building blocks that you can use to create pretty much any web application feature, without demanding that you use any rigidly prefabricated controls. For example, rather than giving you a ready-made wizard control, the MVC Framework relies on the immense flexibility by which you can construct this or any other workflow, just by combining a few views and RedirectToAction() calls. There are countless different ways you could tailor and customize a user interface as you aim for the optimal user experience.
With all this flexibility, you might wonder where to get started. The development process isn't as obvious at first glance as it is with ASP.NET Web Forms, because there's no drag-and-drop designer. But as your requirements grow in complexity, the simplicity and robust engineering of MVC code pays dividends.
In this chapter, you'll see how to apply your knowledge of controllers, views, and models with recipes for the following:
Creating a multistep form (also known as a wizard)
Blocking spam using a custom CAPTCHA widget
Building reusable widgets (such as navigation menus) with their own independent application logic by using the
Html.Action()andHtml.RenderAction()helpersSharing layouts between different views using master pages, and invoking widgets and partials from these master pages
Replacing ASP.NET MVC's entire view engine with a custom-built one or an open source alternative.
These recipes are of course just starting points—you can customize them however you wish.
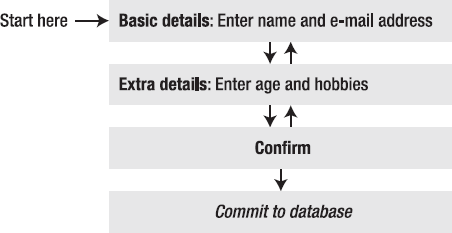
Many web sites use a wizard-style UI to guidethe visitor through a multistep process that is committed only at the very end. This follows the usability principle of progressive disclosure, in which users aren't overwhelmed with dozens of questions—not all of which may even be relevant to them. Rather, a smaller number of questions are presented at each stage. There may be multiple paths through the wizard, depending on the user's selections, and the user is always allowed to go back to change their answers. There's typically a confirmation screen at the end allowing the user to review and approve their entire submission.
There are unlimited ways in which you could accomplish this with ASP.NET MVC; the following is just one example. We'll build a four-step registration wizard according to the workflow shownin Figure 13-1.
To keep things organized, let's start by defining a data model class, RegistrationData, which you can put into your /Models folder:
[Serializable]
public class RegistrationData
{
    public string Name { get; set; }
    public string Email { get; set; }
    public int? Age { get; set; }
    public string Hobbies { get; set; }
}
You'll create a new instance of RegistrationData each time a user enters the wizard, populating its fields according to any data entered on any step, preserving it across requests, and finally committing it in some way (e.g., writing it to a database or using it to generate a new user record). It's marked as [Serializable] because you're going to preserve it across requests by serializing it into a hidden form field.
Note
This is different from how ASP.NET MVC usually retains state by recovering previously entered values from ModelState. The ModelState technique won't work in a multistep wizard: it would lose the contents of any controls that aren't being displayed on the current step of the wizard. Instead, this example uses a technique more similar to how ASP.NET Web Forms preserves form data by serializing it into a hidden form field. If you're unfamiliar with this mechanism, or with serialization in general, be sure to read the "ViewState and Serialization" sidebar later in the chapter, which explains the technique and its issues.
To host the wizard navigation logic, let's create an initial RegistrationController with the first two steps:
public class RegistrationController : Controller
{
    public ActionResultBasicDetails()
    {
        return View();
    }

    public ActionResult ExtraDetails()
    {
        return View();
    }
}
Next, to create an initial view for the BasicDetails() action, right-click inside the BasicDetails() action, and choose Add View. It can have the default name, BasicDetails. It should be strongly typed, using RegistrationData as its view data class. Here's what it needs to contain:
<h2>Registration: Basic details</h2>
Please enter your details

<% using(Html.BeginForm()) { %>
    <%: Html.ValidationSummary() %>
    <p>Name: <%: Html.EditorFor(x => x.Name)  %></p>
    <p>E-mail: <%: Html.EditorFor(x => x.Email) %></p>
    <p><input type="submit" name="nextButton" value="Next >" /></p>
<% } %>
You can check this out in your browser now, by visiting /Registration/BasicDetails (Figure 13-2).
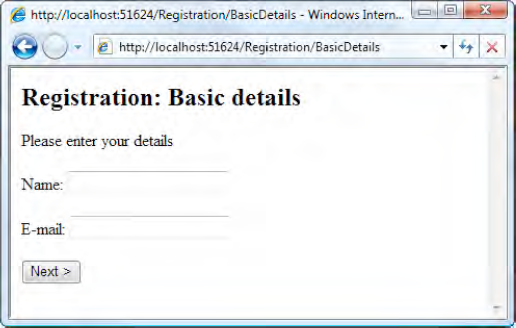
Not much happens. If you click Next, the same screen reappears—it doesn't actually move to the next step. Of course, there's no logic to tell it to move to the next step. Let's add some:
public class RegistrationController : Controller
{
    private RegistrationData regData; // Will populate this later

    public ActionResult BasicDetails(string nextButton)
    {
        if (nextButton != null)
            return RedirectToAction("ExtraDetails");
        return View(regData);
    }

    public ActionResult ExtraDetails(string backButton, string nextButton)
    {
        if (backButton != null)
            return RedirectToAction("BasicDetails");
        else if (nextButton != null)
            return RedirectToAction("Confirm");
        else
            return View(regData);
    }
}
What's happening here? Did you notice that in the view template BasicDetails.aspx, the Html.BeginForm() call doesn't specify a destination action? That causes the <form> to post back to the same URL it was generated on (i.e., to the same action method).
Also, when you click a submit button, your browser sends a Request.Form key/value pair corresponding to that button's name. So, action methods can determine which button was clicked (if any) by binding a string parameter to the name of the button and checking whether the incoming value is null or not (a non-null value means the button was clicked).
Finally, add a similar view for the ExtraDetails action at its default view location, /Views/Registration/ExtraDetails.aspx (also strongly typed, using RegistrationData as the view data class) containing the following:
<h2>Registration: Extra details</h2>
Just a bit more info please.
<% using(Html.BeginForm()) { %>
<%: Html.ValidationSummary() %>
<p>Age: <%: Html.EditorFor(x => x.Age) %></p>
<p>
Hobbies:
<%: Html.TextAreaFor(x => x.Hobbies) %>
</p>
<p>
<input type="submit" name="backButton" value="< Back" />
<input type="submit" name="nextButton" value="Next >" />
</p>
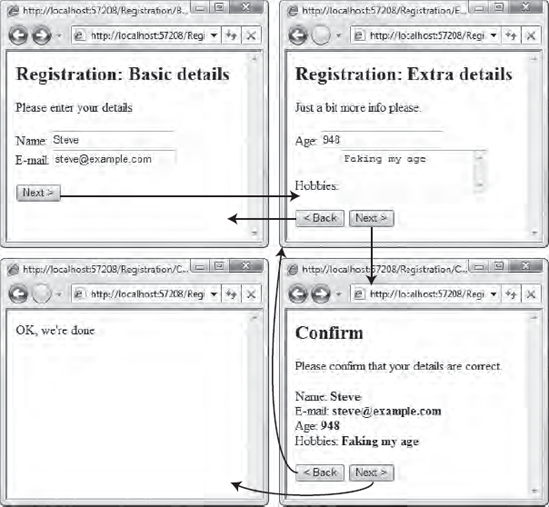
<% } %>You've now created a working navigation mechanism (see Figure 13-3).

However, right now, any data you enter into the form fields is just ignored and lost immediately.
The navigation mechanism was the easy bit. The trickier part is collecting and preserving form field values, even when those fields aren't being displayed on the current step of the wizard. To preserve the RegistrationData instance across requests, we're going to serialize it into a hidden form field using a HTML helper called Html.Serialize(). This HTML helper is in the ASP.NET MVC Futures assembly (not the core ASP.NET MVC package), so before you can use it, you'll need to carry out the following steps:
Download ASP.NET MVC Futures from
http://aspnet.codeplex.com/. Be sure to obtain the version corresponding to your version of ASP.NET MVC (i.e., version 2).Unpack the ZIP archive, copy the included
Microsoft.Web.Mvc.dllfile to a convenient location, and then reference it from your ASP.NET MVC project (right-click your project name in Solution Explorer, choose Add Reference, and then locate the assembly using the Browse tab).Allow your views to find the new helper methods by referencing the
Microsoft.Web.Mvcnamespace inWeb.config, by adding the following line:<configuration> <system.web> <pages> <namespaces> <!-- Leave other entries in place --><add namespace="Microsoft.Web.Mvc" /></namespaces> </pages></system.web> </configuration>
Next, use the new Html.Serialize() helper by adding the following line to both your BasicDetails.aspx and ExtraDetails.aspx views.
<% using(Html.BeginForm()) { %>
    <%: Html.Serialize("regData", Model) %>
    <!-- Leave rest of form as-is -->
<% } %>
This new HTML helper will render a regular hidden form field, containing a random-looking sequence of characters that is actually a serialized representation of your RegistrationData model object—for example:
<form action="/Registration/BasicDetails" method="post">
    <input name="regData" type="hidden" value="/wEy4QIAAQAAAP////8BAAAAAA...etc" />
    ... other form fields appear here ...
</form>
Next, you'll need to update RegistrationController so that it recognizes these incoming values and uses them to populate its regData field. At the same time, you'll set up a convention that during redirections, regData instances are saved in the TempData collection.
public class RegistrationController : Controller
{
   protected override void OnActionExecuting(ActionExecutingContext filterContext)
   {
       var serialized = Request.Form["regData"];
       if (serialized != null) { // Form was posted containing serialized data
          regData = (RegistrationData)new MvcSerializer().Deserialize(serialized);
          TryUpdateModel(regData);
       }
       else
          regData = (RegistrationData)TempData["regData"] ?? new RegistrationData();
   }

   protected override void OnResultExecuted(ResultExecutedContext filterContext)
   {
       if (filterContext.Result is RedirectToRouteResult)
          TempData["regData"] = regData;
   }

   // ... rest as before
}
There's quite a lot going on here! The following points explain what this code does:
Before each action method runs,
OnActionExecuting()tries to obtain any existing value it can get forregData. If possible, it deserializes a value fromRequest.Formusing theMvcSerializerclass fromMicrosoft.Web.Mvc, and then uses model binding to update the instance with any other field values that were posted. Otherwise, it either takes a value fromTempData(in case the request follows a redirection) or constructs a new instance (in case this is the very first request).After each action method runs,
OnResultExecuted()checks the result to see if it's doing a redirection to another action method. If so, the only way to preserveregDatais to stash it inTempData, so it does, knowing thatOnActionExecuting()is going to pick it up next time.
Tip
If you write wizards often, you could encapsulate the preceding logic into your own generic base controller class, WizardController<T>, where <T> specifies the type of data object to be preserved. Then you'd set RegistrationController to derive not from Controller but from WizardController<RegistrationData>.
That does it! Now, any data you enter will be preserved as you navigate backward and forward through the wizard. This code is pretty generic, so if you add new fields to RegistrationData, they'll automaticallybe preserved, too.
To finish off this example, you need to add action methods for the "confirm" and "completed" steps:
public class RegistrationController : Controller
{
    // Leave rest as before

    public ActionResult Confirm(string backButton, string nextButton)
    {
        if (backButton != null)
            return RedirectToAction("ExtraDetails");
        else if (nextButton != null)
            return RedirectToAction("Complete");
        else
            return View(regData);
    }

    public ActionResult Complete()
    {
        // To do: Save regData to database; render a "completed" view
        return Content("OK, we're done");
    }
}
Then add a view for the Confirm action, at /Views/Registration/Confirm.aspx, containing the following code. Again, this is a strongly typed view whose model type is RegistrationData.
<h2>Confirm</h2>
Please confirm that your details are correct.
<% using(Html.BeginForm()) { %>
    <%: Html.Serialize("regData", Model) %>
    <div>Name: <b><%: Model.Name %></b></div>
    <div>E-mail: <b><%: Model.Email %></b></div>
<div>Age: <b><%: Model.Age %></b></div>
<div>Hobbies: <b><%: Model.Hobbies %></b></div>
<p>
<input type="submit" name="backButton" value="< Back" />
<input type="submit" name="nextButton" value="Next >" />
</p>
<% } %>Of course, you could instead display the data simply using Html.DisplayForModel() if you prefer. You might need to add extra display metadata or a custom display template, as described in the previous chapter, to get an acceptable result.
Then it's finished: you've got a wizard that navigates backward and forward, preserving field data, with a confirm screen and a (very) basicfinished screen (see Figure 13-4).
You might noticethat this example doesn't validate any of the data that's entered. No problem—you can use any of the validation techniques discussed in the previous chapter. For example, you can add the following Data Annotations attributes[78] to RegistrationData.
[Serializable]
public class RegistrationData
{
    [Required] public string Name { get; set; }
    [Required] public string Email { get; set; }
    [Required, Range(0, 200)] public int? Age { get; set; }
    public string Hobbies { get; set; }
}
Then make sure each wizard step prevents the user from moving forward when model binding reports problems. To do this, alter BasicDetails() and ExtraDetails() as follows:
public ActionResult BasicDetails(string nextButton)
{
    if ((nextButton != null)&& ModelState.IsValid) {
        return RedirectToAction("ExtraDetails");
    }
    return View(regData);
}

public ActionResult ExtraDetails(string backButton, string nextButton)
{
    if (backButton != null)
        return RedirectToAction("BasicDetails");
    else if ((nextButton != null)&& ModelState.IsValid)
        return RedirectToAction("Confirm");
    else
        return View(regData);
}
Since your view templates already contain a call to Html.ValidationSummary(), any detected errors will be displayed in a bulleted list. However, as shown in Figure 13-5, there's now a little glitch: users can't move on from step 1 until they've populated fields that don't appear until step 2!
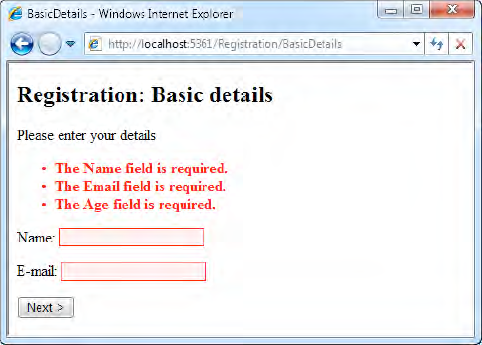
Figure 13-5. A possibly unfair set of validation errors preventing the user from moving to the next step (notice the demand for "Age")
There are two ways to deal with this. One option is to create different model classes for each step in your wizard, because if each action works with a different model class, they can each apply a different set of validation rules. However, you'd then need extra logic to aggregate all the data into some other model object at the end of the process, and in any case it wouldn't fit so elegantly with our system of preserving all values by serializing one object into a hidden field.
Instead, we'll use a technique called partial validation. We want the framework to validate only the model properties that were actually included in the form post. To enable this, create the following action filter class anywhere in your ASP.NET MVC project.
public class ValidateOnlyIncomingValuesAttribute : ActionFilterAttribute
{
    public override void OnActionExecuting(ActionExecutingContext filterContext)
    {
        var modelState = filterContext.Controller.ViewData.ModelState;
        var incomingValues = filterContext.Controller.ValueProvider;

        var keys = modelState.Keys.Where(x => !incomingValues.ContainsPrefix(x));
        foreach (var key in keys) // These keys don't match any incoming value
            modelState[key].Errors.Clear();
    }
}
Now apply this filter to RegistrationController.
[ValidateOnlyIncomingValues]
public class RegistrationController : Controller
{
    ...
}
The filter will discard any validation errors that don't refer to an incoming value, so the user will need to comply only with the rules that are relevant for each step.
If you want to add client-side validation, follow the instructions in the previous chapter. Client-side validation doesn't have any problem with enforcing unwanted extra rules, because you must explicitly tell it which fields to validate by calling Html.ValidateFor(), Html.ValidationMessageFor(), or similar helpers.
Note
When the user completes the wizard, you'll usually submit the RegistrationData instance to your model layer so it can perform some operation such as saving it to a database. Even though you're checking validity at each step during the wizard, you should still be sure to enforce validity at the end of the process in your domain model code; otherwise, you risk accepting invalid data. It's entirely possible that a troublesome visitor who knows the URL for the Confirm action will start at that point, bypassing earlier steps. To be robust, enforce validity in your model layer at the point of committing data or an operation.
Note
As an alternative to serializing RegistrationData instances into a hidden form field, you could store them in the visitor's Session[] collection. If you did that, you wouldn't incur the performance or bandwidth cost of serializing data to the client, and in fact your objects wouldn't even need to be serializable at all. However, storing RegistrationData objects in Session[] comes with some disadvantages, too. First, you can't just use a fixed key into the Session[] collection; otherwise, when a visitor opens more than one browser tab, the tabs would interfere with one another. You need some way of managing that. More critically, the Session[] collection is volatile—its contents can be erased at any moment to free server memory—so you'd need a system to cope with data loss gracefully. Users don't like to be told, "Sorry, your session has expired." In conclusion, storing such data in Session[] might seem convenient, but it's not as robust as serializing it into a hidden form field.
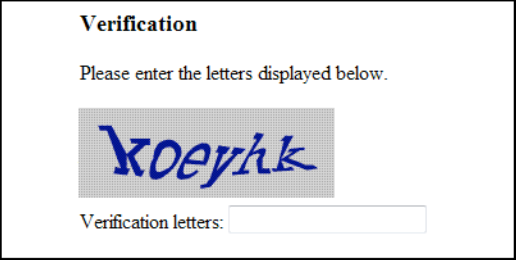
Many web sites protect certain forms from spam submissions by requiring the visitor to type in a series of characters displayed in an image. You can see an example of this in Figure 13-6. The theory is that humans can read the characters, but computers can't. High-volume, automatic submissions are therefore blocked, but human visitors can proceed, albeit slightly inconvenienced. These CAPTCHA (Completely Automated Public Turing Test to Tell Computers and Humans Apart—see www.captcha.net/) tests have come into widespread use in recent years.
Warning
CAPTCHAs can cause accessibility problems, and their overall fitness for purpose is questionable. The best examples of modern optical character recognition (OCR) technology are so good that they're equal to—or better than—most human readers, especially when optimized for a particular CAPTCHA generator. If attackers can profit by breaking your CAPTCHA, they'll probably succeed, but if your site holds no particular appeal to an attacker, a simple CAPTCHA might be enough to hold back the floods of spam. Despite the limitations of CAPTCHAs, web developers are always building them and asking how to build them, which is why I'm including an example here.
Over the next few pages, you'll build a CAPTCHA component. This will take the form of an HTMLhelper method, Html.Captcha(), which you can add to any view template to display a CAPTCHA image. You'll also add to the same view page a text box into which the visitor is asked to type the solution. When the visitor posts the form back to one of your action methods, you'll call a static method, CaptchaHelper.VerifyAndExpireSolution(), to determine whether their attempted solution is correct.
Here's how the CAPTCHA component will work in more detail:
Html.Captcha()will generate some random solution text and store it in the visitor'sSession[]collection under a random GUID key (known as the challenge GUID). It will then render a hidden form field containing the challenge GUID. It will also render an<img>tag referencing an image-generating action method, passing the challenge GUID as a query string parameter.The image-generating action method will use the supplied GUID parameter to retrieve the solution text from the visitor's
Session[]collection, and will render a distorted image of that text. Since this action method was requested via an<img>tag, the image will be displayed in the browser.When you later call
CaptchaHelper.VerifyAndExpireSolution(), you'll supply the challenge GUID taken from the incoming hidden form field data, as well as the attempted solution.CaptchaHelper.VerifyAndExpireSolution()will retrieve the solution text from the visitor'sSession[]collection, compare it with the attempted solution, and return aboolvalue to indicate whether there was a match. At the same time, it will remove the solution entry (if one exists) from theSession[]collection to prevent the same solution from being used repeatedly (this is known as a replay attack).
Let's start by creating an HTML helper method that will display a CAPTCHA test. Create a new static class called CaptchaHelper anywhere in your web application project (e.g., in a folder called /Helpers), and add the following code. As described previously, it generates both random solution text and a challenge GUID, and returns both an <img> tag and a hidden form field.
public static class CaptchaHelper
{
    internal const string SessionKeyPrefix = "__Captcha";
    private const string ImgFormat = "<img src="{0}" />"
                        + @"<input type=""hidden"" name=""{1}"" value=""{2}"" />";

    public static MvcHtmlString Captcha(this HtmlHelper html, string name)
    {
        // Pick a GUID to represent this challenge
        string challengeGuid = Guid.NewGuid().ToString();
        // Generate and store random solution text
        var session = html.ViewContext.HttpContext.Session;
        session[SessionKeyPrefix + challengeGuid] = MakeRandomSolution();

        // Render an <img> tag for the distorted text,
        // plus a hidden field to contain the challenge GUID
        var urlHelper = new UrlHelper(html.ViewContext.RequestContext);
        string url = urlHelper.Action("Render", "CaptchaImage", new{challengeGuid});
        string htmlToDisplay = string.Format(ImgFormat, url, name, challengeGuid);
        return MvcHtmlString.Create(htmlToDisplay);
    }

    private static string MakeRandomSolution()
    {
        Random rng = new Random();
        int length = rng.Next(5, 7);
char[] buf = new char[length];
for (int i = 0; i < length; i++)
buf[i] = (char)('a' + rng.Next(26));
return new string(buf);
}
}Now, to use this helper, let's make a very basic user registration page. It won't actually register any users—it's just so we can use the CAPTCHA helper. Here's a simple controller class called RegistrationController (unrelated to any other RegistrationController used elsewhere in this book):
public class RegistrationController : Controller
{
    public ViewResult Index()
    {
        return View();
    }

    public ActionResult SubmitRegistration()
    {
        return Content("Sorry, this isn't implemented yet.");
    }
}
Obviously, you'll need a view for the Index action, so add a new view by right-clicking inside the Index() method and choosing Add View. For this example, the view doesn't need to be strongly typed.
Since Captcha() is an extension method, you'll only be able to access it once you've imported its namespace by adding an <%@ Import %> declaration to the top of Index.aspx, right under the <%@ Page %> declaration. It will look similar to the following:
<%@ Import Namespace=" YourApp.Helpers" %>You can now fill in some more content in the Index.aspx view:
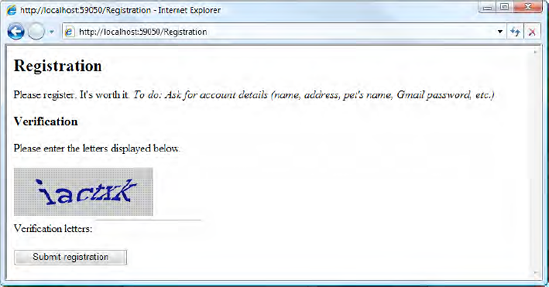
<h2>Registration</h2>
<% using(Html.BeginForm("SubmitRegistration", "Registration")) { %>
    Please register. It's worth it.
    <i>To do: Ask for account details (name, address,
    pet's name, Gmail password, etc.)</i>

    <h3>Verification</h3>
    <p>Please enter the letters displayed below.</p>
    <%: Html.Captcha("myCaptcha") %>
    <div>Verification letters: <%: Html.TextBox("attempt") %></div>
    <%: Html.ValidationMessage("attempt") %>

    <p><input type="submit" value="Submit registration" /></p>
<% } %>
If you run RegistrationController's Index action method now, by visiting /Registration, it will render as shown in Figure 13-7.
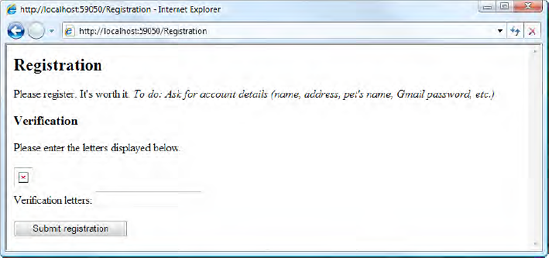
Why is there a broken image icon where the CAPTCHA image should be? If you view the HTML source (in Internet Explorer, press and release Alt, and then go to View ~TRA Source), you'll see that Html.Captcha() renders the following markup:
<img src="/CaptchaImage/Render?challengeGuid=d205c872-83e...etc." />
<input type="hidden" name="myCaptcha" value="d205c872-83e...etc." />
It's trying to load an image from /CaptchaImage/Render, but there isn't any CaptchaImageController yet; hence the broken image icon.
To produce an actual image, add a new controller class, CaptchaImageController, containing an action method, Render(). As described at the beginning of this example, it needs to retrieve the solution text that matches the incoming challenge GUID, and then send a dynamically rendered image of that text back in the response stream.
Rendering a dynamic image in .NET, along with all the awkwardness of creating and disposing of GDI resources, takes quite a lot of code and isn't very interesting or informative. I'll show the full code listing here, but remember that you don't have to type it in—you can download the completed example along with this book's other online code samples. Don't worry if you're unfamiliar with GDI (.NET's graphics API that provides Bitmap objects, Font objects, etc.)—this isn't central to the example.
public class CaptchaImageController : Controller
{
    private const int ImageWidth = 200, ImageHeight = 70;
    private const string FontFamily = "Rockwell";
    private readonly static Brush Foreground = Brushes.Navy;
private readonly static Color Background = Color.Silver;
public void Render(string challengeGuid)
{
// Retrieve the solution text from Session[]
string key = CaptchaHelper.SessionKeyPrefix + challengeGuid;
string solution = (string)HttpContext.Session[key];
if (solution != null) {
// Make a blank canvas to render the CAPTCHA on
using (Bitmap bmp = new Bitmap(ImageWidth, ImageHeight))
using (Graphics g = Graphics.FromImage(bmp))
using (Font font = new Font(FontFamily, 1f)) {
g.Clear(Background);
// Perform trial rendering to determine best font size
SizeF finalSize;
SizeF testSize = g.MeasureString(solution, font);
float bestFontSize = Math.Min(ImageWidth / testSize.Width,
ImageHeight / testSize.Height) * 0.95f;
using (Font finalFont = new Font(FontFamily, bestFontSize)) {
finalSize = g.MeasureString(solution, finalFont);
}
// Get a path representing the text centered on the canvas
g.PageUnit = GraphicsUnit.Point;
PointF textTopLeft = new PointF((ImageWidth - finalSize.Width) / 2,
(ImageHeight - finalSize.Height) / 2);
using(GraphicsPath path = new GraphicsPath()) {
path.AddString(solution, new FontFamily(FontFamily), 0,
bestFontSize, textTopLeft, StringFormat.GenericDefault);
// Render the path to the bitmap
g.SmoothingMode = SmoothingMode.HighQuality;
g.FillPath(Foreground, path);
g.Flush();
// Send the image to the response stream in PNG format
Response.ContentType = "image/png";
using (var memoryStream = new MemoryStream()) {
bmp.Save(memoryStream, ImageFormat.Png);
memoryStream.WriteTo(Response.OutputStream);
}
}
}
}
}
}For this to compile, you'll need to import a number of GDI-related namespaces. Just position the cursor on any unrecognized class name and press Ctrl+dot; Visual Studio will figure it out.
So, having implemented this, you can now reload /Registration, and it will display the CAPTCHA image correctly, as shown in Figure 13-8.
It looks good so far, but something's missing. I bet even the first ever OCR machine (patented in 1929, according to Wikipedia at the time of writing) can read that. There are various strategies intended to foil OCR, such as distorting the characters or overlaying random lines and squiggles. Let's fuzz it up a little. Add the following code to your CaptchaImageController class:
private const int WarpFactor = 5;
private const Double xAmp = WarpFactor * ImageWidth / 100;
private const Double yAmp = WarpFactor * ImageHeight / 85;
private const Double xFreq = 2 * Math.PI / ImageWidth;
private const Double yFreq = 2 * Math.PI / ImageHeight;
private GraphicsPath DeformPath(GraphicsPath path)
{
PointF[] deformed = new PointF[path.PathPoints.Length];
Random rng = new Random();
Double xSeed = rng.NextDouble() * 2 * Math.PI;
Double ySeed = rng.NextDouble() * 2 * Math.PI;
for (int i = 0; i < path.PathPoints.Length; i++)
{
PointF original = path.PathPoints[i];
Double val = xFreq * original.X + yFreq * original.Y;
int xOffset = (int)(xAmp * Math.Sin(val + xSeed));
int yOffset = (int)(yAmp * Math.Sin(val + ySeed));
deformed[i] = new PointF(original.X + xOffset, original.Y + yOffset);
}
return new GraphicsPath(deformed, path.PathTypes);
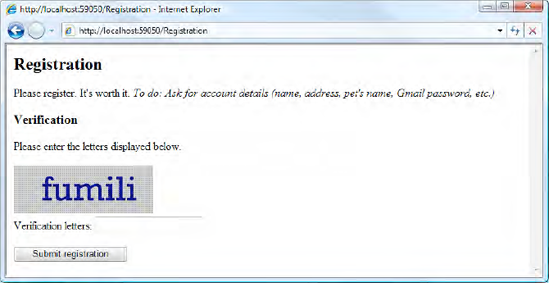
}Basically, this code stretches the canvas over a lumpy surface defined by random sine waves. It's not the most sophisticated protection in the world, but of course you can enhance DeformPath() if you feel that you need to. To make this take effect, update the line in CaptchaImageController's Render() method that actually draws the text, so that it calls DeformPath() (shown in bold):
// Render the path to the bitmap
g.SmoothingMode = SmoothingMode.HighQuality;
g.FillPath(Foreground, DeformPath(path));
g.Flush();
Having done this, the registration screen will appear as shown in Figure 13-9.
OK, you've managed to render a convincing-looking CAPTCHA image, but aren't yet doing anything with form submissions. Start by implementing the VerifyAndExpireSolution() method on CaptchaHelper:
public static bool VerifyAndExpireSolution(HttpContextBase context,
                                           string challengeGuid,
                                           string attemptedSolution)
{
    // Immediately remove the solution from Session to prevent replay attacks
    string solution = (string)context.Session[SessionKeyPrefix + challengeGuid];
    context.Session.Remove(SessionKeyPrefix + challengeGuid);

    return ((solution != null) && (attemptedSolution == solution));
}
As described at the start of the example, it checks whether an attempted solution matches the actual solution stored for a given challenge GUID. Whether or not it does, it expires the solution by removing it from Session[], preventing attackers from reusing known solutions.
Now make use of VerifyAndExpireSolution() by updating RegistrationController's SubmitRegistration() action method:
public ActionResult SubmitRegistration(string myCaptcha, string attempt)
{
    if (CaptchaHelper.VerifyAndExpireSolution(HttpContext, myCaptcha, attempt)) {
        // In a real app, actually register the user now
        return Content("Pass");
    } else {
        // Redisplay the view with an error message
        ModelState.AddModelError("attempt", "Incorrect - please try again");
        return View("Index");
    }
}
That's it. If the visitor enters the correct letters, it will display Pass. Otherwise, it will register a validation error message in ModelState and redisplay the same registration view.
In conclusion, it's fairly straightforward to create a CAPTCHA helper that's easy to reuse in any number of forms throughout your ASP.NET MVC application. This simple example won't protect you from the most determined attackers, but then it's highly unlikely that any CAPTCHA test will be sufficient for that.
Tip
If you want to turn this into a reusable, distributable CAPTCHA component to share across multiple solutions, all you have to do is put the CaptchaHelper and CaptchaImageController classes into a stand-alone assembly.
The reusable control-like constructions covered in Chapter 11—HTML helper methods and partial views—are great for generating HTML markup, but neither of them are good places to put application logic. When you need to implement application logic or work with the application's domain model, it's better to separate such concerns from the mechanism of rendering HTML—it improves the readability and testability of your application.
So, how will you implement some sort of widget[80] that sits in the corner of a page and renders some data unrelated to the rest of the controller's subject matter? I'm talking about things like navigation controls or a stock quotes panel. How will the widget get its data, and if it has to process the data in some way, where will you put that logic?
In this section, you'll explore your options using the powerful HTML helper methods Html.RenderAction() and Html.Action(). Afterward, I'll present a couple of other options.
Html.RenderAction() is very simple in concept: it can call any action method in your application, and it injects that action method's output into the HTML response. When you do this, we call the target action the child action. Any action can invoke any number of child actions, and these in turn can invoke their own child actions.
Html.RenderAction() allows you to pass any set of parameters to the child action. This includes arbitrary routing parameters, because it runs a whole separate MVC request handling pipeline internally, starting by invoking your controller factory with a prepared RouteData structure (see Chapter 7 for an overview of the MVC pipeline).
Since action methods in general allow arbitrary logic, filters, and view templates; support dependency injection (DI) through a custom controller factory; are unit testable; and so on; all those facilities remain available. The target action method acts as a reusable widget, without even needing to know that it's doing so. Simple and very powerful!
In case you've forgotten, we used Html.RenderAction() to create both the navigation menu and the cart summary widget in the SportsStore example in Chapter 5.
Html.RenderAction() is called from a view, and it invokes a controller. From an MVC point of view, that might seem a little backward. What business does a view template have with invoking a controller? Aren't views supposed to be subordinate to controllers? If you've adopted MVC architecture for religious reasons rather than pragmatic ones, you could be offended by the very idea of Html.RenderAction(). But let's take a pragmatic view and consider our old friend, separation of concerns:
If it makes sense for your controller to supply whatever data you're thinking of rendering in the widget, then let it do so, and then use a partial view to render that data as HTML. For example, for the page links at the bottom of a grid, it makes sense for the controller to supply the paging data at the same time as the rest of the grid's data. In this case, there's no need to complicate the MVC pipeline by using a child action.
If the widget you're rendering is logically independent from the controller handling the request, then it would be tidier for the controller not to know about or supply data for that independent widget (the widget's concerns are foreign to it). For example, if you're rendering a global navigation menu on an "About us" page, you don't necessarily want
AboutControllerto be concerned about supplying global navigation data. All you really want to say is, "At this point in the output, display a navigation menu," ignoring the implementation details. The choice to display an independent widget is purely presentational, like displaying an image—a matter for the view, not the controller. For this scenario, child actions work very well, letting you keep the widget's concerns separate from the host controller's concerns.
There will also be intermediate cases where the widget is related to the controller's subject matter, but the controller wouldn't normally expect to provide all the data that the widget needs. In these cases, you might prefer to implement the widget as a partial view, and supply its ViewData entries using an action filter rather than embedding that logic directly into each action method. Structuring your code in the best way is an art, an exercise for your own skill and judgment.
Note
Ruby on Rails has a notion of "components," which fulfill a similar role. These are packages containing a controller and a view, which are rendered into a parent view using a Ruby method called render_component (very similar to ASP.NET MVC's Html.RenderAction()). So why am I telling you this? I'm telling you because in many cases, Rails developers see components as controversial and undesirable, and the debate sometimes spills over into ASP.NET MVC. The main problem with Rails components is that they suffer severe performance issues. Thankfully, you don't have to worry about Rails performance issues! Also, the original plan for Rails components was that they could be reused across projects. This turned out to be a bad idea, because it prevented each project from having its own separately encapsulated domain model. The lesson for ASP.NET MVC developers is that child action widgets might help you to separate concerns within one project, but they won't usually be reusable across multiple projects.
A widget based on Html.RenderAction() is nothing more than an action method—any action method. For example, you might create a controller class, WorldClockController, containing an Index action:
public class WorldClockController : Controller
{
    public ViewResult Index() {
        return View(new Dictionary<string, DateTime>
        {
            { "UTC", DateTime.UtcNow },
            { "New York", DateTime.UtcNow.AddHours(−5) },
            { "Hong Kong", DateTime.UtcNow.AddHours(8) }
        });
    }
}
You might add a strongly typed partial view for this action at /Views/WorldClock/Index.ascx, by right-clicking inside the action method, choosing Add View, ensuring that "Create a partial view (.ascx)" is checked, and entering Dictionary<string, DateTime> as the "View data class." The partial view could contain the following:
<%@ Control Language="C#"
    Inherits="System.Web.Mvc.ViewUserControl<Dictionary<string, DateTime>>" %>
<table>
    <thead><tr>
            <th>Location</th>
            <th>Time</th>
    </tr></thead>
<% foreach(var pair in Model) { %>
<tr>
<td><%: pair.Key %></td>
<td><%: pair.Value.ToShortTimeString() %></td>
</tr>
<% } %>
</table>Note
This is a partial view (i.e., an ASCX file). You don't have to use a partial view for the control's view—a regular view (ASPX) would work too. However, it does make sense to use a partial view given that you only want to render a fragment of HTML, not a whole page.
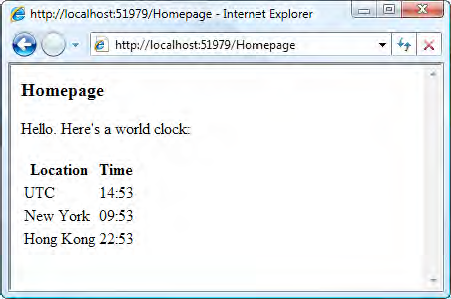
With this in place, it's easy to treat WorldClockController's Index action as a reusable widget, invoking it from any other view. For example, write the following in some other view:
<h3>Homepage</h3>
<p>Hello. Here's a world clock:</p>
<% Html.RenderAction("Index", "WorldClock"); %>
Note
Notice that the syntax for calling Html.RenderAction() is like that for Html.RenderPartial(). The method doesn't return a string; it just allows the target action to send output to the response stream. It's a complete line of code, not an expression to be evaluated, so write <% ...; %> (with the trailing semicolon), not <%: ... %>.
This will render the screen shown in Figure 13-10.
Behind the scenes, Html.RenderAction() sets up a new RouteData object containing the controller and action values you've specified, and uses that to run a new internal request. (starting by invoking your controller factory), piping the output to your response stream. It works by invoking the core ASP.NET platform's Server.Execute() method, so child requests behave almost indistinguishably from normal requests.
You can pass any parameters that the action method requires, too, either as a RouteValueDictionary or as an anonymously typed object. These too go into the RouteData object used for the internal request, and are matched to action method parameters by the MVC Framework's usual mechanism for binding routing parameters to action method parameters. To do this, just supply a third parameter (it's called routeValues)—for example:
<% Html.RenderAction("Index", "WorldClock", new { visitorTimezone = "GMT" }); %>Warning
Due to implementation details in the core ASP.NET platform's output caching mechanism, the built-in [OutputCache] filter isn't compatible with Html.RenderAction(). If you try to use [OutputCache] while processing a child action, the filter won't cache anything—it will do nothing. You can only use [OutputCache] on the top-level parent action. If you want to cache the output from individual Html.RenderAction() widgets, you can obtain an alternative output-caching filter from my blog, at http://tinyurl.com/mvcOutputCache.
Child actions are only allowed to render textual data (e.g., by rendering a view or returning a ContentResult). They cannot perform redirections (e.g., by returning a RedirectResult or a RedirectToRouteResult) because this wouldn't make sense—there's no way to include a redirection in the middle of an HTML page. If you do try to perform a redirection from a child action, the framework will throw an InvalidOperationException.
In some cases, instead of piping the child action's output directly to the response stream, you may prefer to capture it as a string value. This is easy: just use Html.Action() instead of Html.RenderAction().[81] Here's an example:
<%: Html.Action("Index", "WorldClock") %>Notice that this view markup uses <%: ... %> rather than <% ...; %>, because it's now evaluating a string rather than executing a statement.
There's no reason to prefer this above Html.RenderAction()—in fact, it performs slightly worse because it has to construct an extra StringWriter and use it as a buffer for the child action output—except if you need to manipulate the child action's output in some way before displaying it. The following example encodes the child action's output before using it within JavaScript code.
<script type="text/javascript">
    var html = "<%: Ajax.JavaScriptStringEncode(Html.Action(...).ToString()) %>";
    // Now do something with this variable
</script>
Without the call to Ajax.JavaScriptStringEncode(), which you'll learn more about in Chapter 15, this view markup would usually lead to a JavaScript error because the child action may output newline and quote characters.
Similarly, you might use Html.Action() so that you can extract and transmit only a subsection of the child action's output using Html.Action(...).ToString().Substring(...) (though arguably, it would be better to refactor your code so that there was an action that returned only the desired output).
Usually, action methods don't need to know or care whether they are being invoked as a child action. However, in a few cases, you may need to detect whether there is a parent action, and if so, access some of its context data. This situation might arise if you're creating a custom filter that shouldn't apply during child requests, or if you're extending the request processing pipeline in an advanced way.
The ControllerContext class (and also by inheritance the ViewContext class) exposes two relevant properties: IsChildRequest and ParentActionViewContext. To illustrate their usage, here's a simple example of how you can use them to vary a view's output:
<% if (ViewContext.IsChildAction) { %>
    You're calling me from the
    <%: ViewContext.ParentActionViewContext.RouteData.Values["action"] %>
    action
<% } %>When you create an action whose sole purpose is to be invoked as a child action, it doesn't make sense for anybody to invoke that action directly via an HTTP request. If you want to prevent people from invoking it directly, you can use an authorization filter called [ChildActionOnly]—for example:
public class WorldClockController : Controller
{
    [ChildActionOnly]
    public ViewResult Index()
    {
        ... as before ...
    }
}
Now, this action is no longer publicly reachable on any URL, regardless of your routing configuration, and can only be called internally via Html.Action() or Html.RenderAction(). If someone does navigate to a URL that maps to this action, the filter will block the request by throwing an InvalidOperationException, saying "The action 'Index' is accessible only by a child request."
In many cases it won't matter whether you restrict an action like this or not. However, it might be a security concern: if your action returns sensitive data depending on its method parameters, you'll want to be sure that the parameter values were provided by your own call to Html.Action() or Html.RenderAction() and were not provided by someone arbitrarily invoking the action by entering its public URL into their browser.
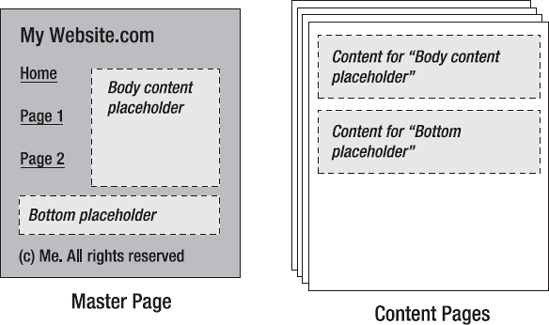
Most web sites have a set of common interface elements, such as a title area and navigation controls, shared across all their pages. Ever since ASP.NET 2.0, it's been possible to achieve this effect by creating one or more layout blueprints called master pages, and then defining the site's remaining pages ("content pages") in terms of how to fill in the gaps on a master page. At runtime, the platform combines the two to generate a finished HTML page. This arrangement is depicted in Figure 13-11.
It's easy to create a new master page: right-click a folder in Solution Explorer, choose Add
Master pages have a .Master file name extension and look just like view templates, except that they contain special <asp:ContentPlaceHolder ... /> controls that define the gaps to be filled in. Each time you create a new view page associated with that master page, the view will contain an <asp:Content .../> control for each gap in the master page.
If you're familiar with master pages in traditional ASP.NET, you'll find that MVC View Master Pages and associated view pages work exactly as you'd expect. You already saw an example of setting up and using master pages as part of the SportsStore example in Chapter 4. Because of this, and because master pages are really an ASP.NET Web Forms feature, not an ASP.NET MVC feature, I won't include a detailed guide to their use here.
Most ASP.NET MVC developers wonder at some stage how to put controls or widgets into a master page. It's easy to render a partial view from a master page using <% Html.RenderPartial(); %>. But how do you send some ViewData to that partial view? There are several ways.
As you know, partial views by default have access to the entire ViewData structure supplied by the controller. That's still true if the partial view was rendered from a .Master file rather than from a regular view template. So, if your controller populates ViewData["valueForMyPartial"], then your partial view can access that value, whether it was rendered from a master page or a content page.
Rather than sending the entireViewData structure to the partial view, you can just send a specific value that will become its Model object. For example, in your .Master file, add the following:
<% Html.RenderPartial("MyPartial", ViewData["valueForMyPartial"]); %>There's nothing new about this. You saw how to use Html.RenderPartial() like this earlier in the chapter.
Method 1 will get tedious when you have many controllers and action methods. Every single one of them has to remember to populate ViewData["valueForMyPartial"], even when that's got nothing to do with them. You don't really want to mix unrelated concerns like this, so it's better to factor out that activity.
It's tidier to create an action filter that populates ViewData["valueForMyPartial"]. For example, create a class similar to the following anywhere in your ASP.NET MVC project:
public class UsesMyWidgetAttribute : ActionFilterAttribute
{
    public override void OnResultExecuting(ResultExecutingContext filterContext)
    {
        ViewResult viewResult = filterContext.Result as ViewResult;
        if (viewResult != null)
        {
            // We're going to render a view, so add a value to ViewData
            viewResult.ViewData["valueForMyPartial"] = someValue;
        }
    }
}
Now, you merely have to tag a controller or action method with [UsesMyWidget], and you know that ViewData["valueForMyPartial"] will be populated appropriately, so your .Master template can retrieve that value and send it on to the partial view.
Note
This technique is essentially what many Rails developers prefer as their means of implementing all reusable controls. It's arguably more consistent with "pure" MVC architecture than using child actions (or components, the Rails equivalent), because the data-gathering phase all happens at once while the controller is in charge. However, your ultimate goal isn't just to follow the MVC pattern—your real goal is to deliver high-quality, maintainable software—and sometimes child actions can lead to a tidier and less repetitious application structure.
Method 2 is fine, but you still have to remember to tag controllers and actions with your widget-specific filter. You might find yourself applying it to every single controller purely for convenience, but that would just be clutter if there are some views that don't even render the partial view.
Child actions, rendered using Html.RenderAction(), are a simple and effective alternative. These are just as easy to use from a master page as from any other view template, and they give you widgets that can populate their own Model and ViewData structures automatically, whenever they're rendered. This works particularly well if the widget is supposed to act independently of everything else on the page.
Like every other component in the MVC Framework, you have complete freedom to swap out the Web Forms view engine for any other view engine. You can implement your own, or adopt one of several open source view engines, each of which comes with its own advantages and disadvantages. We'll take a look at some of the most popular ones shortly.
A view engine can be arbitrarily sophisticated (Web Forms is pretty sophisticated), but it can also be very simple. All that a view really has to do is
Most view engines provide some kind of templating system so that step 2 can be customized quickly. Even this doesn't have to be difficult, as you're about to see.
Here's an example of a custom view engine. It will allow you to write view templates as XSLT transformations and use them to render any XML document that you send as ViewData.Model. You'll have a complete replacement for the framework's Web Forms view engine, though of course a far less powerful one.
The IViewEngine interface describes the ability to supply views (objects implementing IView). This allows you to implement any strategy or convention for locating or constructing views, either from disk or elsewhere, such as a database. If your view templates are files on disk, it's easiest to derive a class from VirtualPathProviderViewEngine, because it provides the behavior of searching in a sequence of disk locations according to a naming convention based on controller and action names. The built-in WebFormViewEngine is derived from that class.
Here's a view engine whose convention is to look for XSLT (*.xslt) files stored in /Views/nameOfController or /Views/Shared, or the equivalent folders under /Areas/areaName/. You can put this class anywhere in your ASP.NET MVC project:
public class XSLTViewEngine : VirtualPathProviderViewEngine
{
    public XSLTViewEngine()
    {
        ViewLocationFormats = PartialViewLocationFormats = new[] {
            "~/Views/{1}/{0}.xslt",
            "~/Views/Shared/{0}.xslt",
        };

        AreaViewLocationFormats = AreaPartialViewLocationFormats = new[] {
            "~/Areas/{2}/Views/{1}/{0}.xslt",
"~/Areas/{2}/Views/Shared/{0}.xslt",
};
}
protected override IView CreateView(ControllerContext controllerContext,
string viewPath, string masterPath) {
// This view engine doesn't have any concept of master pages,
// so it can ignore any requests to use a master page
return new XSLTView(controllerContext, viewPath);
}
protected override IView CreatePartialView(ControllerContext controllerContext,
string partialPath) {
// This view engine doesn't need to distinguish between
// partial views and regular views, so it simply calls
// the regular CreateView() method
return CreateView(controllerContext, partialPath, null);
}
}When the VirtualPathProviderViewEngine base class finds a file on disk matching ViewLocationFormats, it calls your CreateView() or CreatePartialView() method (depending on what's being requested), and it's then up to you to supply a suitable IView.
In this case, your view engine supplies an instance of XSLTView(), defined as follows:
public class XSLTView : IView
{
    private readonly XslCompiledTransform _template;

    public XSLTView(ControllerContext controllerContext, string viewPath)
    {
        // Load the view template
        _template = new XslCompiledTransform();
        _template.Load(controllerContext.HttpContext.Server.MapPath(viewPath));
    }

    public void Render(ViewContext viewContext, TextWriter writer)
    {
        // Check that the incoming ViewData is legal
        XDocument xmlModel = viewContext.ViewData.Model as XDocument;
        if (xmlModel == null)
            throw new ArgumentException("ViewData.Model must be an XDocument");

        // Run the transformation directly to the output stream
        _template.Transform(xmlModel.CreateReader(), null, writer);
    }
}
The IView interface requires only that you implement a Render() method, which is expected to send output to the response stream, writer. In this example, that's achieved by performing an XSLT transformation on the incoming ViewData.Model object.
Tip
Notice that the framework's API intends for you to provide output by writing to a parameter of type TextWriter. That's fine if you only wish to emit text, but what if you want to create a view engine that emits binary data, such as images or PDF files? In that case, you can send raw bytes to viewContext.HttpContext.Response.OutputStream. However, this won't be compatible with Html.Action(), which can only capture text written to the TextWriter.
With these classes in place, it's now possible to invoke the custom view engine from an action method—for example:
public class BooksController : Controller
{
    public ViewResult Index()
    {
        ViewResult result = View(GetBooks());
        result.ViewEngineCollection = new ViewEngineCollection {
            new XSLTViewEngine()
        };
        return result;
    }

    private XDocument GetBooks()
    {
        return XDocument.Parse(@"
          <Books>
             <Book title='How to annoy dolphins' author='B. Swimmer'/>
             <Book title='How I survived dolphin attack' author='B. Swimmer'/>
          </Books>
        ");
    }
}
As you can see, this code uses an unusual way of rendering a view: it explicitly constructs an instance of ViewResult instead of simply calling View(). That enables it to specify a particular view engine to use. In a moment, I'll show how to register your custom view engine with the MVC Framework so that this awkwardness isn't necessary.
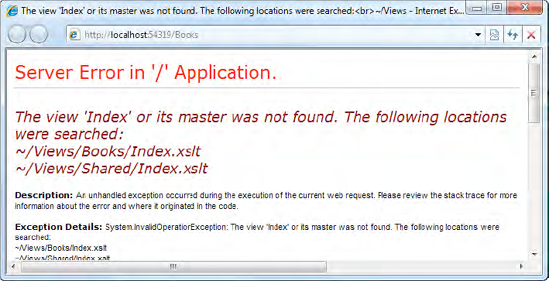
But first, if you run this now by pressing F5 and then navigating to /Books, you'll get the error screen shown in Figure 13-12. Obviously, this is because you haven't prepared a view template yet. Notice that the error message automatically describes the view-naming convention you've established in your VirtualPathProviderViewEngine subclass.
To resolve this, create an XSLT transformation at /Views/Books/Index.xslt, containing the following:
<?xml version="1.0" encoding="utf-8"?>
<xsl:stylesheet version="1.0" xmlns:xsl="http://www.w3.org/1999/XSL/Transform"
xmlns:msxsl="urn:schemas-microsoft-com:xslt" exclude-result-prefixes="msxsl"
>
<xsl:output method="html" indent="yes"/>
<xsl:template match="/">
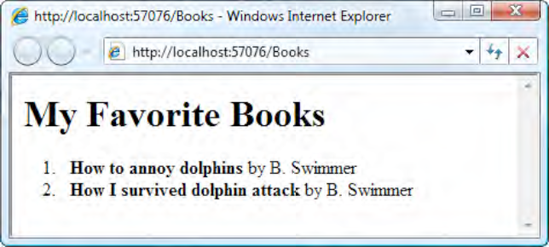
<h1>My Favorite Books</h1>
<ol>
<xsl:for-each select="Books/Book">
<li>
<b>
<xsl:value-of select="@title"/>
</b>
<xsl:text> by </xsl:text>
<xsl:value-of select="@author"/>
</li>
</xsl:for-each>
</ol>
</xsl:template>
</xsl:stylesheet>Run the action method again, and it will work properly (see Figure 13-13). You've got a fully functional custom view engine.
Instead of forcing your controllers to explicitly nominate a custom view engine each time, you can register custom view engines in a static collection called ViewEngines.Engines. You only need to do this once, usually during your application initialization.
For example, in your Global.asax.cs file's Application_Start() handler, add the following:
protected void Application_Start()
{
    AreaRegistration.RegisterAllAreas();
    RegisterRoutes(RouteTable.Routes);
    ViewEngines.Engines.Add(new XSLTViewEngine());
}
The previous BooksController's Index() action can now be simplified as follows:
public ViewResult Index()
{
    return View(GetBooks());
}
The ViewEngines.Engines collection already contains an instance of WebFormViewEngine by default. So now the framework will first ask WebFormViewEngine to supply a view. If no matching .aspx or .ascx file is found, it will then ask XSLTViewEngine to supply a view. This mechanism allows you to enable multiple view engines concurrently, choosing a particular priority order, and for each request using the first view engine that's able to find a template matching its own naming convention.
If you wish to prioritize your custom view engine above the built-in WebFormViewEngine, change your Global.asax.cs initialization code as follows:
protected void Application_Start()
{
    AreaRegistration.RegisterAllAreas();
RegisterRoutes(RouteTable.Routes);ViewEngines.Engines.Clear();ViewEngines.Engines.Add(new XSLTViewEngine()); // First priorityViewEngines.Engines.Add(new WebFormViewEngine()); // Second priority}
Of course, if you wish never to use WebFormViewEngine, that's just a matter of not including it in ViewEngines.Engines.
Even though ASP.NET MVC's built-in WebFormViewEngine can do everything that most developers require, there is a range of open source view engines that are worth a look. Most of them are ports of view engines from other MVC-based web application platforms, and each has different strengths. Few of them are so well integrated into Visual Studio as the default Web Forms view engine (e.g., of the following, only Spark currently attempts to provide IntelliSense), but some ASP.NET MVC developers still find them easier to use.
Advocates of alternative view engines often claim that ASPX views are messy and cluttered, saying that the <% ... %> syntax just looks like random punctuation, and that <%@ Page %> directives are an unwanted holdover from the Web Forms era. My personal experience from working on large ASP.NET MVC projects has been that WebFormViewEngine has been fine to work with—I've faced many difficulties, but creating views has not been one of them—so I don't feel strongly about ditching it. Nonetheless, Spark has gained significant popularity and is definitely worth considering if its syntax appeals to you.
In the remainder of this chapter, you'll find a brief guide to using each of the following open source view engines in ASP.NET MVC:
NVelocity
Brail
NHaml
Spark
It would take far too many pages to present a detailed guide to every one of these alternative view engines—their installation, rules and syntax, special features, quirks, and problems—and in fact, some of those details will probably have changed by the time you read this. So instead, for each view engine, I'll describe the big idea and show an example of its syntax. If you want to learn more and actually use one of them yourself, you should consult the web site of the corresponding open source project to find out the latest download, installation, and usage details.
In each of the following examples, we'll try to produce the same output, assuming a common ViewData structure as shown here:
ViewData["message"] = "Hello, world!";
ViewData.Model = new List<Mountain> // Mountain simply contains three properties
{
    new Mountain { Name = "Everest", Height=8848,
                   DateDiscovered = new DateTime(1732, 10, 3) },
    new Mountain { Name = "Kilimanjaro", Height=5895,
                   DateDiscovered = new DateTime(1995, 3, 1) },
    new Mountain { Name = "Snowdon", Height=1085,
                   DateDiscovered = new DateTime(1661, 4, 15) },
};ApacheVelocity is a general purpose Java-based template engine that can be used to generate almost any kind of textual output. Its .NET port, NVelocity, powers the default view engine for Castle MonoRail (an alternative .NET MVC web application platform).
If you're familiar with NVelocity syntax, then you might be interested in using it with ASP.NET MVC, and that's quite easy because the MVC Contrib Extras project contains MvcContrib.ViewEngines.NVelocity.dll—an assembly containing the class NVelocityViewEngine, an NVelocity-powered view engine. You can download MVCContrib.Extras from www.codeplex.com/mvccontrib. The instructions in this chapter refer to MVCContrib.Extras version 2.0.34.0.
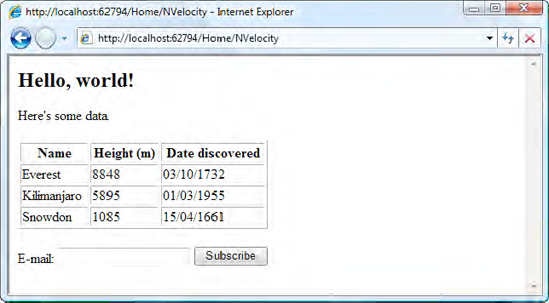
NVelocity templates have a .vm file name extension, so the default template for HomeController's Index action goes at /Views/Home/Index.vm. Here's an example of an NVelocity template:
<h2>$message</h2>
<p>Here's some data</p>
#foreach($m in $ViewData.Model)
  #beforeall
    <table width="50%" border="1">
      <thead>
        <tr>
          <th>Name</th>
          <th>Height (m)</th>
          <th>Date discovered</th>
        </tr>
      </thead>
  #each
      <tr>
        <td>$m.Name</td>
        <td>$m.Height</td>
        <td>$m.DateDiscovered.ToShortDateString()</td>
      </tr>
  #afterall
    </table>
#end
<form action="$Url.Action("SubmitEmail")" method="post">
  E-mail:  $Html.TextBox("email")
  <input type="submit" value="Subscribe" />
</form>
For the ViewData structure described previously, this will render the screen shown in Figure 13-14.
NVelocity has an especially nice #foreach syntax, letting you specify text to be output before all elements (#beforeall), between elements (#between), after all elements (#afterall), and if there are no elements in the set (#nodata). Also, it acts like a duck-typed language, meaning that you can pick out properties from objects by name (e.g., $m.Height) without having to know that object's type—you don't have to cast the object to a known type first.
However, it doesn't allow you to evaluate arbitrary C# expressions—you can only evaluate expressions that fit into its very limited syntax, so it's difficult to use it to call all the MVC Framework's built-in helper methods. Also, since it's so general purpose, its syntax doesn't have any particular optimizations for generating HTML, unlike some of the others you're about to see.
NVelocity has a system of "layouts" and "components" that substitute for Web Forms' master pages and user controls.
Brail was created for Castle MonoRail, as an alternative to NVelocity. The main difference is that it uses the Boo language[82] for inline code and expressions, which means that like ASPX files and unlike NVelocity templates, it can accept arbitrary expressions and code snippets. To use Brail with ASP.NET MVC, you can use MvcContrib.ViewFactories.BrailViewFactory, included in the MvcContrib.BrailViewEngine.dll assembly, which is part of the MVCContrib.Extras project. Again, these instructions refer to MVCContrib.Extras version 2.0.34.0.
Brail templates have a .brail extension, so the default view for HomeController's Index() action goes at /Views/Home/Index.brail. Here's an example:
<h2>${message}</h2>
<p>Here's some data:</p></para>
<table width="50%" border="1">
  <thead>
    <tr>
      <th>Name</th>
      <th>Height (m)</th>
      <th>Date discovered</th>
    </tr>
  </thead>
  <% for m in ViewData.Model: %>
    <tr>
      <td>${m.Name}</td>
      <td>${m.Height}</td>
      <td>${m.DateDiscovered.ToShortDateString()}</td>
    </tr>
  <% end %>
</table>
<form action="${Url.Action("SubmitEmail")}" method="post">
  E-mail: ${html.TextBox("email")}
  <input type="submit" value="Subscribe" />
</form>
This view template will render the exact same screen as that shown in Figure 13-14 earlier.
As you can see, Brail is very similar to NVelocity. It doesn't have the cool #foreach syntax, but it does make life easier when you want to evaluate arbitrary expressions. Brail also has a system of "layouts" and "components" that substitute for Web Forms' master pages and user controls.
NHaml is a port of the Haml template engine for Ruby on Rails, which takes a bravely different approach to generating HTML.
All the view engines you've seen so far are essentially systems for putting inline code into an HTML file. NHaml, however, is more of a domain-specific language (DSL) for generating XHTML. Its template files describe XHTML minimally, but they don't actually look anything like XHTML. The NHaml view engine is downloadable from code.google.com/p/nhaml/.
Its templates have a .haml extension, so the default template for HomeController's Index action goes at /Views/Home/Index.haml. Here's an example, which renders the same screen shown in Figure 13-14 earlier:
%h2= ViewData["message"]
%p Here's some data
%table{ width="50%" border=1 }
  %thead
    %tr
      %th Name
      %th Height (m)
      %th Date discovered
  - foreach(var m in Model)
    %tr
      %td= m.Name
%td= m.Height
%td= m.DateDiscovered.ToShortDateString()
%form{ action=Url.Action("SubmitEmail") method="post" }
E-mail:
= Html.TextBox("email")
%input { type="submit" value="Subscribe" }Whoa—crazy! What's all that about? Each line prefixed with a % symbol represents a tag. Attributes go inside curly braces ({ . . . }). Indentation describes tag hierarchy. You can use = to evaluate arbitrary C# expressions, which includes calling HTML helper methods. Lines prefixed by a dash (-) represent C# statements. Despite being based on C#, it acts like a duck-typed language, so you can access arbitrary object properties without needing typecasts. NHaml also has a system of "layouts" and "partials" to substitute for Web Forms' master pages and user controls. However unfamiliar this is, you can see that it's a very terse and precise way to describe dynamic XHTML.
I saved the most popular one until last! Spark is a view engine for ASP.NET MVC and Castle MonoRail. You can get it from its web site, at http://sparkviewengine.com/. The idea of Spark is to integrate inline code expressions into the flow of your HTML, so that your brain doesn't have to keep context-switching between code and HTML, and so as not to frighten web designers who need to work with your view templates. Also, it allows you to use arbitrary C# code to evaluate expressions.
Spark templates have a .spark extension, so the default template for HomeController's Index action goes at /Views/Home/Index.spark. Here's an example based on Spark version 1.0.39970.0, which renders the same screen shown in Figure 13-14 earlier:
<use namespace="System.Collections.Generic"/> <use namespace="System.Web.Mvc.Html"/> <viewdata model="IList[[YourNamespace.Mountain]]"/> <h2>${ViewData["message"]}</h2> <p>Here's some data</p> <table width="50%" border="1"> <thead> <tr> <th>Name</th> <th>Height (m)</th> <th>Date discovered</th> </tr> </thead><tr each='var m in Model'><td>${m.Name}</td> <td>${m.Height}</td> <td>${m.DateDiscovered.ToShortDateString()}</td> </tr> </table> <form action="${Url.Action("SubmitEmail")}" method="post"> E-mail: ${Html.TextBox("email")} <input type="submit" value="Subscribe" /> </form>
The most interesting line to notice is the one highlighted in bold. You can see that there isn't an explicit foreach loop anywhere—the notion of iteration has been elegantly reduced to a tag attribute. Spark also has a very neat way of including external partial templates simply by referencing them as a tag (e.g., <MyPartialTemplate myparam="val"/>) without even having to register those special tags anywhere. Finally, Spark also comes with a system of master templates that work similarly to Web Forms master pages.
Note that because Spark is based on C#, it doesn't act like a duck-typed language. To access properties of an object, you first have to cast the object to a specific type, importing that type's namespace when needed. That's why there are a couple of <use namespace="..."/> nodes at the top of the template. Alternatively, you can configure namespace imports globally when you first instantiate your SparkViewFactory, as shown here:
protected void Application_Start()
{
    AreaRegistration.RegisterAllAreas();
    RegisterRoutes(RouteTable.Routes);

   ViewEngines.Engines.Clear();
    ViewEngines.Engines.Add(new SparkViewFactory(
        new SparkSettings()
            .AddNamespace("System.Collections.Generic")
            .AddNamespace("System.Web.Mvc.Html")
            .AddNamespace("YourApplication.Models")
    ));
}
Of all the view engines you've just seen, Spark is the most serious candidate to replace the default Web Forms view engine in real ASP.NET MVC applications. It has significantly more users than the others because it's under more active development, has excellent documentation, and even makes an effort at providing syntax highlighting and IntelliSense via a Visual Studio integration package with a proper installer (currently for Visual Studio 2008 only).
This chapter demonstrated a range of common user interface techniques, including a multistep wizard, a CAPTCHA control, and independently reusable widgets built using child actions. We also considered alternatives to the default WebFormViewEngine: a custom view engine and a range of open source view engines.
Since you've now learned the majority of the MVC Framework's built-in features, you've got most of the building blocks for typical web applications. However, we haven't yet paid any significant attention to client-side interactivity. The next chapter shows how ASP.NET MVC plays nicely with JavaScript and Ajax, helping you to build a rich and modern in-browser user experience for your clients.
[78] I haven't applied [DataType(DataType.EmailAddress)] to the Email property because, as described in the previous chapter, that wouldn't produce the result that most developers would expect. See the previous chapter for examples of how to implement custom validation logic to validate e-mail addresses.
[79] And also because ASP.NET Web Forms has a built-in wizard control—but that's beside the point. The approach shown here is a starting point for you to build your own interactive workflows and behaviors.
[80] I'm using the nonstandard word widget rather than the word control specifically to avoid any sense that it should behave like a Web Forms server control or a Windows Forms control. In particular, you should not expect to allow two-way interaction between users and these widgets, because in ASP.NET MVC, view code is merely about generating HTML, not handling user interaction. For rich user interaction in ASP.NET MVC, consider finding or creating a purely client-side (Ajax) control. This will give the best possible user experience.
[81] Html.Action() and Html.RenderAction() are related in the same way as Html.Partial() and Html.RenderPartial().
[82] Boo is a statically typed, .NET-based programming language, with a syntax similar to Python. Its main selling points are its concise syntax and extreme flexibility.