You've just experienced building a good-sized MVC application, SportsStore, and picked up a lot of ASP.NET MVC development knowledge along the way. However, this was just one example, and it didn't cover every feature and facility in the MVC Framework. To progress, we'll now take a more systematic look at each aspect of the framework. In Chapter 8, you'll learn more about the core routing system. In Chapters 9 and 10, you'll see what's on offer as you build controllers and actions. Chapter 11 focuses on the framework's built-in view engine. Chapter 12 describes what ASP.NET MVC does for your models. The rest of the book considers other common web development tasks and scenarios, including security and deployment.
But hang on a minute—to make sure we don't get lost in the small-print details of each MVC component, let's take stock of the bigger picture. This chapter will summarize the overall landscape of MVC applications: the default project structure and naming conventions you must follow. You'll also get a condensed view of the entire request processing pipeline, showing how all the framework components work together.
Note
More advanced readers who are already comfortable with the ASP.NET MVC project structure, and how IIS, routing, controllers, and views all fit together at runtime, can skip ahead to the next chapter where we'll begin exploring the depths of the framework and its extensibility. This short chapter is intended to bridge any gaps in understanding for readers newer to ASP.NET MVC and ASP.NET generally.
When you use Visual Studio to create a brand new ASP.NET MVC 2 project, the File
ASP.NET MVC 2 Web Application
ASP.NET MVC 2 Empty Web Application (note that to see this option, you'll need to open the Web category inside the File

The first option sets up a relatively large initial set of files and folders matching those shown in Figure 7-1. This suggested project structure is supposed to help you get started; it provides a skeleton application with a simplistic way of performing navigation, user registration, and authentication. The second option gives you a smaller number of initial files and folders; it tries to stay out of your way by giving you just the minimal structure that almost all ASP.NET MVC projects will actually want to keep.
Some of these initial items have special roles hard-coded into the MVC Framework (and are subject to predetermined naming conventions), while others are merely suggestions for how to structure your project. These roles and rules are described in Table 7-1.
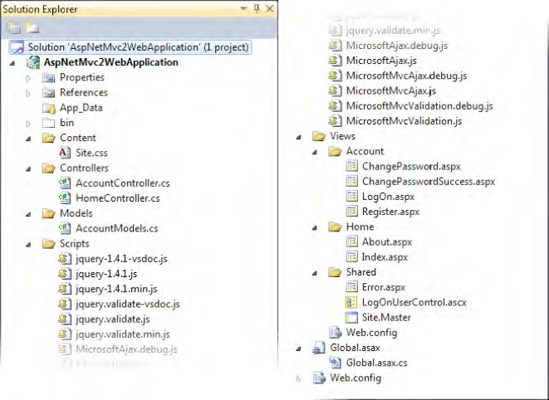
Figure 7-1. Solution Explorer immediately after creating a new ASP.NET MVC 2 Web Application project and enabling Show All Files. Note that the Emptyproject template does not create any of these controllers or view files by default; it mainly creates empty folders.
Table 7-1. Files and Folders in the Default ASP.NET MVC 2 Web Application Template
Intended Purpose | Special Powers and Responsibilities | |
|---|---|---|
| If you use a file-based database (e.g., an | IIS won't serve its contents to the public. When you have SQL Server Express Edition installed and reference a connection string containing |
| This contains the compiled .NET assembly for your MVC web application, and any other assemblies it references (just like in a traditional ASP.NET Web Forms application). | IIS expects to find your DLLs here During compilation, Visual Studio copies any referenced DLLs to this folder (except ones from the system-wide global assembly cache (GAC). IIS won't serve its contents to the public. |
| This is a place to put static, publicly servable files (e.g., | None—it's just a suggestion. You can delete it if you want, but you'll need somewhere to put images and CSS files, and this is a good place for them. |
| This holds your controller classes (i.e., classes derived from | None—it's just a suggestion. It makes no difference whether you put controllers directly into this folder, into a subfolder of it, or anywhere else in the whole project, because they're all compiled into the same assembly. You can also put controller classes into other referenced projects or assemblies. You can delete this folder's initial contents ( |
| This is a place to put model classes representing data items that users can view or edit. However, in all but the most trivial of applications, it's better to put your domain model into a totally separate C# class library project instead. You can then either delete | None—feel free to delete it. |
This is another place for static, publicly servable files, but this one is of course intended for JavaScript code files | None—you can delete this folder, but if you want to use the | |
| This holds views (usually | By convention, views for the controller class If you're not using the initially provided |
| This holds views that aren't associated with a specific controller—for example, master pages | If the framework can't find |
| This is not your application's main | It's necessary for the reasons I've just described. |
| This defines the global ASP.NET application object. Its code-behind class ( | ASP.NET expects to find a file with this name, but won't serve it to the public. |
| This defines your application configuration. You'll hear more about this important file later in the chapter. | ASP.NET (and IIS 7.x) expects to find a file with this name, but won't serve it to the public. |
Note
As you'll learn in Chapter 16, you deploy an MVC application by copying much of this folder structure to your web server. For security reasons, IIS won't serve files whose full paths contain Web.config, bin, App_code, App_GlobalResources, App_LocalResources, App_WebReferences, App_Data, or App_Browsers, because IIS 7's applicationHost.config file contains <hiddenSegments> nodes hiding them. (IIS 6 won't serve them either, because it has an ISAPI extension, called aspnet_filter.dll, that is hard-coded to filter them out.) Similarly, IIS is configured to filter out requests for *.asax, *.ascx, *.sitemap, *.resx, *.mdb, *.mdf, *.ldf, *.csproj, and various others.
Those are the files you get by default when creating a new ASP.NET MVC web application, but there are also other folders and files that, if they exist, can have special meanings to the platform. These are described in Table 7-2.
Table 7-2. Optional Files and Folders That Have Special Meanings
Folder or File | Meaning |
|---|---|
| If you create at least one area (by right-clicking your project name in Solution Explorer and then choosing Add |
| These contain resource files used for localizing Web Forms pages. You'll learn more about internationalization in Chapter 17. |
| This contains |
| This contains Web Forms "themes" (including |
The last three are really part of the core ASP.NET platform, and aren't necessarily so relevant for ASP.NET MVC applications. For more information about these, consult a dedicated ASP.NET platform reference.
As you will have noticed by now, ASP.NET MVC prefers convention over configuration.[45] This means, for example, that you don't have to configure explicit associations between controllers and their views; you simply follow a certain naming convention and it just works. (To be fair, there's still a lot of configuration you'll end up doing in Web.config, but that has more to do with IIS and the core ASP.NET platform.) Even though the naming conventions have been mentioned previously, let's clarify by recapping:
Controller classes must have names ending with
Controller(e.g.,ProductsController). This is hard-coded intoDefaultControllerFactory: if you don't follow the convention, it won't recognize your class as being a controller, and won't route any requests to it. Note that if you create your ownIControllerFactory(described in Chapter 10), you don't have to follow this convention.Views and partial views (
*.aspxand*.ascx) should go into the folder/Views/controllername. Don't include the trailing stringControllerhere—views forProductsControllershould go into/Views/Products(not/Views/ProductsController).The default view for an action method should be named after the action method. For example, the default view for
ProductsController'sListaction would go at/Views/Products/List.aspx. Alternatively, you can specify a view name (e.g., by returningView("SomeView")), and then the framework will look for/Views/Product/SomeView.aspx.When the framework can't find a view called
/Views/Products/Xyz.aspx, it will try/Views/Products/Xyz.ascx. If that fails, it will try/Views/Shared/Xyz.aspxand then/Views/Shared/Xyz.ascx. So, you can use/Views/Sharedfor any views that are shared across multiple controllers.
All of the conventions having to do with view folders and names can be overridden using a custom view engine. You'll see how to do this in Chapter 13.
As you can see from Figure 7-1, newborn ASP.NET MVC projects don't enter the world empty handed. If you create an ASP.NET MVC 2 Web Application project, then already built in are controllers called HomeController and AccountController, plus a few associated views. Quite a bit of application behavior is already embedded in these files.
HomeControllercan render a Home page and an About page. These pages are generated using a master page and a soothing blue-themed CSS file.AccountControllerallows visitors to register and log on. This uses Forms Authentication with cookies to keep track of whether you're logged in, and it uses the core ASP.NET membership facility to record the list of registered users. The membership facility will try to create a SQL Server Express file-based database on the fly in your/App_Datafolder the first time anybody tries to register or log in. This will fail—after a long pause—if you don't have SQL Server Express installed and running.AccountControlleralso has actions and views that let registered users change their passwords. Again, this uses the ASP.NET membership facility.
The initial application skeleton provides a nice introduction to how ASP.NET MVC applications fit together, and helps people giving demonstrations of the MVC Framework to have something moderately interesting to show as soon as they create a new project.
However, it's unlikely that you'll want to keep the default behaviors unless your application really does use the core ASP.NET membership facility (covered in much more detail in Chapter 17) to record registered users. You might find that you start most new ASP.NET MVC projects by using the ASP.NET MVC 2 Empty Web Application project template instead, as we did in Chapters 2 and 4.
You can debug an ASP.NET MVC application in exactly the same way you'd debug an ASP.NET Web Forms application. If you're already familiar with using Visual Studio's debugger, you can skip over this section.
The easiest way to get a debugger going is simply to press F5 in Visual Studio (or go to Debug
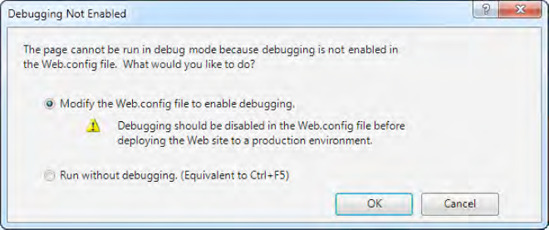
When you select "Modify the Web.config file to enable debugging," Visual Studio will update the <compilation> node of your Web.config file:
<system.web>
   <compilation debug="true">
   ...
   </compilation>
</system.web>
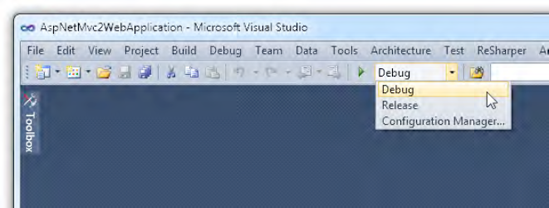
This means that your ASPX and ASCX files will be compiled with debugging symbols enabled. It doesn't actually affect your ability to debug controller and action code, but Visual Studio insists on doing it anyway. There's a separate setting that affects compilation of your .cs files (e.g., controller and action code) in the Visual Studio GUI itself. This is shown in Figure 7-3. Make sure it's set to Debug (Visual Studio won't prompt you about it), so the compiler will perform fewer optimizations and the debugger will more reliably be able to display the runtime activity in terms of your original source code.
Note
When deploying to a production web server, you should only deploy code compiled in Release mode. Similarly, you should set <compilation debug="false"> in your production site's Web.config file, too. You'll learn about the reasons for this, and how Visual Studio 2010 can automatically perform such configuration changes as part of the deployment process, in Chapter 16.
Visual Studio will then launch your application with the debugger connected to its built-in development web server, WebDev.WebServer40.exe (or simply WebDev.WebServer.exe if you're using Visual Studio 2008/.NET 3.5) All you need to do now is set a breakpoint, as described shortly in the "Using the Debugger" section.
If, instead of using Visual Studio's built-in web server, you've got your application running in IIS on your development PC, you can attach the debugger to IIS. In Visual Studio, press Ctrl+Alt+P (or go to Debug
Note
If you can't find the worker process, perhaps because you're running IIS 7 or working through a Remote Desktop connection, you'll need to check the box labeled "Show processes in all sessions." Also make sure that the worker process is really running by opening your application in a web browser (and then click Refresh back in Visual Studio). On Windows Vista or Windows 7 with UAC enabled, you'll need to run Visual Studio in elevated mode (it will prompt you about this when you click Attach).
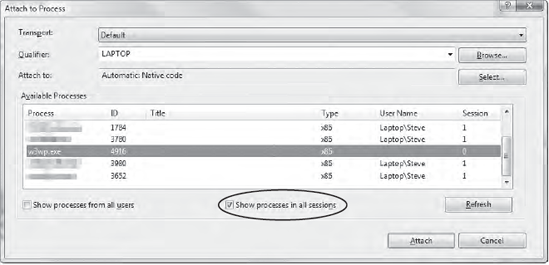
Once you've selected the IIS process, click Attach.
If you do a lot of unit testing, you'll find that you run your code through a test runner, such as NUnit GUI, just as much as you run it through a web server. When a test is inexplicably failing (or inexplicably passing), you can attach the debugger to your test runner in exactly the same way that you'd attach it to IIS. Again, make sure your code is compiled in Debug mode, and then use the Attach to Process dialog (Ctrl+Alt+P), finding your test runner in the Available Processes list (see Figure 7-5).

Notice the Type column showing which processes are running managed code (i.e., .NET code). You can use this as a quick way to identify which process is hosting your code.
If you have IIS on other PCs or servers in your Windows domain, and have the relevant debugging permissions set up, you can enter a computer name or IP address in the Qualifier box and debug remotely. If you don't have a Windows domain, you can choose Remote from the Transport drop-down, and then debug across the network (having configured Remote Debugging Monitor on the target machine to allow it).
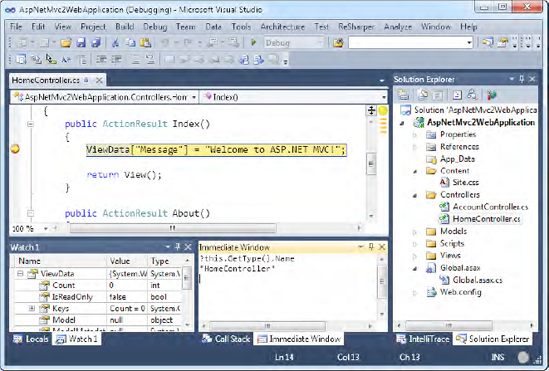
Once Visual Studio's debugger is attached to a process, you'll want to interrupt the application's execution so you can see what it's doing. So, mark some line of your source code as a breakpoint by right-clicking a line and choosing Breakpoint
The Visual Studio debugger is a powerful tool: you can read and modify the values in variables (by hovering over them or by using the Watch window), manipulate program flow (by dragging the yellow arrow), or execute arbitrary code (by entering it into the Immediate window). You can also read the call stack, the machine code disassembly, the thread list, and other information (by enabling the relevant item in Debug
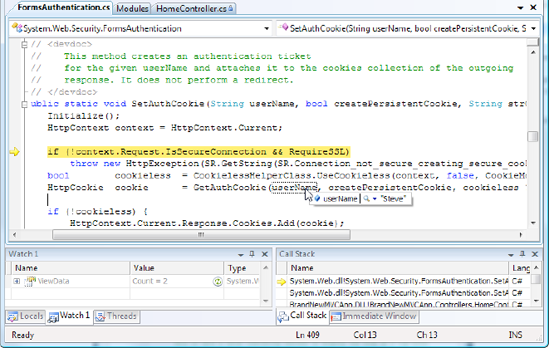
If your application calls code in a third-party assembly, you wouldn't normally be able to step into that assembly's source code during debugging (because you don't have its source code) without using a third-party decompilation tool such as Red Gate's Reflector Pro (www.red-gate.com/products/reflector/). However, if the third party chooses to publish the source code through a symbol server, you can configure Visual Studio to fetch that source code on the fly and step into it during debugging.
Since January 2008, Microsoft has enabled a public symbol server containing source code for most of the .NET Framework libraries. This means you can step into the source code for System.Web.dll and various other core assemblies, which is extremely useful when you have an obscure problem and not even Google can help. This contains more information than the disassembly you might get from a decompilation tool—you get the original source code, with comments (see Figure 7-7).
For instructions about setting this up, see http://referencesource.microsoft.com/serversetup.aspx.
Note
Microsoft has made the ASP.NET MVC Framework's source code available to download so that you can compile it (and modify it) yourself. However, it has not released the source code to the rest of the .NET Framework libraries in the same way—you can only get that though Microsoft's symbol server for the purposes of stepping into it while debugging. You can't download the whole thing, and you can't modify or compile it yourself.
Since you can download the whole ASP.NET MVC framework source code package, it's possible to include the System.Web.Mvc source code project in your solution (as if you created it!). This allows you to use Visual Studio's Go to Declaration command to jump directly from any reference in your own source code to the corresponding point in the framework source code, and of course to step into the framework source code when debugging. It can be a huge time-saver when you're trying to figure out why your application isn't behaving as expected.
This isn't too difficult to set up, as long as you know about a few likely problems and how to solve them. The instructions may well change over time, so I've put the guide on my blog at http://tinyurl.com/debugMvc.
We've taken an overview of how ASP.NET MVC projects look from Visual Studio's point of view. Now let's get an overview of what actually happens at runtime as the MVC Framework processes each incoming request.
ASP.NET MVC's request processing pipeline is comparable to the page life cycle from ASP.NET Web Forms in that it constitutes the anatomy of the system. Having a good grasp of it is essential before you can do anything out of the ordinary. Unlike the traditional ASP.NET page life cycle, MVC's pipeline is infinitely flexible: you can modify any piece to your own liking, and even rearrange or replace components outright. You don't usually have to extend or alter the pipeline, but you can—that's the basis of ASP.NET MVC's powerful extensibility. For example, while developing SportsStore, you implemented a custom IControllerFactory to instantiate controllers through your DI container.
Figure 7-8 shows a representation of the request processing pipeline. The central, vertical line is the framework's default pipeline (for requests that render a view); the offshoots are the major extensibility points.
Note
To keep things comprehensible, this diagram doesn't show every event and extensibility point. The greatest omission is filters, which you can inject before and after running action methods, and before and after executing action results (including ViewResults). For example, in Chapter 6, you used the [Authorize] filter to secure a controller. You'll hear more about where they fit in later in the chapter.
The rest of this chapter describes the request processing pipeline in a little more detail. After that, Chapters 8 through 12 consider each major component in turn, giving you the complete low-down on ASP.NET MVC's features and facilities.
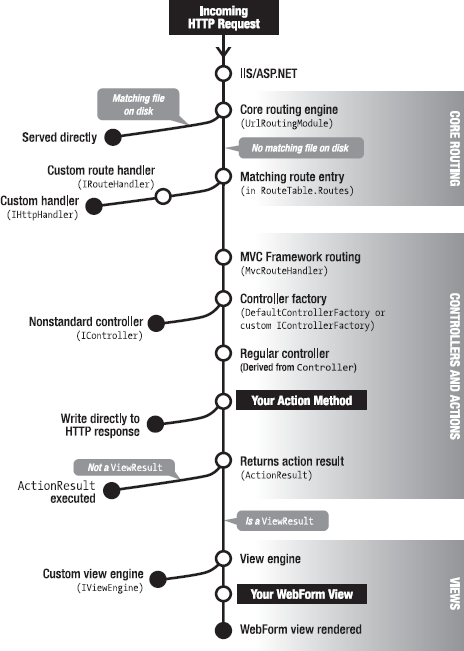
IIS (Internet Information Services), Microsoft's enterprise-grade web server, plays the first part in the request handling pipeline. As each HTTP request arrives, before ASP.NET enters the scene, a kernel-mode Windows device driver called HTTP.SYS considers the requested URL/port number/IP address combination, and matches and forwards it to a registered application (which will be either an IIS web site or a virtual directory within an IIS web site).
Since ASP.NET MVC applications are built upon ASP.NET, you need to have enabled ASP.NET for that IIS application's application pool (each IIS application is assigned to an application pool). You can enable ASP.NET in one of two managed pipeline modes:
In ISAPI mode, also called Classic mode, ASP.NET is invoked through an ISAPI extension (
aspnet_isapi.dll)[46] associated with particular URL "file name extensions" (e.g.,.aspx, .ashx, .mvc). To support clean, extensionless URLs on IIS 6, you can set up a wildcard map so thataspnet_isapi.dllwill handle all requests, regardless of any URL file name extension. If you're using .NET 4, this is usually unnecessary, because .NET 4 automatically configures ASP.NET to handle all requests that contain no file name extension. You'll learn more about deploying MVC Framework applications to IIS 6, including setting up wildcard maps, in Chapter 16.In Integrated mode (only supported by IIS 7+), .NET is a native part of the IIS request processing pipeline, so you don't need any ISAPI extension associated with a particular URL file name extension. That makes it easy to use routing configurations with perfectly clean URLs (i.e., with no file name extension), regardless of your .NET Framework version.
Either way, once ASP.NET gets hold of an incoming request, it notifies each registered HTTP module that a new request is starting. (An HTTP module is a .NET class, implementing IHttpModule, that you can plug into the ASP.NET request processing pipeline.)
One particularly important HTTP module is registered by default in any ASP.NET MVC application: UrlRoutingModule. This module is the beginning of the core routing system, which you'll hear more about in a moment. If your application targets .NET 3.5, you'll see that UrlRoutingModule is registered in your Web.config file in two places:
<configuration>
  <system.web>
    <httpModules>
      <!-- This module registration is for IIS 6, or IIS 7 in "Classic" mode -->
      <add name="UrlRoutingModule"
           type="System.Web.Routing.UrlRoutingModule, System.Web.Routing, ..."/>
    </httpModules>
  </system.web>
  <system.webServer>
    <modules runAllManagedModulesForAllRequests="true">
      <!-- This module registration is for IIS 7+ in "Integrated" mode -->
      <add name="UrlRoutingModule" preCondition=""
           type="System.Web.Routing.UrlRoutingModule, System.Web.Routing, ..."/>
</modules> </system.webServer> </configuration>
Or, if your application targets .NET 4, it doesn't have to reference UrlRoutingModule from Web.config, because the machine-wide .NET 4 configuration already references this by default.
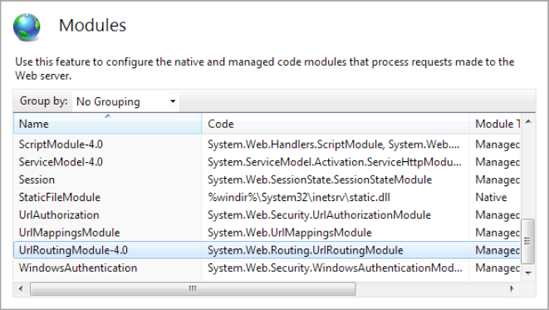
Either way, if you're running IIS 7, then you can see that UrlRoutingModule is active for your application using the Modules GUI (from Administrative Tools, open Internet Information Services (IIS) Manager, select your web site, then and double-click Modules), as shown in Figure 7-9.
When UrlRoutingModule gets involved in processing a request, it causes the System.Web.Routing routing system to run. The job of routing is to recognize and parse arbitrary incoming URL patterns, setting up a request context data structure that subsequent components can use however they wish (e.g., ASP.NET MVC uses it to transfer control to the relevant MVC controller class and to supply action method parameters).
From Figure 7-8, you can see that core routing first checks whether the incoming URL corresponds to a file on disk. If it does, then core routing bails out, leaving IIS to handle that request. For static files (e.g., .gif, .jpeg, .png, .css, or .js), this means that IIS will serve them natively (because they exist on disk), which is very efficient. Likewise, it means that traditional ASP.NET Web Forms .aspx pages will be executed in the normal way (they exist on disk, too).
However, if the incoming URL doesn't correspond to a file on disk (e.g., requests for MVC controllers, which are .NET types, not files on disk), then core routing investigates its active configuration to figure out how to handle that incoming URL.
Routing configuration is held in a static collection called System.Web.Routing.RouteTable.Routes. Each entry in that collection represents a different URL pattern that you wish to accept, which may optionally include parameter placeholders (e.g., /blog/{year}/{entry}) and constraints, which limit the range of acceptable values for each parameter. Each entry also specifies a route handler—an object implementing IRouteHandler—which can take over and process the request. You will normally populate the RouteTable.Routes collection by adding code to a method called RegisterRoutes() in your Global.asax.cs file.
To match incoming requests to particular RouteTable.Routes entries, the core routing system simply starts at the top of the RouteTable.Routes collection and scans downward, picking the first entry that matches the incoming request. Having found the matching entry, routing transfers control to that entry's nominated route handler object, passing it a request context data structure that describes the chosen RouteTable.Routes entry and any parameter values parsed from the URL. This is where the real MVC Framework gets in on the action, as you're about to discover.
You'll find in-depth coverage of the routing system in Chapter 8.
By now, the routing system has selected a particular RouteTable.Routes entry, and has parsed any routing parameters out of the URL. It's packaged this information up as a request context data structure. So, where do controllers and actions enter the scene?
For ASP.NET MVC applications, almost all RouteTable.Routes entries specify one particular route handler: MvcRouteHandler. That's ASP.NET MVC's built-in default route handler, and it's the bridge between core routing and the actual MVC Framework. MvcRouteHandler knows how to take the request context data and invoke the corresponding controller class.
As you can see from Figure 7-8, it does so using a controller factory object. By default, it uses the built-in, excitingly named DefaultControllerFactory, which follows a particular naming and namespacing convention to pick out the correct controller class for a given request. However, if you replace the built-in DefaultControllerFactory with some other object implementing IControllerFactory, or a subclass of DefaultControllerFactory, then you can change that logic. You've already used this technique in Chapter 4 to plug a DI container into therequest handling pipeline.
One of the requirements for a controller class is that it must implement IController:
public interface IController
{
    void Execute(RequestContext requestContext);
}
As you can see, it's a pretty trivial interface! It doesn't really specify anything other than that the controller must do something (i.e., implement Execute()). Note that the requestContext parameter provides all the request context data constructed by the routing system, including parameters parsed from the URL, and also provides access to the Request and Response objects.
Much more commonly, you don't implement IController directly, but instead derive your controller classes from System.Web.Mvc.Controller. This is the MVC Framework's built-in standard controller base class, which adds extra infrastructure for handling requests. Most importantly, it introduces the system of action methods. This means that each of the controller class's public methods is reachable via some URL (such public methods are called action methods), and it means that you don't have to implement Execute() manually.
While action methods can send output directly to the HTTP response, this isn't recommended practice. For reasons of code reuse and unit test ability (which I'll cover later), it's better for action methods to return an action result (an object derived from ActionResult) that describes the intended output. For example, if you want to render a view, return a ViewResult. Or to issue an HTTP redirection to a different action method, return a RedirectToRouteResult. The MVC Framework will then take care of executing that result at the appropriate moment in the request processing pipeline.
There's also the very flexible system of filters. These are .NET attributes (e.g., [Authorize]) that you can "tag" onto a controller class or action method, injecting extra logic that runs before or after action methods, or before or after action results are executed. There's even built-in support for special types of filters (exception filters and authorization filters) that run at particular times. Filters can appear in so many different places that I couldn't fit them into Figure 7-8!
Controllers and actions (and related facilities) are the central pillars of the MVC Framework. You'll learn much more about them in Chapter 9.
OK, quite a lot has happened! Let's recap:
The routing system matched the incoming URL to its configuration and prepared a request context data structure. The matching
RouteTable.Routeentry nominatedMvcRouteHandlerto process the request.MvcRouteHandlerused the request context data with a controller factory to select and invoke a controller class.The controller class invoked one of its own action methods.
The action method returned an
ActionResultobject.
At this point, the MVC Framework will ask that ActionResult object to execute, and you're done. The ActionResult does whatever that type of ActionResult does (e.g., return a string or JSON (JavaScript Object Notation) data to the browser, issue an HTTP redirection, demand authentication, etc.). In Chapter 9, you'll learn all about the built-in ActionResult types, plus how to create custom ones.
It's worth paying special attention to one particular subclass of ActionResult, namely ViewResult. This one is able to locate and render a particular view, passing along whatever ViewData structure the action method has constructed. It does so by calling a "view engine" (a .NET class implementing IViewEngine) nominated by the controller.
The default view engine is called WebFormViewEngine. Its views are Web Forms ASPX pages (i.e., server pages as used in traditional ASP.NET Web Forms). Web Forms pages have a pipeline all their own, starting with on-the-fly ASPX/ASCX compilation and running through a series of events known as the page life cycle. Unlike in traditional Web Forms, these pages should be kept as simple as possible, because with MVC's separation of concerns, view templates should have no responsibilities other than generating HTML. That means you don't need a very detailed understanding of the Web Forms page life cycle. With diligent separation of concerns comes simplicity and maintainability.
Note
To encourage MVC developers not to add Web Forms-style event handlers to ASPX views, the ASPX views do not normally have any code-behind class files at all. However, you can create one with a code-behind file by asking Visual Studio to create a regular Web Form at the relevant view location, and then change its code-behind class to derive from ViewPage (or ViewPage<T>, for some model type T) instead of System.Web.UI.Page. But don't ever let me catch you doing that!
Of course, you can implement your own IViewEngine, replacing the Web Forms view engine entirely. You'll learn all about views—especially the Web Forms view engine, but also some alternative and custom view engines—in Chapters 11 and 13.
This chapter presented an overview of ASP.NET MVC applications from two perspectives:
From a project structure perspective, you saw how the default MVC Visual Studio project templates work, and how code files are laid out by default. You learned which files, folders, and naming conventions are merely suggestions, and which are actually required by the framework. You also considered how this works with Visual Studio's debugger.
From a runtime perspective, you reviewed how ASP.NET MVC handles incoming HTTP requests. You followed the entire pipeline, right from route matching, through controllers and actions, into view templates that send finished HTML back to the browser.(Remember, this is just the default setup—there's no end of flexibility to rearrange the pipeline by adding, changing, or removing components. The MVC Framework is all about giving you, the developer, total control over every action it takes.)
In the next five chapters, you'll turn this outline knowledge into a deep, thorough understanding of each part. Chapter 8 covers routing, Chapters 9 and 10 cover controllers and actions, Chapter 11 covers views, and Chapter 12 covers models. You'll learn about all the available options and how to make the best use of each feature.