
Using the Camera Class
The Camera class in Android is what we use to access the camera hardware on the device. It allows us to actually capture an image, and through its nested Camera.Parameters class, we can change set various attributes, such as whether the flash should be activated and what value the white balance should be set to.
http://developer.android.com/reference/android/hardware/Camera.html
Camera Permissions
In order to use the Camera class to capture an image, we need to specify in our AndroidManifest.xml file that we require the CAMERA permission.
<uses-permission android:name="android.permission.CAMERA" />
Preview Surface
Also before we can get started using the camera, we need to create some type of Surface for the Camera to draw viewfinder or preview images on. A Surface is an abstract class in Android representing a place to draw graphics or images. One straightforward way to provide a drawing Surface is to use the SurfaceView class. SurfaceView is a concrete class providing a Surface within a standard View.
To specify a SurfaceView in our layout, we simply use the <SurfaceView /> element within any normal layout XML. Here is a basic layout that just implements a SurfaceView within a LinearLayout for a camera preview.
<?xml version="1.0" encoding="utf-8"?>

<LinearLayout xmlns:android="http://schemas.android.com/apk/res/android"

    android:orientation="vertical"

    android:layout_width="fill_parent"

    android:layout_height="fill_parent"

    >

<SurfaceView android:id="@+id/CameraView" android:layout_width="fill_parent"

 android:layout_height="fill_parent"></SurfaceView>

</LinearLayout>
In our code, for the purposes of using this SurfaceView with the Camera class, we'll need to add a SurfaceHolder to the mix. The SurfaceHolder class can act as a monitor on our Surface, giving us an interface through callbacks to let us know when the Surface is created, destroyed, or changed. The SurfaceView class conveniently gives us a method, getHolder, to obtain a SurfaceHolder for its Surface.
Here is a snippet of code that accesses the SurfaceView as declared in the layout XML and obtains a SurfaceHolder from it. It also sets the Surface to be a “push” type of Surface, which means that the drawing buffers are maintained external to the Surface itself. In this case, the buffers are managed by the Camera class. A “push” type of Surface is required for the Camera preview.
SurfaceView cameraView = (CameraView) this.findViewById(R.id.CameraView);

SurfaceHolder surfaceHolder = cameraView.getHolder();

surfaceHolder.setType(SurfaceHolder.SURFACE_TYPE_PUSH_BUFFERS);
Additionally, we'll want to implement SurfaceHolder.Callback in our activity. This allows our activity to be notified when the Surface is created, when it changes and when it is destroyed. To implement the Callback, we'll add the following methods.
public void surfaceChanged(SurfaceHolder holder, int format, int w, int h) {}

public void surfaceCreated(SurfaceHolder holder) {}

public void surfaceDestroyed(SurfaceHolder holder) {}
To finish up, we'll need to tell our SurfaceHolder to use this activity as the Callback handler.
surfaceHolder.addCallback(this);
Our activity should now look something this.
package com.apress.proandroidmedia.ch2.snapshot;


import android.app.Activity;

import android.os.Bundle;

import android.view.SurfaceHolder;

import android.view.SurfaceView;


public class SnapShot extends Activity implements SurfaceHolder.Callback {


    SurfaceView cameraView;

    SurfaceHolder surfaceHolder;


    @Override

    public void onCreate(Bundle savedInstanceState)

    {

        super.onCreate(savedInstanceState);

        setContentView(R.layout.main);


        cameraView = (SurfaceView) this.findViewById(R.id.CameraView);

        surfaceHolder = cameraView.getHolder();

        surfaceHolder.setType(SurfaceHolder.SURFACE_TYPE_PUSH_BUFFERS);

        surfaceHolder.addCallback(this);

    }


    public void surfaceChanged(SurfaceHolder holder, int format, int w, int h) {

    }

  public void surfaceCreated(SurfaceHolder holder) {

    }

    public void surfaceDestroyed(SurfaceHolder holder) {

    }

}
Implementing the Camera
Now that we have the activity and preview Surface all set up, we are ready to start using the actual Camera object.
When the Surface is created, which will trigger calling the surfaceCreated method in our code due to the SurfaceHolder.Callback, we can obtain a Camera object by calling the static open method on the Camera class.
Camera camera;

public void surfaceCreated(SurfaceHolder holder) {

  camera = Camera.open();
We'll want to follow that up with setting the preview display to the SurfaceHolder we are using, which is provided to our method through the callback. This method needs to be wrapped in a try catch block as it can throw an IOException. If this happens, we'll want to release the camera as we could tie up the camera hardware resources for other applications if we don't.
try

    {

      camera.setPreviewDisplay(holder);

    }

    catch (IOException exception)

    {

      camera.release();

    }
Finally, we'll want to start the camera preview.
camera.startPreview();


}
Likewise, in surfaceDestroyed, we'll want to release the camera as well. We'll first call stopPreview, just to make sure everything cleans up as it should.
public void surfaceDestroyed(SurfaceHolder holder) {

  camera.stopPreview();

  camera.release();

}
Running this code, you'll probably notice something strange with the preview. It is rotating the preview image 90 degrees counter-clockwise as shown in Figure 2–1.

Figure 2–1. The camera preview rotated 90 degrees
The reason this rotation is happening is that the Camera assumes the orientation to be horizontal or landscape. The easiest way to correct the rotation is to make our activity appear in landscape mode. To do this, we can add the following code in our activity's onCreate method.
@Override

    public void onCreate(Bundle savedInstanceState)

    {

        super.onCreate(savedInstanceState);

        setRequestedOrientation(ActivityInfo.SCREEN_ORIENTATION_LANDSCAPE);
Now our Camera preview appears correctly as illustrated in Figure 2–2. Unfortunately, our application is now stuck in landscape mode.

Figure 2–2. The camera preview in landscape
Setting Camera Parameters
As previously mentioned, the Camera class has a nested Camera.Parameters class. This class has a series of important attributes or settings that can be used to change how the Camera operates. One of these that would help us right now is a way to deal with the rotation/landscape issue we have in the preview.
The Parameters to be used by the Camera can be modified as follows:
Camera.Parameters parameters = camera.getParameters();


parameters.set("some parameter", "some value");

// or

parameters.set("some parameter", some_int);


camera.setParameters(parameters);
There are two different generic Parameters.set methods. The first takes a string for the parameter name and value, and the second takes a string for the name but the value is an integer.
Setting the Parameters should be done in the surfaceCreated method right after the Camera is created and its preview Surface specified.
Here is how we can use Parameters to request that the Camera be used with a portrait orientation rather than landscape.
public void surfaceCreated(SurfaceHolder holder) {

        camera = Camera.open();

        try {

            Camera.Parameters parameters = camera.getParameters();

            if (this.getResources().getConfiguration().orientation !=

                Configuration.ORIENTATION_LANDSCAPE) {

                // This is an undocumented although widely known feature

                parameters.set("orientation", "portrait");


                // For Android 2.2 and above

                //camera.setDisplayOrientation(90);


                // Uncomment for Android 2.0 and above

                //parameters.setRotation(90);

            } else {

                // This is an undocumented although widely known feature

                parameters.set("orientation", "landscape");


                // For Android 2.2 and above

                //camera.setDisplayOrientation(0);


                // Uncomment for Android 2.0 and above

                //parameters.setRotation(0);

            }

            camera.setParameters(parameters);

            camera.setPreviewDisplay(holder);

        } catch (IOException exception) {

            camera.release();

            Log.v(LOGTAG,exception.getMessage());

        }

        camera.startPreview();

}
The foregoing code first checks the device configuration (through a call to Context.getResources().getConfiguration()) to see what the current orientation is. If the orientation is not landscape, it sets the Camera.Parameters “orientation” to be “portrait.” Additionally, the Camera.Parameters setRotation method is called, and 90 degrees is passed in. This method, which is available in API level 5 (version 2.0) and higher, does not actually do any rotation; rather, it tells the Camera to specify in the EXIF data that the image should be rotated 90 degrees on display. If this isn't included, when you view this image in other applications, it would likely be displayed sideways.
NOTE: The method shown for modifying the Camera's rotation by using Camera.Parameters is for use with Android version 2.1 and earlier. In Android 2.2, a new method on the Camera class, setDisplayOrientation(int degrees), was introduced. This method takes in an integer representing the degrees the image should be rotated. The only valid degrees are 0, 90, 180, 270.
Most parameters that can or should be modified have specific methods associated with them. As we can see with the setRotation method, they follow the Java getter and setter design pattern. For instance, the flash mode of the Camera can be set with setFlashMode(Camera.Parameters.FLASH_MODE_AUTO) and the current value can be gotten with getFlashMode() rather than having to be done through the generic Parameters.set method.
Starting with Android 2.0, one fun parameter that we can use for demonstration allows us to change effects. The getter and setter are getColorEffect and setColorEffect. There is also a getSupportedColorEffects method, which returns a List of String objects with the various effects that are supported on the specific device. In fact, this method exists for all of the parameters that have getter and setter methods and should be used to ensure that the capability requested is available before being used.
Camera.Parameters parameters = camera.getParameters();

List<String> colorEffects = parameters.getSupportedColorEffects();

Iterator<String> cei = colorEffects.iterator();

while (cei.hasNext()) {

    String currentEffect = cei.next();

    Log.v("SNAPSHOT","Checking " + currentEffect);

    if (currentEffect.equals(Camera.Parameters.EFFECT_SOLARIZE)) {

        Log.v("SNAPSHOT","Using SOLARIZE");

        parameters.setColorEffect(Camera.Parameters.EFFECT_SOLARIZE);

        break;

    }

}

Log.v("SNAPSHOT","Using Effect: " + parameters.getColorEffect());

camera.setParameters(parameters);
In the foregoing code, we first query the Camera.Parameters object to see what effects are supported through the getSupportedColorEffect method. We then use an Iterator to go through the List of effects and see if any of them match the one we want, in this case Camera.Parameters.EFFECT_SOLARIZE. If it appears in the list, it is supported and we can go ahead and call setColorEffect on the Camera.Parameters object, passing in the solarize constant. Figure 2–3 shows the Camera.Parameters.EFFECT_SOLARIZE in action.

Figure 2–3. Solarized preview image from the camera
The other possibilities are also listed as constants within the Camera.Parameters class:
EFFECT_NONEEFFECT_MONOEFFECT_NEGATIVEEFFECT_SOLARIZEEFFECT_SEPIAEFFECT_POSTERIZEEFFECT_WHITEBOARDEFFECT_BLACKBOARDEFFECT_AQUA
Similar constants exist for antibanding, flash mode, focus mode, scene mode, and white balance.
Changing the Camera Preview Size
Another particularly useful setting available in Camera.Parameters is the ability to set a preview size. As with other settings, we'll first want to query the parameters object and get the supported values. Having gotten this list of sizes, we can go through it to make sure the size we want is supported before we set it.
In this example, we aren't specifying an exact size that we want, rather choosing a size that is close to but no larger than a couple of constants. Figure 2–4 shows the output of this example.
...

public static final int LARGEST_WIDTH  =  200;

public static final int LARGEST_HEIGHT= 200;

...
As with all Camera.Parameters, we'll want to get and set them in surfaceCreated after we have opened the camera and set its preview display Surface.
public void surfaceCreated(SurfaceHolder holder) {

    camera = Camera.open();

    try {

      camera.setPreviewDisplay(holder);

      Camera.Parameters parameters = camera.getParameters();
We'll keep track of the closest values that are under our constant in these two variables:
int bestWidth = 0;

           int bestHeight = 0;
Then we'll get the list of all of the supported sizes on our device. This returns a list of Camera.Size objects that we can loop through.
List<Camera.Size> previewSizes = parameters.getSupportedPreviewSizes();

        if (previewSizes.size() > 1)

        {

            Iterator<Camera.Size> cei = previewSizes.iterator();

            while (cei.hasNext())

            {

                Camera.Size aSize = cei.next();
If the current size in the list is larger than our saved best sizes and smaller than or equal to our LARGEST_WIDTH and LARGEST_HEIGHT constants, then we save that height and width in our bestWidth and bestHeight variables and continue checking.
Log.v("SNAPSHOT","Checking " + aSize.width + " x " + aSize.height);

                     if (aSize.width > bestWidth && aSize.width <= LARGEST_WIDTH

                         && aSize.height > bestHeight && aSize.height <= LARGEST_HEIGHT) {

                         // So far it is the biggest without going over the screen dimensions

                             bestWidth = aSize.width;

                             bestHeight = aSize.height;

                     }

                 }
After we have finished going through the supported sizes, we make sure we got something out. If our bestHeight and bestWidth variables are equal to 0, then we didn't find anything that matched our needs, or there is only one supported size and we shouldn't take any action. If, on the other-hand, they have values, we'll call setPreviewSize with the bestWidth and bestHeight variables on the Camera.Parameters object.
Additionally, we want to tell our camera preview SurfaceView object, cameraView, to display at that size as well. If we don't do this, SurfaceView won't change sizes and the preview image from the camera will be either distorted or very low quality.
if (bestHeight != 0 && bestWidth != 0) {

              Log.v("SNAPSHOT", "Using " + bestWidth + " x " + bestHeight);

              parameters.setPreviewSize(bestWidth, bestHeight);

            cameraView.setLayoutParams(new LinearLayout.LayoutParams( bestWidth,

bestHeight));

            }

        }

        camera.setParameters(parameters);
After we set the parameters, all that remains is to close out the surfaceCreated method.
{  catch (IOException exception) {

        camera.release();

    }

}
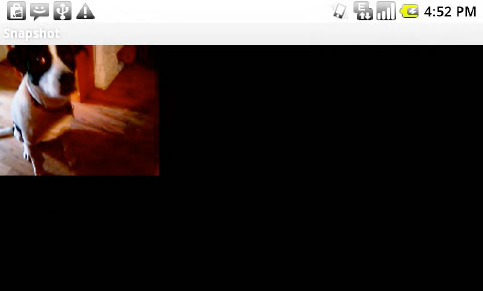
Figure 2–4. Camera preview with small preview size
Capturing and Saving an Image
To capture an image with the Camera class, we have to call the takePicture method. This method takes in three or four arguments, all of which are Callback methods. The simplest form of the takePicture method is to have all of the arguments be null. Unfortunately, while a picture would be captured, no reference to it will be available. At the very least, one of the callback methods should be implemented. The safest one is Camera.PictureCallback.onPictureTaken. This is guaranteed to be called and is called when the compressed image is available. To utilize this, we'll make our activity implement Camera.PictureCallback and add an onPictureTaken method.
public class SnapShot extends Activity implements

  SurfaceHolder.Callback, Camera.PictureCallback {


  public void onPictureTaken(byte[] data, Camera camera) {

  }
The onPictureTaken method has two arguments; the first is a byte array of the actual JPEG image data. The second is a reference to the Camera object that captured the image.
Since we are handed the actual JPEG data, we simply need to write it to disk somewhere in order to save it. As we already know, it is a good idea to leverage the MediaStore for specifying its location and metadata.
When our onPictureTaken method is called, we can call startPreview on the Camera object. The preview had been automatically paused when the takePicture method was called, and this method tells us that it is now safe to be restarted.
public void onPictureTaken(byte[] data, Camera camera) {

    Uri imageFileUri = getContentResolver().insert(Media.EXTERNAL_CONTENT_URI, new

 ContentValues());

    try {

       OutputStream imageFileOS = getContentResolver().openOutputStream(imageFileUri);

       imageFileOS.write(data);

       imageFileOS.flush();

       imageFileOS.close();


     } catch (FileNotFoundException e) {

     } catch (IOException e) {

     }


     camera.startPreview();

}
In the foregoing snippet, we are inserting a new record into the MediaStore and given a URI in return. This URI is what we can subsequently use to obtain an OutputStream to write the JPEG data to. This creates a file in the location specified by the MediaStore and links it to the new record.
If we wanted to update the metadata stored in the MediaStore record later, we can update the record with a new ContentValues object as described in Chapter 1.
ContentValues contentValues = new ContentValues(3);

contentValues.put(Media.DISPLAY_NAME, "This is a test title");

contentValues.put(Media.DESCRIPTION, "This is a test description");

getContentResolver().update(imageFileUri,contentValues,null,null);
Last, we'll have to actually call Camera.takePicture. To do this, let's make the preview screen be “clickable,” and in the onClick method, we'll take the picture.
We'll make our activity implement an OnClickListener and set our SurfaceView's onClickListener to be the activity itself. We'll then make our SurfaceView be “clickable” with setClickable(true). Additionally we'll need to make the SurfaceView be “focusable.” A SurfaceView by default isn't focusable, so we'll have to explicitly set that with setFocusable(true). Also, when we are in “touch mode,” focus is generally disabled, so we'll have to explicitly set that not to happen with setFocusInTouchMode(true).
public class SnapShot extends Activity implements OnClickListener,

 SurfaceHolder.Callback, Camera.PictureCallback {

...
public void onCreate(Bundle savedInstanceState)  {

...

        cameraView.setFocusable(true);

        cameraView.setFocusableInTouchMode(true);

        cameraView.setClickable(true);

        cameraView.setOnClickListener(this);

    }


    public void onClick(View v) {

      camera.takePicture(null, null, null, this);

  }
Other Camera Callback Methods
Aside from Camera.PictureCallback, there are a few others that are worth mentioning.
Camera.PreviewCallback: Defines a method,onPreviewFrame(byte[] data, Camera camera), which is called when preview frames are available. A byte array that holds the current pixels of the image may be passed in. There are three different ways that this callback can be used on a Camera object.setPreviewCallback(Camera.PreviewCallback): Registering aCamera.PreviewCallbackwith this method ensures that theonPreviewFramemethod is called whenever a new preview frame is available and displayed on the screen. The data byte array that is passed into theonPreviewFramemethod will most likely be in YUV format. Unfortunately Android 2.2 is the first version to have a YUV format decoder (YuvImage); in previous versions, decoding has to be done by hand.setOneShotPreviewCallback(Camera.PreviewCallback): Registering aCamera.PreviewCallbackwith this method on theCameraobject causes theonPreviewFrameto be called once, when the next preview image is available. Again, the preview image data passed to theonPreviewFramemethod will most likely be in the YUV format. This can be determined by checking the result ofCamera.getParameters().getPreviewFormat()with the constants inImageFormat.setPreviewCallbackWithBuffer(Camera.PreviewCallback): Introduced in Android 2.2, this method works in the same manner as the normalsetPreviewCallbackbut requires us to specify a byte array that will be used as a buffer for the preview image data. This is done to allow us the ability to better manage the memory that will be used when dealing with preview images.
Camera.AutoFocusCallback: Defines a method,onAutoFocus, which is called when an auto-focus activity has completed. Auto-focus may be triggered by calling theautoFocusmethod on theCameraobject, passing in an instance of this callback interface.Camera.ErrorCallback: Defines anonErrormethod, which is called when a Camera error occurs. There are two constants that can be compared with the passed-in error code:CAMERA_ERROR_UNKNOWNandCAMERA_ERROR_SERVER_DIED.Camera.OnZoomChangeListener: Defines a method,onZoomChange, which is called when a “smooth zoom” (slow zoom in or out) is in progress or completed. This class and method were introduced in Android 2.2 (API level 8).Camera.ShutterCallback: Defines a method,onShutter, which is called at the moment an image is captured.
Putting It All Together
Let's go through the entire example. The following code is written to run on Android 2.2 and higher, but with minor changes, it should run on versions 1.6 and higher. The sections that require higher than 1.6 are noted with comments.
package com.apress.proandroidmedia.ch2.snapshot;


import java.io.FileNotFoundException;

import java.io.IOException;

import java.io.OutputStream;

import java.util.Iterator;

import java.util.List;


import android.app.Activity;

import android.content.ContentValues;

import android.content.res.Configuration;

import android.hardware.Camera;

import android.net.Uri;

import android.os.Bundle;

import android.provider.MediaStore.Images.Media;

import android.util.Log;

import android.view.SurfaceHolder;

import android.view.SurfaceView;

import android.view.View;

import android.view.View.OnClickListener;

import android.widget.Toast;


public class SnapShot extends Activity implements OnClickListener,

 SurfaceHolder.Callback, Camera.PictureCallback {


    SurfaceView cameraView;

    SurfaceHolder surfaceHolder;

    Camera camera;


    @Override

    public void onCreate(Bundle savedInstanceState)  {

        super.onCreate(savedInstanceState);


        setContentView(R.layout.main);


        cameraView = (SurfaceView) this.findViewById(R.id.CameraView);
surfaceHolder = cameraView.getHolder();

        surfaceHolder.setType(SurfaceHolder.SURFACE_TYPE_PUSH_BUFFERS);

        surfaceHolder.addCallback(this);


        cameraView.setFocusable(true);

        cameraView.setFocusableInTouchMode(true);

        cameraView.setClickable(true);


        cameraView.setOnClickListener(this);

    }


    public void onClick(View v) {

        camera.takePicture(null, null, this);

    }
We follow this up with the onPictureTaken method as described earlier.
    public void onPictureTaken(byte[] data, Camera camera) {

       Uri imageFileUri =

       getContentResolver().insert(Media.EXTERNAL_CONTENT_URI, new ContentValues());

      try {

            OutputStream imageFileOS =

              getContentResolver().openOutputStream(imageFileUri);

            imageFileOS.write(data);

            imageFileOS.flush();

            imageFileOS.close();

      } catch (FileNotFoundException e) {

            Toast t = Toast.makeText(this,e.getMessage(), Toast.LENGTH_SHORT);

            t.show();

      } catch (IOException e) {

            Toast t = Toast.makeText(this,e.getMessage(), Toast.LENGTH_SHORT);

            t.show();

      }

      camera.startPreview();

    }
Last, we need the various SurfaceHolder.Callback methods in which we set up the Camera object.
public void surfaceChanged(SurfaceHolder holder, int format, int w, int h) {

        camera.startPreview();

    }


    public void surfaceCreated(SurfaceHolder holder) {

        camera = Camera.open();

        try {

            camera.setPreviewDisplay(holder);

            Camera.Parameters parameters = camera.getParameters();

            if (this.getResources().getConfiguration().orientation !=

             Configuration.ORIENTATION_LANDSCAPE)

            {

                 parameters.set("orientation", "portrait");

                 // For Android Version 2.2 and above

                 camera.setDisplayOrientation(90);


                 // For Android Version 2.0 and above

                 parameters.setRotation(90);

              }
// Effects are for Android Version 2.0 and higher

          List<String> colorEffects = parameters.getSupportedColorEffects();

          Iterator<String> cei = colorEffects.iterator();

          while (cei.hasNext())

          {

              String currentEffect = cei.next();

              if (currentEffect.equals(Camera.Parameters.EFFECT_SOLARIZE))

              {

              parameters.setColorEffect(Camera.Parameters.EFFECT_SOLARIZE);

                  break;

              }

          }

          // End Effects for Android Version 2.0 and higher


              camera.setParameters(parameters);

      }

      catch (IOException exception)

      {

              camera.release();

      }

  }


  public void surfaceDestroyed(SurfaceHolder holder) {

      camera.stopPreview();

      camera.release();

  }

} // End the Activity
That takes care of our Snapshot activity. Here is the layout XML that is in use by it. It belongs in res/layout/main.xml.
<?xml version="1.0" encoding="utf-8"?>

<LinearLayout xmlns:android="http://schemas.android.com/apk/res/android"

    android:orientation="vertical"

    android:layout_width="fill_parent"

    android:layout_height="fill_parent"

    >

    <SurfaceView android:id="@+id/CameraView" android:layout_width="fill_parent"

 android:layout_height="fill_parent"></SurfaceView>

</LinearLayout>
Last, we need to add the CAMERA permission to our AndroidManifest.xml file. Here is the entire manifest.
<?xml version="1.0" encoding="utf-8"?>

<manifest xmlns:android="http://schemas.android.com/apk/res/android"

      package="com.apress.proandroidmedia.ch2.snapshot"

      android:versionCode="1"

      android:versionName="1.0">

    <application android:icon="@drawable/icon" android:label="@string/app_name">

        <activity android:name=".SnapShot"

                  android:label="@string/app_name">

            <intent-filter>

                <action android:name="android.intent.action.MAIN" />

                <category android:name="android.intent.category.LAUNCHER" />

            </intent-filter>

        </activity>
</application>

    <uses-sdk android:minSdkVersion="8" />

    <uses-permission android:name="android.permission.CAMERA"></uses-permission>

</manifest>
That should cover the basics of building a custom camera-based application. Next, let's look at how we can extend this application, implementing features that don't exist in the built-in camera application.