
Canvas Drawing
We know from the last chapter that we can draw Bitmap images on a Canvas object. That's not it for the Canvas class in Android, though. It also supports vector and text drawing. We can use a Canvas object either with Bitmap objects, as we did in the last chapter, or with Views. To start, we'll use a Canvas to create or alter a Bitmap and then move on to doing some very simple Canvas-based animation using a View.
Bitmap Creation
In the same manner we used previously, we can construct a Canvas object from a mutable Bitmap. To create a mutable Bitmap, a Bitmap that can be modified, we have to supply a width, a height, and a configuration. The configuration is generally a constant value defined in the Bitmap.Config class.
The following snippet of code creates a mutable Bitmap object with the dimensions of the display for the width and height and the Bitmap.Config.ARGB_8888 constant as the configuration.
Bitmap bitmap = Bitmap.createBitmap((int)

 getWindowManager().getDefaultDisplay().getWidth(), (int)

 getWindowManager().getDefaultDisplay().getHeight(), Bitmap.Config.ARGB_8888);
Bitmap Configuration
The ARGB_8888 configuration constant defines that the bitmap will be created with 8 bits of memory per color, 8 bits for the “A” or alpha channel, 8 bits for the “R” or red channel, 8 bits for the “G” or green channel, and 8 bits for the “B” or blue channel. This means that each pixel of the image will be represented by values between 0 and 255 for each color, including alpha. This means that each pixel will be represented by 32 bits and the total number of distinct colors that can be represented is more than 16.7 million.
Other configuration constants are available that use less memory and are therefore faster to process at the expense of image quality.
ALPHA_8: Used for Bitmaps that function as alpha masks, 8 bits on alpha channel only. No other colors.ARGB_4444: 4 bits per color channel including alpha. Allows for 4096 unique colors with 16 alpha values. Figure 4–1 illustrates this setting using a rainbow gradient.ARGB_8888: 8 bits per color channel including alpha. Allows for 16.7 million unique colors with 256 alpha values. Figure 4–2 illustrates this setting using a rainbow gradient.RGB_565: 5 bits for the red channel, 6 bits for green, and 5 for blue (no alpha). Allows for 65,535 distinct colors. As Figure 4–3 illustrates, this setting is almost as high-quality as ARGB_8888 but takes up much less memory space.

Figure 4–1. Rainbow gradient displayed on Bitmap in ARGB_4444 mode; notice the banding in the dark blue to light blue and yellow to orange portions. ARGB_4444 can't represent the required colors to make those transitions smooth.

Figure 4–2. Rainbow gradient displayed on Bitmap in ARGB_8888 mode

Figure 4–3. Rainbow gradient displayed on Bitmap in RGB_565 mode
Creating the Canvas
Now that we have the Bitmap image that we'll be drawing into created, we need to create the Canvas object that we'll be using to actually draw.
To do this, we simply construct a Canvas object by passing in our new Bitmap object.
Bitmap bitmap = Bitmap.createBitmap((int)

 getWindowManager().getDefaultDisplay().getWidth(), (int)

 getWindowManager().getDefaultDisplay().getHeight(), Bitmap.Config.ARGB_8888);

Canvas canvas = new Canvas(bitmap);
Working with Paint
Before we can do any drawing, we need to construct a Paint object. The Paint object will allow us to define the color, size of the stroke, and style of the stroke used when drawing. We can therefore think of the Paint as both paint and brush.
Paint paint = new Paint();

paint.setColor(Color.GREEN);

paint.setStyle(Paint.Style.STROKE);

paint.setStrokeWidth(10);
The foregoing snippet of code creates a Paint object, sets its color to be green, defines that we want to draw the outline of shapes rather than fill them in, and sets the width of that stroke to be 10 pixels.
Let's examine each of these methods individually.
Color
Using the setColor method on the Paint object, we can pass in a Color object. The Color class defines a series of colors represented as 32bit integers as constants:
Color.BLACKColor.BLUEColor.RED
For the complete list, you can refer to the online reference for the Color class at http://developer.android.com/reference/android/graphics/Color.html.
Paint paint = new Paint();

paint.setColor(Color.GREEN);
We can also construct a specific color by calling the static method Color.argb, passing in a value between 0 and 255 for alpha, red, green, and blue. This method returns a 32bit integer representing that color that we then pass to setColor.
Paint paint = new Paint();

int myColor = Color.argb(255,128,64,32);

paint.setColor(myColor);
We can actually skip the color creation step completely if we are defining the exact values:
Paint paint = new Paint();

paint.setARGB(255,128,64,32);
Style
When defining the style of the paint through the setStyle method, we are determining whether the shapes drawn will be filled or simply outlined. The possible styles are defined as constants in the Paint.Style class.
Paint.Style.STROKE: Only draw the outline of the shapesPaint.Style.FILL: Only fill the shapesPaint.Style.FILL_AND_STROKE: Fill and draw the outline of the shapes
Stroke Width
Last, we can use the setStrokeWidth method on the Paint object to specify the width of the stroke that will be used when outlining the shapes. Setting a value of 0 will still yield a 1-pixel stroke. To remove the stroke altogether, the setStyle method should be used, passing in Paint.Style.FILL.
Drawing Shapes
The Canvas class defines several drawing methods. Let's go through a couple of these.
Point
The simplest of these is simply drawing a point. To draw a point, we use the drawPoint method on the Canvas object, passing in the x and y position as well as a Paint object.
canvas.drawPoint(199,201,paint);
The size of the point that is drawn is dependent on the stroke width of the Paint object. The following code will render as shown in Figure 4–4.
Paint paint = new Paint();

paint.setColor(Color.GREEN);

paint.setStrokeWidth(100);

canvas.drawPoint(199,201,paint);

Figure 4–4. Point drawn using a Paint object that has a stroke width set to 100; it doesn't look much like a point due to the exceptionally large stroke width. In many cases, a point would be a single pixel, having a stroke width of 1.
Line
A line is, well, a line: a series of points extending in a single direction from a start point to an end point. You draw a line in using the Canvas method drawLine, passing in a start x and y coordinate, an end x and y coordinate, and a Paint object. Figure 4–5 illustrates how the following code will render.
Paint paint = new Paint();

paint.setColor(Color.GREEN);

paint.setStrokeWidth(10);

int startx = 50;

int starty = 100;

int endx = 150;

int endy = 210;

canvas.drawLine(startx,starty,endx,endy,paint);

Rectangle
Rectangles can be drawn in a few different ways, the easiest being to specify the left y coordinate, the top x coordinate, the right y coordinate, and the bottom x coordinate along with a Paint object.
Paint paint = new Paint();

paint.setColor(Color.GREEN);

paint.setStyle(Paint.Style.FILL_AND_STROKE);

paint.setStrokeWidth(10);

float leftx = 20;

float topy = 20;

float rightx = 50;

float bottomy = 100;

canvas.drawRect(leftx, topy, rightx, bottomy, paint);
Another means to draw a rectangle is to pass in a RectF object. RectF is a class that defines a rectangle using float values representing the left, top, right, and bottom coordinates.
Paint paint = new Paint();

float leftx = 20;

float topy = 20;

float rightx = 50;

float bottomy = 100;

RectF rectangle = new RectF(leftx,topy,rightx,bottomy);

canvas.drawRect(rectangle, paint);
Oval
In the same way a rectangle may be drawn using RectF, we can draw an oval. The RectF defines the bounds of the oval. In other words, the oval will be drawn inside the rectangle with the longest point of the oval hitting the midpoint of the top and bottom bounds and the widest point of the oval hitting the midpoint of left and right bounds.
Paint paint = new Paint();

paint.setColor(Color.GREEN);

paint.setStyle(Paint.Style.STROKE);

float leftx = 20;

float topy = 20;

float rightx = 50;

float bottomy = 100;

RectF ovalBounds = new RectF(leftx,topy,rightx,bottomy);

canvas.drawOval(ovalBounds, paint);
Circle
A circle can be drawn by specifying a center point (x and y) and radius. The following code will be rendered as shown in Figure 4–6.
Paint paint = new Paint();

paint.setColor(Color.GREEN);

paint.setStyle(Paint.Style.STROKE);

float x = 50;

float y = 50;

float radius = 20;

canvas.drawCircle(x, y, radius, paint);

Figure 4–6. Circle
Path
A path is a series of lines that can be used to create an arbitrary shape. To draw a path, we first have to construct a Path object. The Path object can have any number of calls telling it to move to a point without drawing, using moveTo, or draw a line to a point using lineTo. Of course, there are methods for drawing arcs and so on. Documentation of these methods can be found in the documentation of the Path class at http://developer.android.com/reference/android/graphics/Path.html.
The Path can then be passed to the Canvas method drawPath.
Paint paint = new Paint();

paint.setStyle(Paint.Style.STROKE);

paint.setColor(Color.GREEN);

Path p = new Path();

// Without the first "moveTo", drawing will start at (0,0)

p.moveTo(20, 20);

p.lineTo(100, 200);

p.lineTo(200, 100);

p.lineTo(240, 155);

p.lineTo(250, 175);

p.lineTo(20, 20);

canvas.drawPath(p, paint);

Figure 4–7. Path
Drawing Text
Of course, we aren't limited to just drawing lines, shapes, and points. We can draw text on the Canvas as well, using the method drawText; we simply pass in the text to draw as a String and the start x and y coordinates along with a Paint object. The Paint class has a method called setTextSize for setting the size of the text that we can use.
Paint paint = new Paint();

paint.setColor(Color.GREEN);

paint.setTextSize(40);

float text_x = 120;

float text_y = 120;

canvas.drawText("Hello", text_x, text_y, paint);

Figure 4–8. Text drawn on a canvas
Built-In Fonts
Drawing text without being able to specify a font or style would be pretty limiting. Fortunately, the Paint class allows us to specify which font should be used by calling the setTypeface method and passing in a Typeface object.
The Typeface class has a number of constants defined that represent the built-in fonts that come with the Android OS. These fonts were created by a company called Ascender (www.ascendercorp.com/) as part of their Droid suite of fonts.
They are defined in the Typeface class as follows:
Typeface.MONOSPACE: This font has equal spacing for each letter.Typeface.SANS_SERIF: This is a font that doesn't have serifs.Typeface.SERIF: This is a font that contains serifs.
NOTE: Serifs are small lines at the ends of the lines that make up the letters. The font that you are reading right now is a sansserif font. This is an example of a serif font.

Figure 4–9. Typeface.MONOSPACE example

Figure 4–10. Typeface.SANS_SERIF example
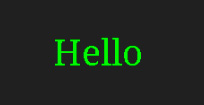
Figure 4–11. Typeface.SERIF example
In addition to the main three fonts, there are two other Typeface constants:
Typeface.DEFAULT: This is the same as the sanserif font and is the default font that is used ifsetTypefaceis not called.Typeface.DEFAULT_BOLD: This is a bold version of the sanserif font.
Here is a short code example:
Paint paint = new Paint();

paint.setColor(Color.GREEN);

paint.setTextSize(40);

paint.setTypeface(Typeface.DEFAULT_BOLD);

float text_x = 120;

float text_y = 120;

canvas.drawText("Hello", text_x, text_y, paint);

Figure 4–12. Typeface.DEFAULT_BOLD
Font Styles
Along with the built-in fonts, there is a series of styles that are defined as constants in the Typeface class. These styles can be used to modify one of the built-in fonts through the create method available in the Typeface class. This method returns a new Typeface object that can be used.
Here is the list of styles that are defined in the Typeface class:
Typeface.BOLDTypeface.ITALICTypeface.NORMALTypeface.BOLD_ITALIC
Using one of them is fairly straightforward. First we call Typeface.create, passing in the base font and the style we want to apply. We get back a Typeface that we pass into the Paint.setTypeface method, and that's it.
Paint paint = new Paint();

paint.setColor(Color.GREEN);

paint.setTextSize(40);


Typeface serif_italic = Typeface.create(Typeface.SERIF, Typeface.ITALIC);

paint.setTypeface(serif_italic);


float text_x = 120;

float text_y = 120;

canvas.drawText("Hello", text_x, text_y, paint);
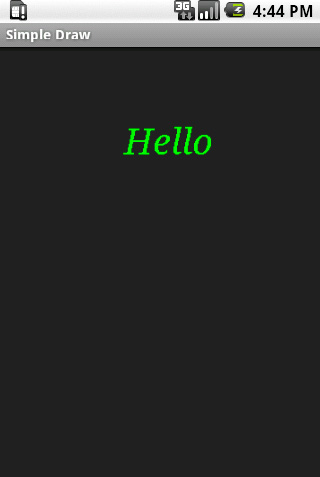
Figure 4–13. Serif font with Italic style applied
External Fonts
We aren't limited in our Android applications to just the built-in fonts. Android supports the creation of Typeface objects from any TrueType font file. TrueType fonts are a standard and work on a variety of platforms. This opens up a wide range of possibilities for our applications.
Many sites on the Internet offer free fonts, and, of course, there are font foundries, companies that create fonts that will sell you a license to use their fonts.
One font that I found that was completely different from Android's built-in fonts is the Chopin Script font by Claude Pelletier. It is in the public domain and available as a free download from a variety of sources such as fontspace.com (www.fontspace.com/diogene/chopinscript). To use the font, I downloaded it and put the.ttf file (ChopinScript.ttf) into my project's “assets” folder.
The Typeface.createFromAsset method takes in an AssetManager, which can be gotten through a call to getAssets from the Context and the name of the file. It returns a Typeface object that can be passed into the Paint.setTypeface method.
Typeface chops = Typeface.createFromAsset(getAssets(), "ChopinScript.ttf");

paint.setTypeface(chops);

Figure 4–14. Chopin Script font
Text on a Path
Text isn't limited to being drawn on a horizontal line; it can be drawn on a Path as well.
Here is an example.
Paint paint = new Paint();

paint.setColor(Color.GREEN);

paint.setTextSize(20);

paint.setTypeface(Typeface.DEFAULT);


Path p = new Path();

p.moveTo(20, 20);

p.lineTo(100, 150);

p.lineTo(200, 220);


canvas.drawTextOnPath("Hello this is text on a path", p, 0, 0, paint);
